
Table of Contents
Pacific EMIS Systems Administrator Guide
Introduction
For an introduction to this project refer to the Pacific EMIS User Guide and Developer Guide both offering a detailed background for their respective target users. Otherwise, this is a systems administrator guide and it is understood that the person filling this role is familiar with the project. This guide instead focuses on aspects such as deployment into production and maintenance which includes upgrades, backups and how to report problems so they get fixed. A clear release history with versioning done following the Semantic Versioning Standard will also be included.
External Tools
A number of external tools can optionally be used with the main Pacific EMIS database-driven web application.
- PDF eSurveys Systems Administrator Guide (for Annual School Surveys)
- Excel Workbook Systems Administrator Guide (for Annual School Surveys)
- JasperReports Systems Administrator Guide (for reports)
New Deployment
A new deployment is done when a new country adopts the Pacific EMIS. A new deployment requires several important steps for a good setup though it only needs to be done once and future upgrades are much easier. A easier deployment method is planned in the future though not a priority.
Operating System
Currently only the Windows operating system is supported. The application can be installed on any recent version of the Windows operating system.
- Windows Server 2022 (recommended), 2019, 2016
- Windows 11, 10
If this is a first time trying this out it is recommended to try on a test virtual machine. VirtualBox is a free virtualisation technology great for trying this on your personal machine.
Database Engine Installation
The only database engine currently supported is Microsoft SQL Server (SQL Server) with most deployments tested with the following versions:
- SQL Server 2022 (including Express Edition) (recommended)
- SQL Server 2019 (including Express Edition)
- SQL Server 2014 (including Express Edition)
Though it should work with anything above SQL Server 2012. At times the requirements was upgraded to make use of newer functions available in later versions of SQL Server. One such instance is documented in this issue.
There is no need for an expensive license, the Express edition which is freely available will work fine for most small countries. If you don't have already a commercial license download the free version MS SQL Server Express. Any of the files would have the required minimal database engine but might has well download the 64bit full version called ENU\x64\SQLEXPRADV_x64_ENU.exe. Double click and follow through the installation. Choosing the default values is a good start and reboot the system when done.
Install .NET Framework
The projects in the whole solution target 4.8.The compiled solution runs fine in the default .NET that comes with the operations system and there should be no need to install another .NET version.
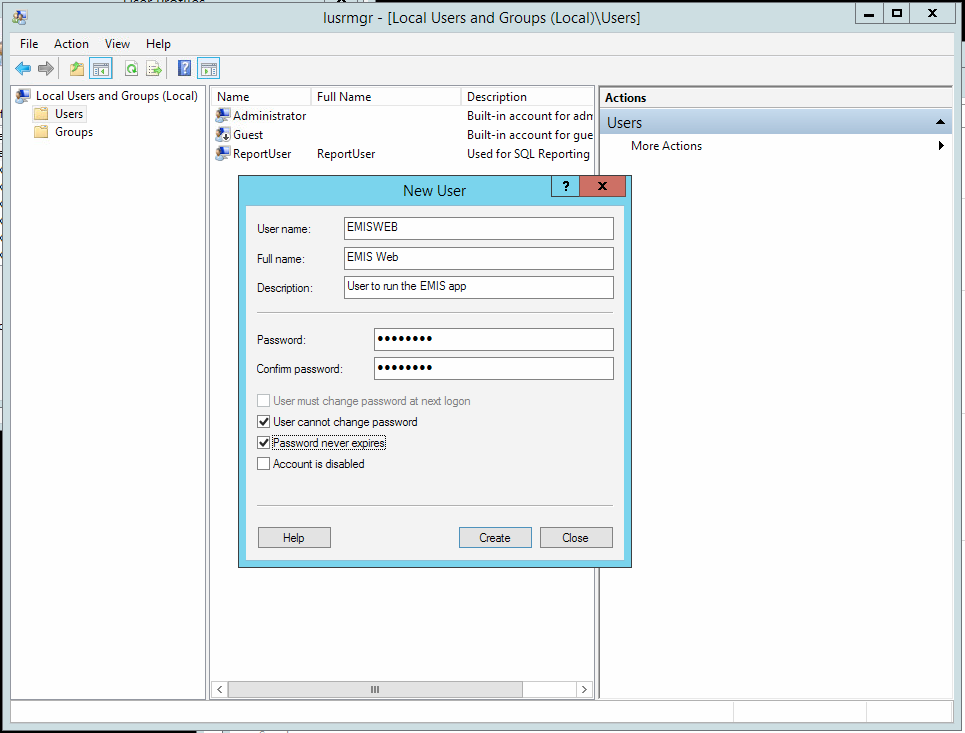
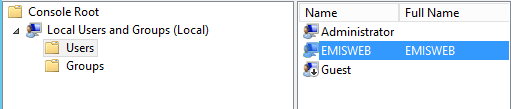
Create Account to Run the Application
Create a Windows user account (on local machine or active directory) to run the application. Call this new user something like EMISWEB. This new user should both be owner of the SQL database and the one running the IIS web process.
User Management
The Pacific EMIS supports two primary ways to manage users: Active Directory and Local Users. The primary advantage of Active Directory is that the organizations systems administrator can managed users, groups and roles (i.e. access permission levels) all centrally. The primary advantage of local users is ease of setup but permissions need to be configured for each user individually. You might find yourself in one of the following scenarios:
- Your organisation already runs an Active Directory in which case this is great, things will be much easier
- Your organisation do not run an Active Directory in which case you could deploy one and join workstations to the domain. You have the choice of Microsoft Server's Active Directory or the free open source Samba
- Your organisation does not run an Active Directory and uses Google Accounts in which case you could deploy a local Active Directory and use Google Sync to sync users between both system
- Your organisation does not run an Active Directory and not ready to deploy one. In this case you could opt for a local user deployment setup instead.
Restoring the Main Application Database
There are two main ways to installed the main application database:
- Restore the application database (e.g. FEDEMIS, MIEMIS, SIEMIS, etc.) from a backup given to you by one of the experienced developers (geared towards systems administrators)
- Restore an empty/default application database from a backup file that can be found in the source code repository in the folder SqlScripts
Restoring the IdentitiesP Database
The Pacific EMIS makes use of another auxiliary database called IdentitiesP where two main things are managed: the concept of ASP.NET user, roles and claims, and some details about the navigation system. When deploying a new DB you'll need that one to be given to you by one of the team members.
Restore this database backup into a database called IdentitiesP. The default is good to get going but you'll likely want to eventually customize this. It can be done mostly from the Web UI once installation is complete or directly in the database if you know what to do.
More details about how this works is documented in the Developer Guide in High Level Architecture in Navigation and Module System. But from a systems administrator's point of view you can simply move on to the next section to configure the modules for your country.
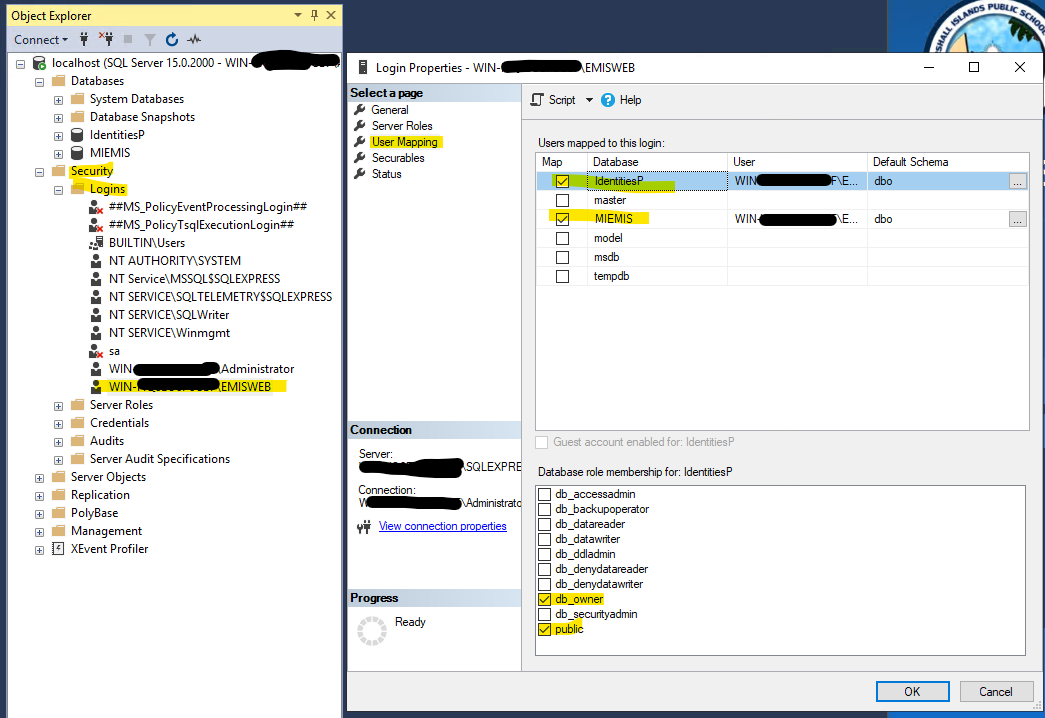
Make EMISWEB User Owner of both Databases
Add the EMISWEB user as db_owner of the databases created previously. You can do this by opening SSMS, browsing to the new database created early on then click Security–Users where you can add a new user as show in the following figure (select Windows user from User Type dropdown list). Locate the Windows account EMISWEB from the User name field and create it.

Next assign the db_owner to that new user in Membership as shown below.

Do the same as above for the IdentitiesP database.
Give User Login Permission
The user created in Create Account to Run the Application must be given permission to login the SQL Server. Do this in the MS SQL Management Studio by adding the user as shown below.
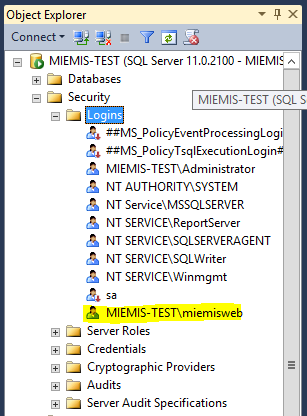
And setup the db_owner mappings to both the IdentitiesP and EMI databases.
Deploy the Application
Enable the IIS Role
We first enable the IIS role to create the necessary folders where the app will be deployed.
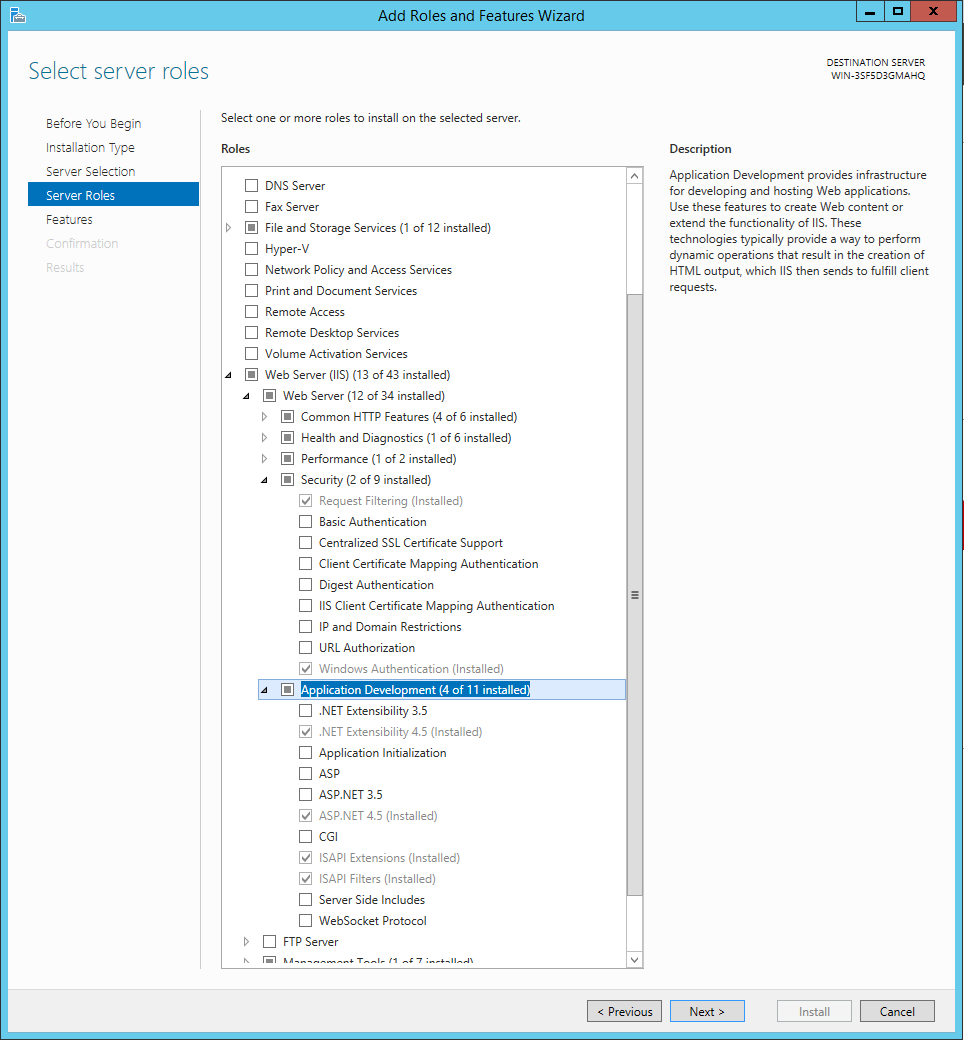
To enable to Web Server (IIS) on the Windows Server open the Server Manager and find Add Roles and Features. Find the Web Server (IIS), enable it and make sure it contains the following minimum functionalities.
Install Web Server Dependencies
To avoid some minor loading errors within the IIS configuration section we can install the dependencies now as they might already be expected from the configuration in the app's Web.Config file. Currently installing the URL Rewrite should be enough https://www.iis.net/downloads/microsoft/url-rewrite.
Deployment Method
The application is deployed using a dropbox share. If you do not have an account create one on the Dropbox website and install their dropbox PC application. Your account and the dropbox application should be accessible from both the development machine and the production machine where the Pacific EMIS is to be deployed. And your account should be given access to a share called WebInstall by one of the Pacific EMIS maintainers. Using your own dropbox account for this is fine to get started and test deployment (e.g. training purposes, practice on your own machine) but the actual real production deployment should be using one of the organisation's dropbox account, one perpetually accessible by the current technical responsible person of the organisation (e.g. admin, sysadmin, system are common accounts for this).
Deployment Configuration
The share WebInstall contains a folder called Pineapples which has the application. The Pacific EMIS software project maintainer is usually the one preparing this folder with the latest releases. Before moving to the next step this is a good time to create a folder to hold some key files for your country of deployment. For example, in RMI the folder RMI-deployment-files was created in the WebInstall share. This folder can hold among, other things, the logo (rename it miemis.png,) the lookups spreadsheet and the SQL script generated from the spreadsheet.
Next you must edit the deployment configuration file called Web.config. You can find it in the dropbox WebInstall (e.g. C:\Users\Administrator\Dropbox\wwwroot\WebInstall\Pineapples\Web.config). Then open it and edit the following three section to configuration the databases access. The example below is for Marshall Islands: it uses miemis-test for database name, miemis for context and the SERVERNAME\SQLINSTANCENAME will depend on the server it is being deployed on.
  <connectionStrings>
    <!-- Connection to the Identities database , note the factory seetting below will generate this database if going "code first"
    this connectin string is referenced in ApplicationDbContext constructor
    -->
    <add name="DefaultConnection" connectionString="Data Source=SERVERNAME\SQLINSTANCENAME;Initial Catalog=IdentitiesP;Integrated Security=True" providerName="System.Data.SqlClient" />
  </connectionStrings>
  <!--
    For a description of web.config changes see http://go.microsoft.com/fwlink/?LinkId=235367.

    The following attributes can be set on the <httpRuntime> tag.
      <system.Web>
        <httpRuntime targetFramework="4.5.1" />
      </system.Web>
  -->
  <appSettings>
    <add key="server" value="SERVERNAME\SQLINSTANCENAME" />
    <add key="database" value="miemis-test" />
    <add key="context" value="miemis" />
    <add key="title" value="MIEMIS Online" />
    <add key="ReportServerUrl" value="http://localhost:8080/reportserver" />
    <add key="FileDb" value="d:\files\filedb"/>
  </appSettings>
<parameter value="Data Source=SERVERNAME\SQLINSTANCENAME;Initial Catalog=IdentitiesP; Integrated Security=True; MultipleActiveResultSets=True" />
Note: the document library where incoming documents are stored (both for the teacher images, and upload files such as this) is specified by the AppSetting FileDb
On your local system, you will need to :
- Create a folder for this (e.g. C:\fileDb )
- Make sure that the account running the EMIS apppool has CRUD and Create Folder permissions to this folder
- Set the web.config entry
Deployment Copy to IIS inetpub
Now use the deploy.bat script to copy files into the IIS folder (i.e. C:\inetpub\wwwroot\). You'll have to do it through the command line. From the Windows menu open the command prompt then change directory to the dropbox share and then run the script (ignore the warning at the end and press enter when presented with pause), should be something like this:
   > cd C:\Users\Administrator\Dropbox\WebInstall\Pineapples\
   > deploy.bat miemis
This will create the folder C:\inetpub\wwwroot\miemis with most of the necessary application. Now will be put in the remaining missing files: the Web.config, miemis.png logo and the Global.asax files. If you have already put your logo into C:\Users\Administrator\Dropbox\WebInstall\RMI-deployment-files as instructed earlier then the following commands should copy the files in the right place (you could do it from the Windows Desktop too)
   > mkdir C:\inetpub\wwwroot\miemis\assets_local
   > copy C:\Users\Administrator\Dropbox\WebInstall\Pineapples\Web.config C:\inetpub\wwwroot\miemis\
   > copy C:\Users\Administrator\Dropbox\WebInstall\RMI-deployment-files\miemis.png C:\inetpub\wwwroot\miemis\assets_local
   > copy C:\Users\Administrator\Dropbox\WebInstall\Pineapples\Global.asax C:\inetpub\wwwroot\miemis\
You may have to give permission on the folder to the user running the IIS application pool (i.e. EMISWEB).

Web Server (IIS)
Create an Application Pool
Next open the Internet Information Services (IIS) Manager and right click on Application Pools and Add Application Pool.. to create an application pool called EMIS as shown in figure below. An application pool is essentially an isolated server worker process running that will run our application.

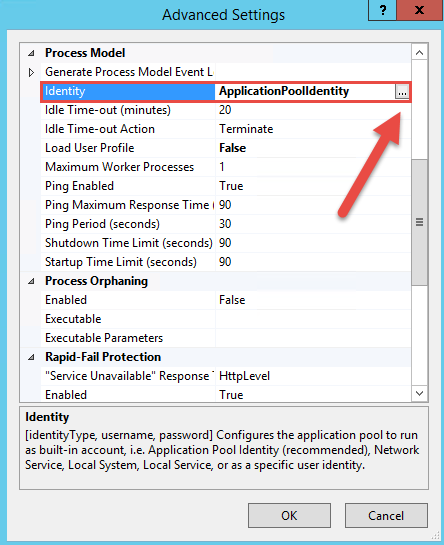
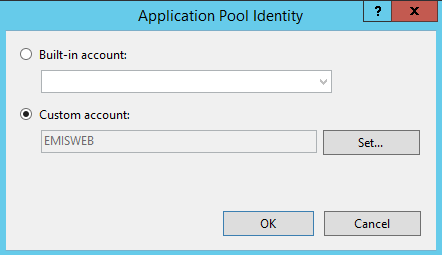
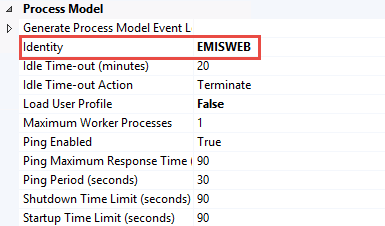
Apart from the default setting as shown in the above figure you will need to go in the new EMIS application pool's Advanced Settings… and configure the Identity to the Windows account EMISWEB we created earlier. Select the EMIS application pool and Advanced Settings…. The steps involved in setting the custom identity are depicted in the following figure.

Choose custom account and enter the details for your newly created local account;
Choose custom account and enter the details for your newly created local account;
Add the Website (i.e. Web Application)
This step requires that you have already copied all the app's files to the C:\inetpub\wwwroot\ folder.
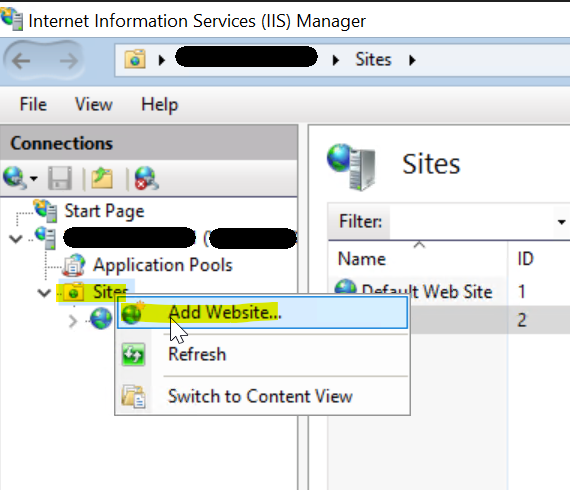
Then complete the website's details as shown below.

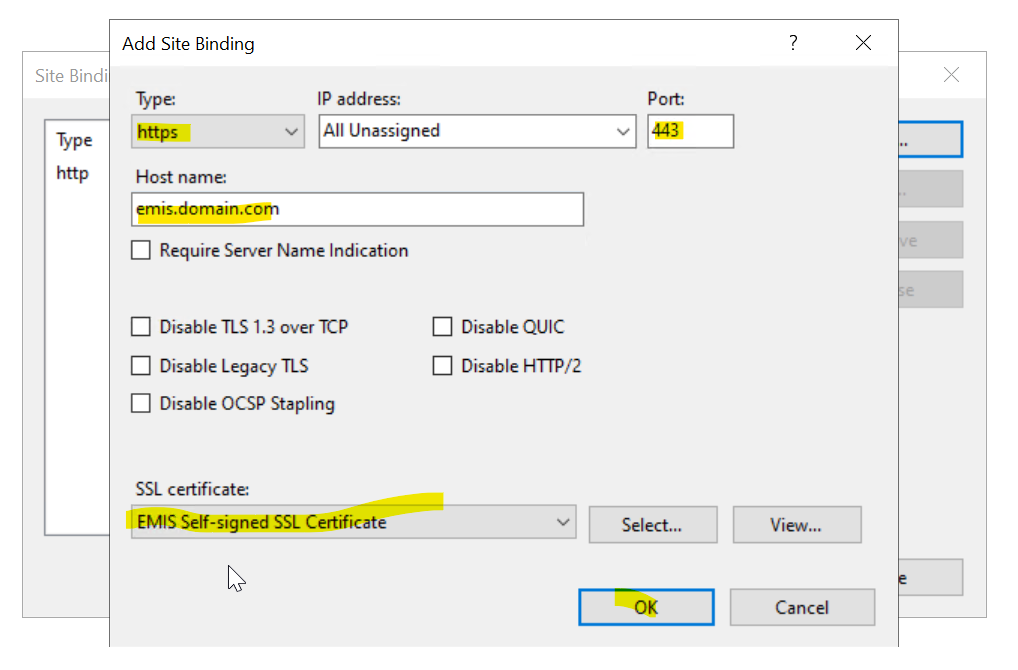
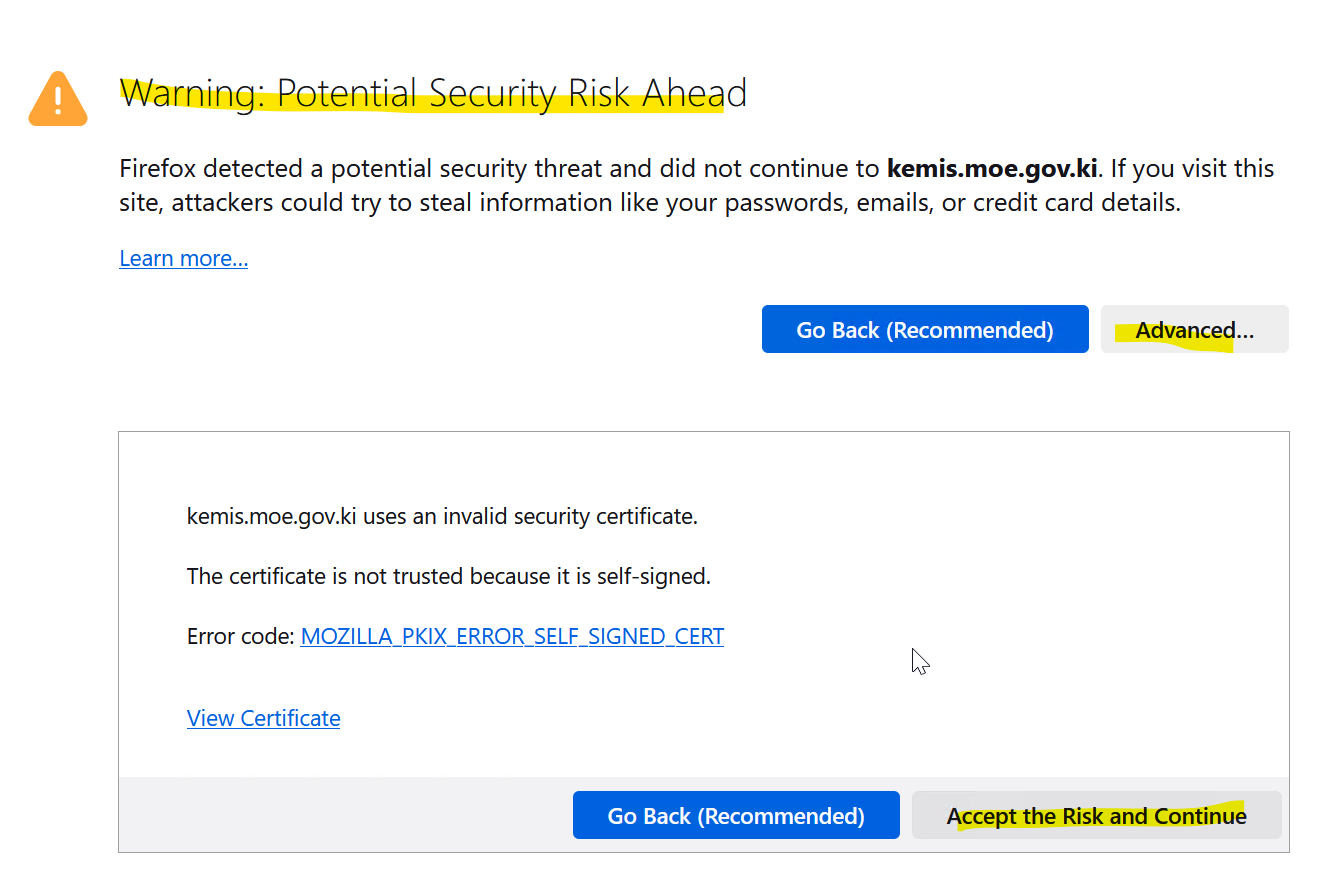
Add support for HTTPS
Since this app has a strong security focus it automatically redirects to https from any http connection attempt. Therefore we must add support for https. First create a self signed SSL certificate in the IIS server.

Give it details like follows.

The newly added self signed certificate should look like this.

Go back to our new website and edit the bindings.
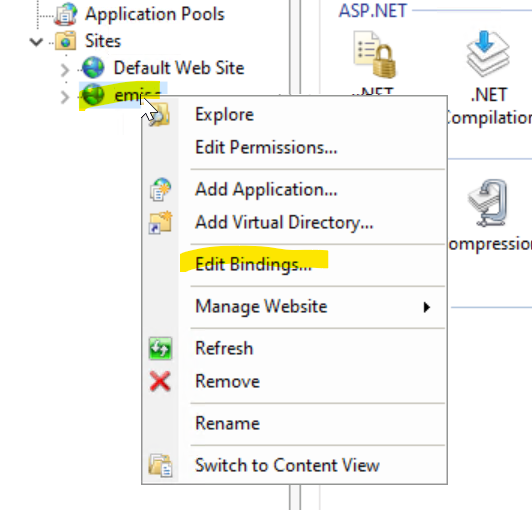
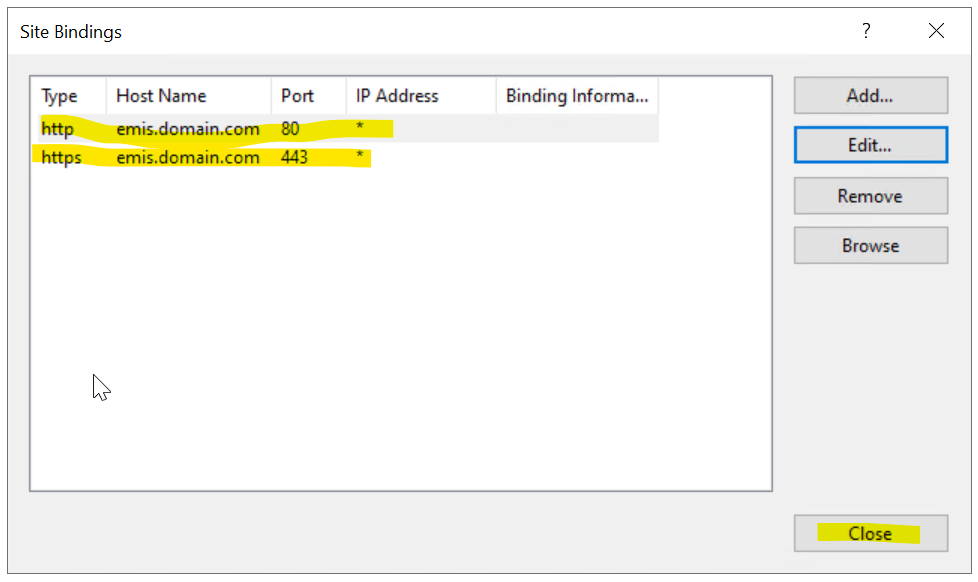
Add a new bindings for https like follows.
It should results in something like this.
Now when accessing the website to it's configured bindings you will see the following.
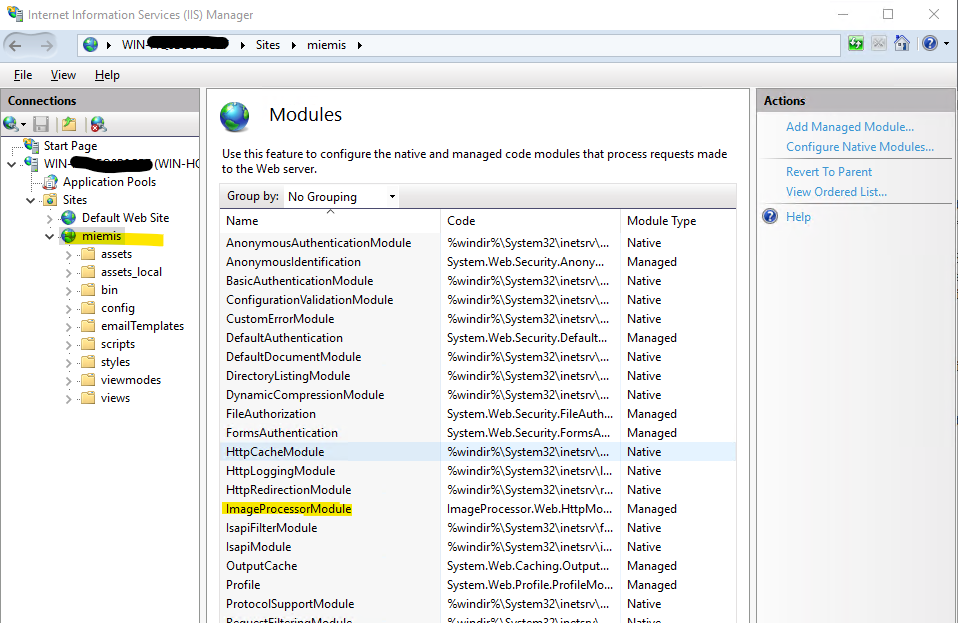
Install missing modules
For example, the one below was missing.
Once this is done you can test by point your browser to http://server-name/miemis.
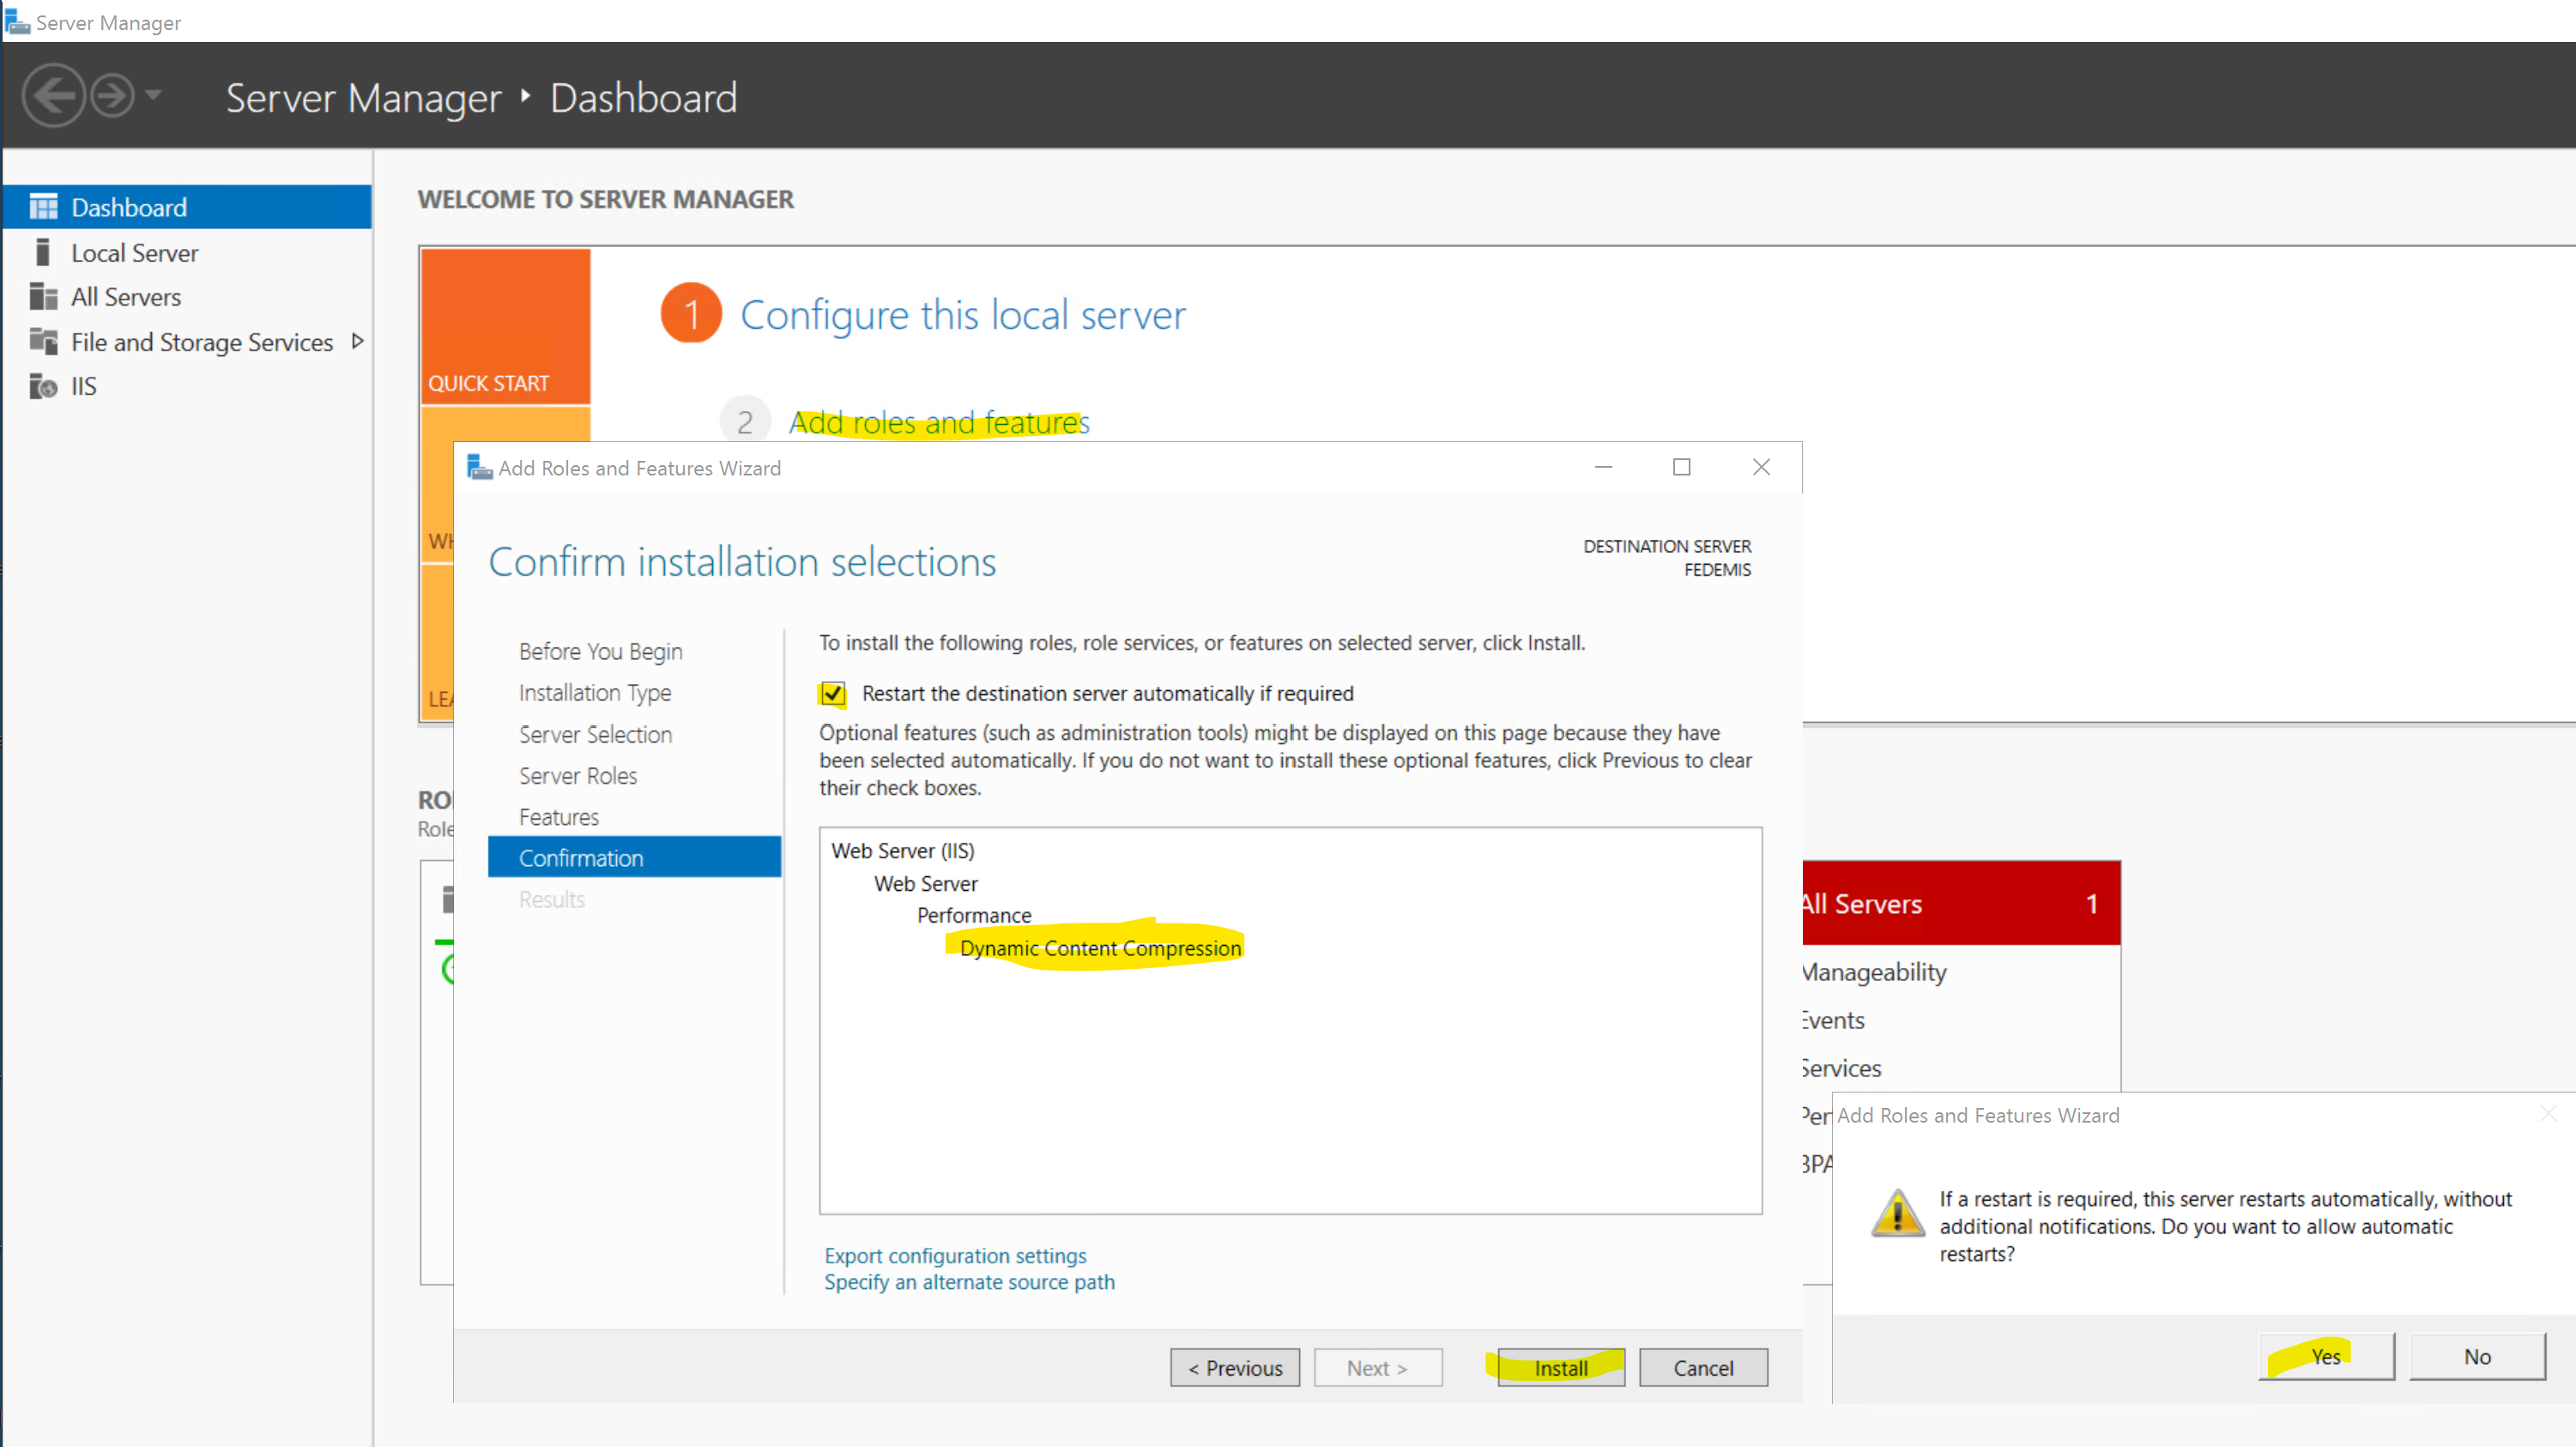
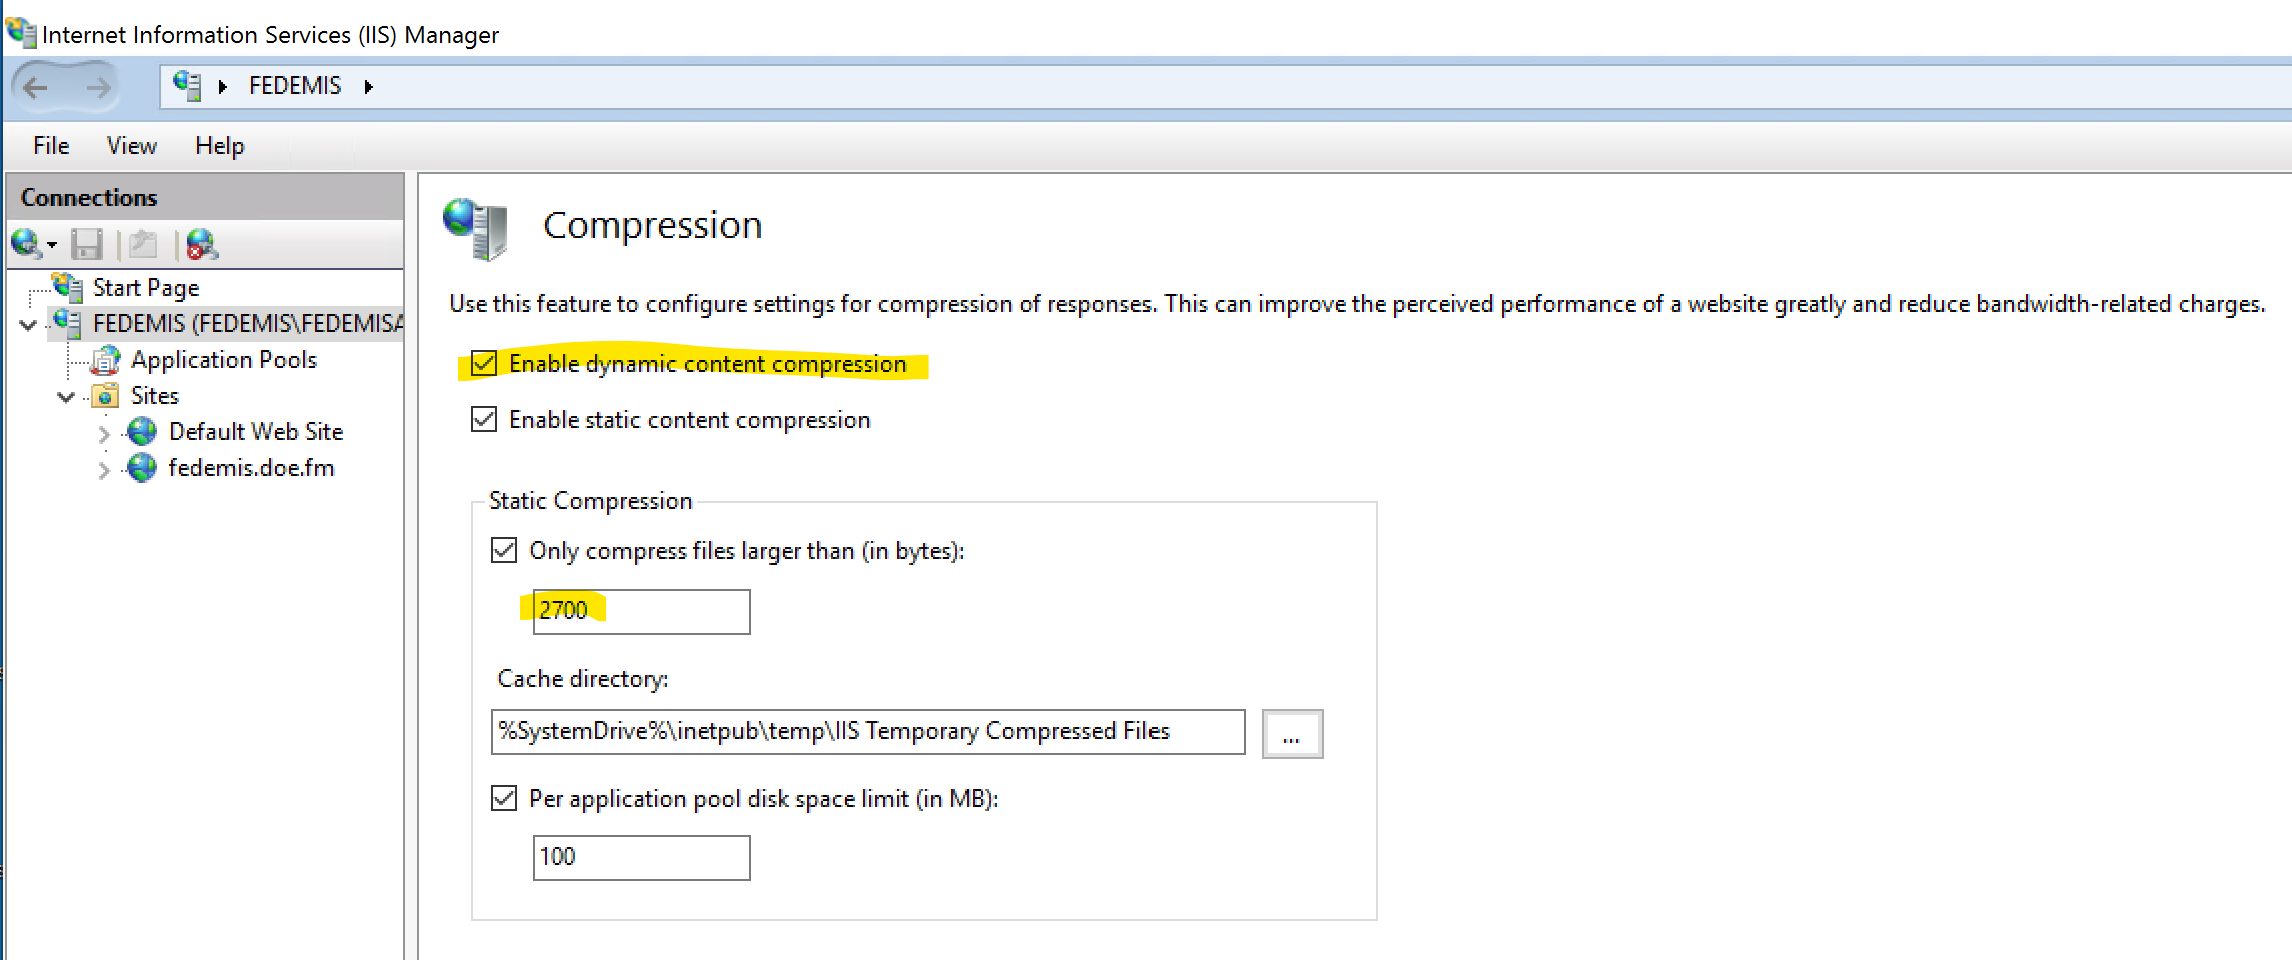
Enable Dynamic Compression
To improve speed of the EMIS you should enable dynamic compression of JSON and other data, especially if this is hosted and accessed over the Internet. Refer to Enable Dynamic Compression for IIS
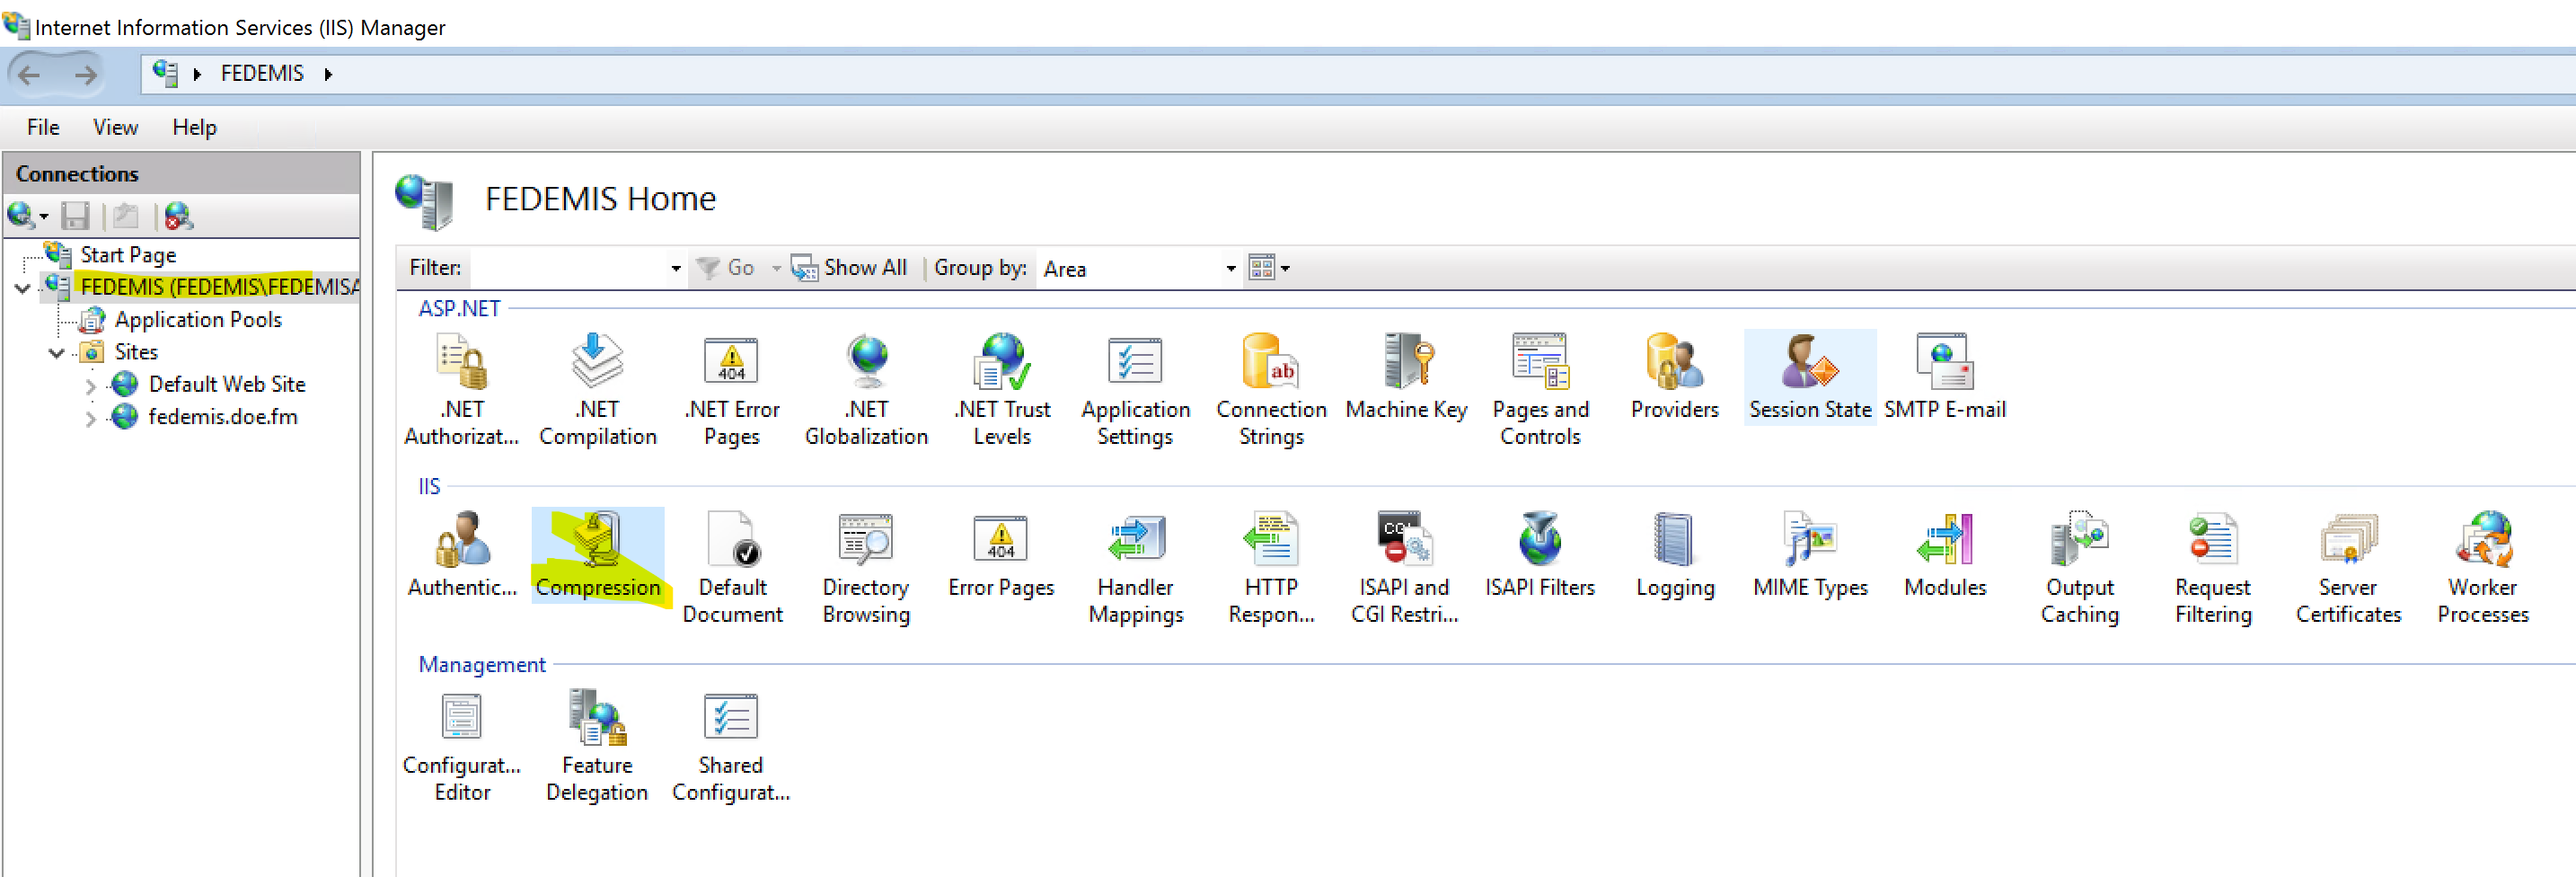
Essentially you can simply install the dynamic compression feature as shown below.
Open the configuration editor of the server.
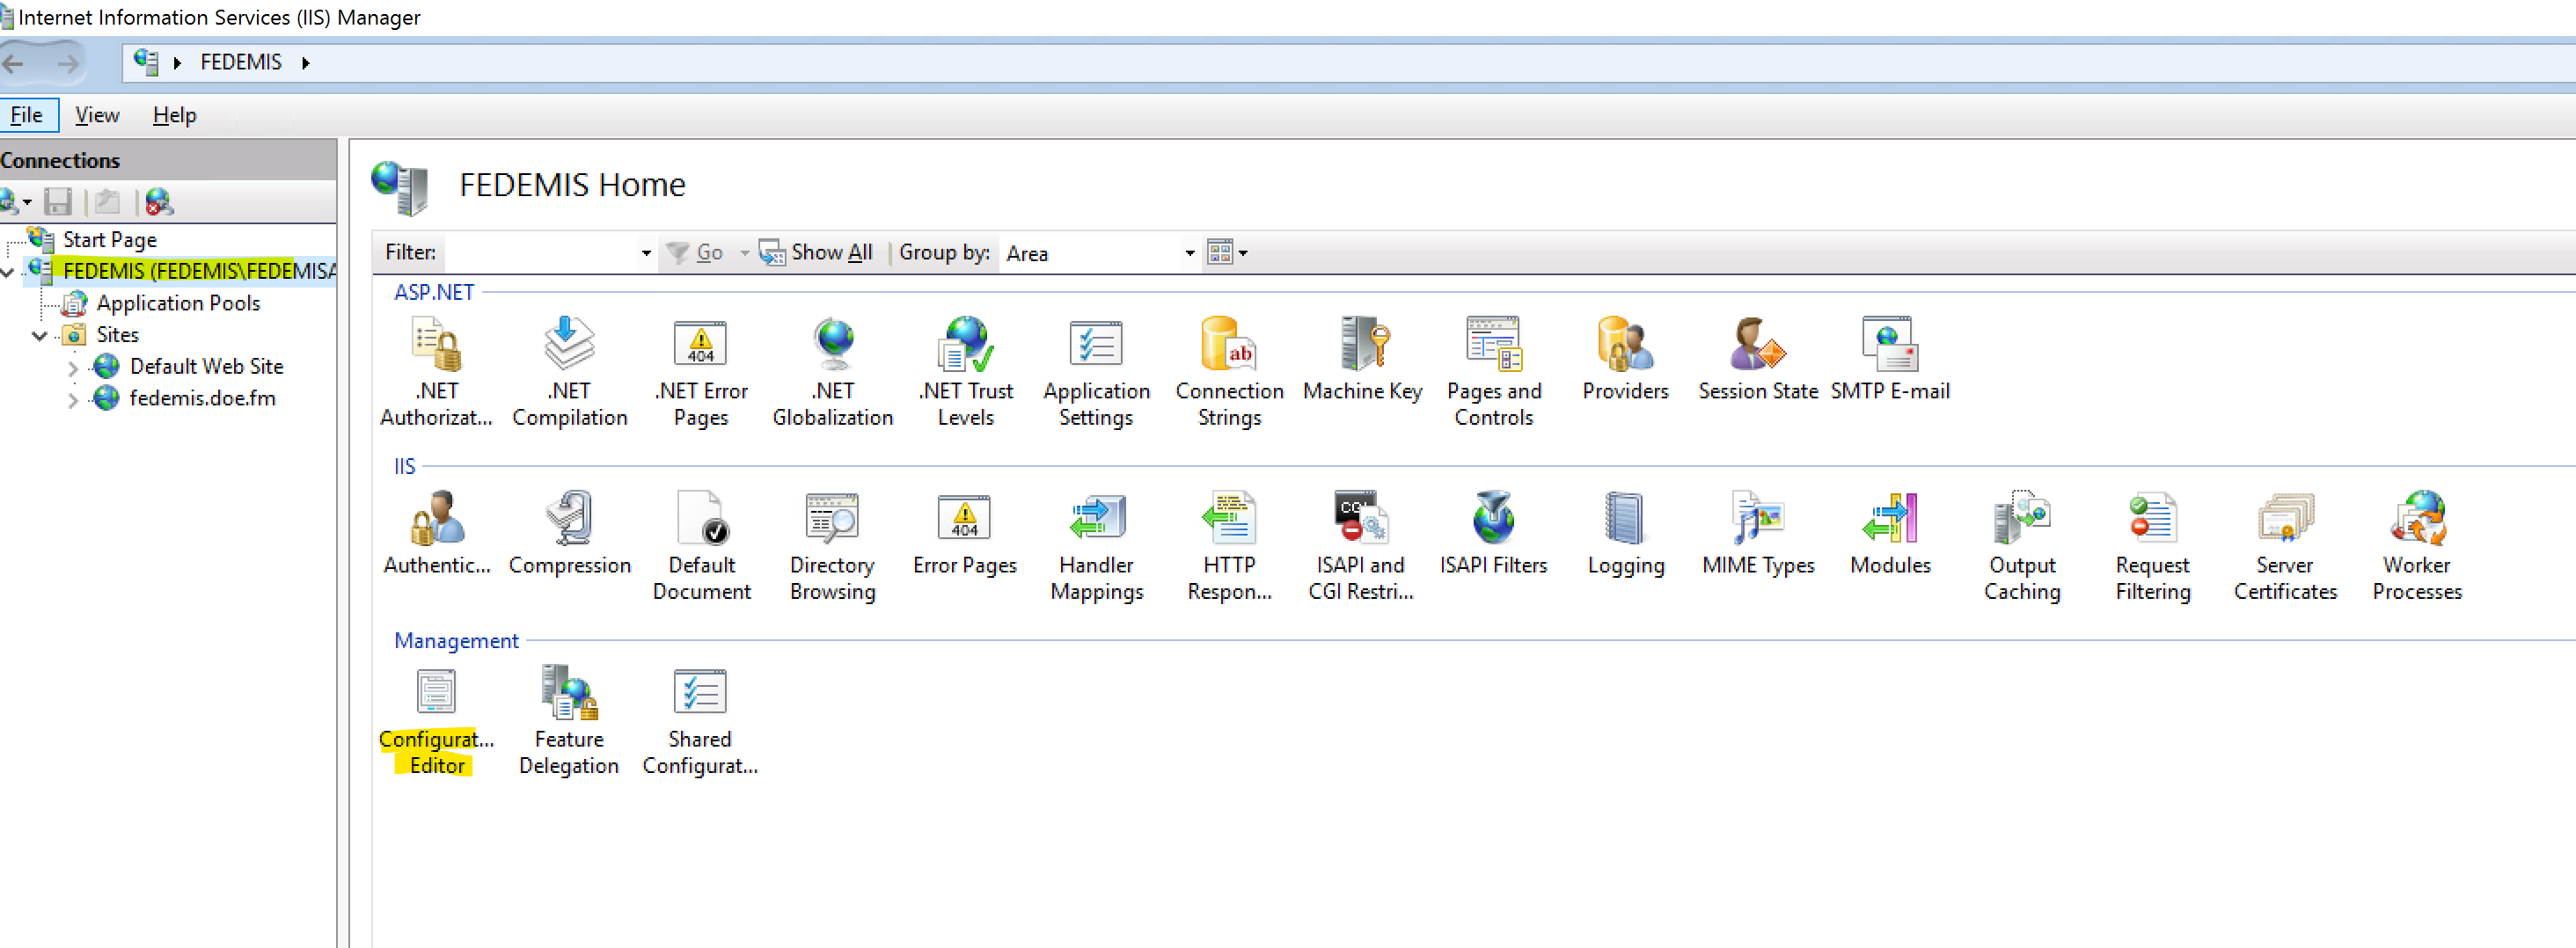
Find the compression settings.
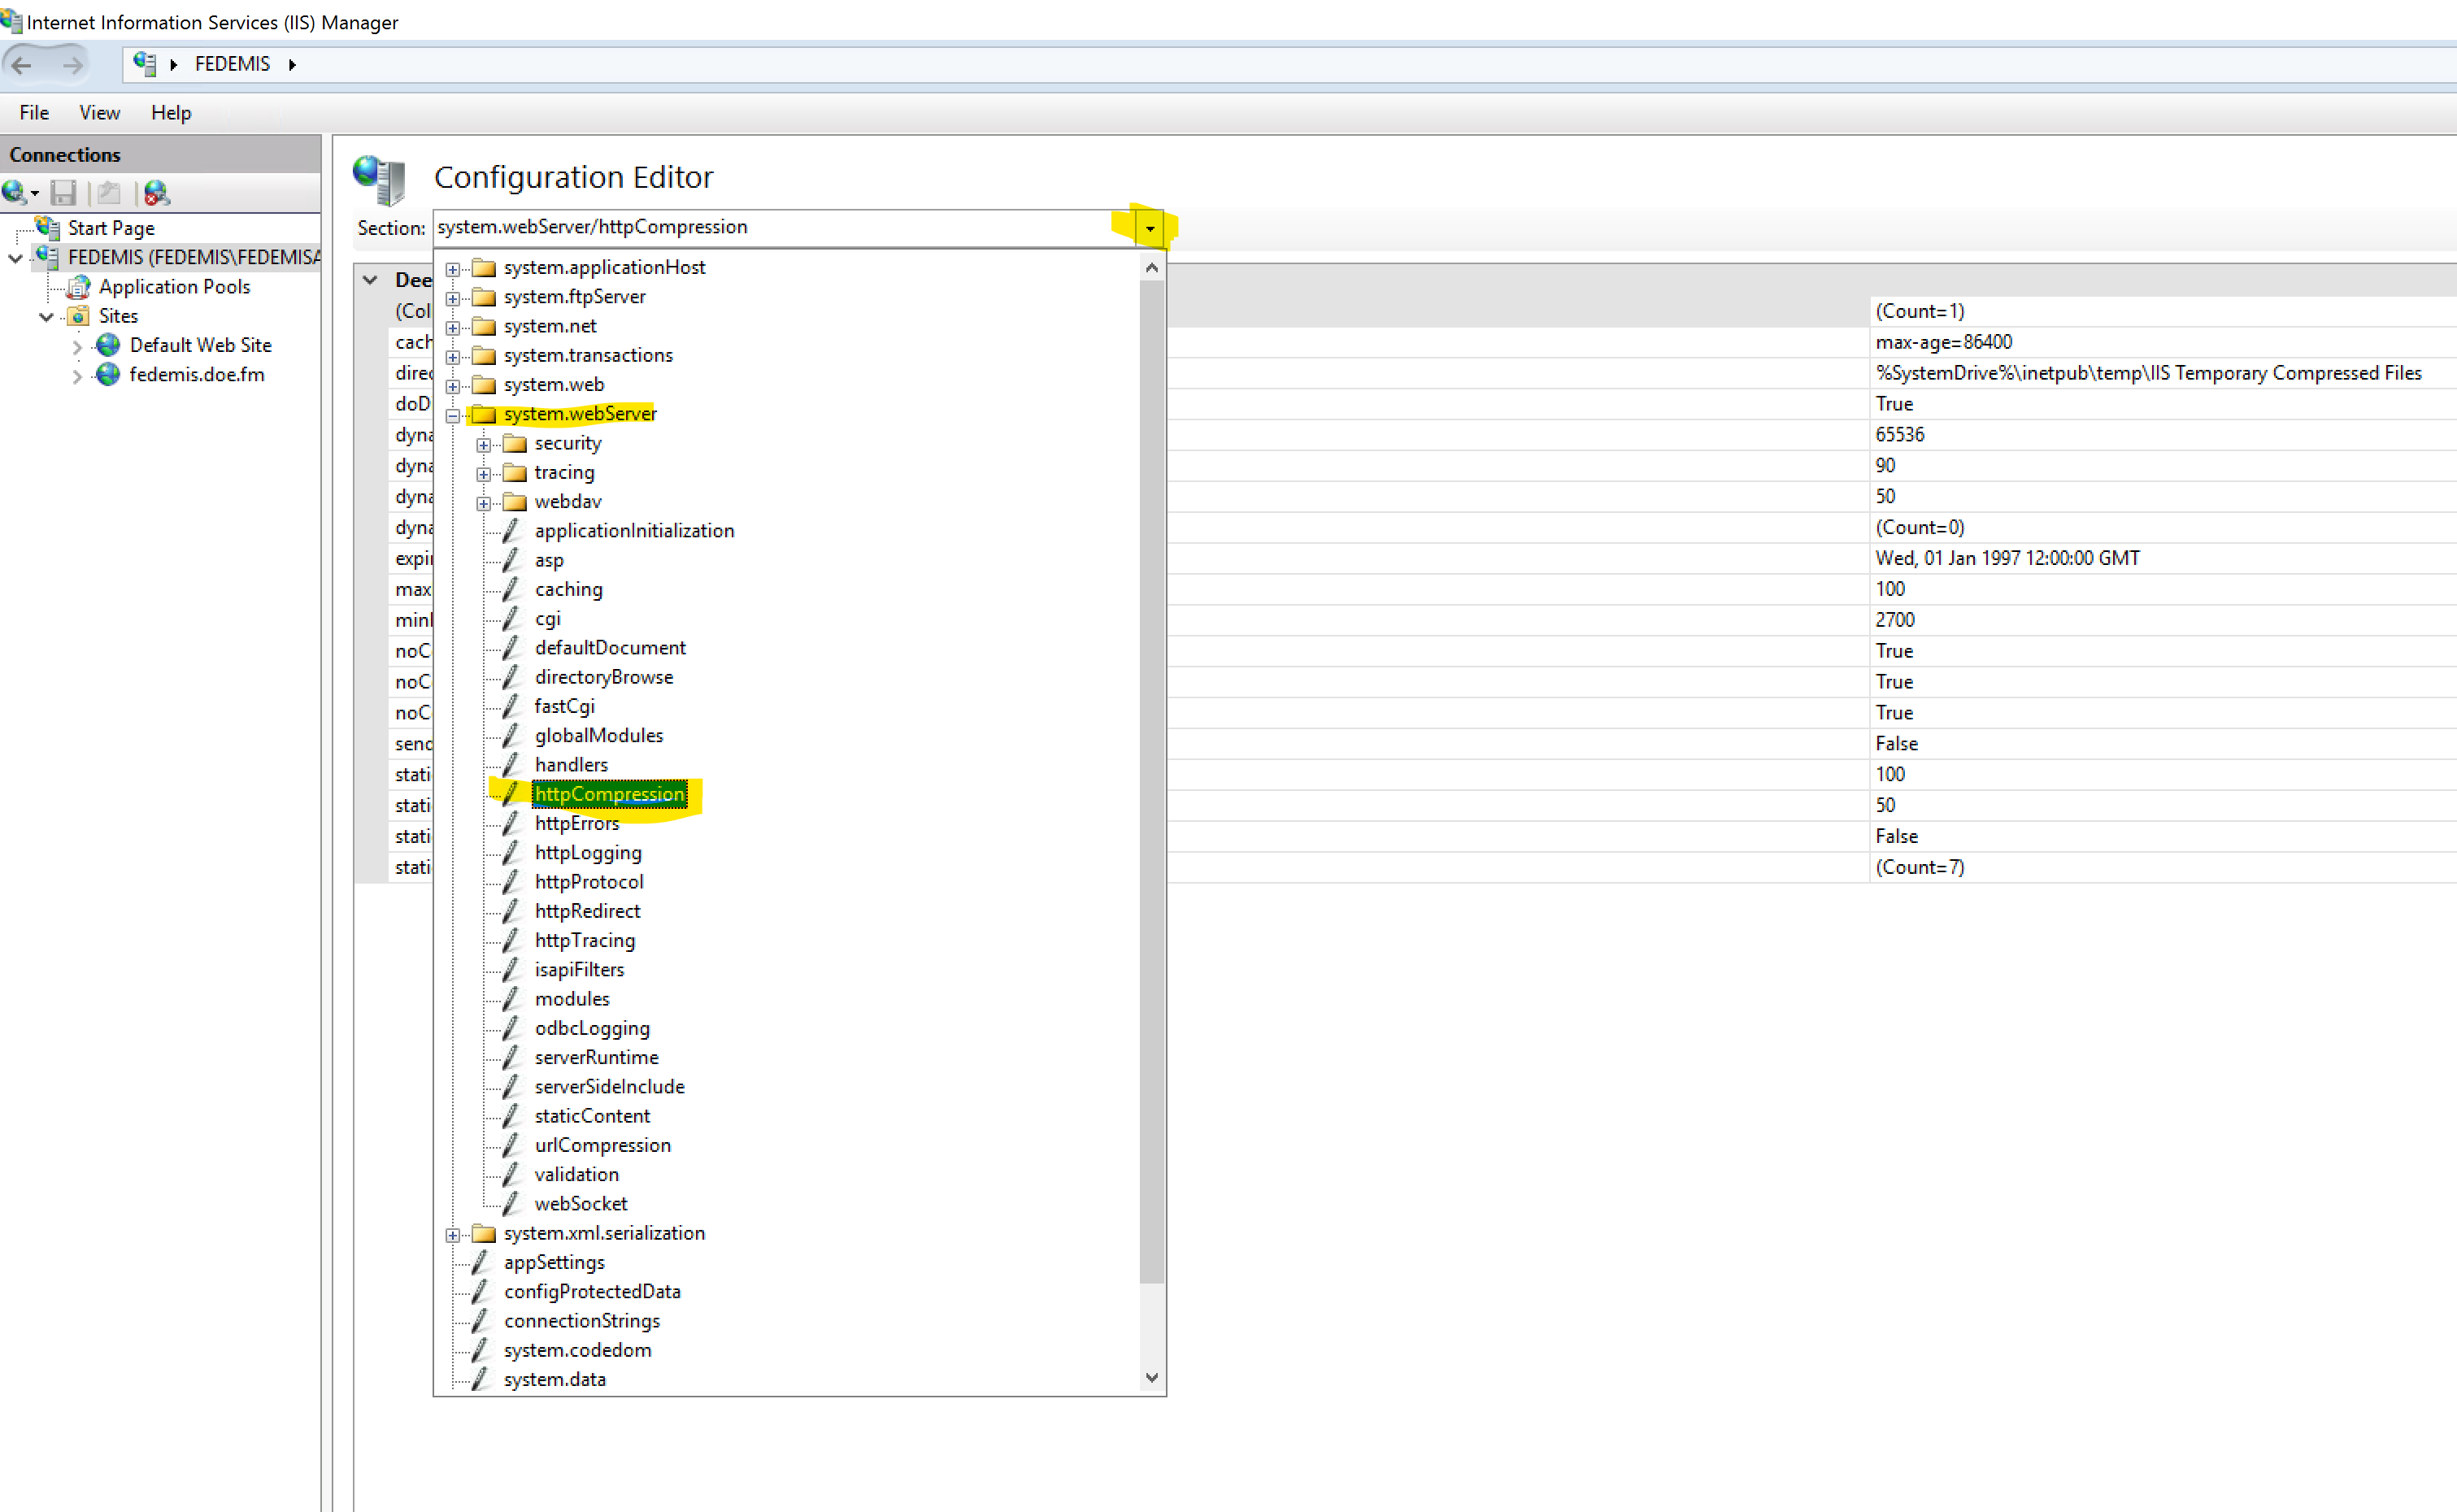
Add the following and then apply your settings.
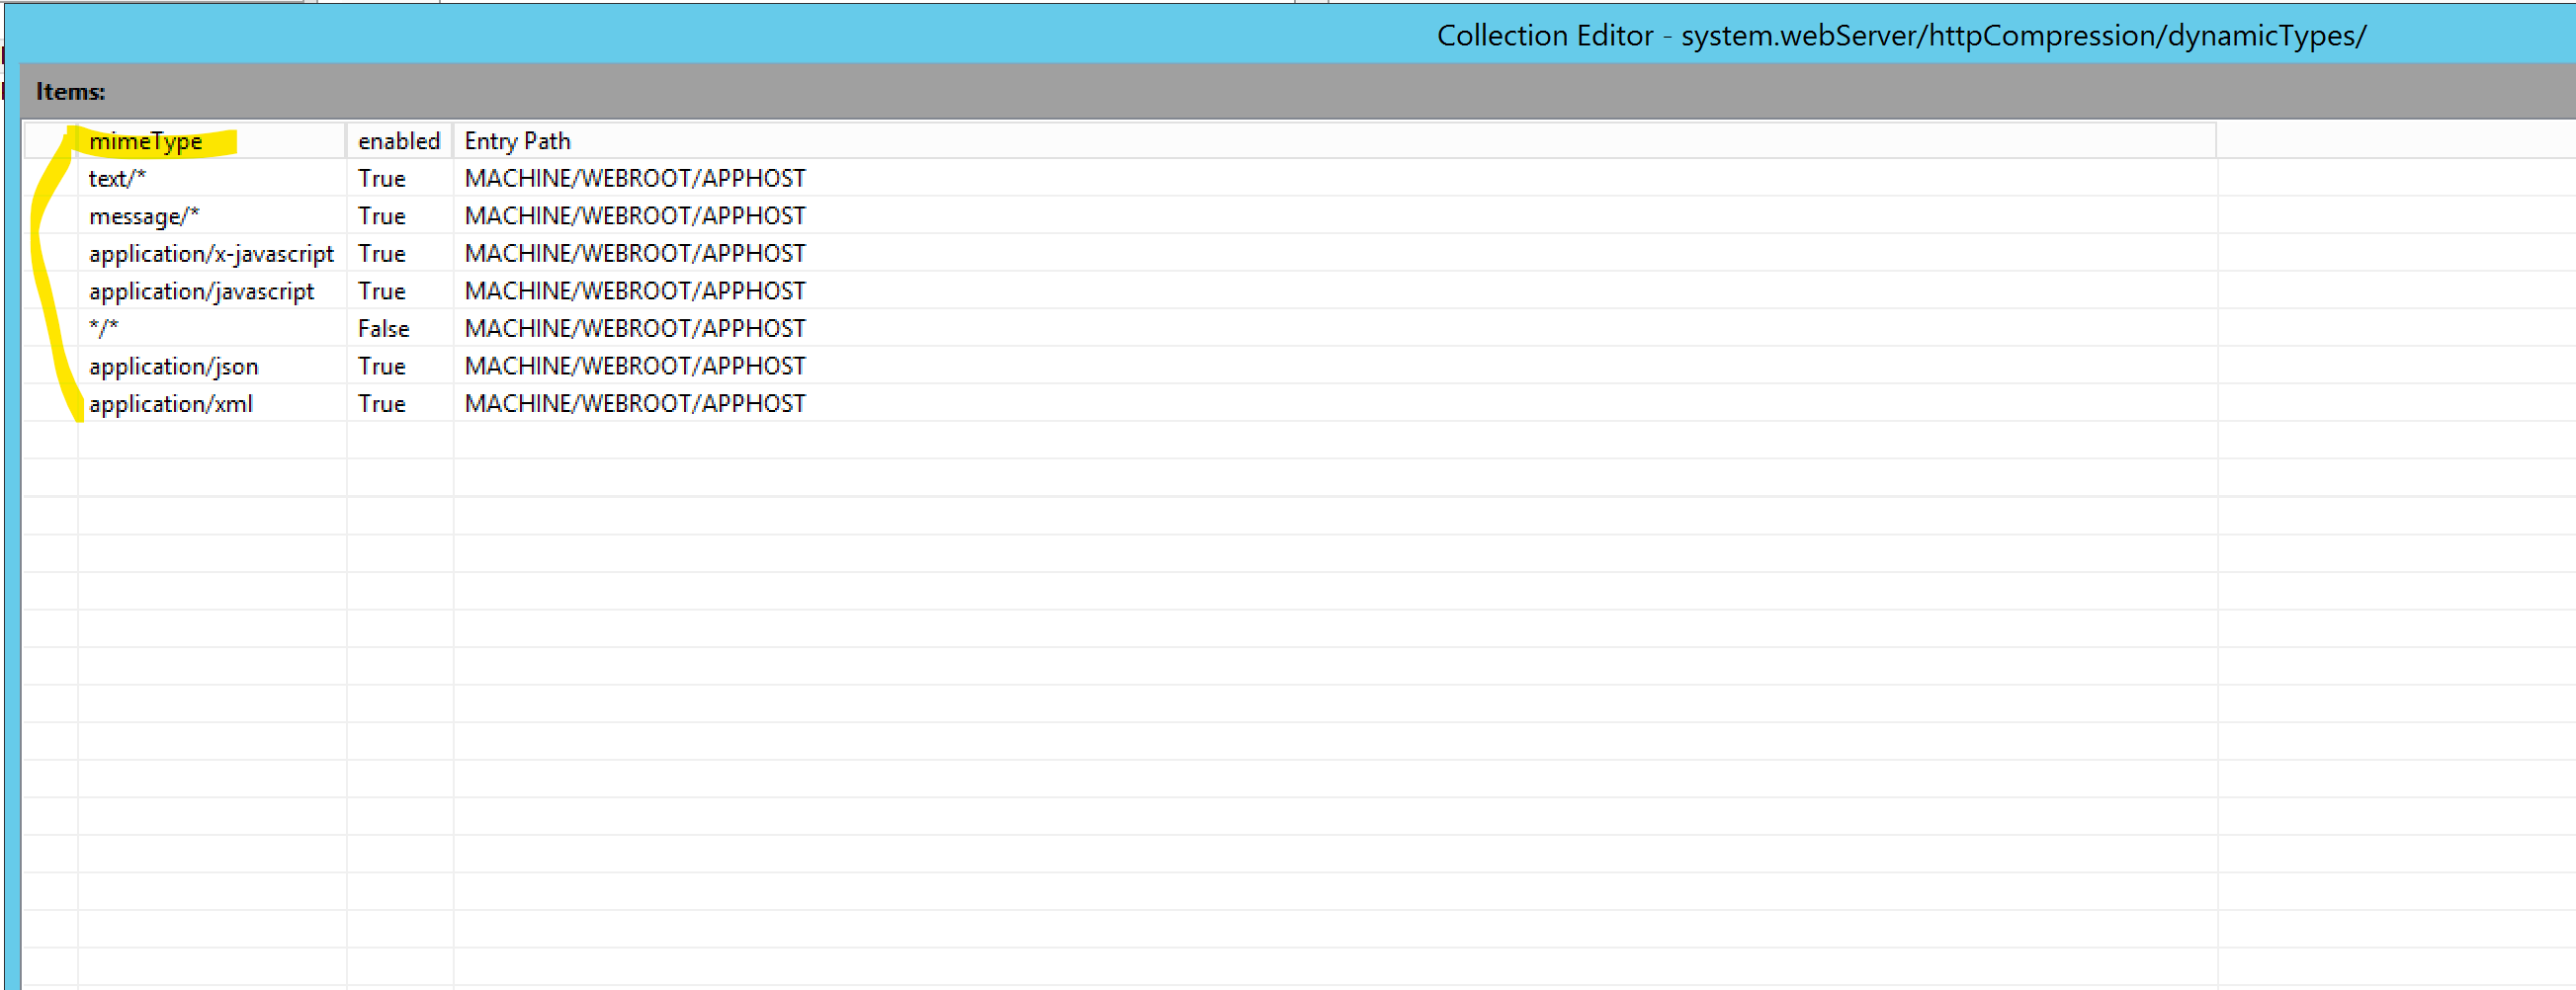
Enable the dynamic compression like the following two illustrations.
Change the Self-signed SSL certificate with a LetsEncrypt Verified SSL Certificate
The easiest and cheapest way to remove the security from a self signed SSL certificate is to use LetsEncrypt. On windows you can install and run https://github.com/PKISharp/win-acme. Two things to do only.
- Run to deploy the certificate the first time
- Then setup a schedule task to renew every 3 months
When HTTPS is working it is a good idea to redirect all HTTP (non-secured) traffic to HTTPS. While this is already done at the configuration of the application (i.e. Web.Config) it does not hurt to also do it at the web server level as described at https://www.ssl.com/how-to/redirect-http-to-https-with-windows-iis-10/.
Setting Up Email
Notes on how to setup email which is used to password reset, sending out reports, notifications, etc.
Google Workspace or Plain Google Account
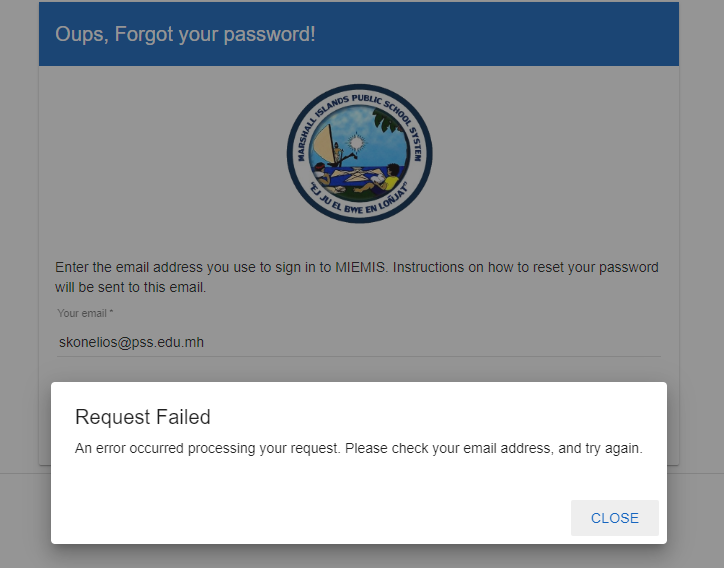
Those using Google Workspace or a plain Google account as their email service for their domain can configure like below at the bottom of the Web.config file. Of course you would need an working Google account for this to work. This is the most reliable and easy way to configure the EMIS to send emails.
<!-- Using a Google account is an easy and reliable way.
     this may require that you "Access for less secure apps"
     be enabled for the Gmail account used by the NetworkCredential
     see https://www.google.com/settings/u/1/security/lesssecureapps -->
<smtp deliveryMethod="Network">
  <network host="smtp.gmail.com" port="587"
           userName="email@address.com" password="yourpassword"
           defaultCredentials="false" enableSsl="true" />
</smtp>
Make sure you turn back on the following.
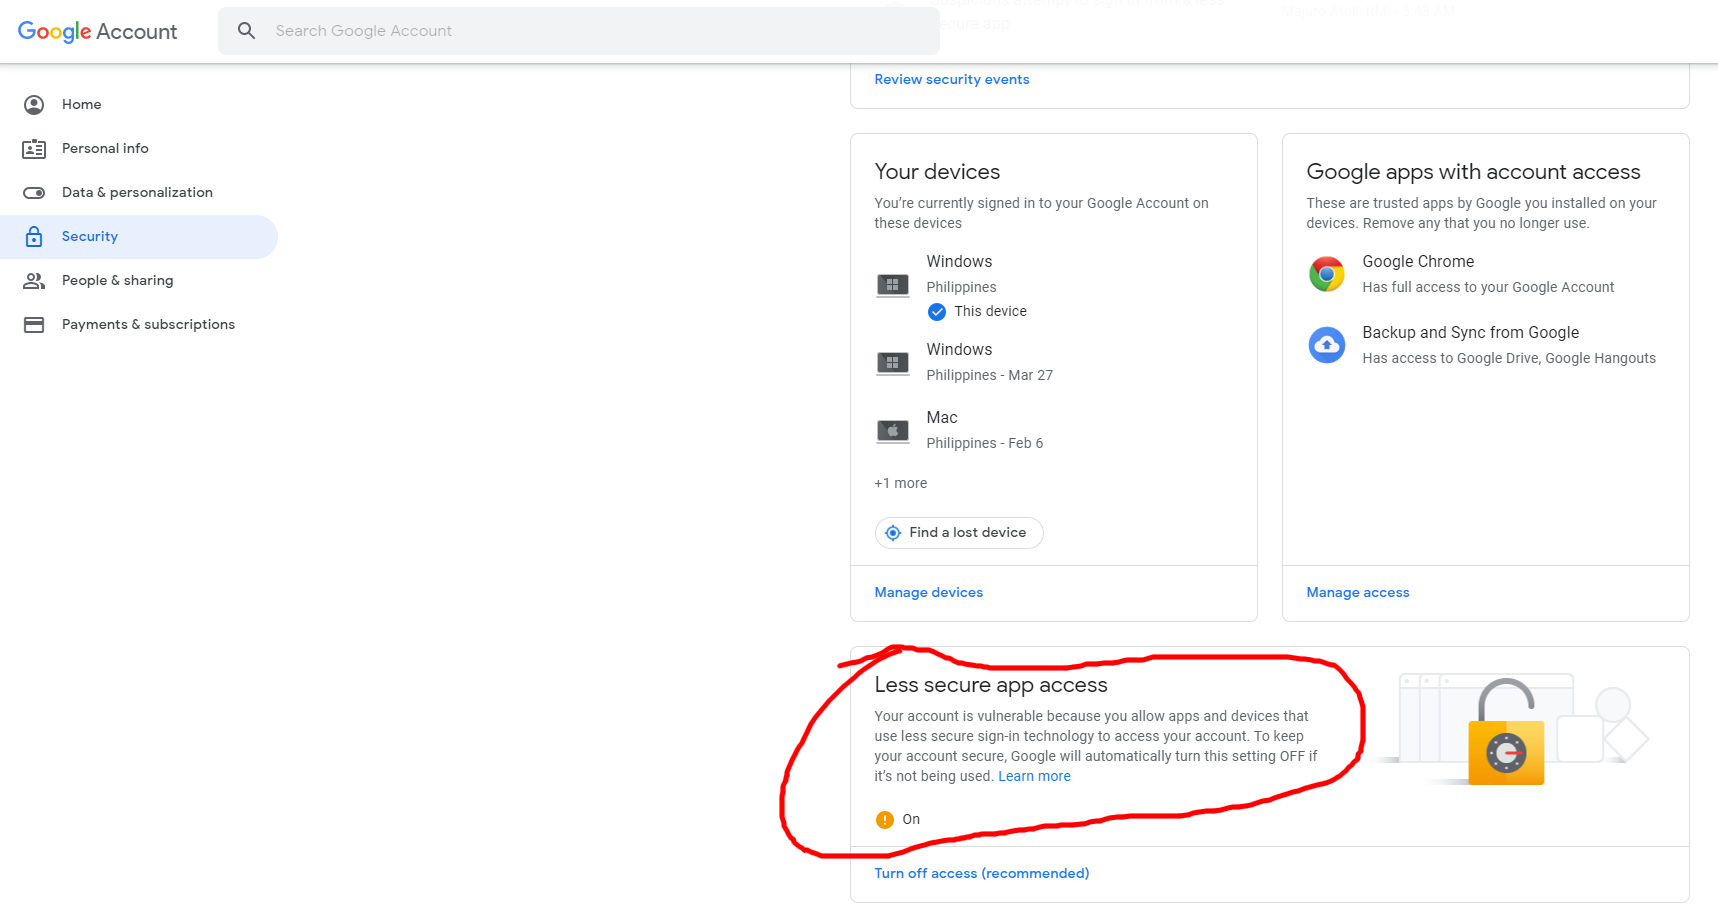
A better approach using Google accounts is to enable 2 factor auth for the user account you want to send mail with. When setting up 2 factor auth Google provides a way for app that don't support 2 factor auth to more securely connection. You simple need to create a App password and use that password instead of the normal user account password.
<!-- Using a Google account with 2 factor authentication where
     yourapppassword below is the App password create under that user
     by first enabling 2 factor auth and then creating an App password -->
<smtp deliveryMethod="Network">
  <network host="smtp.gmail.com" port="587"
           userName="email@address.com" password="yourapppassword"
           defaultCredentials="false" enableSsl="true" />
</smtp>
Exchange Server
With exchange server the setup is a little trickier. we need a receive connector to relay from the IIS server.

The security has to be set up to allow Windows authentication

and the IIS Server has to forward mail to the exchange server.

Currently it was working in at least one country environment by specifying the credentials of a user with an exchange mailbox. It would be best if this can be the same account running the apppool–this account also needs access to the SQL server, so it centralizes security setup in this one place. In that working environment is was only made to work with a Domain Admins user so more to do to figure out what is the minimal security requirement. But the notes herein provide a starting point.
Configuration
Systems configuration can be done in the table sysParams.
Main Configuration
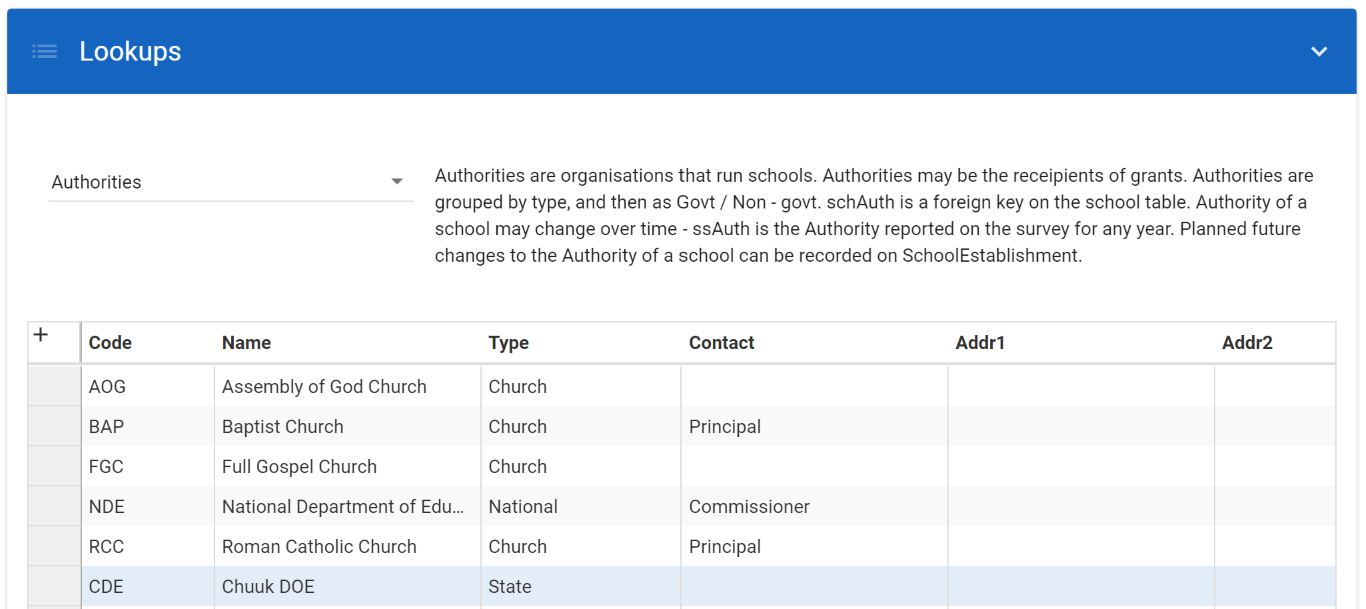
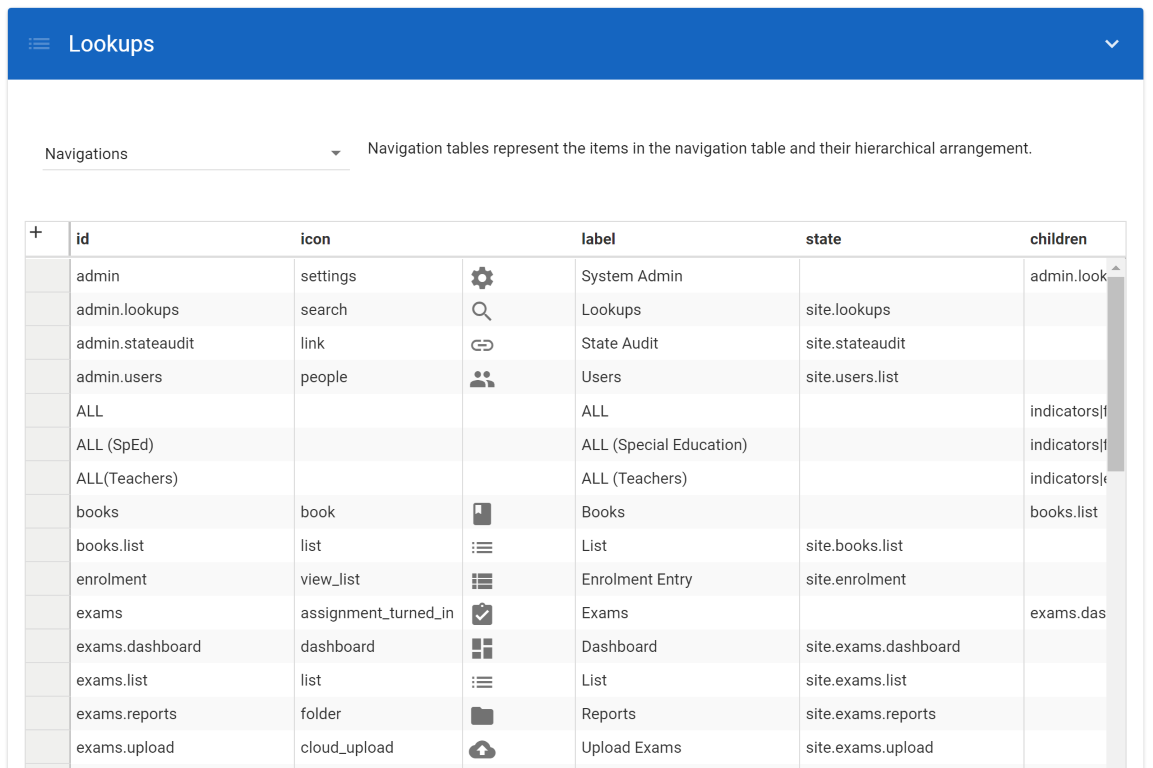
Most of the configuration resides in the database; some of which is pre-loaded and most can be edited from the web UI through the Lookups (a small number of which may only be editable directly in the database). Below is an example of configuring a lookup (i.e. the school authorities). You can see a brief description and purpose of the lookup being edited. This is done after the installation.
Navigation and Module Configuration
Navigation is essentially how the menu in the user interface is organized. Modules are essential features (e.g. Performance Assessments, Schools, Teachers). Not all Pacific countries will require (or even be ready) for all features of the system. You can in effect enable and disable modules by taking them out of the Navigation menu. The table Navigation in IdentitiesP defines the hierarchy shown in the side bar menu.
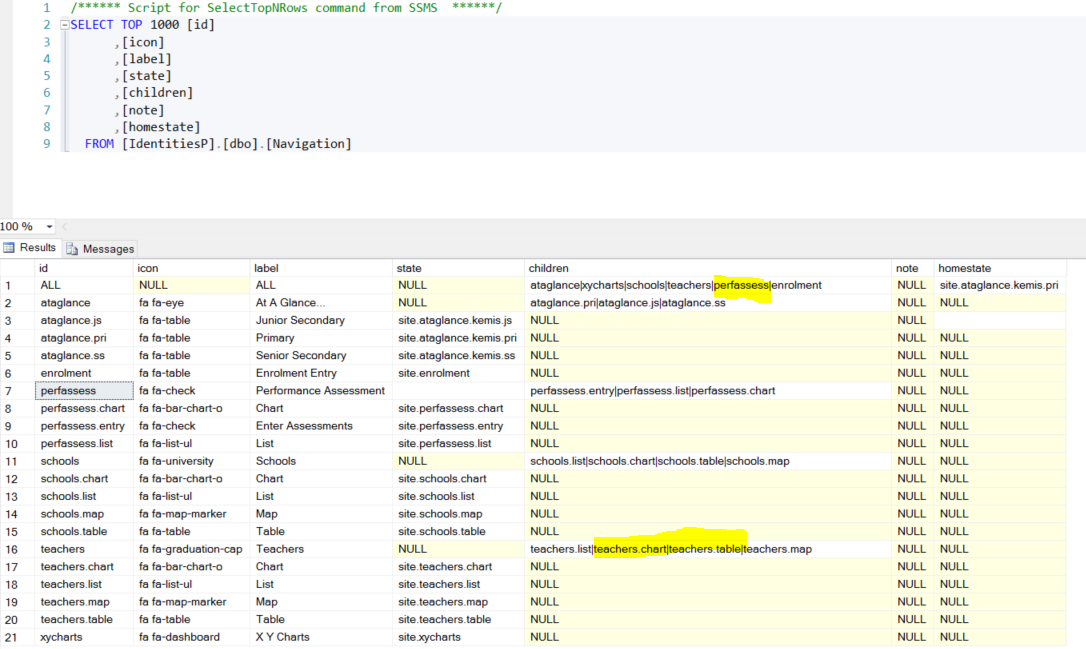
So for example, you can remove perf assessments by removing it from the children of ALL. I would expect the structure of this to be different from site to site. The leaf nodes define the icon text, and ui-router state associated to the task. For users defined using ASP.NET identity logins, the menu they are given is defined by the MenuKey on AspNetUsers. If you log in using a domain login, you currently get menu key ALL, as previously mentioned, the missing piece here is some mapping between domain groups and user profile to determine the menu key, Roles and filters.
You can also edit this table like you would edit other lookups directly from within the user interface as shown below.
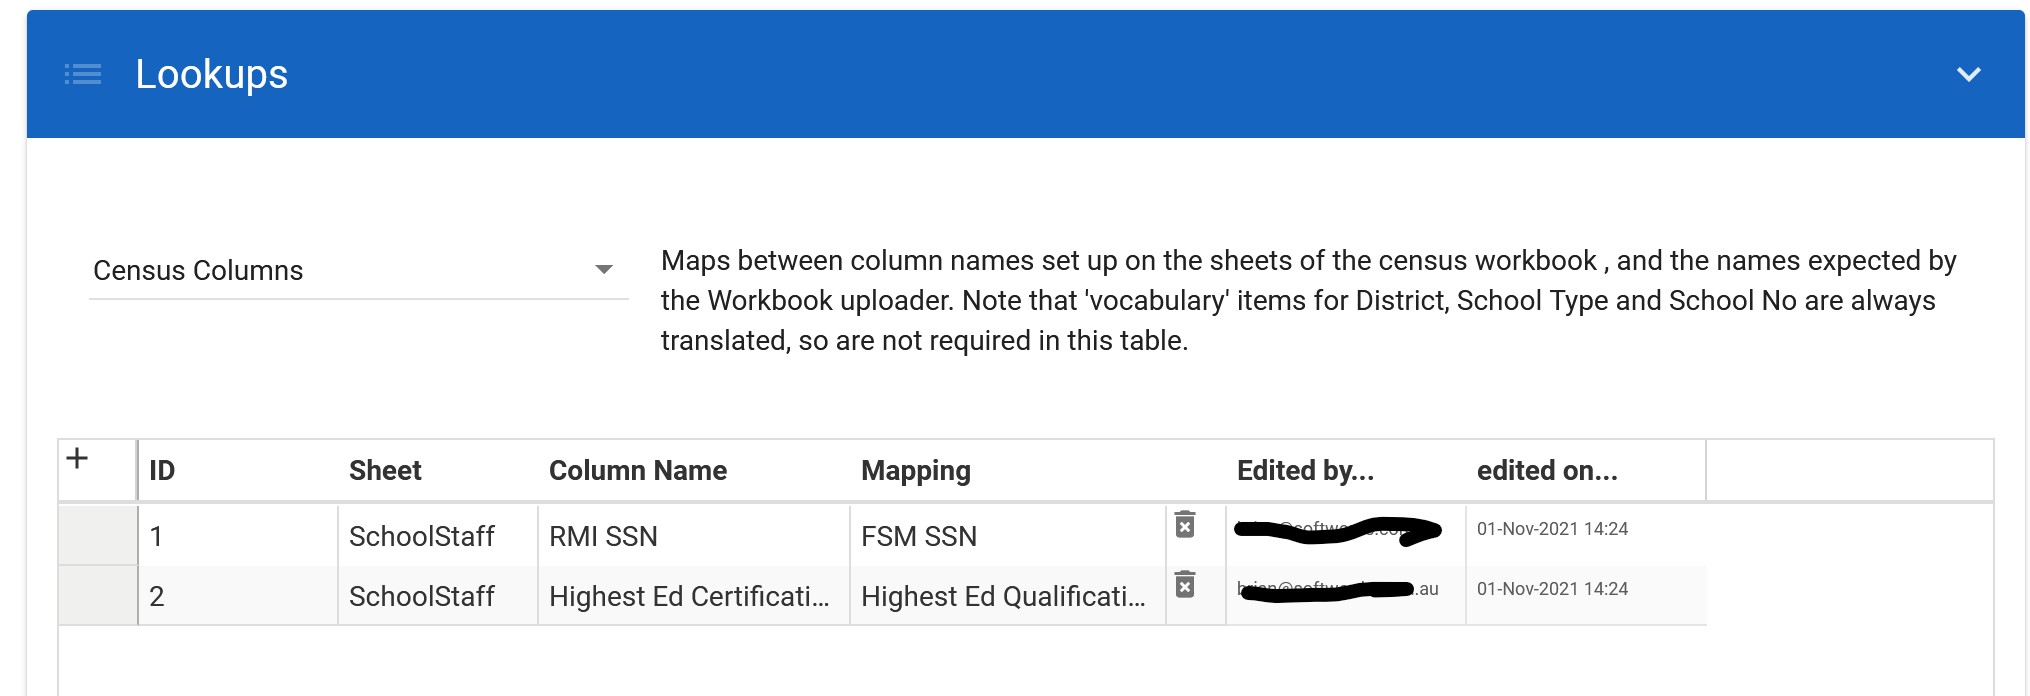
Column Mapping for Census
To localize the census the columns mapping can be used. The column is the heading of the column as in the workbook, and the mapping is the name used internally.
Turn off automatic estimate of enrollments for active schools with no data
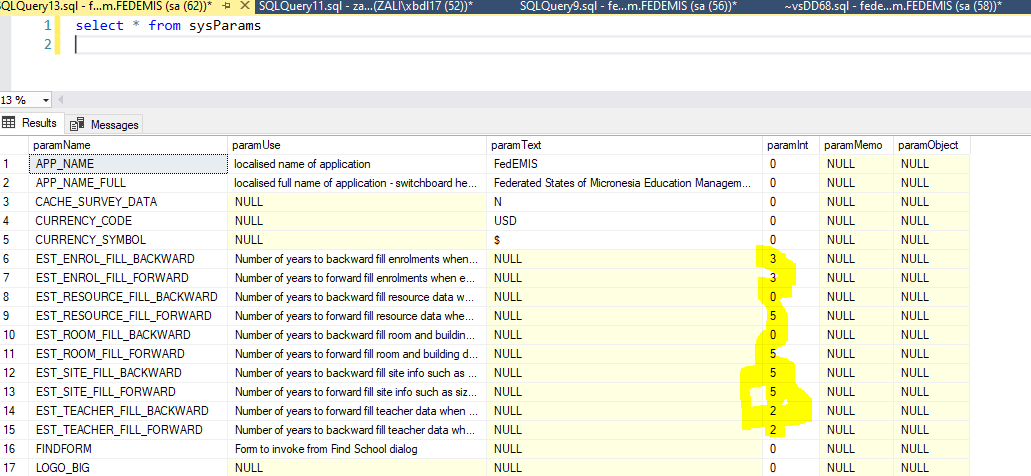
Set all these to 0, there will be no estimates.
Upgrade
Currently upgades are done using Dropbox by a developer with write access to the dropbox share. Essentially, a dropbox account runs on the developer's machine and also on the production machine running the EMIS.
Cutting a Release
No official releases are currently being cut. The way upgrades work currently is a developer brings his local develop branch up-to-date with origin/develop branch which contains the most up-to-date application. Note that this process will eventually improve.
Sync Latest to Dropbox
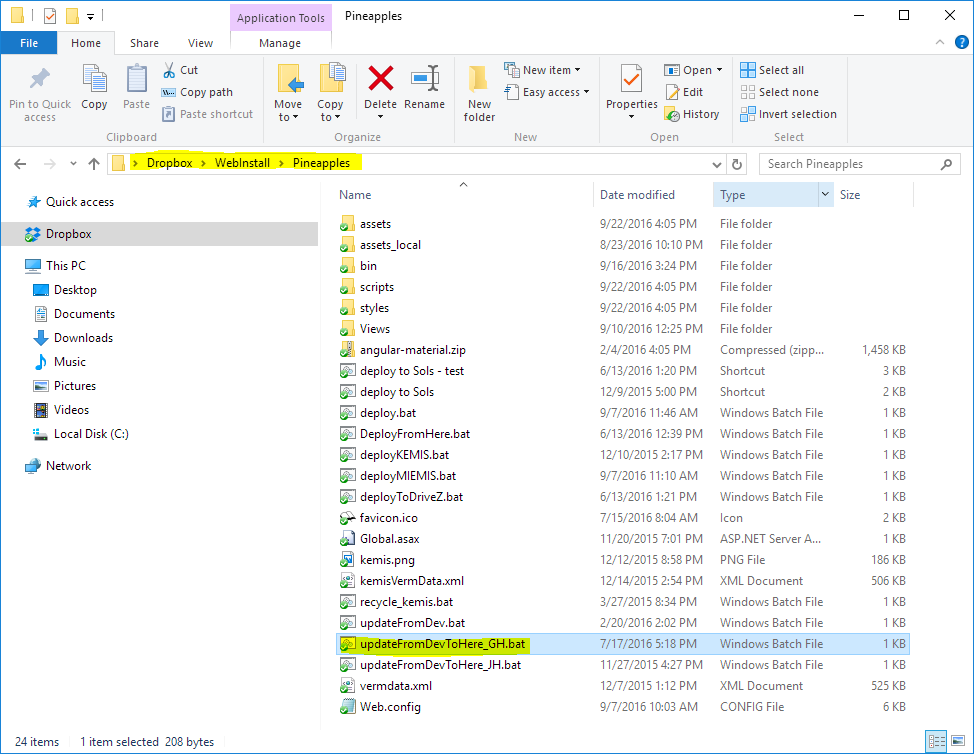
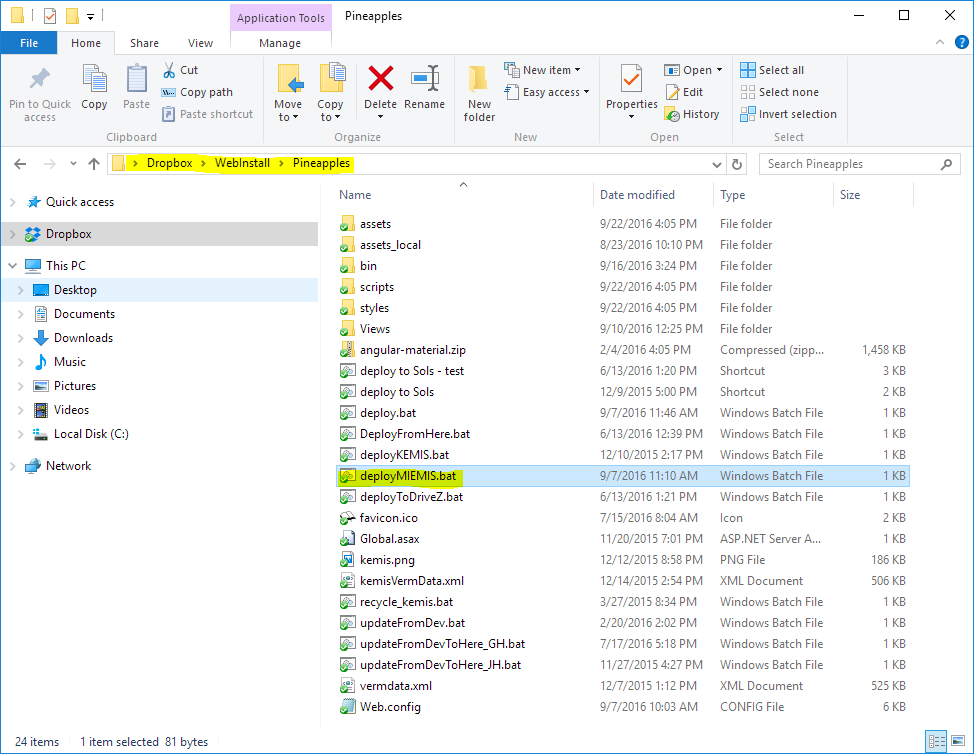
Once the local develop branch is up-to-date. Open the dropbox share which should look like the following image. The script updateFromDev.bat simply copy only the necessary files for deployment into production into the same folder. The extra ones such as the highlighted one updateFromDevToHere_GH.bat is simply a convenience to the developer which likely has a different location for his/her repository. Double clicking that script will sync the local develop branch to the dropbox fairly quickly.
Wait until the dropbox sync is complete
Sync Latest to Production
Login the production server using remote desktop or equivalent. Open the drop box folder as it is shown in the following image. If you have a good Internet connection by the time you get to the production dropbox might have completed the sync, otherwise wait until it is synced also locally on the production server. Then double click on the deployMIEMIS.bat which is a convenient wrapper script to call the deploy script with configuration specific to MIEMIS in Marshall Islands.
Database Schema Change
Most upgrade will not require an upgrade to the DB schema but occasionally some will. In those case it is best to use SQLDelta to look through each change and carefully apply them.
Configuration Change
Most upgrade will not require an upgrade to the configuration in web.config but occasionally some will. When the dependencies are upgraded and specified in the web.config file it will also need to be updated on the server.
Backup and Disaster Recovery
There are two main methods of backups that are typically used with the Pacific EMIS deployments:
- Platform backups which backs up the whole operating system (virtual machine backup/snapshots), its configuration, the data and everything in needed for a single click recovery.
- Data backups which only backs up the following:
- Database using scheduled MS SQL Servers database backups (usually in
C:\Program Files\Microsoft SQL Server\MSSQL15.SQLEXPRESS\MSSQL\Backup) - JasperServer automated exports (can be anywhere but a convenient location is in
C:\Jaspersoft\jasperreports-server-cp-8.0.0\buildomatic) - JasperServer encrypted files (usually
C:\Users\Administrator\.jrsksandC:\Users\Administrator\.jrsksp) - Everything in
C:\inetpub\wwwroot\miemis(the actual EMIS web app) - The files/folders containing some media (e.g. photos, documents, etc.) loaded by users from the EMIS online app (usually goes in something like
C:\files) - Other stuff can be put in (
C:\EMIS)
The exact folders and files above depend on the configuration of the system and should be verified.
Platform Backup (Virtual Machine Backup)
Nightly backup of the whole production server can be done using the virtualization backup feature. How this is done depends on the virtualization platform. It may even be done for you if the EMIS is managed hosted or you may have to do it yourself if you self host your virtual machine.
Data Backup (Cloud)
The easiest backup strategy is to sync to the cloud (Google Drive) all the important files. It's not the best backup solution but it is simple and works. The folders getting sync'ed could be all those listed above. A dedicated systems account with Google/Dropbox/Onedrive/etc can do this easily.
Data Backup (BackupPC)
One problem with cloud sync as a backup has that it would sync any corrupted or hacked data to the cloud without the ability to go back in time. For this a better data backup strategy is needed. One used by one of the Pacific EMIS expert is using the free and open source BackupPC on a Linux server.
BackupPC Server
BackupPC is a highly reliable and efficient backup server but it requires a fair bit of Linux systems administration skills to deploy. How to set this up is outside the scope of this guide. Veeam is a high quality backup solution requiring less advanced Linux skills but will have licensing costs.
BackupPC Client
The BackupPC Client setup differs whether you are backing up a Windows, Linux or macOS computer. Here brief notes on setting up a windows server (or PC) to be backed up are included since the Pacific EMIS generally runs on Windows. The notes are based on this guide but simplified for an experienced system administrator.
- First create a backuppc user account and add it to the Administrators and Backup Operators groups. Set it so the password never expires. Make sure every Windows user has a password set.
- Still as an administrator install Cygwin. Use default options and then finally install the following tools: nano, vim, wget, openssh, rsync, shutdown
- Logout and login with new backuppc user
- Open the Cygwin Bash Shell from the desktop icon (right click as administrator)
- Create ssh-keys with command
ssh-host-config(mostly defaults are fine though some linux SSH experience is valuable here) - Do any edits to the
/etc/sshd_configif you need (like changing SSH listen port) - Start the SSH service with command
net start cygsshd - Configure the backuppc user encryption keys with the command
ssh-user-config - Test ssh access with
ssh backuppc@localhostandssh backuppc@hostname - Create a symlink to easily access the files on the C: drive with command
ln -s /cygdrive/c/ /c
Back on the BackupPC server login as backuppc user and test SSH access.
$ ssh -p 22 backuppc@windowsclient
If this logs in copy the SSH key for secure password-less authentication.
$ ssh-copy-id -p 22 backuppc@windowsclient
Schedule Important Tasks
Backing up the data would not be entirely complete without scheduling a few important tasks.
Automate daily SQL database exports
There are two ways to achieve this:
- The expensive paid version of Microsoft SQL Server can easily produce nightly backup plans from the UI.
- The free version of Microsoft SQL Server Express does not support this feature. However, it is not difficult to produce a script to do the backup and execute the script using the Windows Task Scheduler. This is the method used in most deployment of Pacific EMIS using a custom script on the server.
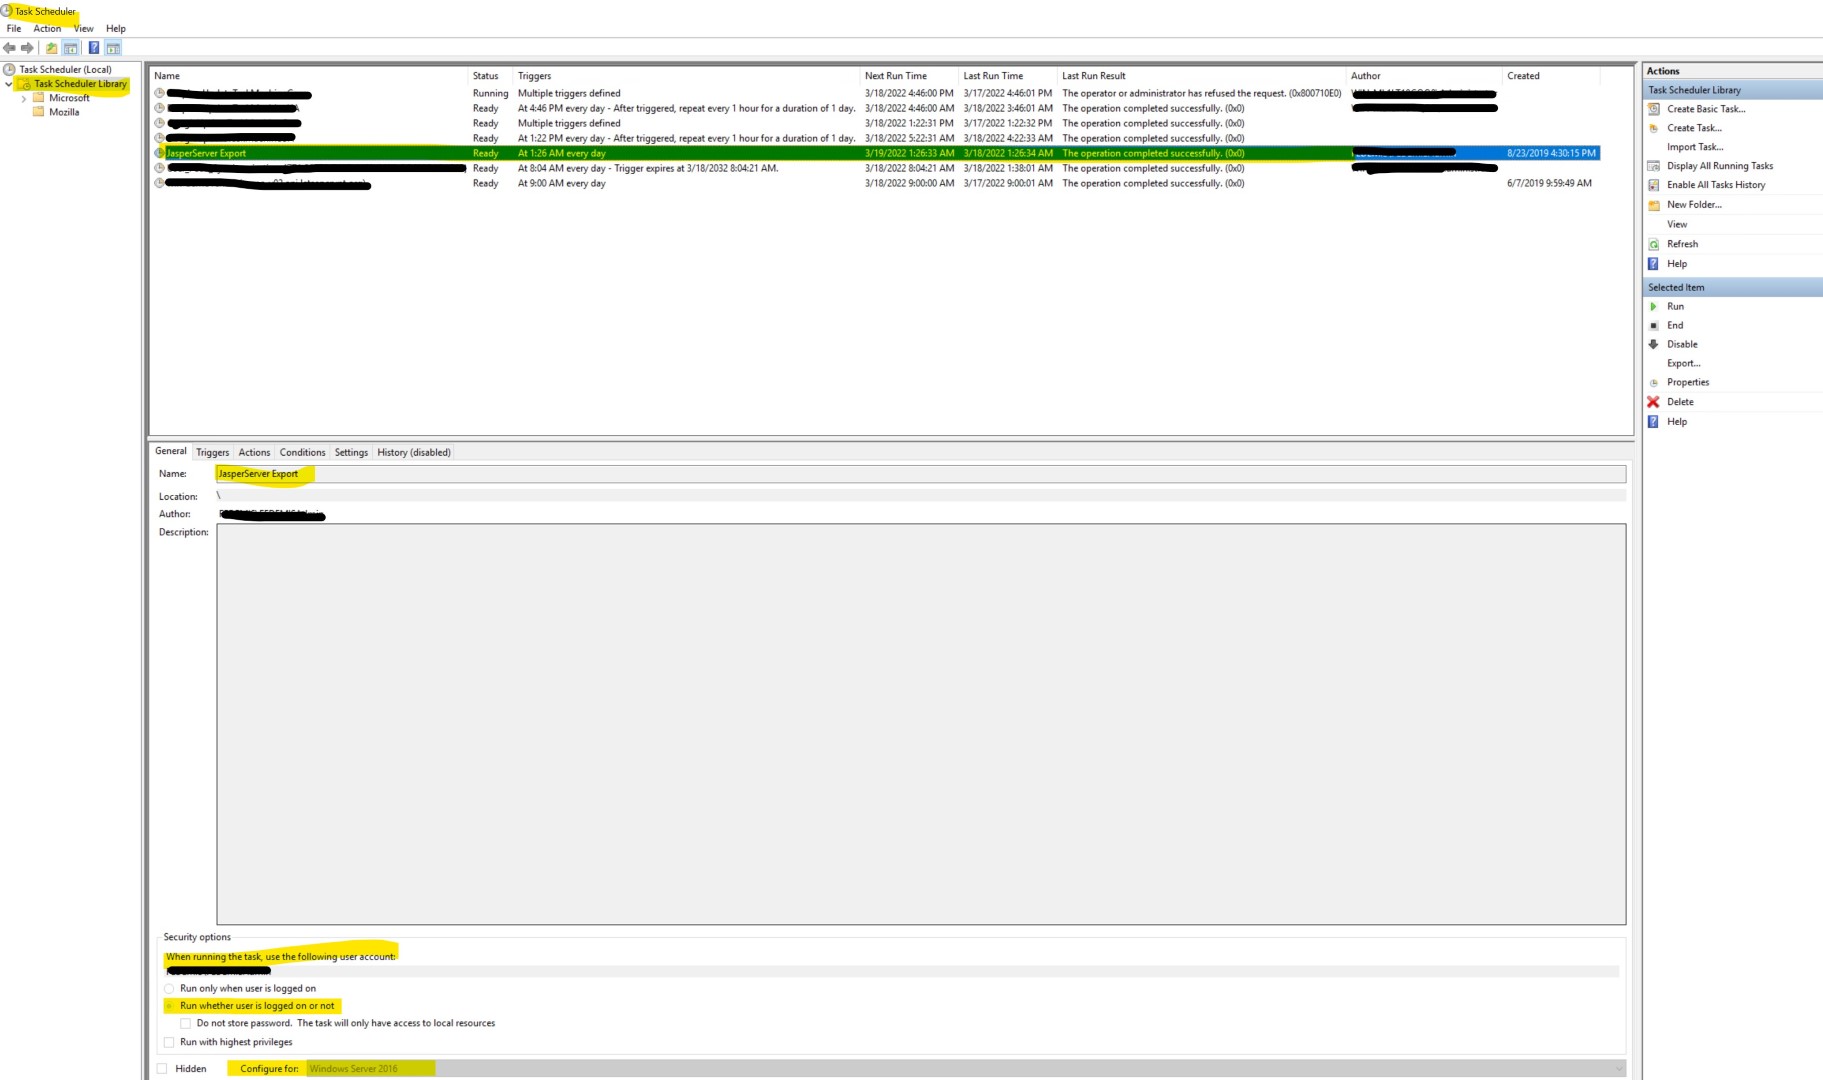
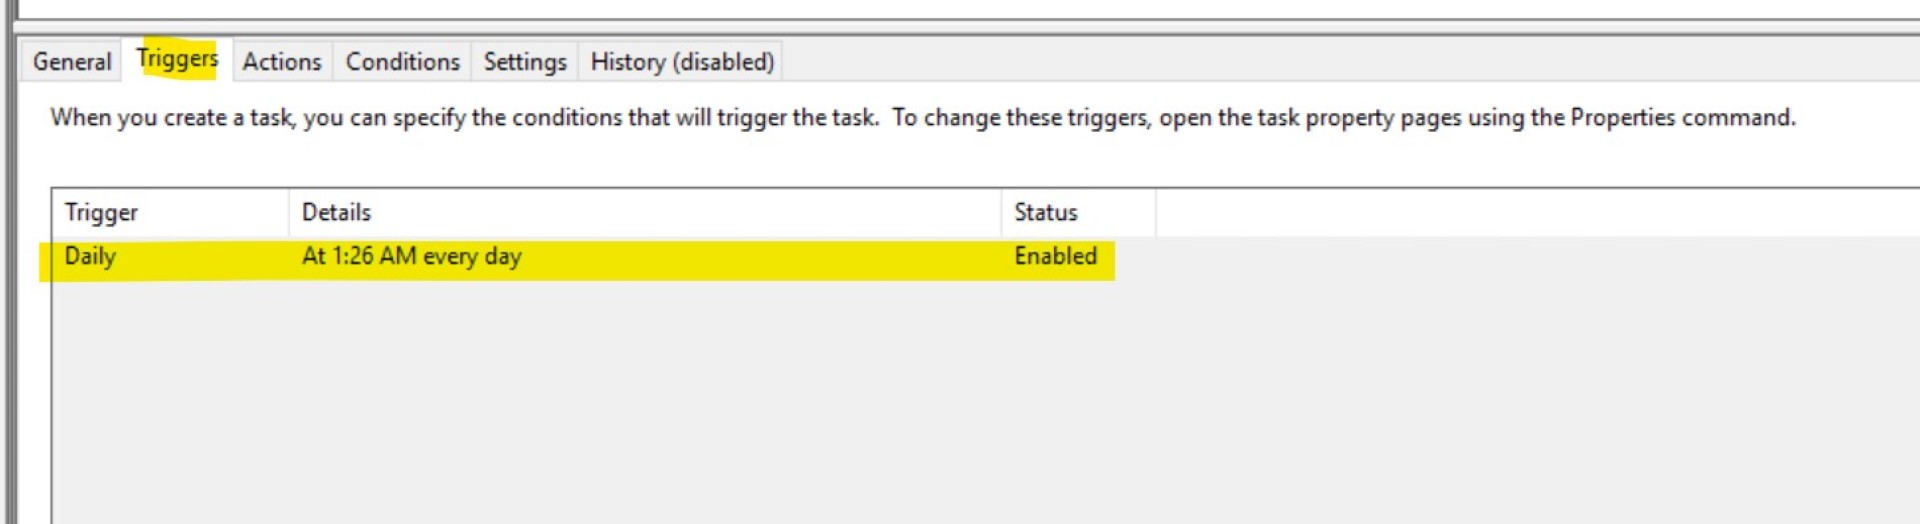
Automate daily JasperReports exports
Create a scheduled task to export the JasperServer data. This is useful to upgrade JasperServer and also to quickly recover from a (reports) data loss or crash of the server. Steps are summarized below.

On-Going Maintenance Tasks
This section contains a list of maintenance tasks to do to ensure the best possible operation of the system.
Yearly quick sanity checks
Every year there is new work happening and new data coming in. It is important to do a list of sanity checks that while not perfect provides a quick way to make sure nothing has drastically changed and been somehow affected by recent work and bad data. Such a list will be documented here.
Compare student enrollments from census data source with online dashboard
The simplest comparison is just producing a pivot table report in the source excel workbook and comparing it with the relevant dashboard summary analysis with the online web app. This could look like something below.
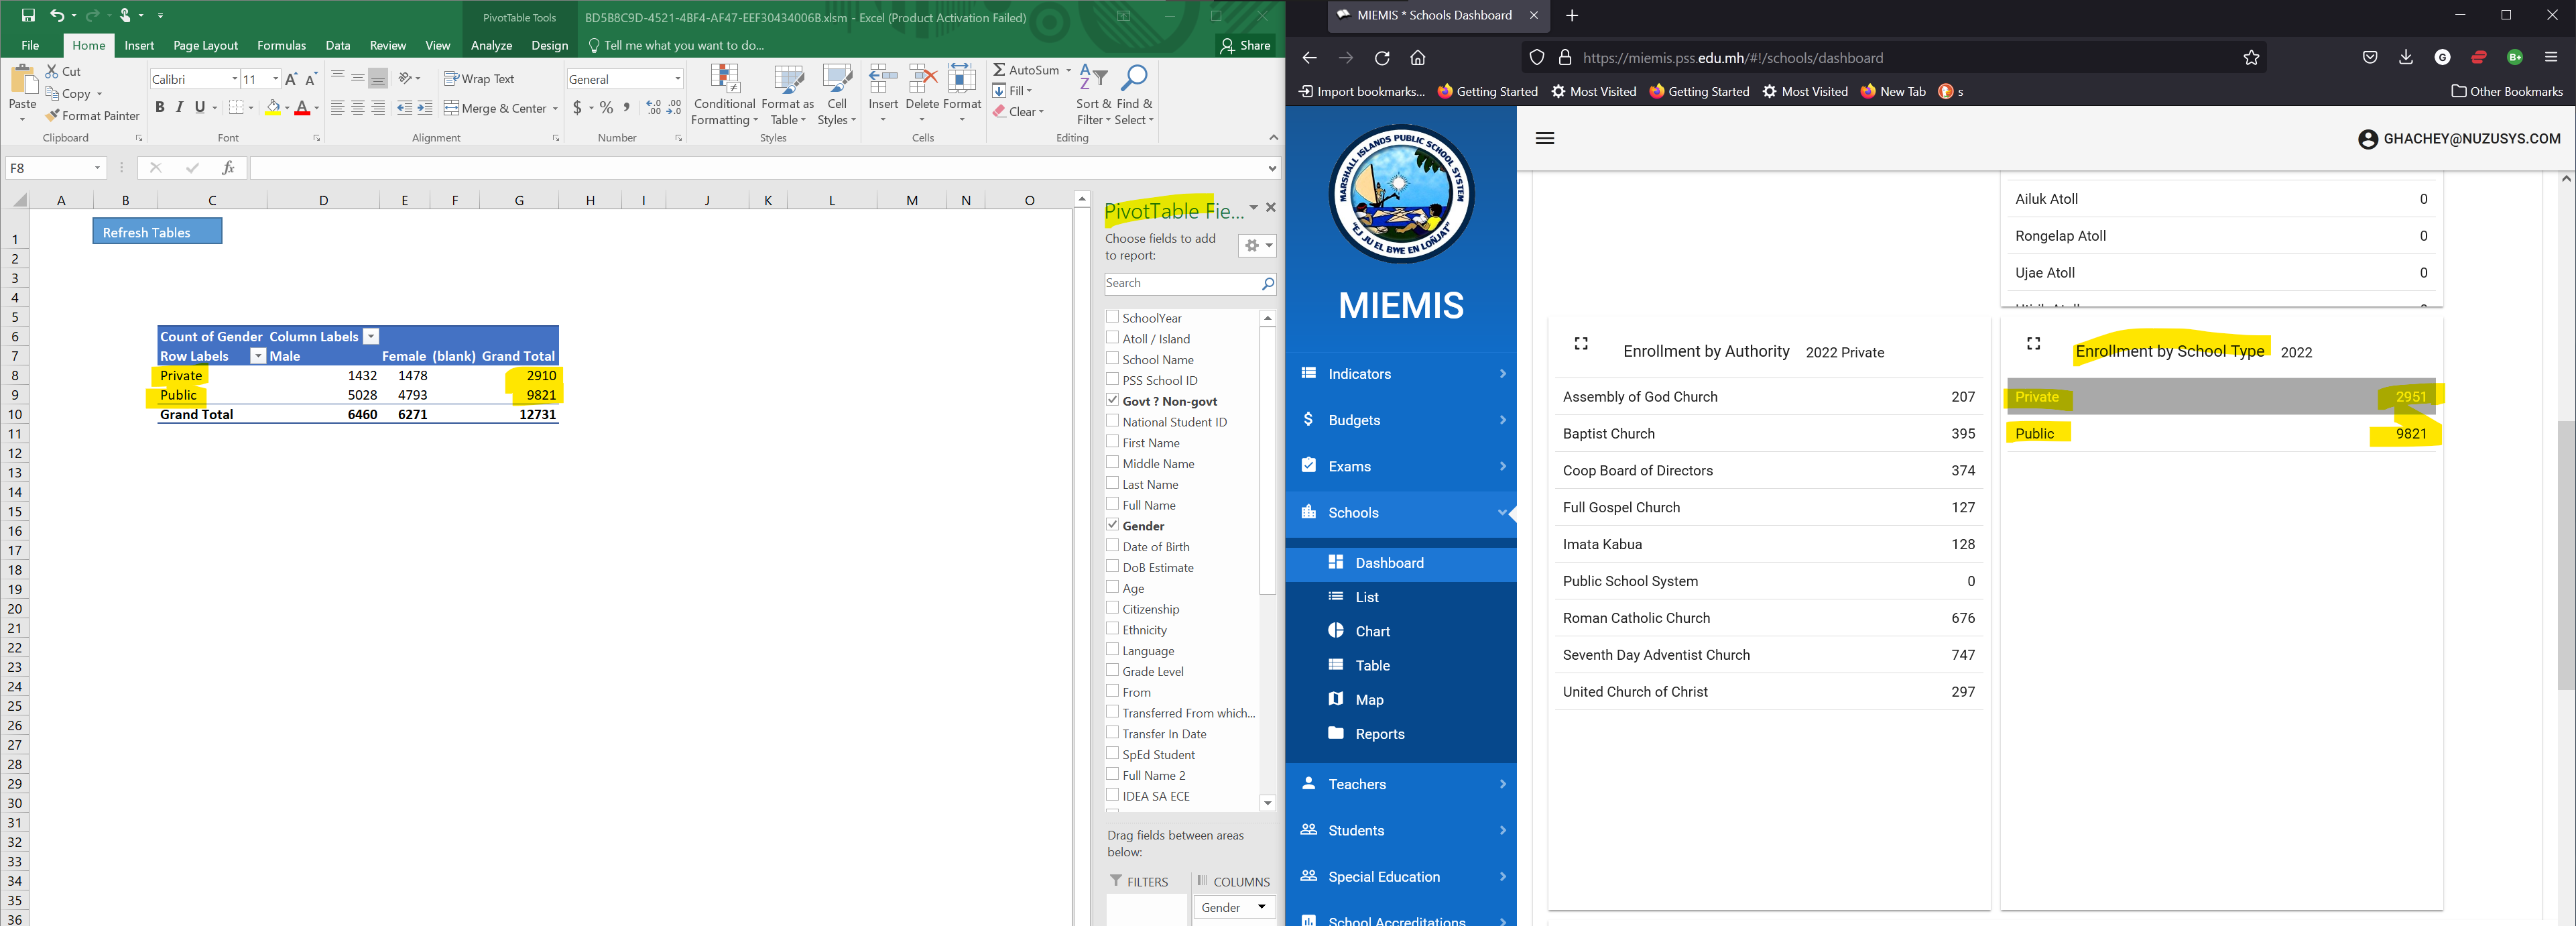
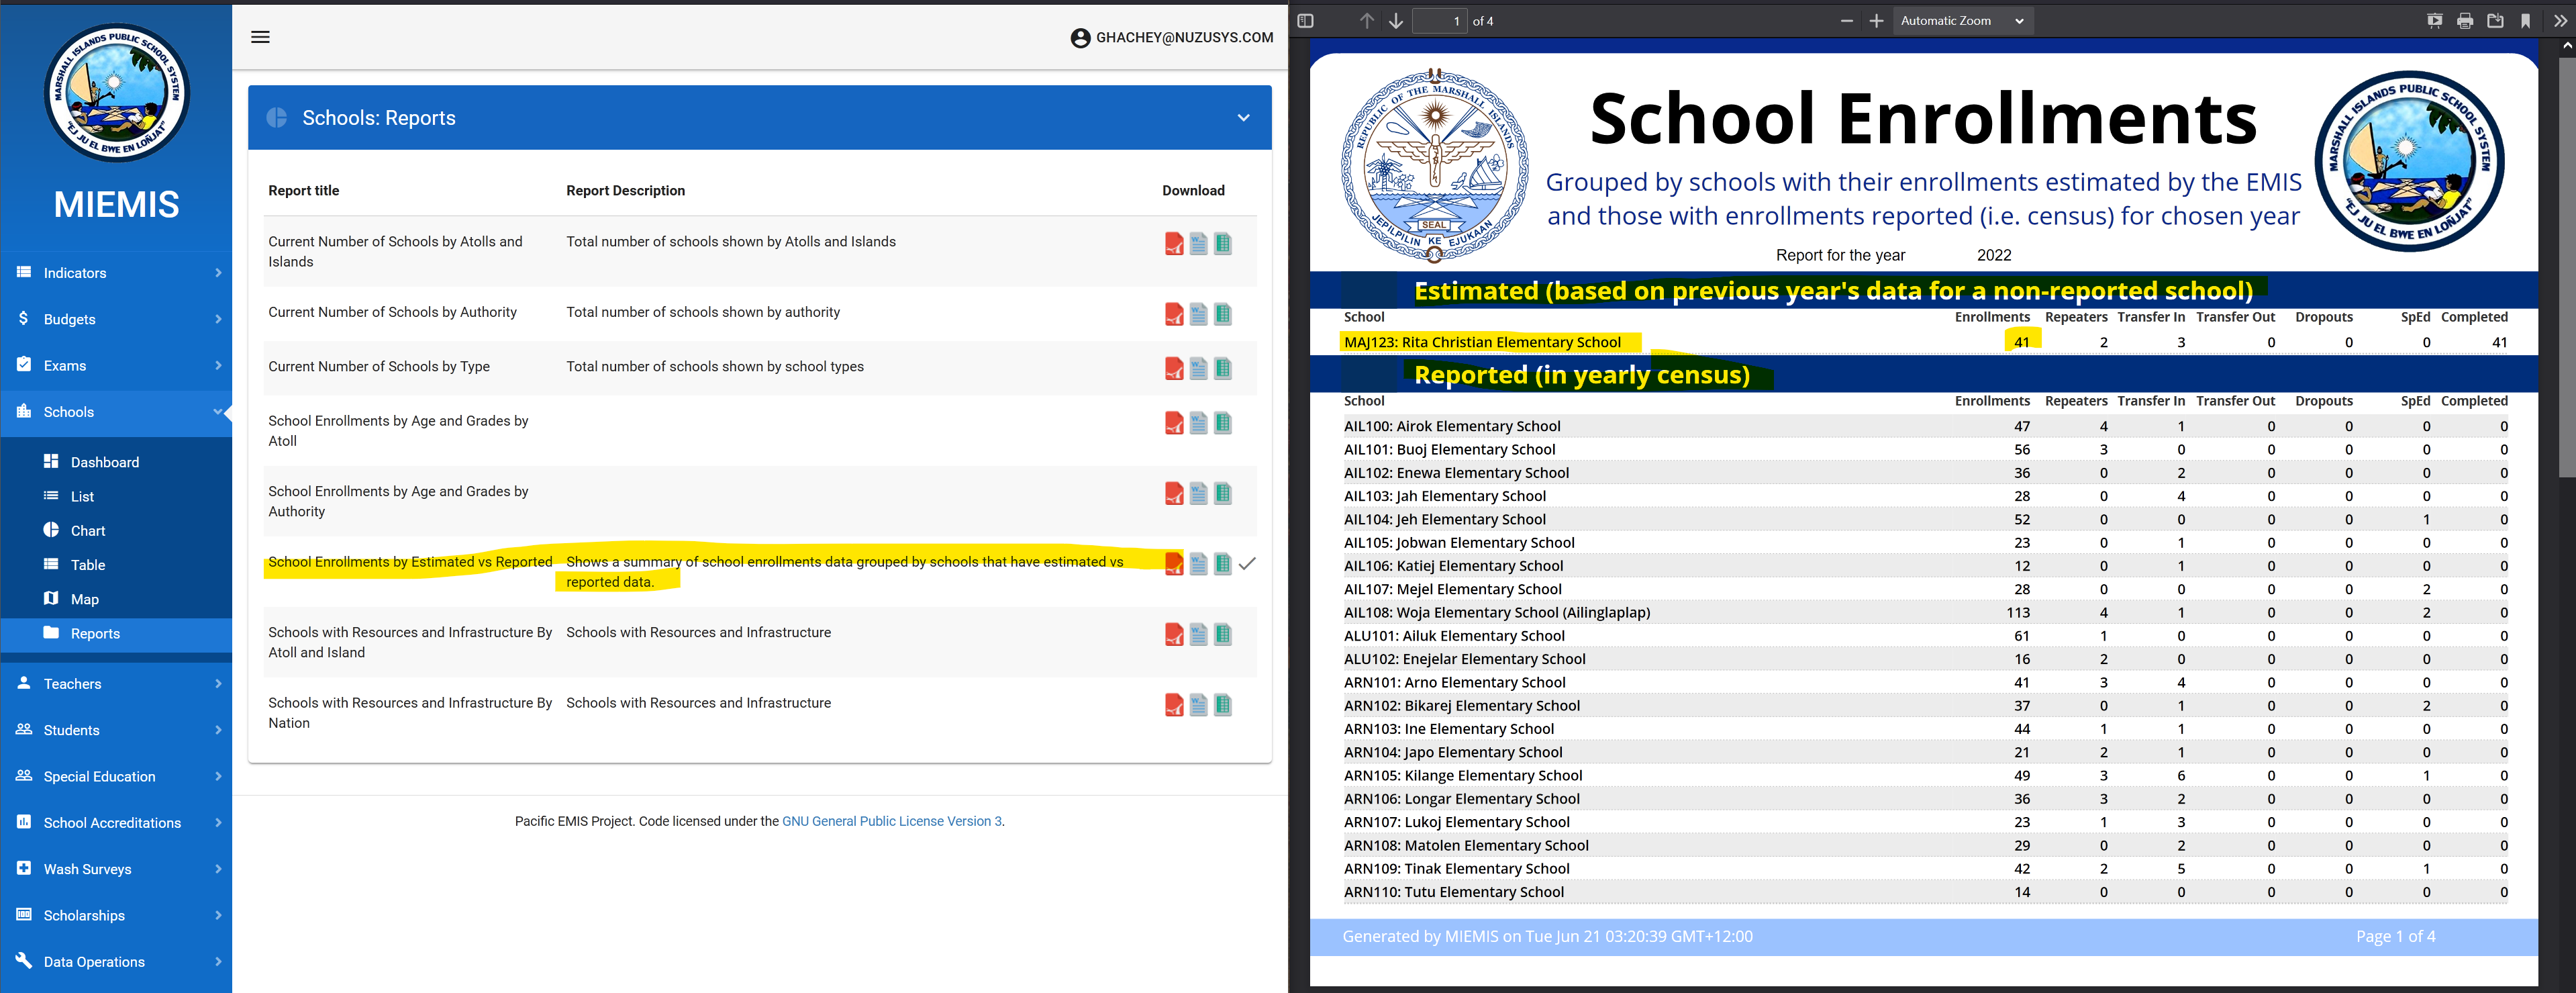
In this case there is a suspicious difference in Private enrollments: 2910 from the source vs. 2951. The first place to check with such minor difference is whether or not there is a missing school in the roster for which the EMIS provided an estimate number of enrollments. For this, we can generated the following report and quickly see that the additional 41 enrollments come from a school with estimated data based on previous years.
Compare teachers from census data source with online dashboard
This will depend on the source of data (e.g. a excel workbook roster or PDF surveys). When documenting this with screenshots refer to Weison's email with subject “Upated files” dated “7/21/2021, 10:51 PM”
First, do a quick comparison to see you have the total count of teachers as expected. The is a small difference in the number of private teachers. These small differences are usually a missing school in the census that the EMIS expects data for and therefore might provide some estimated values.
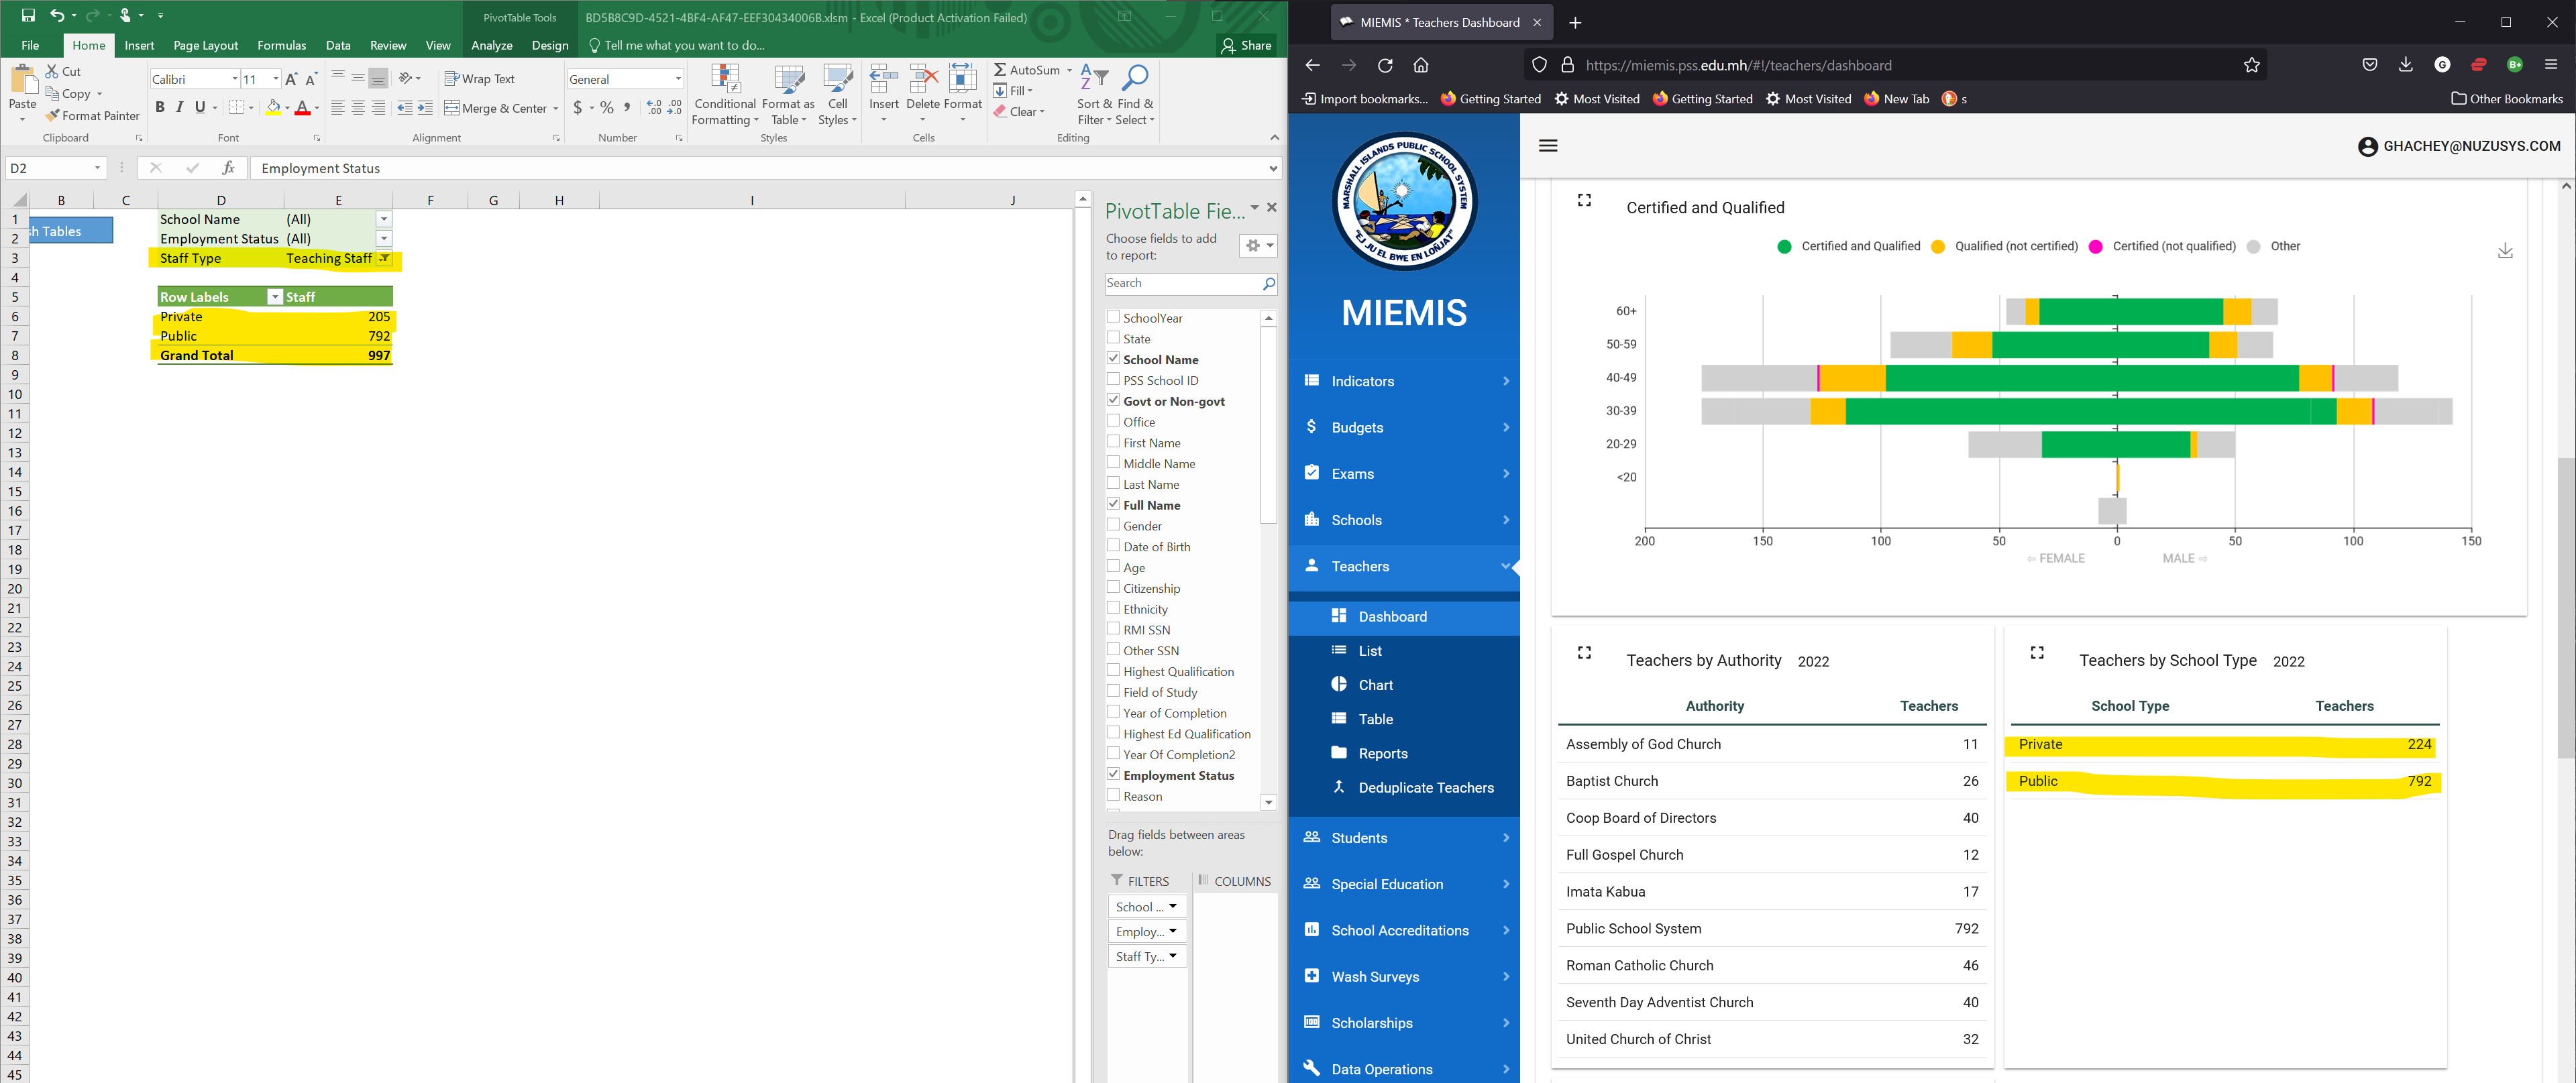
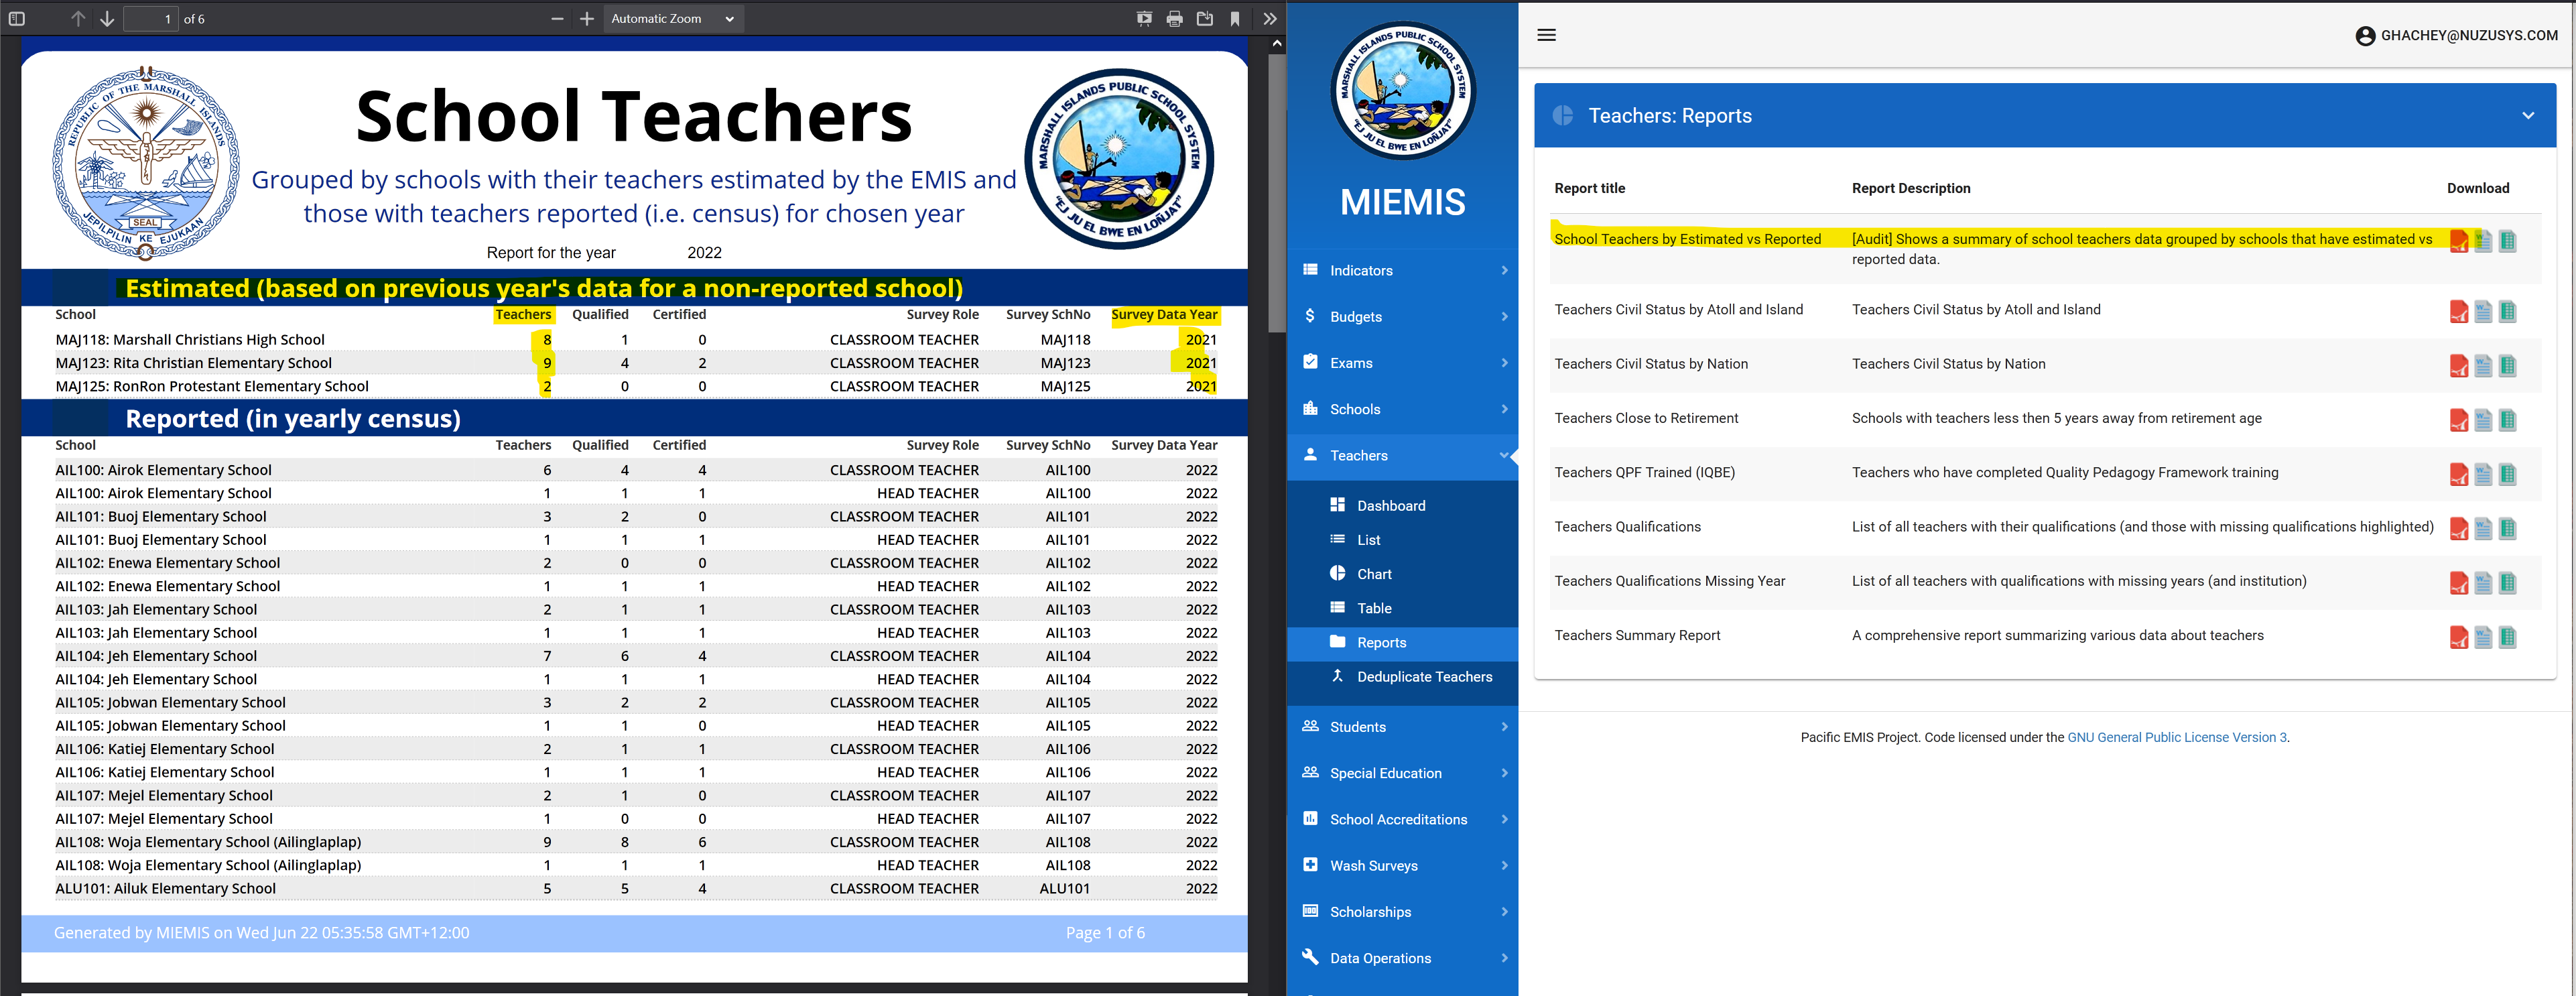
This may or may not be what you want. To understand further you can generate the following report to see for which schools those estimated teachers are coming up. You may or may not want those additional teacher but now you can understand why the workbook reports 997 teachers while the EMIS dashboard reports 1016. There are 19 additional teachers estimated from three additional schools not reported.
Cleanup the Pacific EMIS Cloud Storage
For offsite integration of the Pacific EMIS Education Survey Tool tablet app and the Pacific EMIS web database a cloud storage is used as transient location for syncing of “cloudfiles” (the data/photos of the surveys on the tablet). This should be cleaned up once a year to make sure the storage does not get cluttered and full. This should take place at the end of the fiscal year after all activities are complete (i.e. all school accreditation have been approved and made final). At this point the following maintenance tasks can be undertaken:
- Delete the “merged” files of all the approved school accreditation surveys (or whatever other survey) directly in Pacific EMIS online (this should also delete on the tablet but a tablet reset is also recommended every year)
- Delete the “in progress” files of all the approved school accreditation surveys (or whatever other survey) directly in Pacific EMIS online (this should also delete on the tablet but a tablet reset is also recommended every year)
- Delete any “Ready” files that is never to be approved (a duplicate, an invalid, etc.)
- Purge all photos of the school accreditation (or any other survey) that were approved as the photos now are saved in local Pacific EMIS server storage. This can be done by an sysadmin logged into Pacific EMIS and visit the link https://emis.pacific-emis.org/api/cloudfiles/purge?limit=100. The link should be executed and want until it complete and returns a replies. You can change the limit of photos to purge and can execute as many times as required until nothing left to purge.
Reporting Issues
All issues are currently reported to Bitbucket Issues
Release History
The best way to see the release history is looking at the commits.