Table of Contents
Annual School Census Workbook User Manual
Work in progress. Currently what is needed is the rollover for the SY2017-18 to the SY2018-19 so this is what is documented here. The remaining of the document will be done within this month of September 2018.
Overview
The Annual School Census Workbook is an advanced excel workbook designed to collect data on an bi-annual basis. The use of excel is used to address the challenge of schools and organizations with little to no Internet connections in the Pacific while building on a tool that many people already know: Excel.
At the start and end of each school year, data is entered into the annual school census workbook which can then be uploaded into the Pacific EMIS database. This data is then available in a consistent data warehouse for all stakeholders to access through the web app, android app, website, hard copy reports, etc.
The workbook main objective is to improve the quality of data collected in a challenging environment where many do not have reliable Internet connection while building on tools that people know. It is designed to be updated by managing authorities twice a year (a) in September/October as an enrolment update and (b) in June/July as both for the outcomes of the year (graduations, drop outs, transfers etc).
Aims of this document
This is not a step-by-step how to document. Most Data and IT staff are comfortable working in excel, understand the schools data model and make rapid transition across to the workbook. This document therefore will aim to explain the key differences and tools.
Main features of the workbook
The workbook main objective is to improve the quality of data collected while still collecting granular student data in an challenging Pacific environment where many locations and schools still have no Internet connectivity.
- Remote/Offline Data Entry by design: it can be updated by schools remotely and sent to a central data office, or the central data office can help fill up this data by communicating with schools. It aims at collecting students & enrollments, staff and their latest qualifications, schools and their resources and WASH data. It is updated and sent twice a year: in September/October as official enrollment for the year and in June/July the same data is simply updated with the outcomes of the year (i.e. graduations, drop outs, transfers, etc.)
- Quality Control: The workbook also aims at improving data by providing some basic data validation and other quality control mechanism.
- Rollover: a facility to rollover enrollment data into a new year, setting up enrolments based on each individual student’s outcomes from the previous year greatly increasing speed and ease of data submission in challenging environments.
- Merge: a facility to merge workbooks to import one or more secondary workbooks. This merge feature can be used in a number of ways including merging whole workbook data into a newer master workbook that contains new features and bug fixes, merged individually completed workbook part (e.g. a single schools workbook) into a large workbook (e.g. a district or national workbooks)
Workbook Content
| Worksheet Name | Description/purpose | Default Mode |
|---|---|---|
| Schools | This is where you enter school data for each school in your state. You can’t create a new schools here, they must already exist in the EMIS | Visible |
| Students | This is where you enter student data | Visible |
| Student Summary | A pivot table that allows you to analyse the data in the Students worksheet | Visible |
| Staff | This is where you enter all staff (teaching and non-teaching staff for each school.) | Visible |
| Staff Summary | A pivot table that allows you to analyse the data in the School Staff worksheet. | Visible |
| WASH | Unicef Water and Sanitation/hygiene. This is the minimal data requested by UNICEF. | Visible |
| WASH Summary | A pivot table that allows you to analyse data in the WASH worksheet. | Visible |
| SchoolsList | These lists holds the complete list of schools taken from the EMIS | Visible |
| SchoolByState | A pivot table that allows you to analyse the data in the SchoolsList worksheet. | Visible |
| Merge | Use this worksheet when you want to merge from another workbook into this workbook. | Hidden |
| Rollover | Use this worksheet when you want to rollover (create a new year) from an earlier workbook. | Hidden |
| Settings | This is where you set the State, School Year and Census date. | Hidden |
| Lists | All the validation lists are kept here. You may need to make temporary changes to this list from time to time, but discuss this with NDOE. | Hidden |
Hidden vs Visible Sheets
Some sheet will be hidden by default as they should only be used by people with more experience with Excel and this workbook in particular. If you need to access one of the hidden worksheets go the Home menu then Format, Hide & Unhide, Unhide Sheet and then select the Sheet you wish to unhide. OR – Right click on any worksheet tab and select Unhide, then select the sheet to show. To Hide a sheet, right click on the tab for the worksheet and click Hide.
Protected Sheets
The worksheets are all protected by default which prevents the user from accidentally modifying (corrupting) formulas and other data quality mechanisms. However, this protection also prevents some desirable operations like MS Excel’s autofill tool (dragging a value to copy it to a range of cells). You may need to do this if, for example, you are entering new ECE enrolments and need to drag/copy a value such as the school name. To use autofill you will need to unprotect the worksheet. Do this by
- selecting the worksheet
- select Review from the menu and click on the unprotect worksheet button (see image below).

Workbook Version
Has the workbook constantly undergoes improvements it is important to make sure you are always using the latest and greatest version. Currently the best way to do this is to contact the people of the project you are working with. You can also check the version in the Settings sheet of the workbook as shown below.

Data Validation
The workbook helps improve data quality with some basic data validation. There are various types of validations which will be introduced below.
Non-Conditional Required Data
In non-conditional cases, certain cells always require a value. In the example below there are three crucial pieces of data missing: a Student ID, a Student First Name and a Student Last Name. The spreadsheet will highlight cells (by turning them red) if they are missing required data.

Conditional Required Data
In conditional cases, cells only require a value depending on the value in a different cell. In the example below the Reason column is empty in all three rows, but only the first two rows are red. This is because a reason is only required if the Employment Status is Inactive. Clicking on the red cell will display a message that explains why the cell needs to be filled in.

Dropdown List Validation
It is very important to use the dropdown list data and not copy paste or write new data when there is a dropdown list. The reason for this is to improve the quality of data by only allowing specify choices that are standardized and pulled from the EMIS and loaded for use in the workbook.
Let's use school names as an example. The EMIS holds the official list of school names, and this list is loaded to the Excel data Workbook through a database connection. This is done automatically, nothing needs to be done by users of the workbook. This helps the data manager select the proper school name. If the workbook recognizes a school name it will return the school number in the School No column automatically (and School Type as well.) In the following example the workbook recognizes Mortlocks High School and tells us that the school code is CHU156 and that he School_Type is Public.

In the example below the workbook does not recognize Nomusofo Junior High Schoo/Udot Elementary School, so it cannot tell us the School No. When you see this (on any of the worksheets) it means that you need to edit the cell and select the proper school name from the validation list attached to the cell/column.

Rollover
The rollover function allows you to anticipate enrolments for a new school year. The function is based around the Completed and Outcome columns (Outcomes view) and the ‘From’ column in the Enrolment.
Basic Rollover Logic
This is how it works.
- Students who successfully completed any Grade (Completers) are re-enrolled in the next Grade.
- Students who did not successfully complete (Non-Completers) are either of the following cases:
- Repeaters are re-enrolled in the same Grade
- Dropouts, Expelled students and international transfers are not re-enrolled.
- You then need to process any extra enrolments by adding them manually (e.g. all the new ECE and any other local or international transferred in enrolments).
Performing a Rollover in the Workbook
- Create a new, empty, clean Workbook. See How to create a ‘clean’ Workbook (for Rollover or as a temporary, Secondary Workbook for merging back into a Master.)
- Rename the new, empty, clean Workbook according to the Workbook naming convention for a Beginning of Year Workbook: i.e. for the Public School System's Mango School this could be
PSS Mango School 20170907 BOY2018_19.xlsm. - The number
20170907is the version of workbook: it is represented by the the date on which that version (functionality) was created and can also be found inside the workbook in sheet Settings. - There are two critical workbooks at this point for this particular school. See sample below as demonstration:
- Last Year Workbook
PSS Mango School 20170907 EOY2017_18.xlsm - New Year Rollover Workbook
PSS Mango School 20170907 BOY2018_19.xlsm
- Make sure MS Excel is closed and that you have no workbooks open.
- Open the New Year Rollover Workbook
PSS Mango School 20170907 BOY2018_19.xlsm(double check this carefully!) - Open the Last Year Workbook (i.e.
PSS Mango School 20170907 EOY2017_18.xlsm) - Switch to the New Year Rollover Workbook (i.e.
PSS Mango School 20170907 BOY2018_19.xlsm) - Select the Rollover Worksheet (As below)
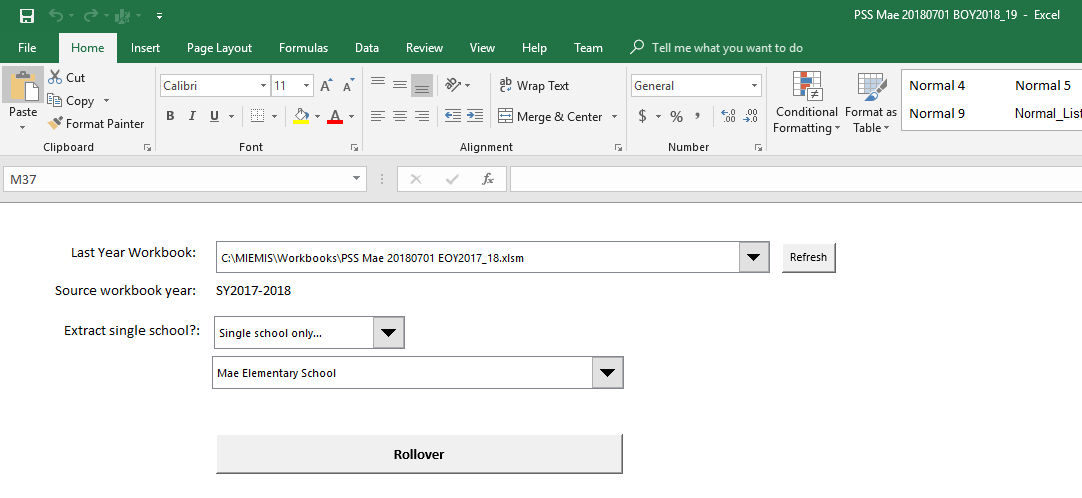
- In the combo box, select the Last Year Workbook.
- Press the Rollover button
- The Rollover is now being performed. Depending on the speed of the computer, this could take quite some time–up to half hour or even hours for very large workbooks. Most schools in the Pacific would have this done fairly quickly however.
- When finished verify the New Year Rollover Workbook (i.e. make sure that Completers are enrolled in the next Grade. For non-completers make sure that Repeaters are reenrolled at the same Grade. Check that Year 12 Completers, all dropouts and expelled students have not been re-enrolled.) Refer to the section Basic Rollover Logic
- Change from Single School Only to all schools. The school name dropdown is cleared
- Change back to single school only. Select the school. It is now the only one in the list.
- Do the rollover
Merge
Each workbook has a Merge function that allows it to import data (schools, students, school staff and WASH data) from another copy of the workbook.
The Merge feature support various scenarios including:
- Having each school complete their own school's workbook data and submit it to the national department who can then merge all school workbooks into a single Master workbook.
- Having members of the national or district departments share this data entry among them. For example, each IT staff has 20 schools to complete individually. This can then be merged into a single Master workbook.
- Upgrading all data to a newer version of the workbook. A single one to one merge from old workbook version to new one.
The Master workbook can then be verified one last time before loading into the EMIS.
Which ever scenario you use the process for Merging is almost identical and summarized below. Let's say you want to Merge a whole workbook with many schools into a new clean updated version of the workbook.
- Make sure all excel documents are first closed
- Open the old version of the workbook that contains all the data. If following correct naming convention this could look something like
Kosrae 20171019 BOY2018_19.xlsm - Open the new clean version of the workbook that contains no data. This file could be copied from the empty master copy of the new version into a file called
Kosrae 20181019 BOY2018_19.xlsmfor example. - From within the new workbook go the to Merge sheet. You should see something like the following. From there you can refresh the list of other workbooks detected, select it. You can either extract a single school or all schools. You can also extract individual sheets or all sheets. When ready click Load and wait until process is complete.

- Do a verification that all your data was transferred as expected. You're done.
Create Clean Workbook
This is typically needed for Rollover or Merge (e.g. as a temporary, Secondary Workbook for merging back into a Master.)
- Make a copy of an existing workbook.
- Open the new workbook.
- In the New Workbook, on the Schools, Students, School Staff and WASH Worksheets click the button
Delete All Rows…and press OK to delete all the rows. - Save the new cleaned up workbook
- You now have a new, empty workbook that you can use for:
- As a secondary Workbook for data entry that can be merged back into a Master Workbook
- As a new year “rollover” Workbook
- As a test/training workbook
Annual Census (Data Collection Workbook)
 aka Annual Census, Annual Survey
Data Collection Workbook Submission
Advanced
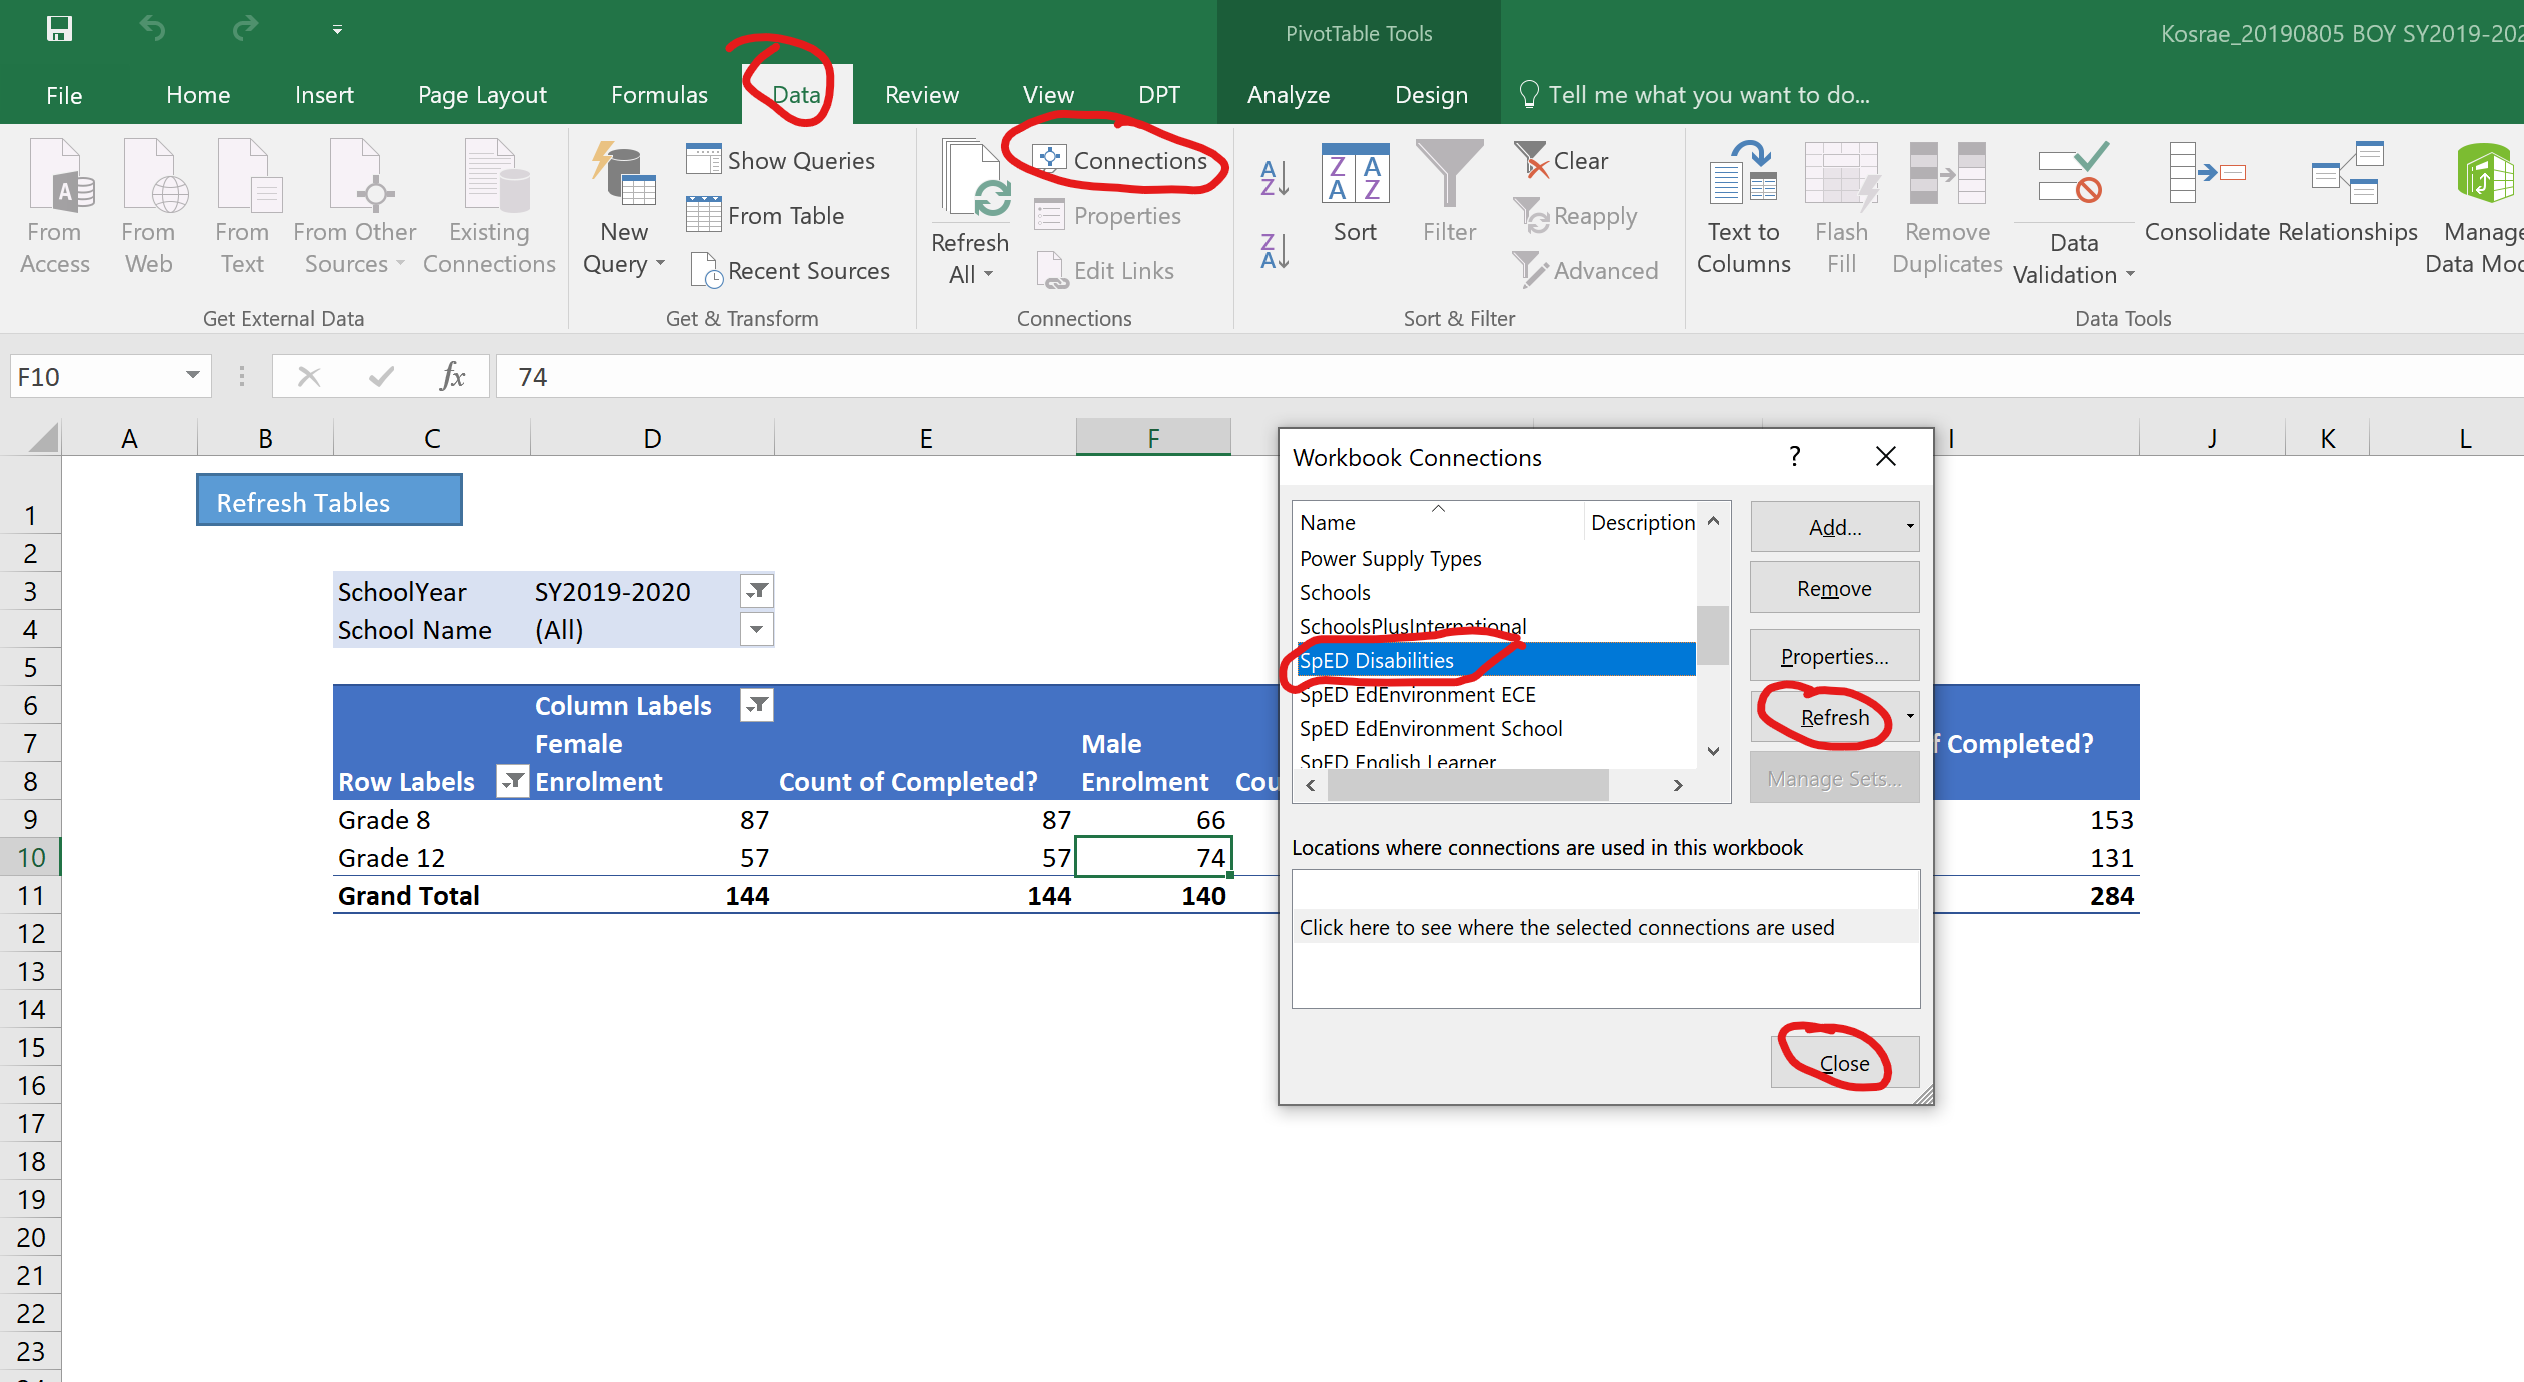
Refresh Data Connection
To improve data quality the workbook makes use of data connection to the EMIS database. It does that to retrieve the exact school name and various dropdown values. It can be useful to know how to refresh those data connection if any dropdown is updated in the EMIS for example. This is shown below.