
Table of Contents
Pacific SIS User Guide
This is the user guide for the Pacific Student Information System (Pacific SIS) used for training and as reference for people using it. The Pacific SIS is a component of the wider Pacific EMIS project.
Login
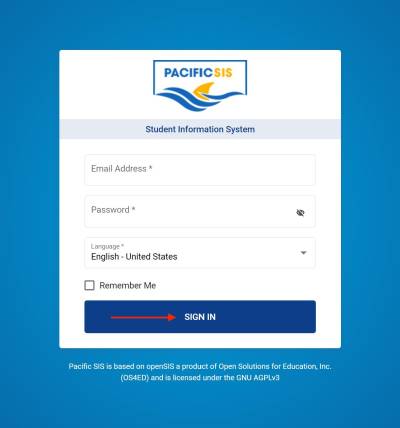
You access your Pacific SIS in production through a secure web browser. Using a modern web browser such as Firefox or Chrome point it to the address given to you. You should see something like the following. Put in your username and password and click Signin.
School Setup
This section explains how to setup or model your school.
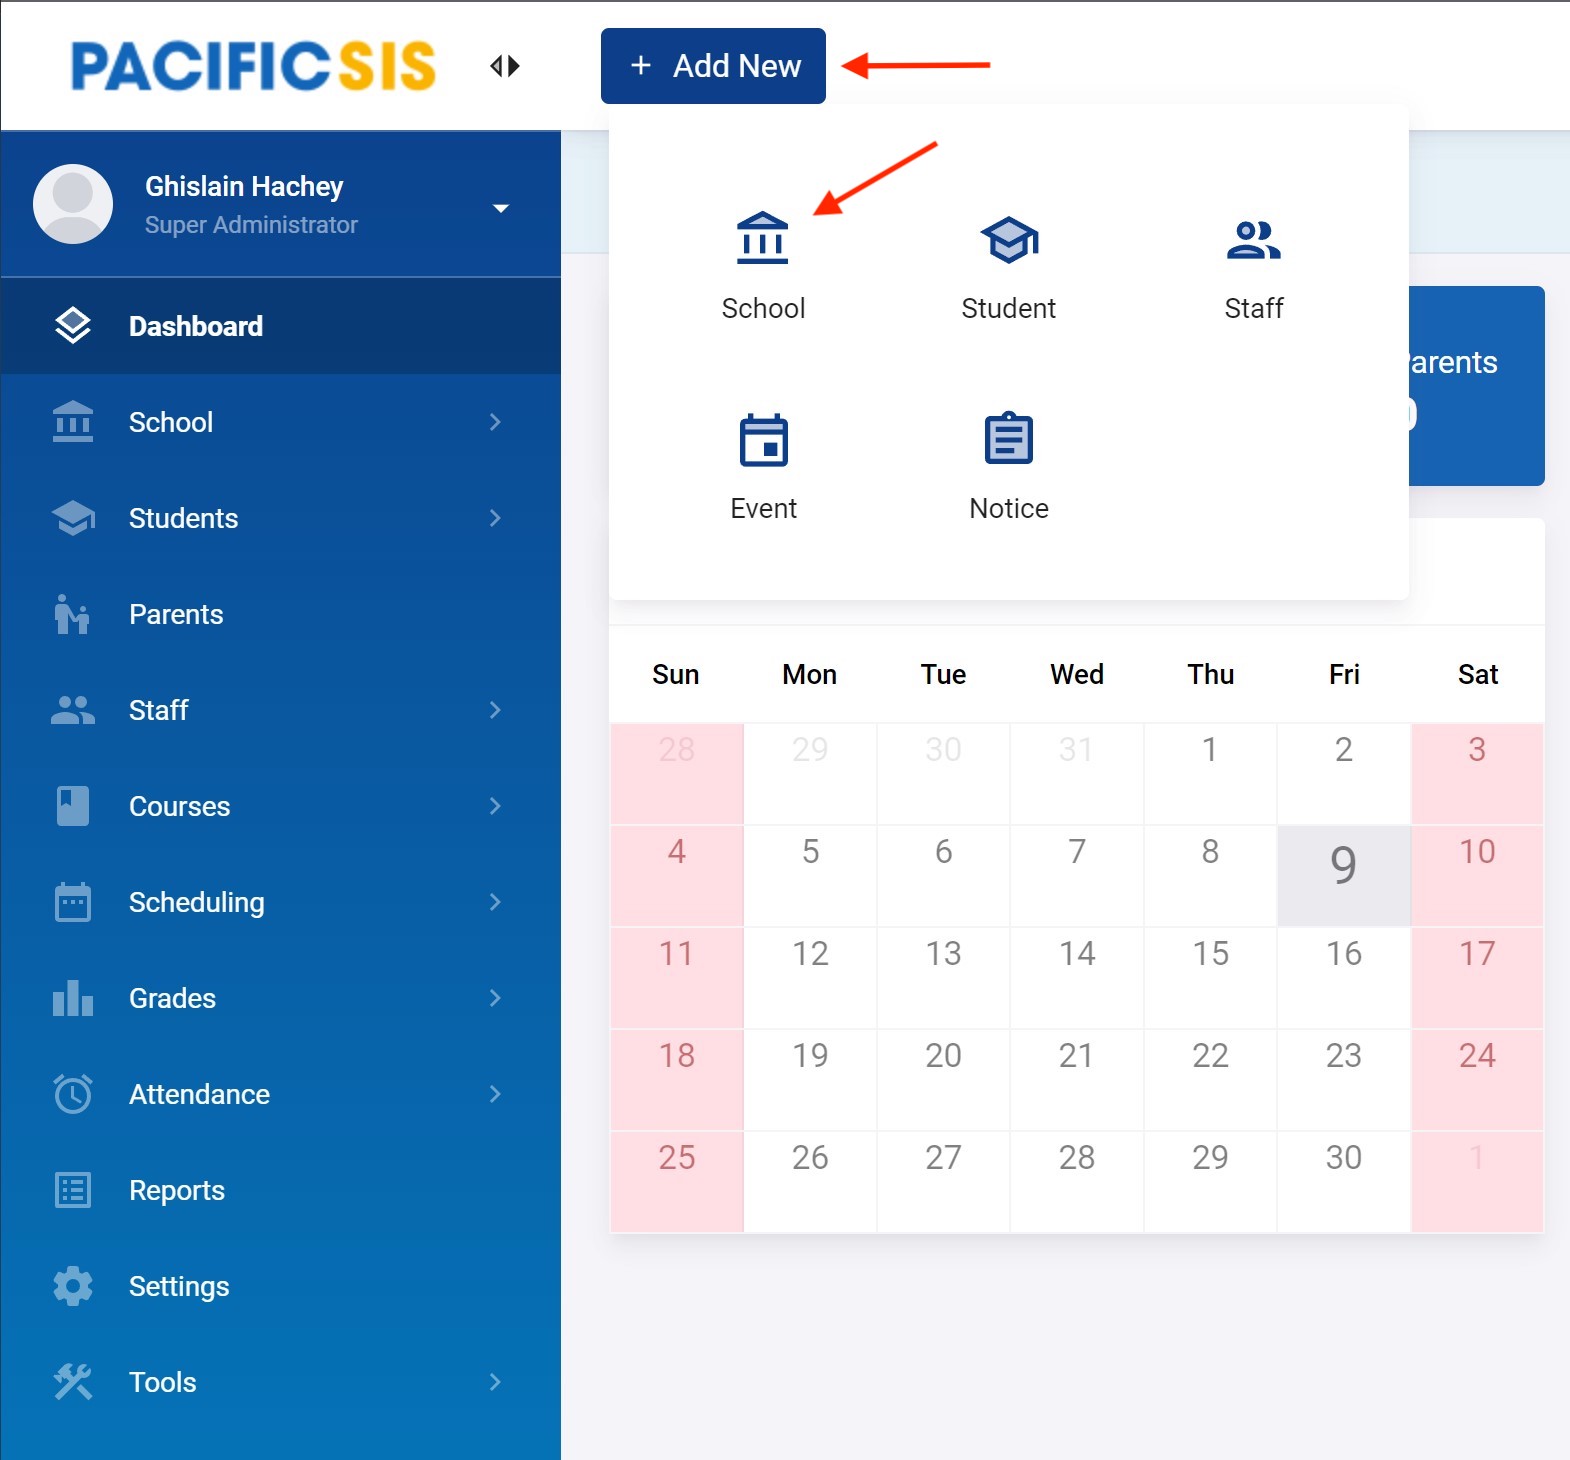
Add a New School
You create a school from the top menu Add New → School as shown below.
You will then first have to enter the start and end date of the school.
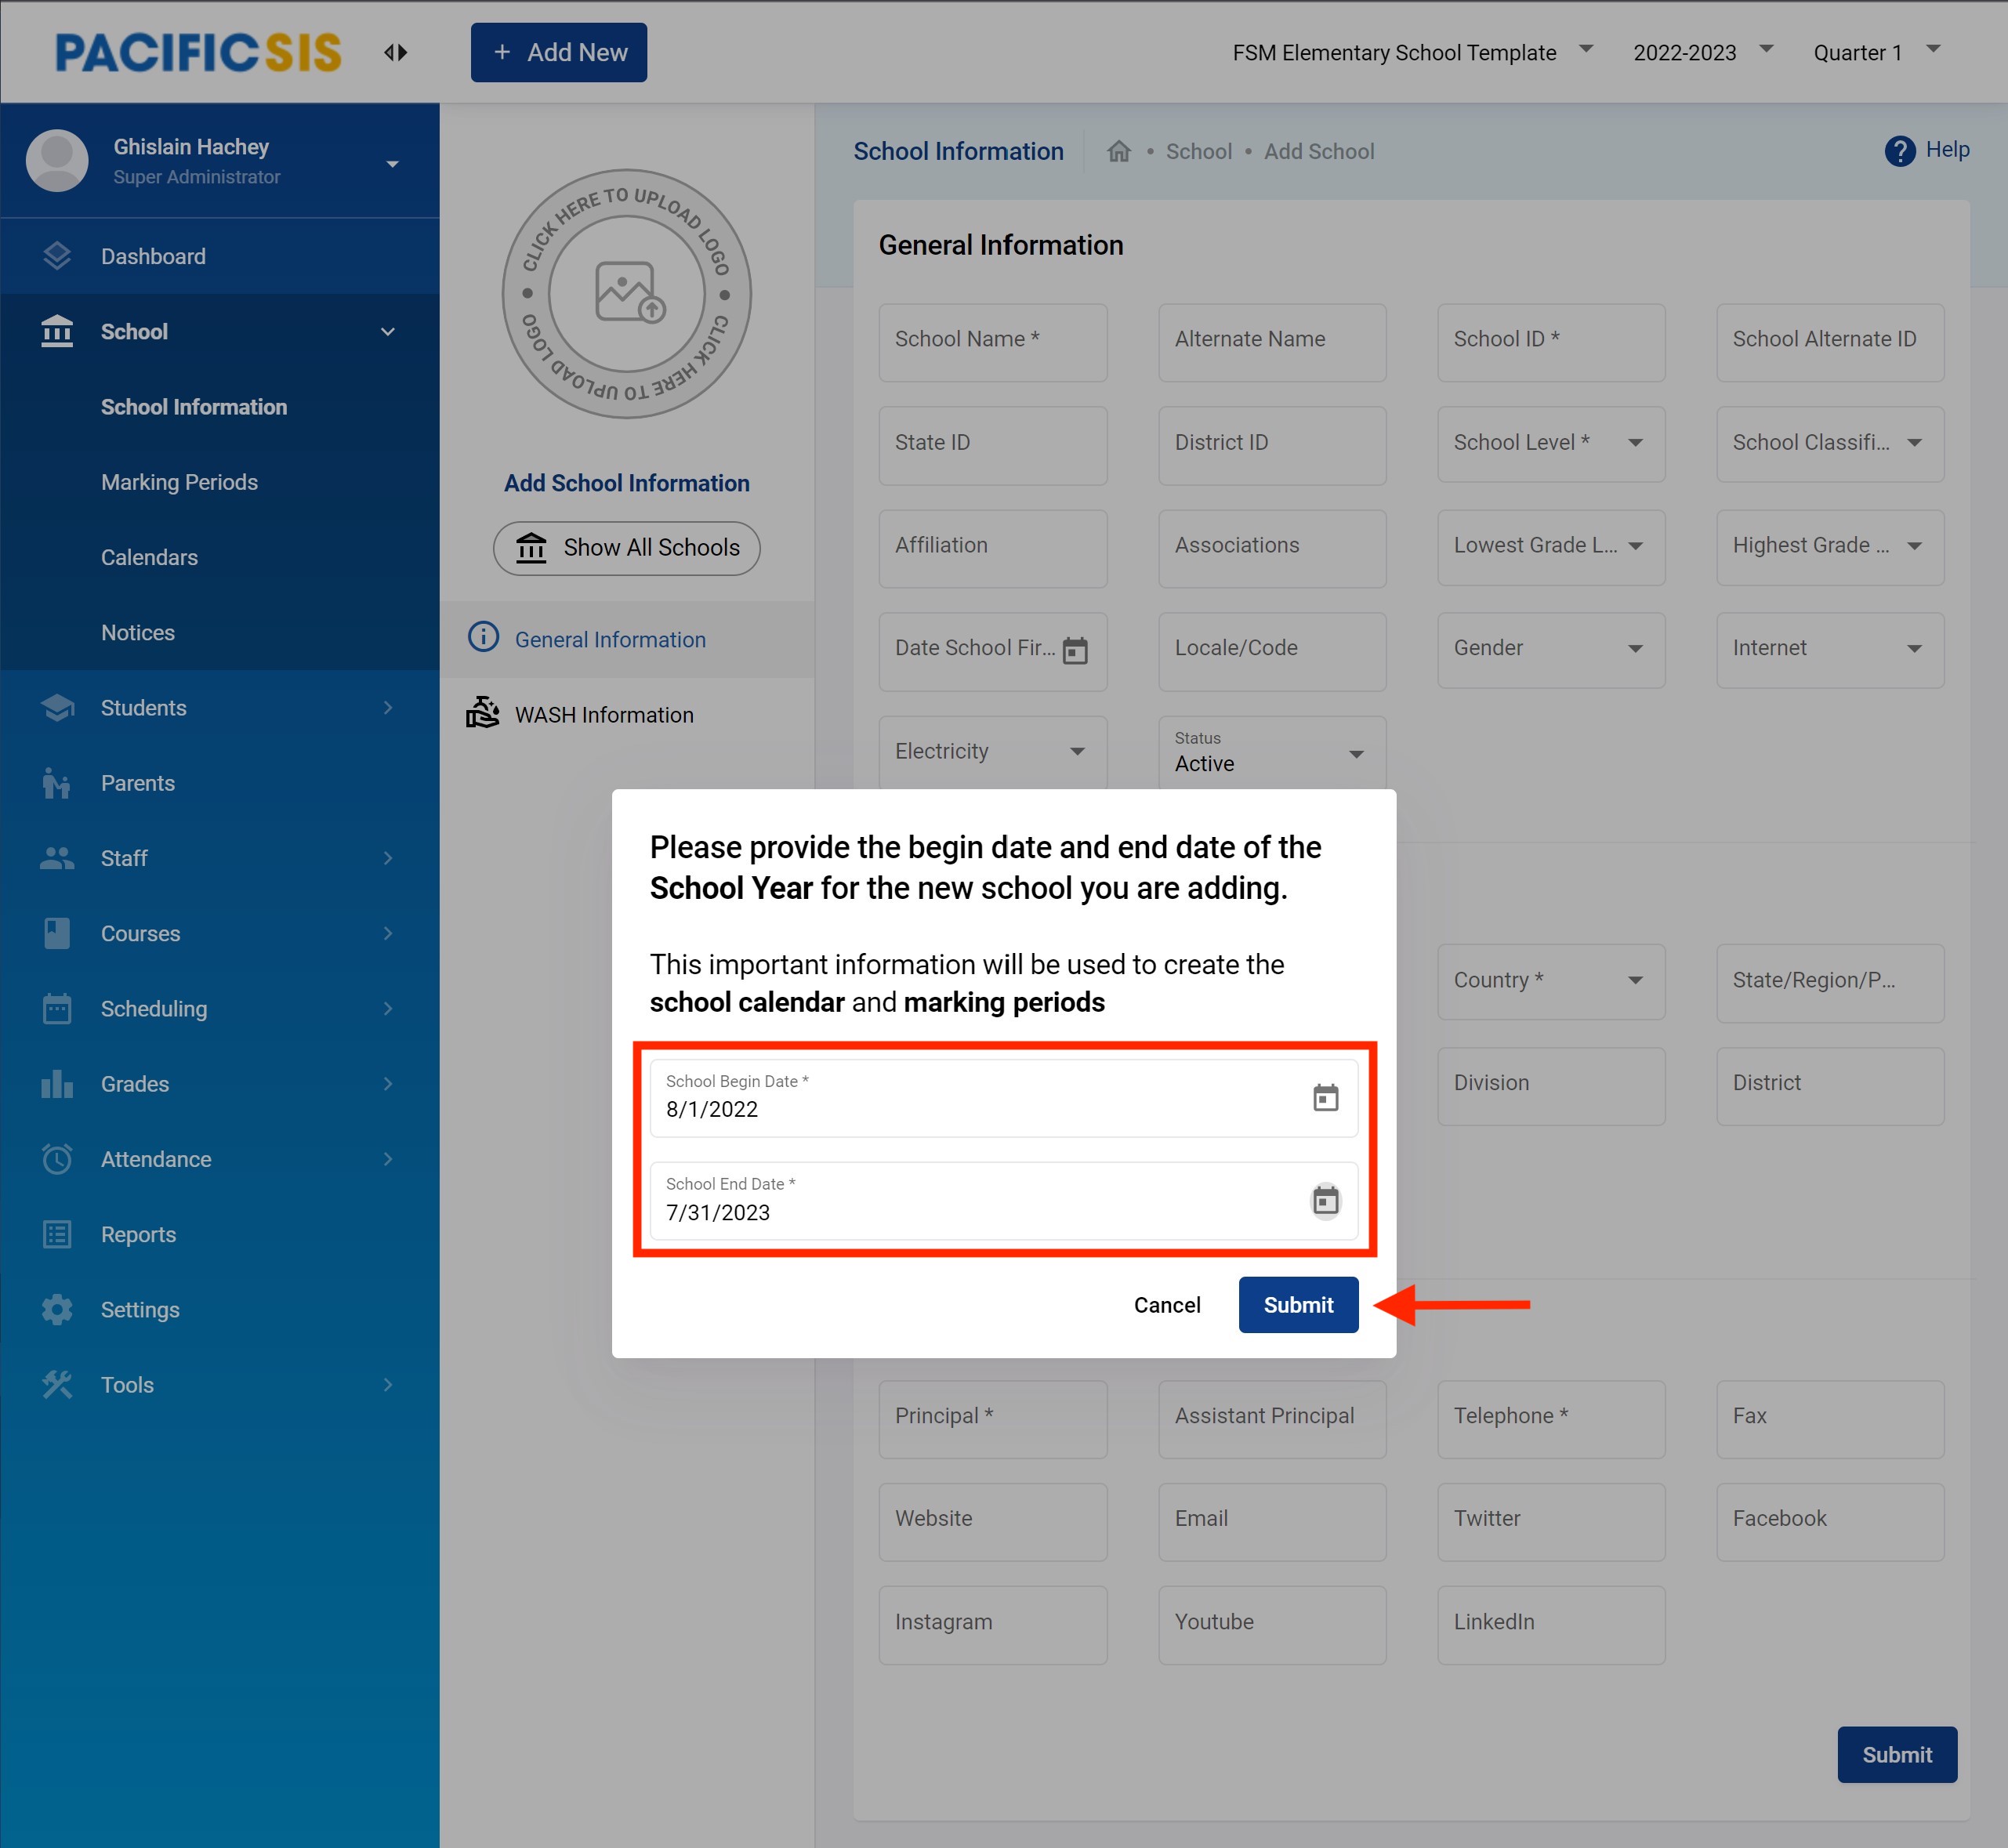
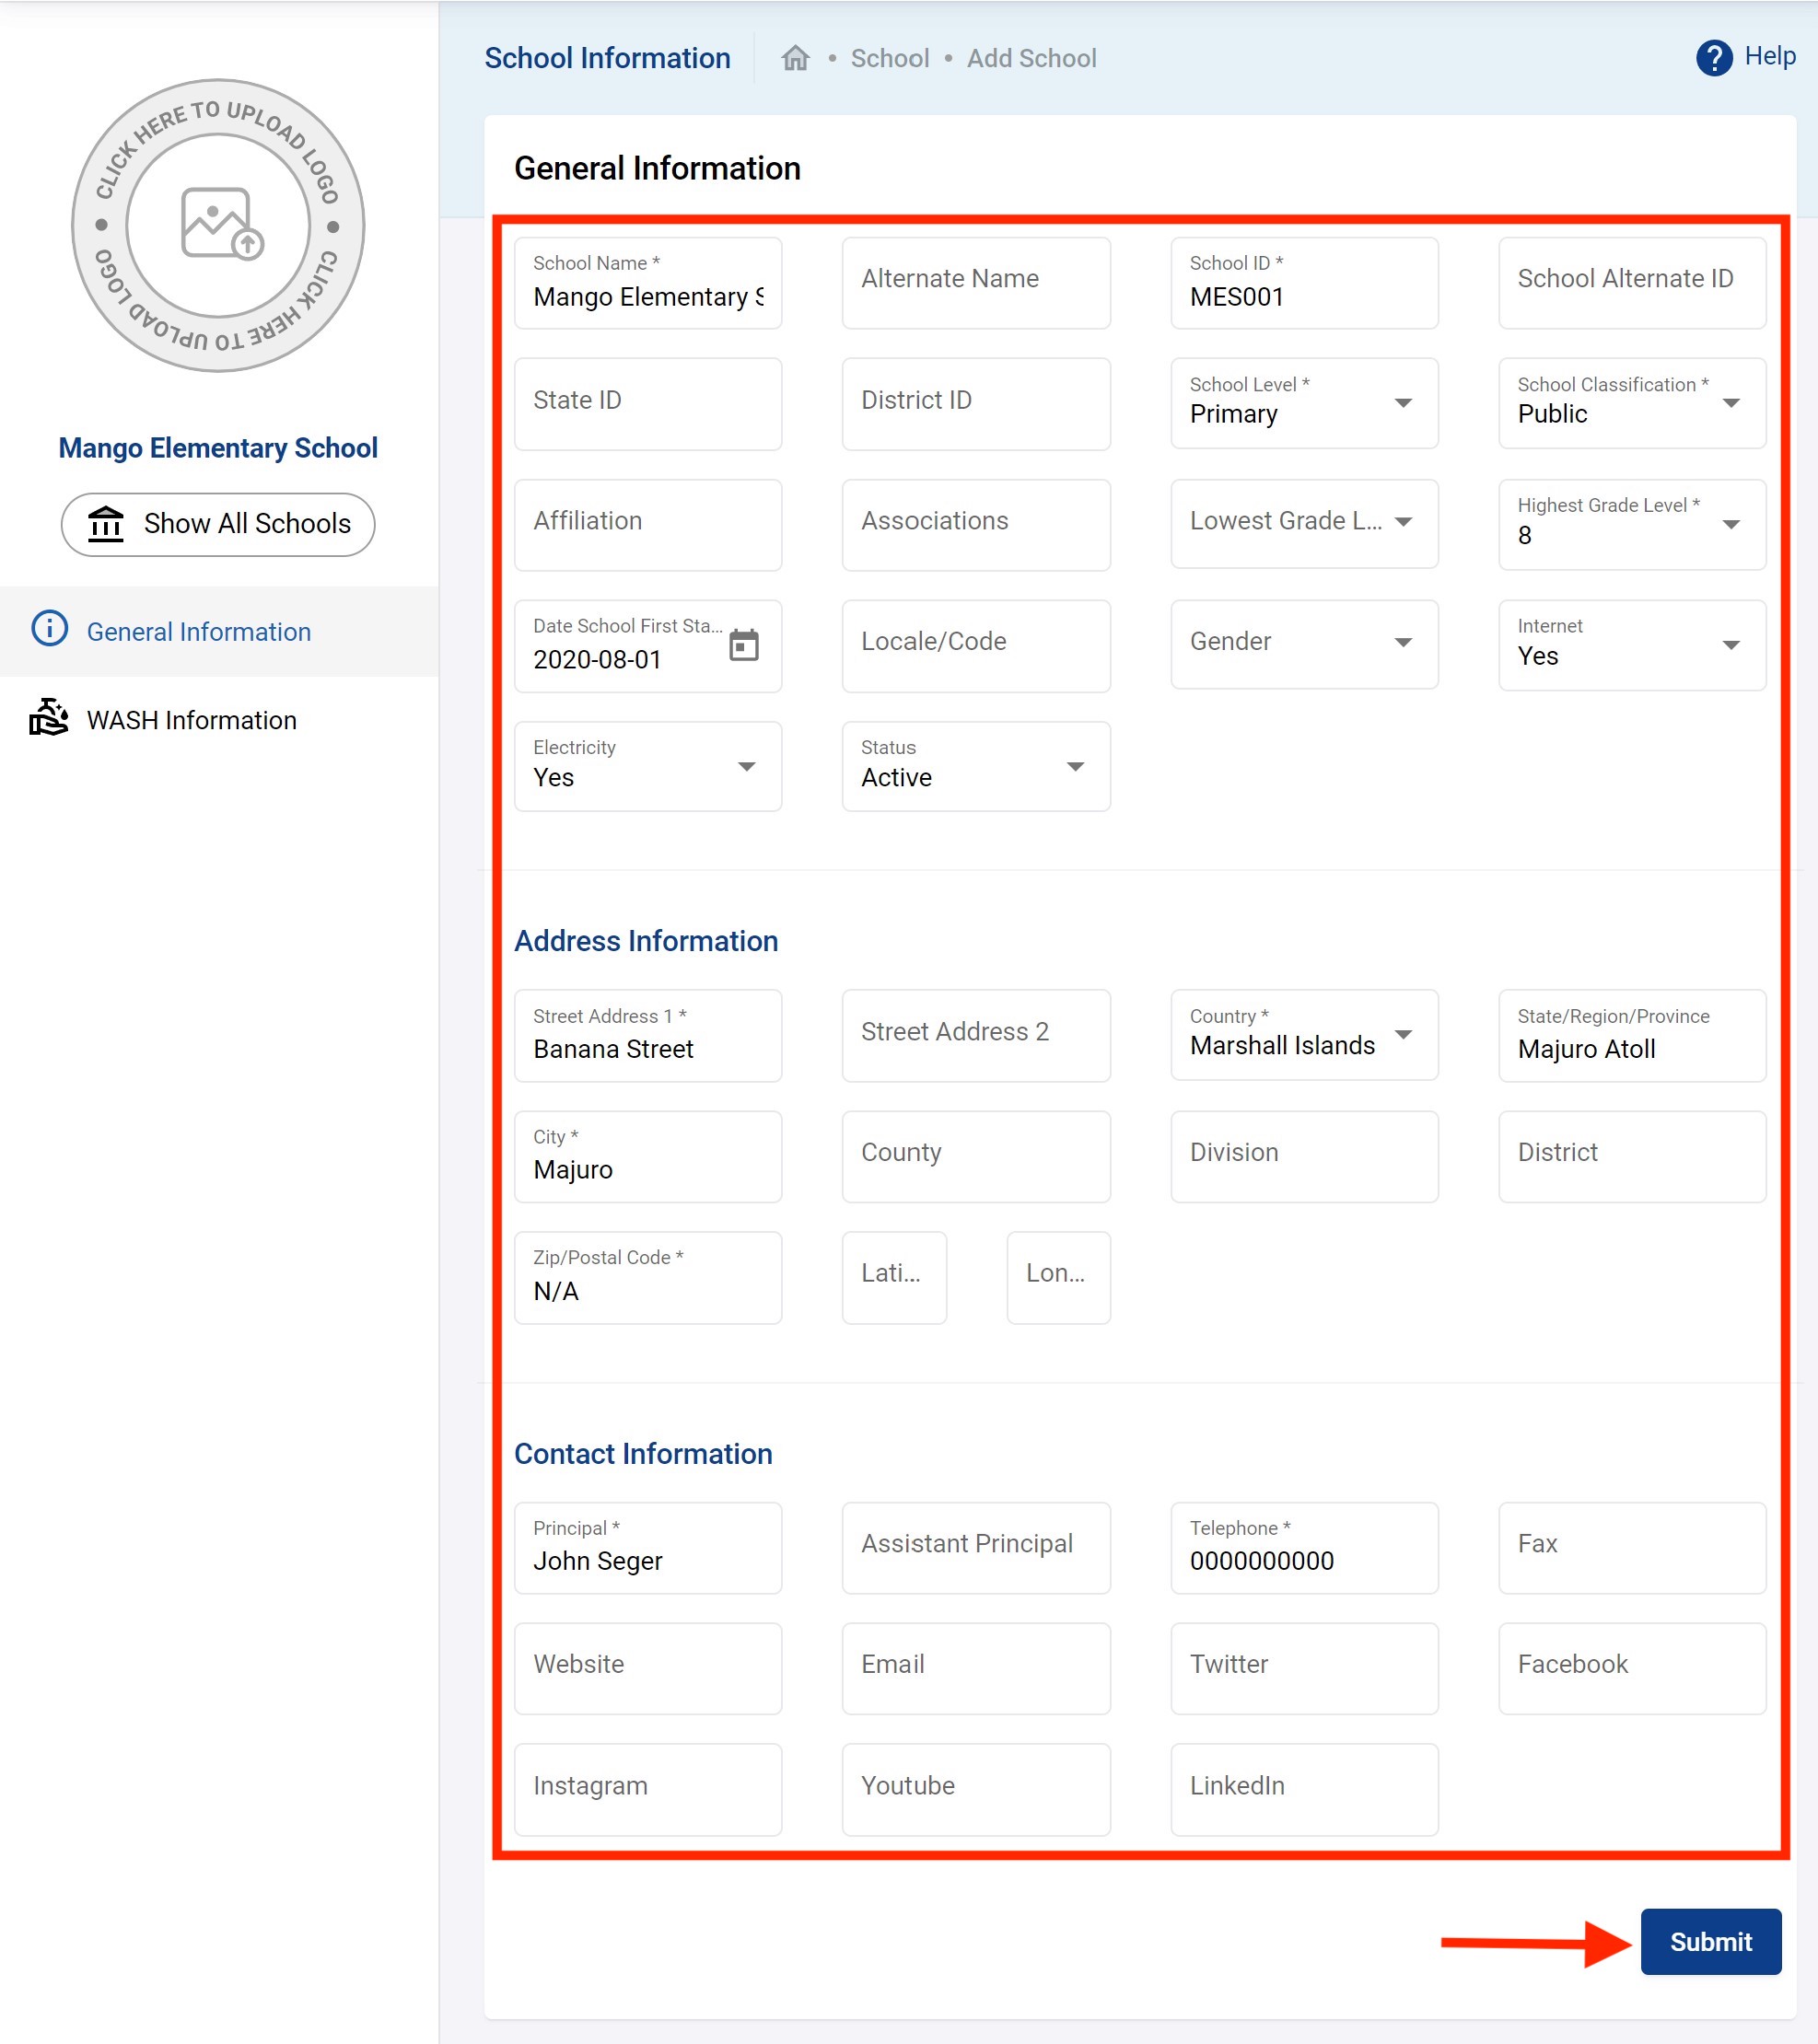
Then all the other school information you would like to record with the ones marked with an * being required.
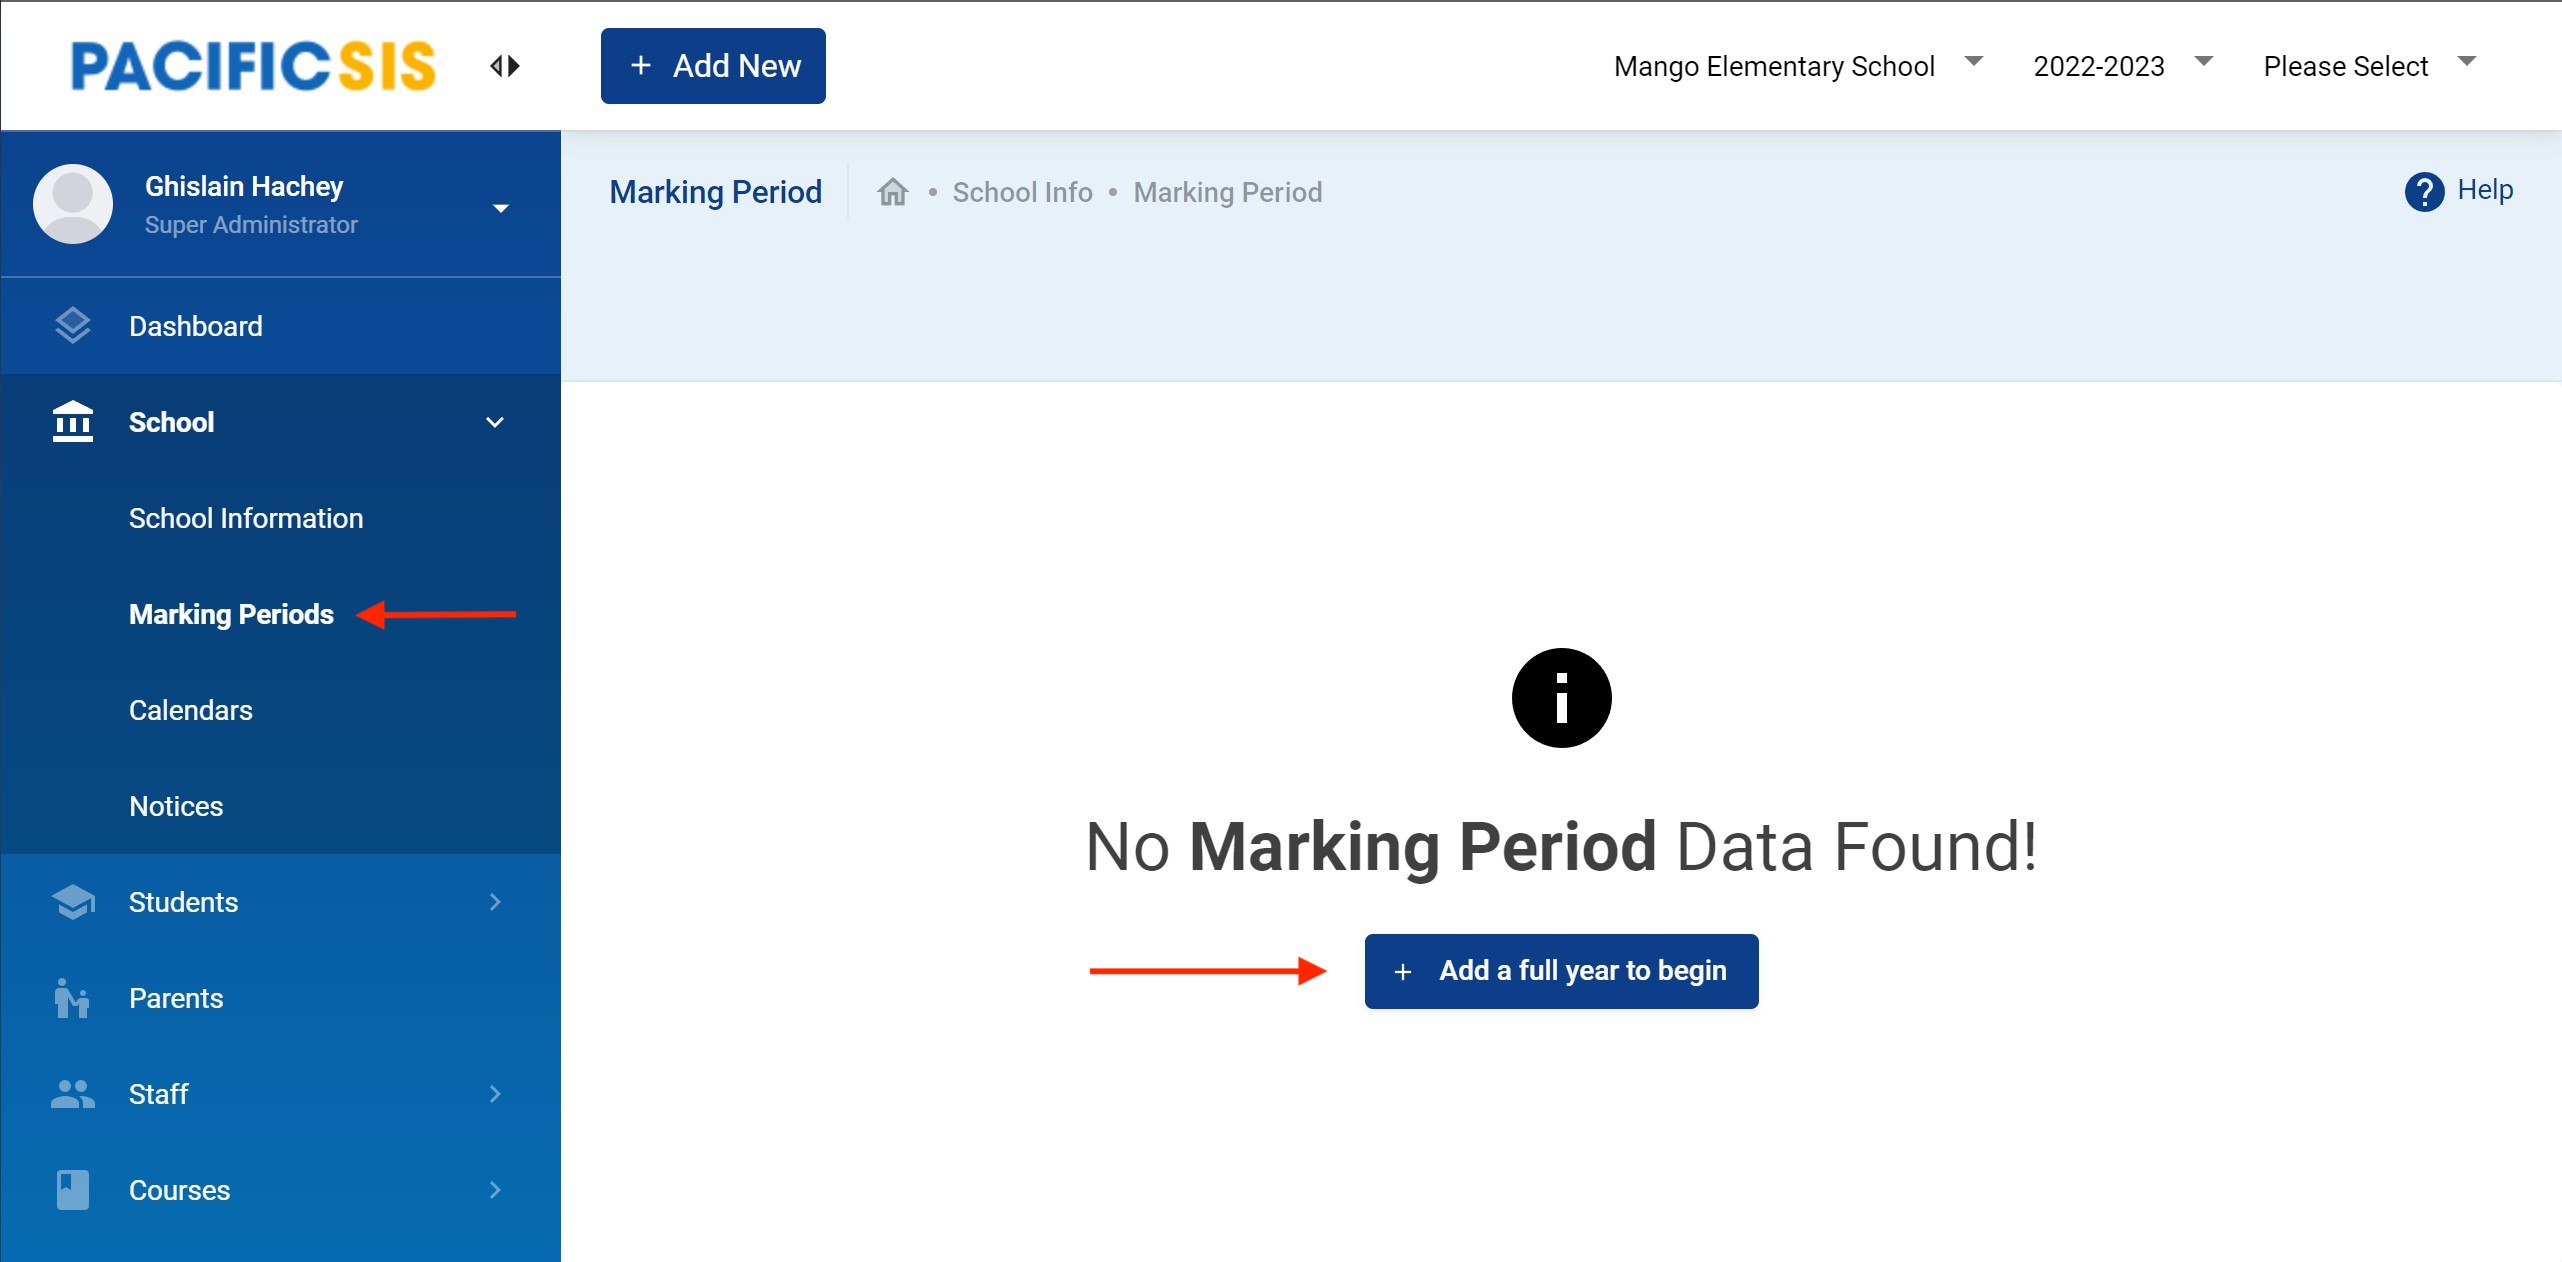
Create Marking Periods
Marking Periods are the time divisions of the entire school year. For setting up the marking periods go to School → Marking Periods. You will see the following when no marking periods have been created yet. Start by clicking to Add a full year to begin.
In other words, for a training in August you could use the following scheme for a school year. Simply replace the year.
- Calendar Year ⇒ 1 August 2022 – 31 July 2023
- Semester 1 ⇒ 1 August 2022 – 31 January 2023
- Quarter 1⇒ 1 August 2022 – 31 October 2022
- Quarter 2⇒ 1 October 2022 – 31 December 2022
- Semester 2 ⇒ 1 February 2023 – 31 July 2023
- Quarter 3⇒ 1 February 2023 – 30 April 2023
- Quarter 4⇒ 1 May 2023 – 31 July 2023
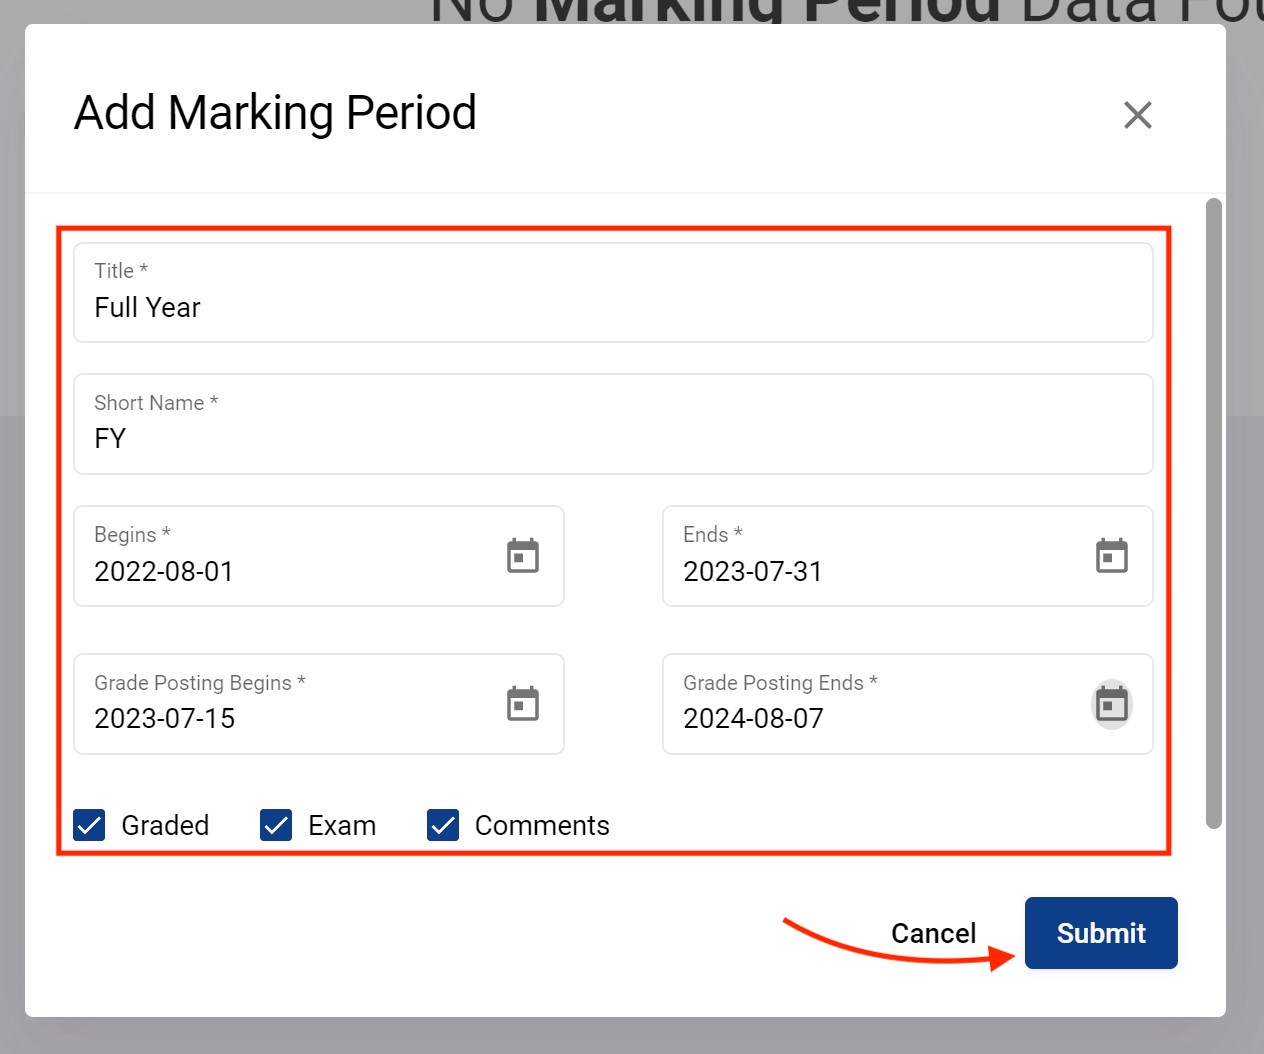
Enter the full year marking period details. In this following example the full year is graded with a final exams and comments which are then available in the students' report cards.
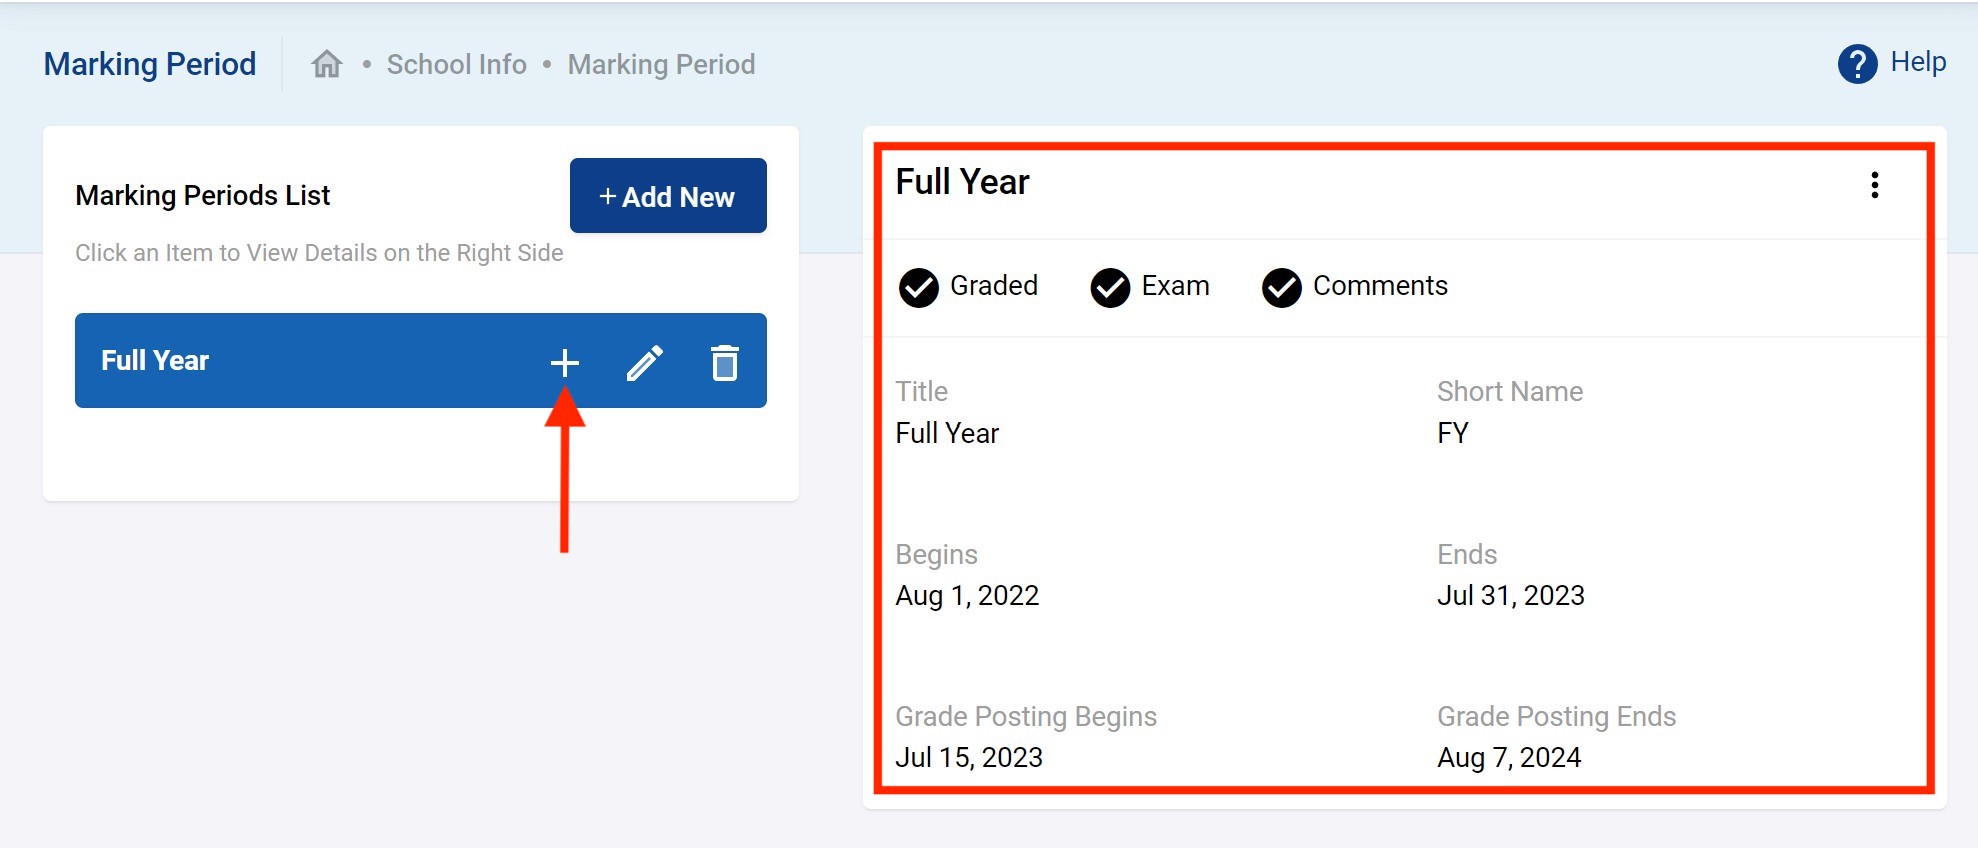
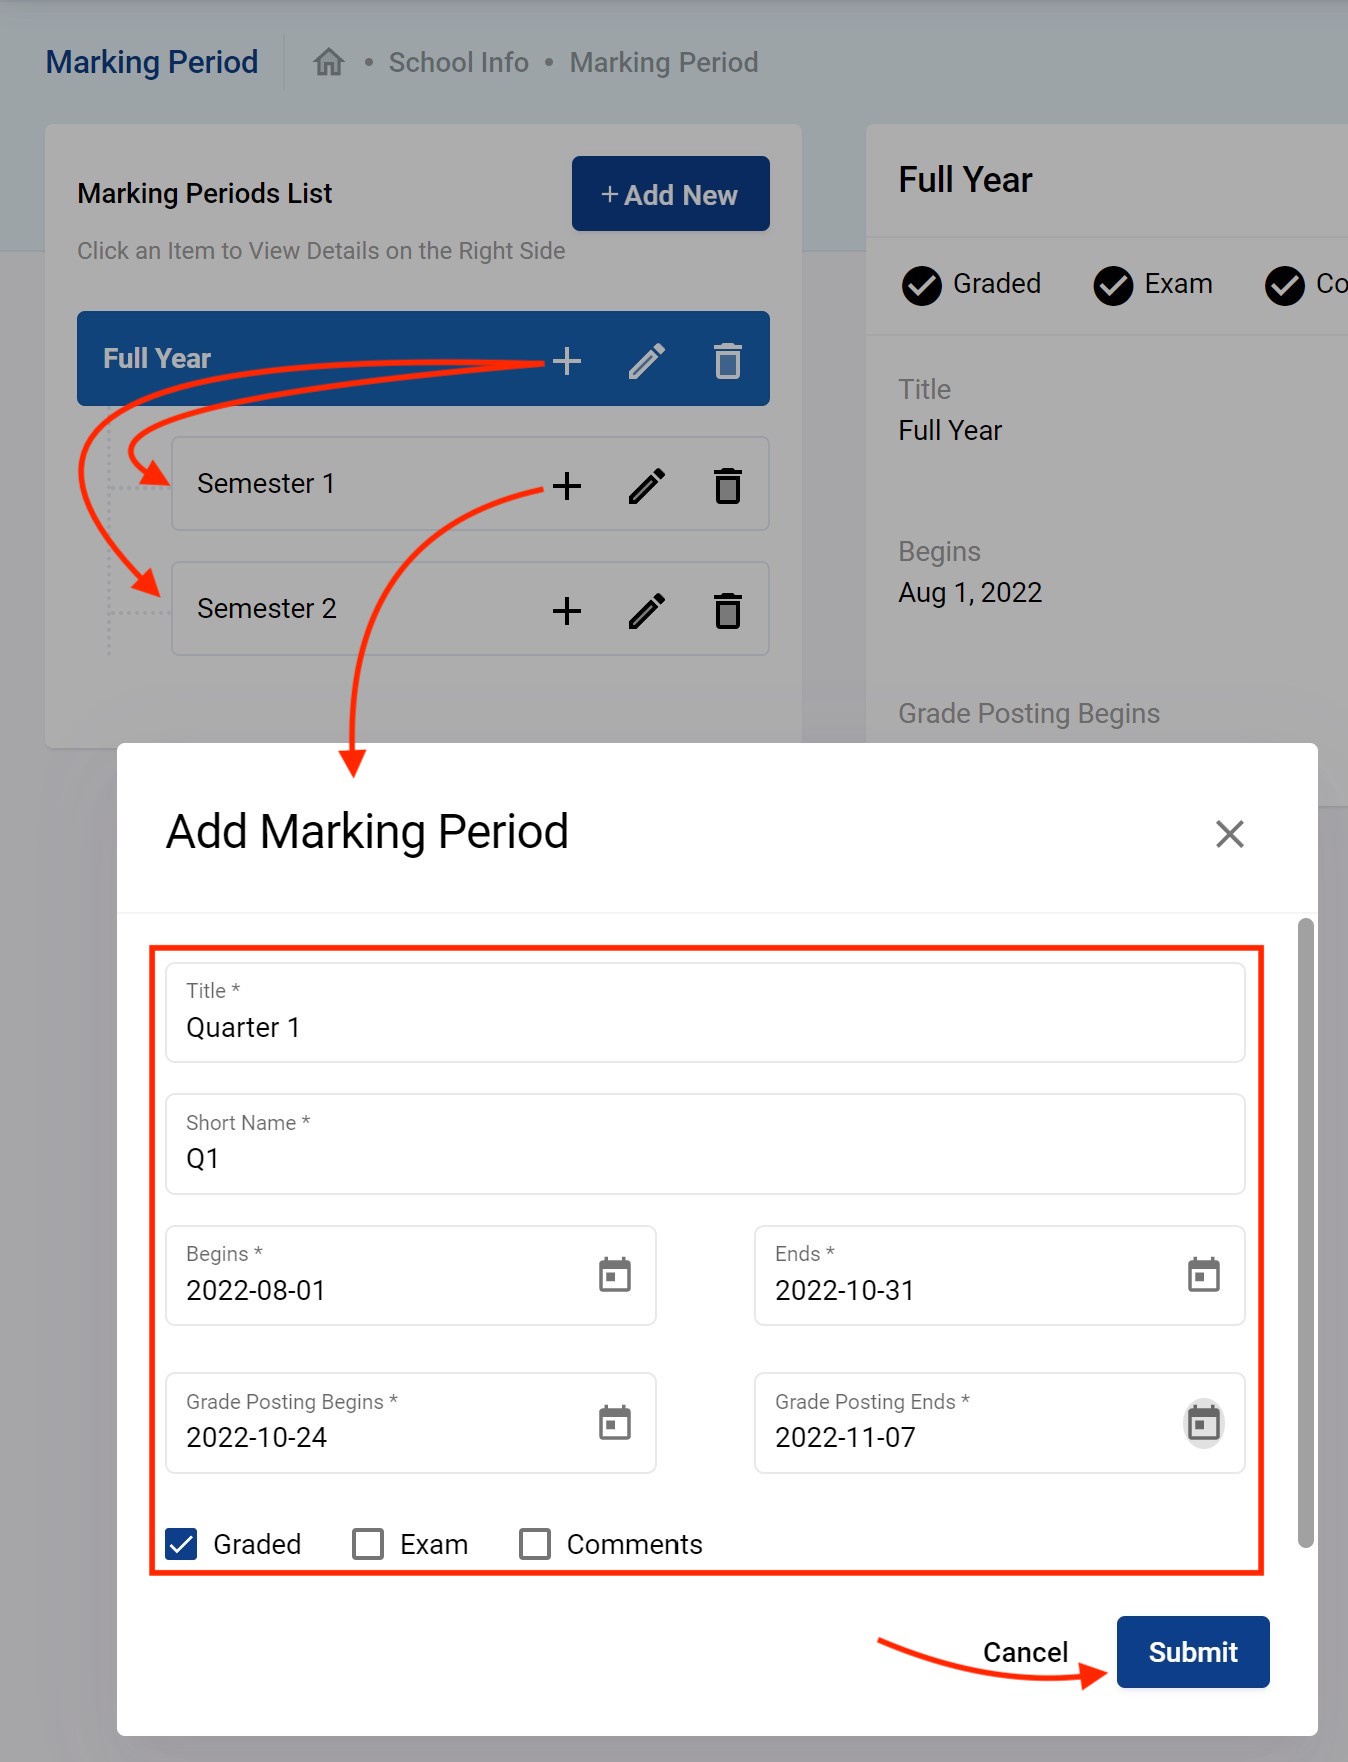
Once the full year is there you can create your semesters. click on the “+” as shown below.
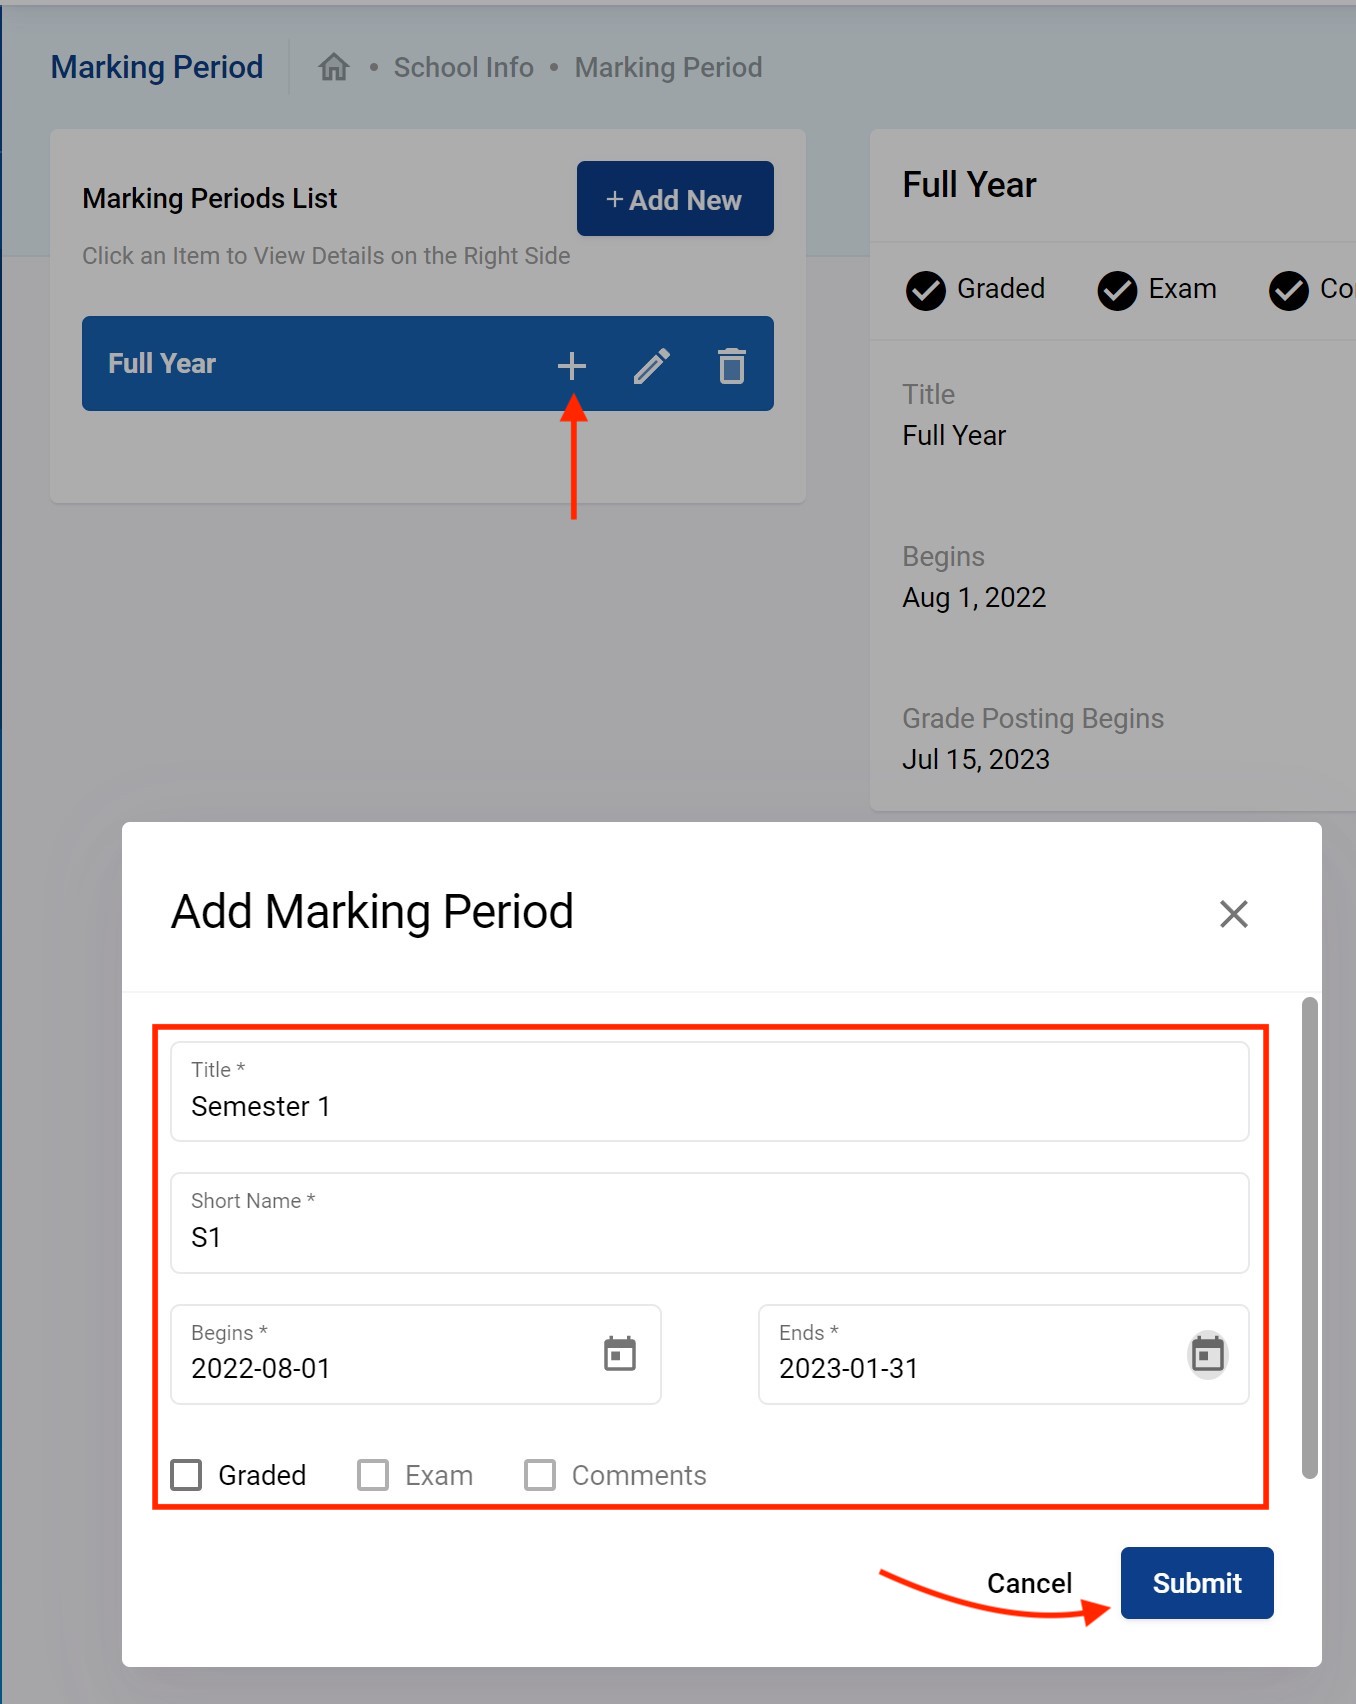
Enter the Title, Short Name, Marking Period Begins & End dates and then Submit. This example does not grade the semesters but if you do you simply check mark the Graded option.
When you have your semesters created you can create your Quarters as depicted below. Quarters are graded in this example there the Graded options is checked and additional Grade Posting Begins & End dates must be entered. Grade posting begins & end date indicates the span of time in which users can input final grades.
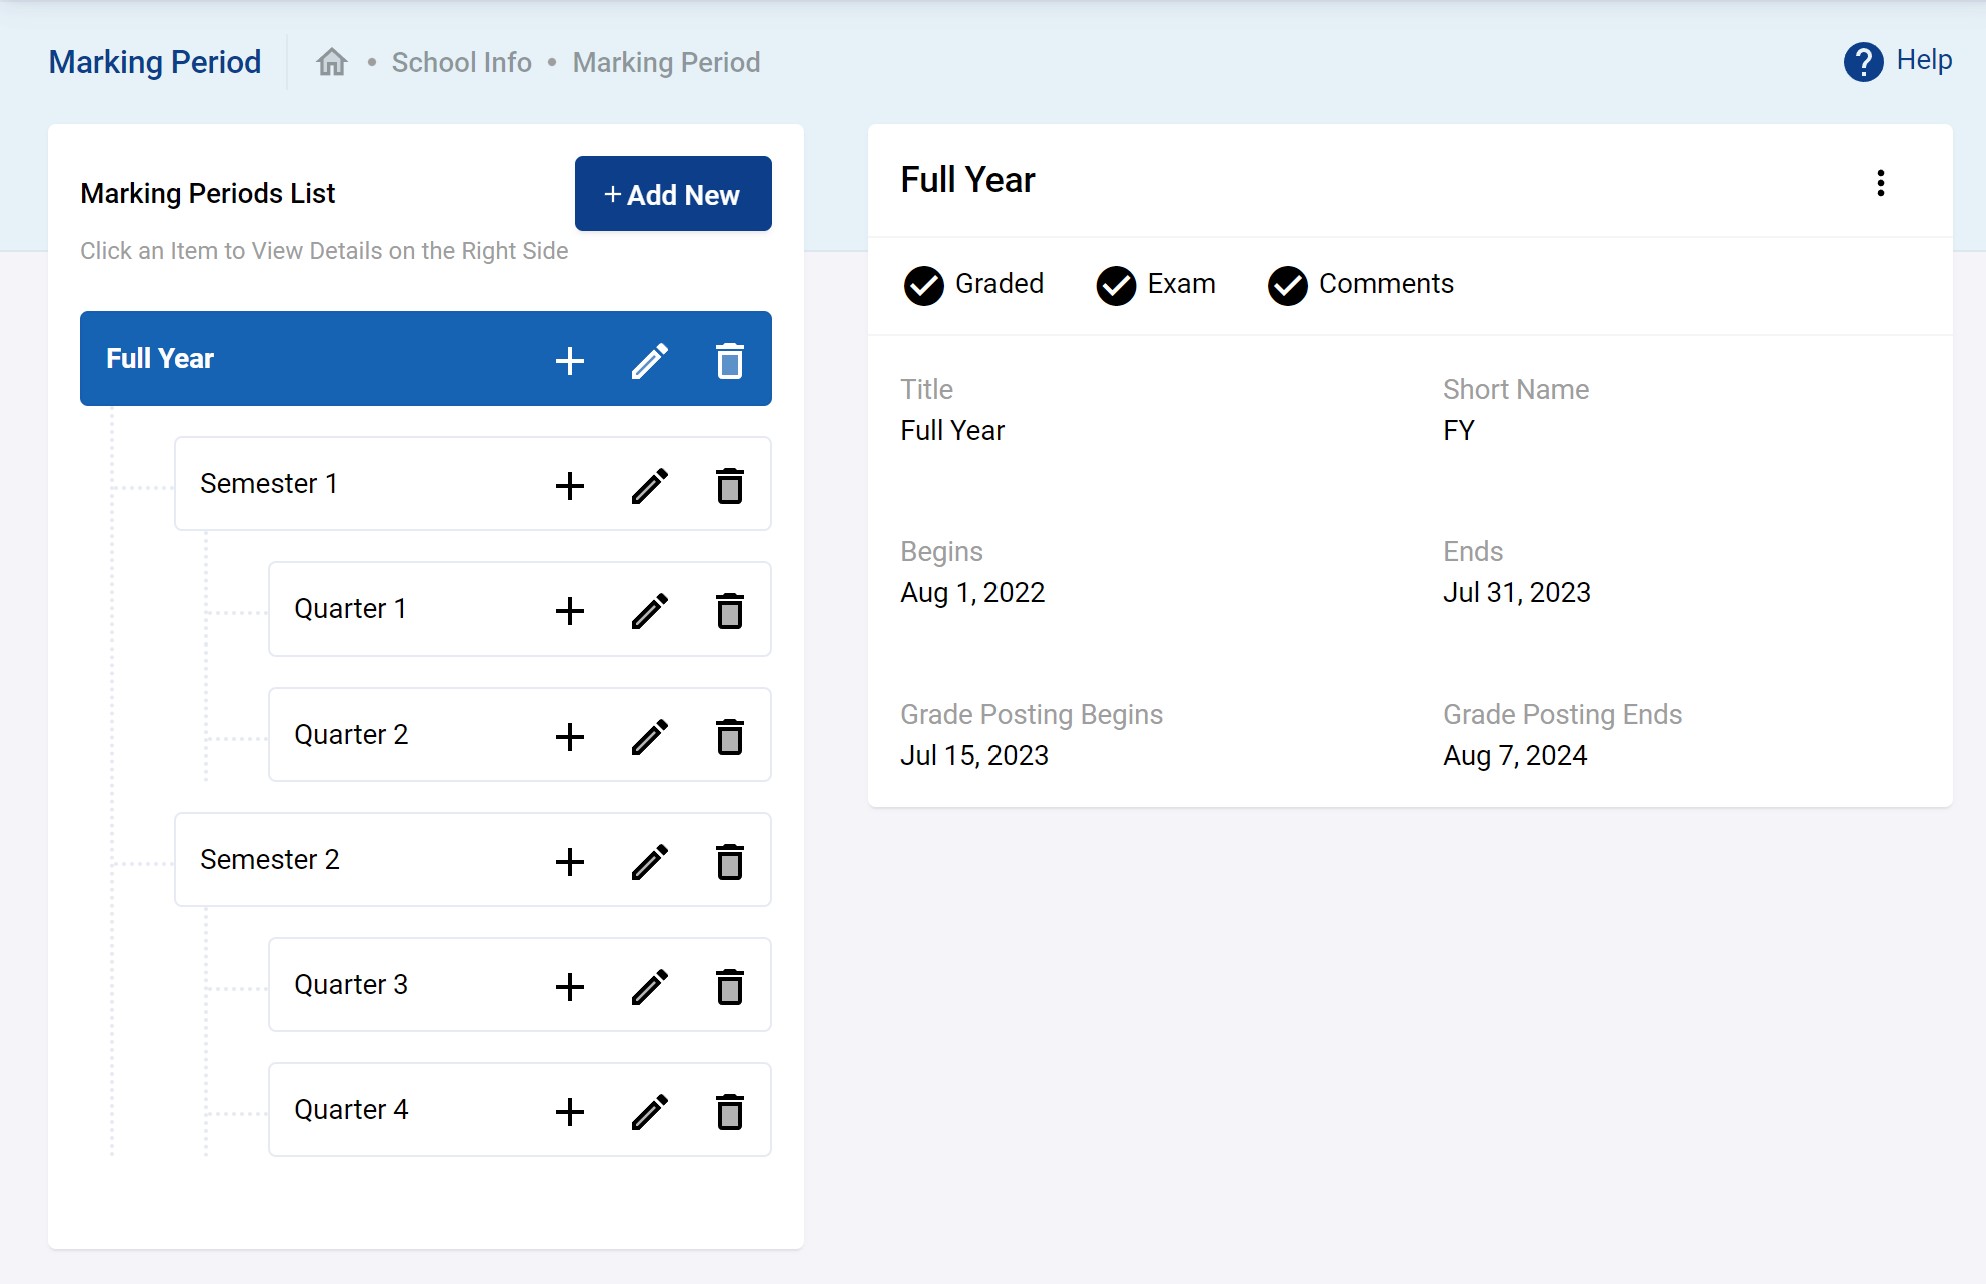
Eventually, you should have all your marking periods configured. A typical example if shown below.
Some more detailed information on the three check boxes available when creating the marking periods:
- Graded: By checking a marking period ‘Graded’, grading option is allowed and you can enter final grades for the courses which run for that marking period.
- Comments: By checking the ‘Comments’ box, teachers and administrators are allowed to enter Comments while giving final grades.
- Exam: Exam option should be checked when you want to take a physical exam at the end of a marking period. Checking the Exam box will allow the teachers and administrators to enter grades manually for this exam.
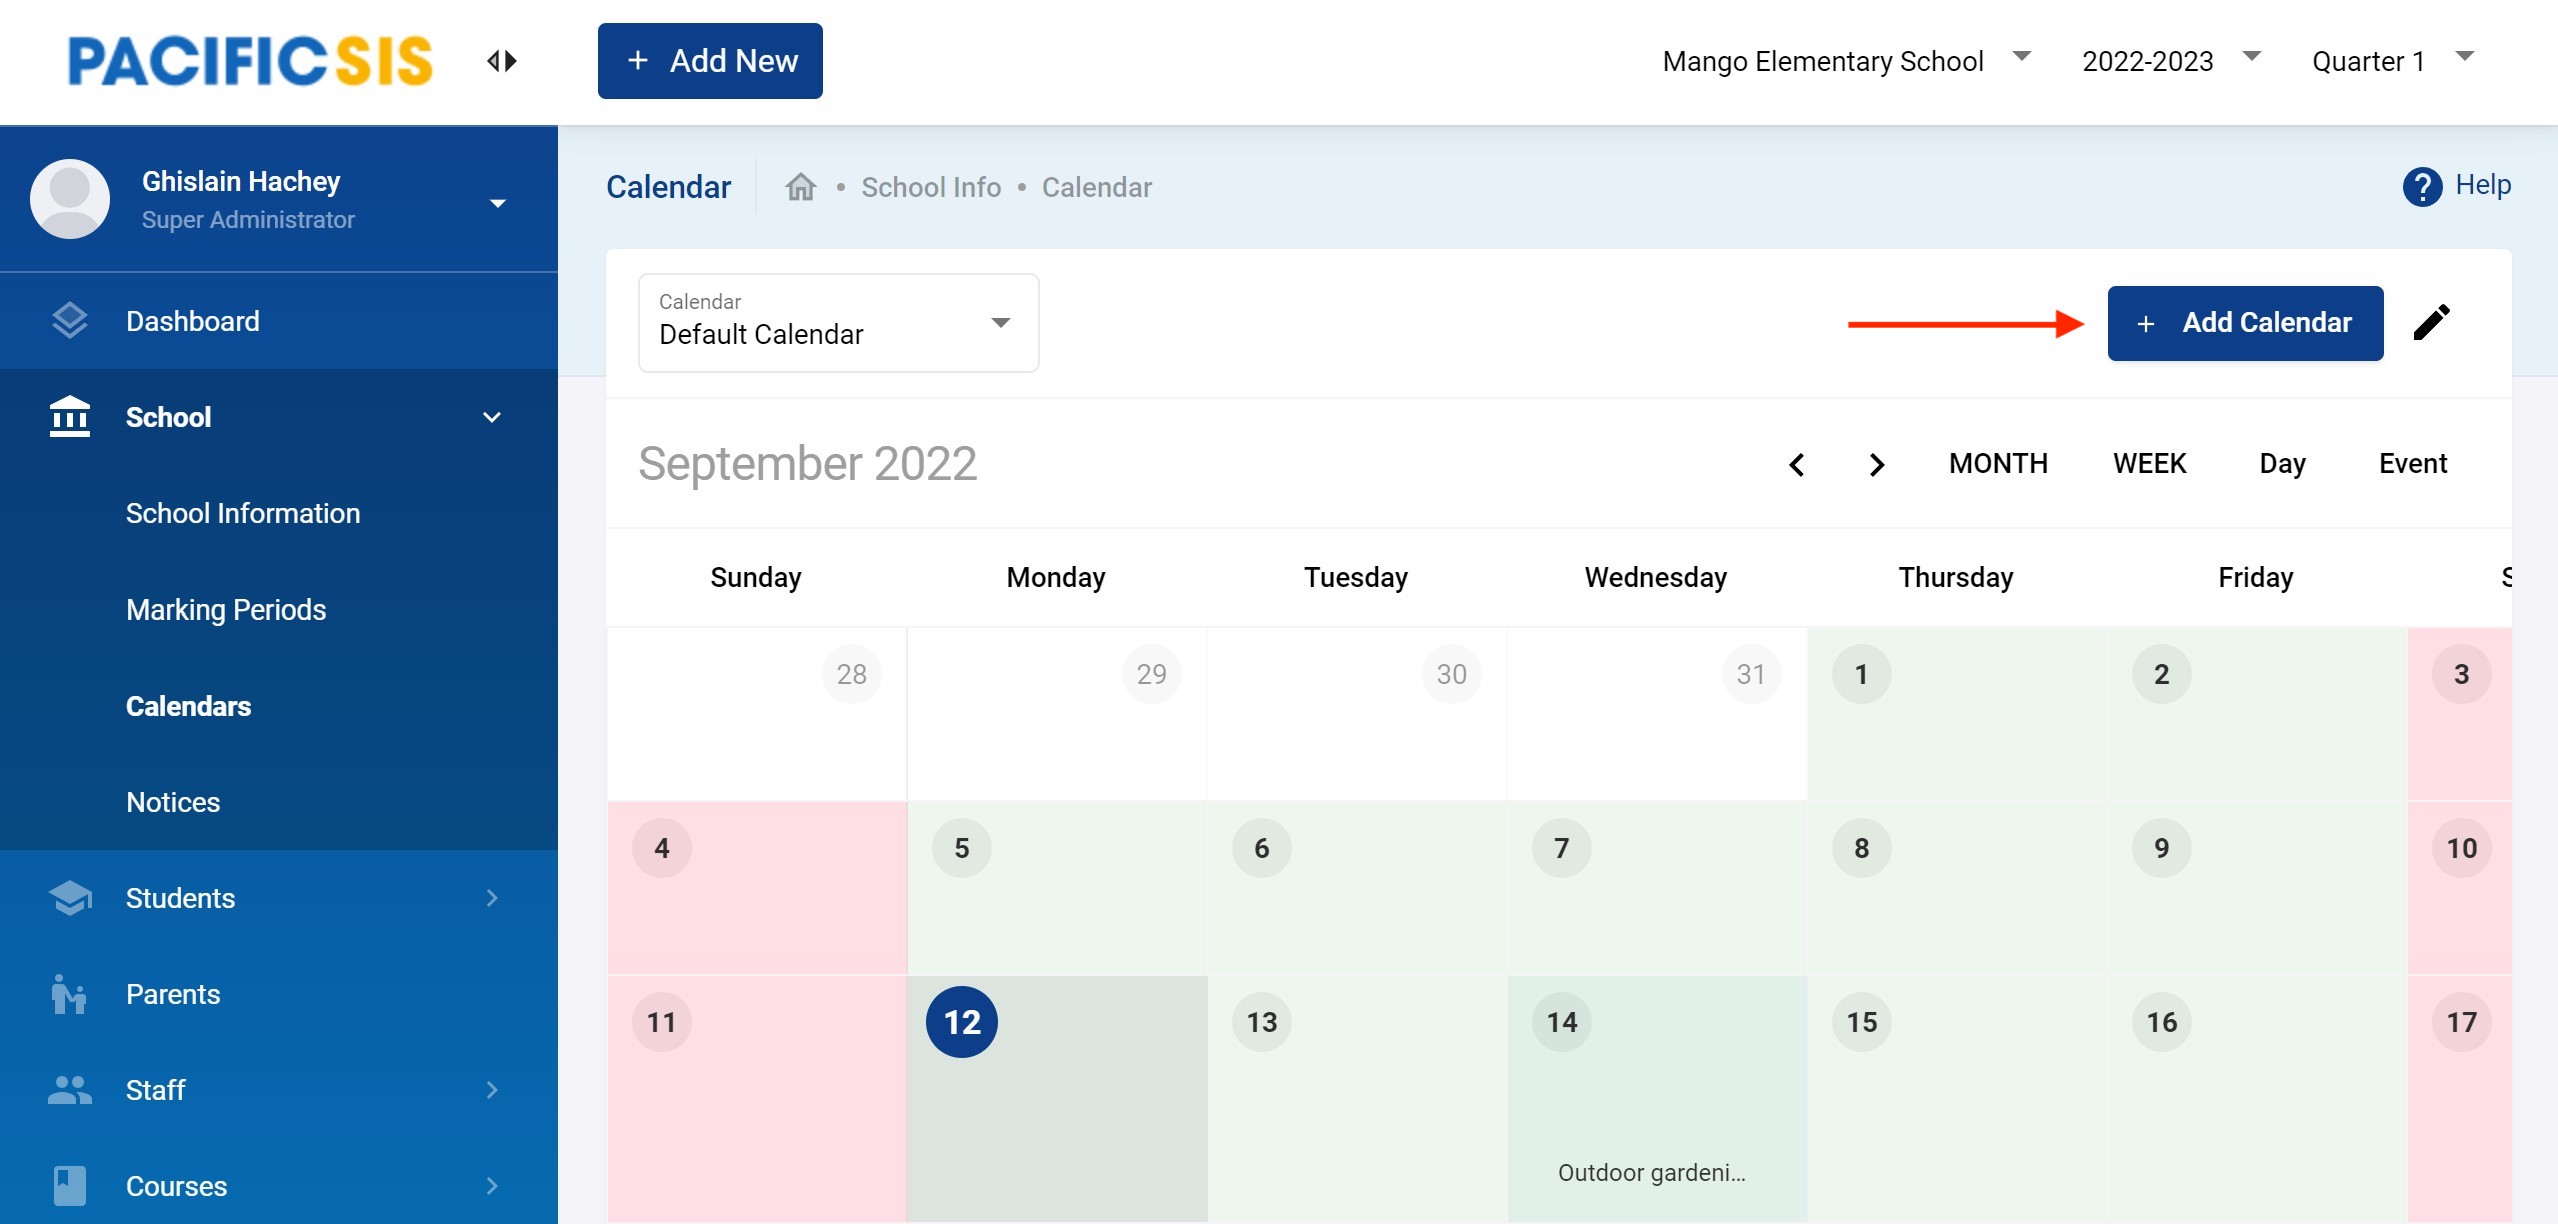
Calendars
Default Calendar
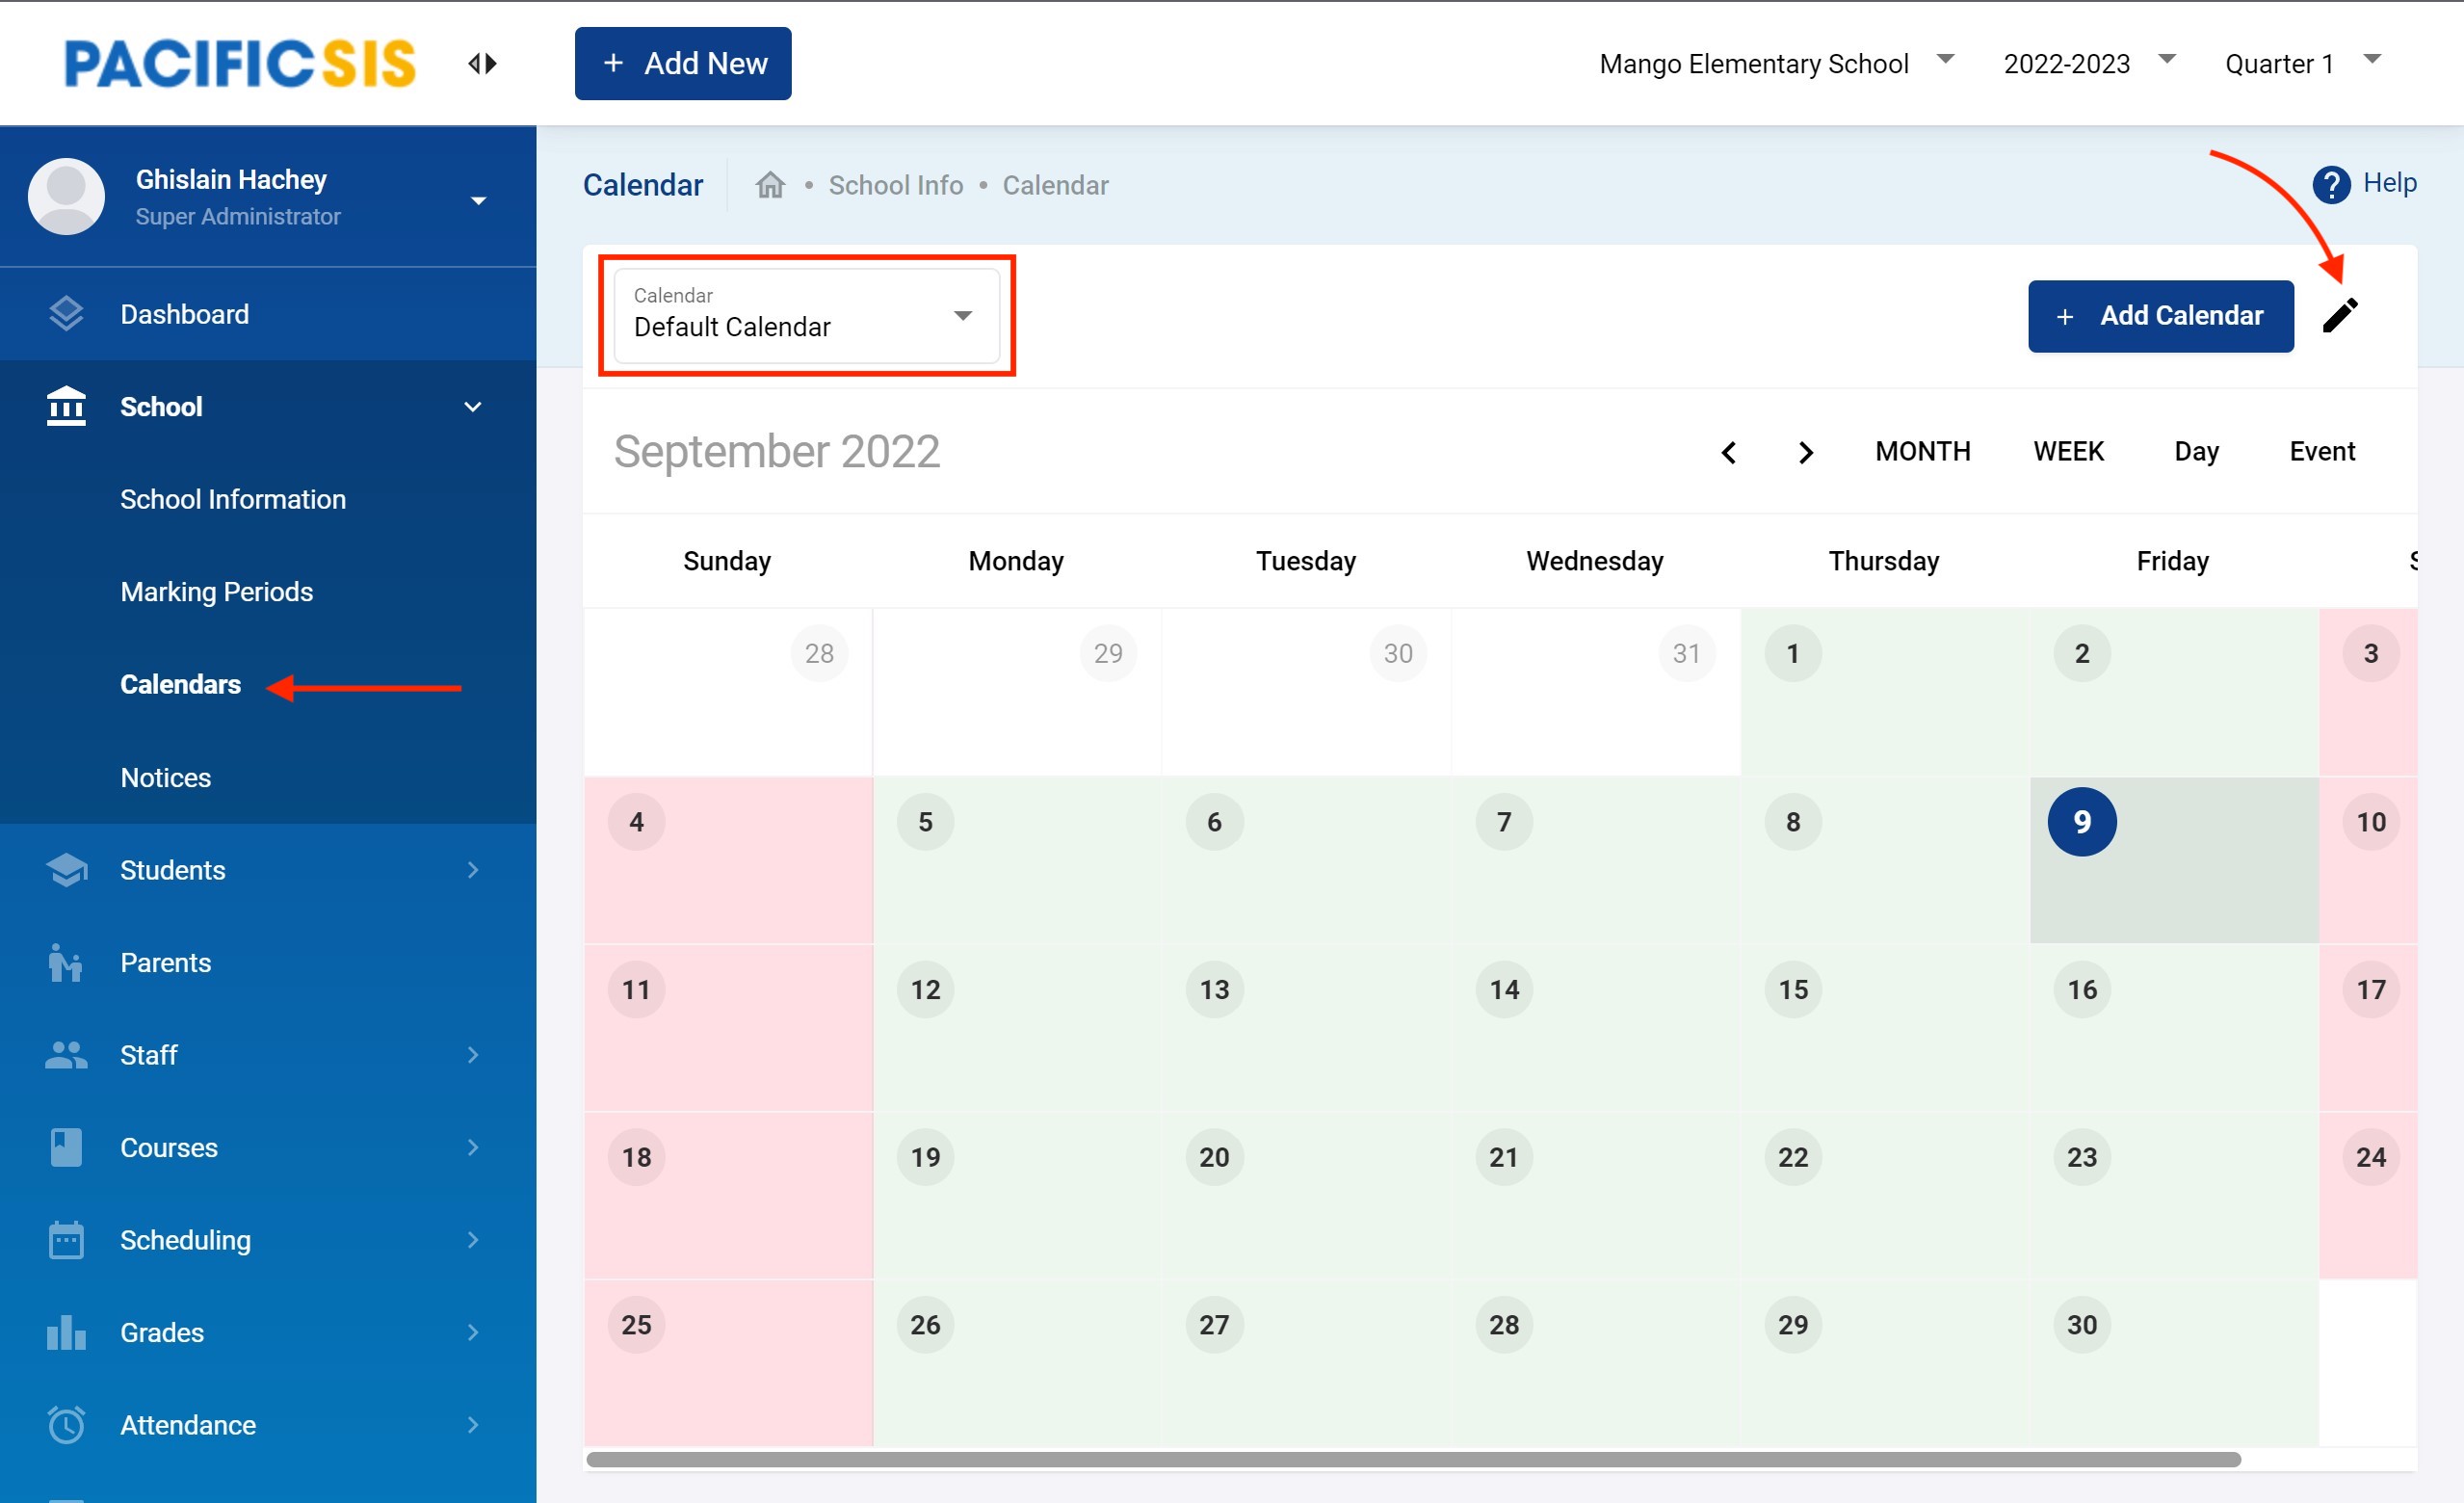
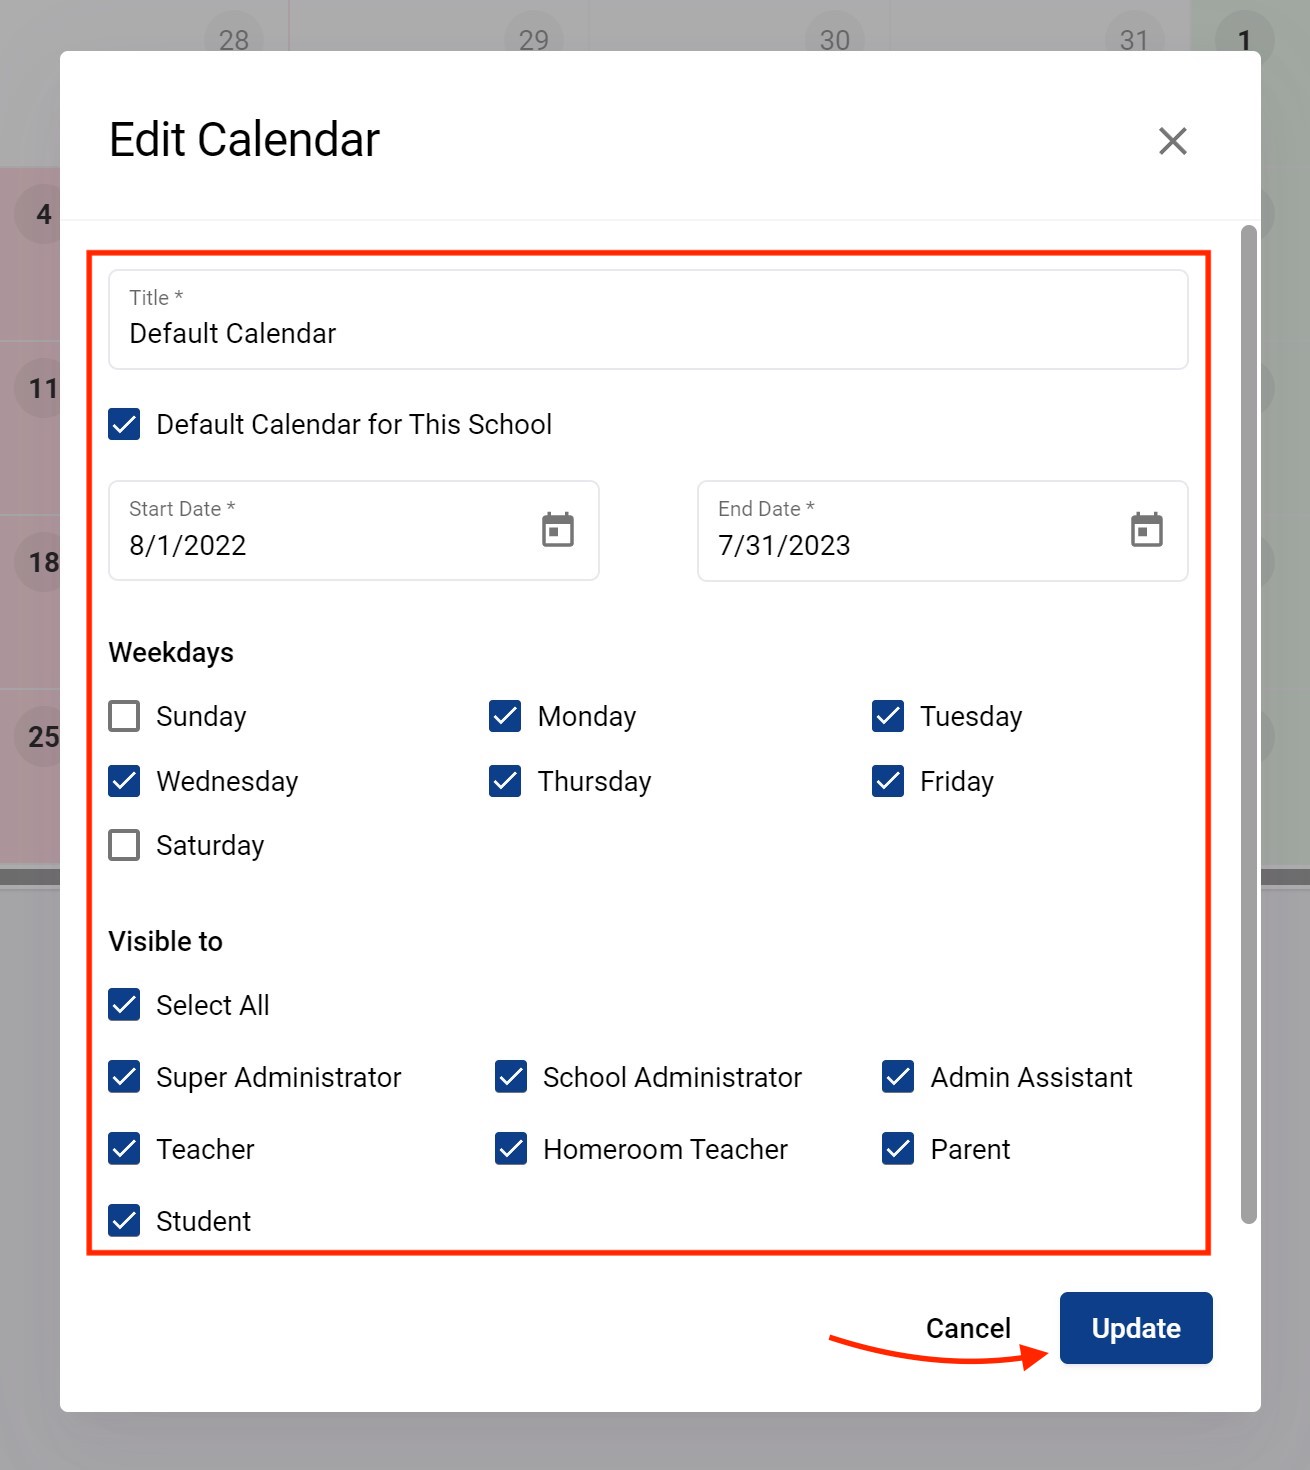
The school comes with a default calendar. This is all your need but you could also create additional calendars if you need to. You can edit the default calendar by clicking on the pencil icon as shown below.
The dates will be the start and end dates you entered for your school with standard week days marked as school days. You can then decide who this calendar will be visible to. The example below is visible to all types of users for simplicity.
Note that the schools days are shown in green while the non school days in red.
Add Holidays
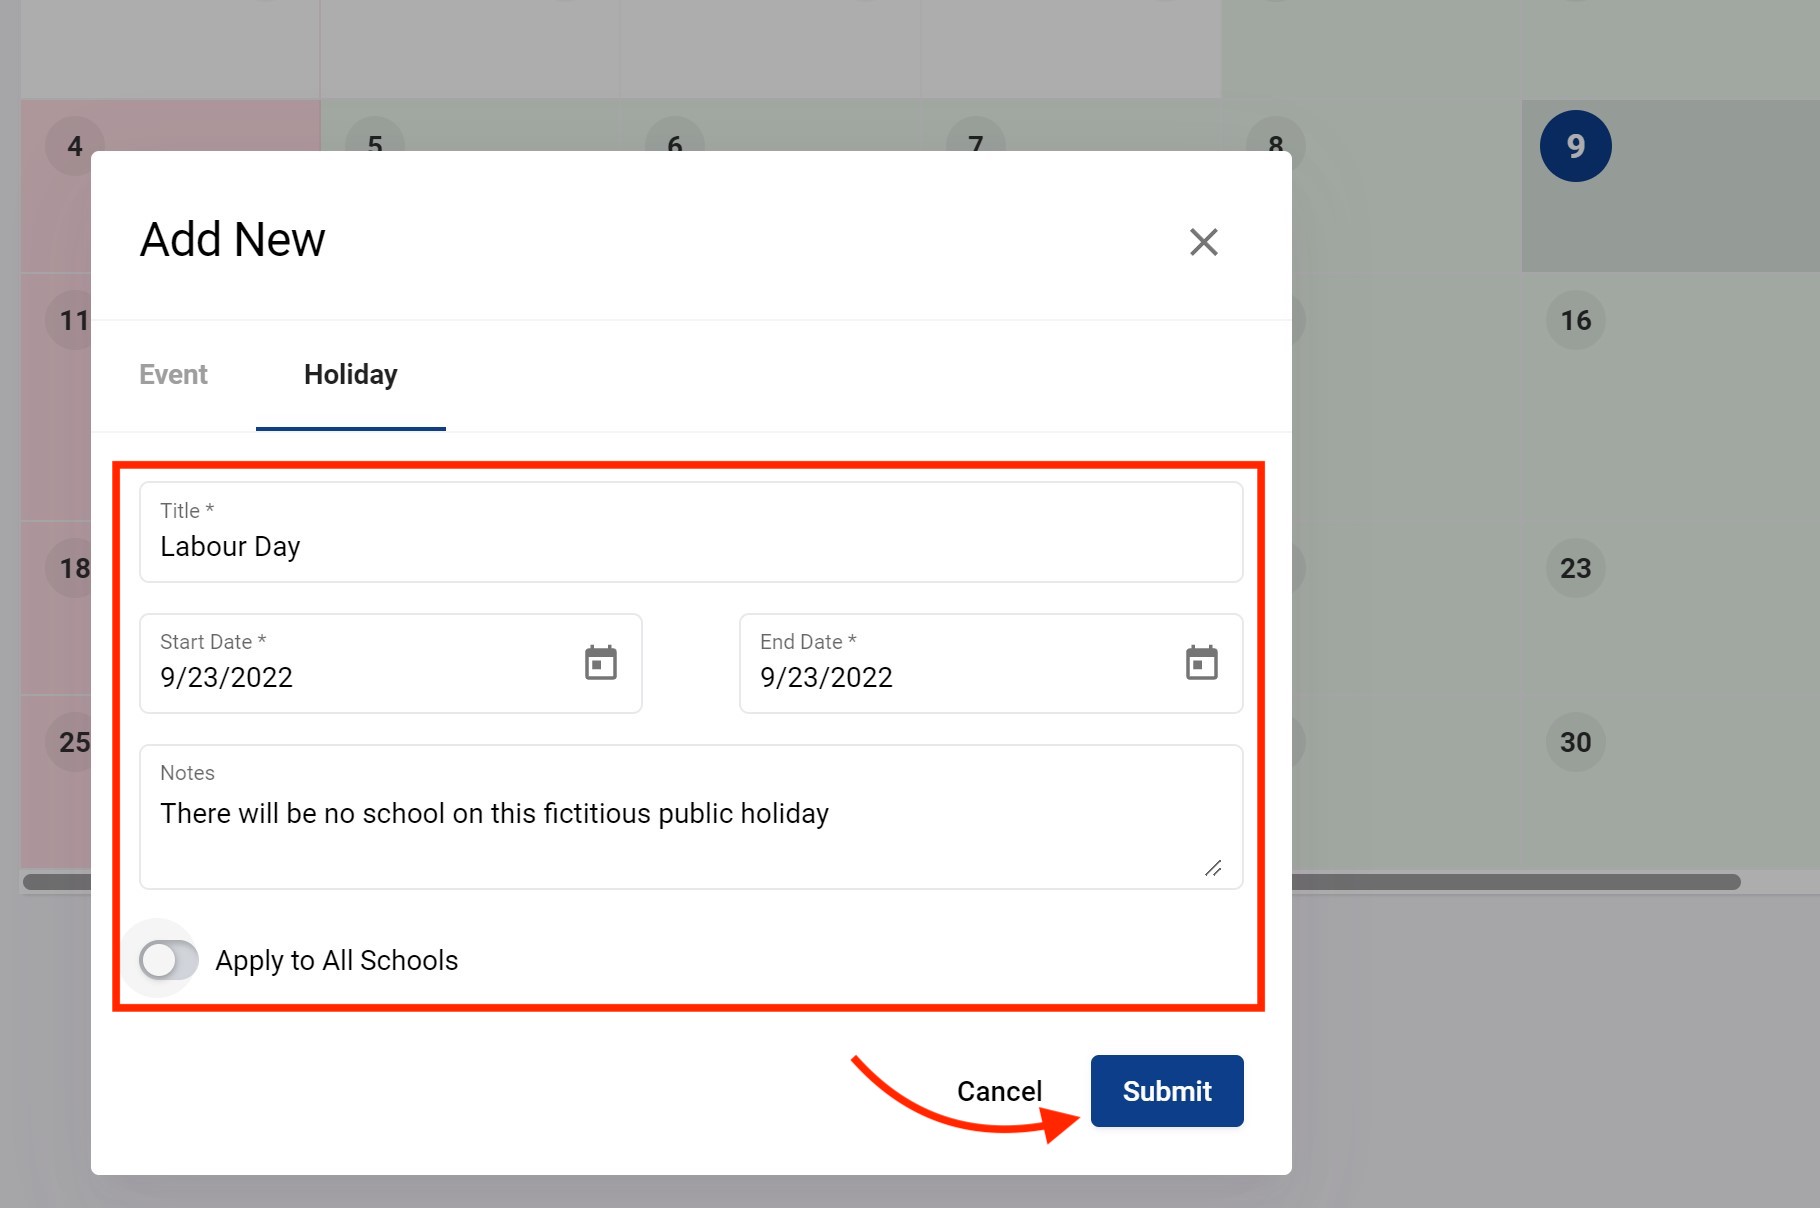
For every school year you need to mark your holidays since they are non school days and should not be counted as days to mark attendance. To do this you simply click on any day of the calendar and get the below. Click on the Holiday tab. Enter a title for your holiday, the start and end dates (which would be the same if it is a single day holiday), notes and whether it applies to all the schools or not.
Add Events
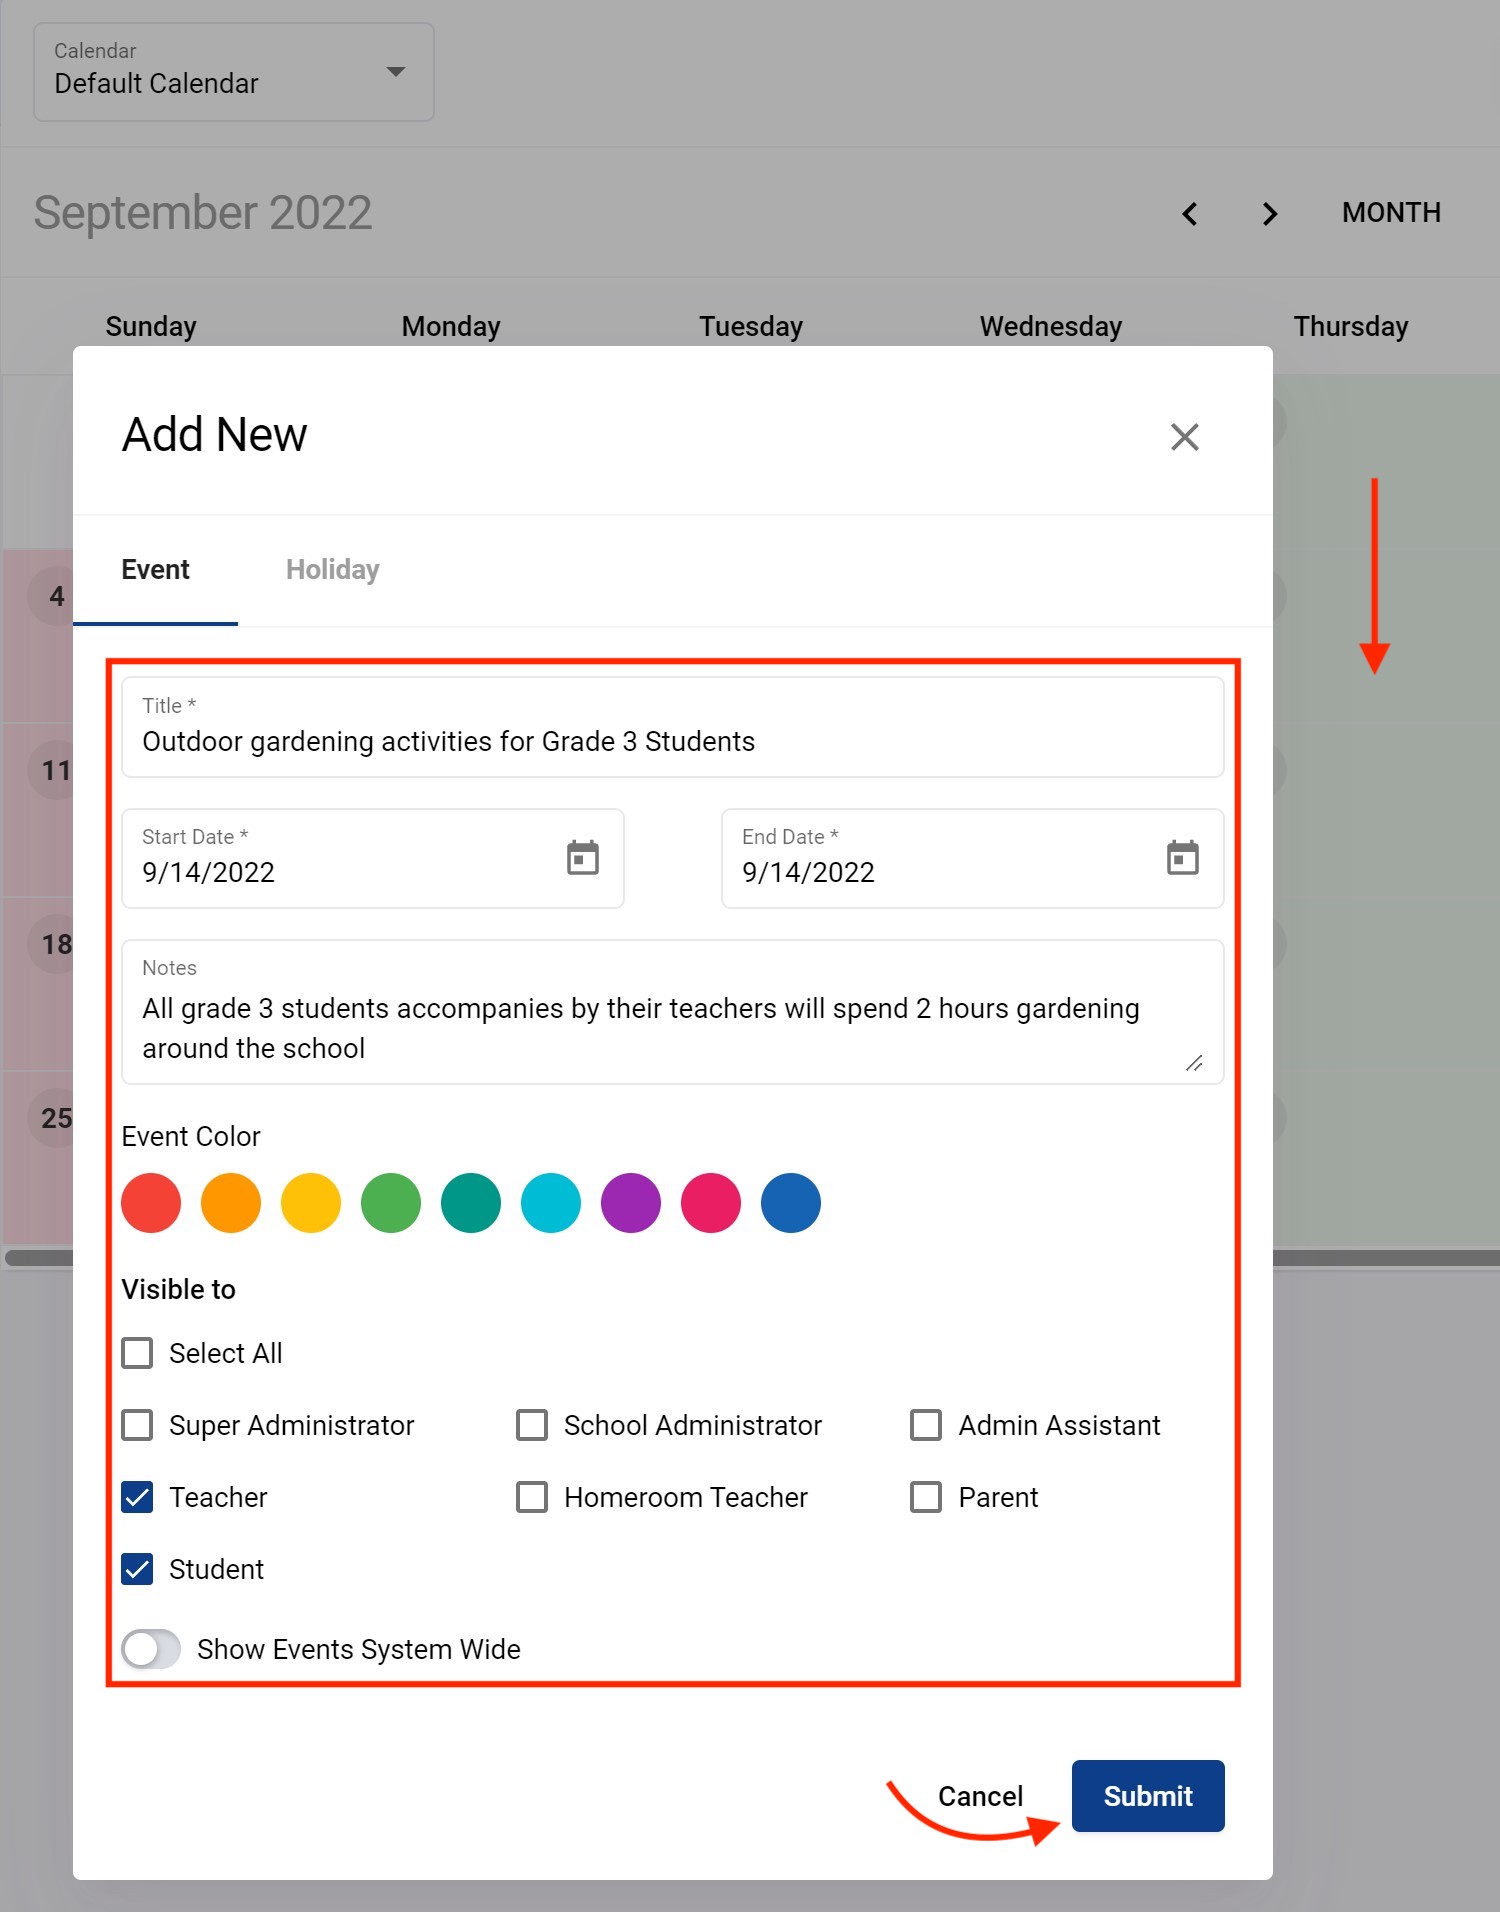
Adding an event on the calendar is done in much the same way as adding an holiday except the day is still counted as a school day and marked for attendance. Click on any day on the calendar. Enter a title, start and end dates, notes, optional color and who you want the event to be visible to. The click on Submit
Editing Holidays/Events
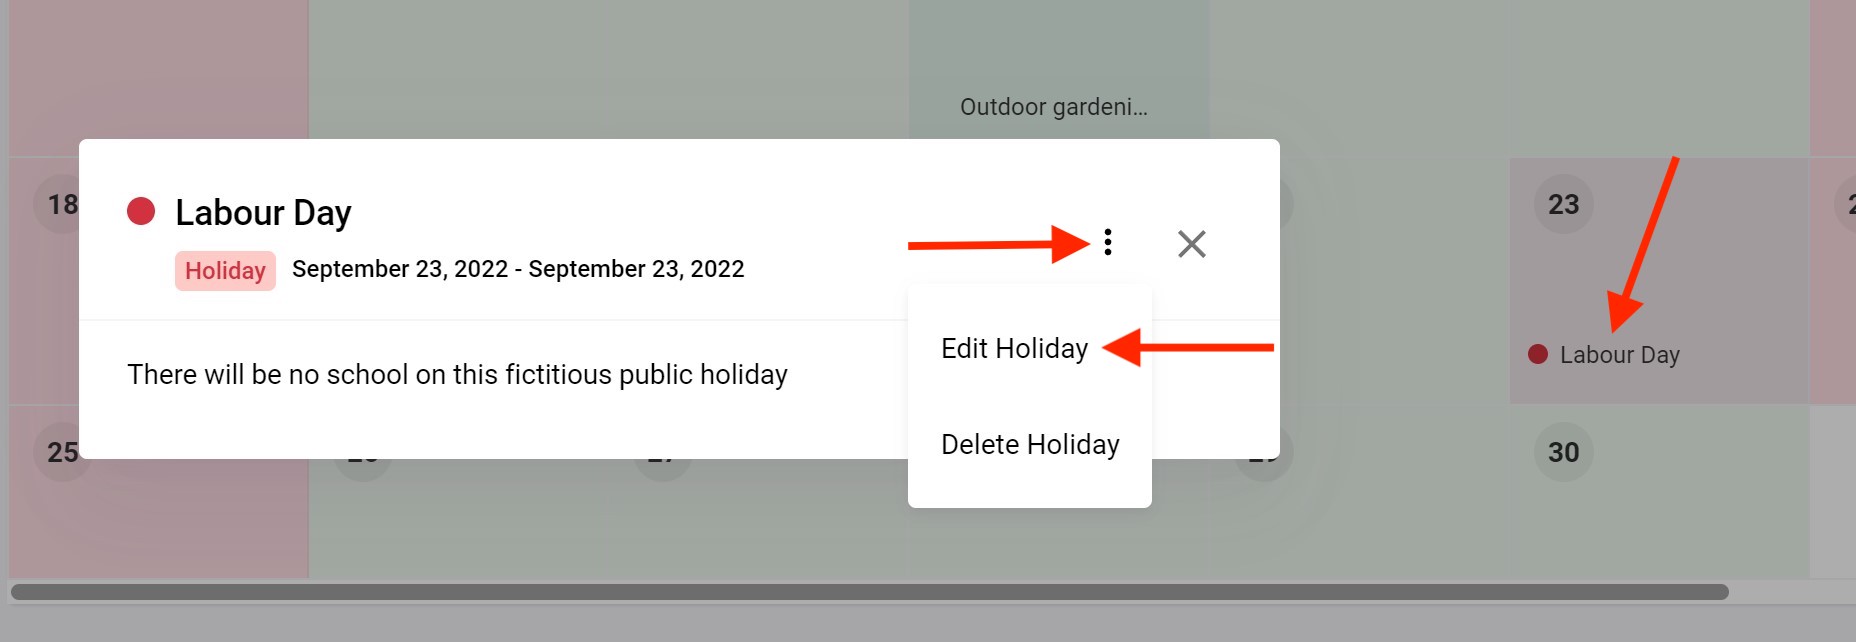
At any time you can go back to edit your holidays and event simply by clicking on the event or holiday you want to edit, click on the triple dots and Edit Holiday (or Event).
[Optional] Add/Deleting Additional Calendars
As mentioned above, you can create additional calendars in addition to your default main calendar. You create a new calendar as shown above.
The example below creates an additional calendar geared only towards parents.
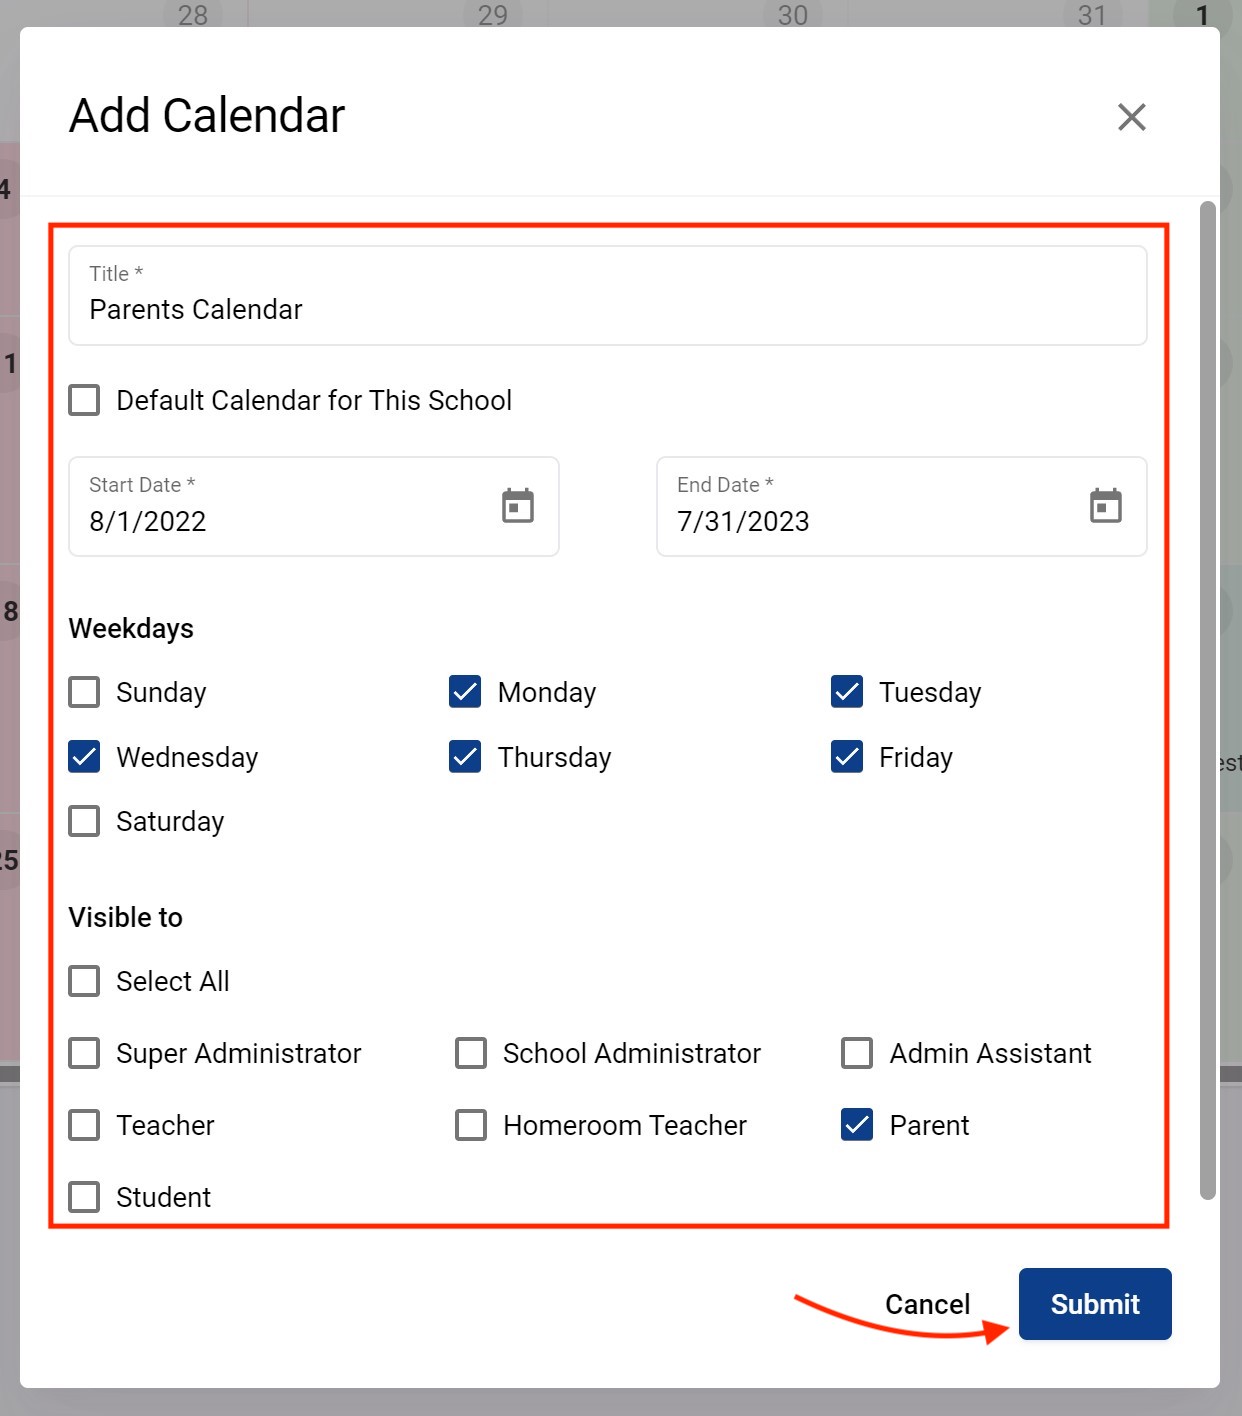
You now see it listed with the default calendar. It can then be edited or remove entirely if not needed anyone.
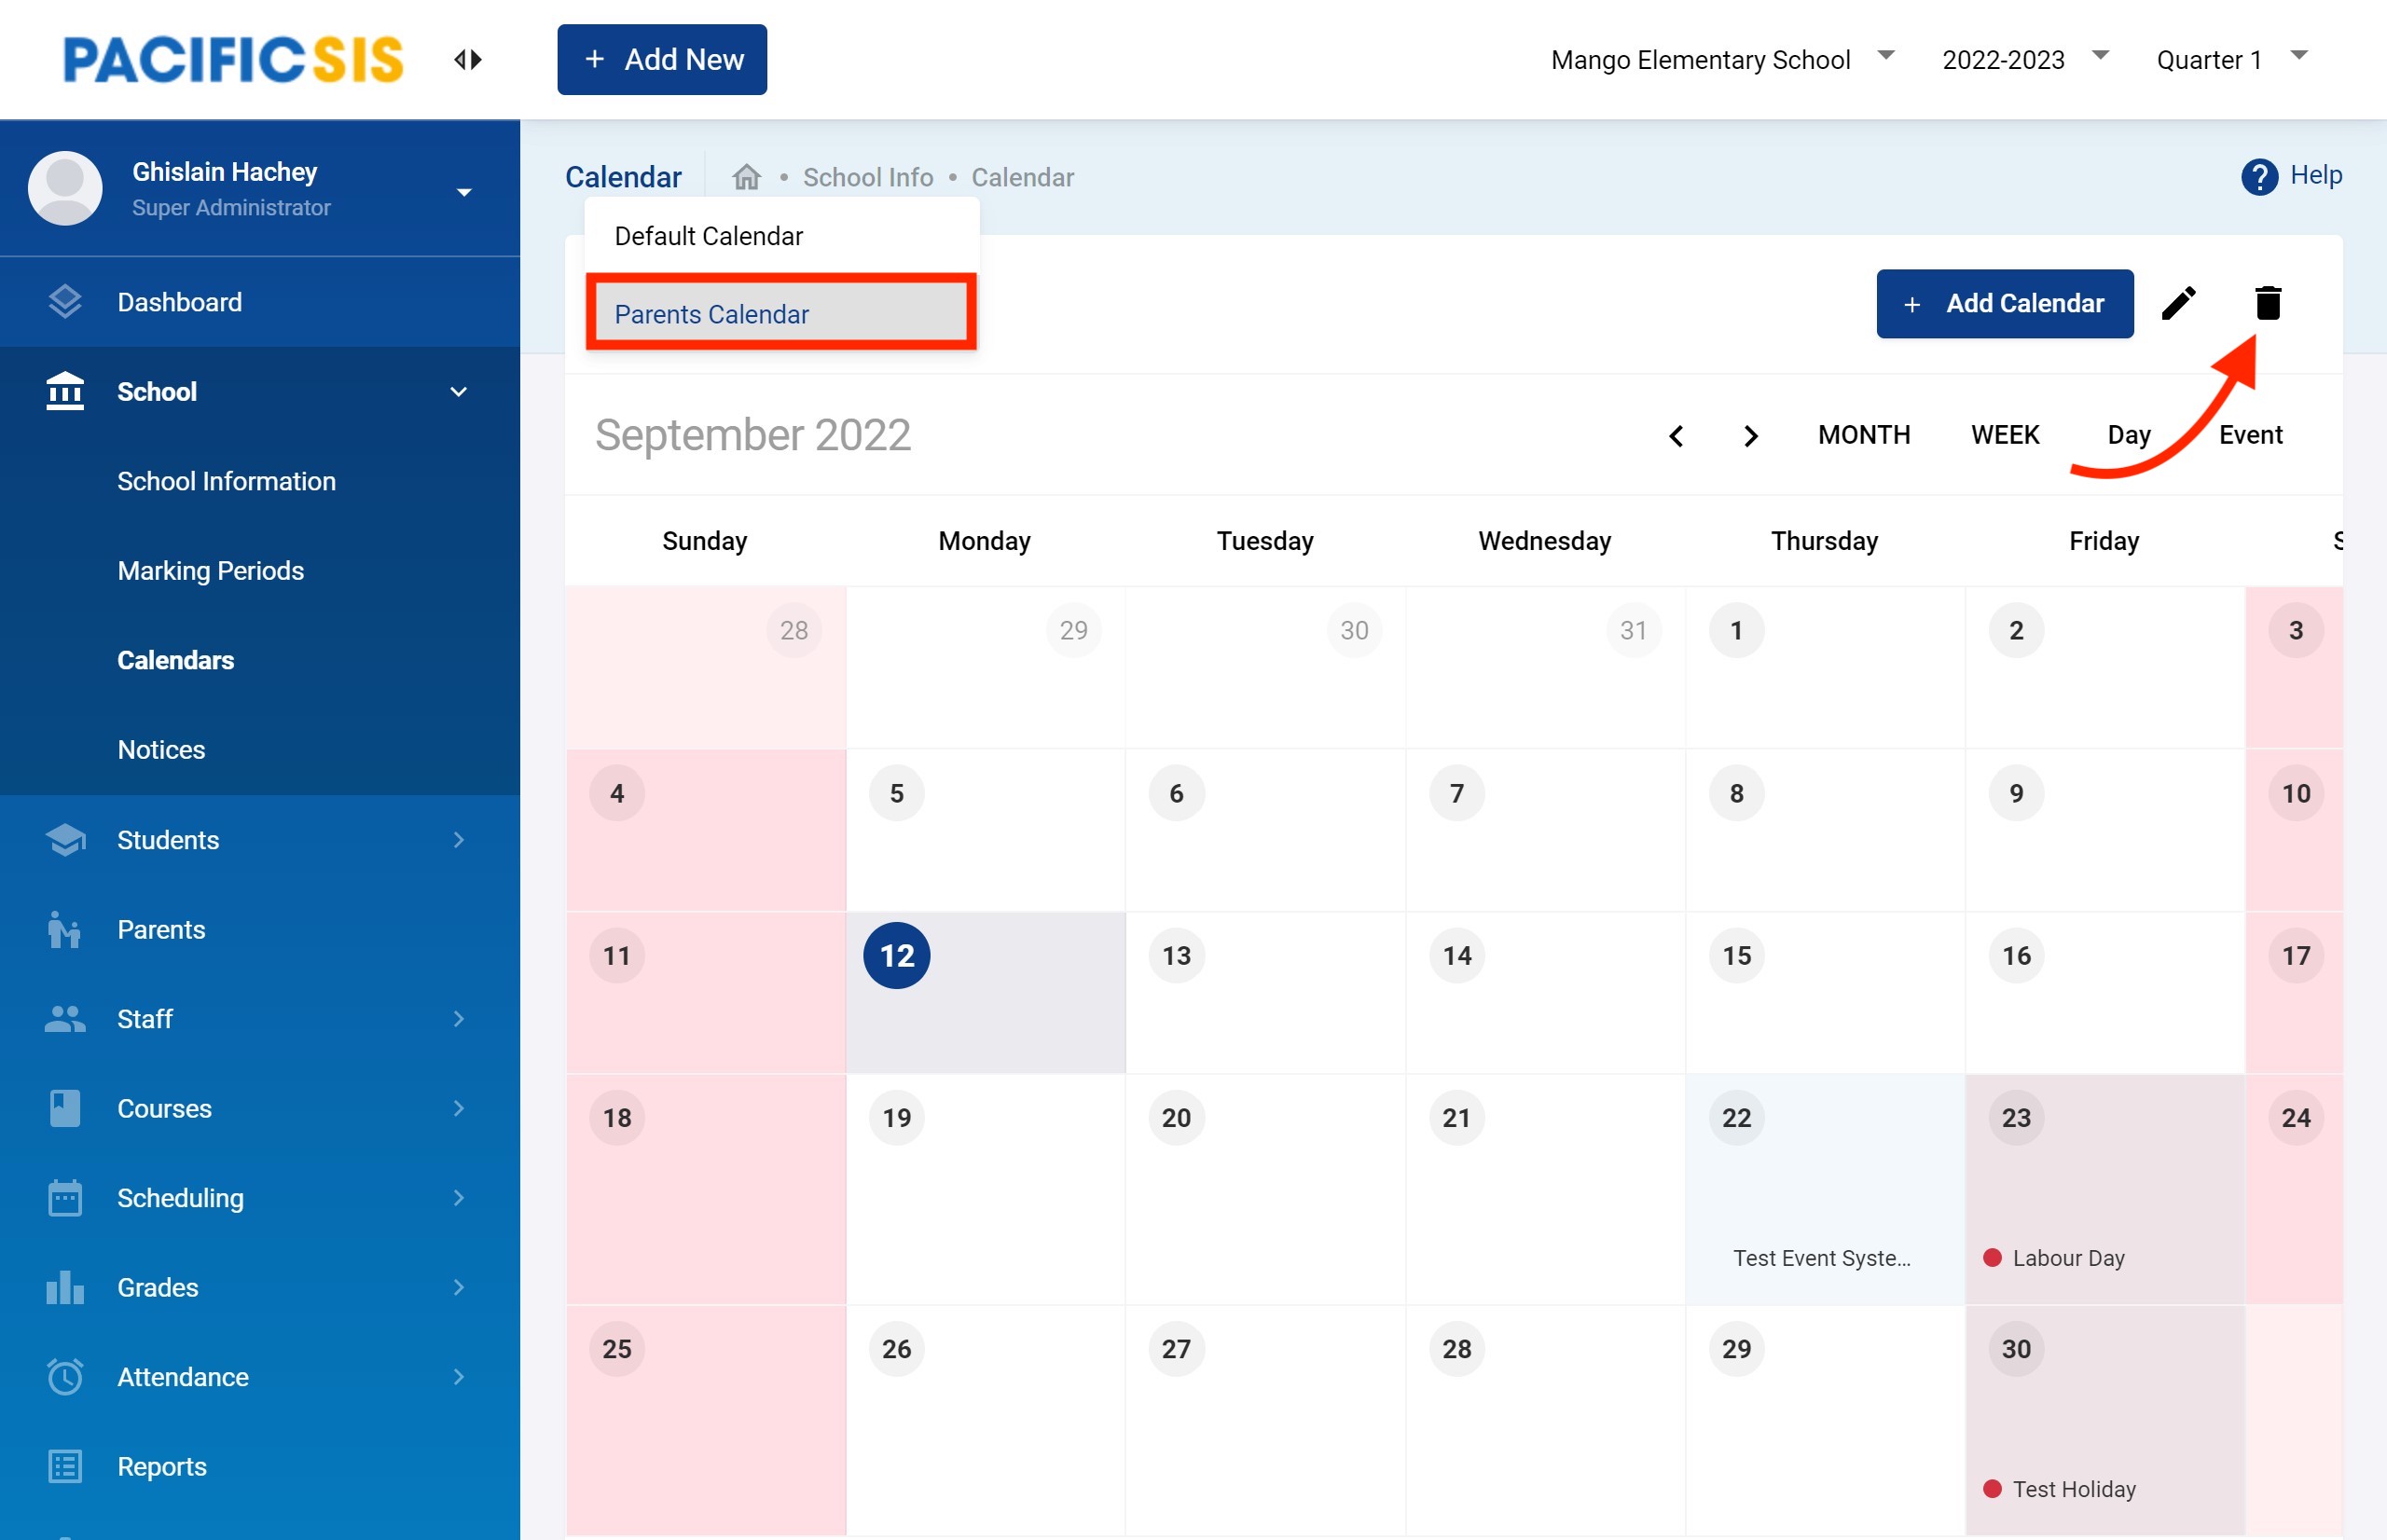
If the calendar does not have any association (like students or course periods created in it) you will be able to delete it. If the calendar has been associated with the students or course periods, it will show a message stating, “Calendar can't be deleted as it has association”. Deleting will prompt for confirmation before completely removing it since this is a non-recoverable destructive operation.
Settings
This section will not review all possible settings in the system but those that you should more commonly pay attention to.
Creating Periods
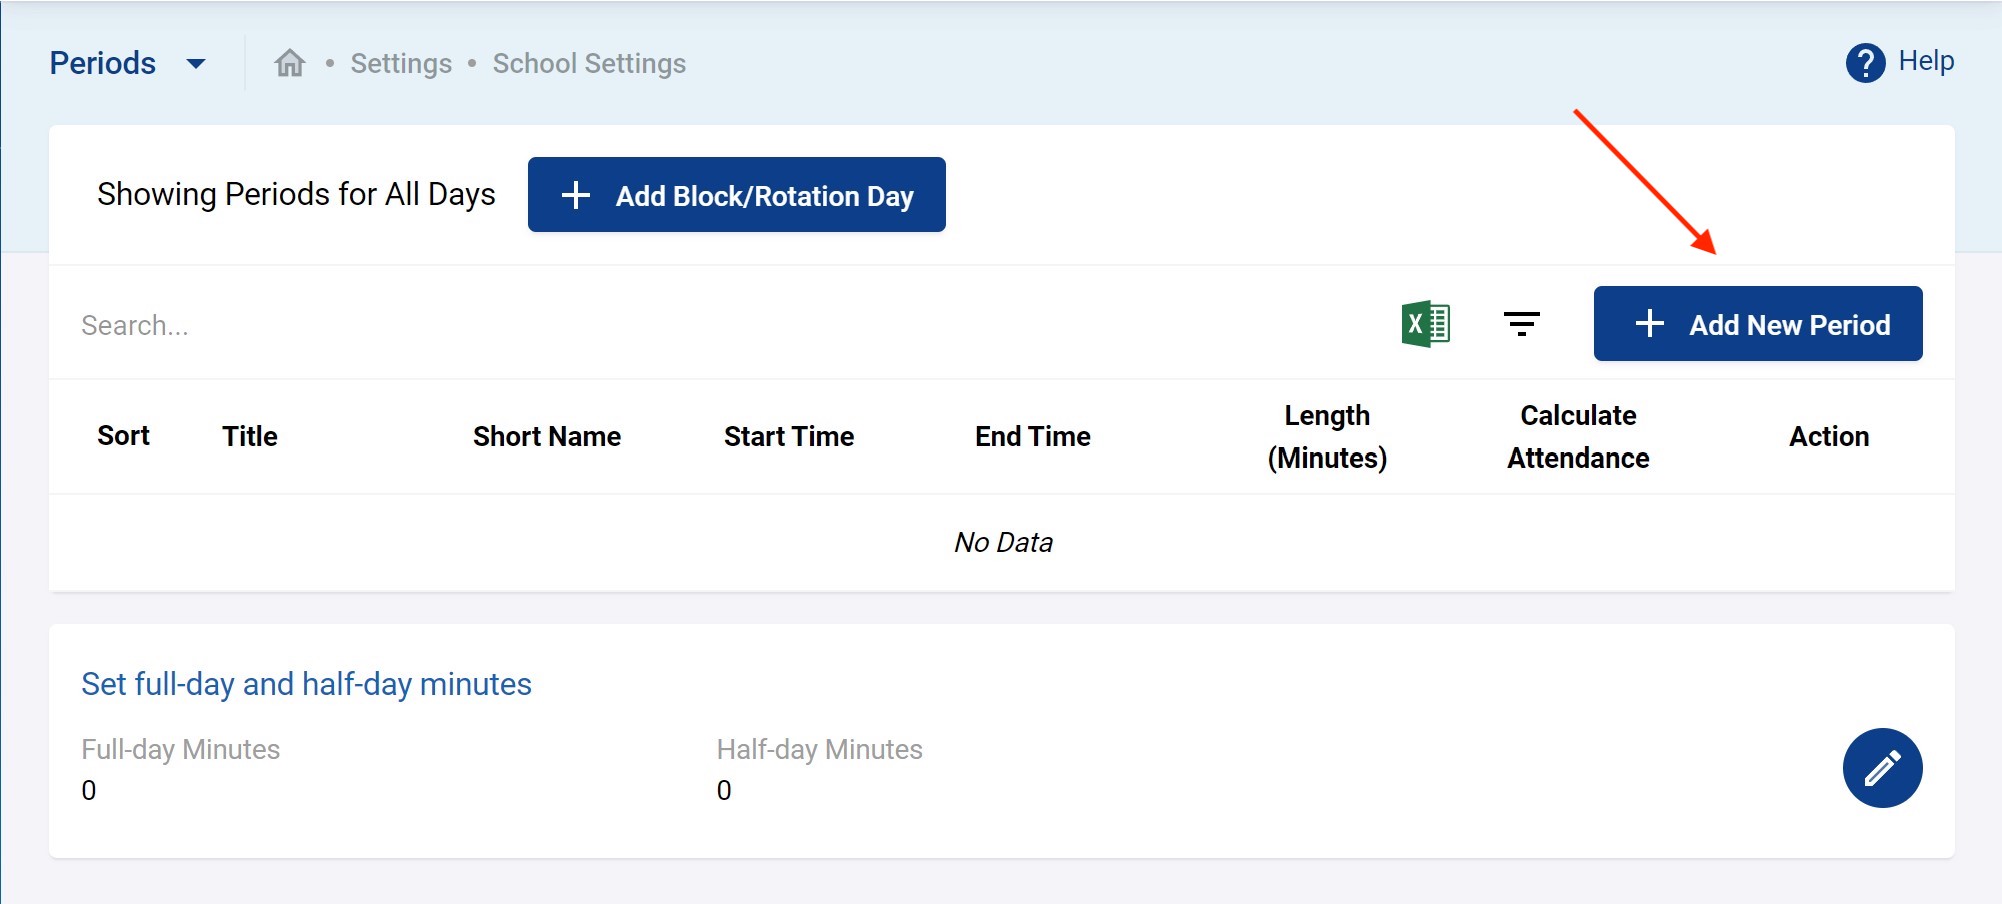
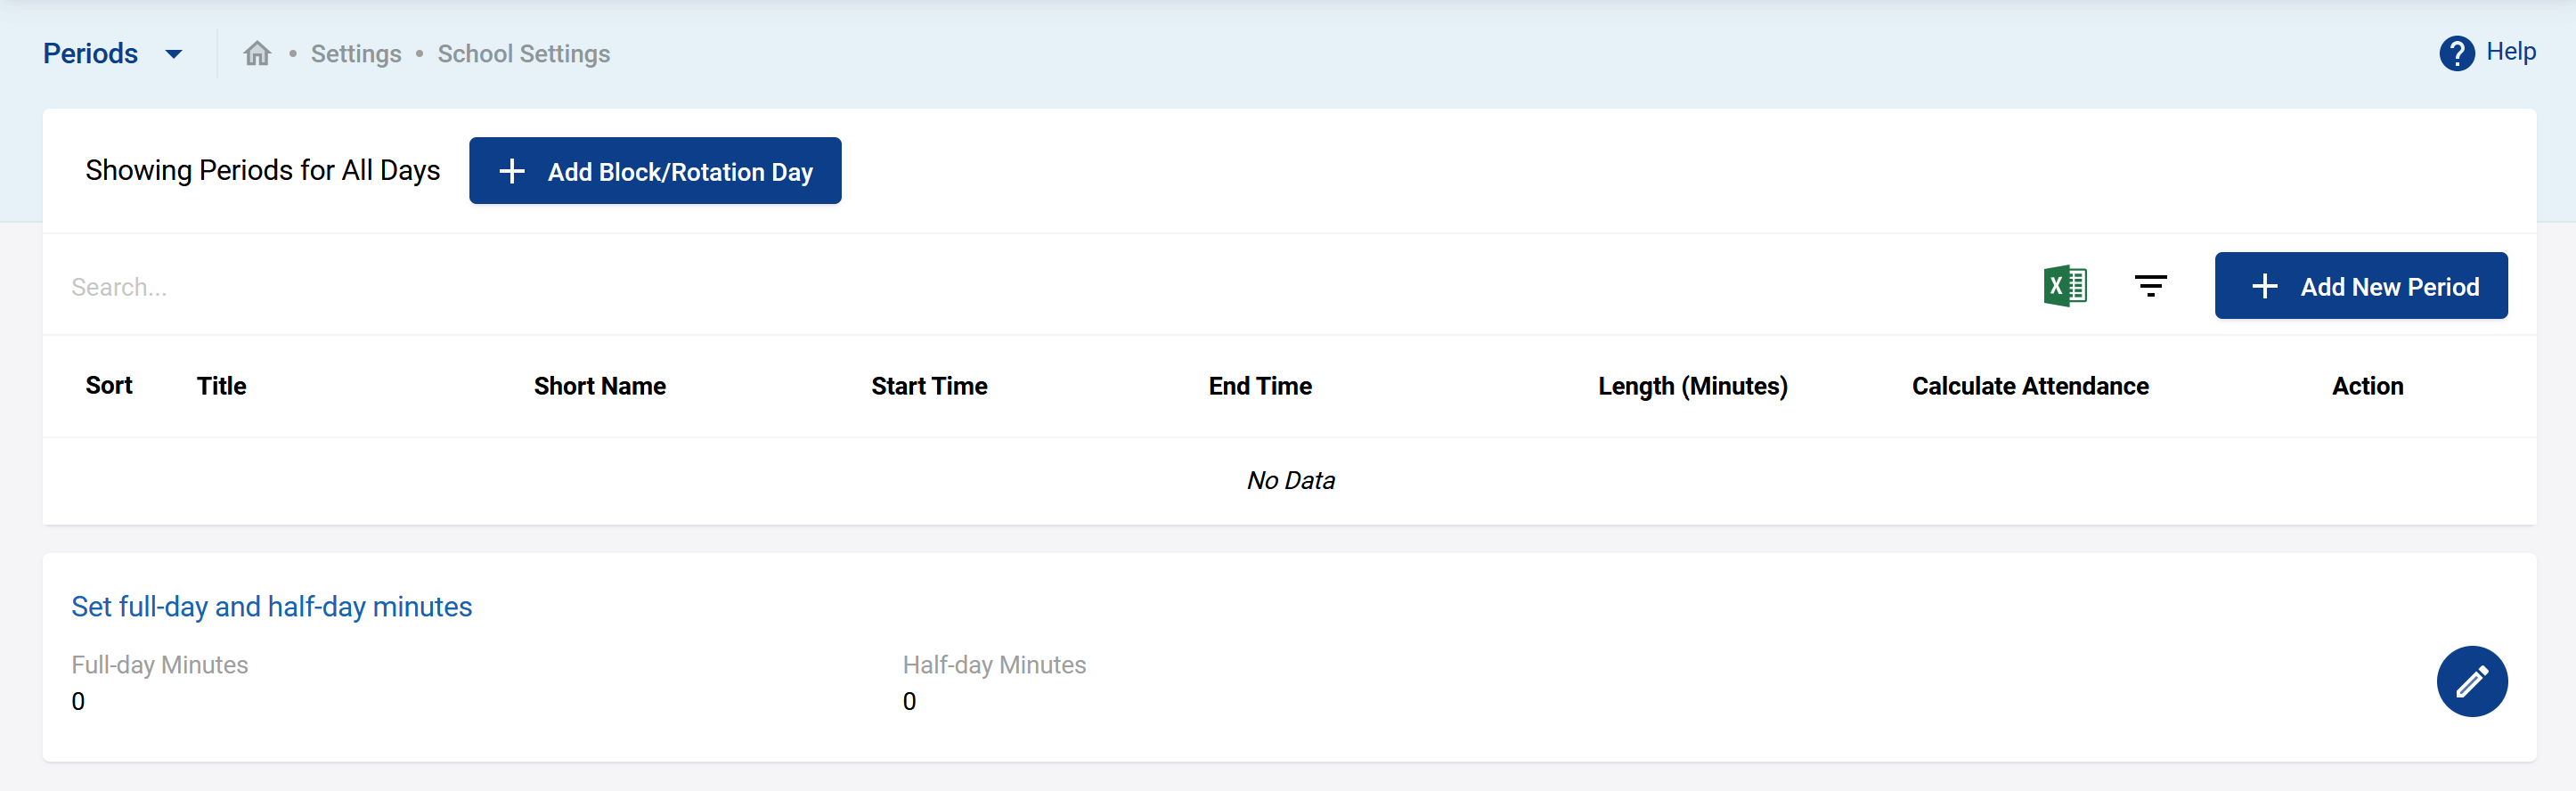
This is the area where you define the time divisions of a school day, known as periods. To create periods go to Settings → Periods. You will see the following when no periods configured. Start entering your periods one by one by clicking + Add New Period.
The first period we'll create as example is a special period to take attendance in the morning (typical in primary schools).

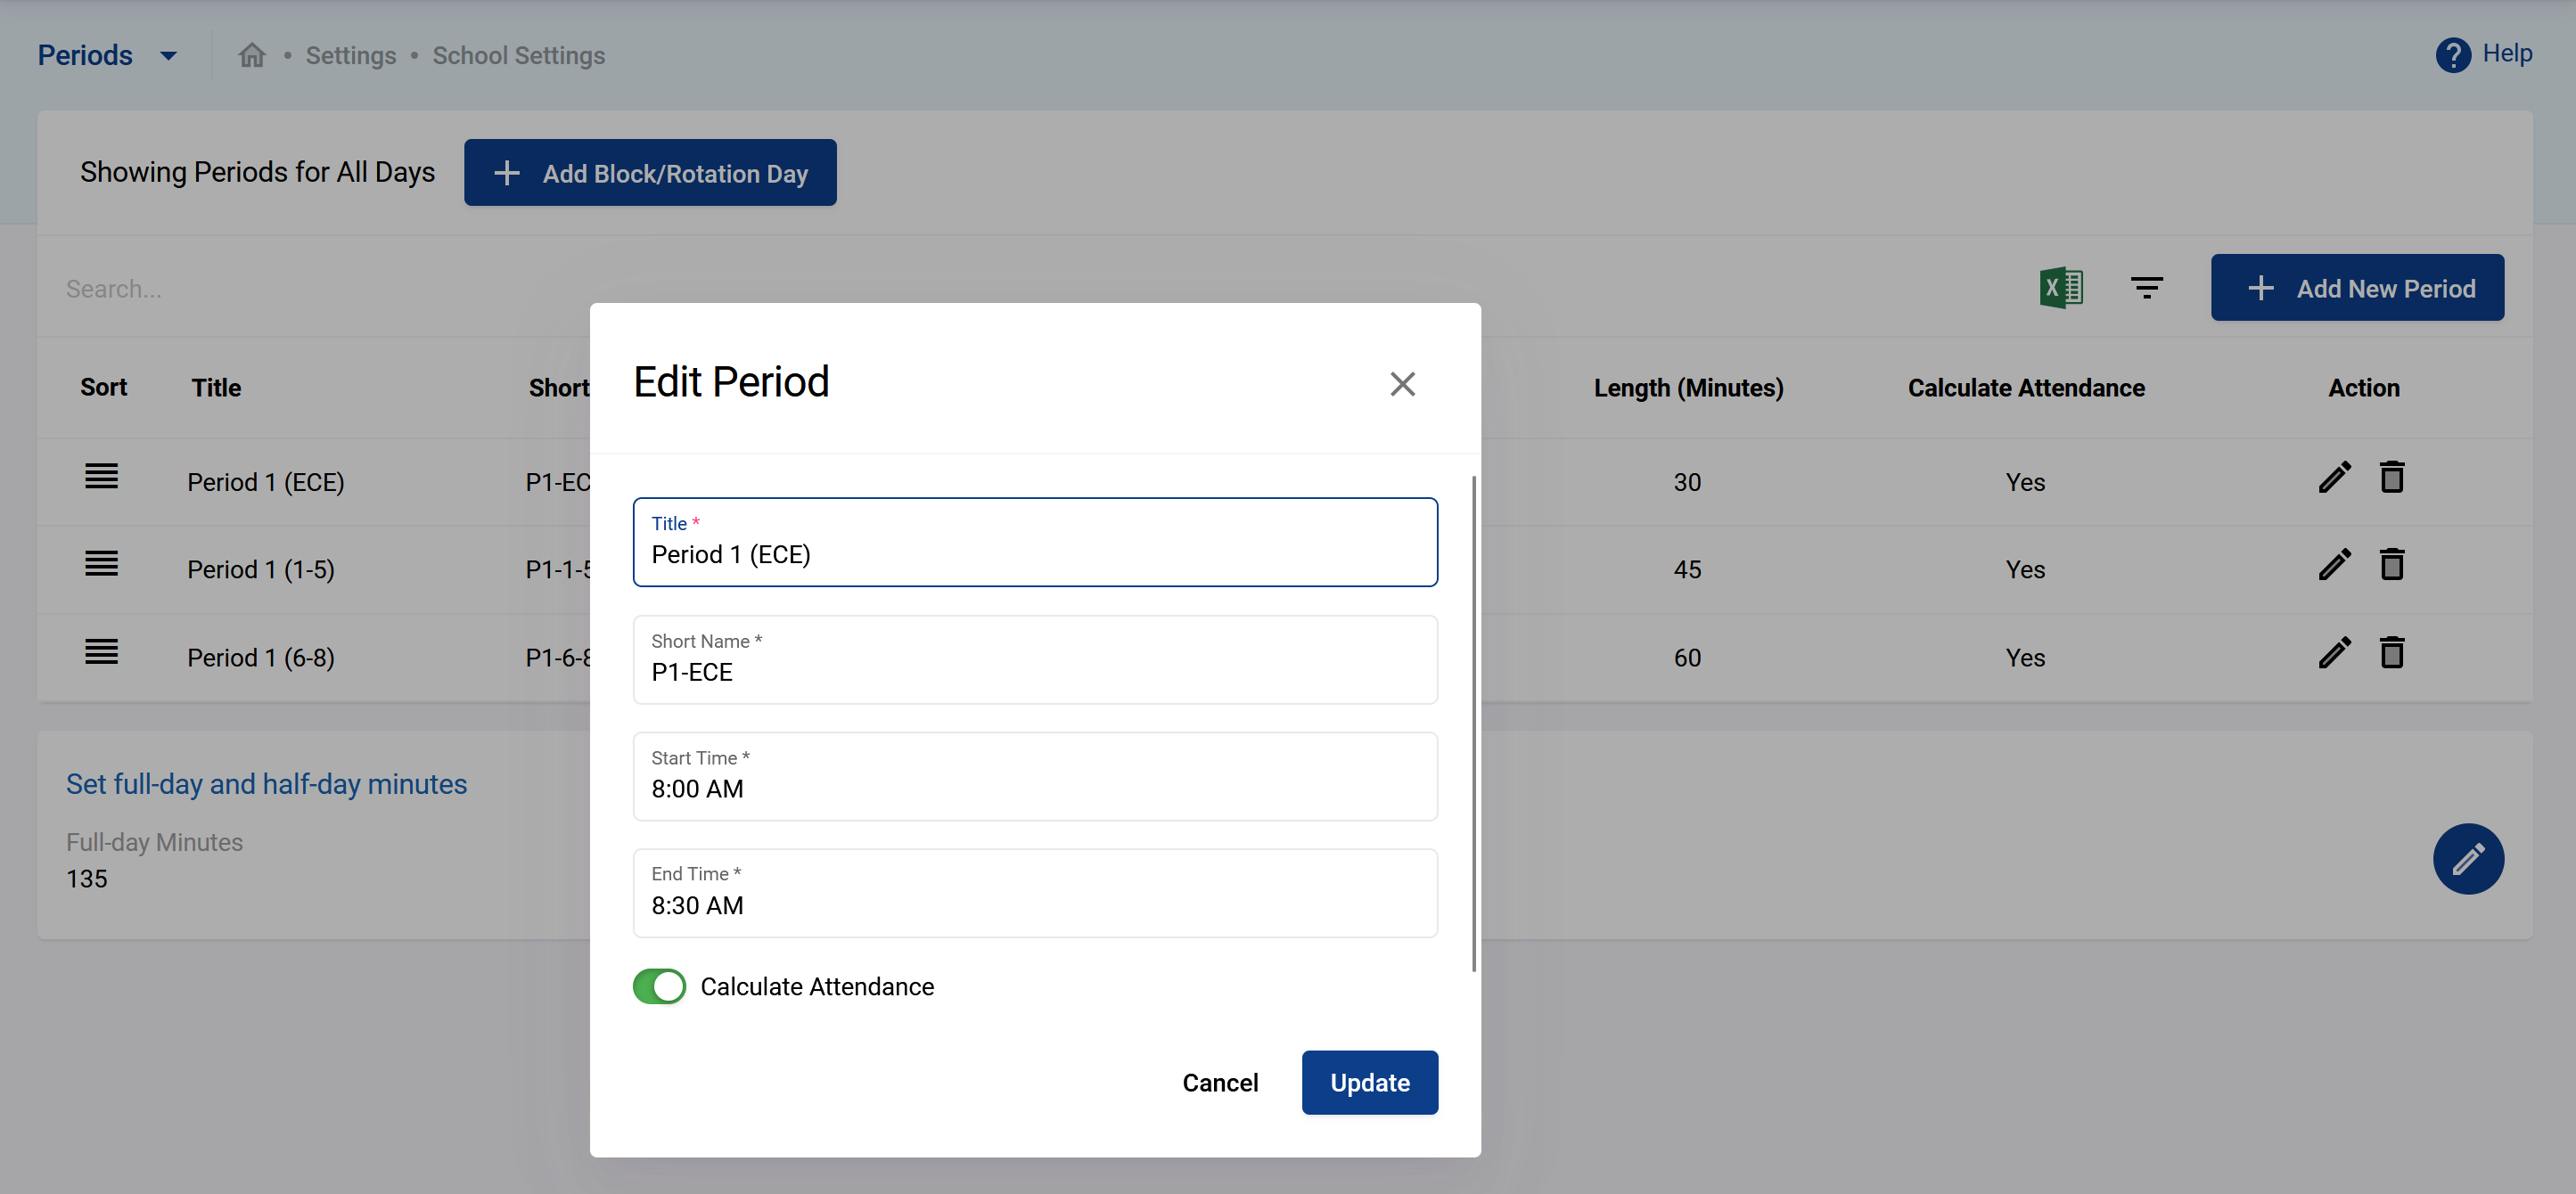
The Title, Short Name, Start Time, End Time are self explanatory. The checkboxes are explained below.
- Calculate Attendance: Checking this option will allow the teachers to take attendance on that particular period when that period is associated in a course period.
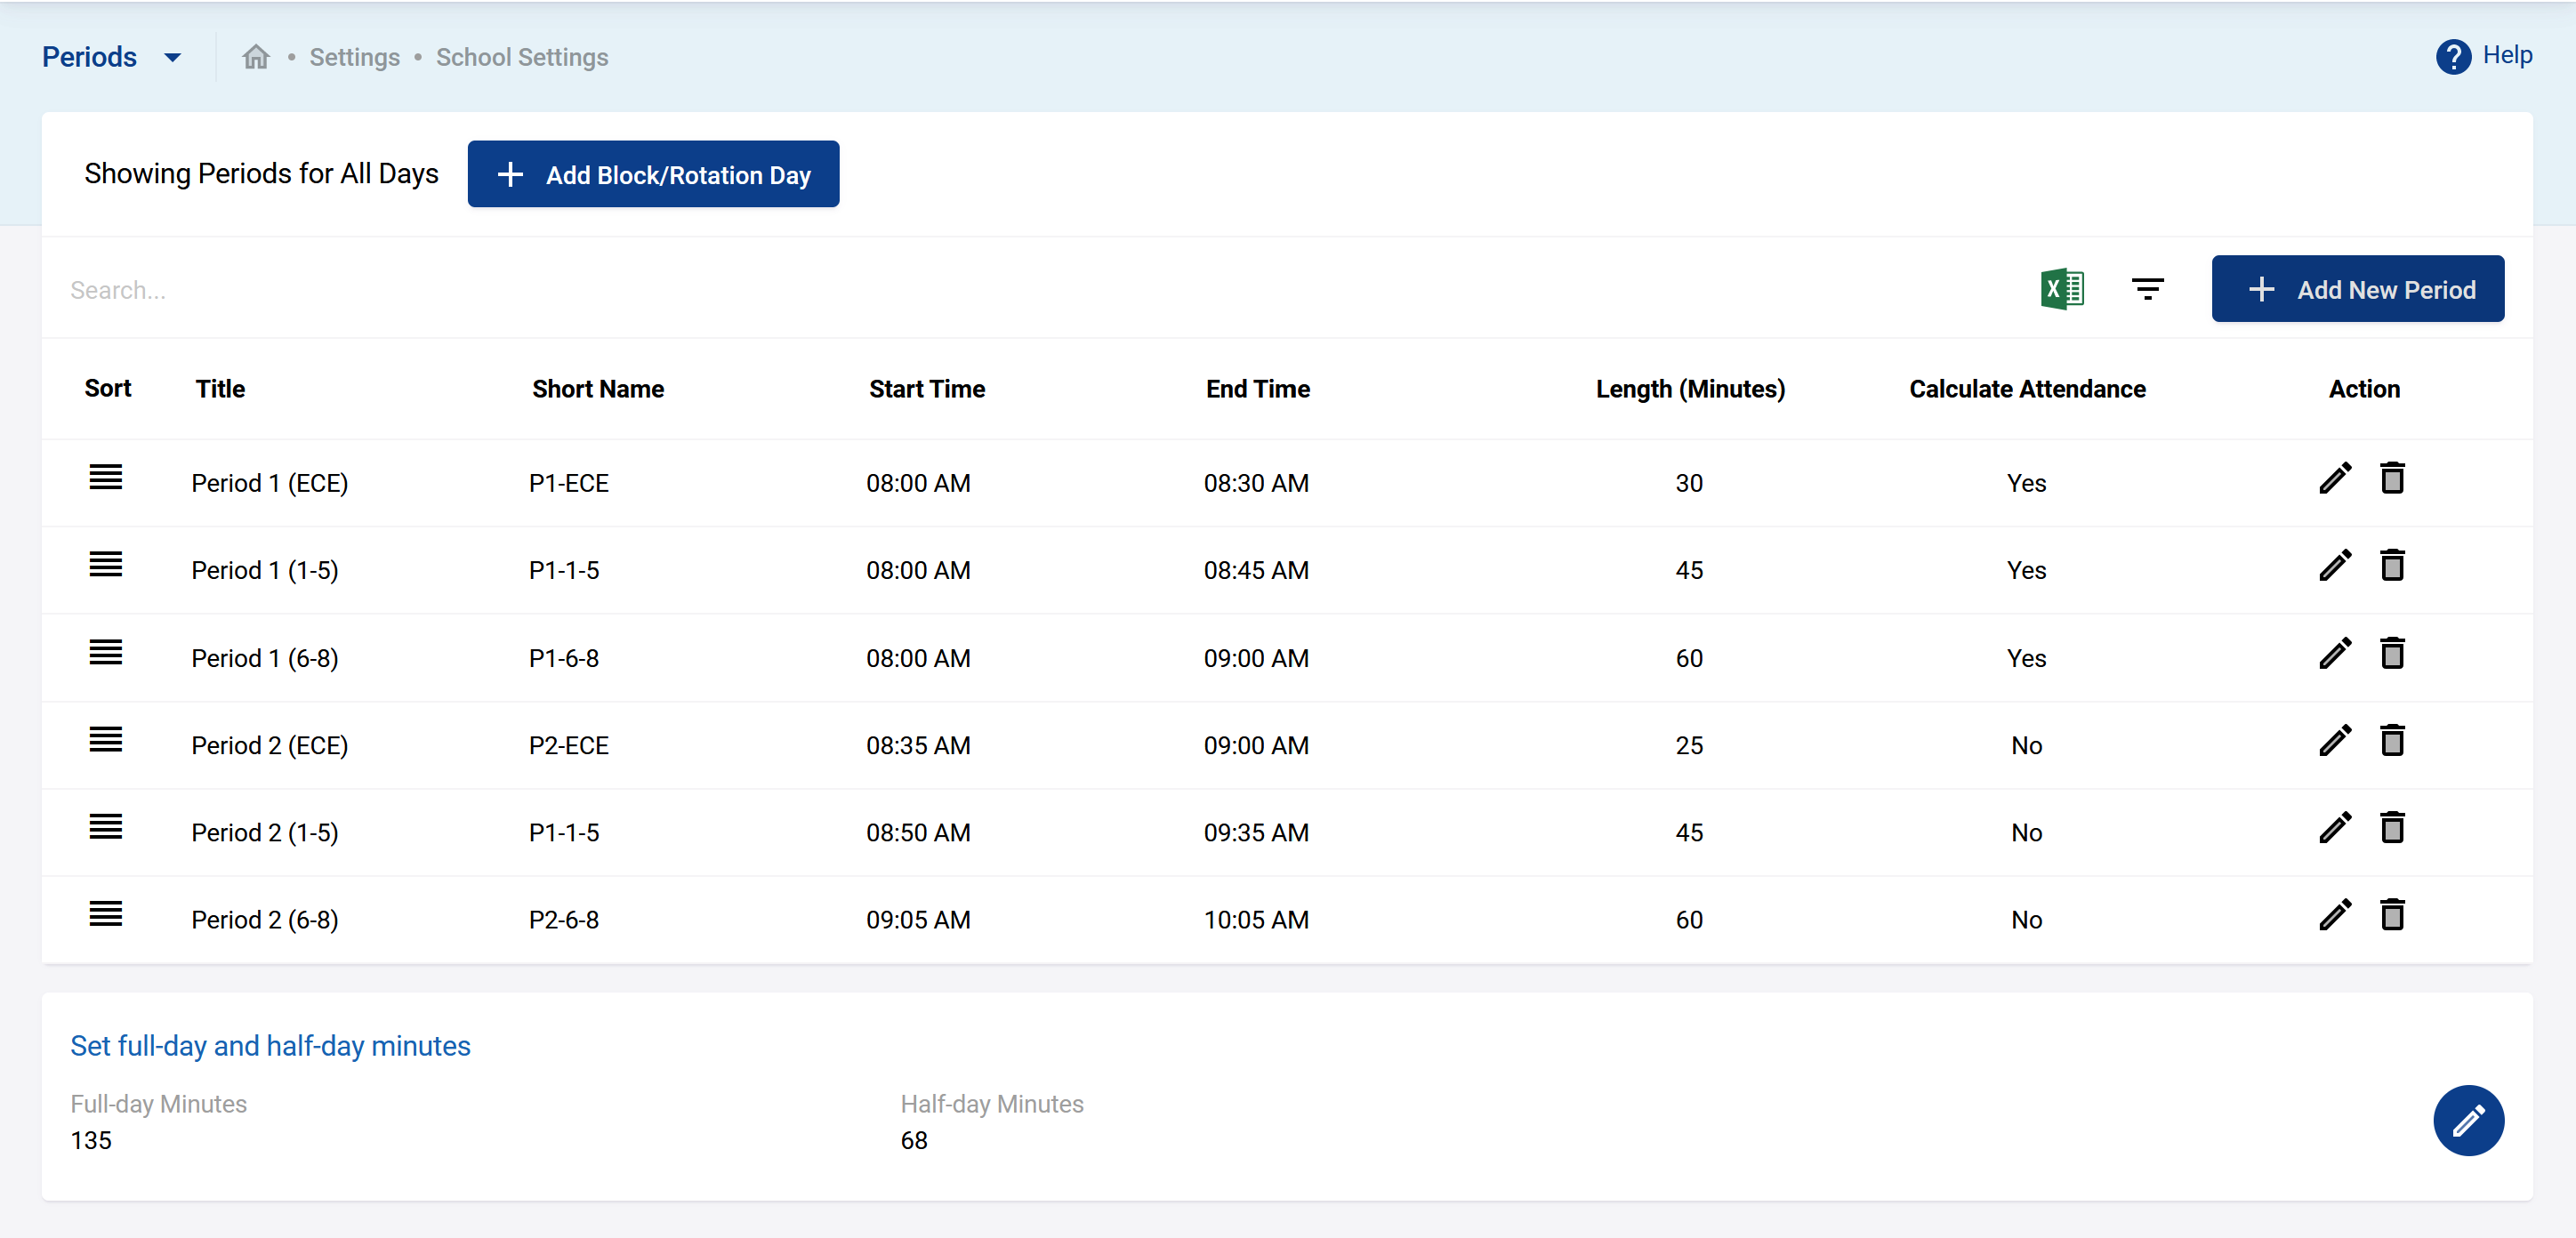
You can always edit/remove any of the previously created periods if you need to using the pencil or trash icons. Once complete, your periods could look something like the following.
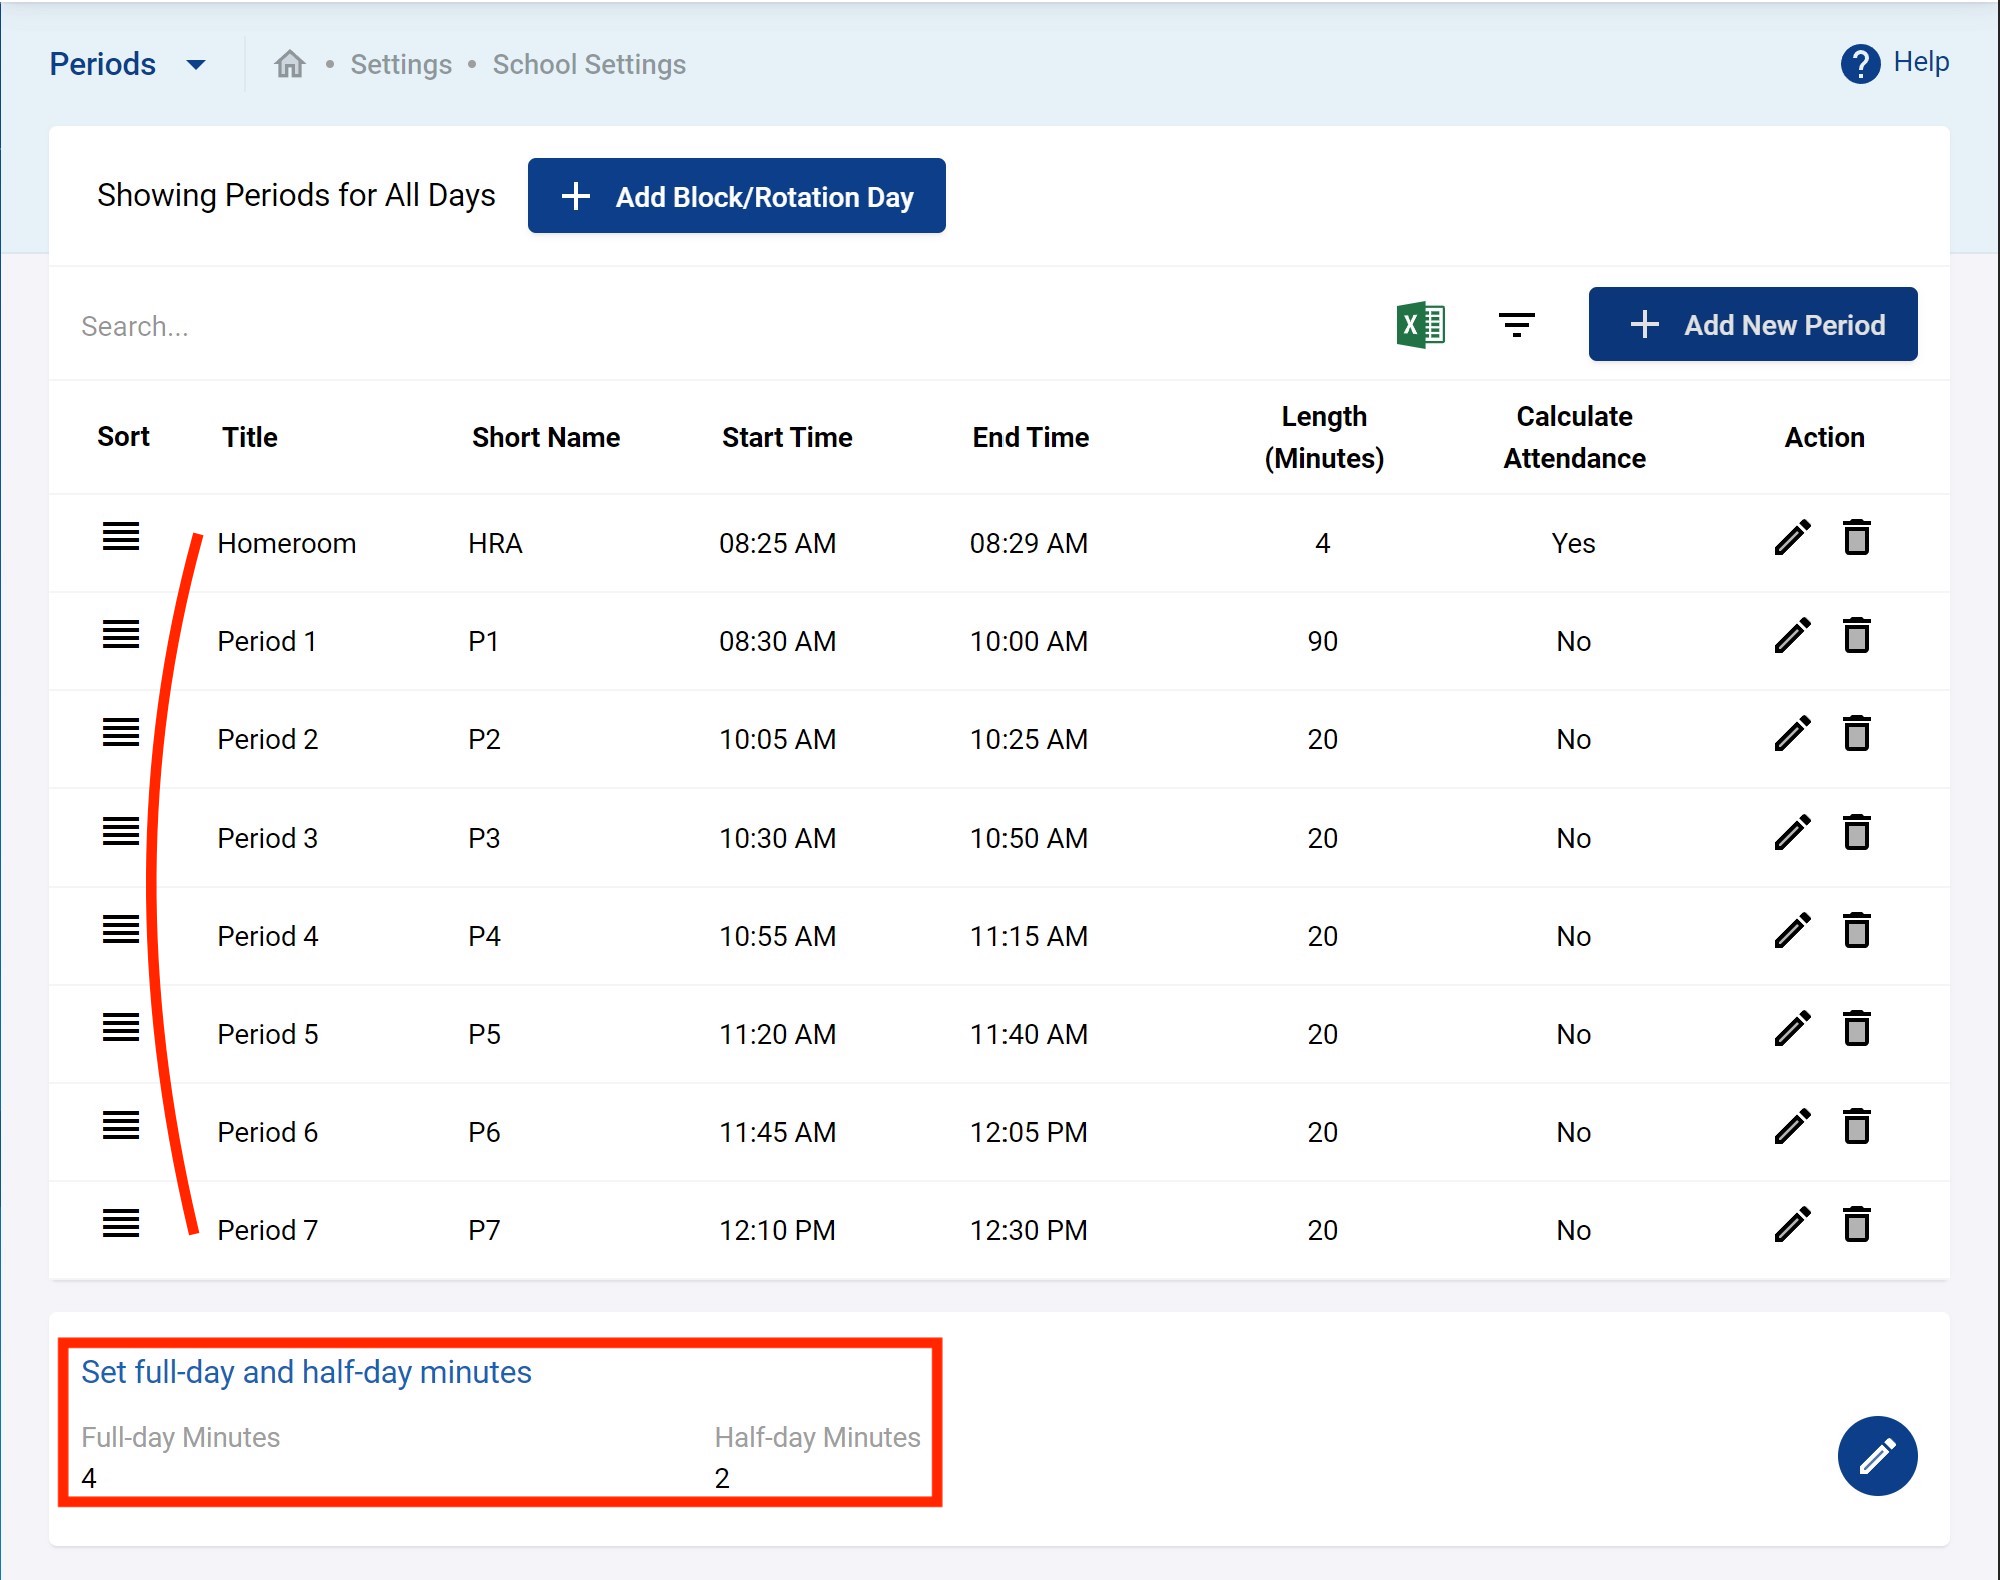
[Optional] Note from the above figure that Set full-day and half-day minutes. This is automatically calculated based on the periods for which you will mark attendance. For the Attendance Chart feature to work the system needs to know what it means to be at school the full day or half a day. This is the purpose of this configuration. It provides an automatically suggestion default but it can also be adjusted. This will depend on how you setup your periods and how you mark attendance. The most typical use cases are:
- An elementary school creates a small homeroom attendance period to take attendance only one time in the morning. This homeroom period could be 15 minutes. Therefore a full-day would translate to 15 minutes and half-day to 7 minutes.
- A secondary school or any school taking attendance for each periods. Then to get your full-day minutes you would add the total minutes for each period of the day as you configured them in Periods. The half-day could be half those total minutes or you could define them as all the total minutes of the first 4 periods out of a total of 7 periods in the day for example.
Creating Periods (when they differ by grades)
Sometimes a school will have different period timings for different grades. For example, Grade ECE their sets of periods, Grade 1 to 5 has their sets of period times and grade 6 to 8 also have their own period times. The correct way to do this is to put all combination of periods as detailed in the screenshots below. DO NOT use the feature “Block/Rotation Day” for this use case.
One by one create all the combination of periods of your school clearly identifying which grades it applies to (e.g. Period 1 (ECE) is the Period one times for the ECE students, etc.)
It will end up looking something like this.
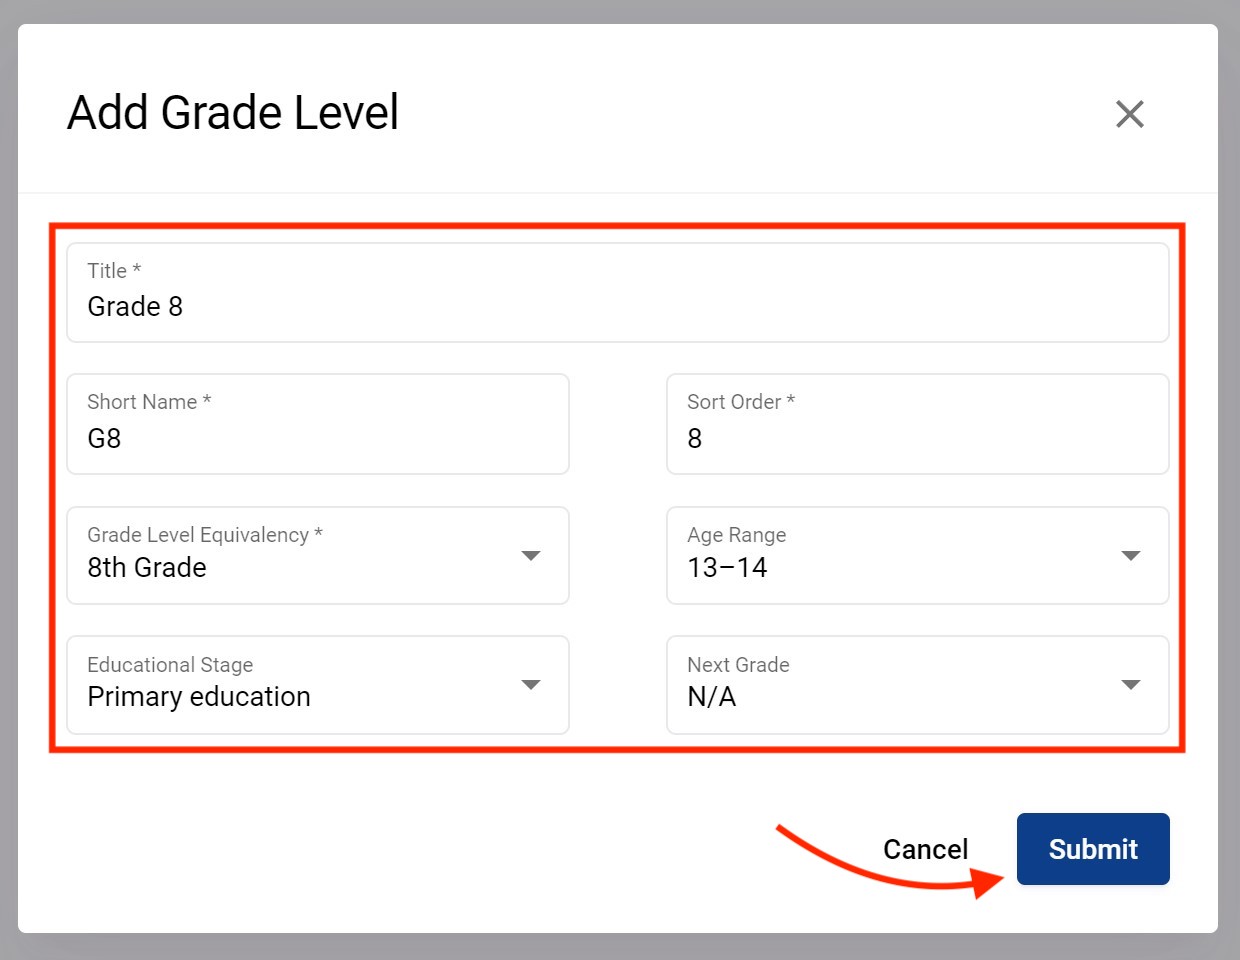
Grade Levels (aka. Class Levels)
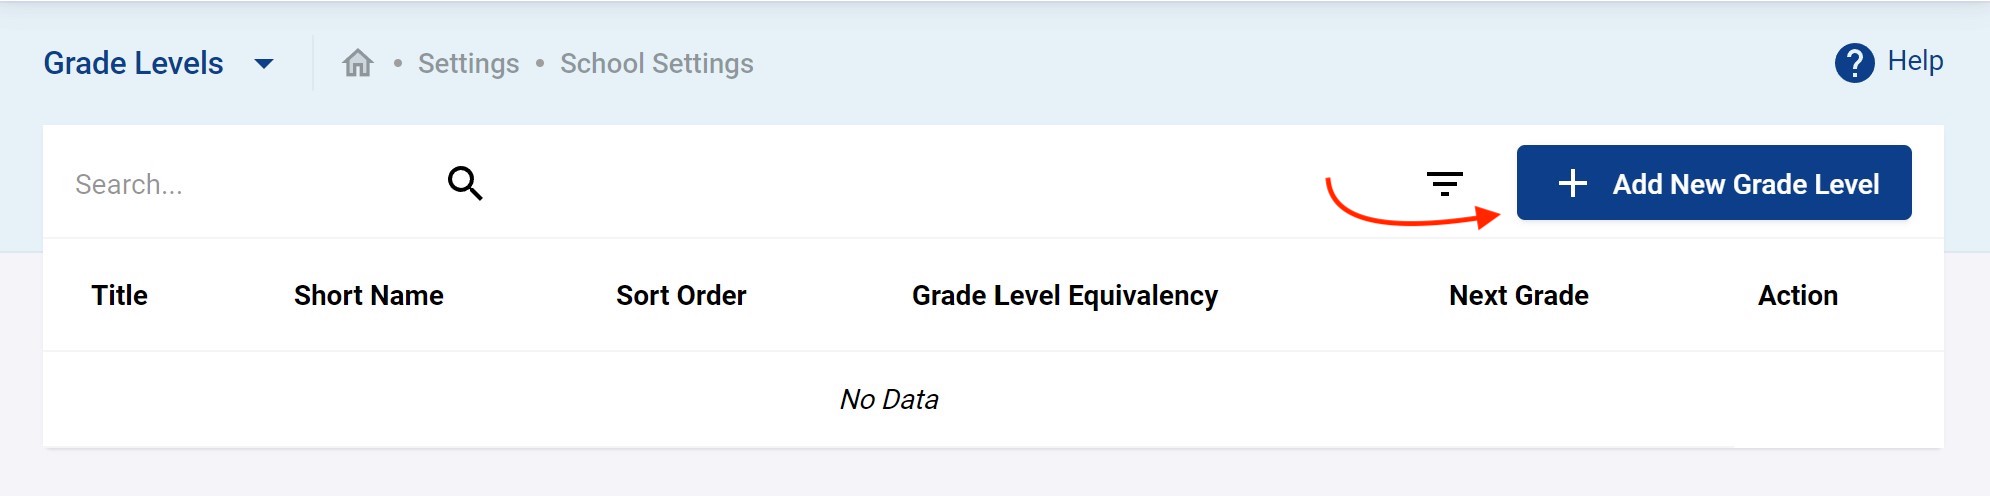
This section captures the different grade levels (aka. class levels) as per your school’s requirements. You do this in Settings → Grade levels. Add all your grade levels by clicking on + Add New Grade Level.
You'll see the following. Pay particular attention to the Next Grade field. When the school is rolled over at the end of each academic year, the students who are set to be promoted to the next grade are done according to the value you set here.
Once completed, grade levels for a typical primary school would look like the following.
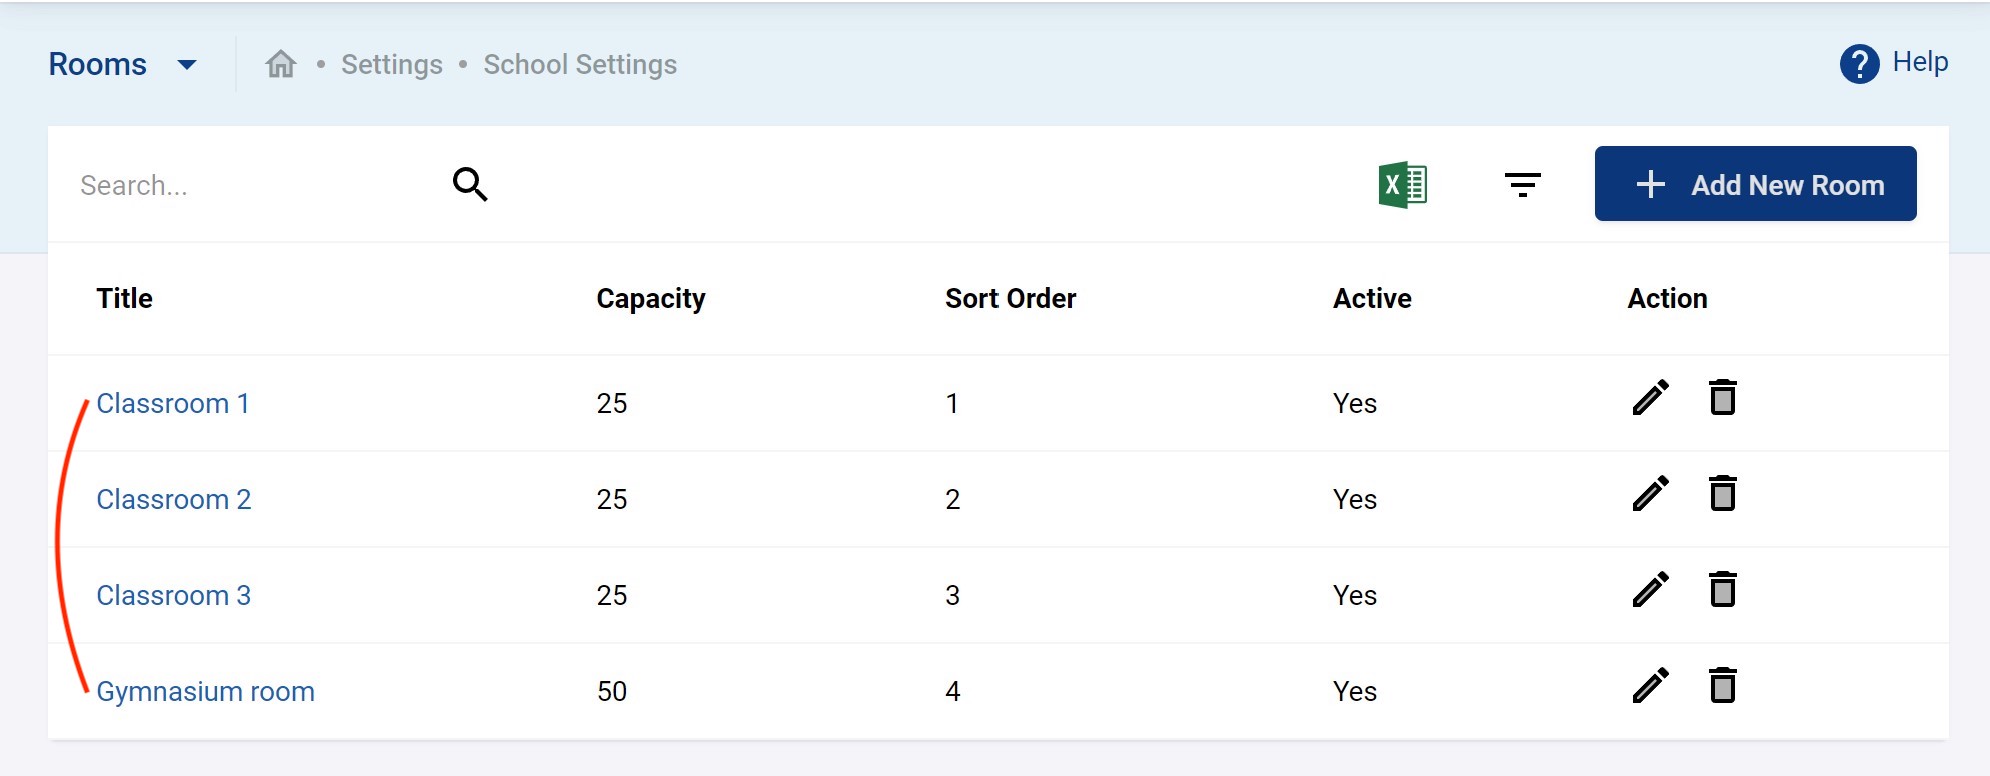
Rooms
This section lets you to create and define numerous rooms in the school. Go to Settings → Rooms. Simply add room one by ones entering the title and its capacity along with an optional brief description. The final result for a tiny simple fictitious school looks like this.
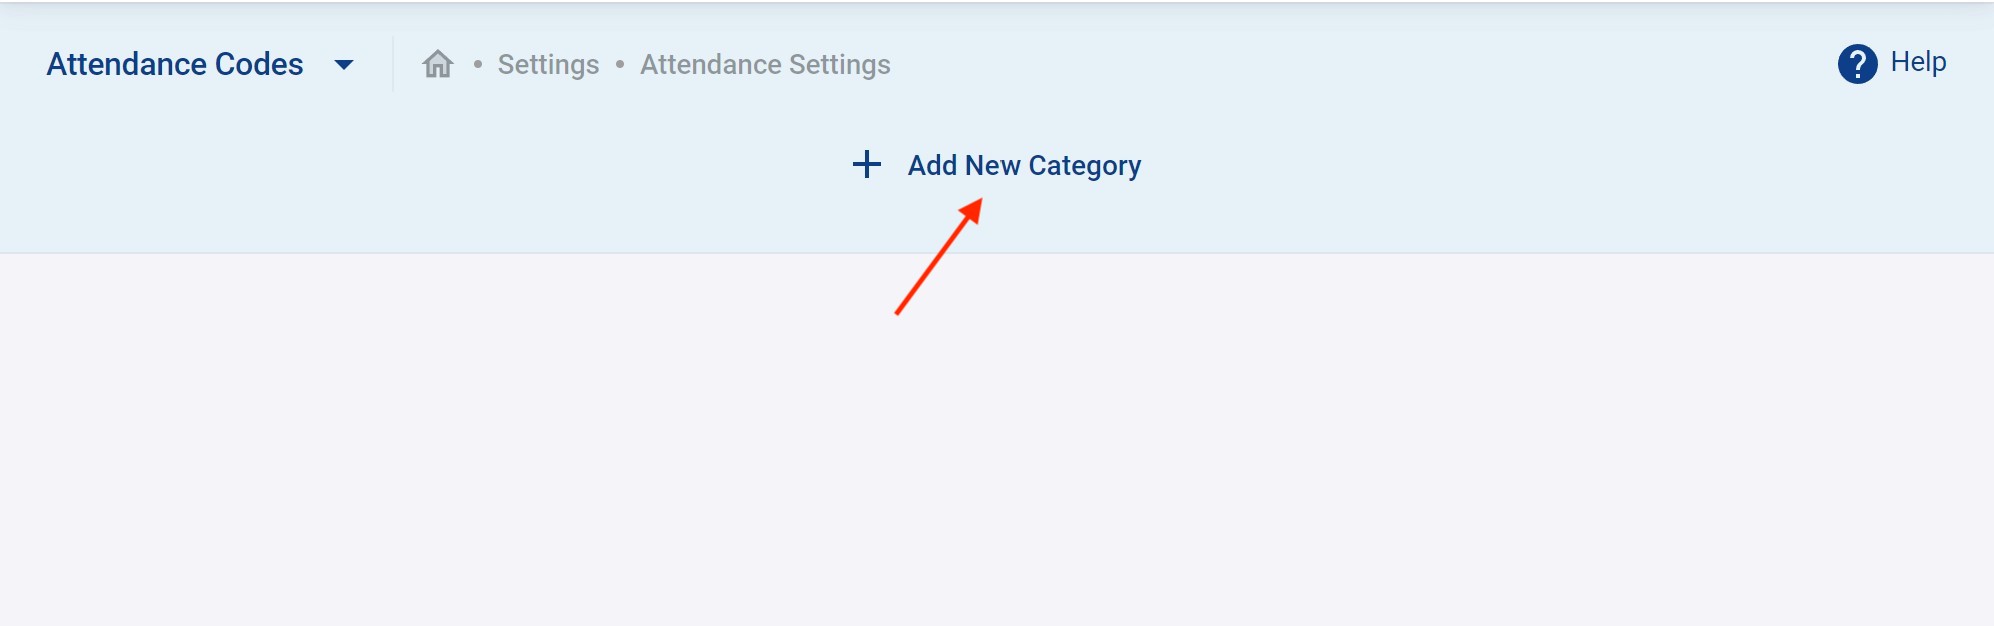
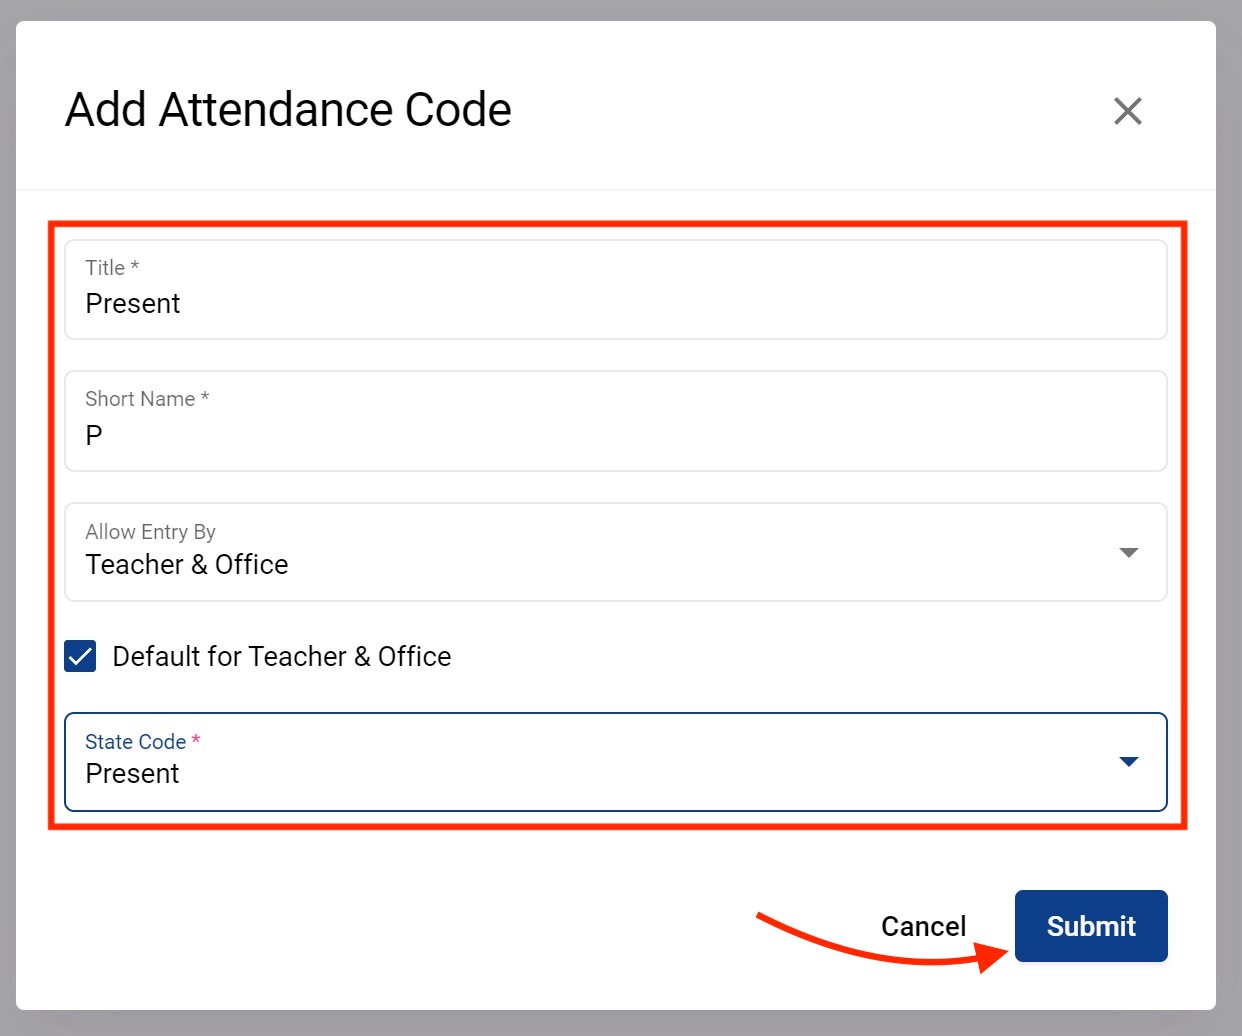
Attendance Code
As a one time setup you need to configure your attendance codes as per your school's policy. You do this in Settings → Attendance Codes. First, add a category for your attendance by clicking on + Add New Category.
Then add your attendance codes one by one.
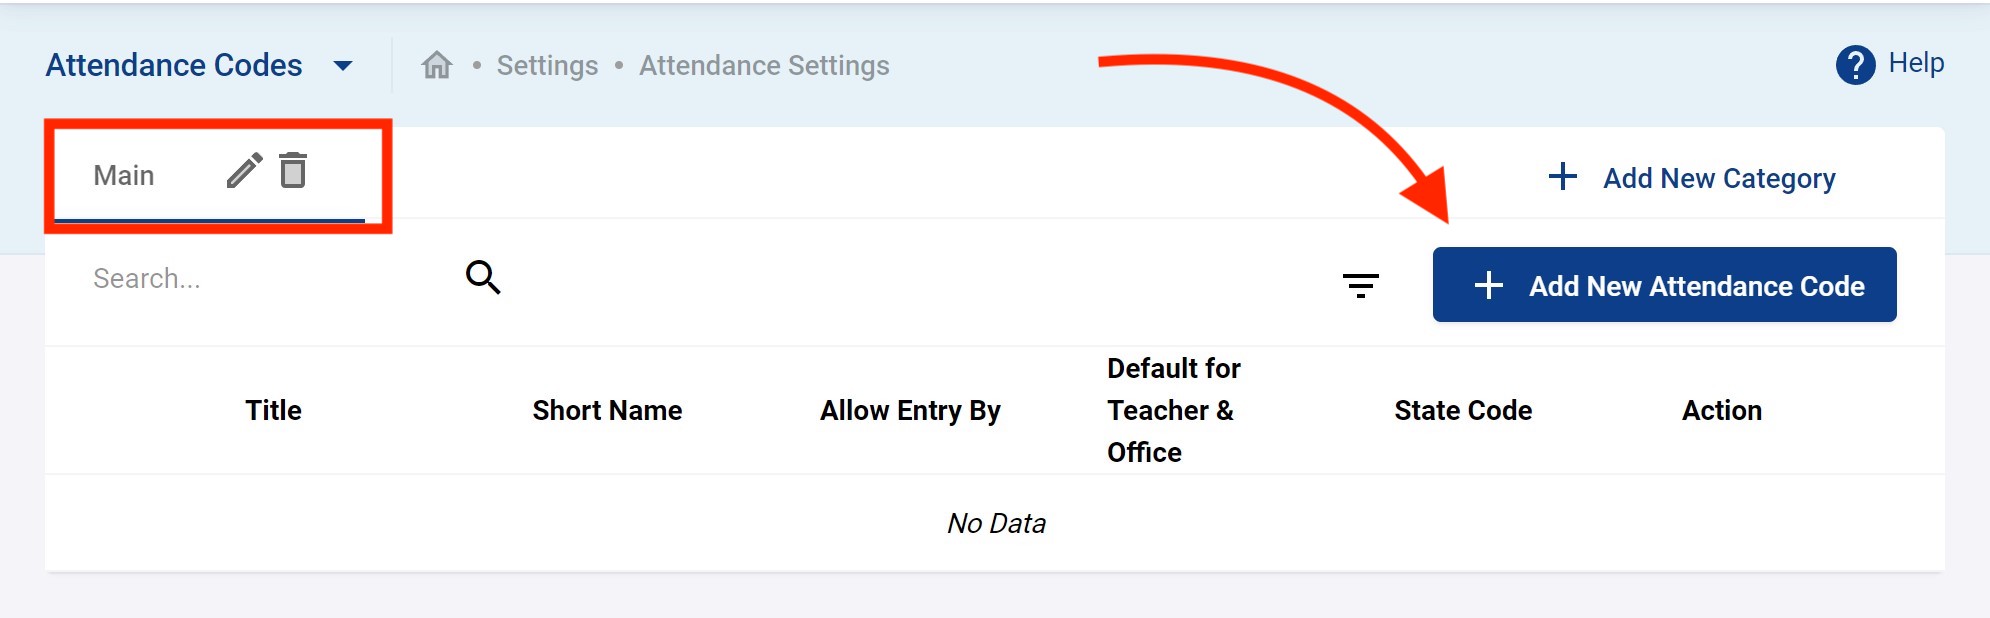
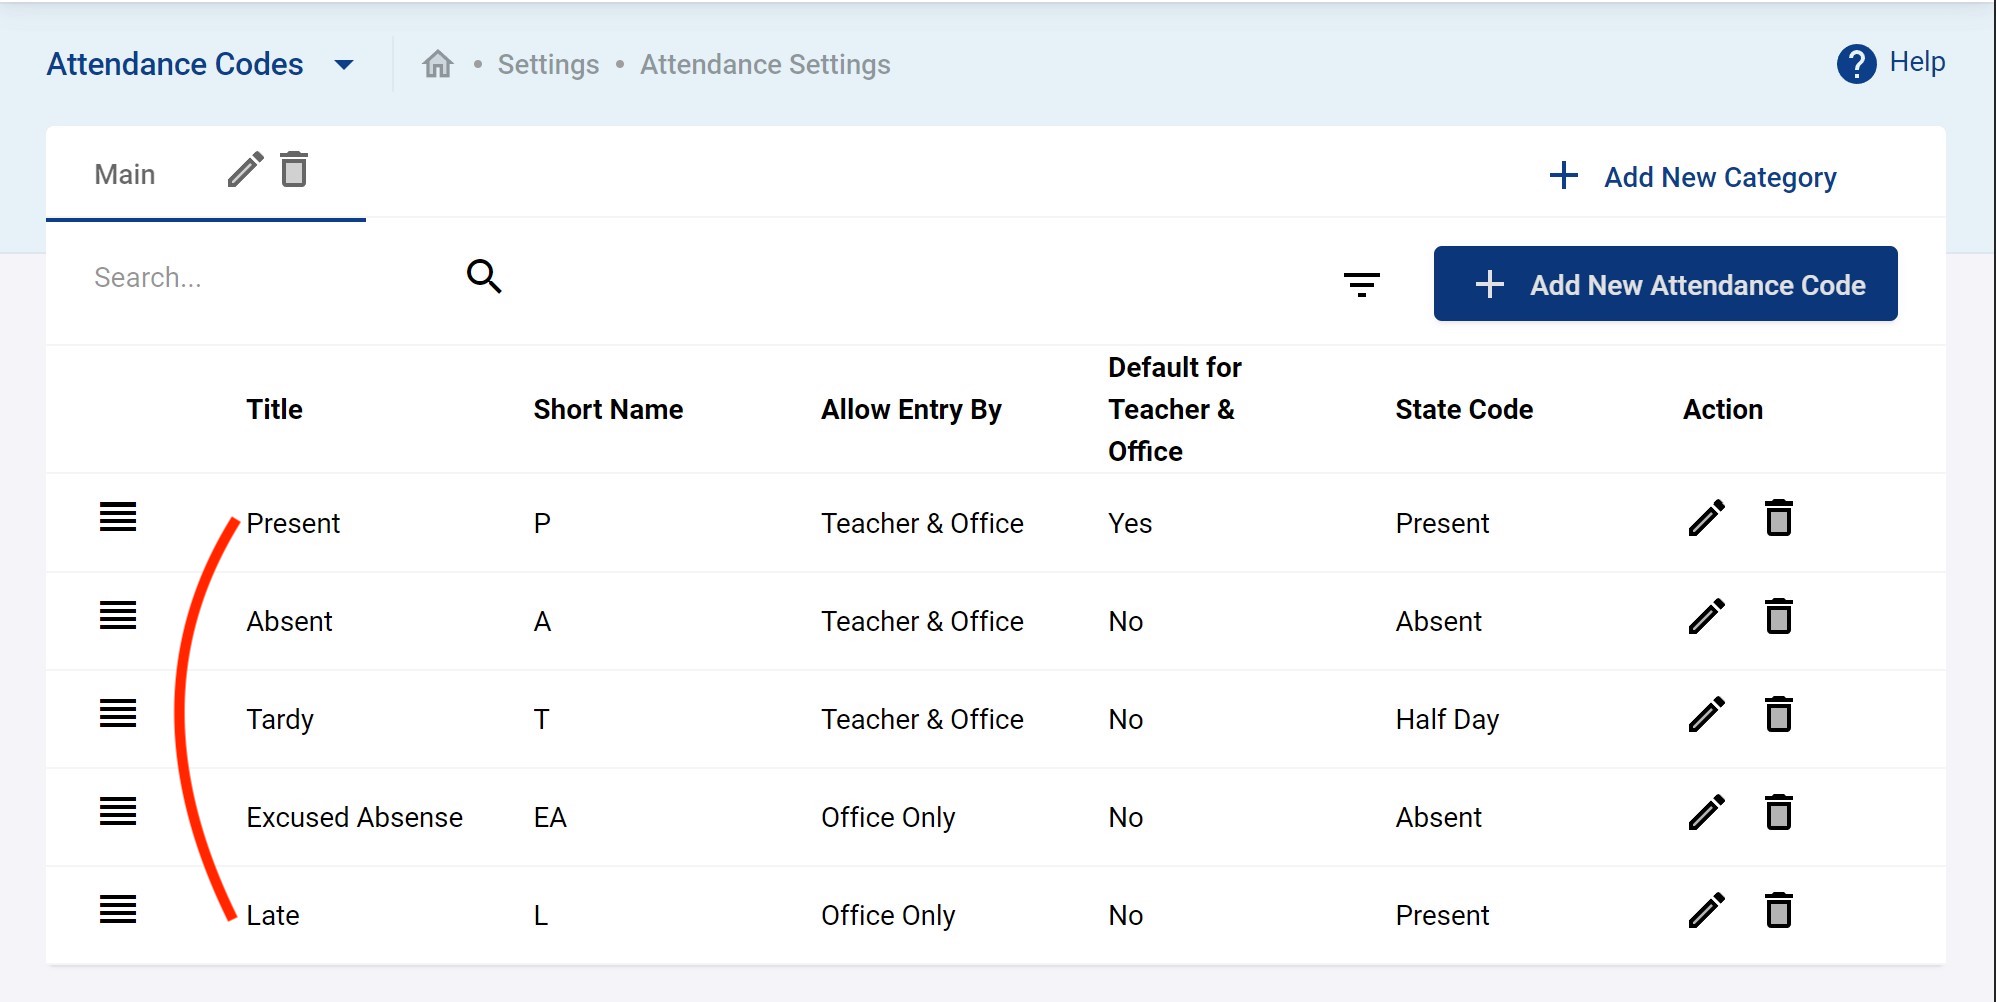
Enter the Title, Short Name, Allowed Entry By and State Code. Allowed Entry By options are explained below.
- Teacher & Office: means a Teacher as well as Office staff can enter Attendance for that code.
- Office Only means Office staff can only use that code.
A completed attendance code setup might look like this.
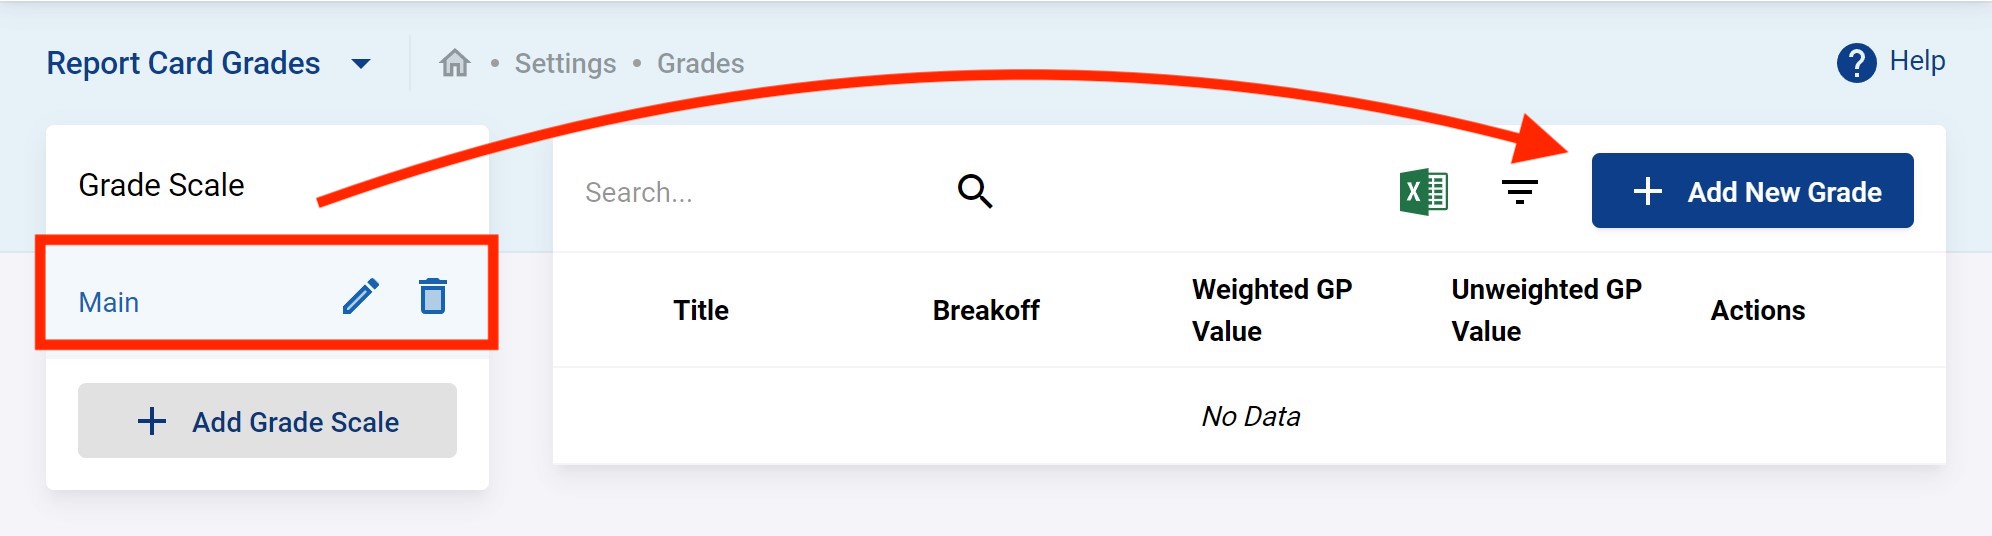
Grade Scales
There are different ways students can be “graded” on subjects. This section will discuss the simplest most common method. Report Card Grades scales are created to enter letter grades with the actual scores. A one time setup for the school will be required. Go to Settings → Grades → Report Card Grades.
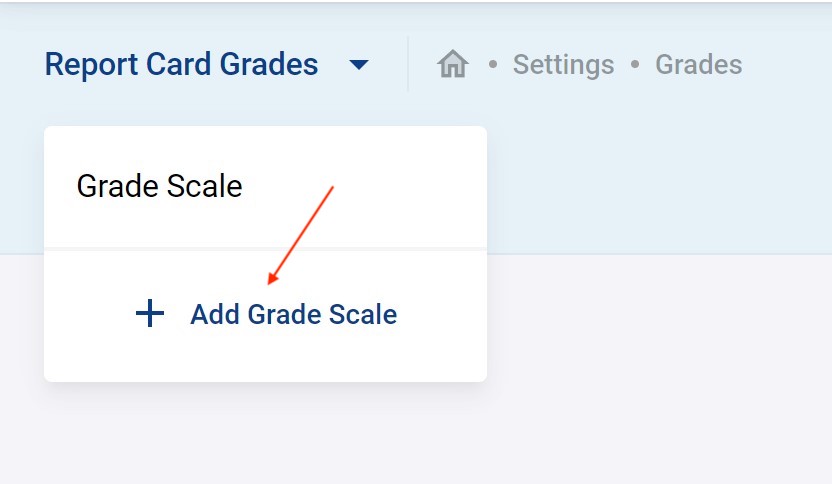
The example below is for the simple common use case that a school uses a single grade scale. Enter the Grade Scale Name, Scale Value and any Comment and click on Submit.
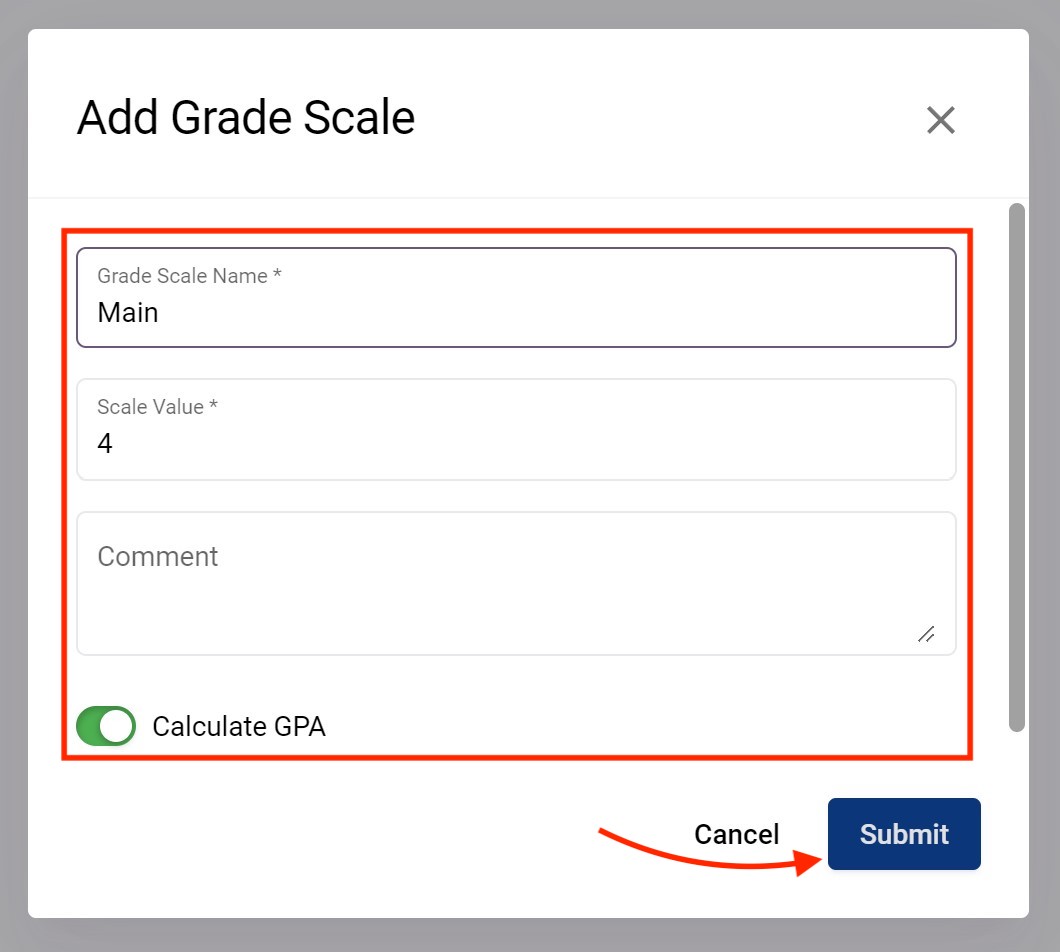
After the grade scale is created (as shown in red rectangle below), letter grades need to be entered one by one as per requirement into this new grade scale.
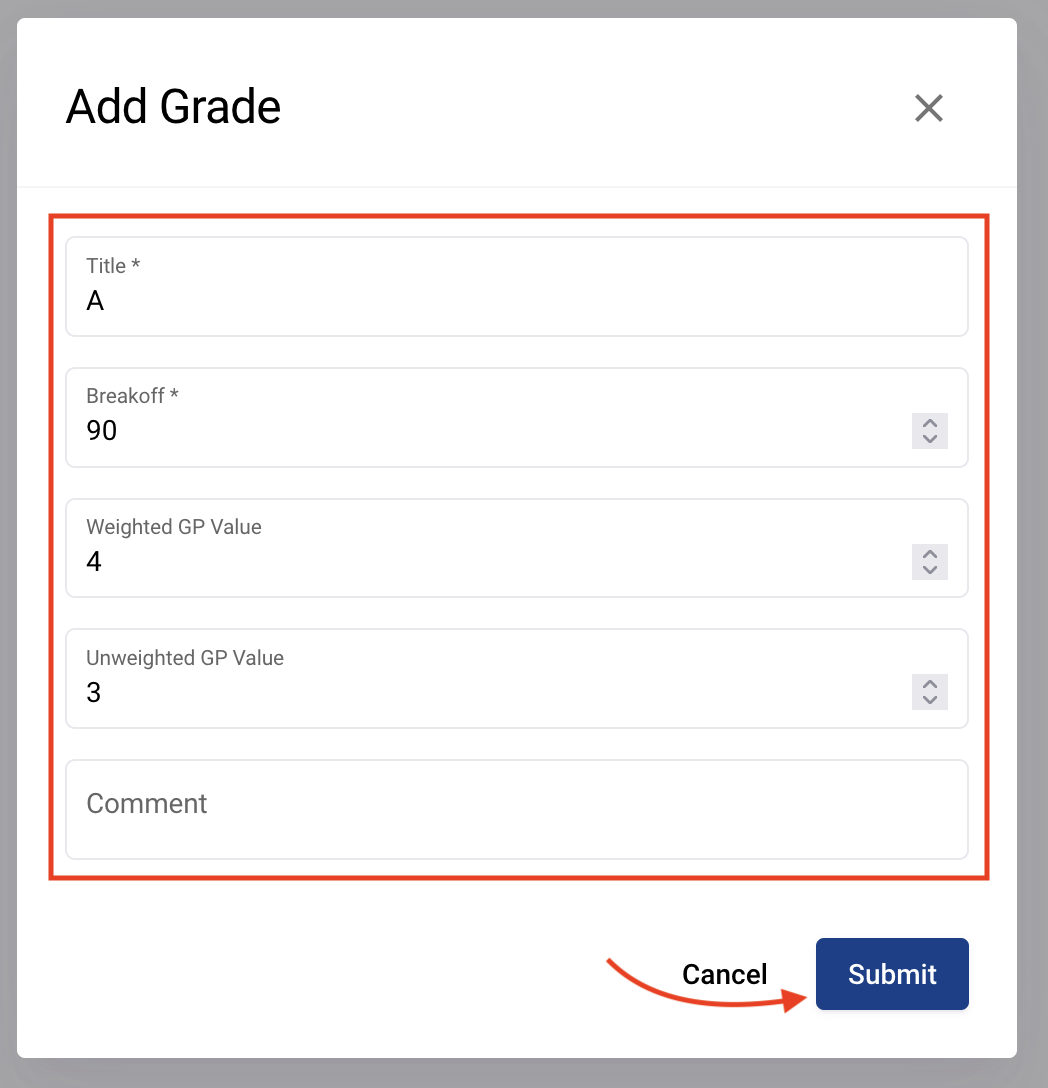
Put the Title, Breakoff, Weighted GP value, Unweighted GP value & sort order & then click on Submit.
- The Breakoff fetches the letter grades as per the scores. Here, A=90; when a student gets 90 & above he will be entitled to get an A.
- The Weighted GP Value is entered to calculate GPA of the weighted courses (where “Course is weighted” option is on).
- The Unweighted GP Value is entered to calculate GPA of the unweighted courses (where “Course is weighted” option is off).
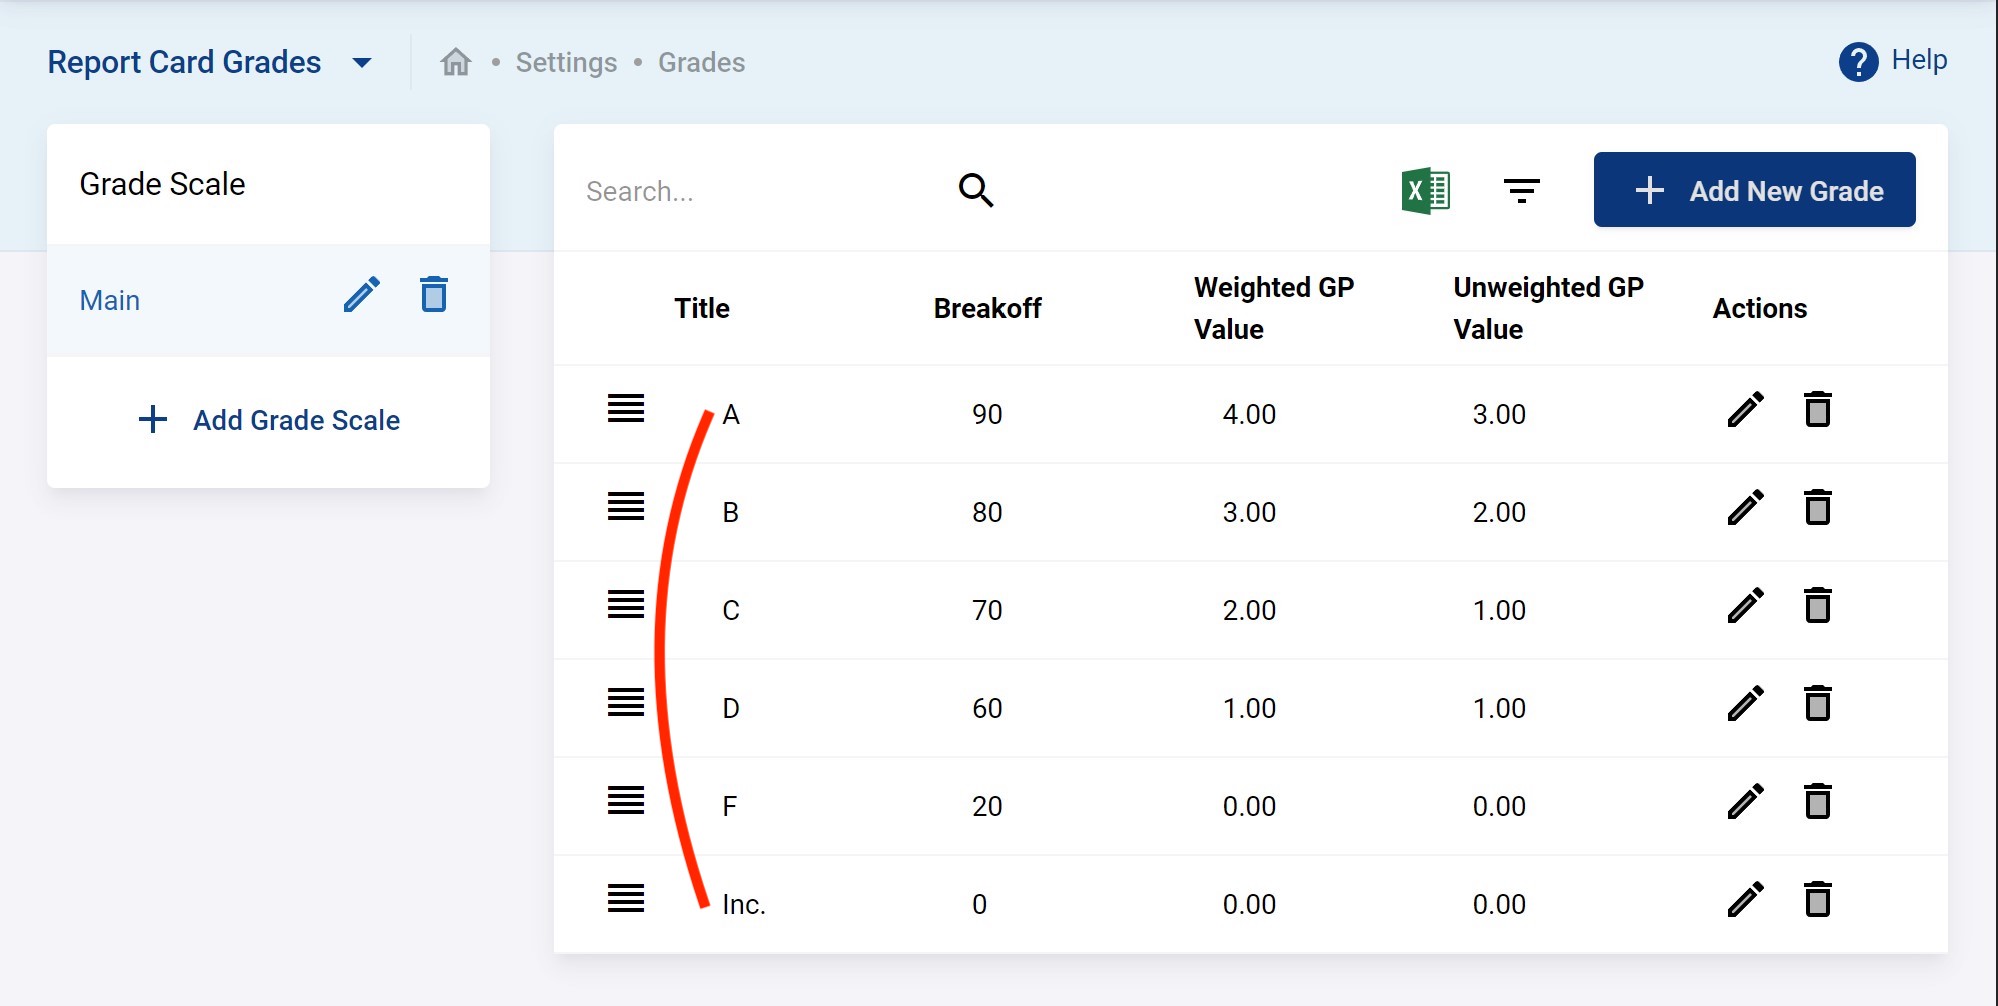
Basically, creating this section would help to get the letter grades on the report card and to calculate GPA while creating Transcript. A complete setup might look something like the following.
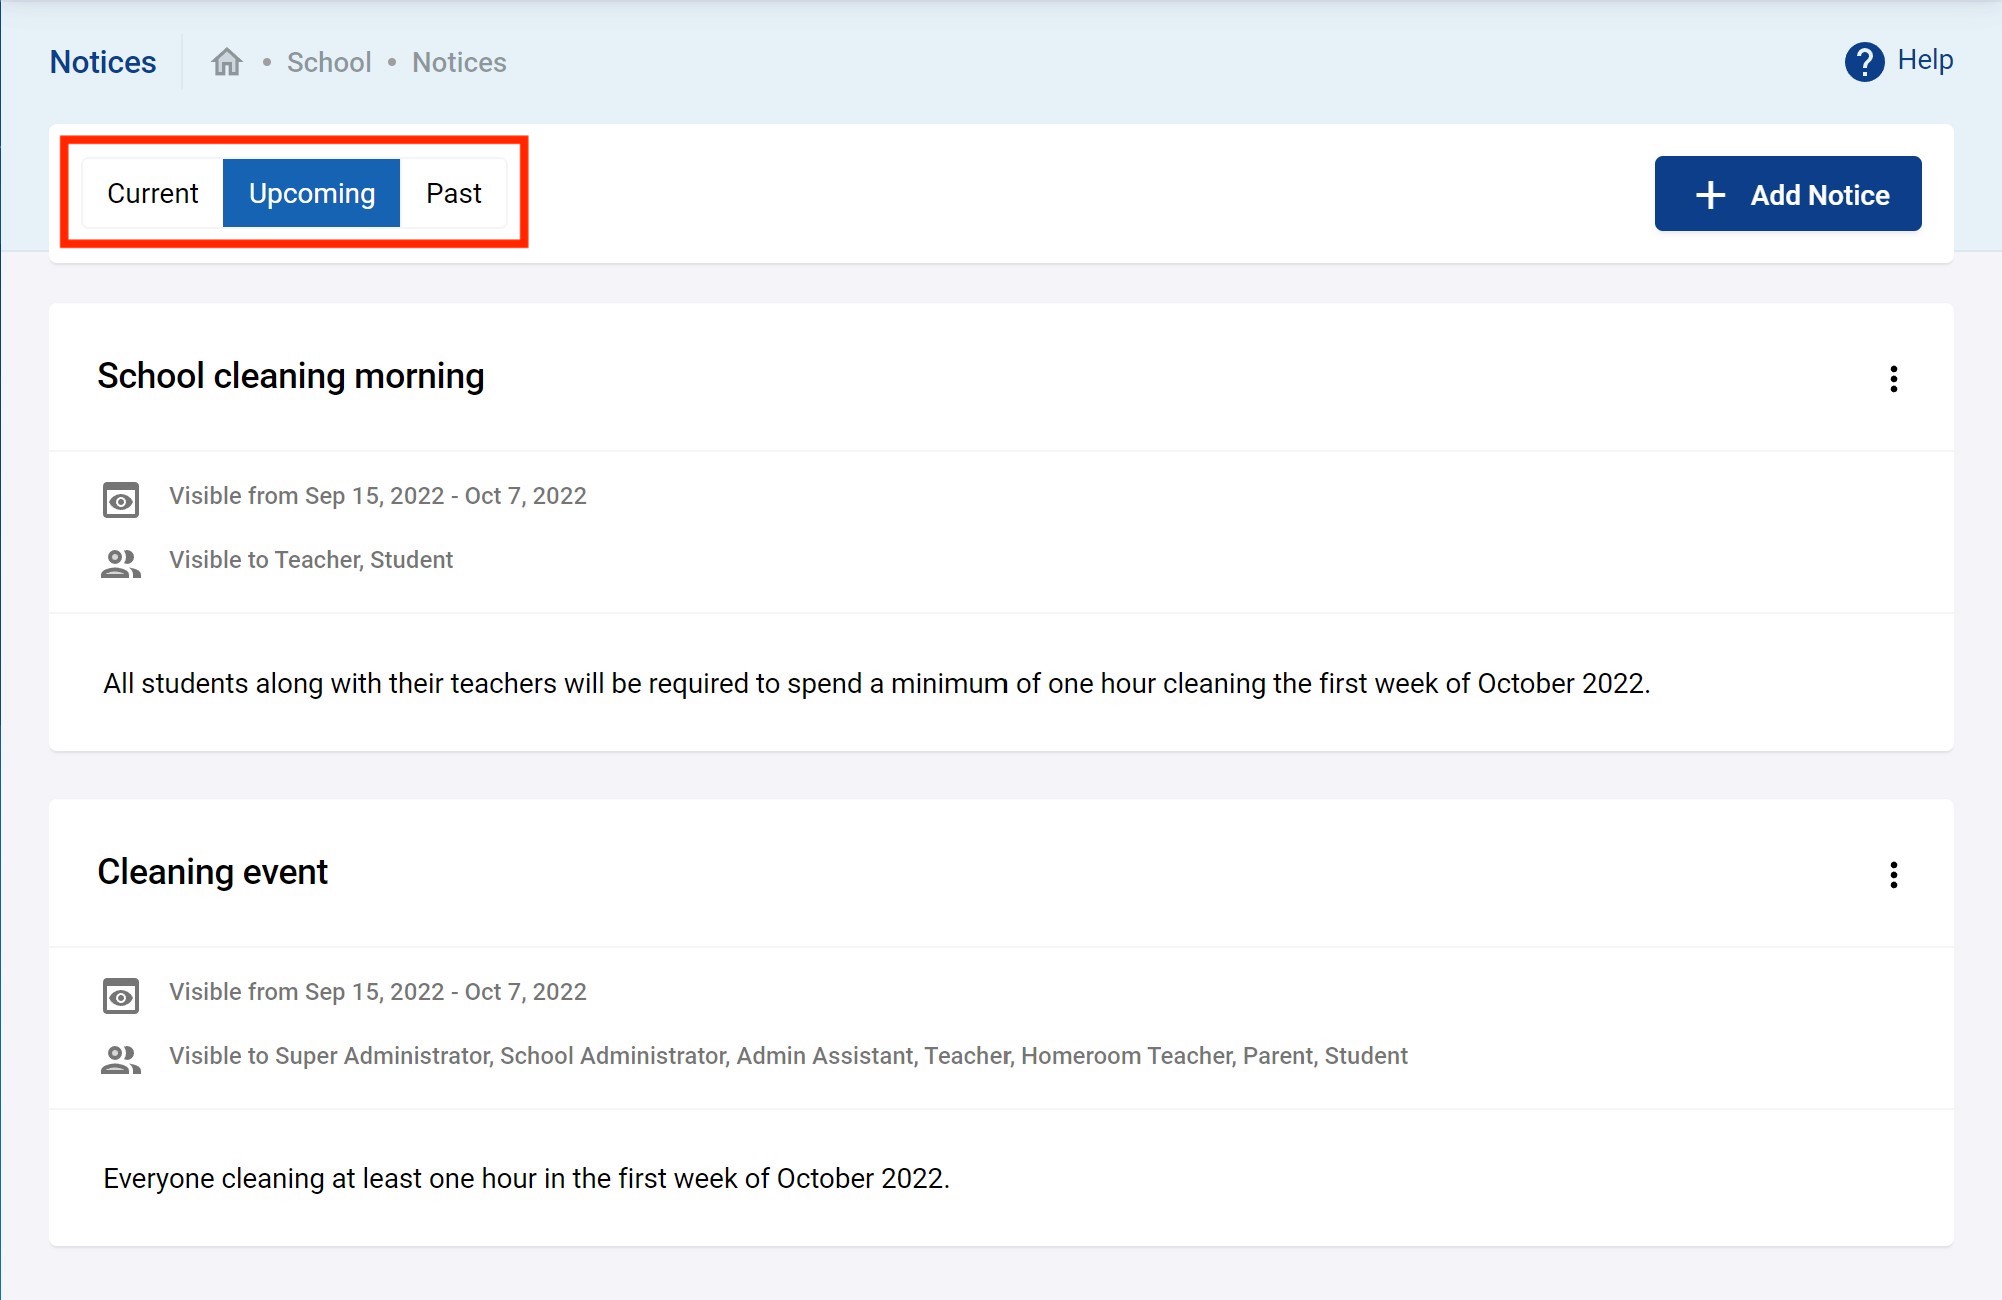
[Optional] Notices
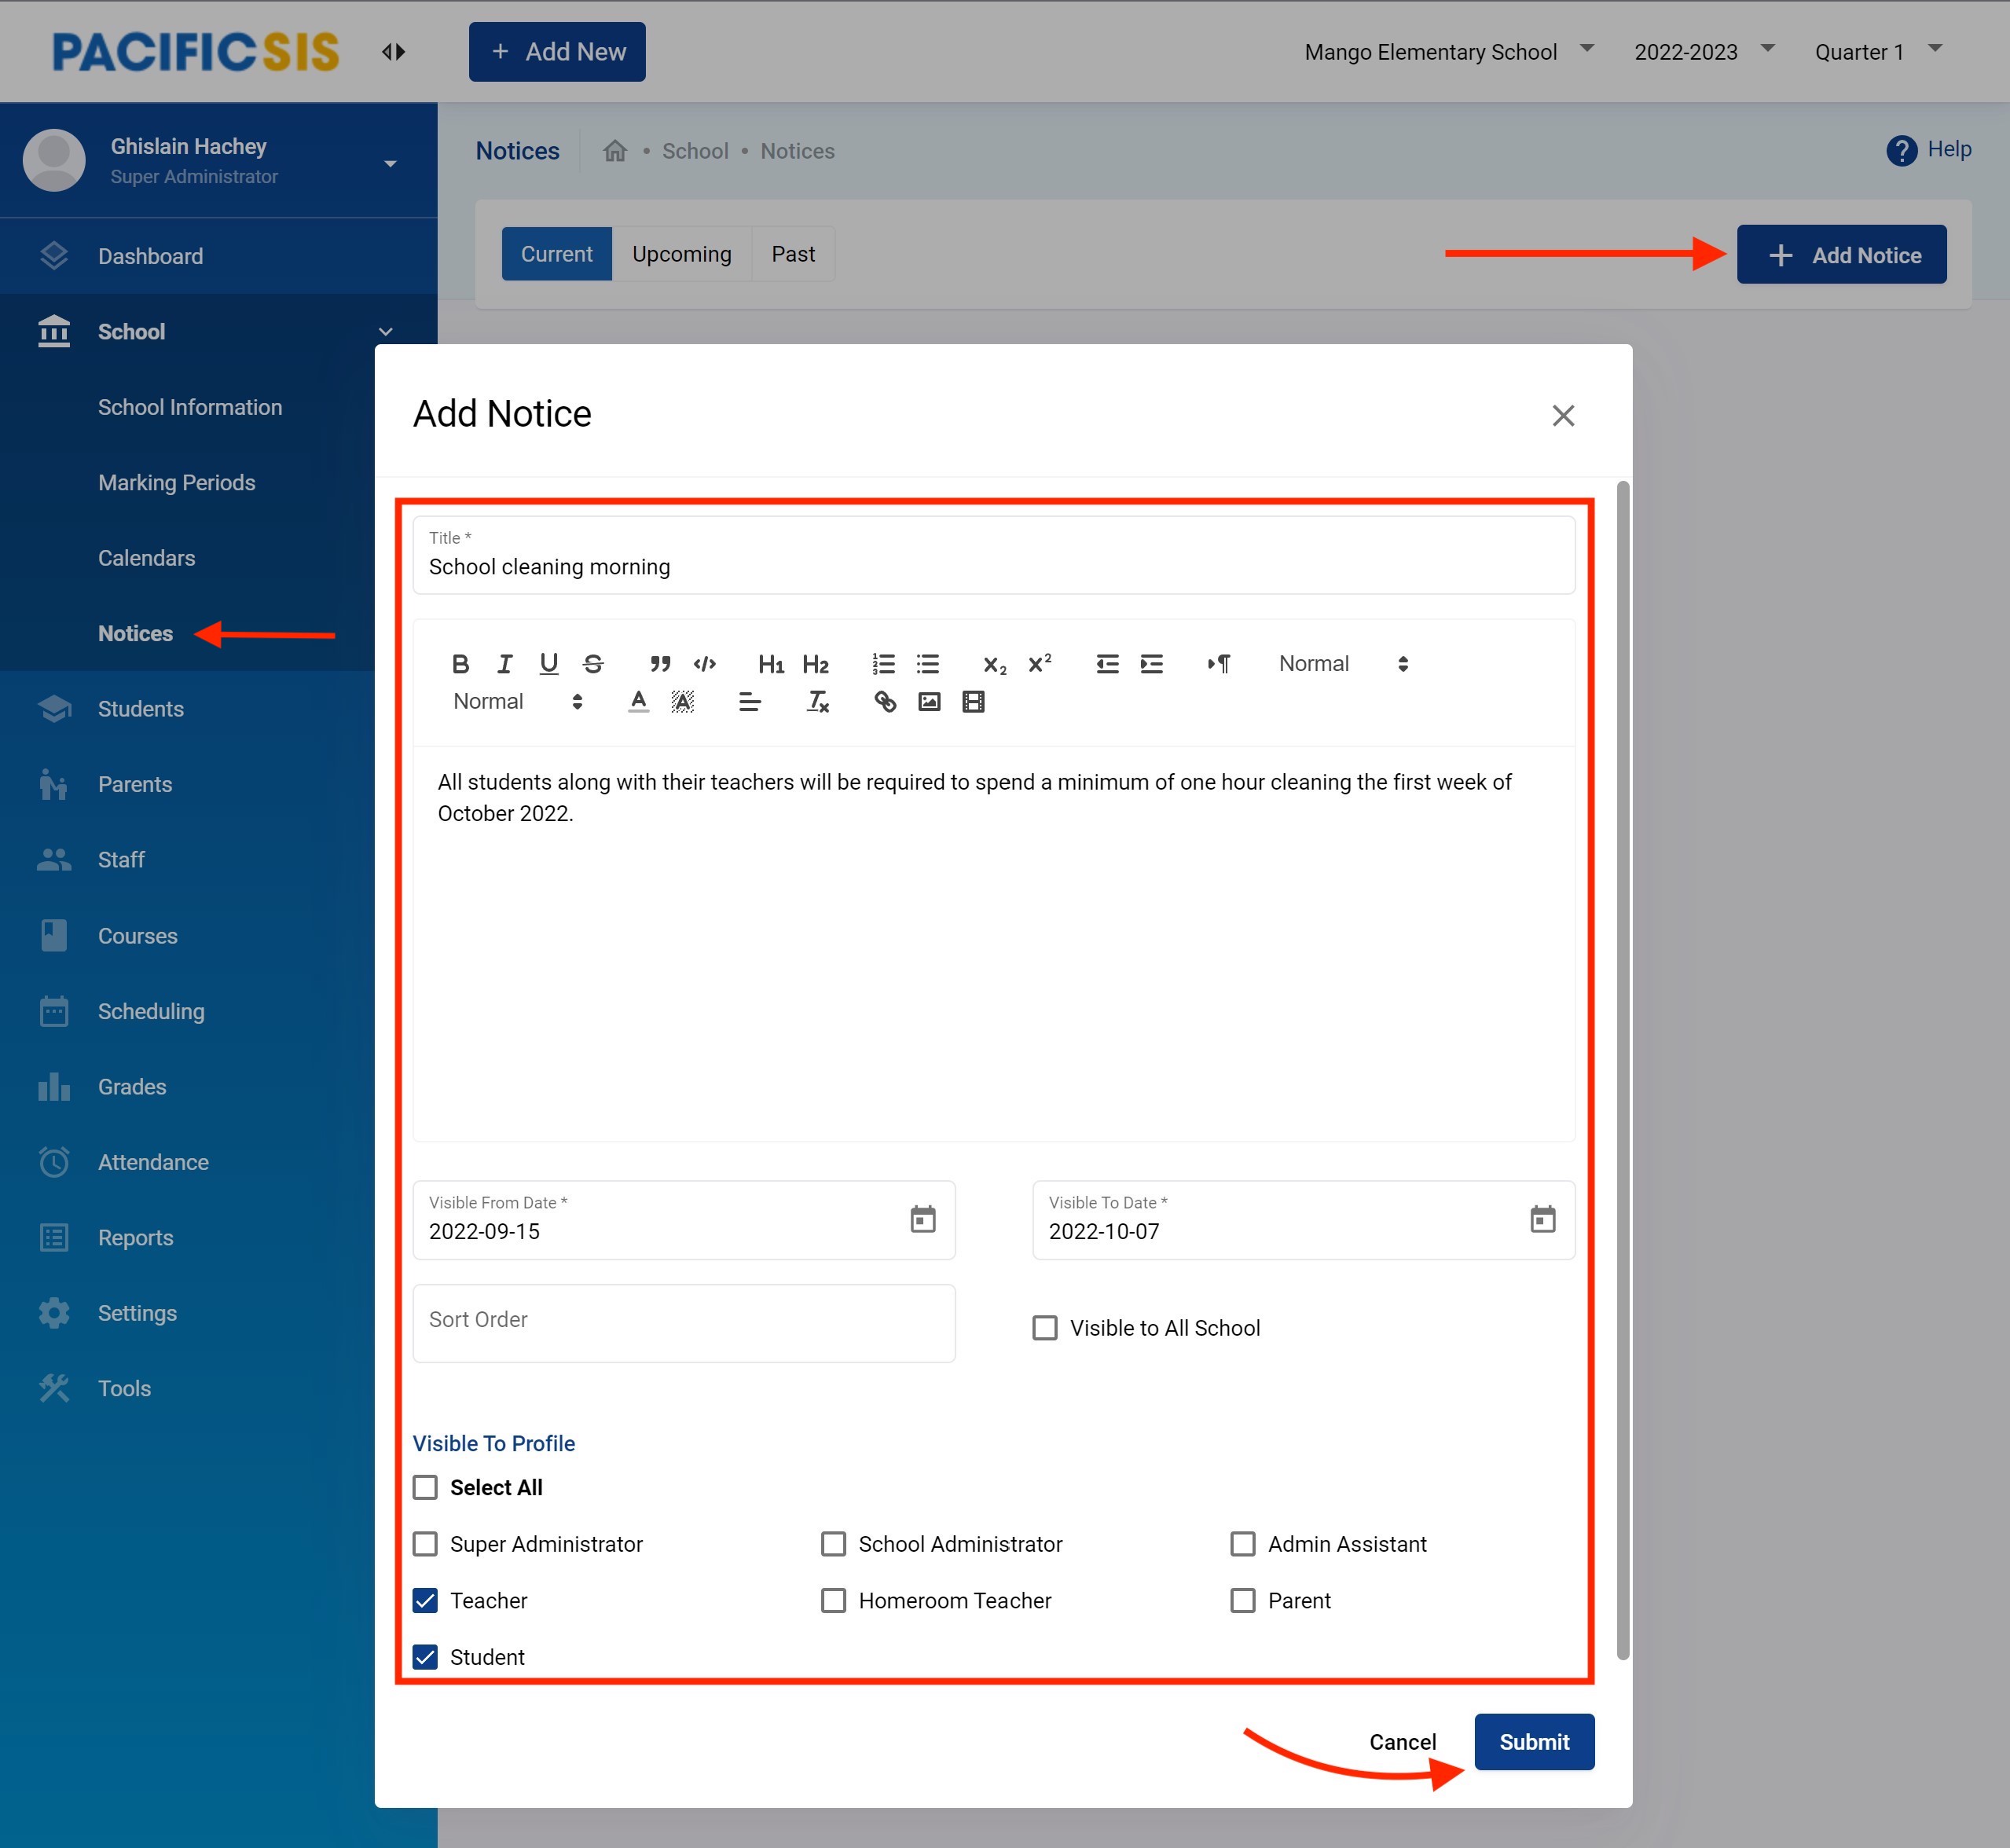
The Notices page is an announcement feature for the admin to communicate messages to the other users like teachers, parents and students; the message will display on the homepage of the user’s portal. Users can access their portal from a smartphone, tablet, laptop or computer with access to the SIS.
To access this page, go to School → Notices.
You can make the text appear for a certain period of time by selecting begin and end dates. You can also control who gets to see the message by clicking on the Visible to options.
For example, if you want only teacher and students to view the message, click Visible to Teacher and Student.
You can then view the notices and filter by Current, Upcoming and Past.
Staff Management
Staff is where you manage teachers and principals (you could also include other non-teacher staff if you like).
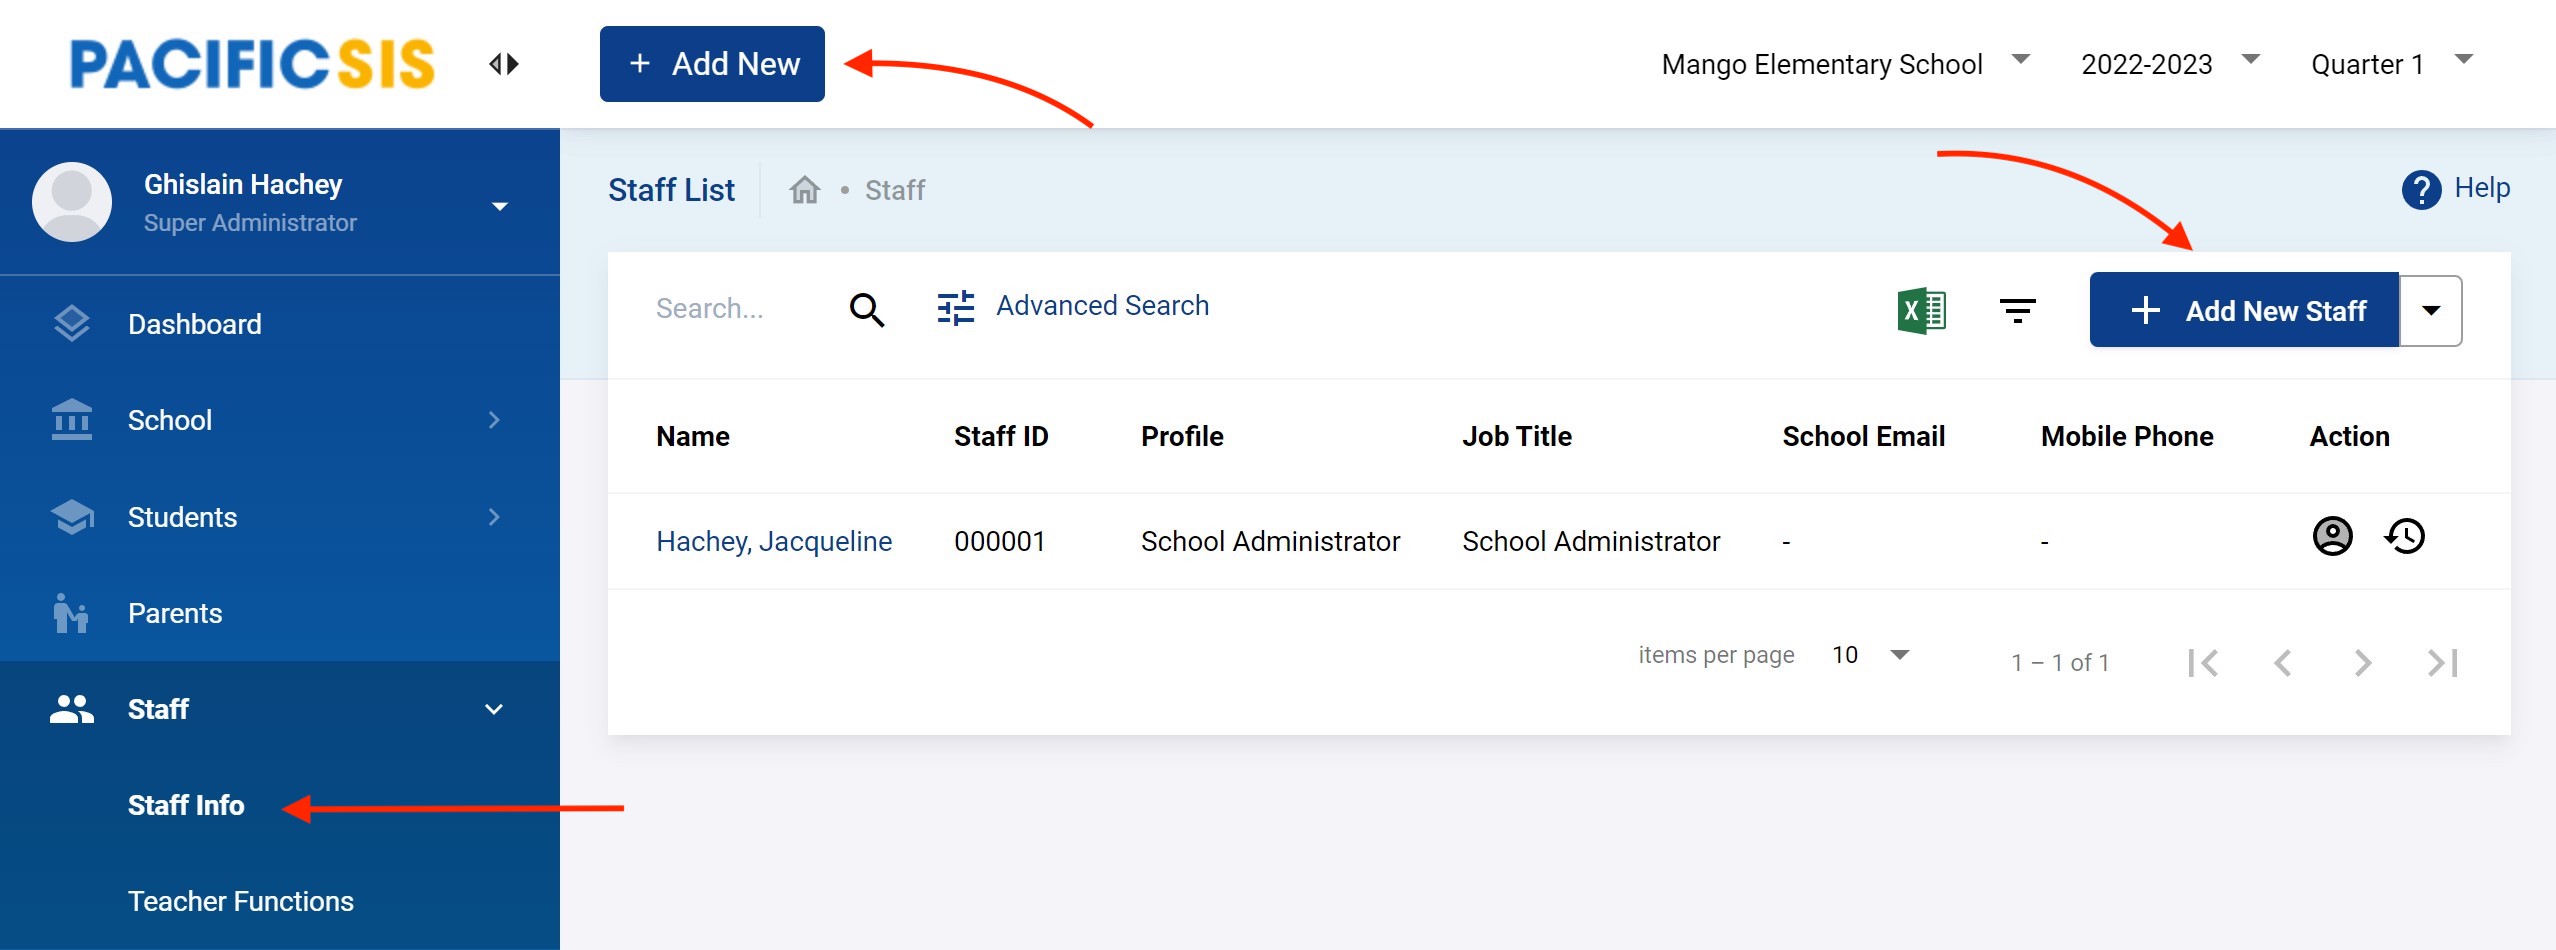
Adding a new staff
To add new Staff (e.g. Admin, Teachers and other Staff) in the system, go to Staff → Staff info → Add New Staff as shown below.
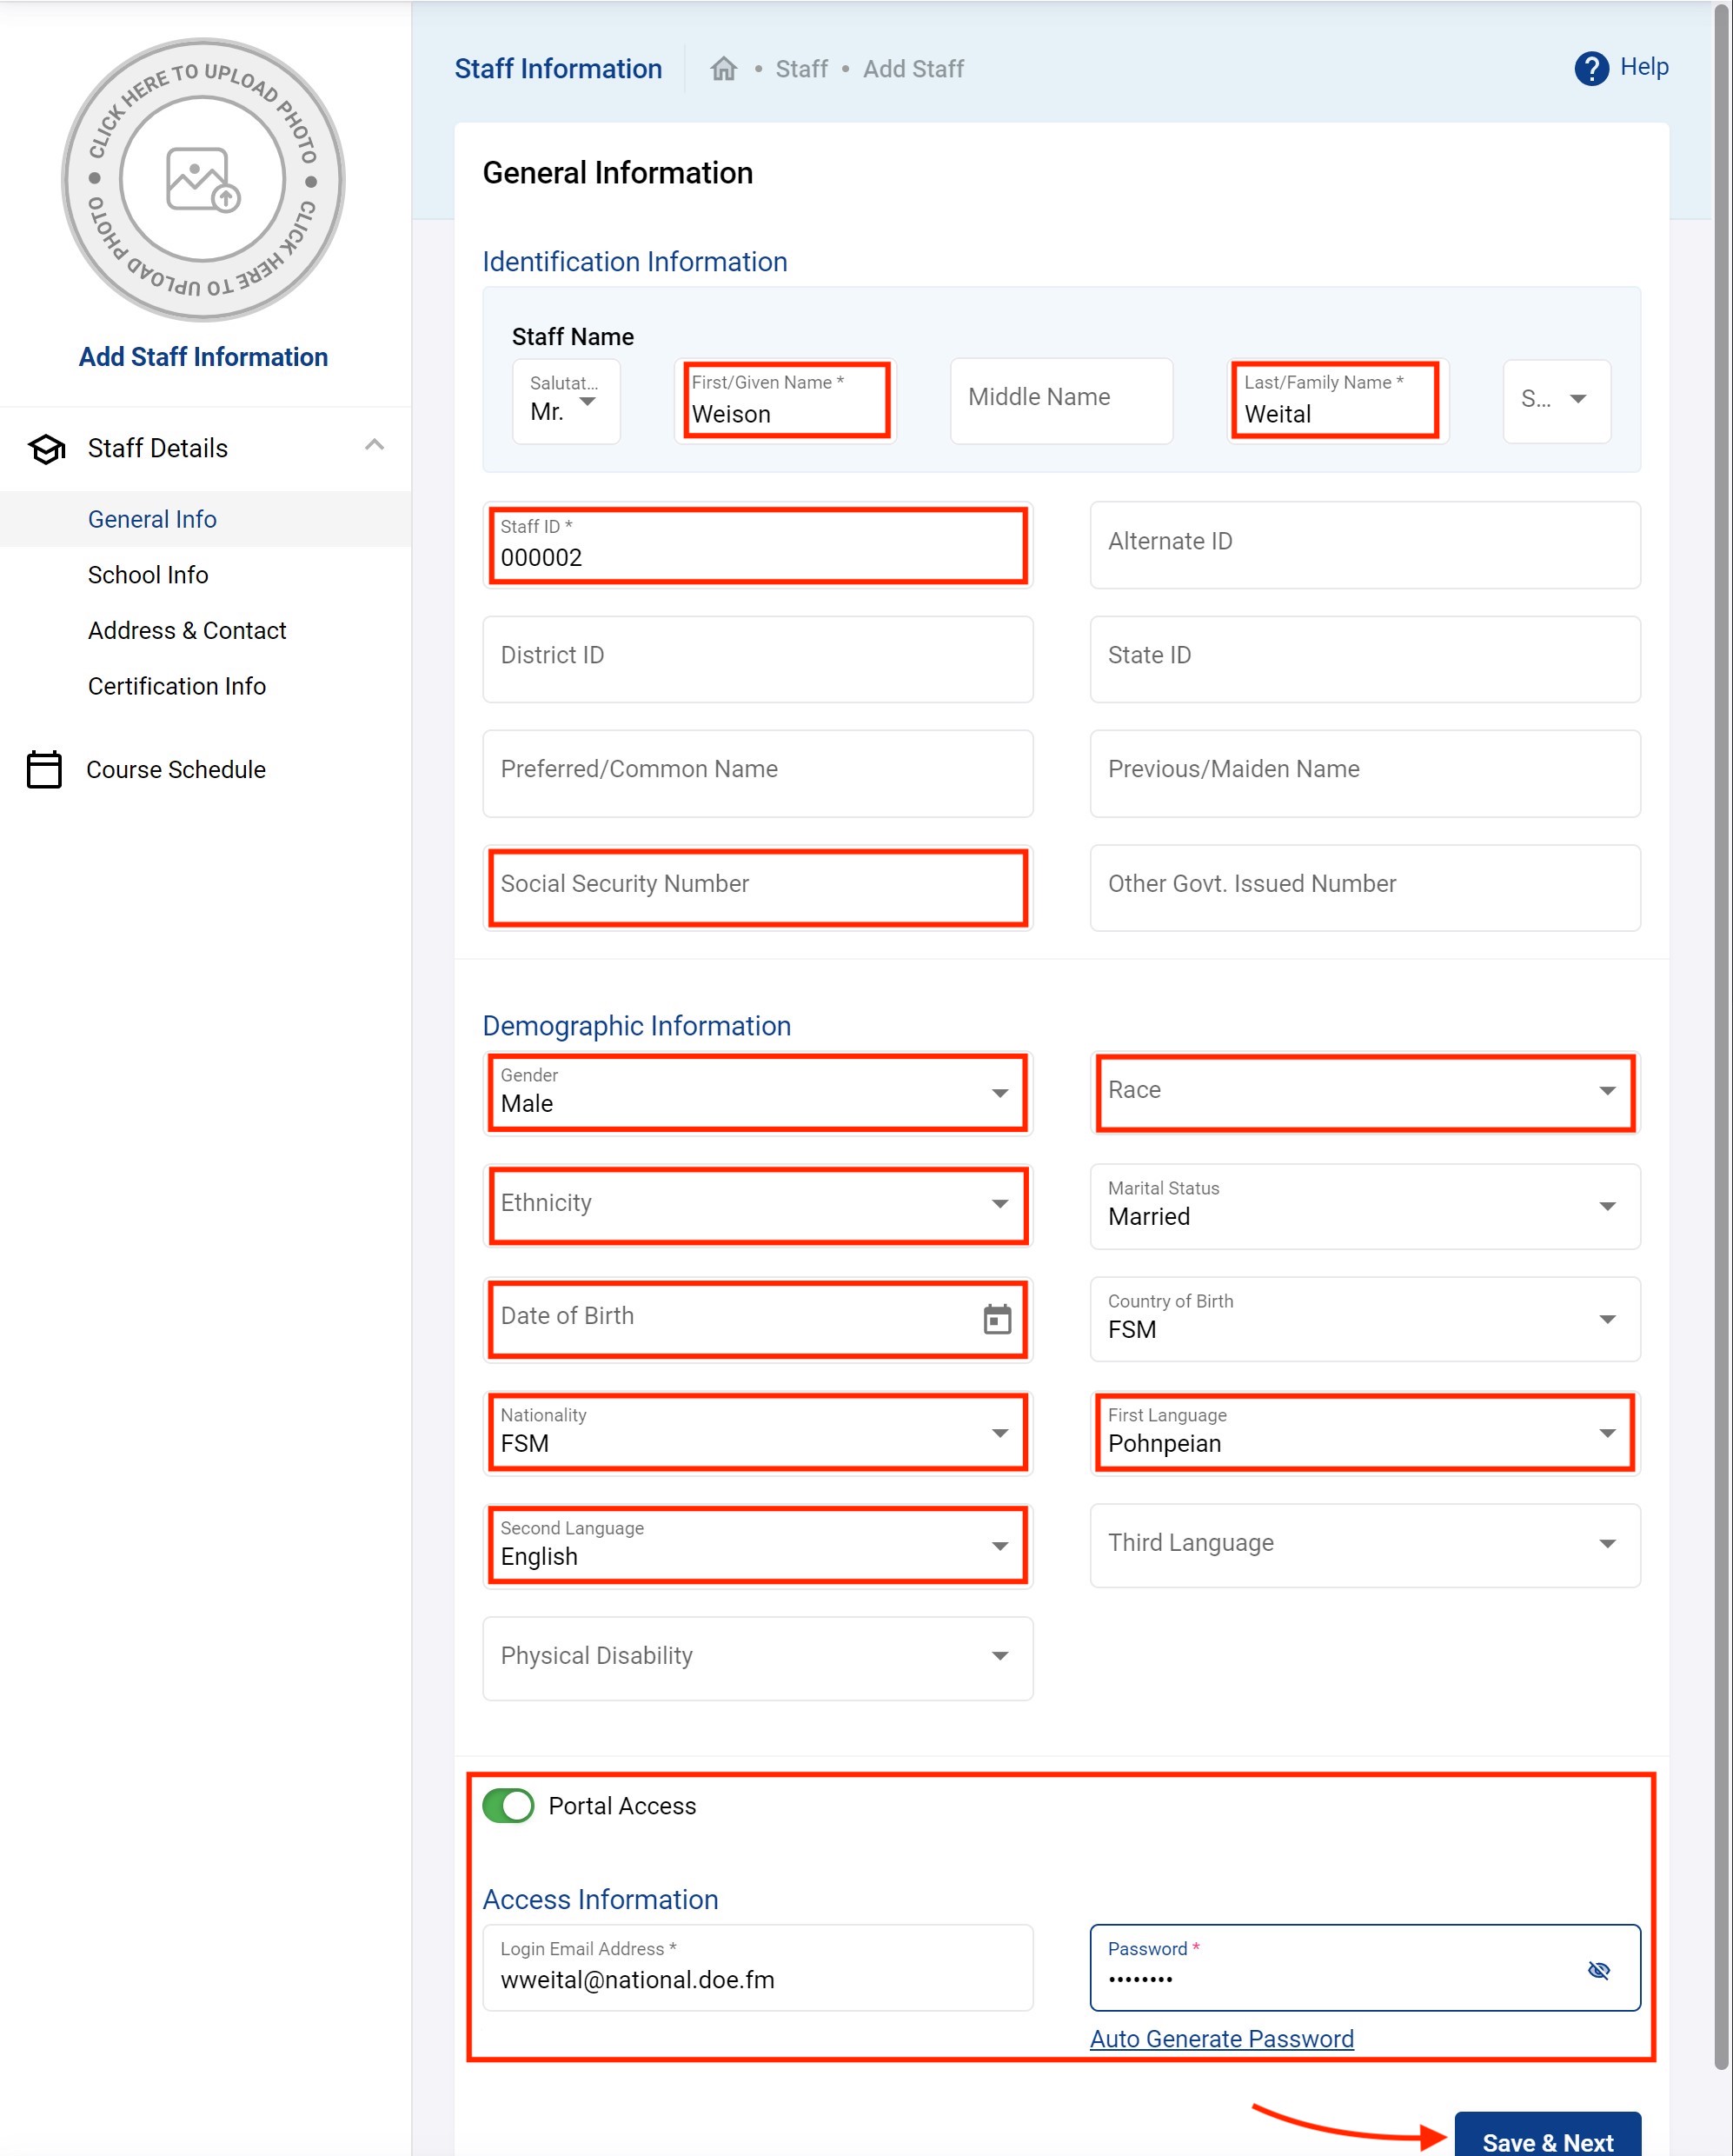
Fill up the information and click Save & Next as shown below. Note that the data in red rectangle is the most important to put. In particular, the Portal Access if you want the new staff to be able to login the Pacific SIS and do data entry.
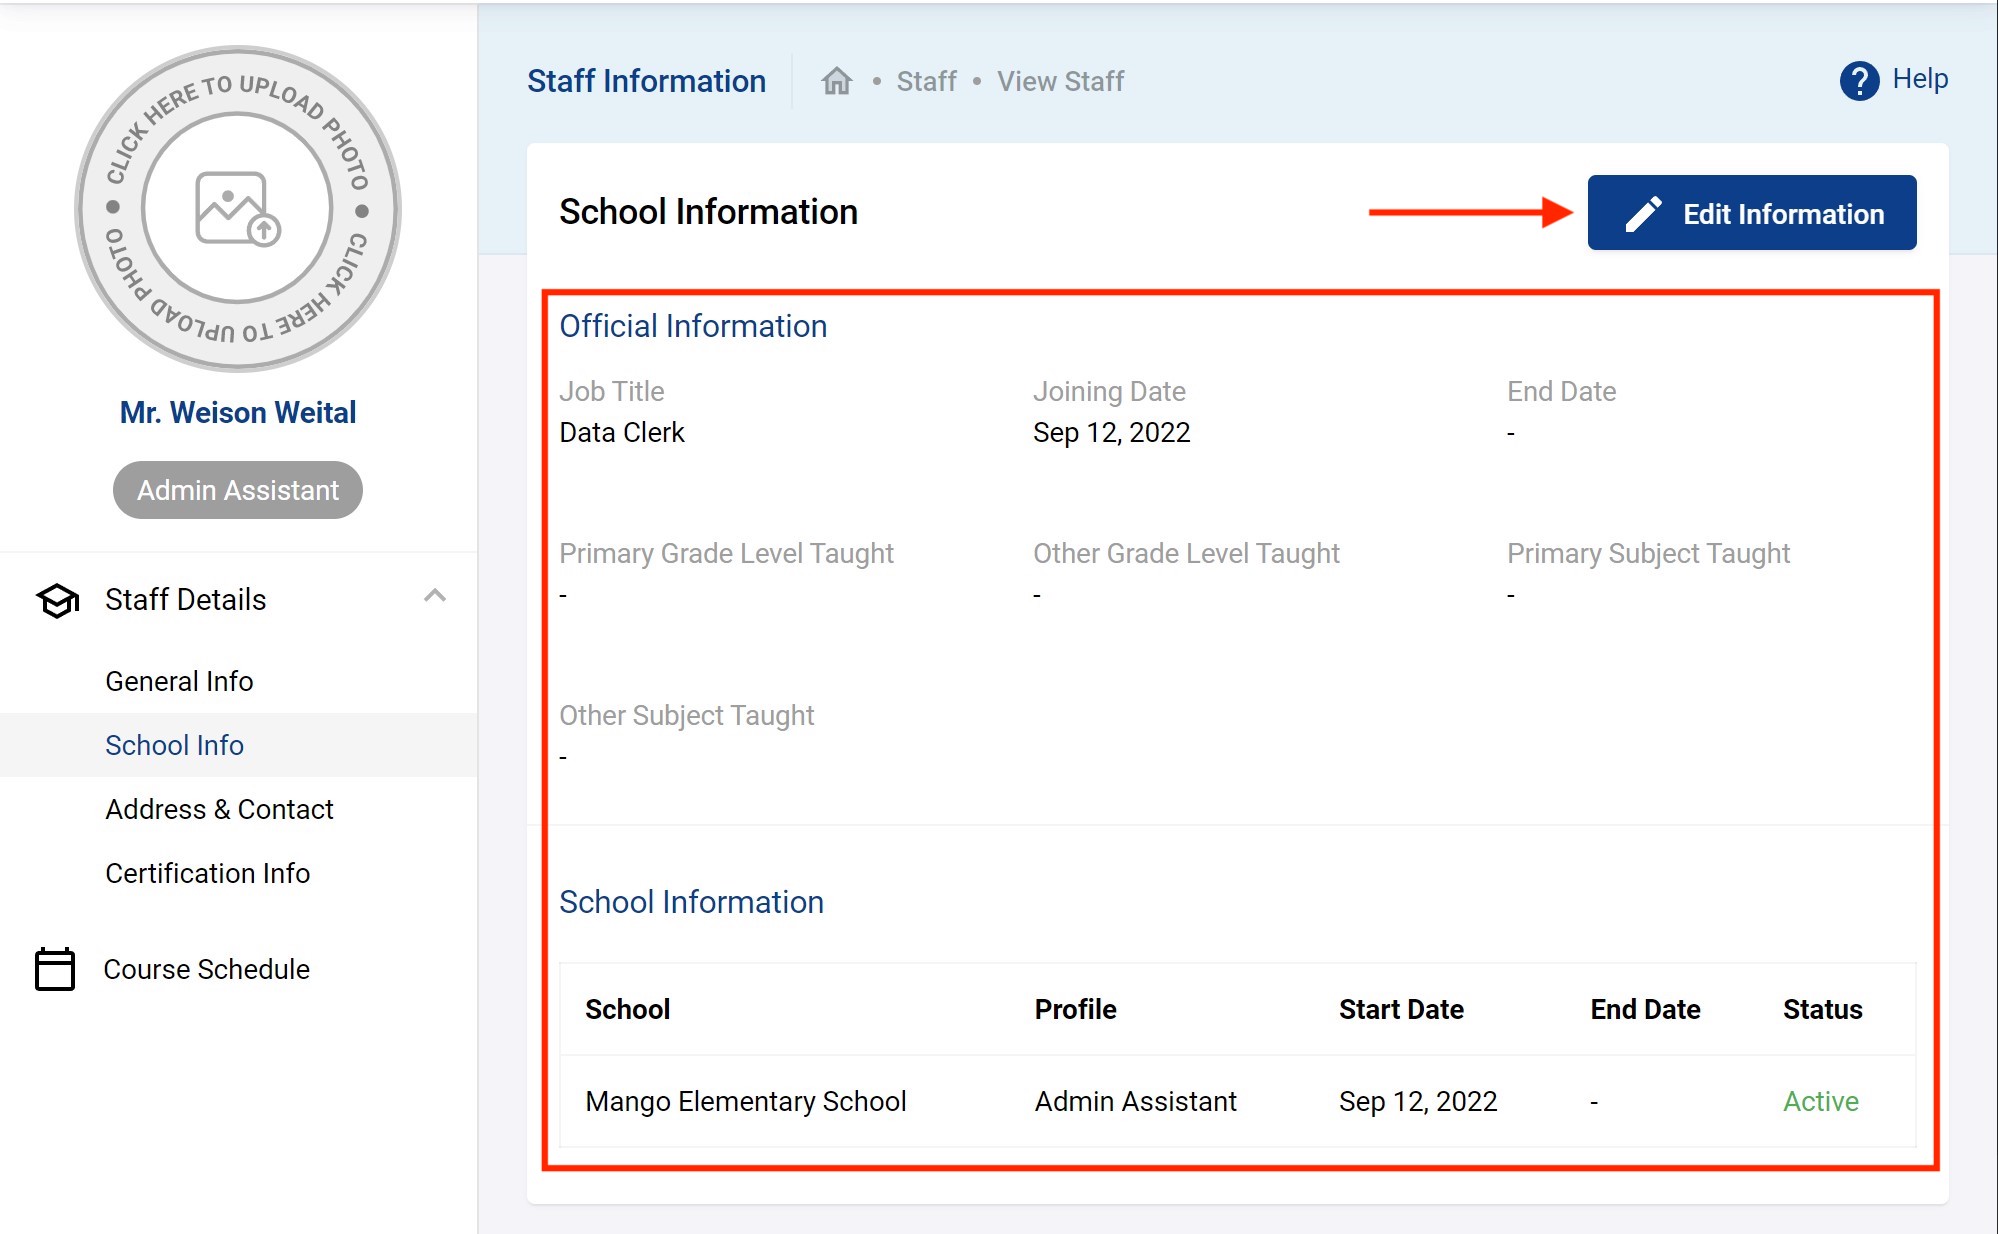
The next section is the School Info. Most of the data here is important to correctly enter. First the Official Information.
- Job Title: is merely the current official title the staff holds.
- Joining Date: is the date the staff joined the school.
- End date: is when the staff leaves the school, only put this if the staff is no longer working.
- Primary Grade Level Taught: is the main grade level taught by the teacher. If teaching multiple grades put the ones the teachers spends most time in, if all equal put the highest grade.
- Other Grade Level Taught: if any
- Primary Subject Taught: the primary subject taught by the teacher. The same as grade, if more then one put the one the teacher specializes in the most.
- Other Subject Taught: if any
Finally, the School Information. This is where you assign which school a staff has access to and under what roles (i.e. profile).
- School: for which the staff will have access too. This is often just one (a teacher in a school) or several (a data entry person assigned to work with several schools).
- Profile: defines the level of access to the school (teachers, administrators and admin assistants all have different types of access).
- Start Date: starting date of that staff into that school
- End Date: ending date of that staff into that school..

When done click on Update and you should see the following. You can go back to change any of these details at any time simply by clicking Edit.
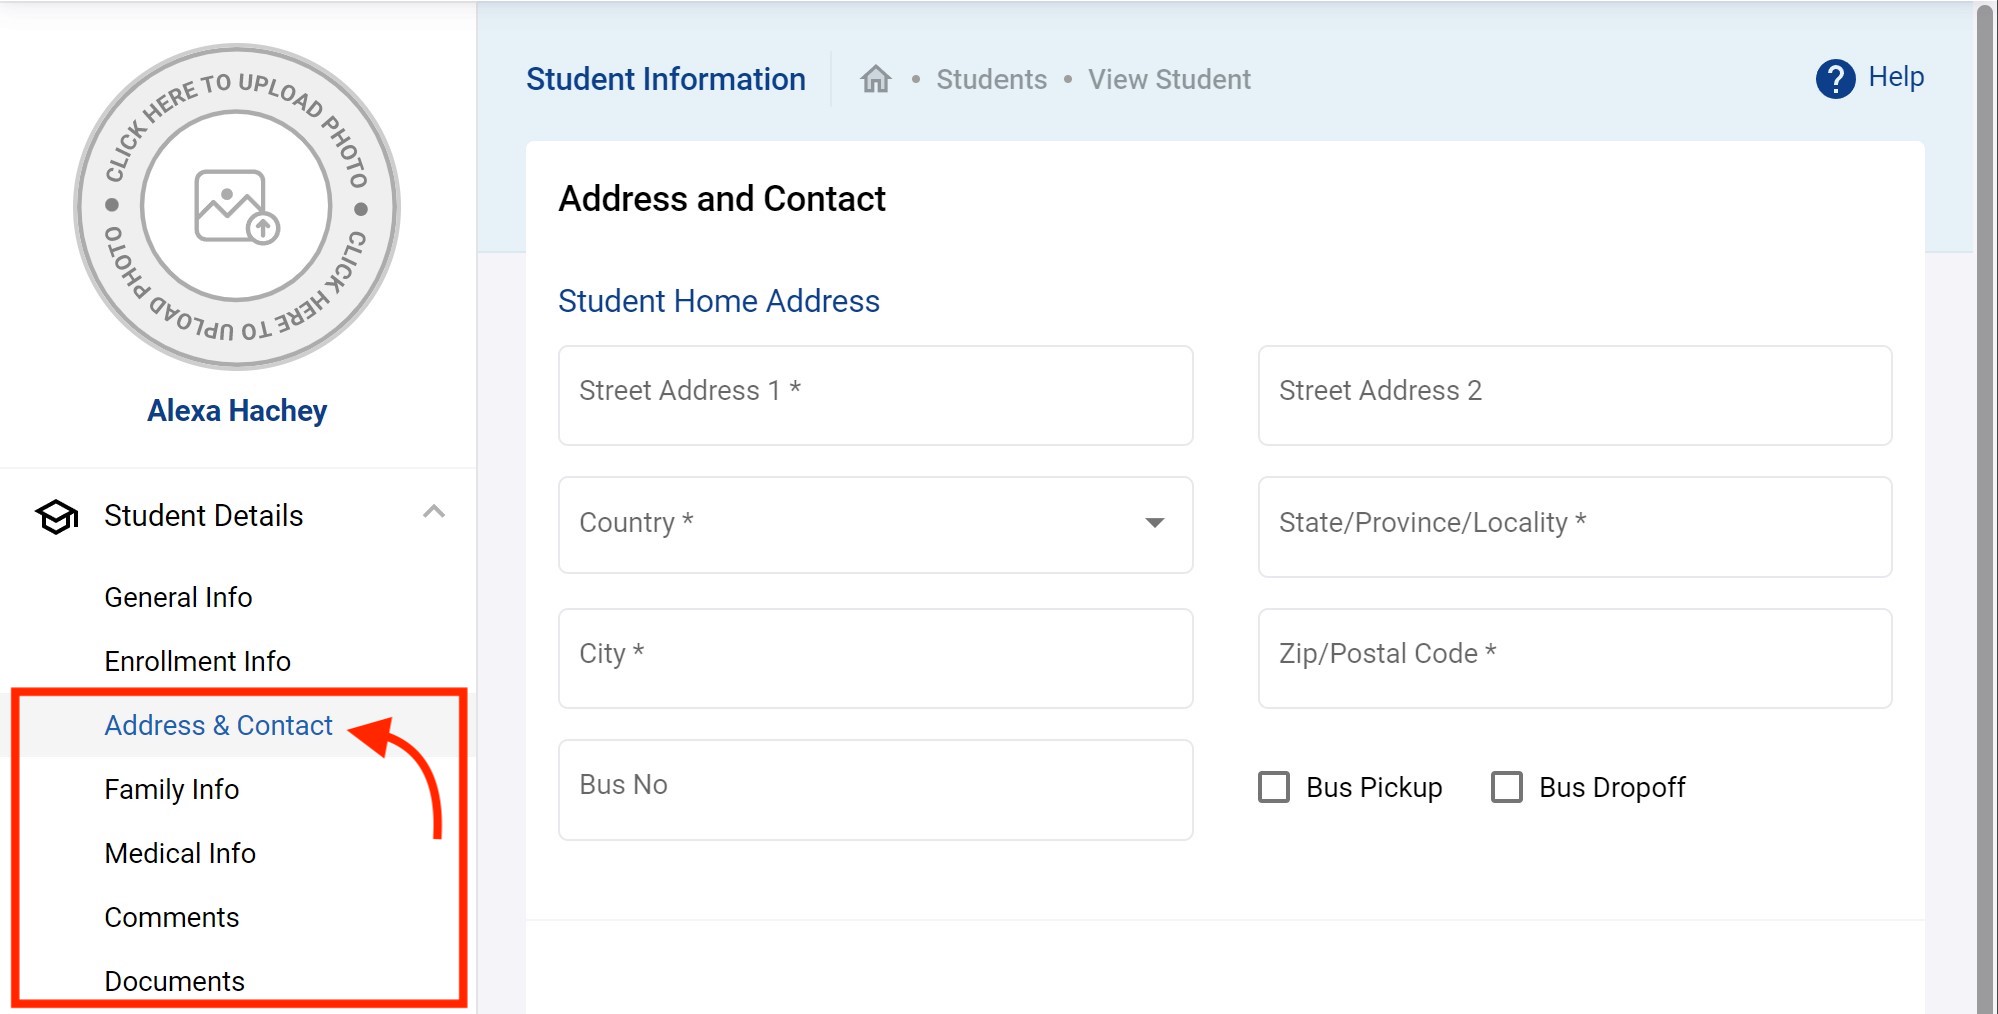
Optionally, you can enter more data under other sections like the example below Address & Contact.

When you go back to Staff info you should see the new staff. The staff should show for any school the staff was given access to.

Bulk Adding Staff
In addition to adding staff individually, you can bulk load staff. This is especially useful when first getting started with the system and you have many to add.
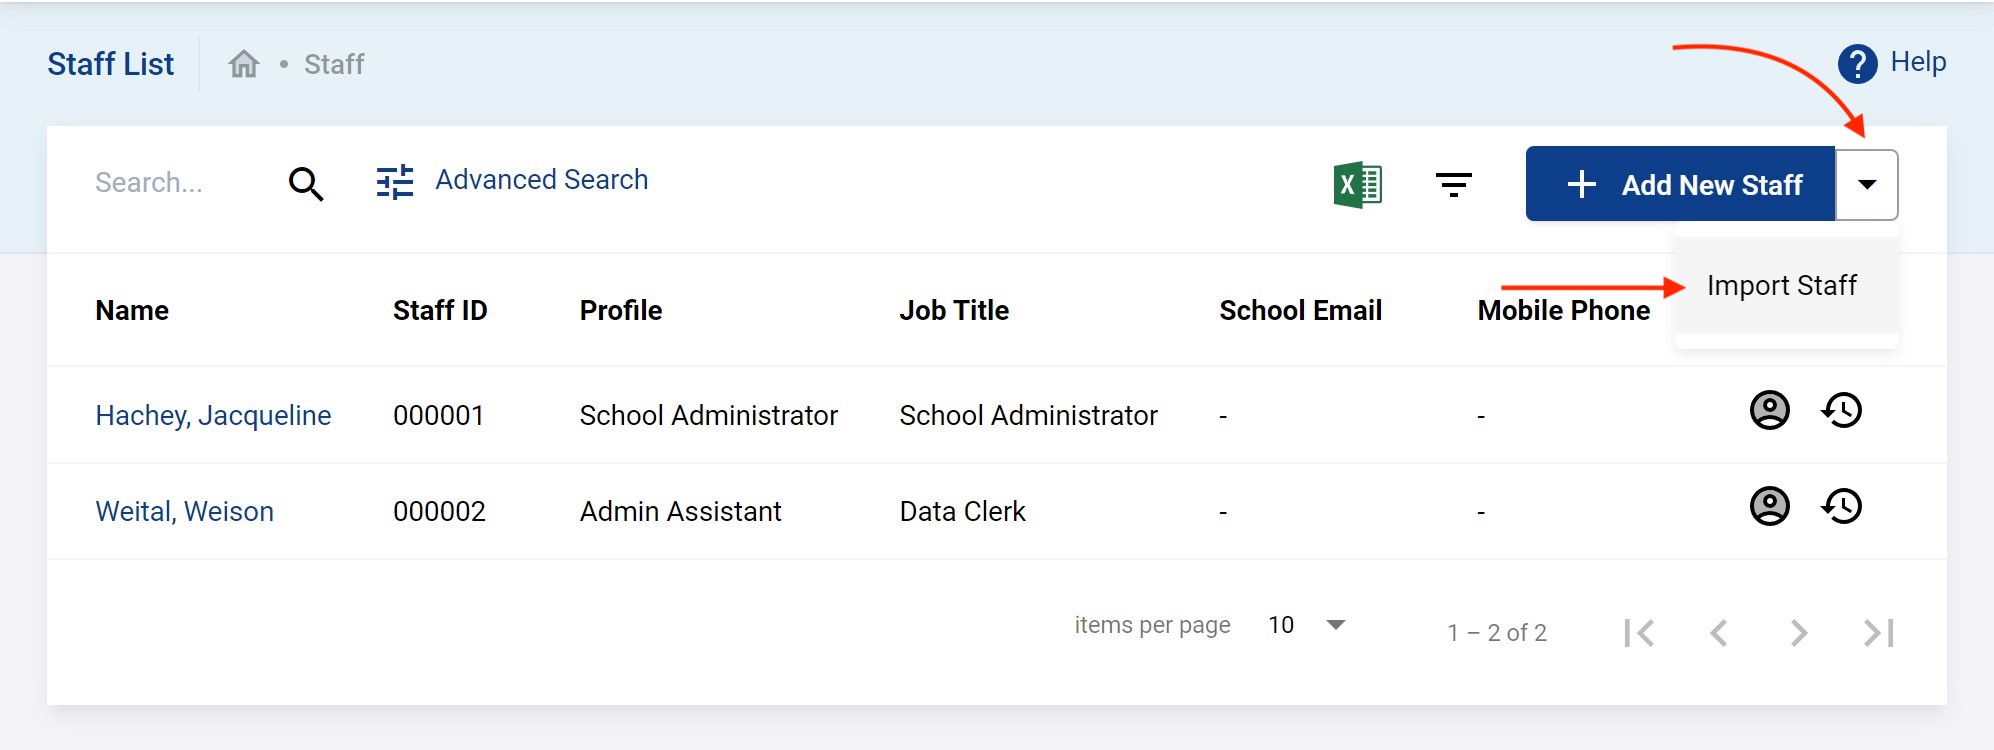
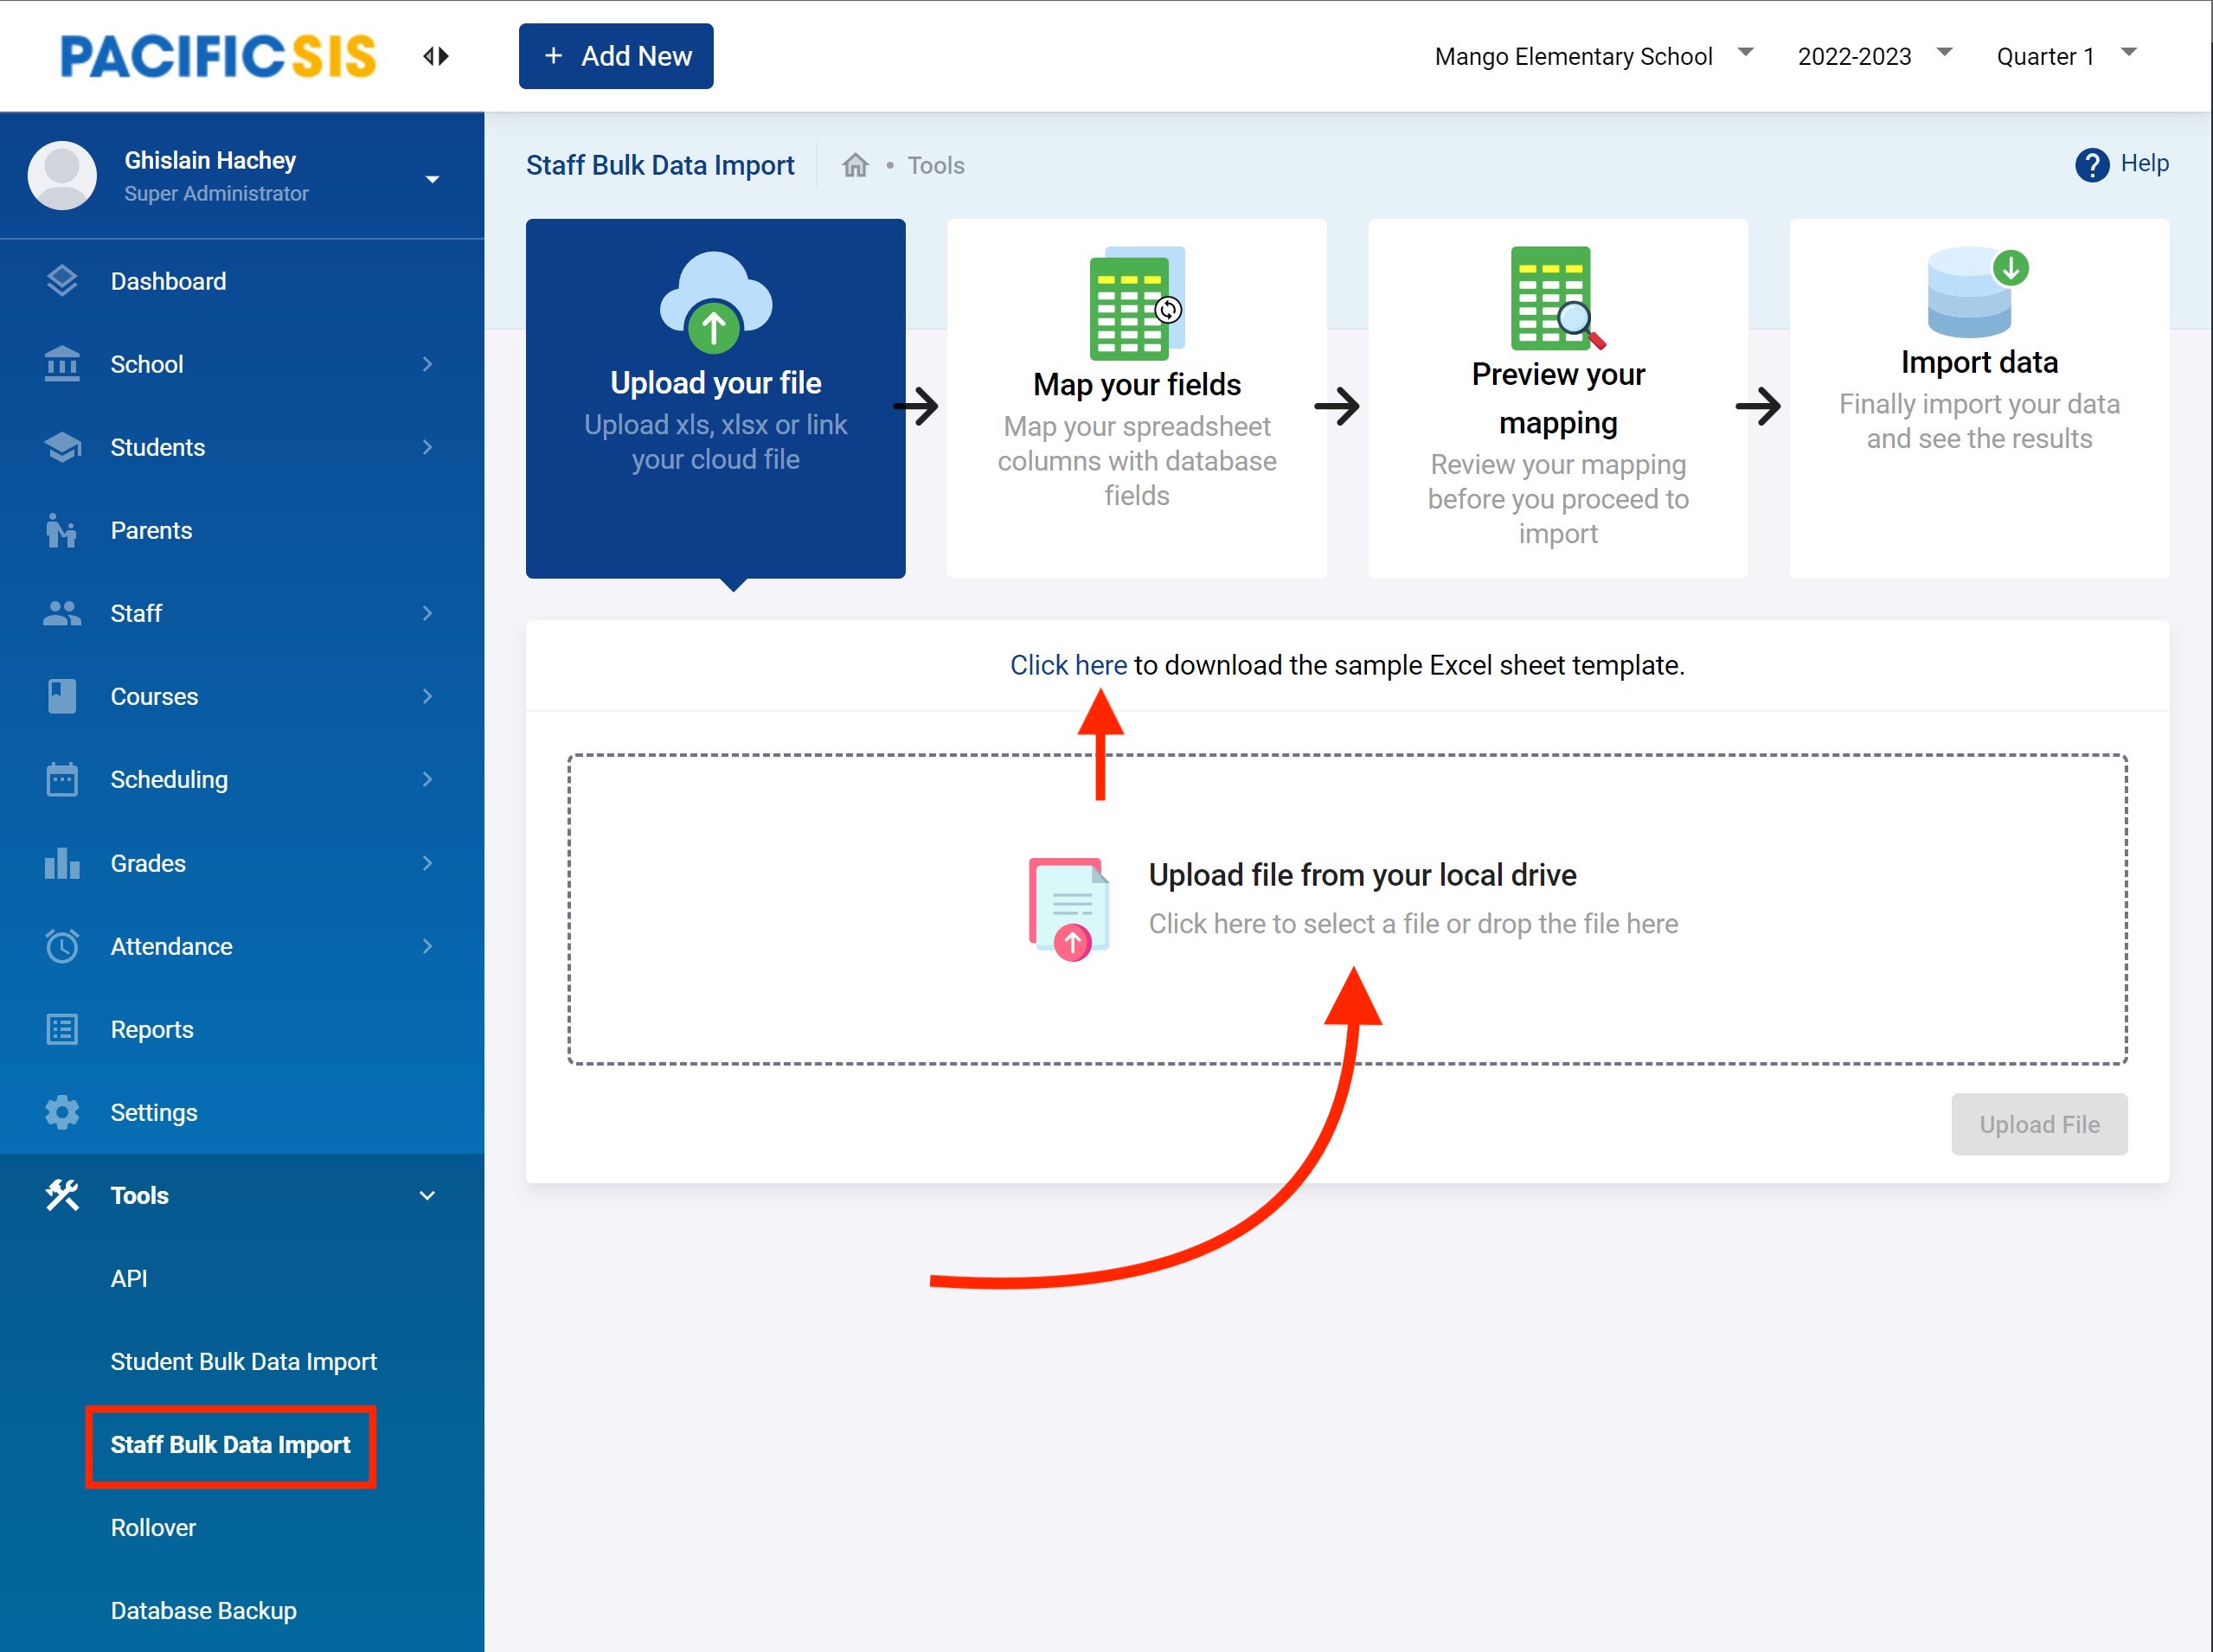
You bulk load staff by clicking on the down arrow to the right of the + Add New Staff and then click on Import Staff as shown below.
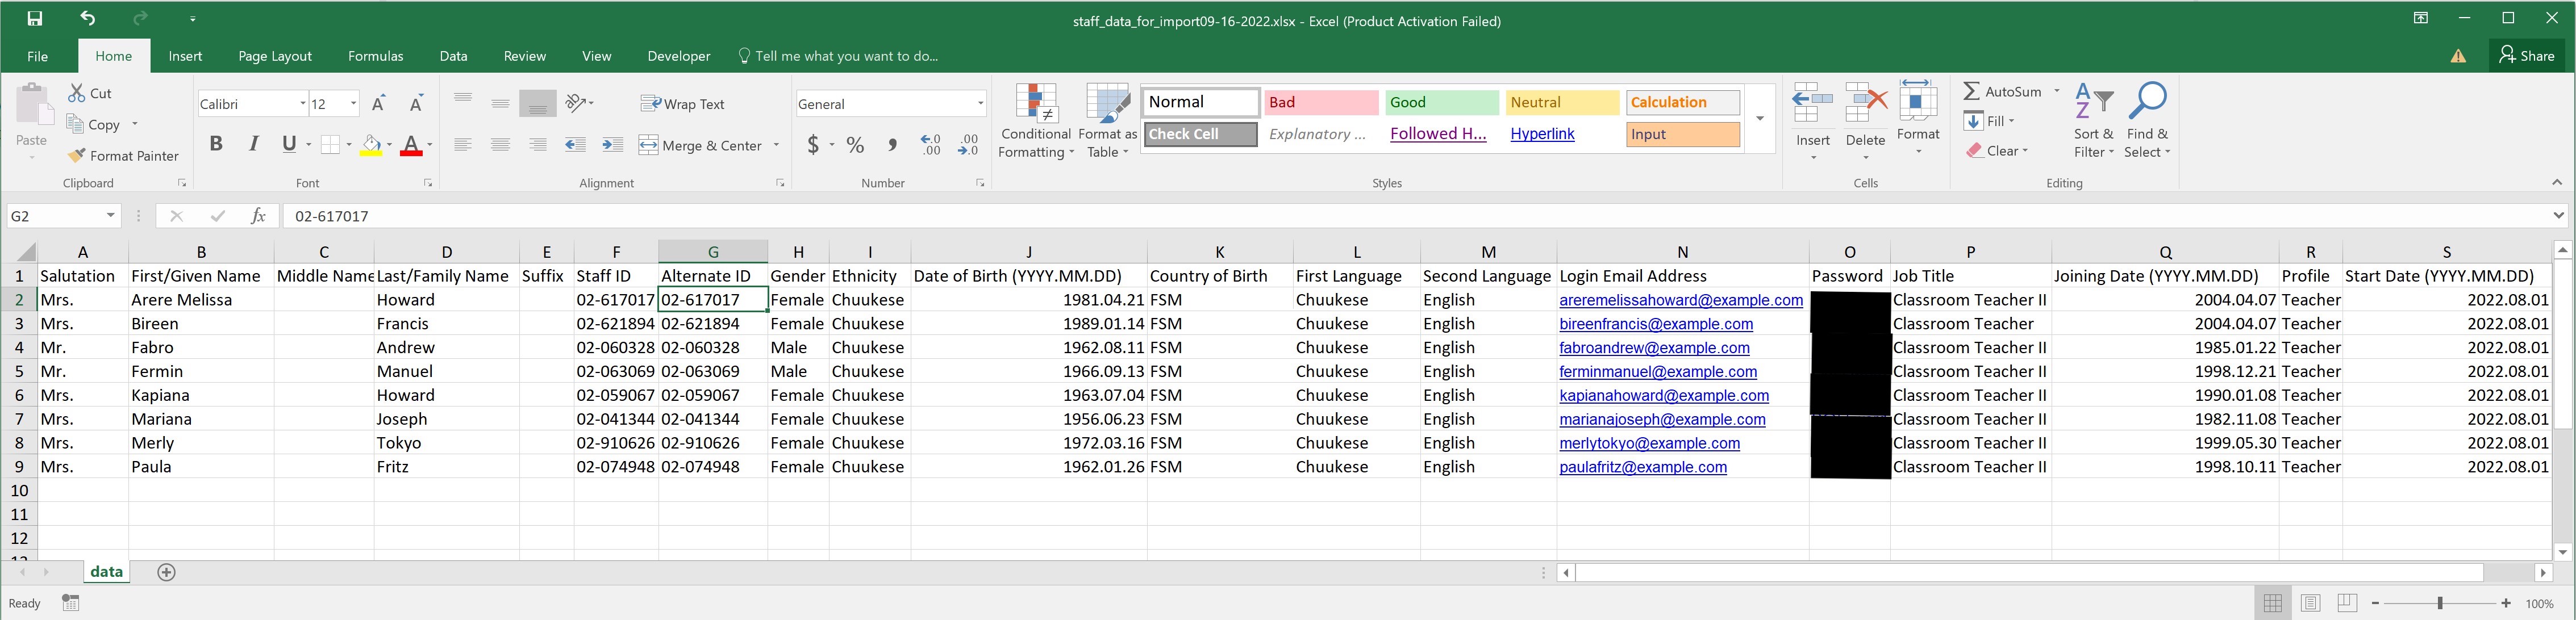
You will be redirected to the following. Note you could also do this from the Tools in the main menu. You can click here to download a sample of an Excel sheet to put your staff details in. A sample might look something like this.

A locally provided staff data file will be simpler and may look like this.
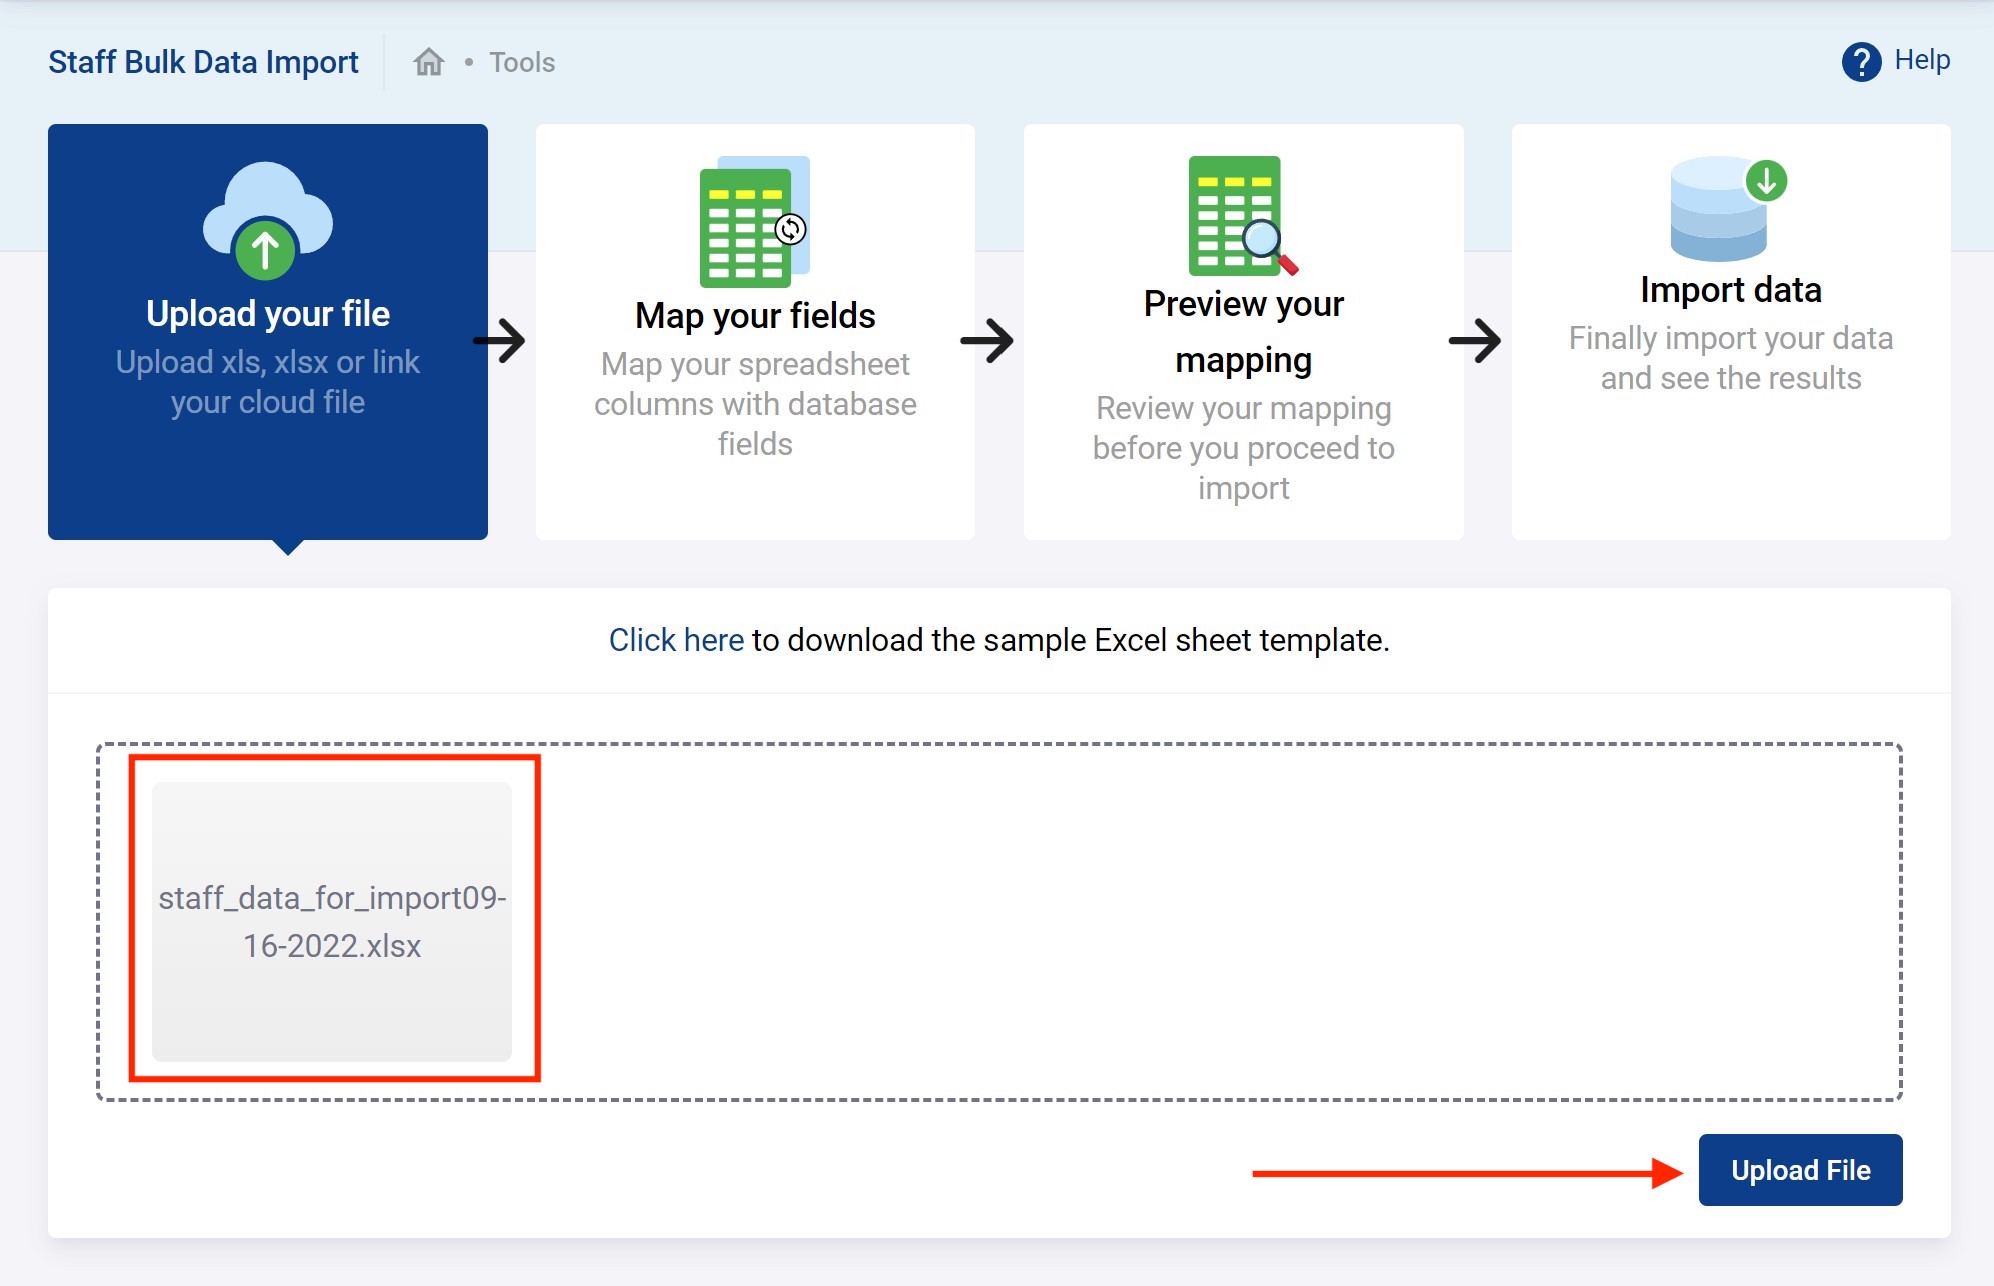
When ready with your staff data file drag and drop it in the Upload file from your local drive area.
When dragged and dropped you should see your files in the upload area as shown below. Click on Upload File to get started.
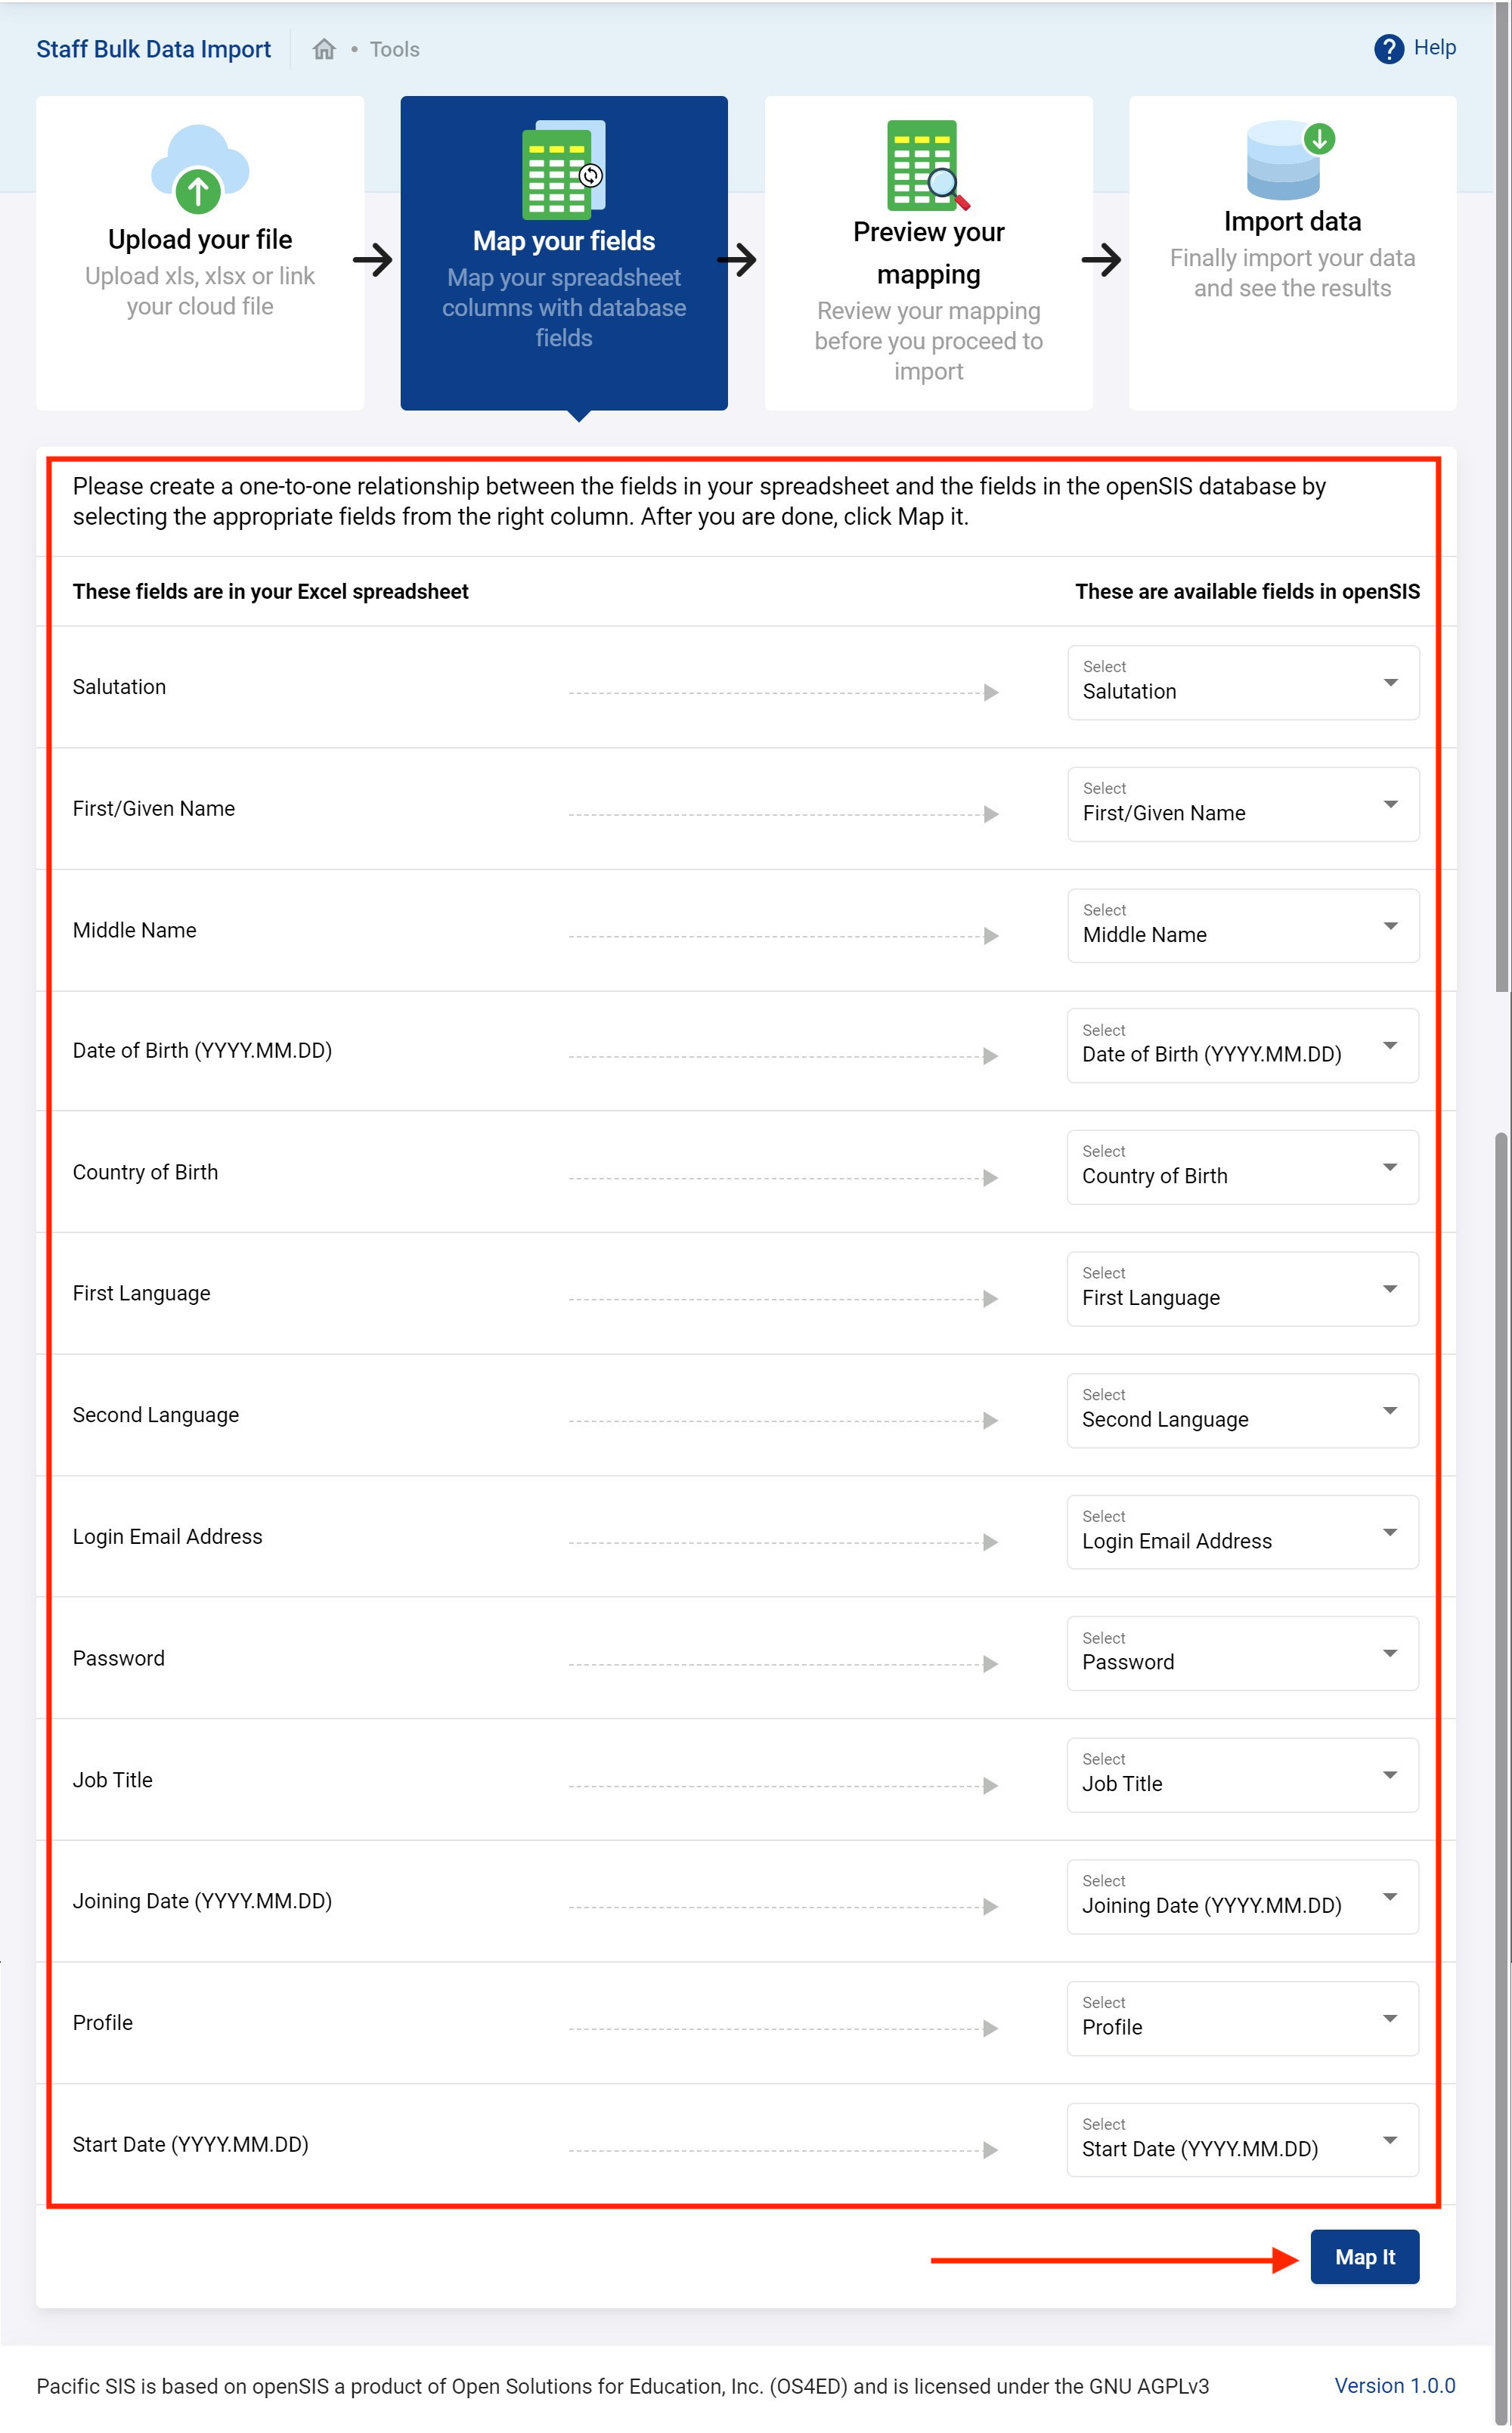
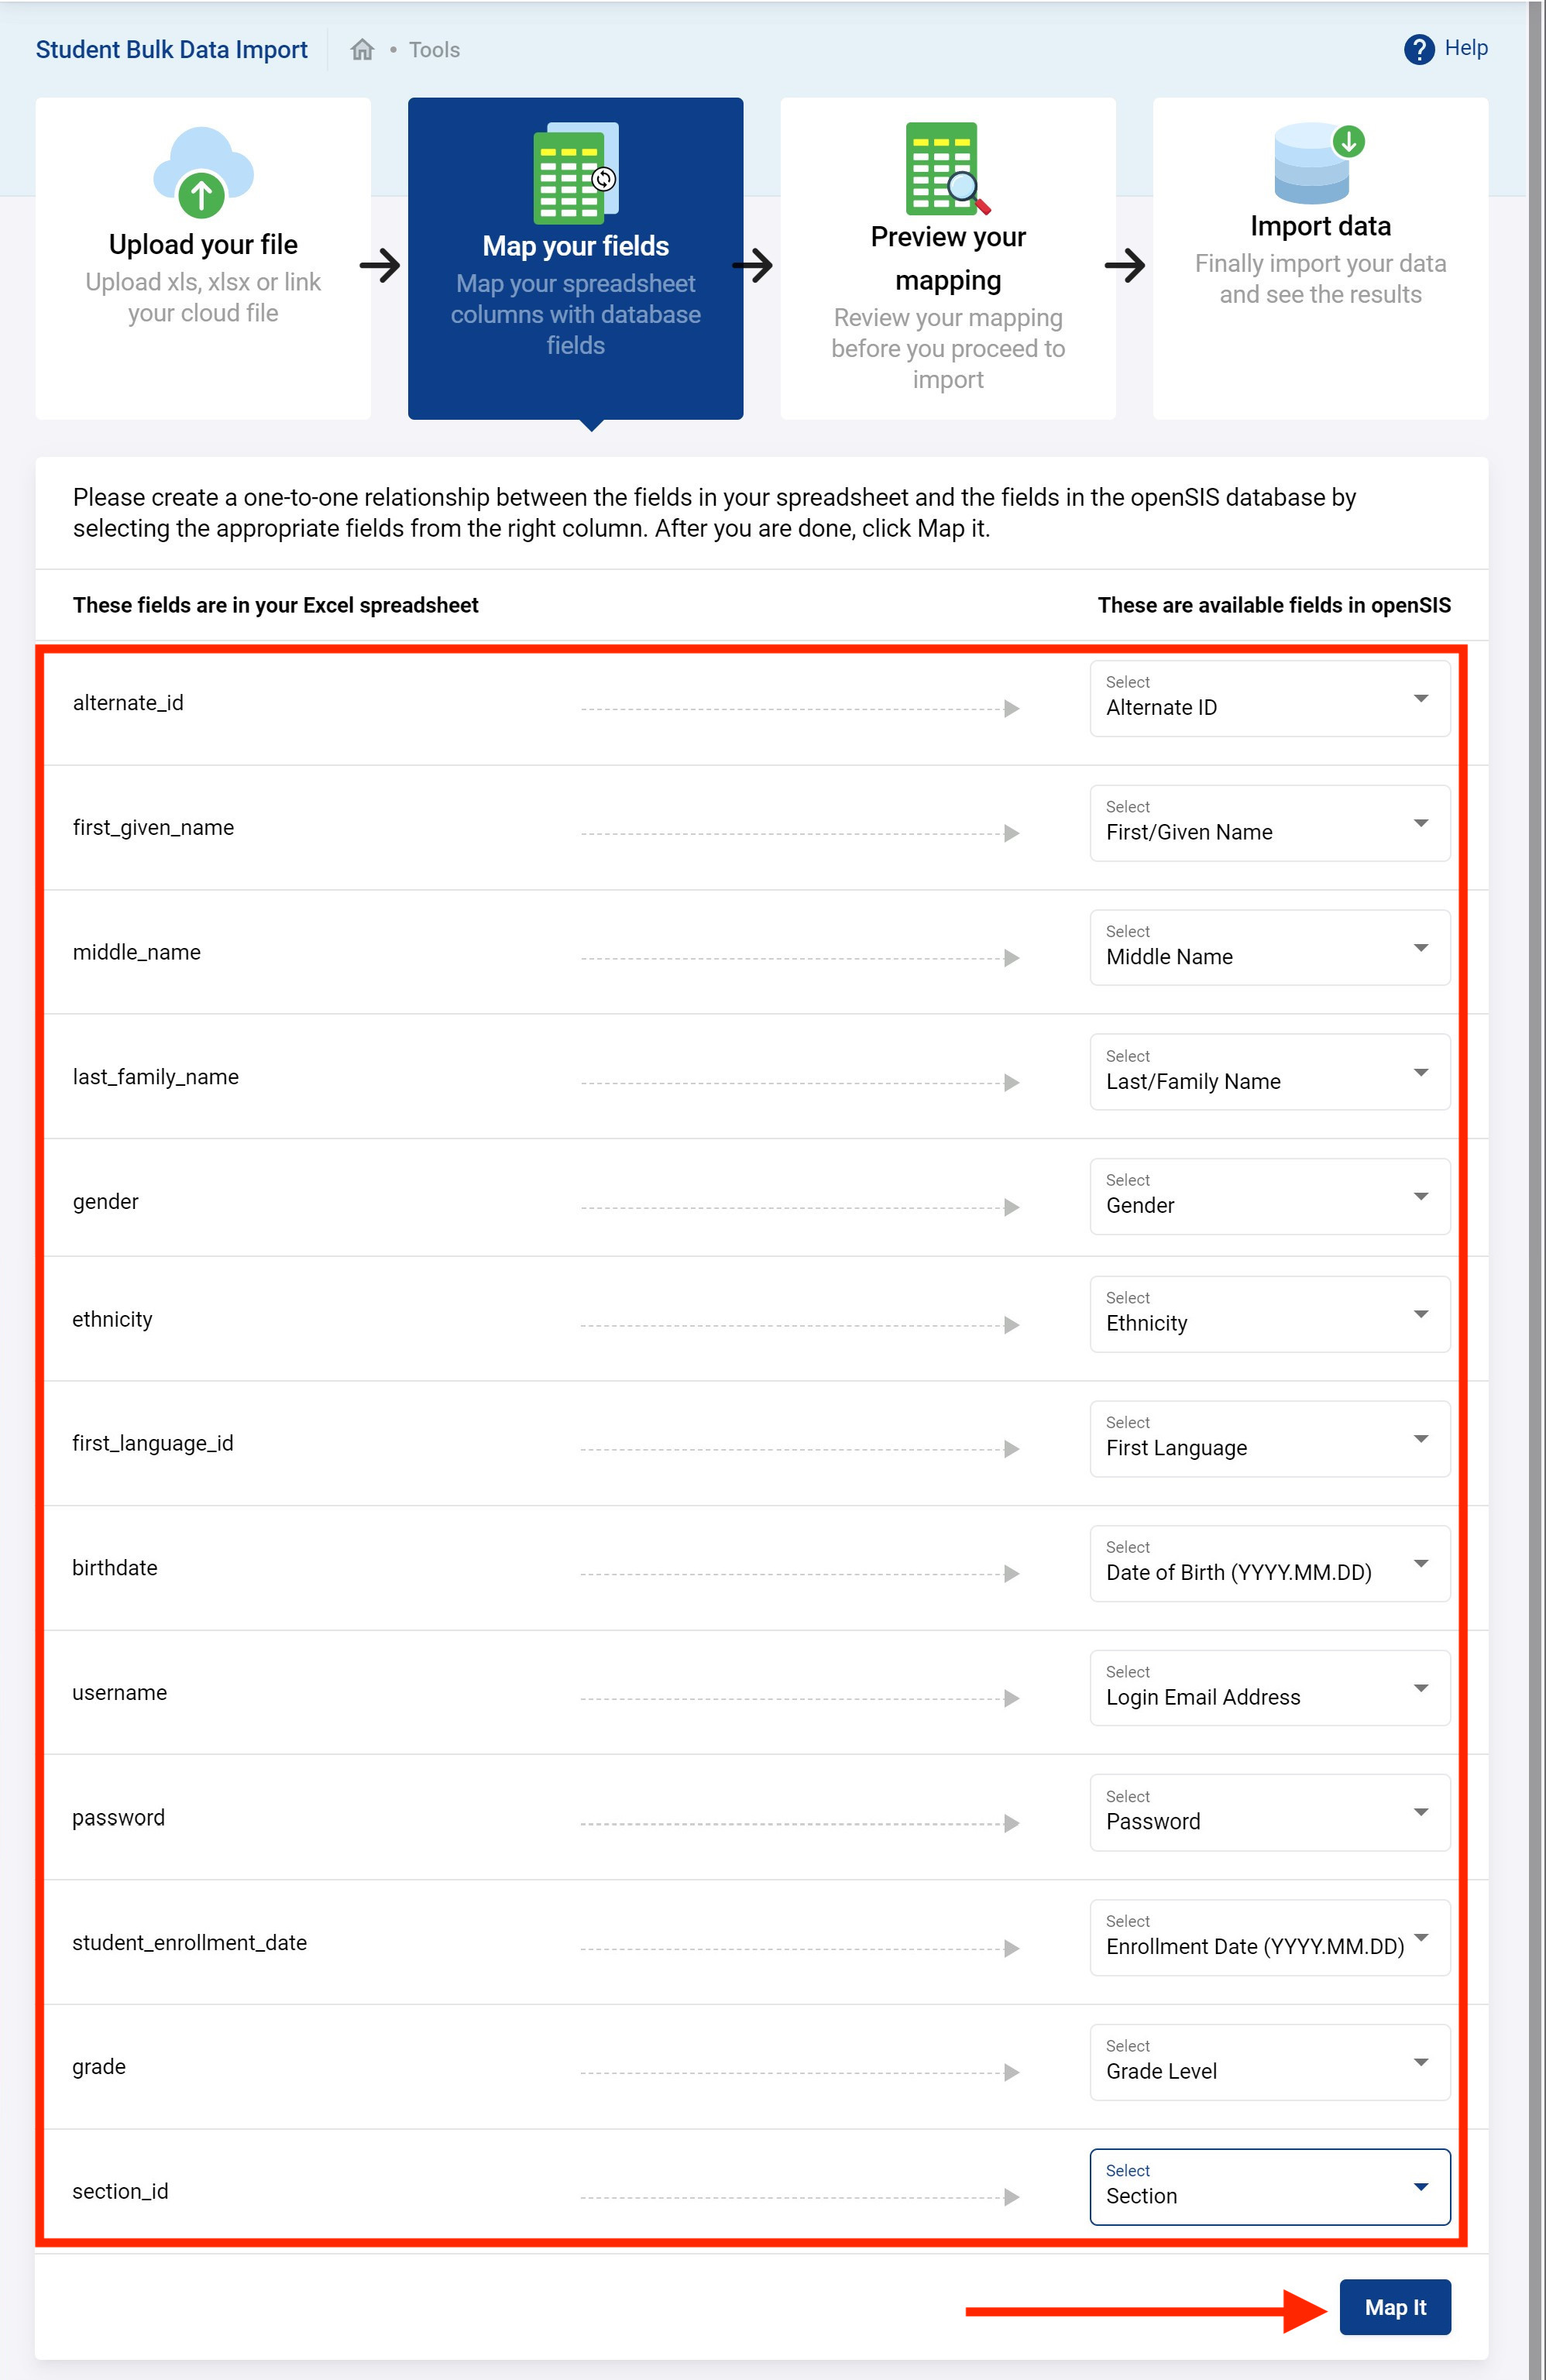
The next step will be to map the field from your excel data file to the fields in the Pacific SIS. If you use a template provided to you chances are the fields will already be correctly mapped. Click on Map It to proceed.
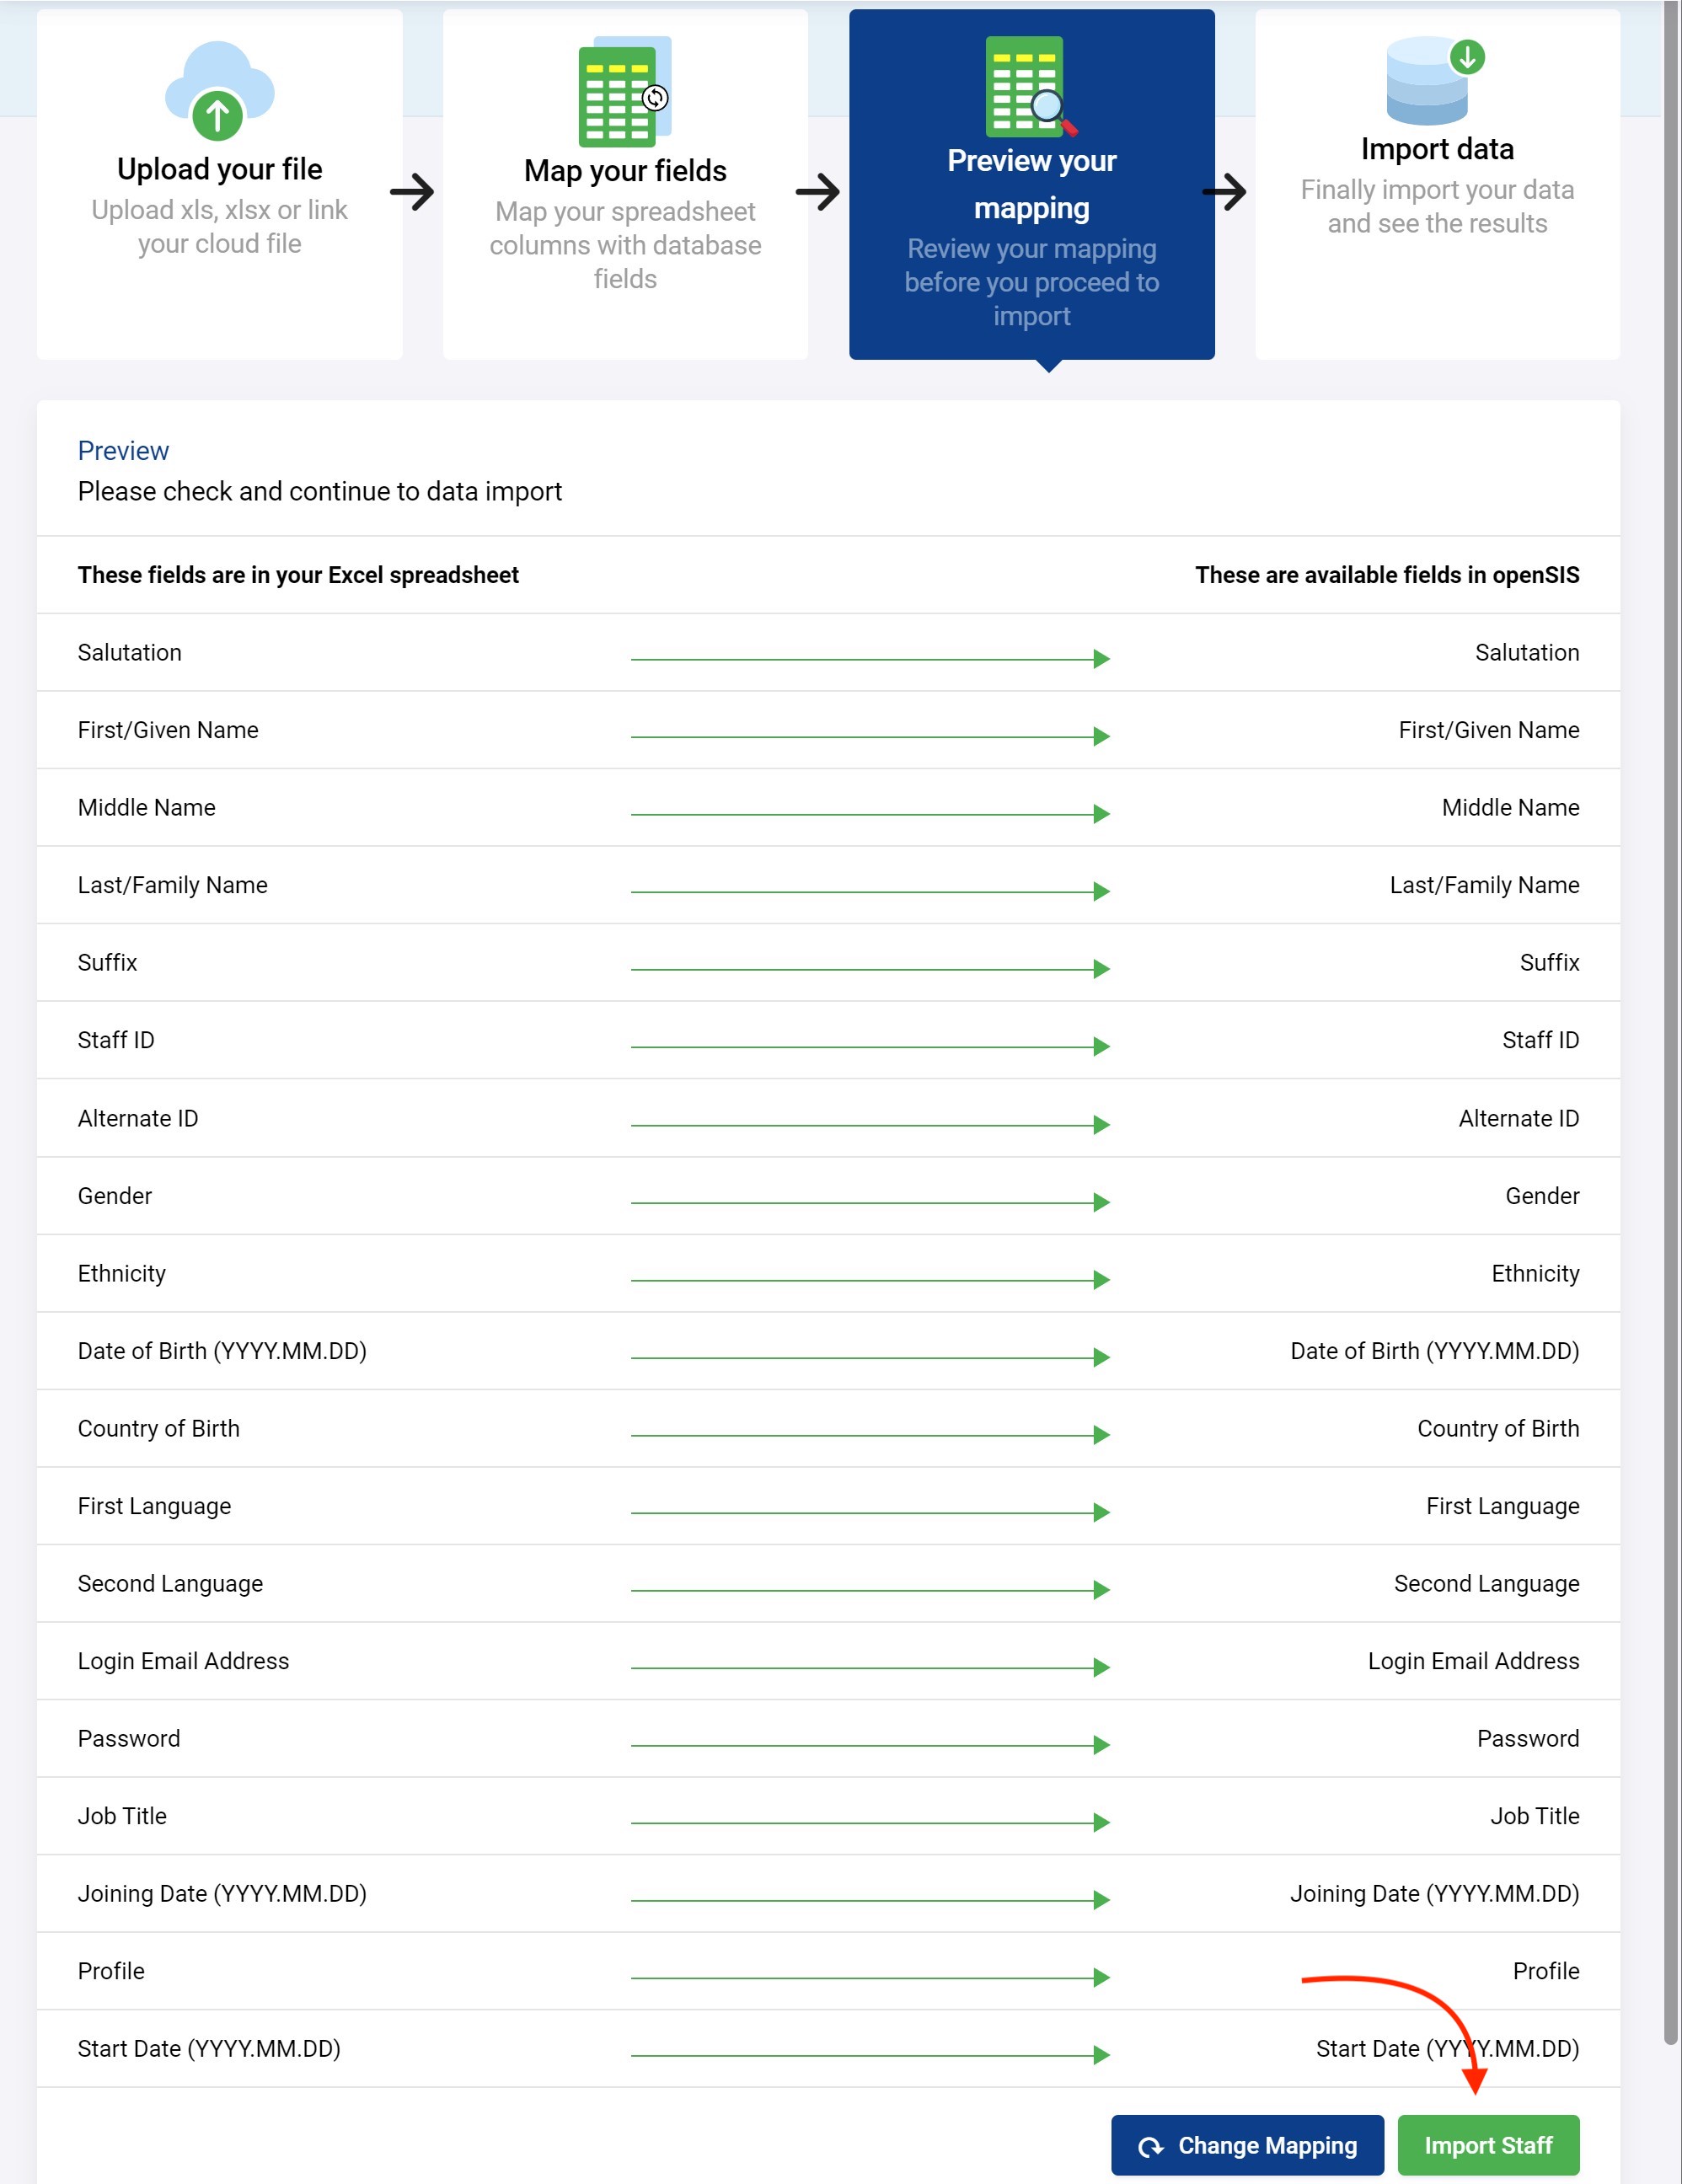
You'll have a chance to review and when confident you can click on Import Staff.
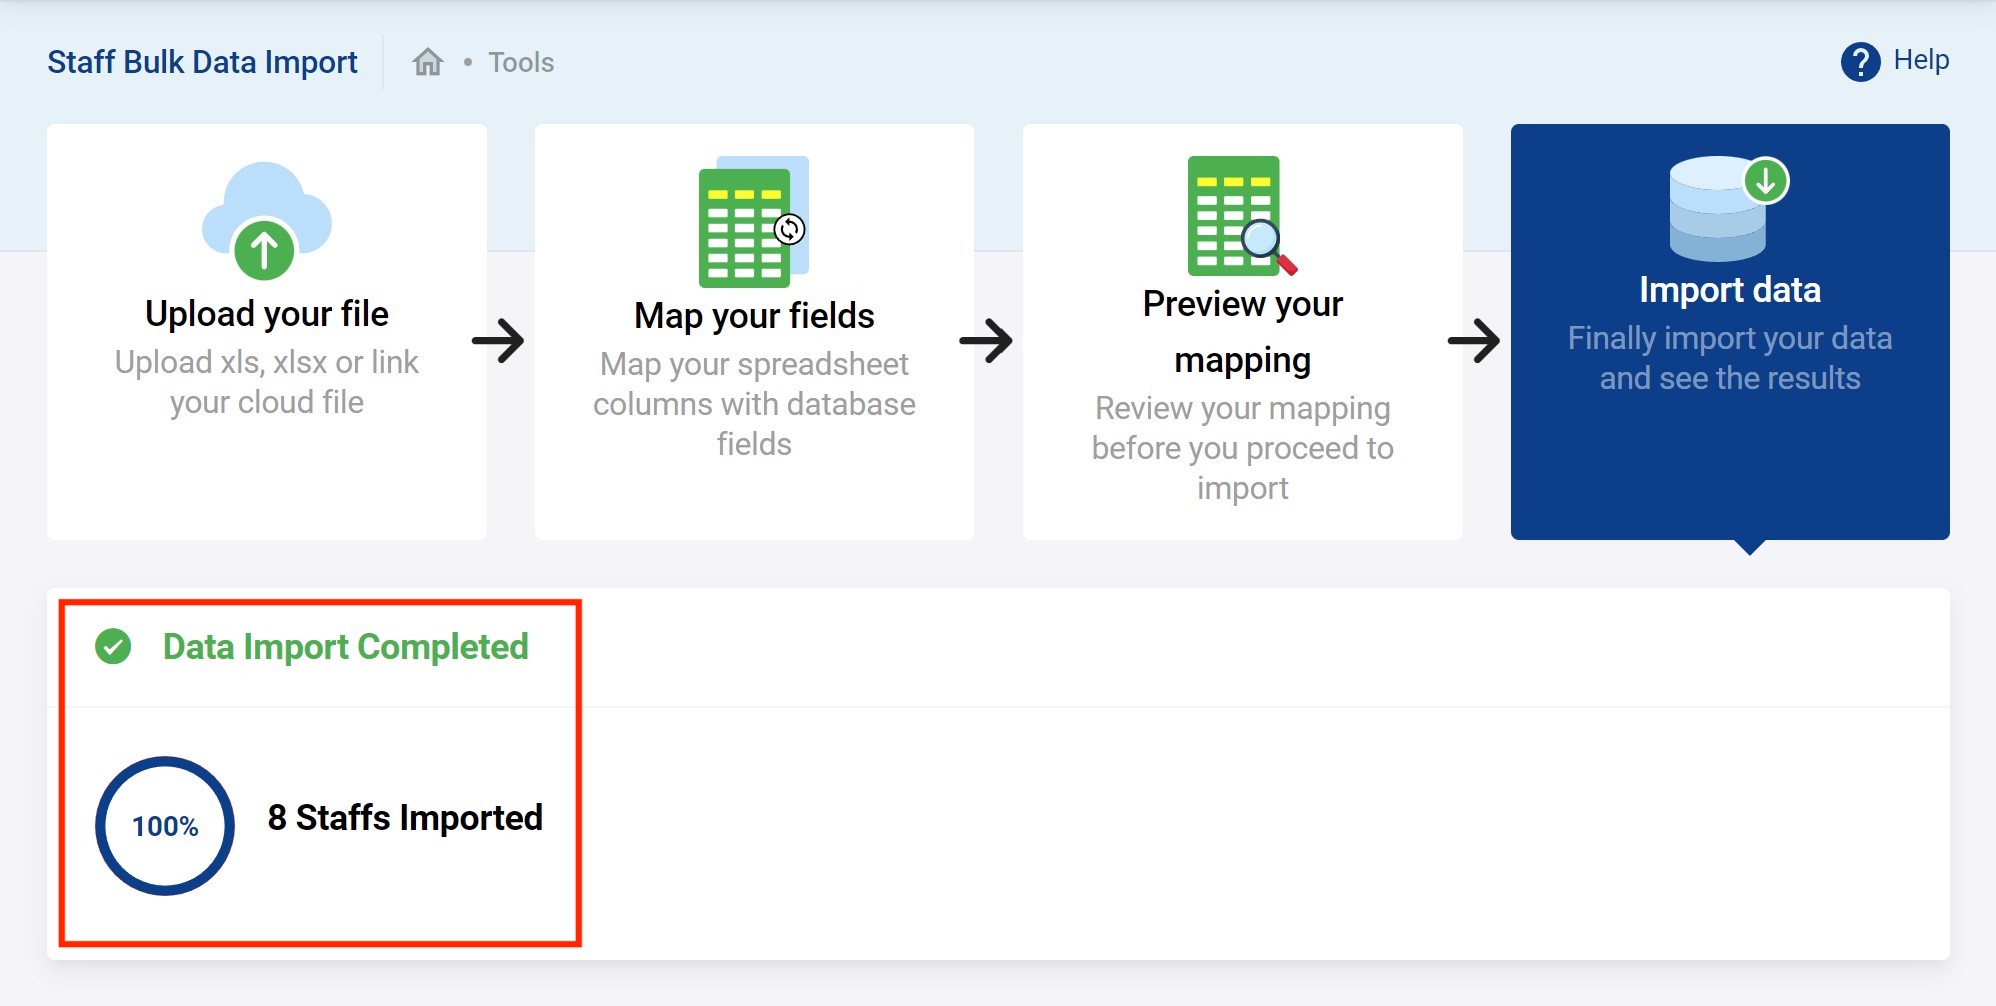
If all goes well with the bulk upload you should see the following.
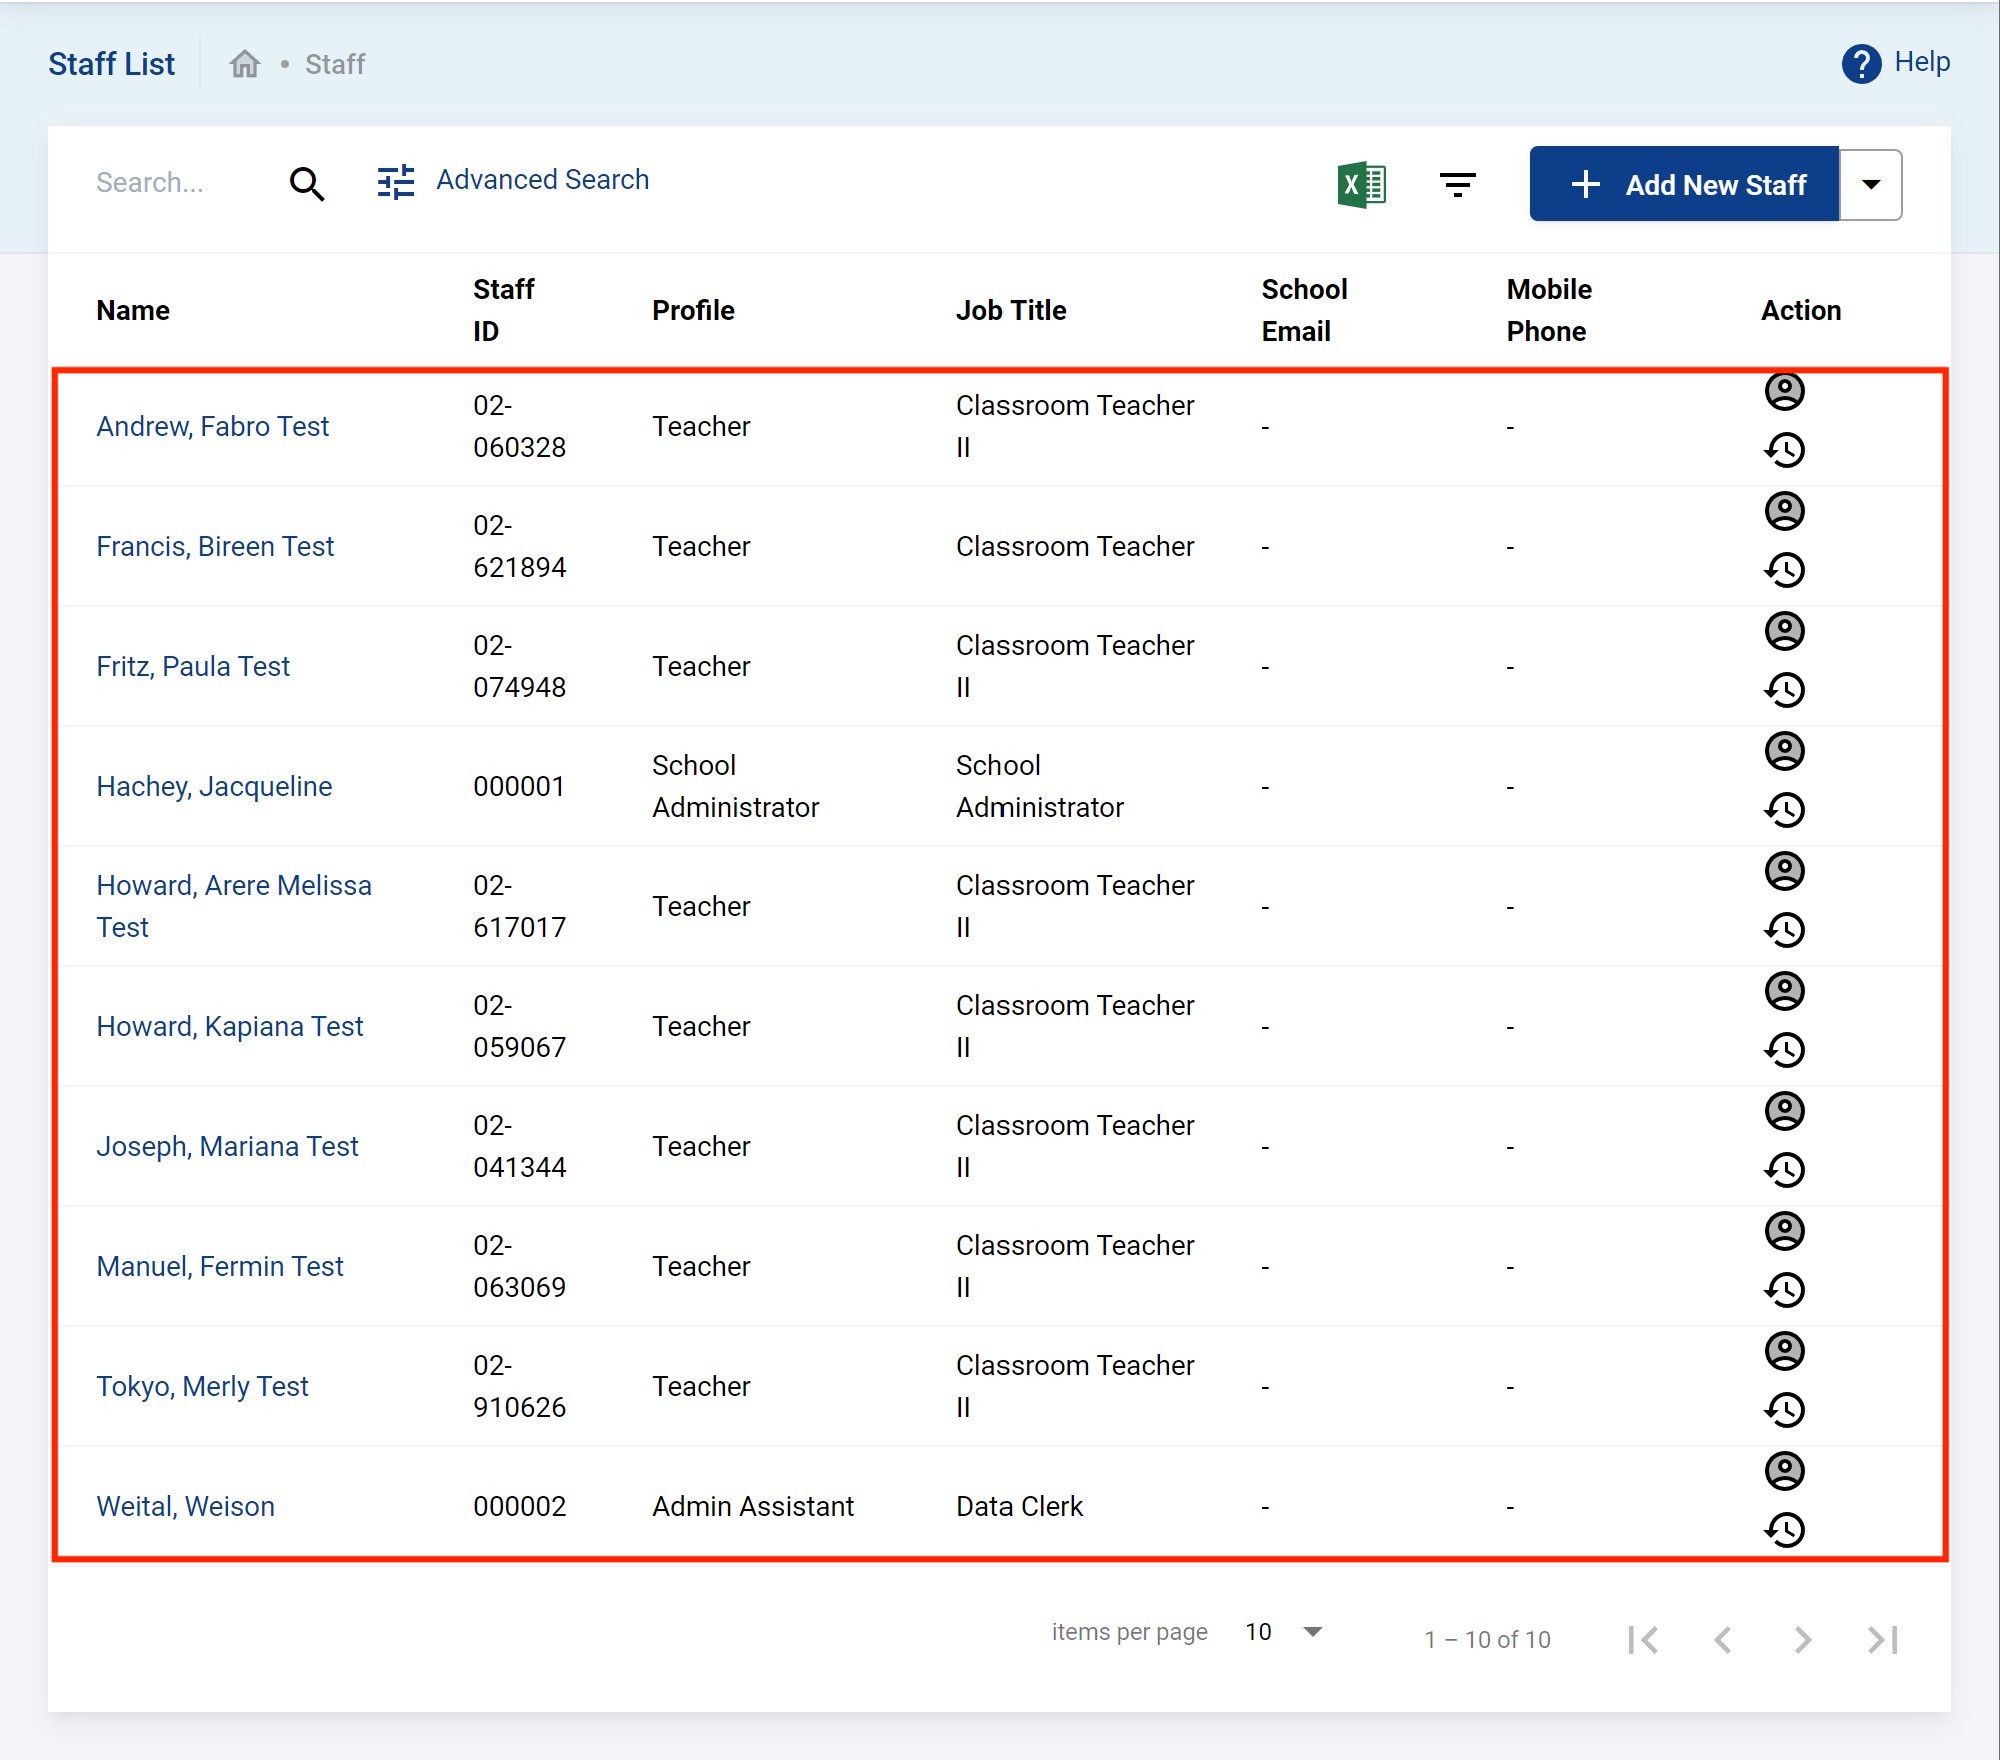
And if you browse again to the Staff Info for which you uploaded the staff you will see the whole list there as shown below.
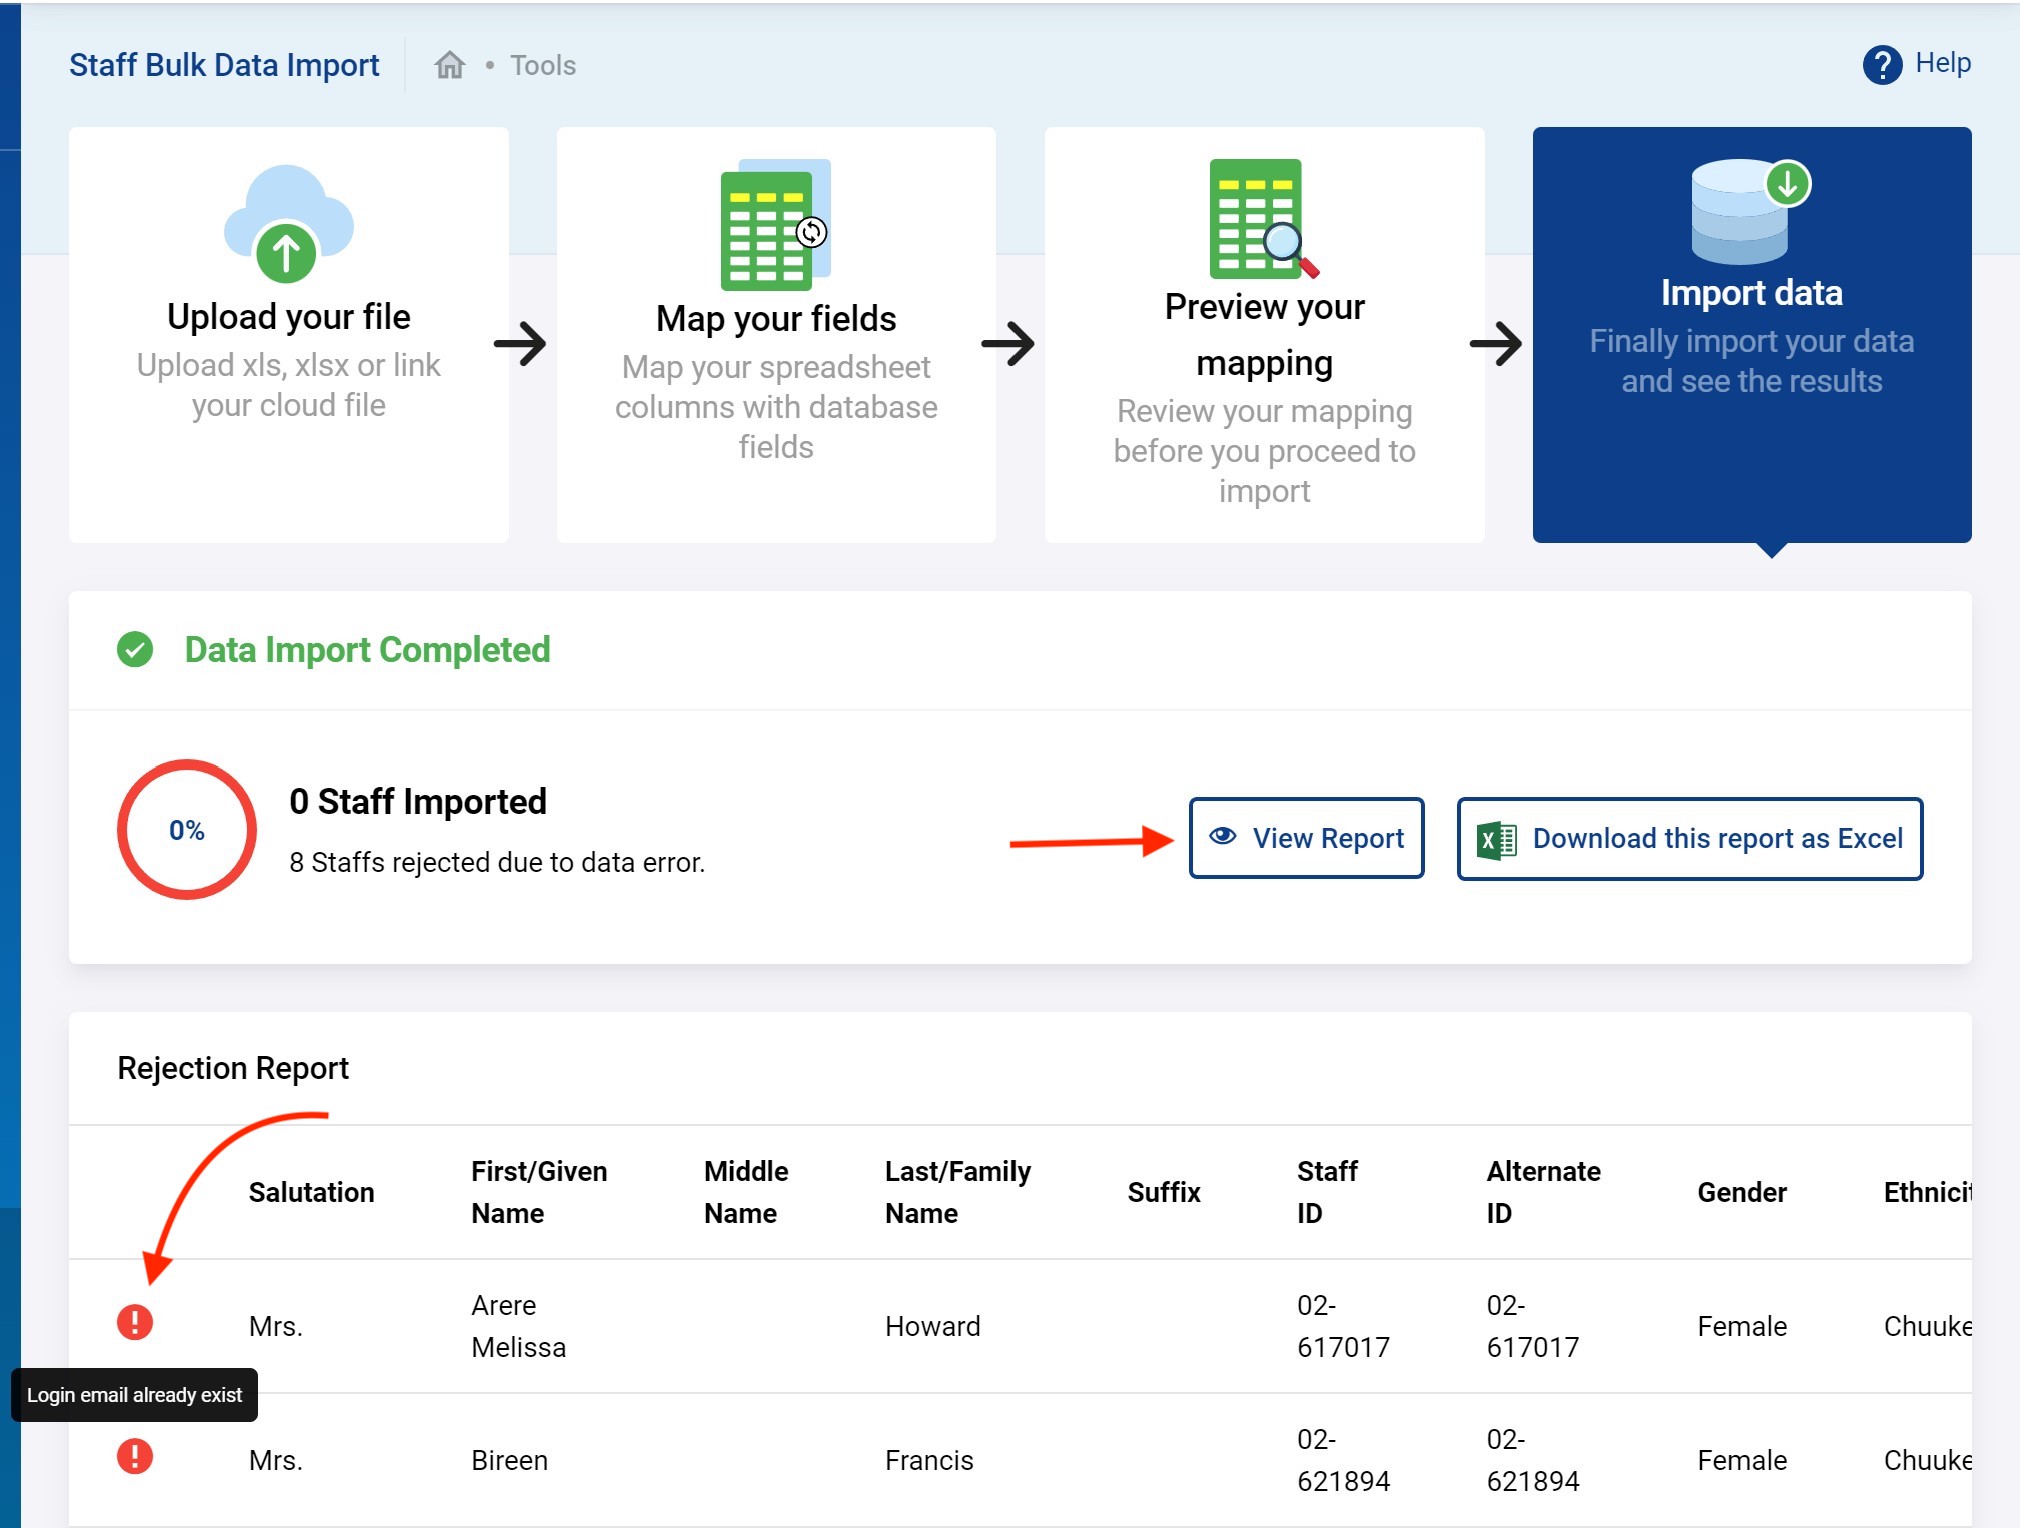
But things can also go wrong in which case it will look like the following. You see that 0 staff has been loaded. You can click on the View Report which may provide hints as to why.
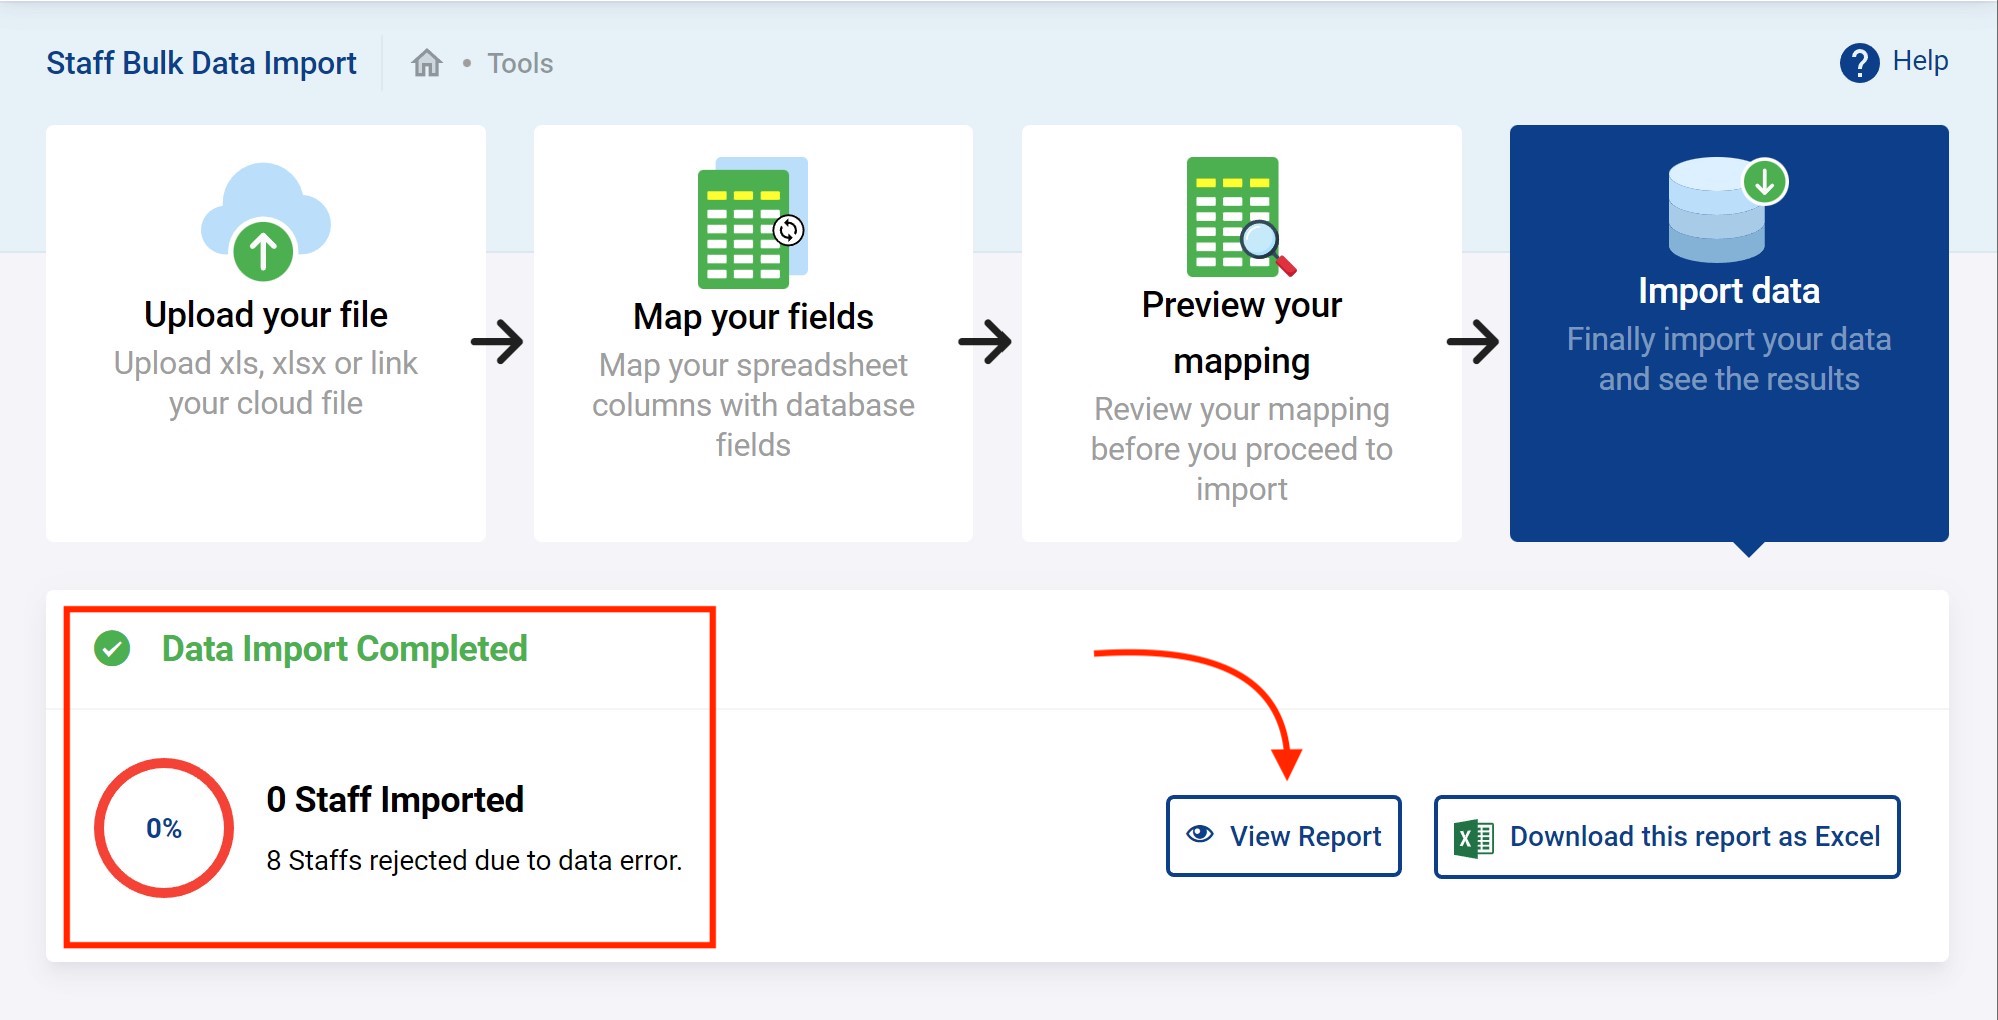
For example, the below all staff were already in the system and so the rejection was clear with Login email already exist.
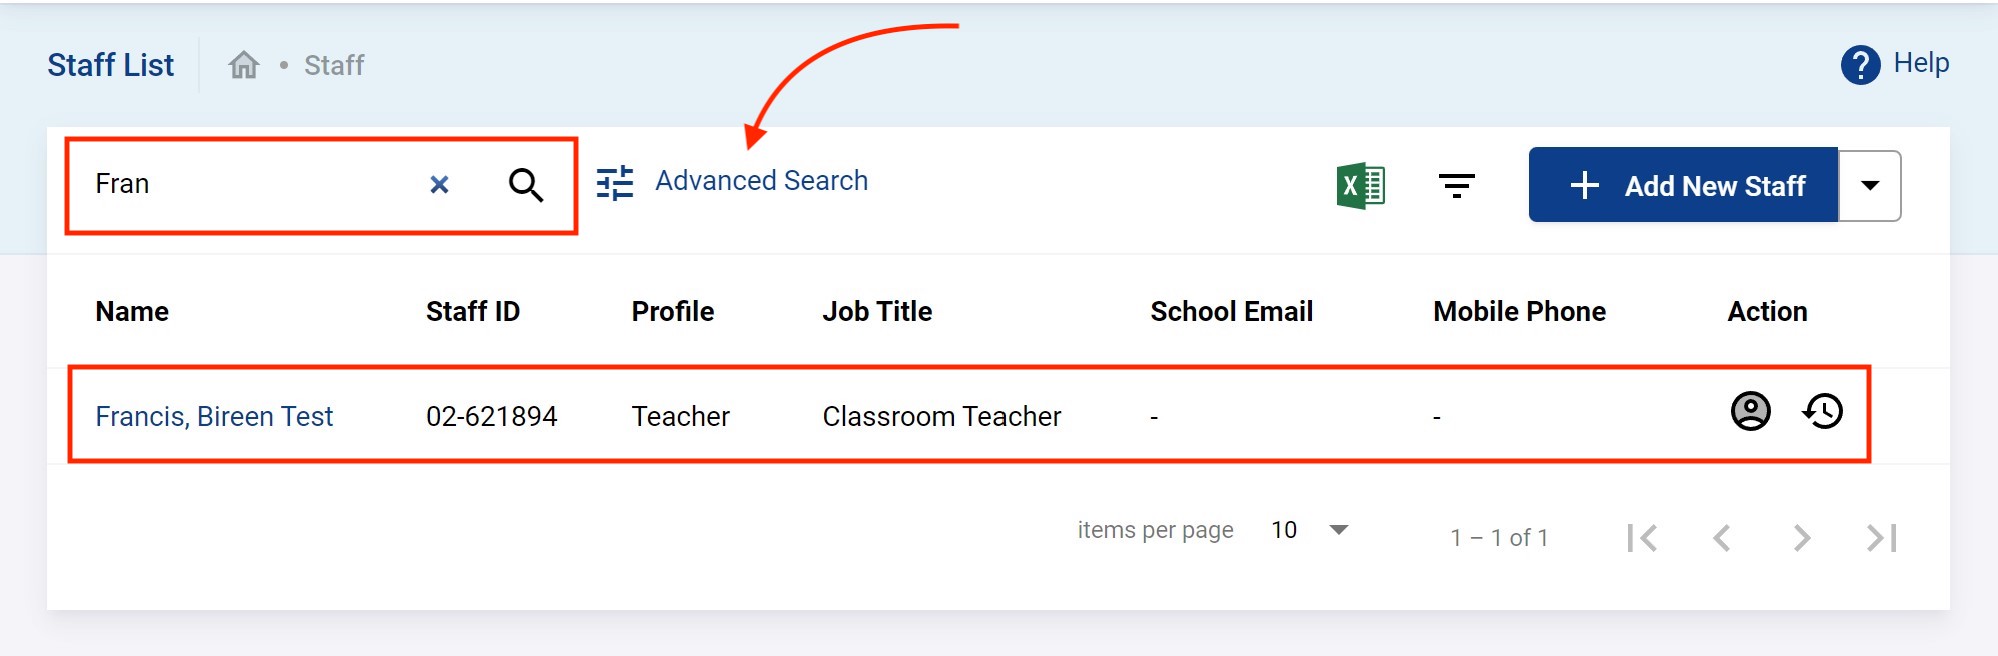
Finding existing staff
You can find staff in Staff Info simply by starting the type in the search box at the top left. This is the quickest way and will quickly only show the staff matching your search text as shown below. But you can also do a more advanced search by clicking on Advanced Search.
You will see the below. This example merely searching by First Name. You can search by just about any data field for a staff.
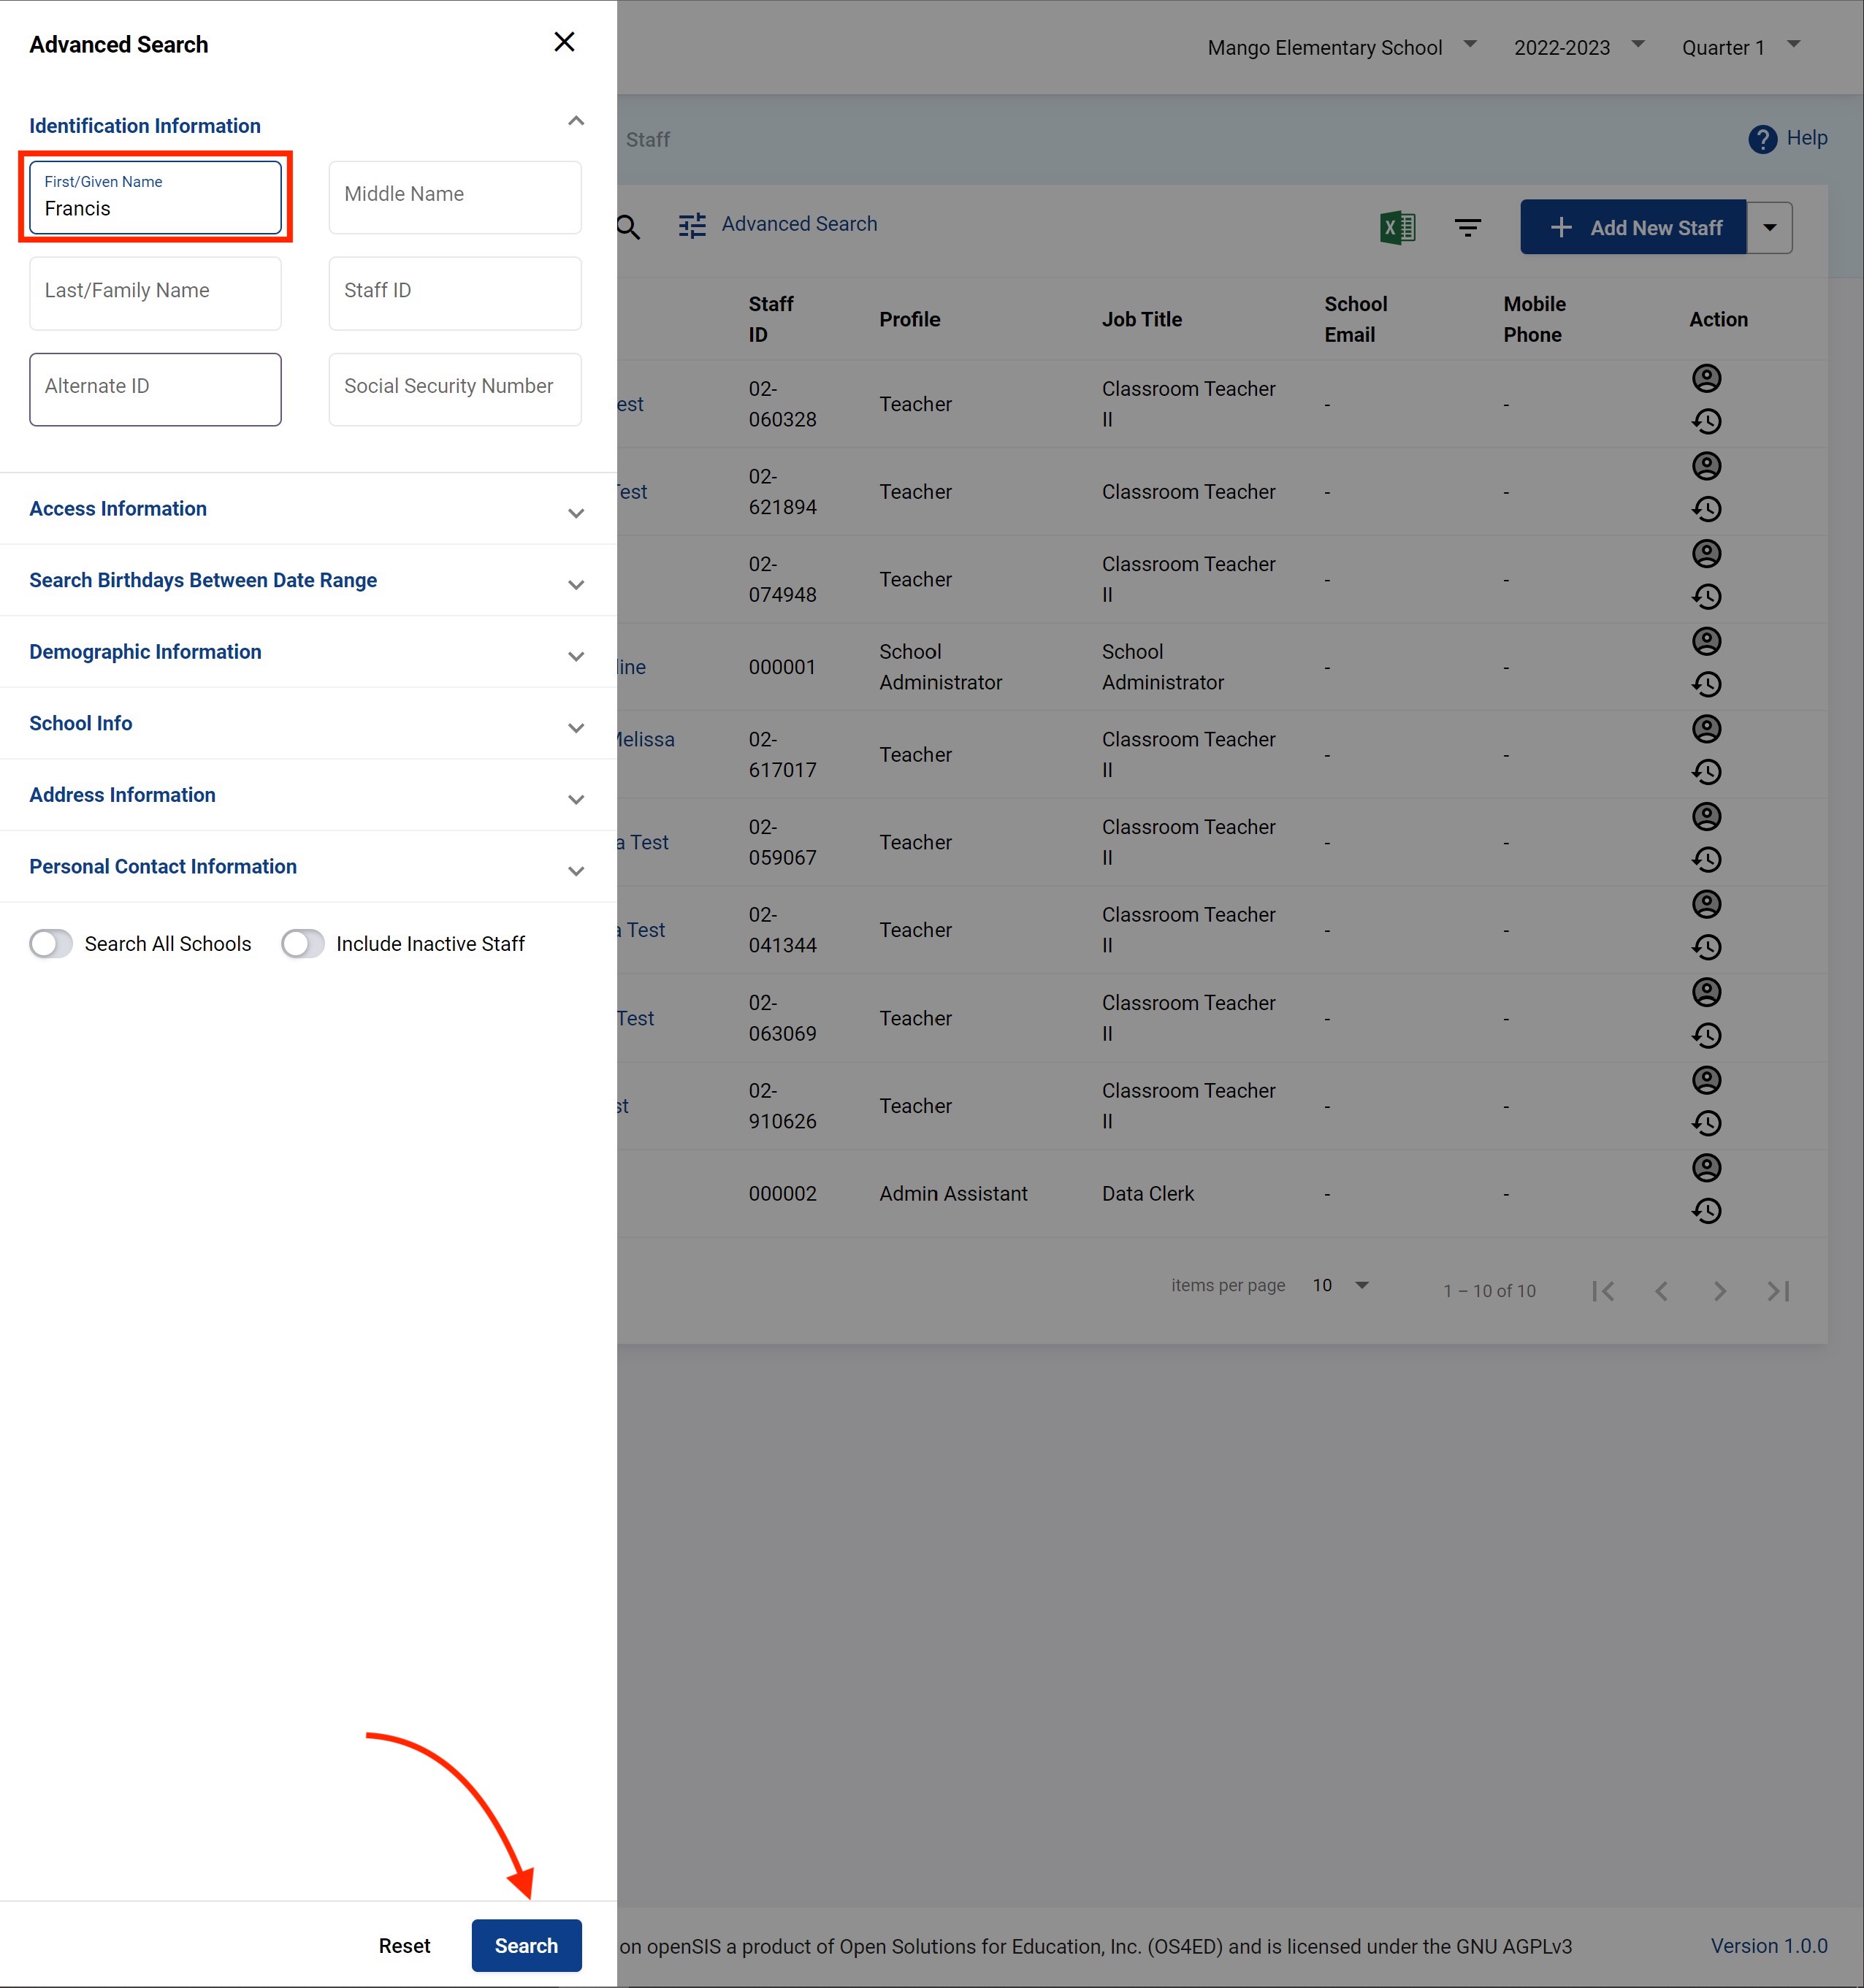
This next example, a search is done to retrieve all staff with Teacher profile to the school. Note that you can also check mark to Search All Schools and Include Inactive Staff. Then Click Search.

Students
Student Info
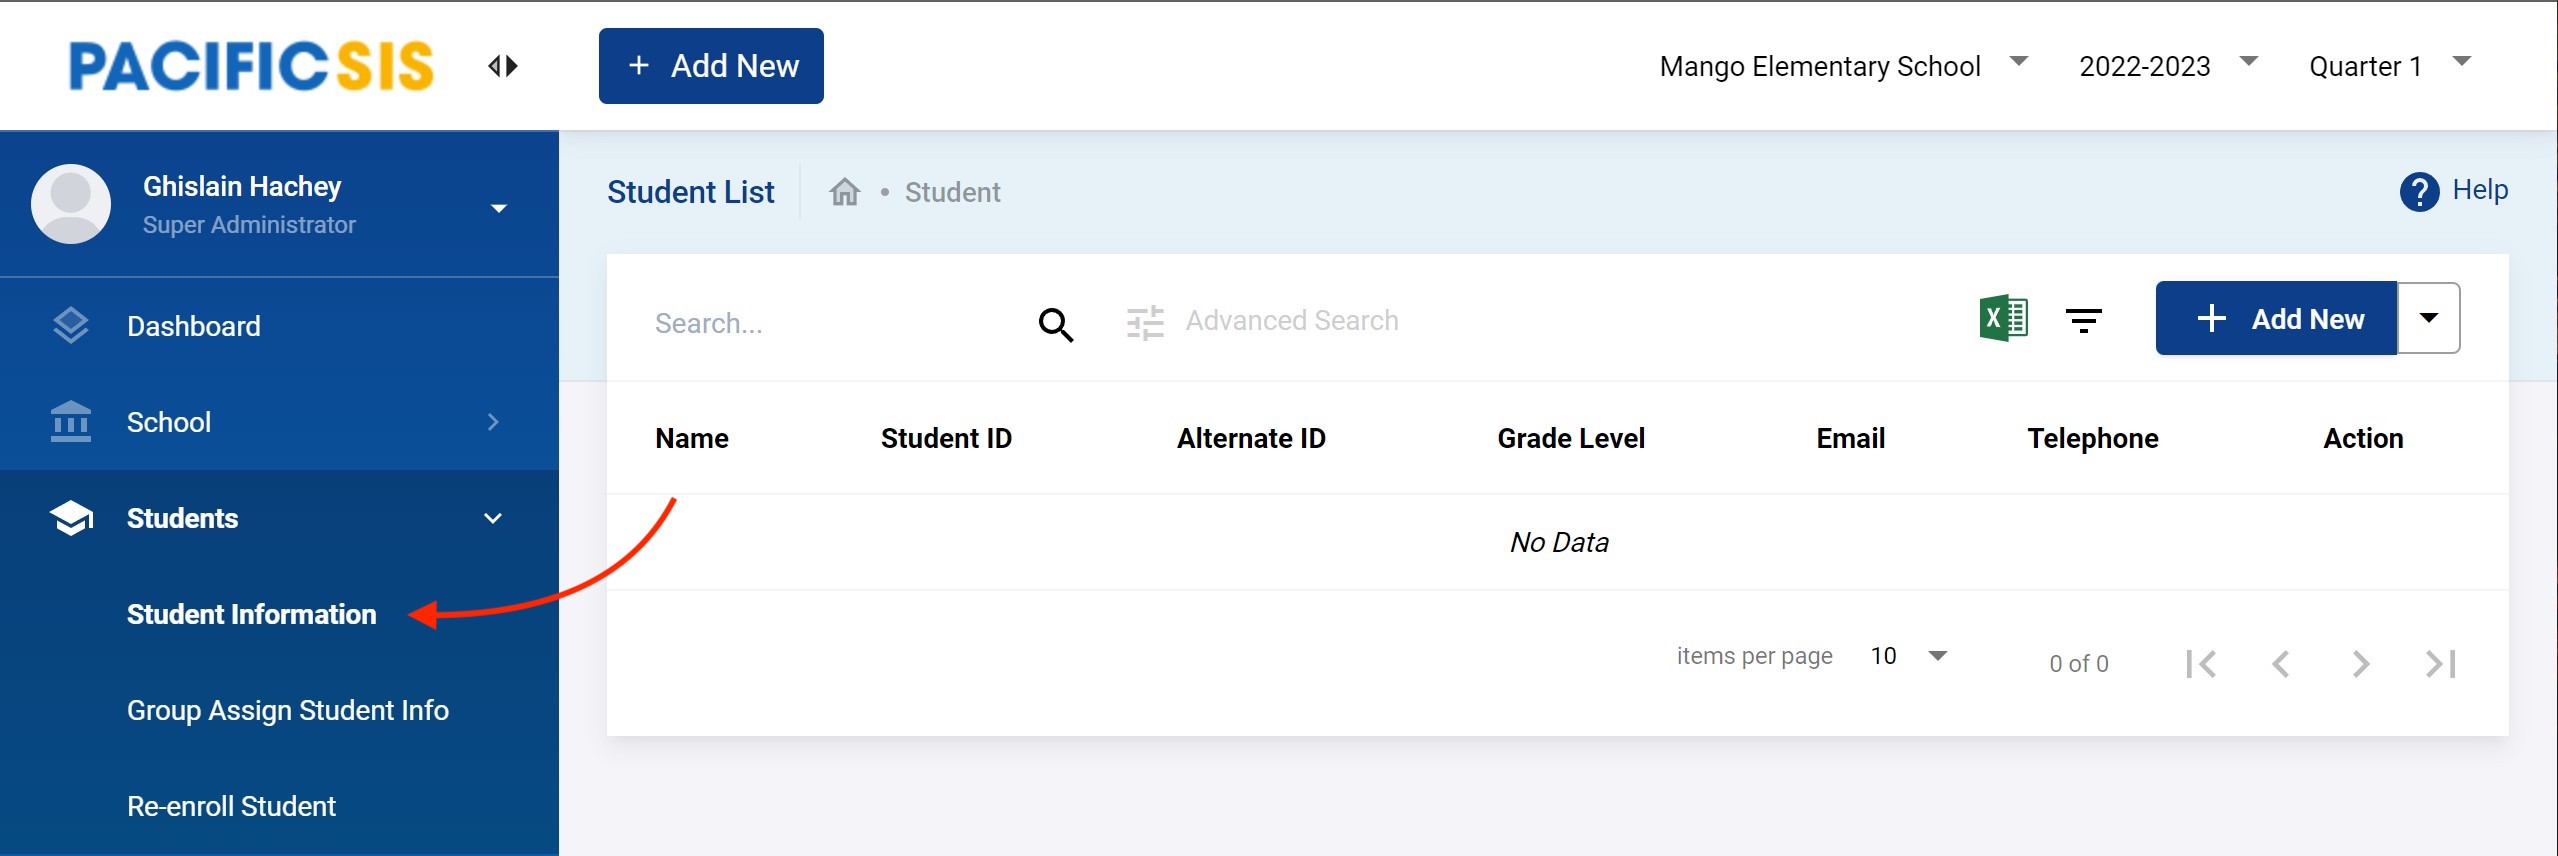
Go to Students → Student Information to find your students. At first with a new school you will have no students and should look something like below.
Add a Student
You need to add your students in the system one by one carefully. You do this in Students → Student Information and click on + Add New.

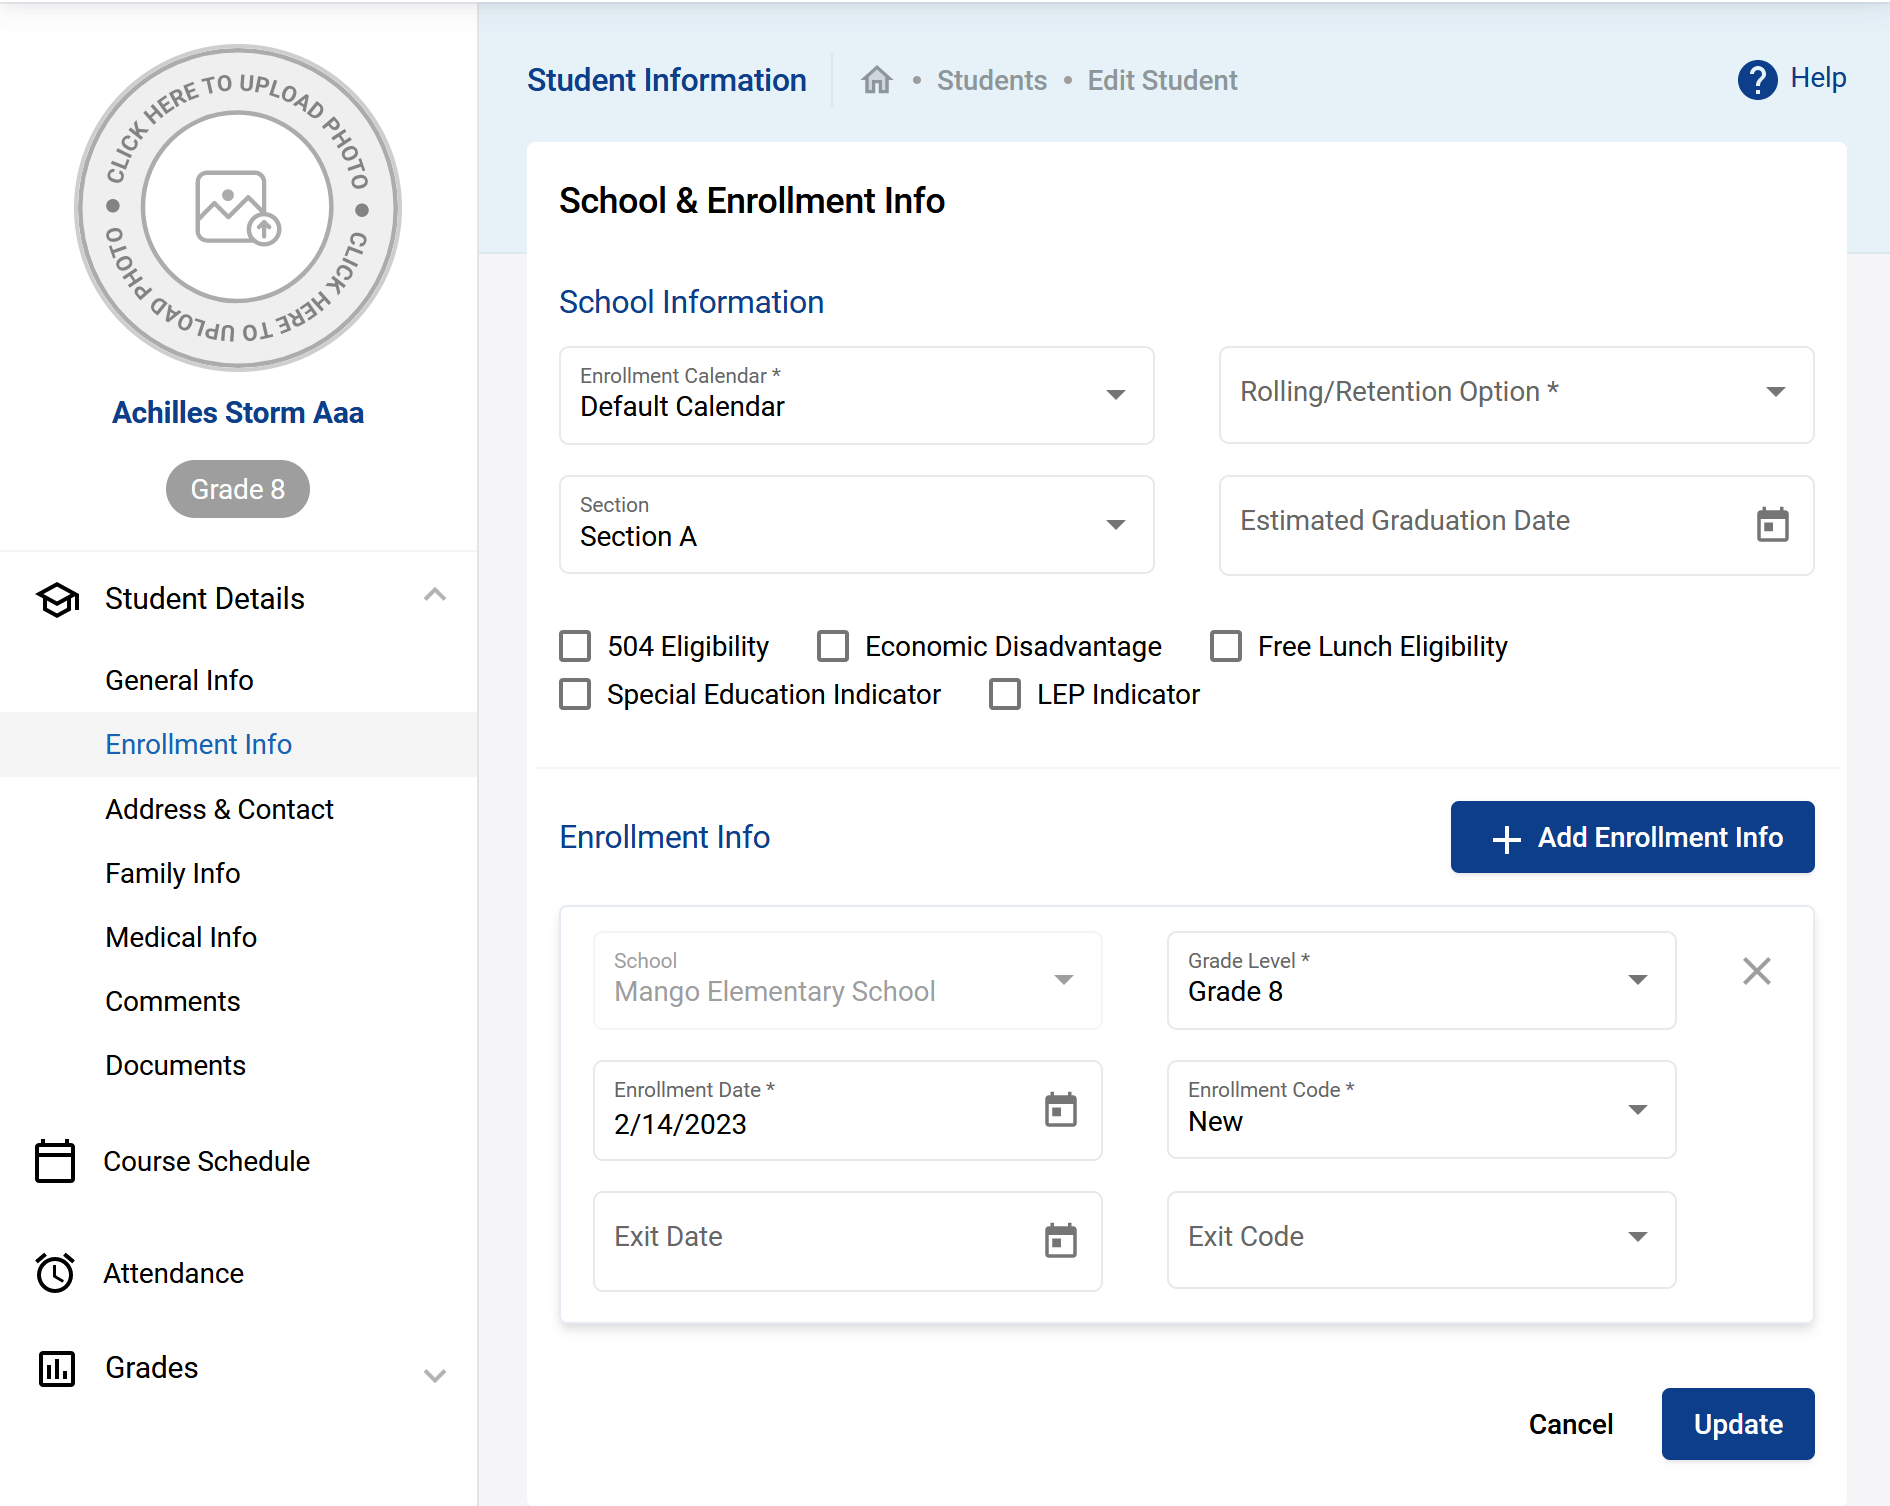
You should see the following form. Fill up the form as complete as you can. The data field with red rectangle identifies the most important data to enter but only those with an * are required.
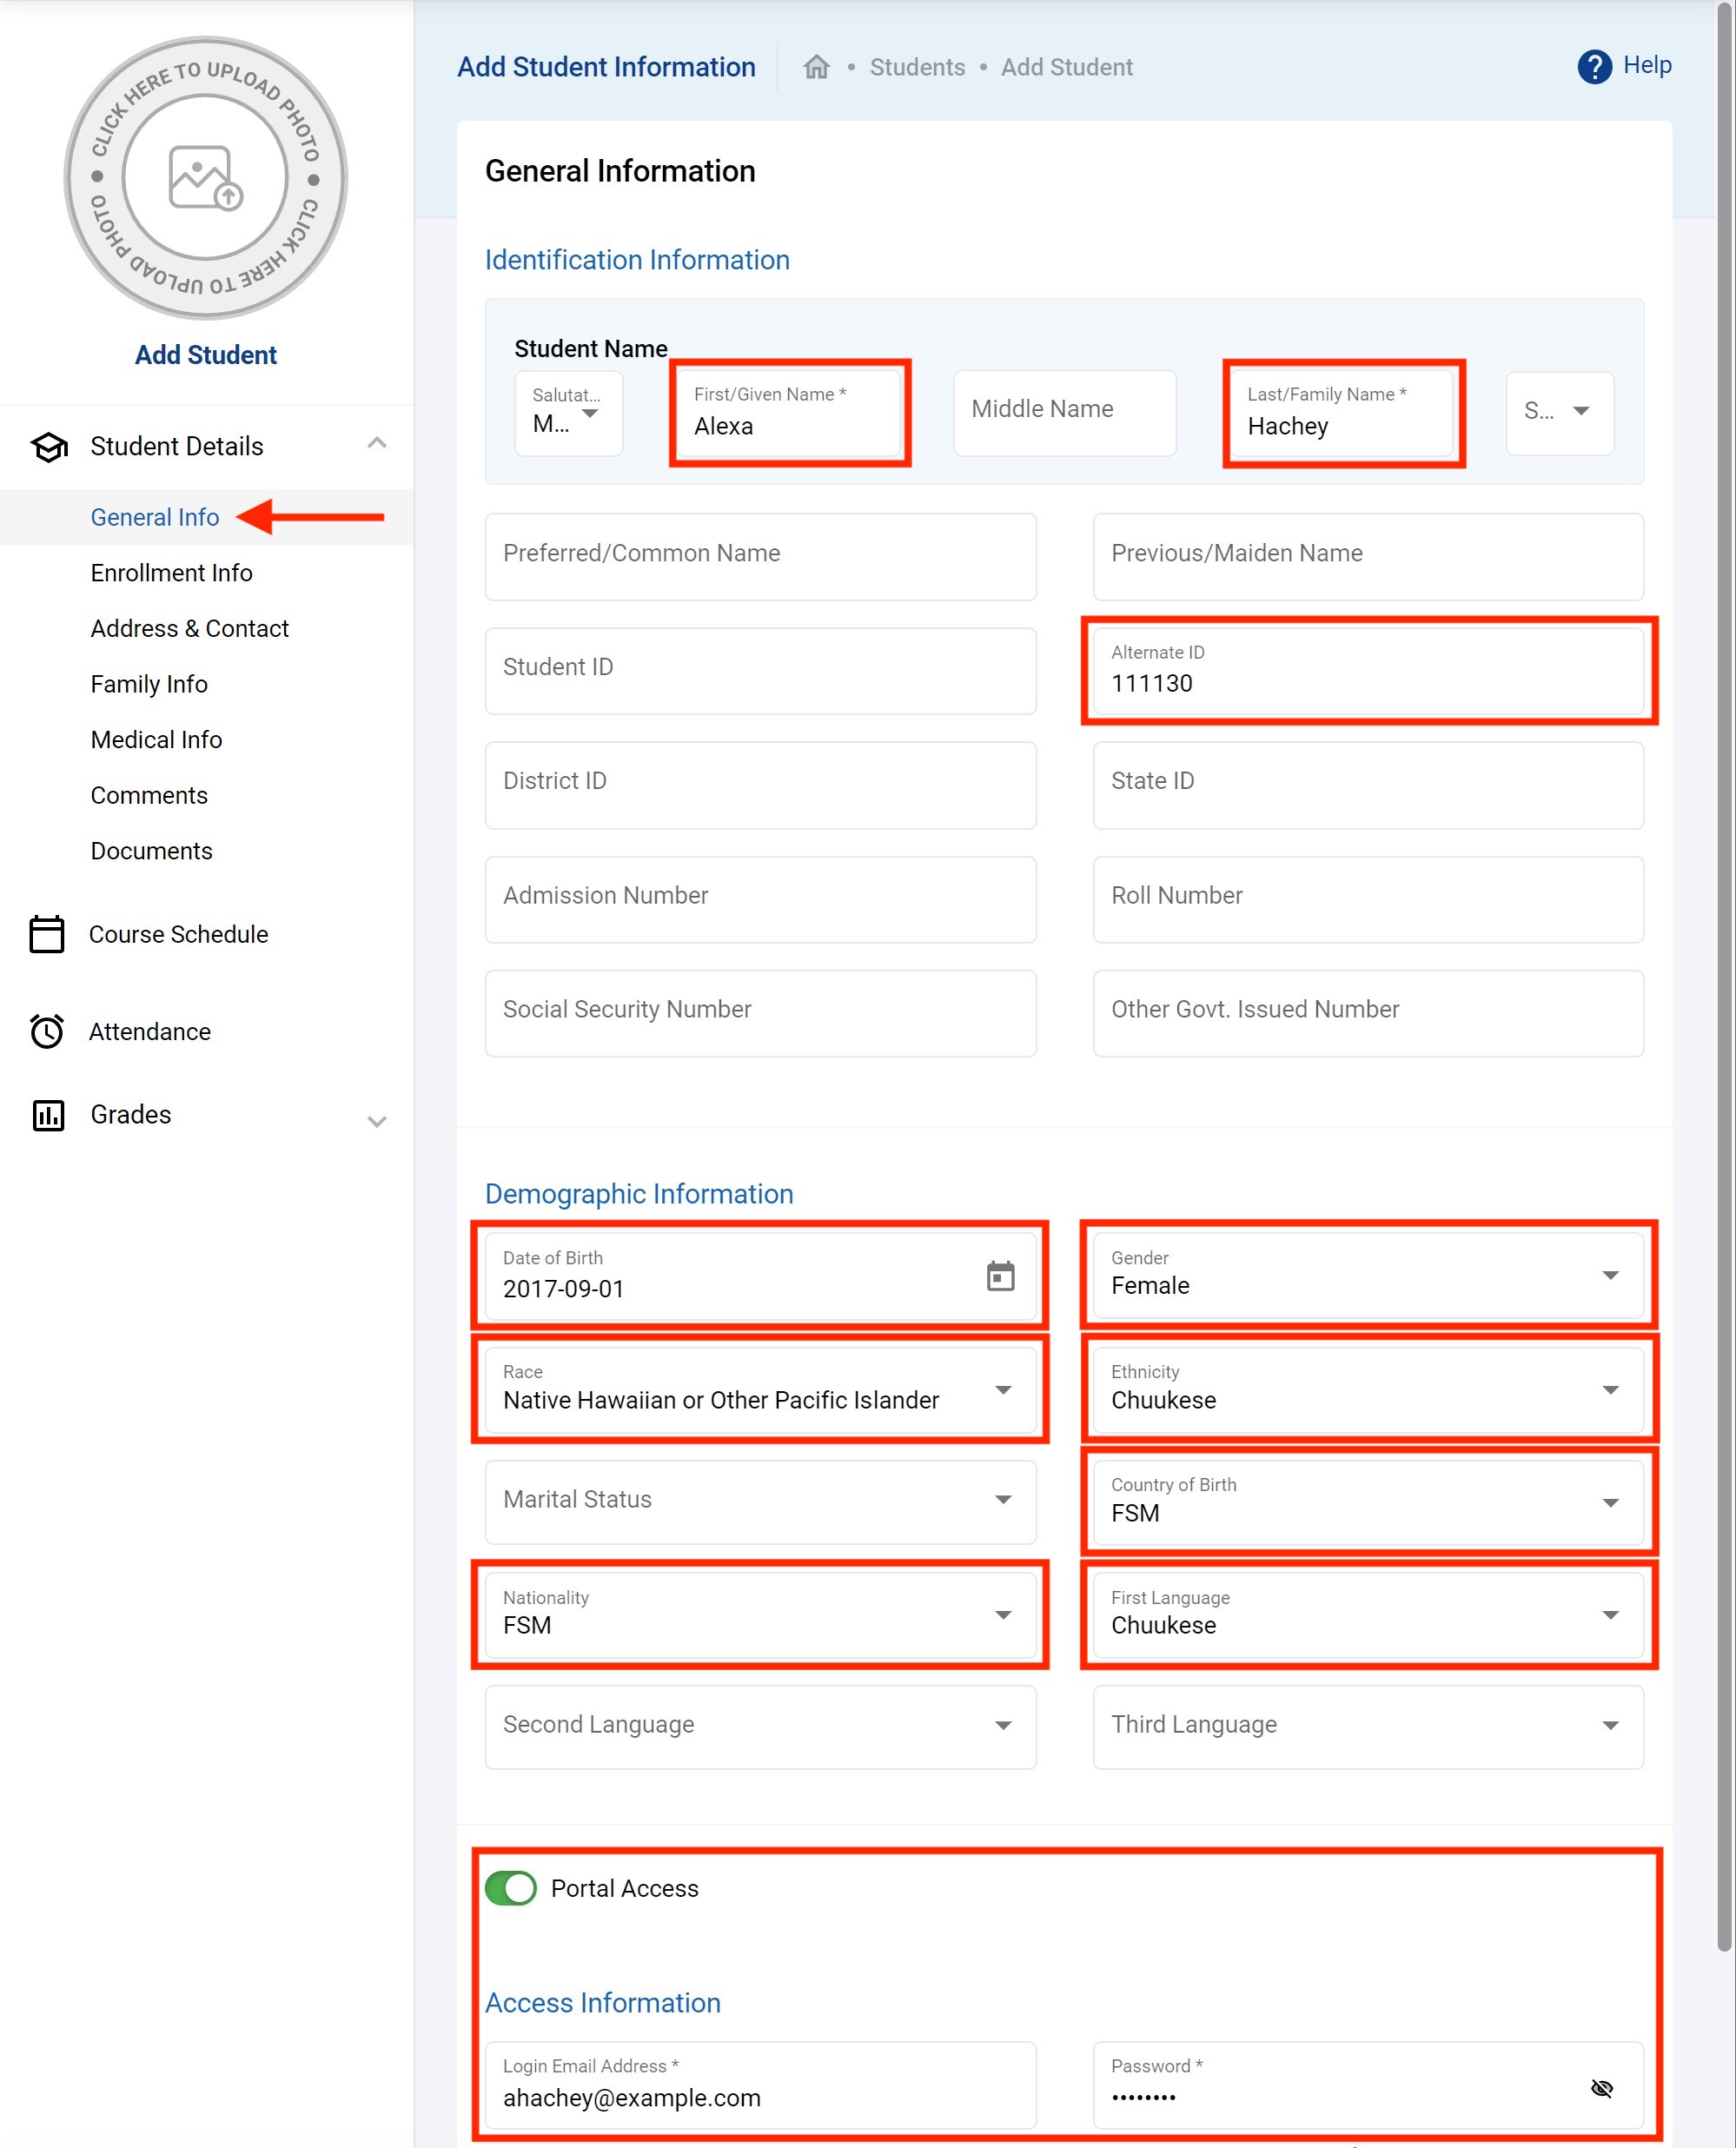
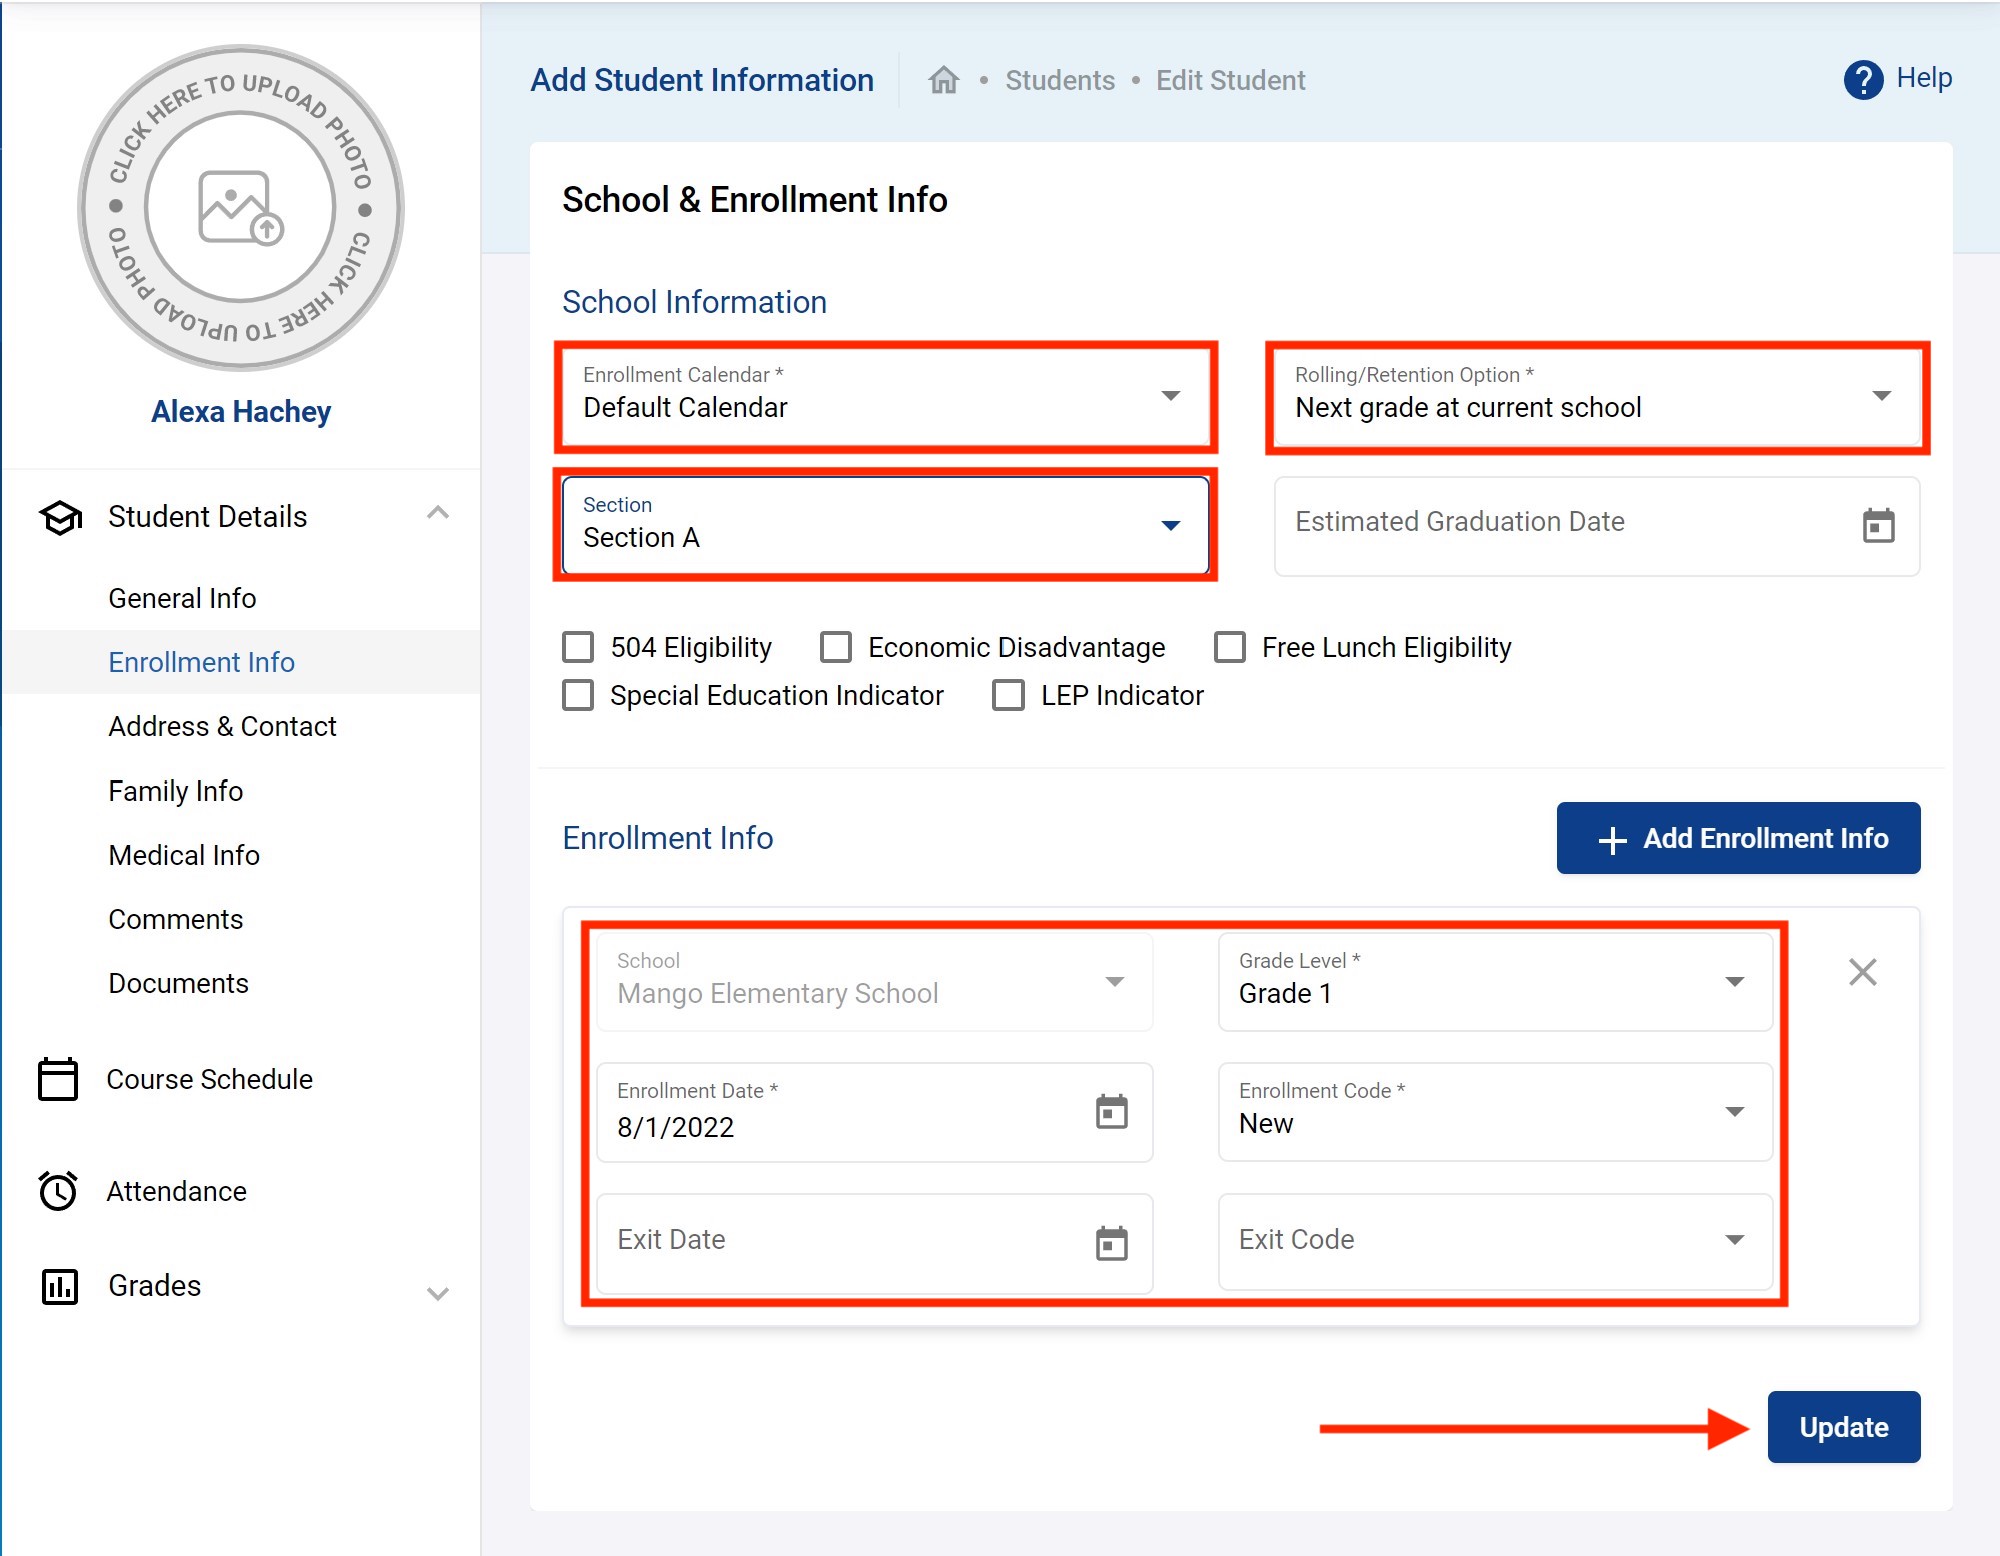
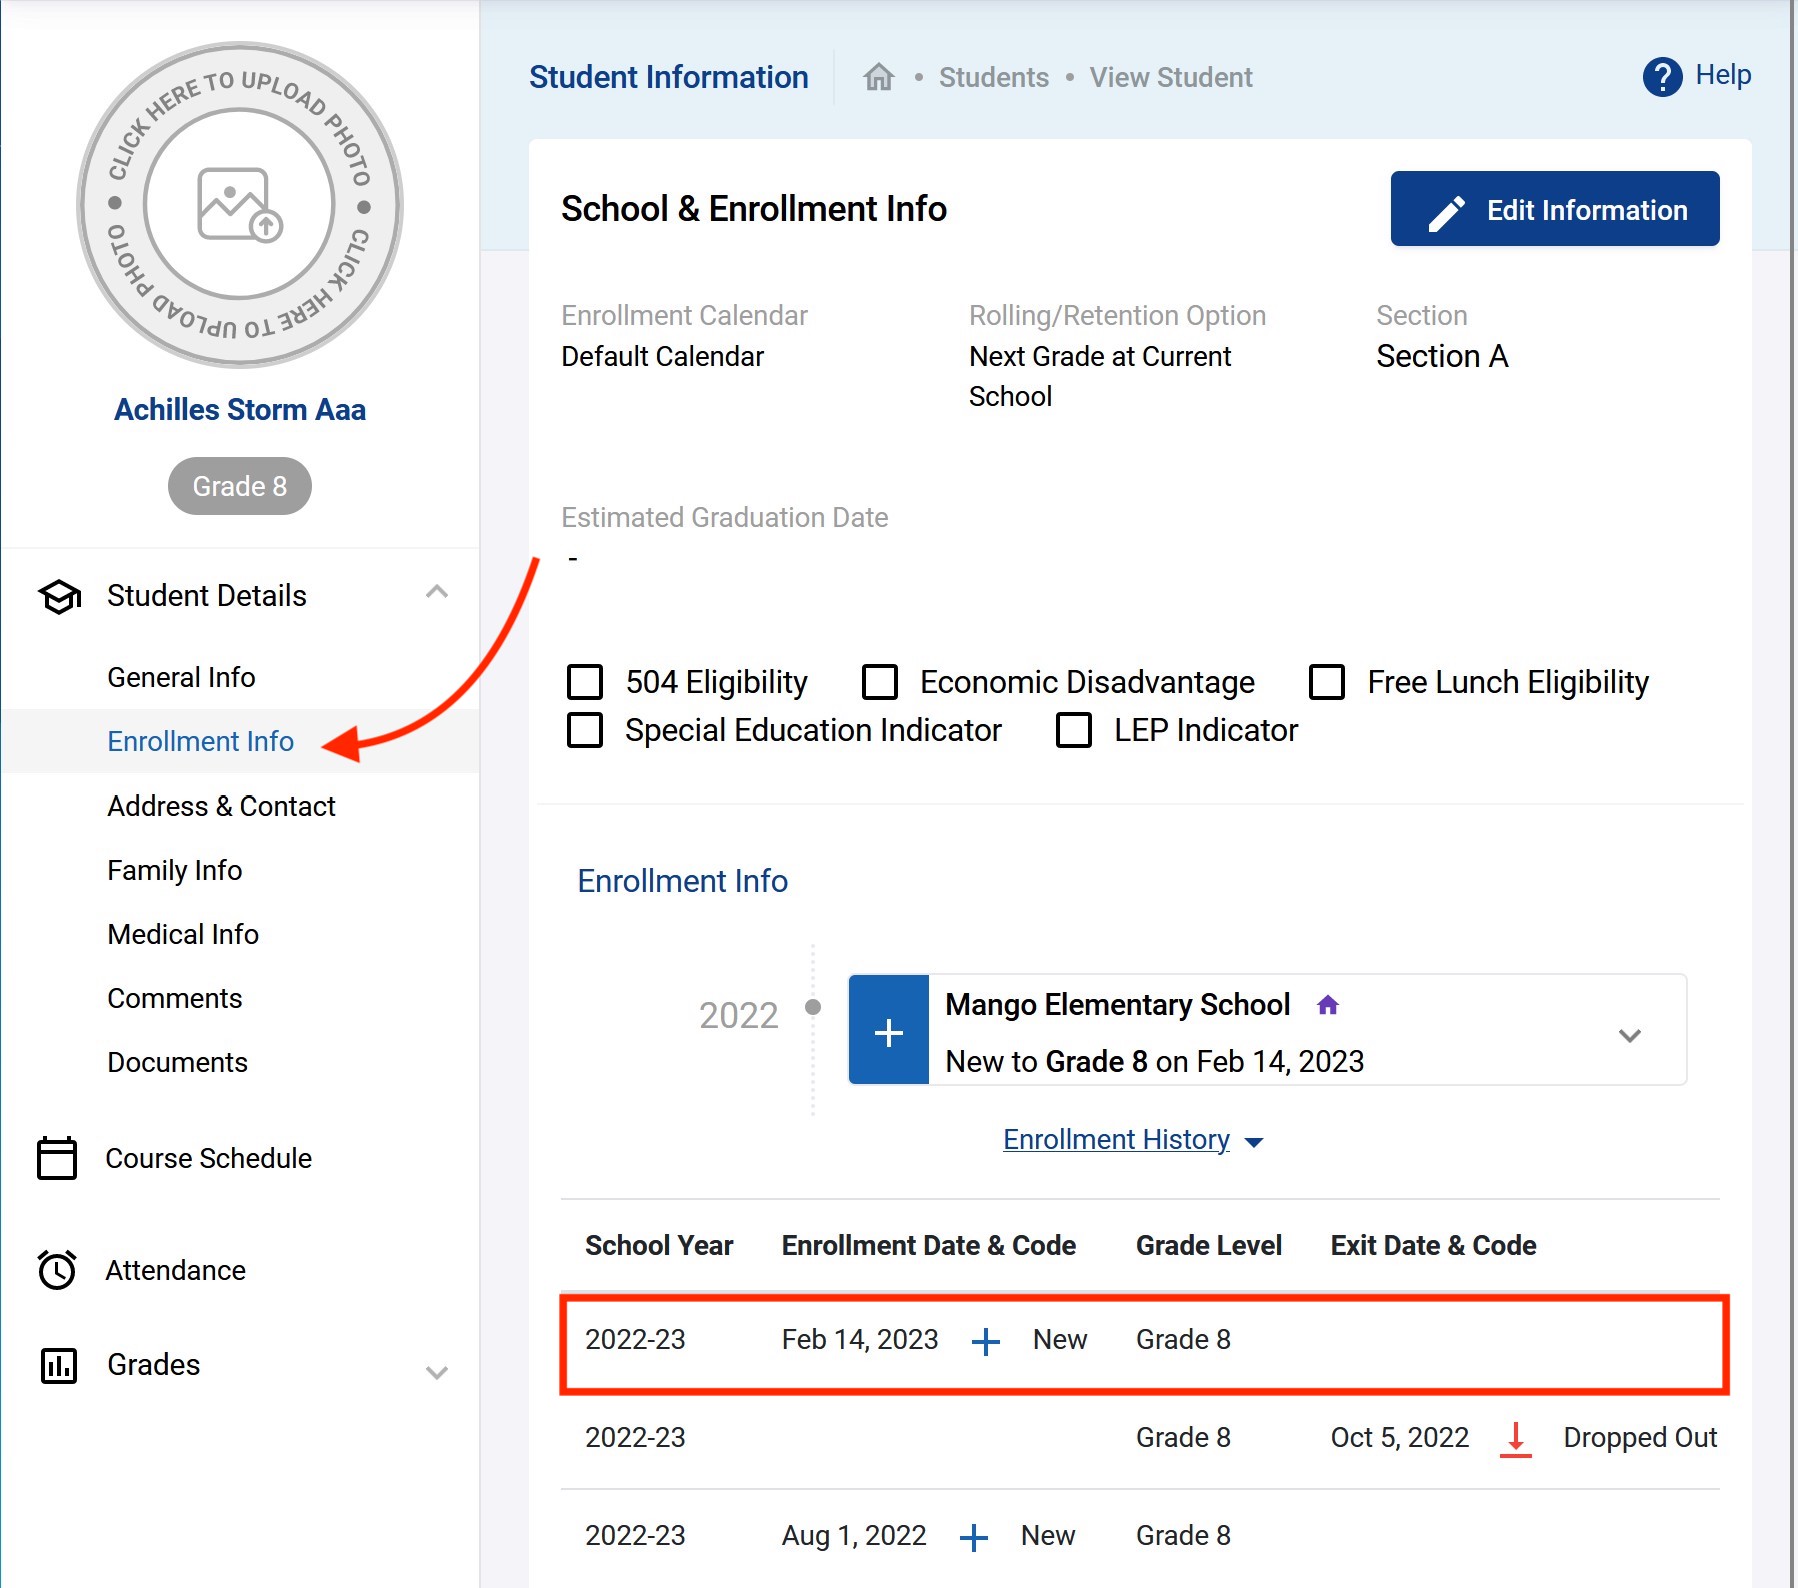
Once done with the General Information of the student click on Save & Next. You will get to the next important section of a student profile: the School & Enrollment Info section. Again, the most important data fields are highlighted in red rectangles. All the School Information data fields are detailed below.
- Enrollment Calendar: the school calendar for which this student's enrollment will follow.
- Rolling/Retention Option: defines how the student will roll over into the next school year. here are the option:
- Next Grade at Current School By default this option is selected which means when you rollover the data to the next school year, the student in 1st Grade would be promoted to 2nd Grade in the same school.
- Retain you can retain a student (if failed) to the same Grade level he/ she are in after rollover.
- Do not enroll after this school year can be used when a Student is graduating; the student’s data are not rolled over to the next grade in the coming year.
- School Name If you have a multi-school database, you will have the option to select any of those schools from this dropdown list to move the student directly to another school after rollover.
- Section: whether the student will belong to a particular section (groups used in larger schools)
- Estimated Graduation Date: optionally put this date
- 504 Eligibility:
- Economic Disadvantage:
- Free Lunch Eligibility:
- Special Education Indicator:
- LEP Indicator:
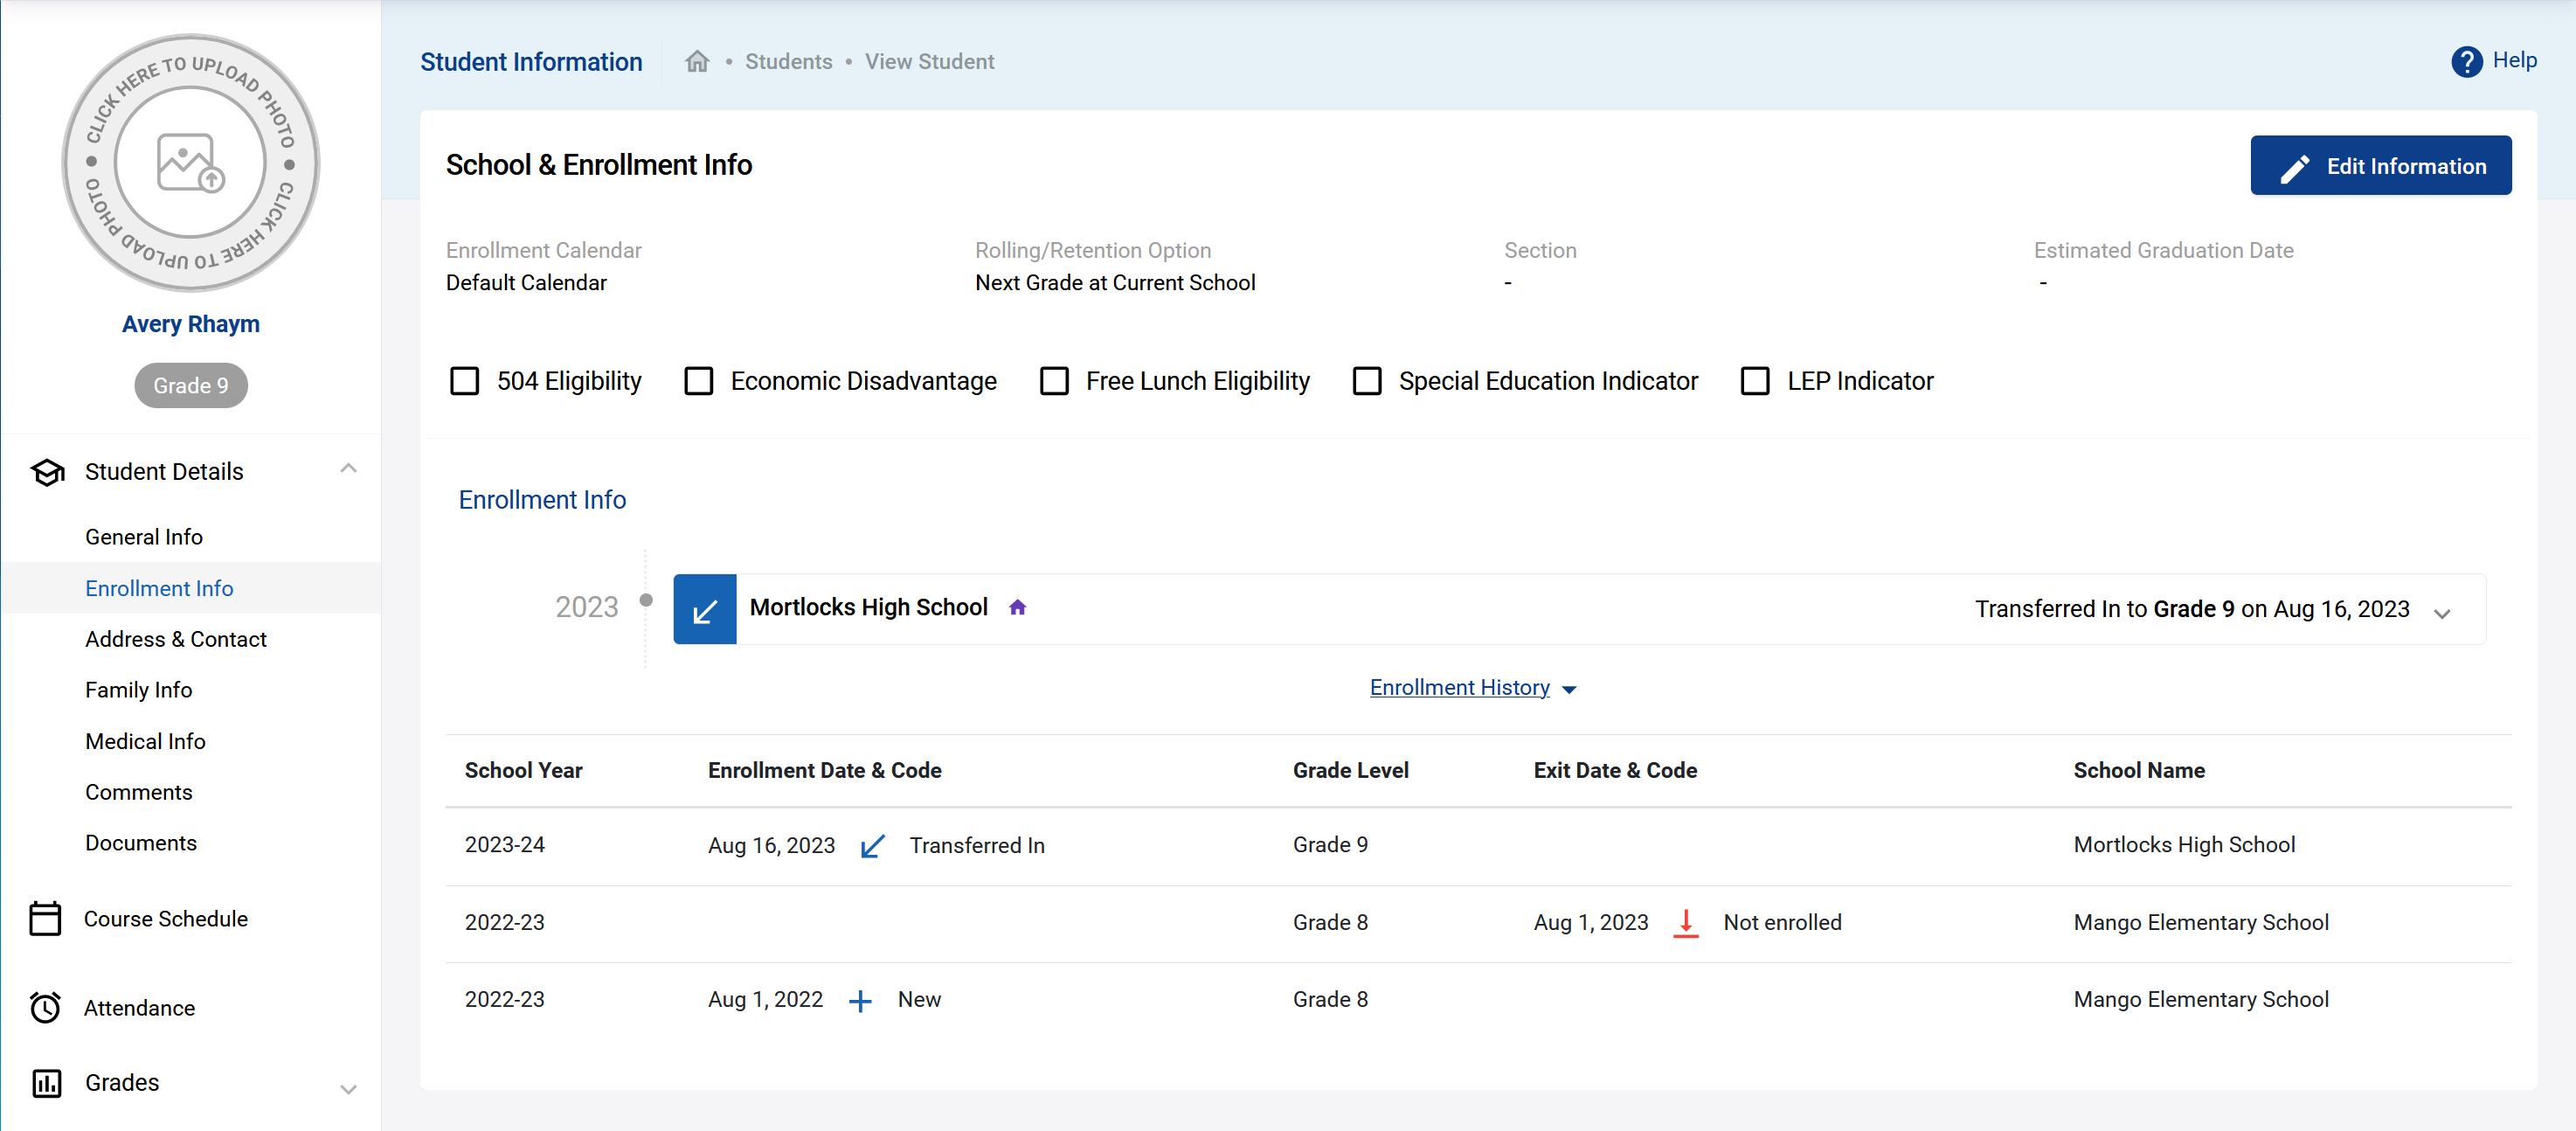
At the bottom of the same page you have the Enrollment Info where you can view/create enrollment records of the student over the years. The fields are explained below.
- School the school in which the enrollment record is.
- Grade Level: the grade of the student's enrollment.
- Enrollment Date indicates the enrollment date (i.e. start date when student enrolled).
- Enrollment Code you can give an enrollment code to describe how the student enrolled in your school; for instance, this could be:
- a new student coming to school,
- an existing student that has been rolled over into a next grade (or same grade),
- or transferred in from another school.
- Exit Date can be used for students leaving the schools (dropping, etc.)
- Exit Code defines how the student exited the school enrollment and could be any of the following:
- Transferred out
- Rolled over
- Dropped out
Click on Update when done.
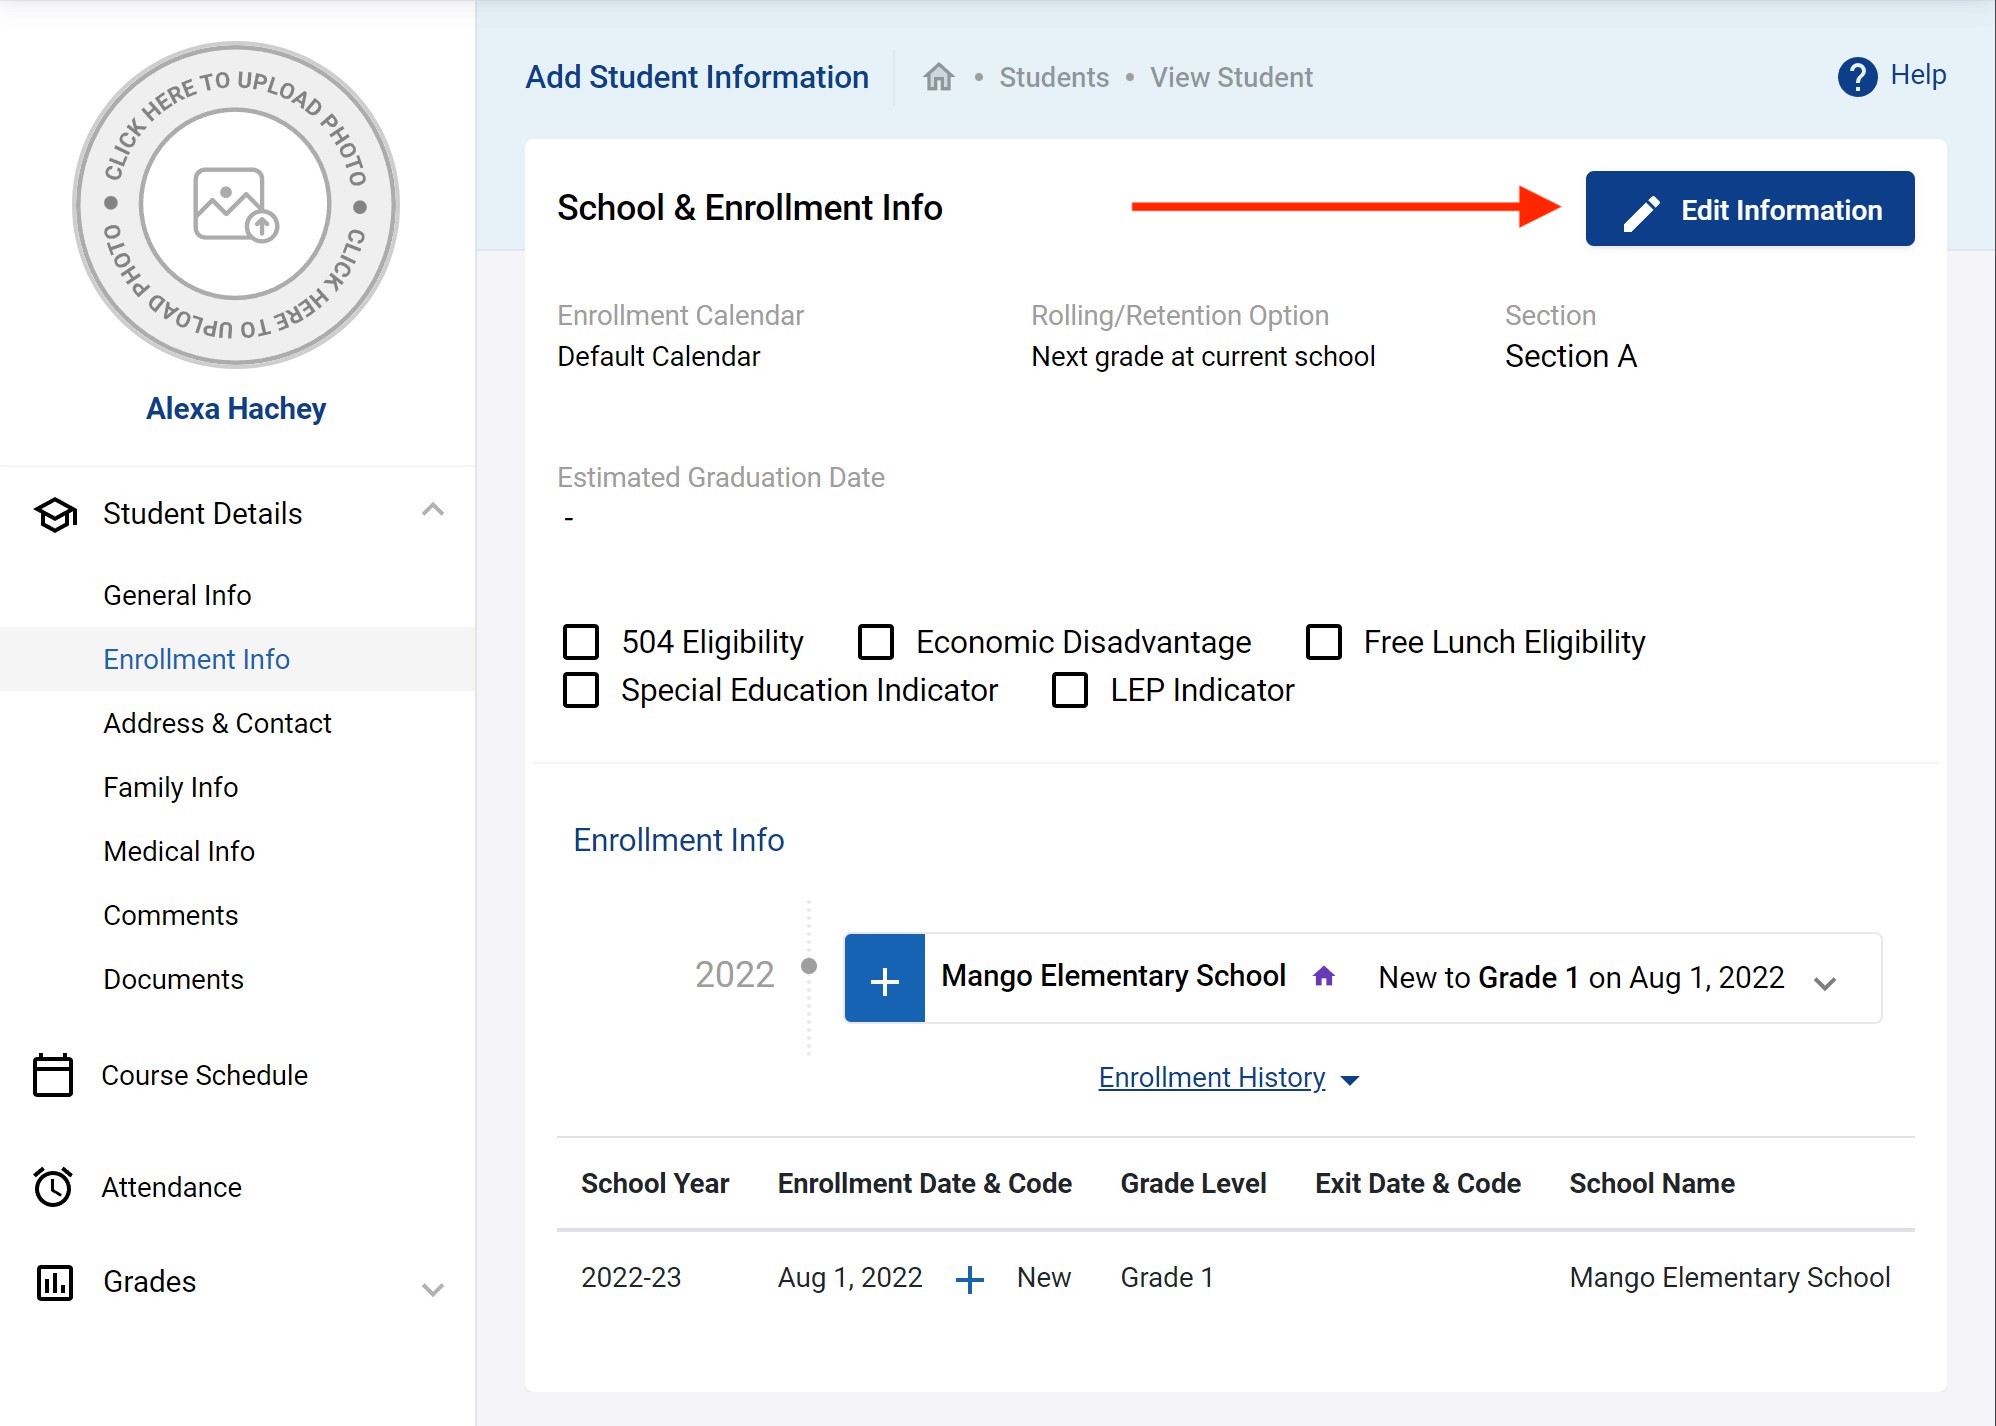
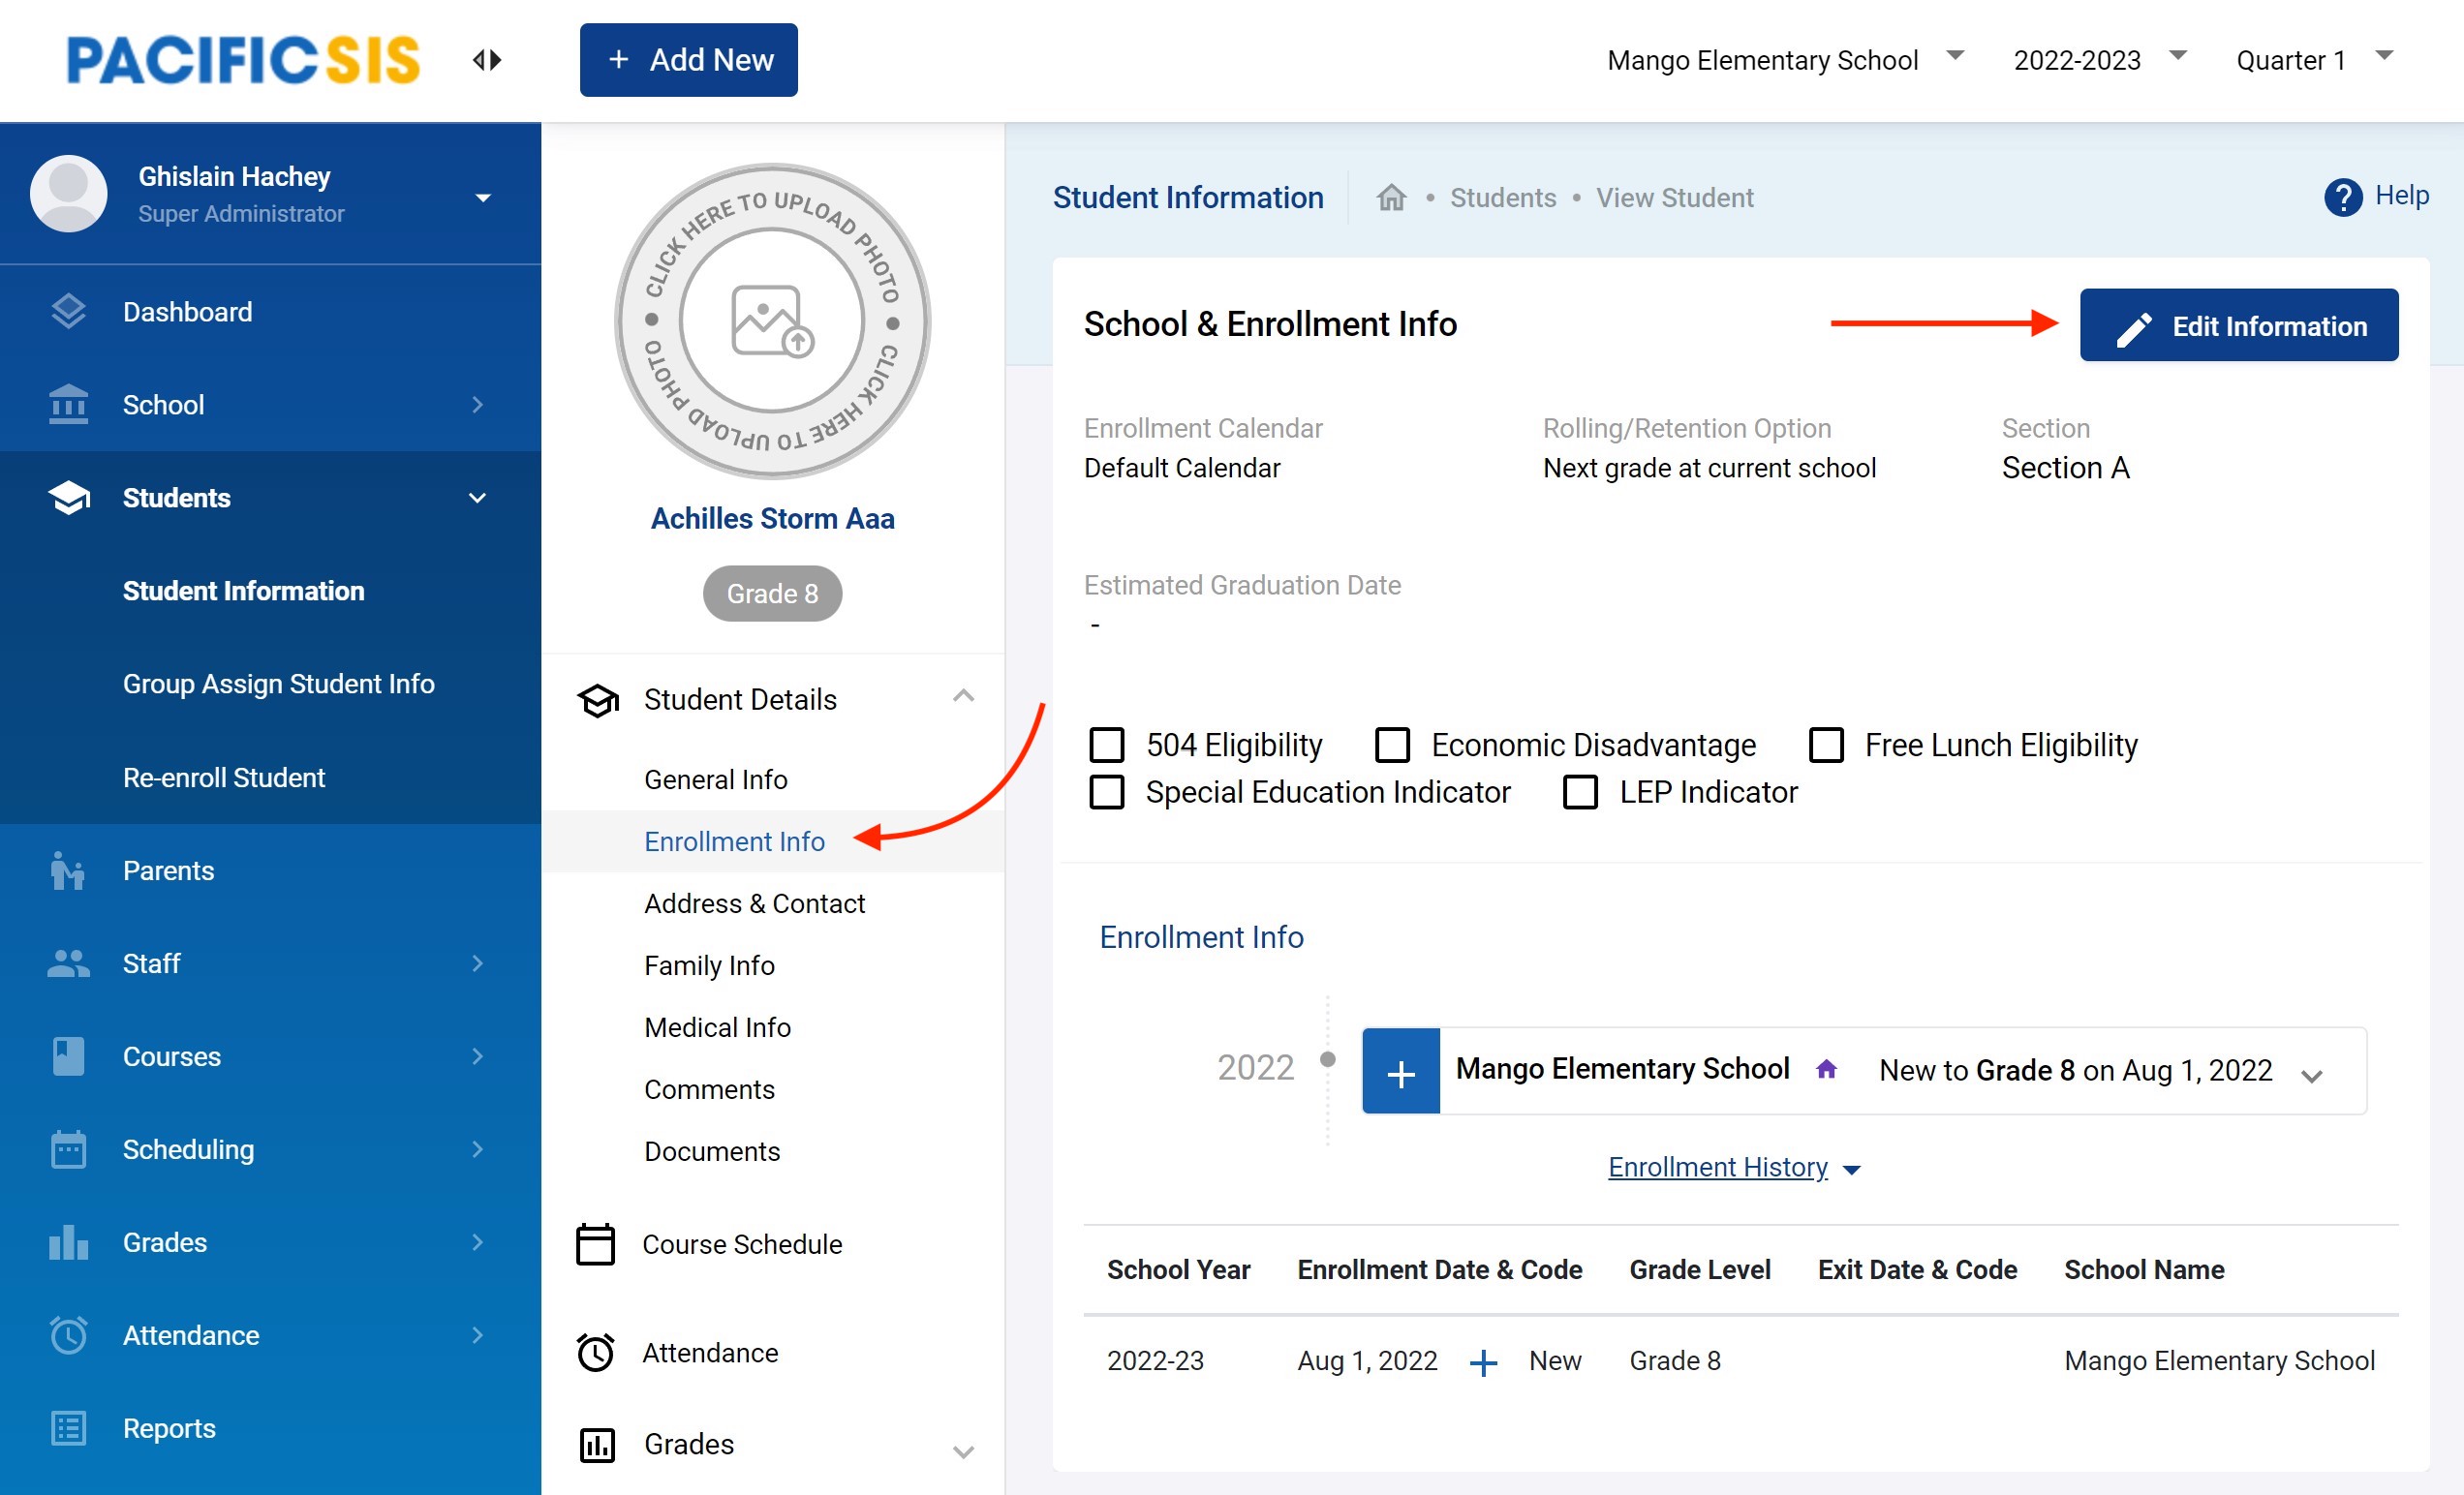
You will return to the same page in view mode. You can click on Edit Information to modify this at any time as needed.
The remaining sections of a student profile is optional for those desiring more data.
Finally, click on Save to proceed. You will see your newly added student in the list as shown below.
Bulk Adding Student
In addition to adding students individually, you can bulk load students (just like you can do with staff as detailed earlier in this guide. This is especially useful when first getting started with the system and you have many students add to the system.
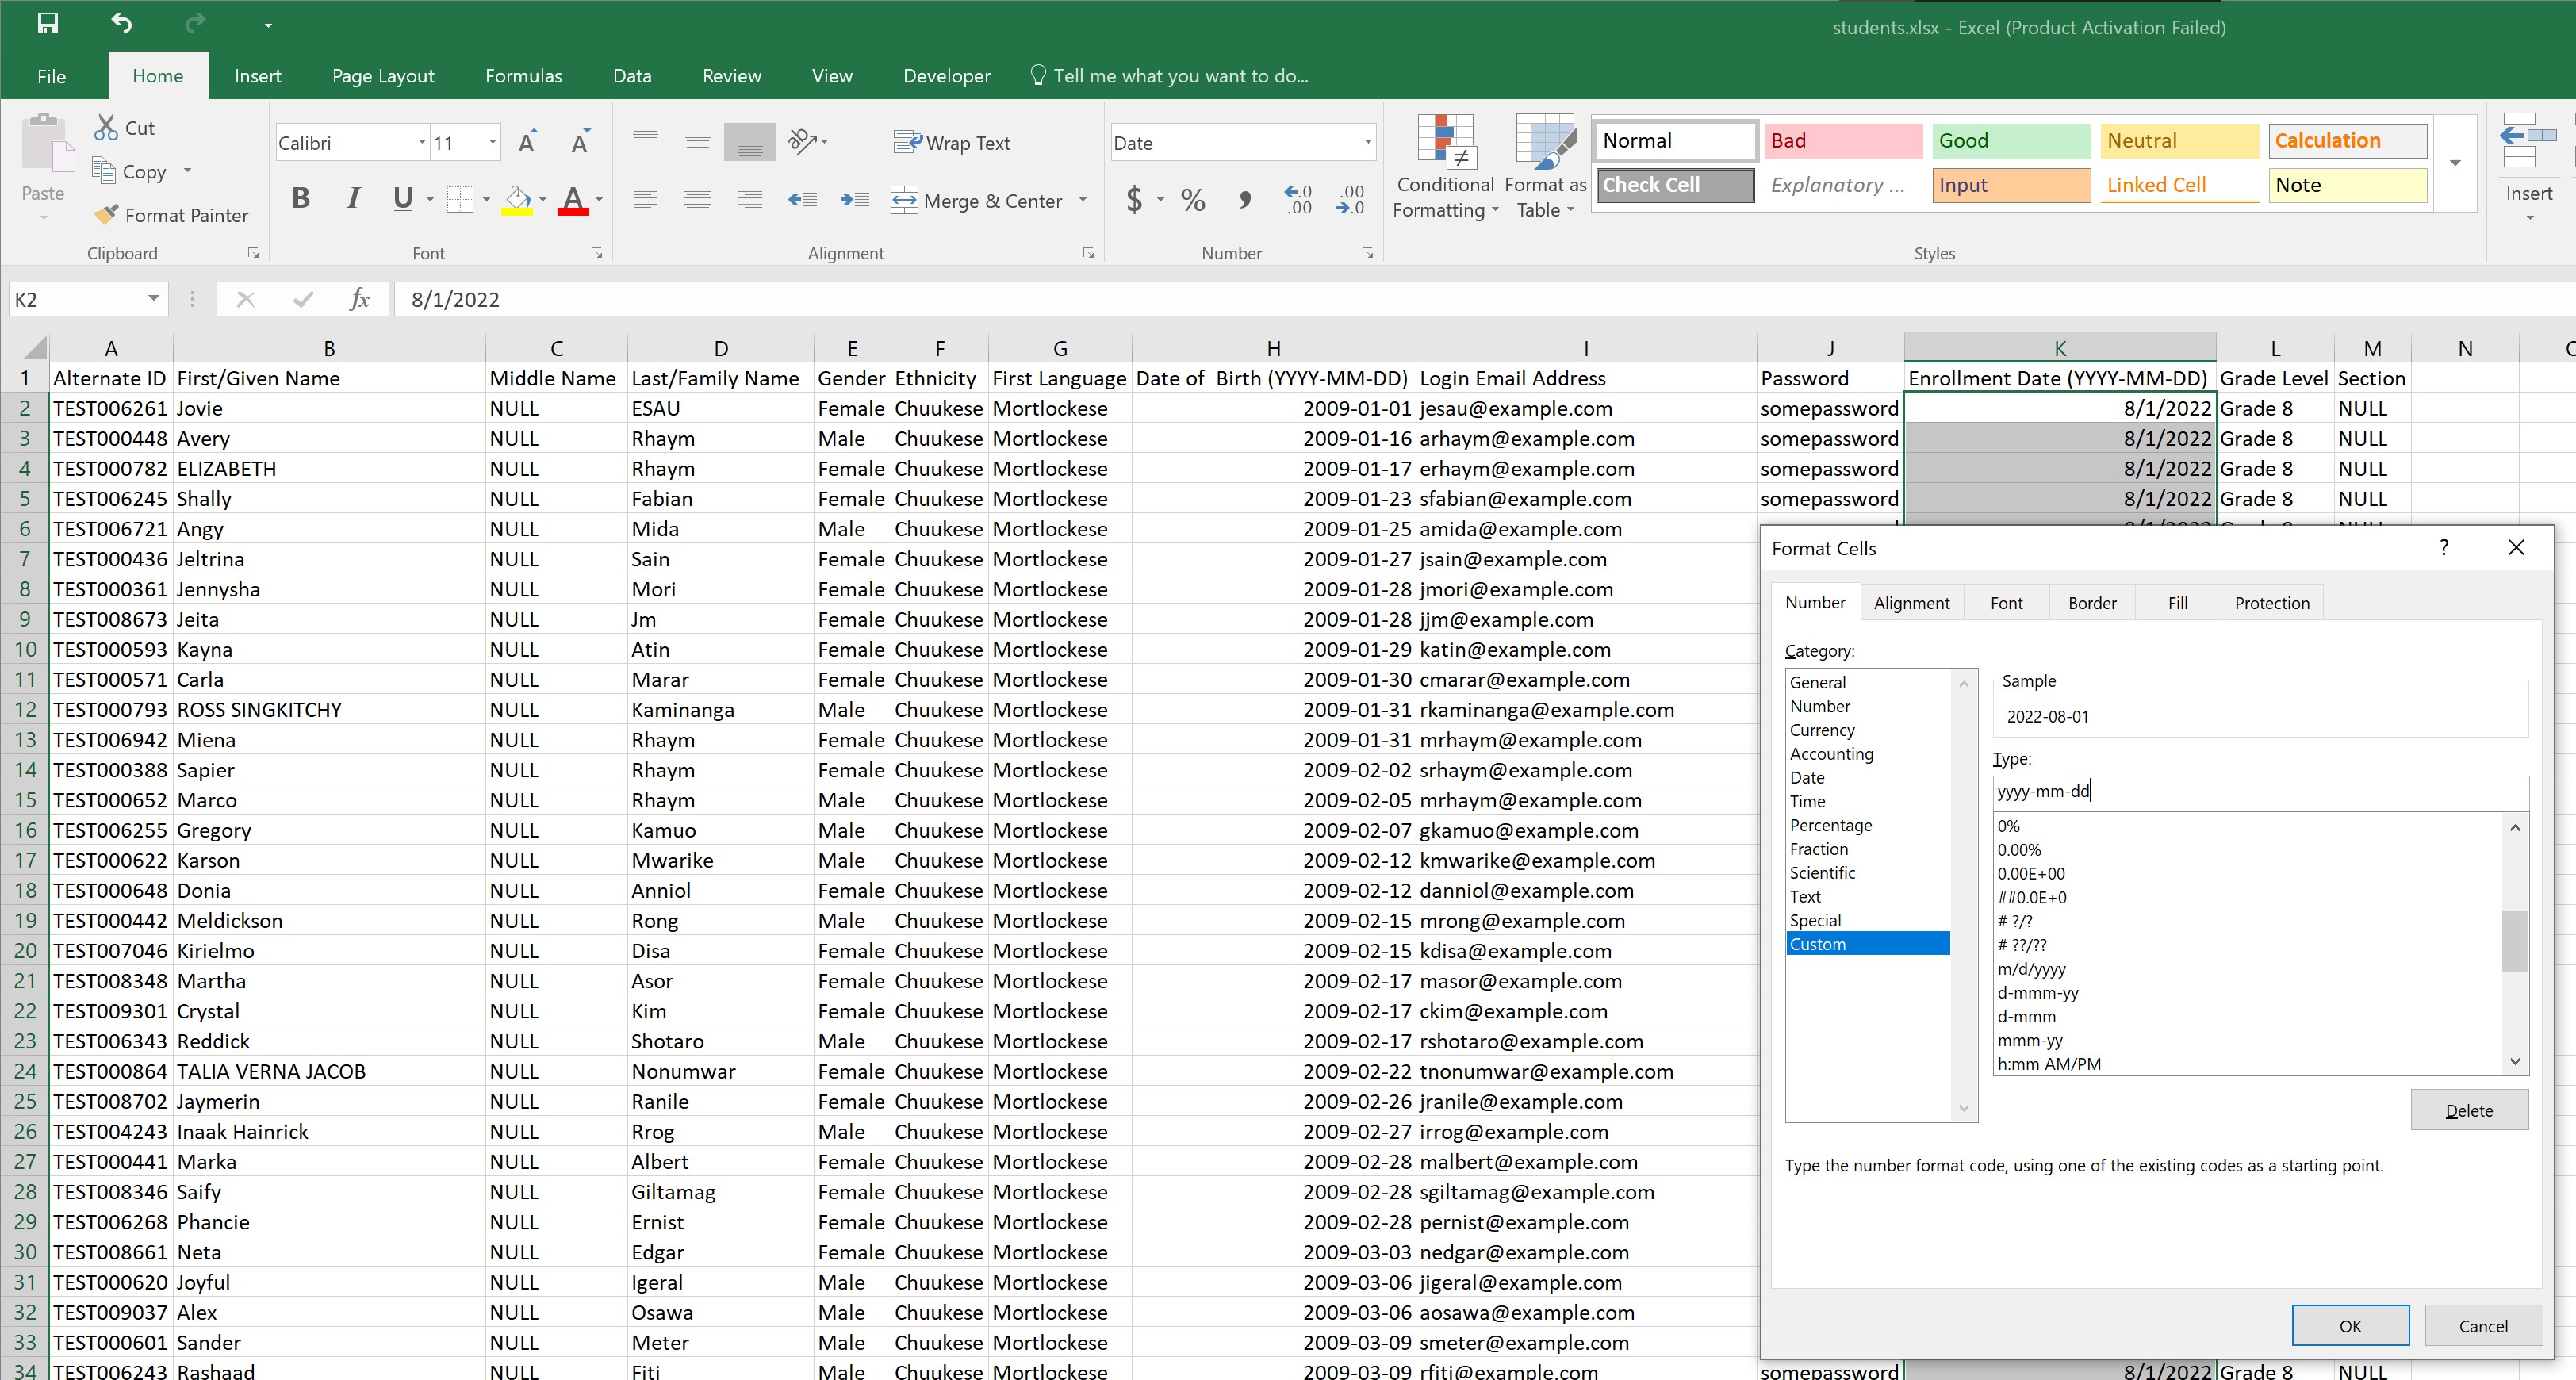
Let's say you have your students in an excel workbook, something like follows.
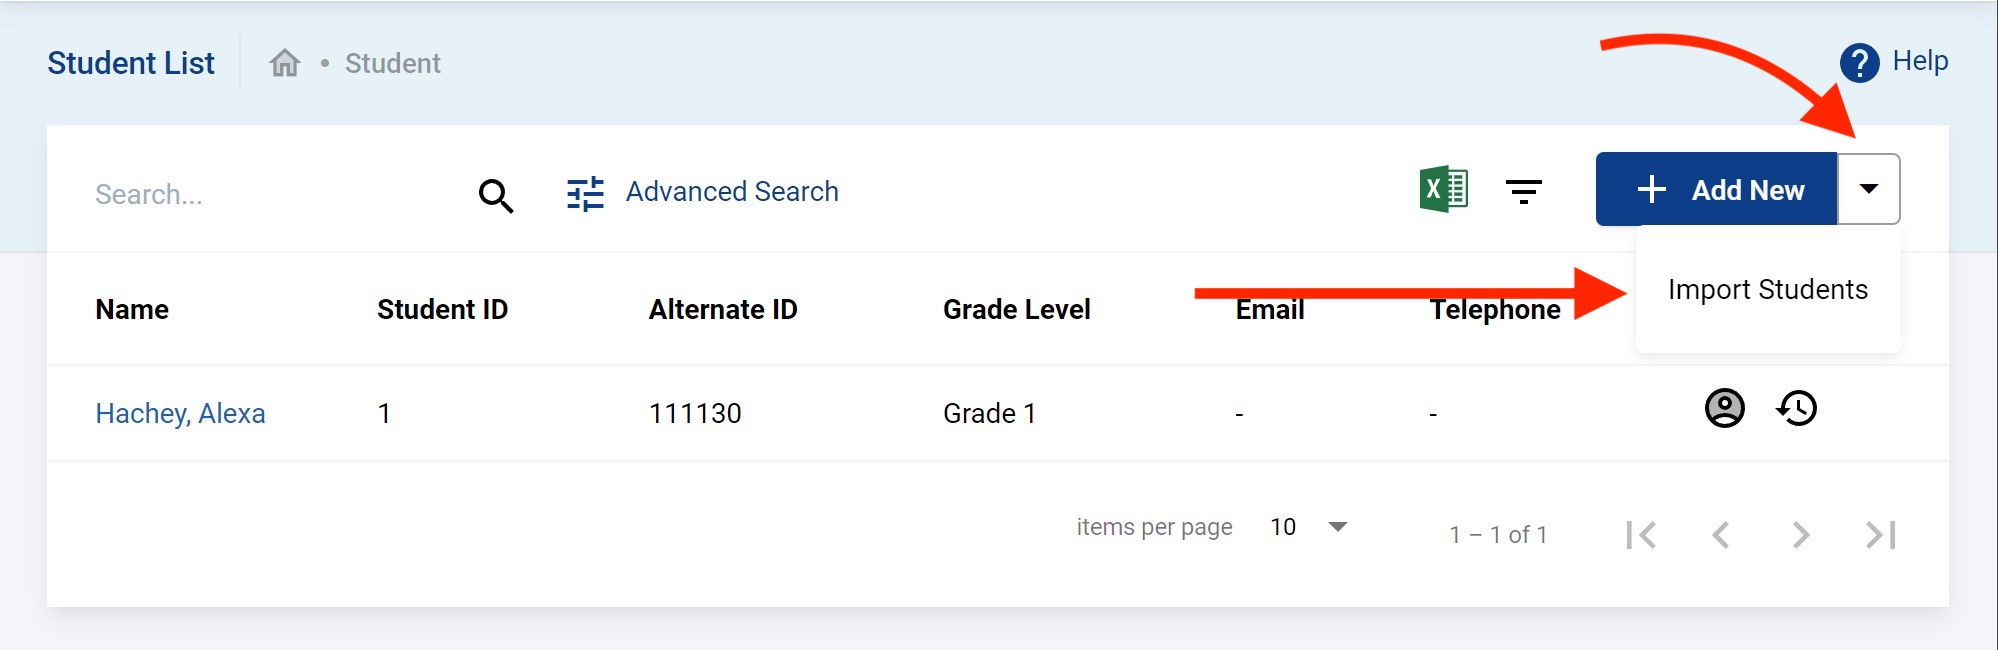
You bulk load staff by clicking on the down arrow to the right of the + Add New and then click on Import Students as shown below.
You will be redirected to the place where you upload your excel workbook by dragging and dropping.
When dragged and dropped you should see your files in the upload area as shown below. Click on Upload File to get started.
The next step will be to map the field from your excel data file to the fields in the Pacific SIS. If you use a template provided to you chances are the fields will already be correctly mapped. Click on Map It to proceed.
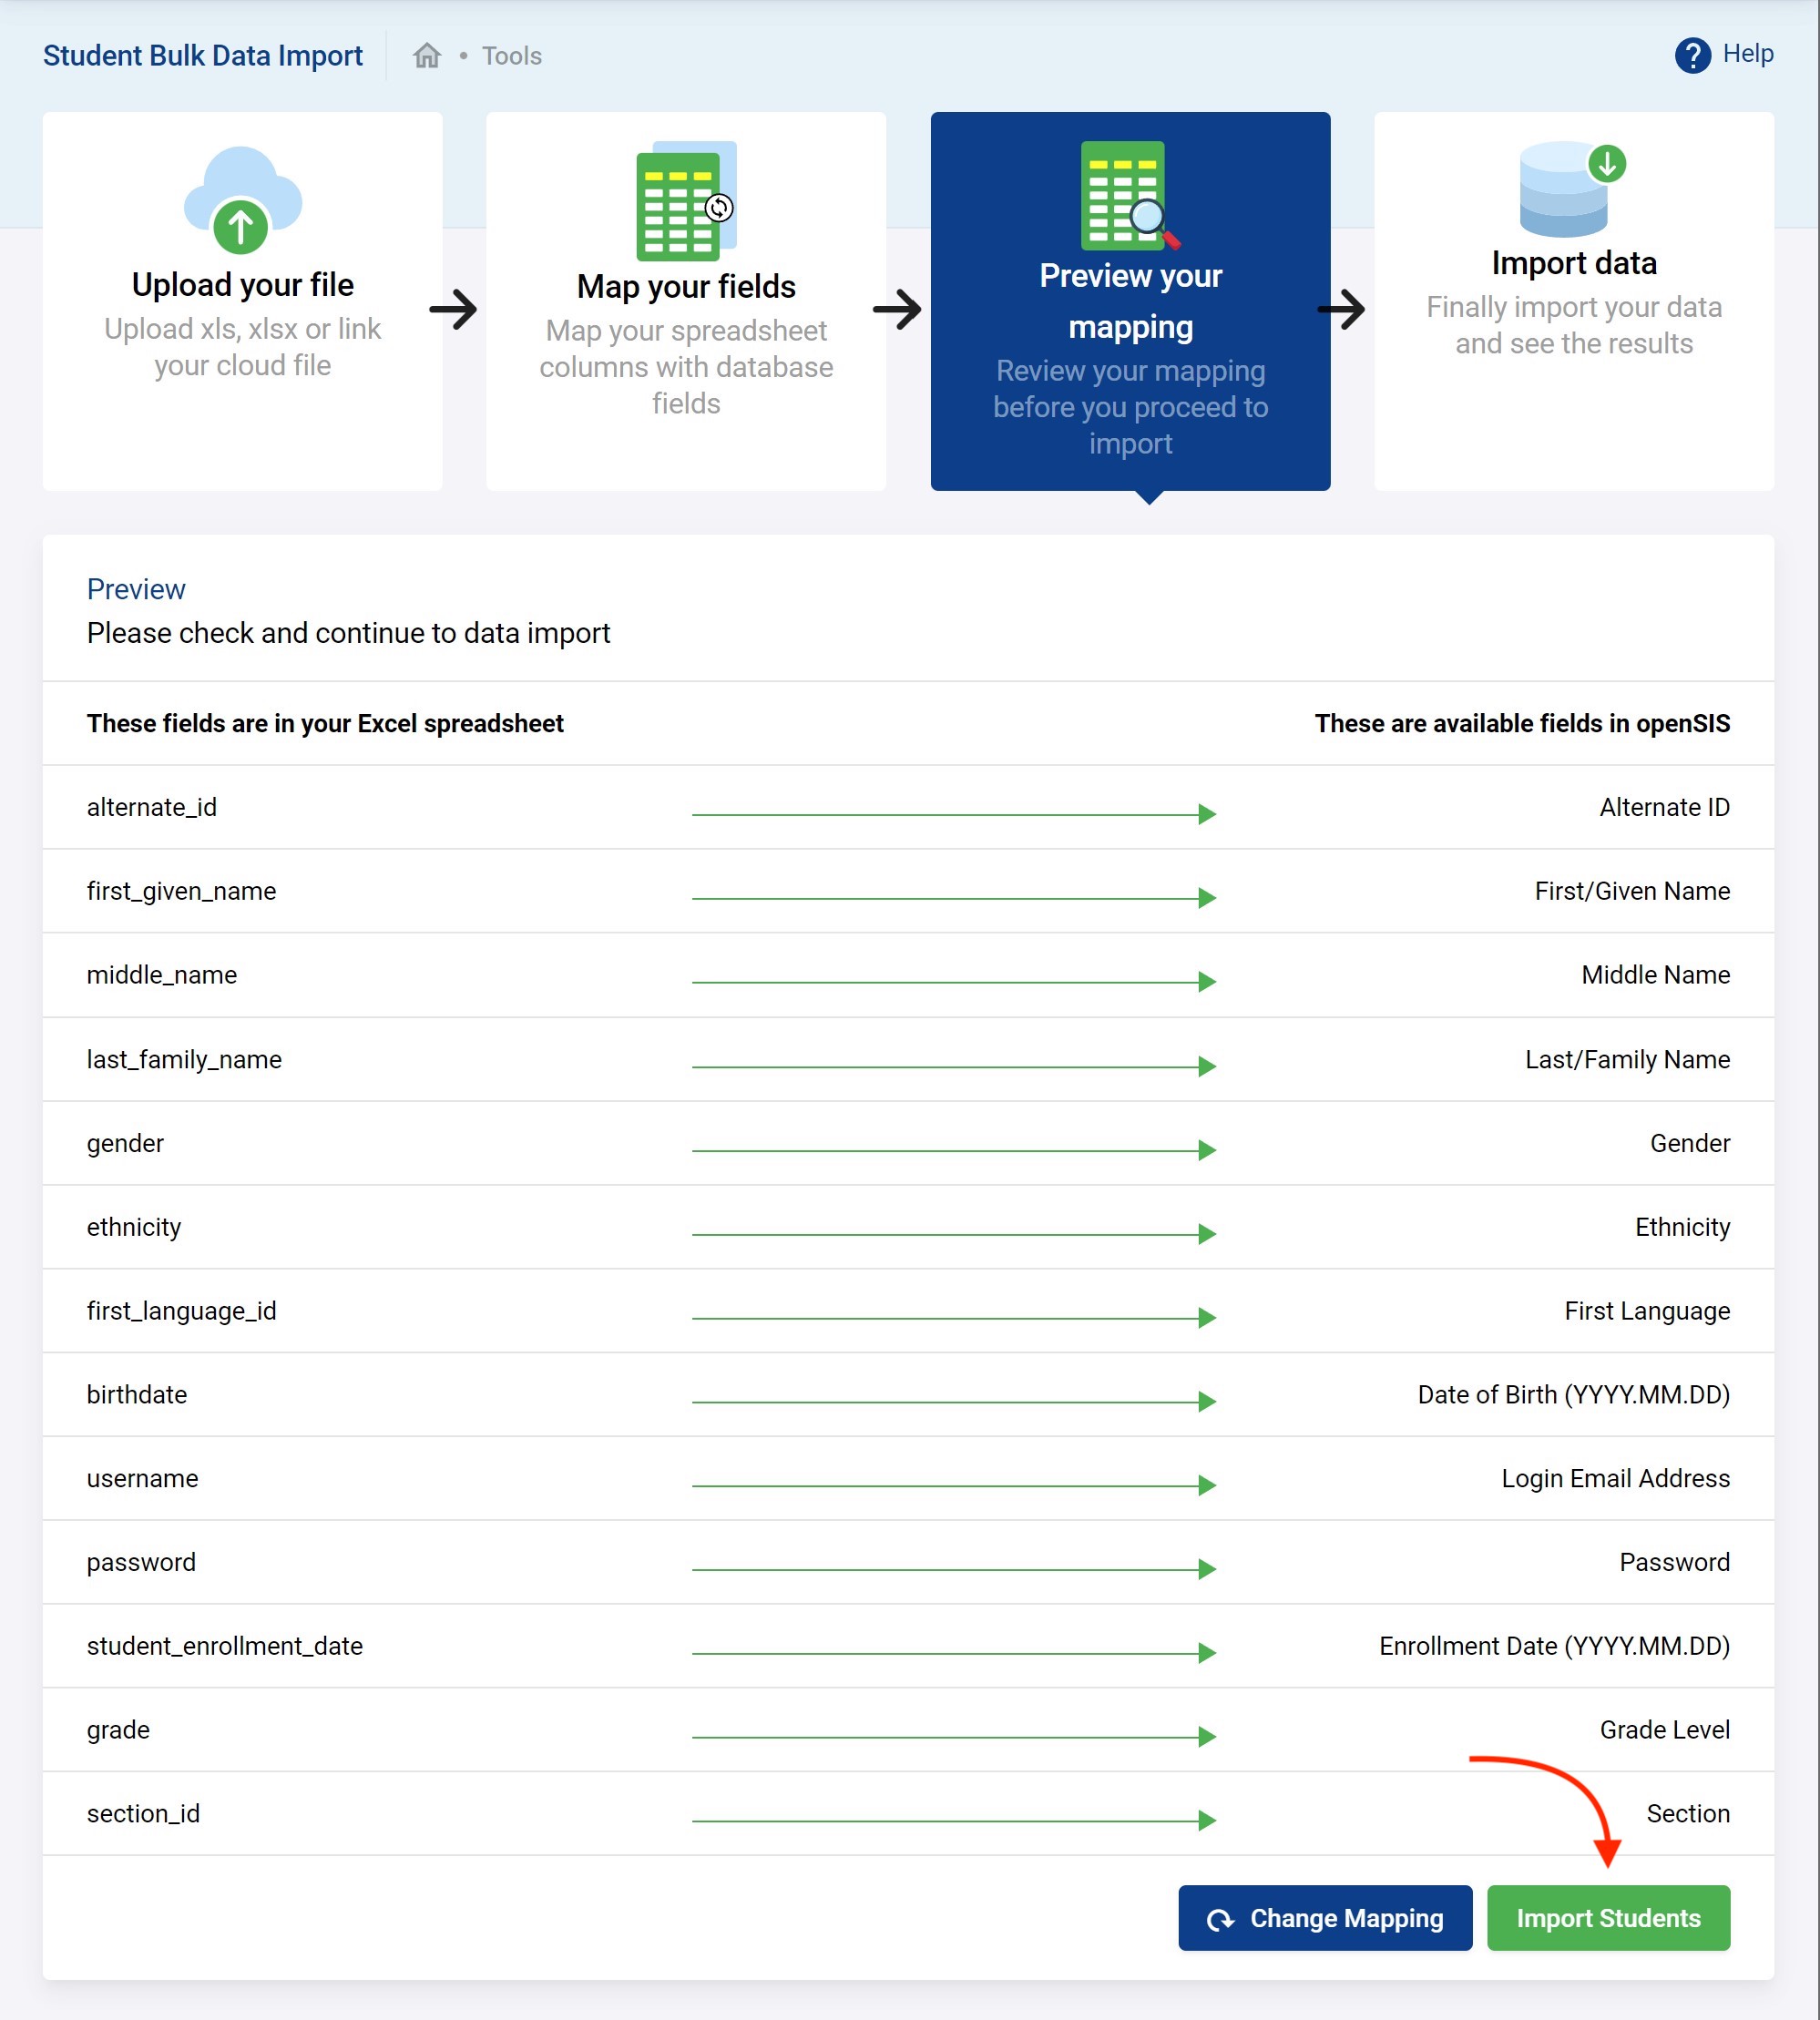
You'll have a chance to review and when confident you can click on Import Staff.
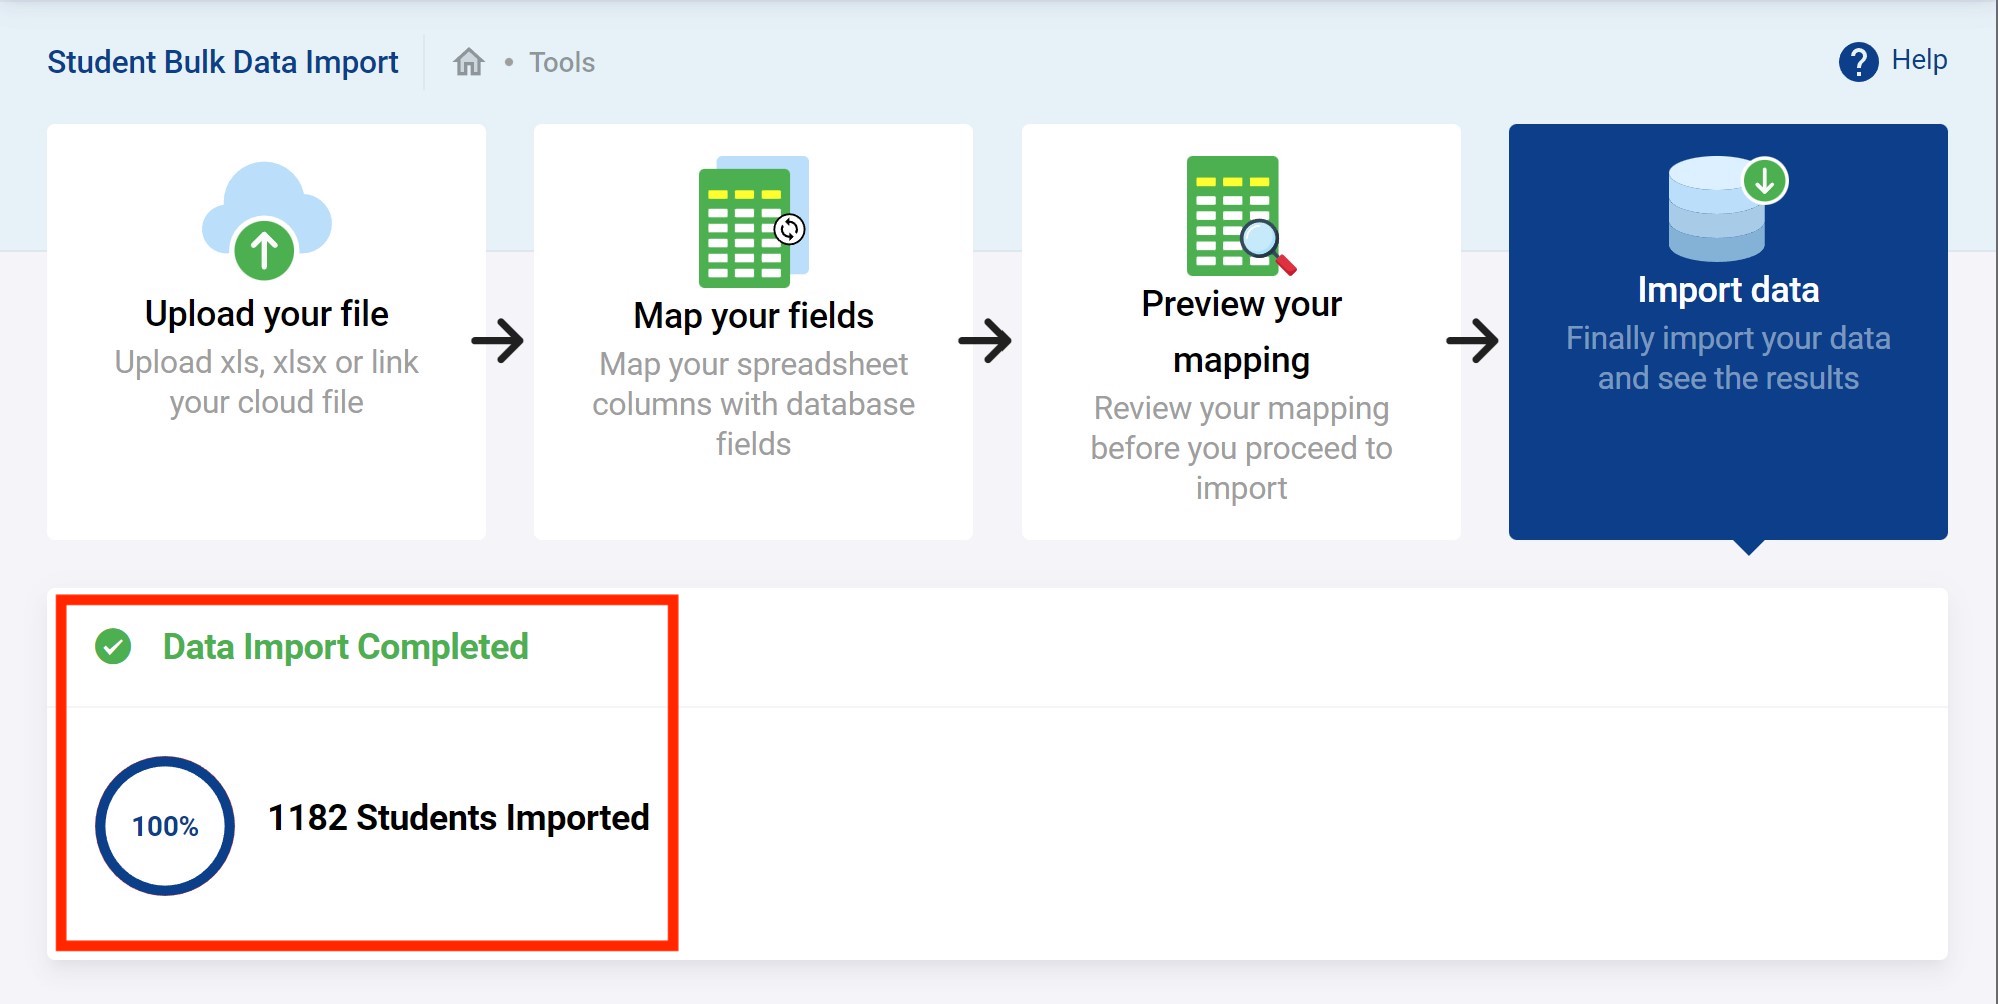
If all goes well with the bulk upload you should see the following.
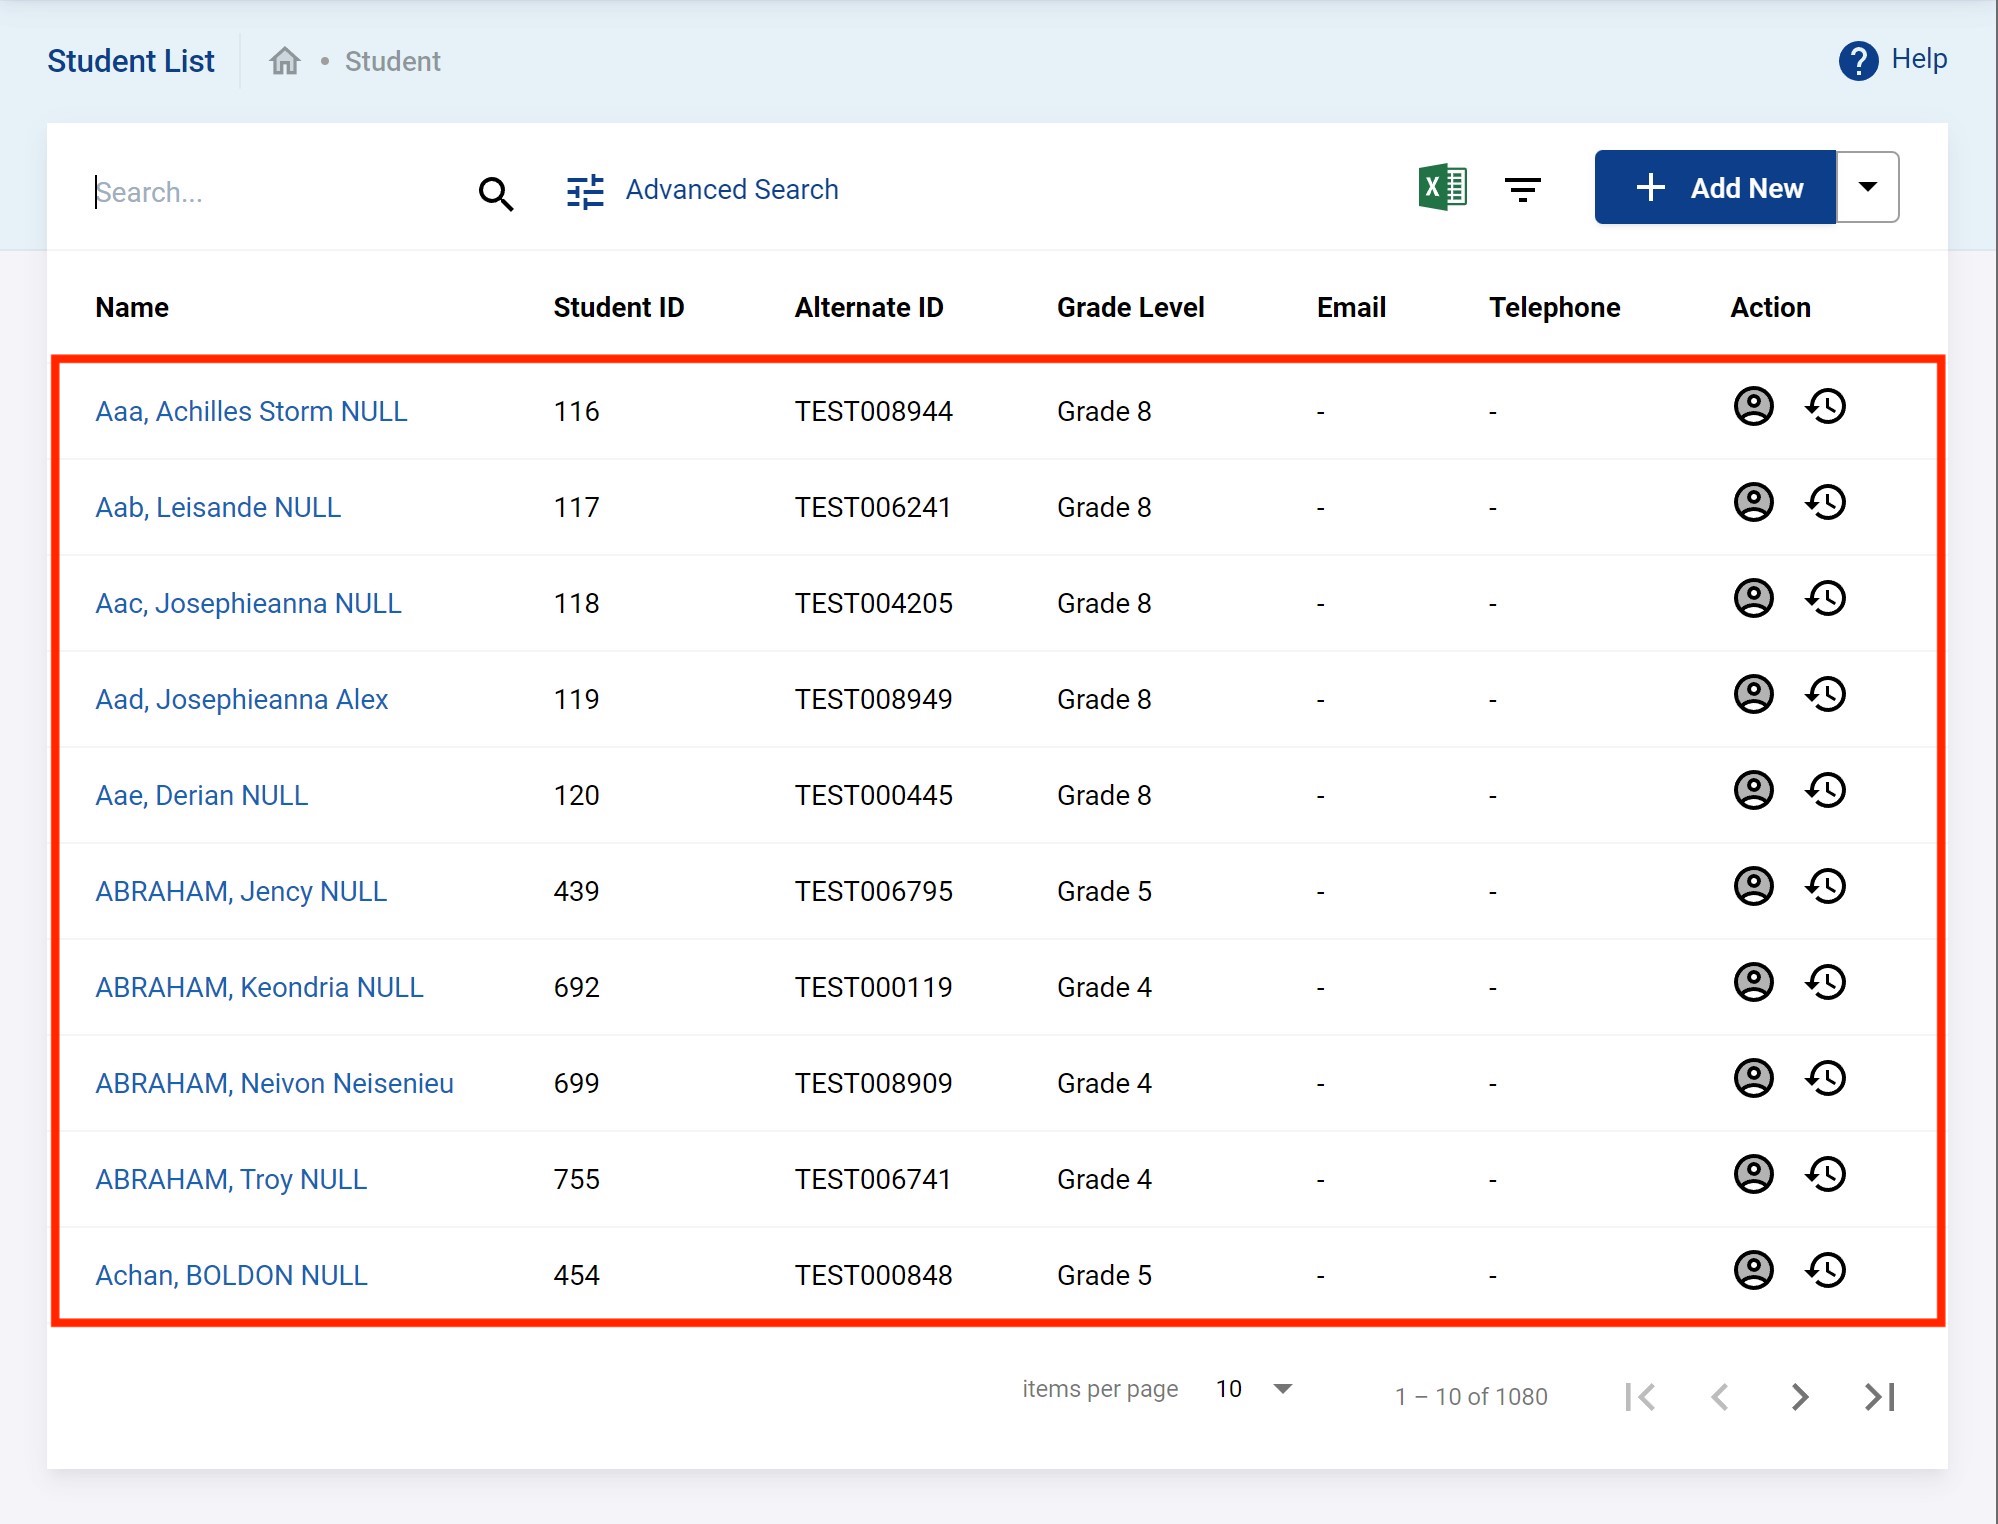
And if you browse again to the Students Info you will see the whole list there as shown below.
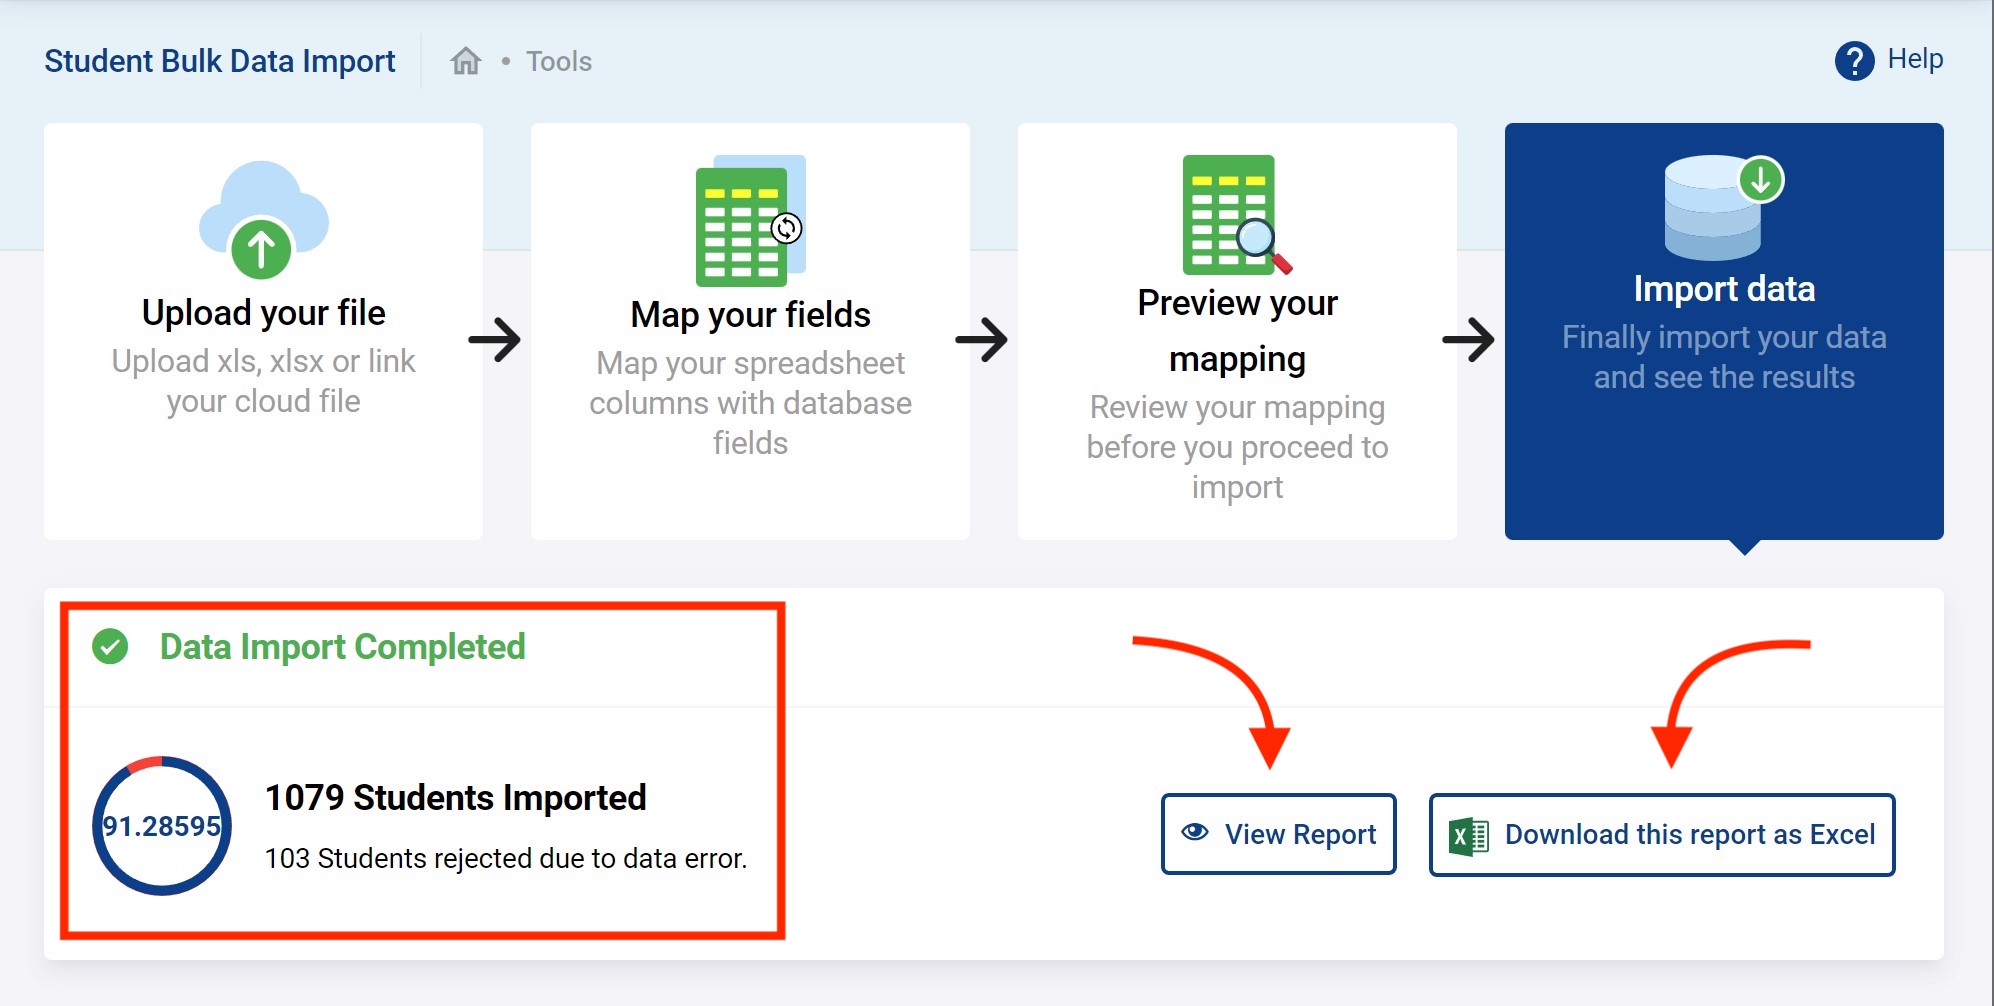
But things can also go wrong in which case it will look like the following. You see that 1079 students have been loaded and that 103 students were rejected. You can click on the View Report which may provide hints as to why.
Student Group Assign Info
This feature is used to assign some student information in bulk. Go to Students → Group Assign Student Info.
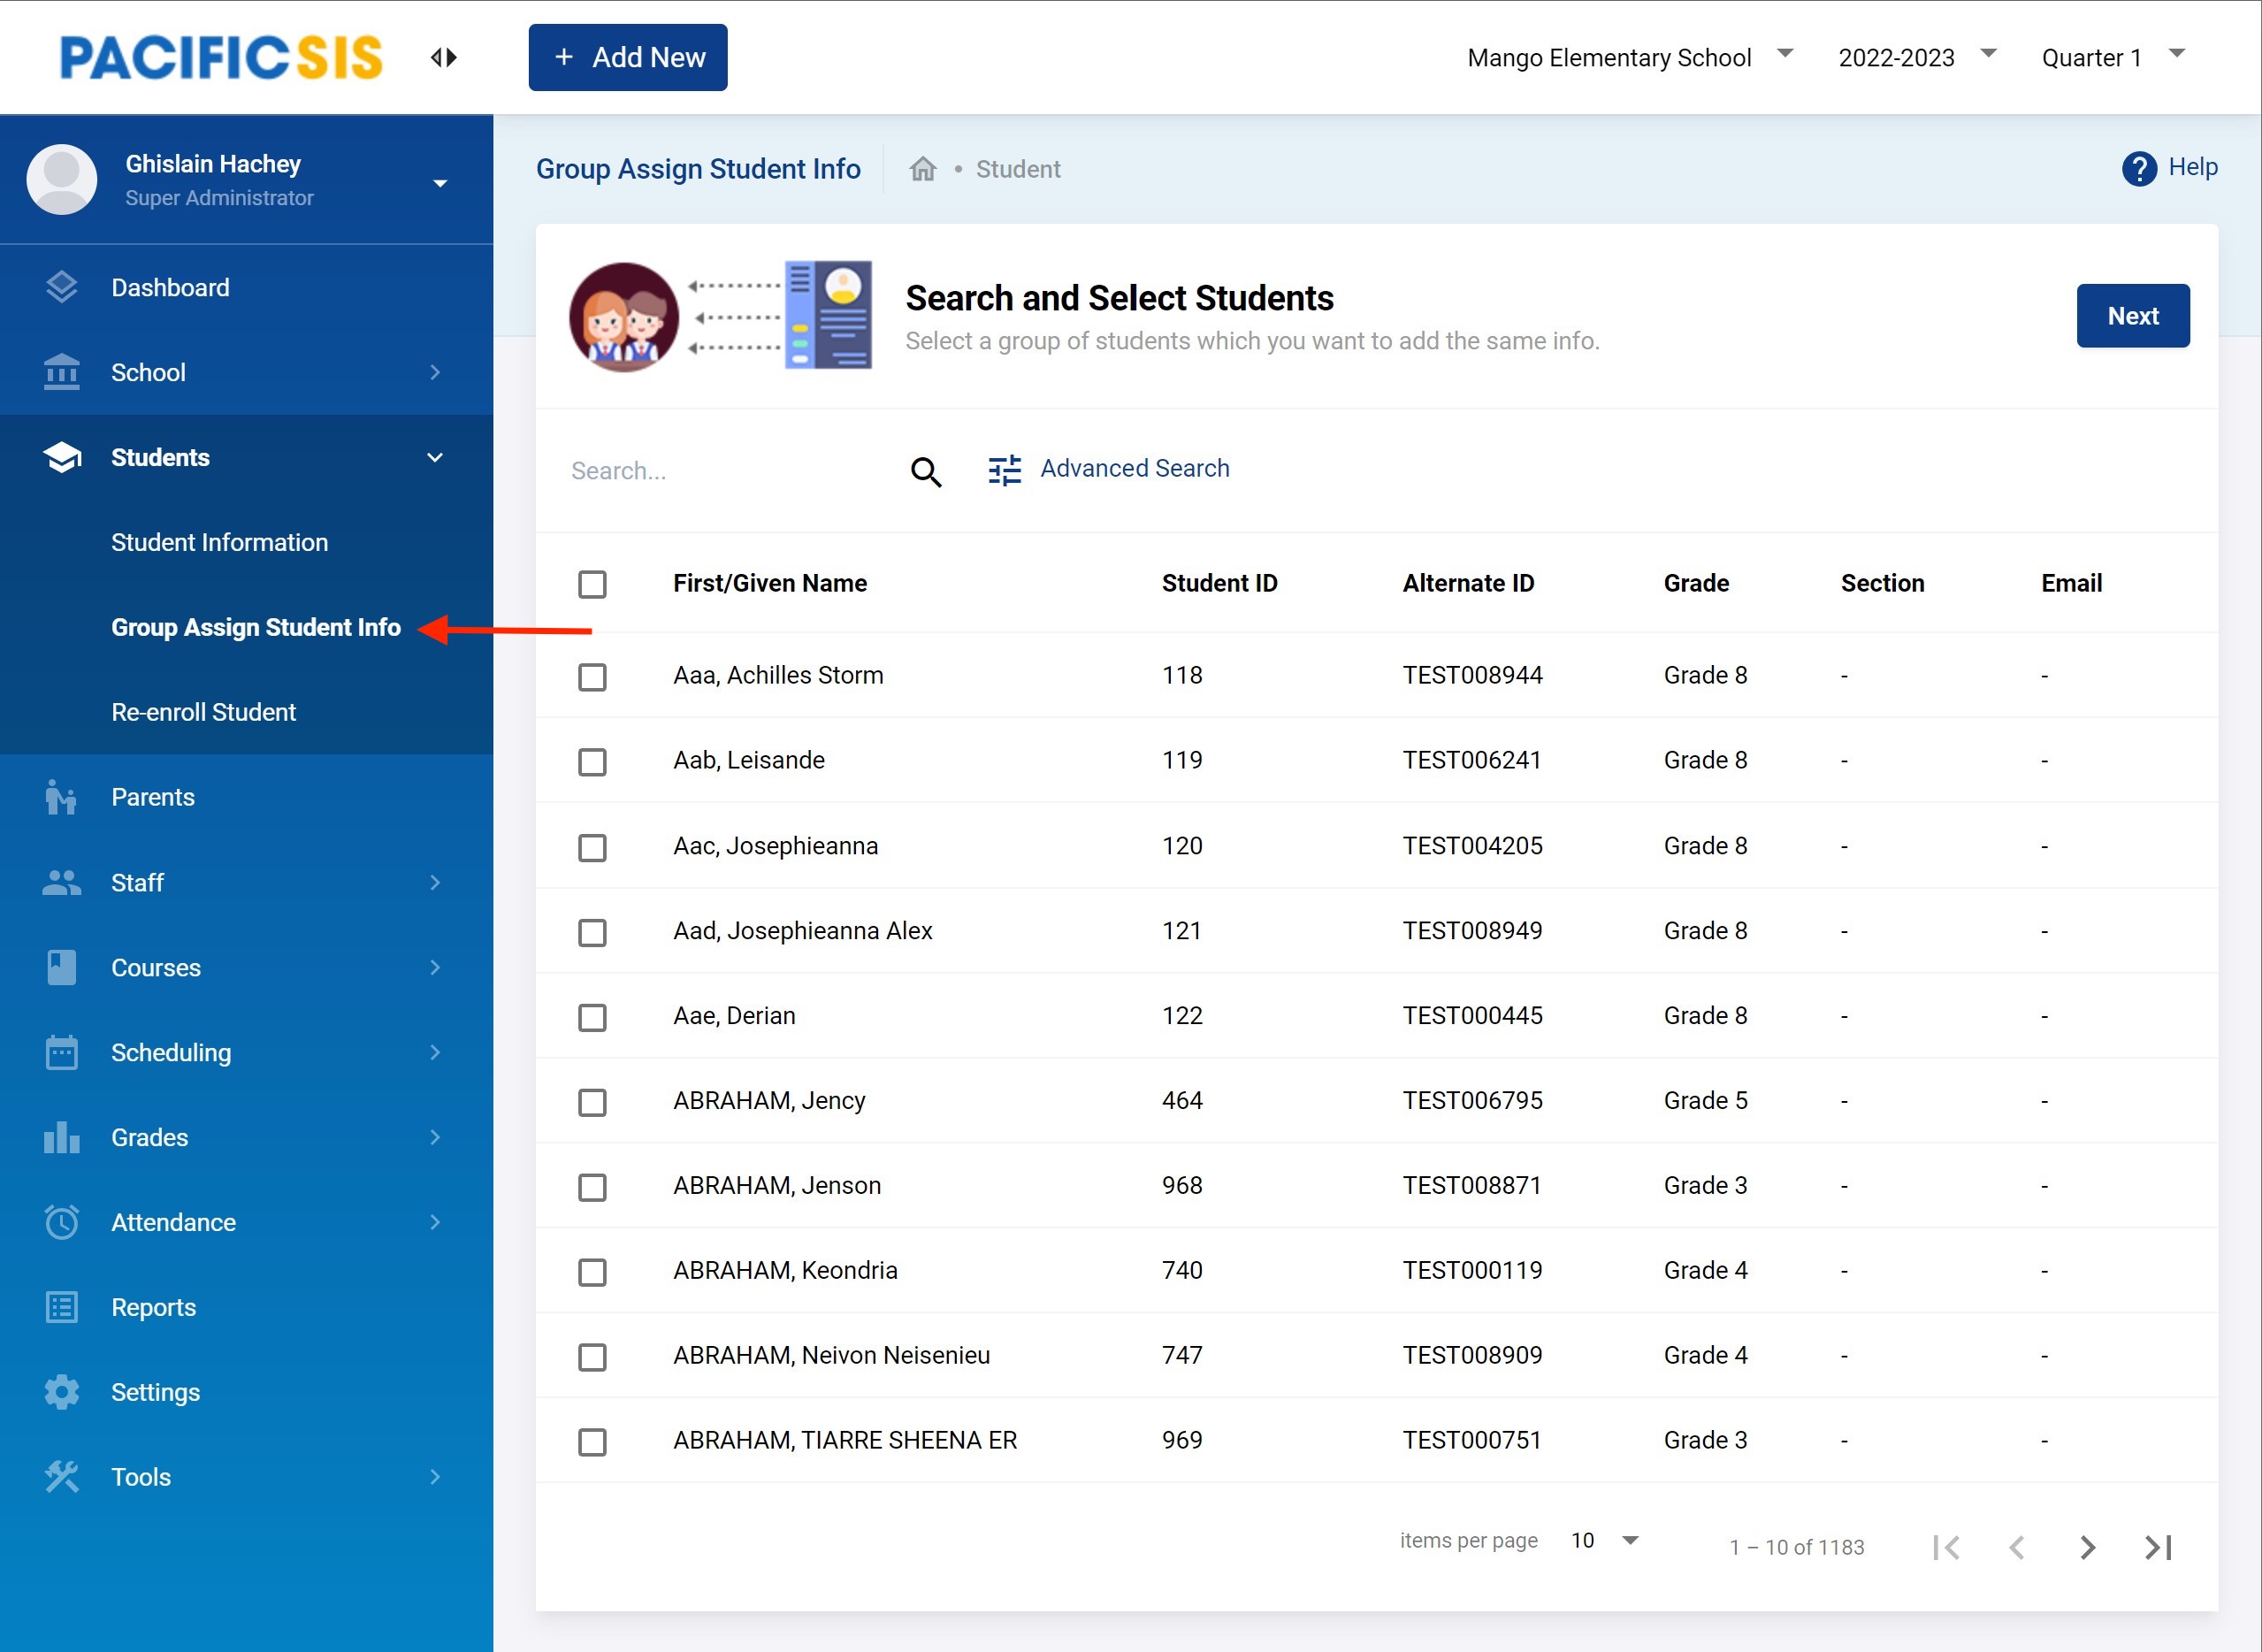
For example, you might have loaded all your student in the system but you did not know their section. In that case you can group assign the section to your students. In the example below we are selecting a list of students to be in a section called Section A. Select the desired students and click on Next.
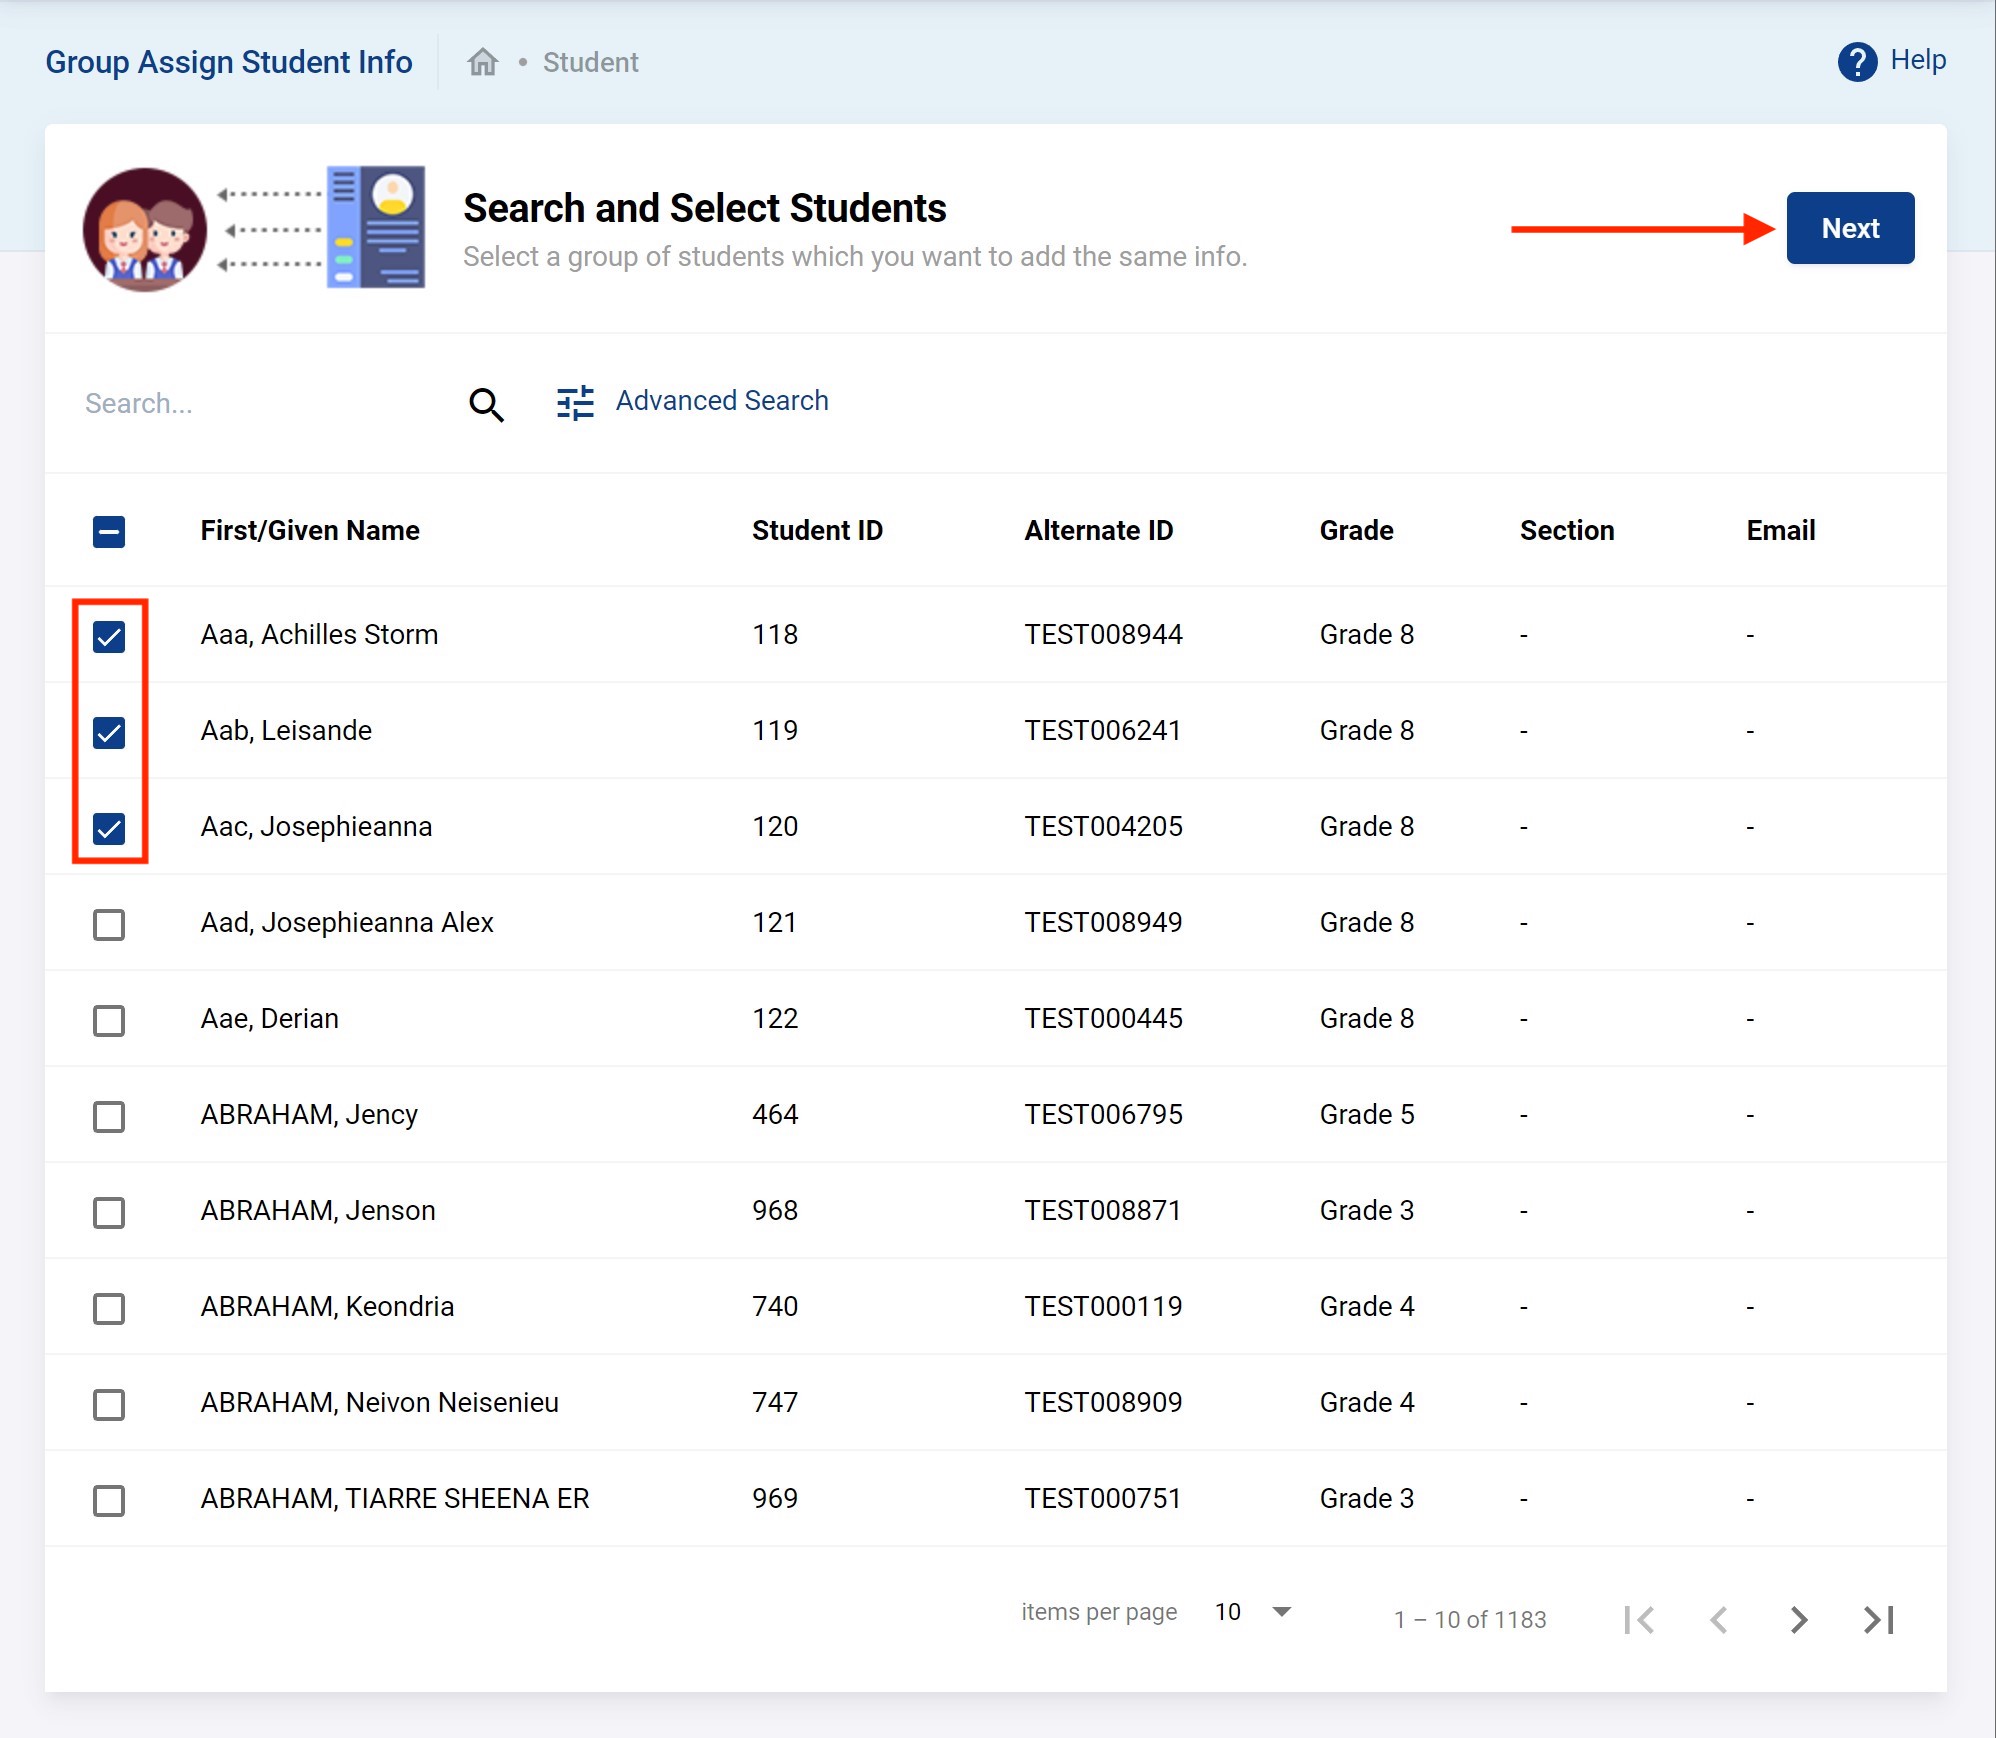
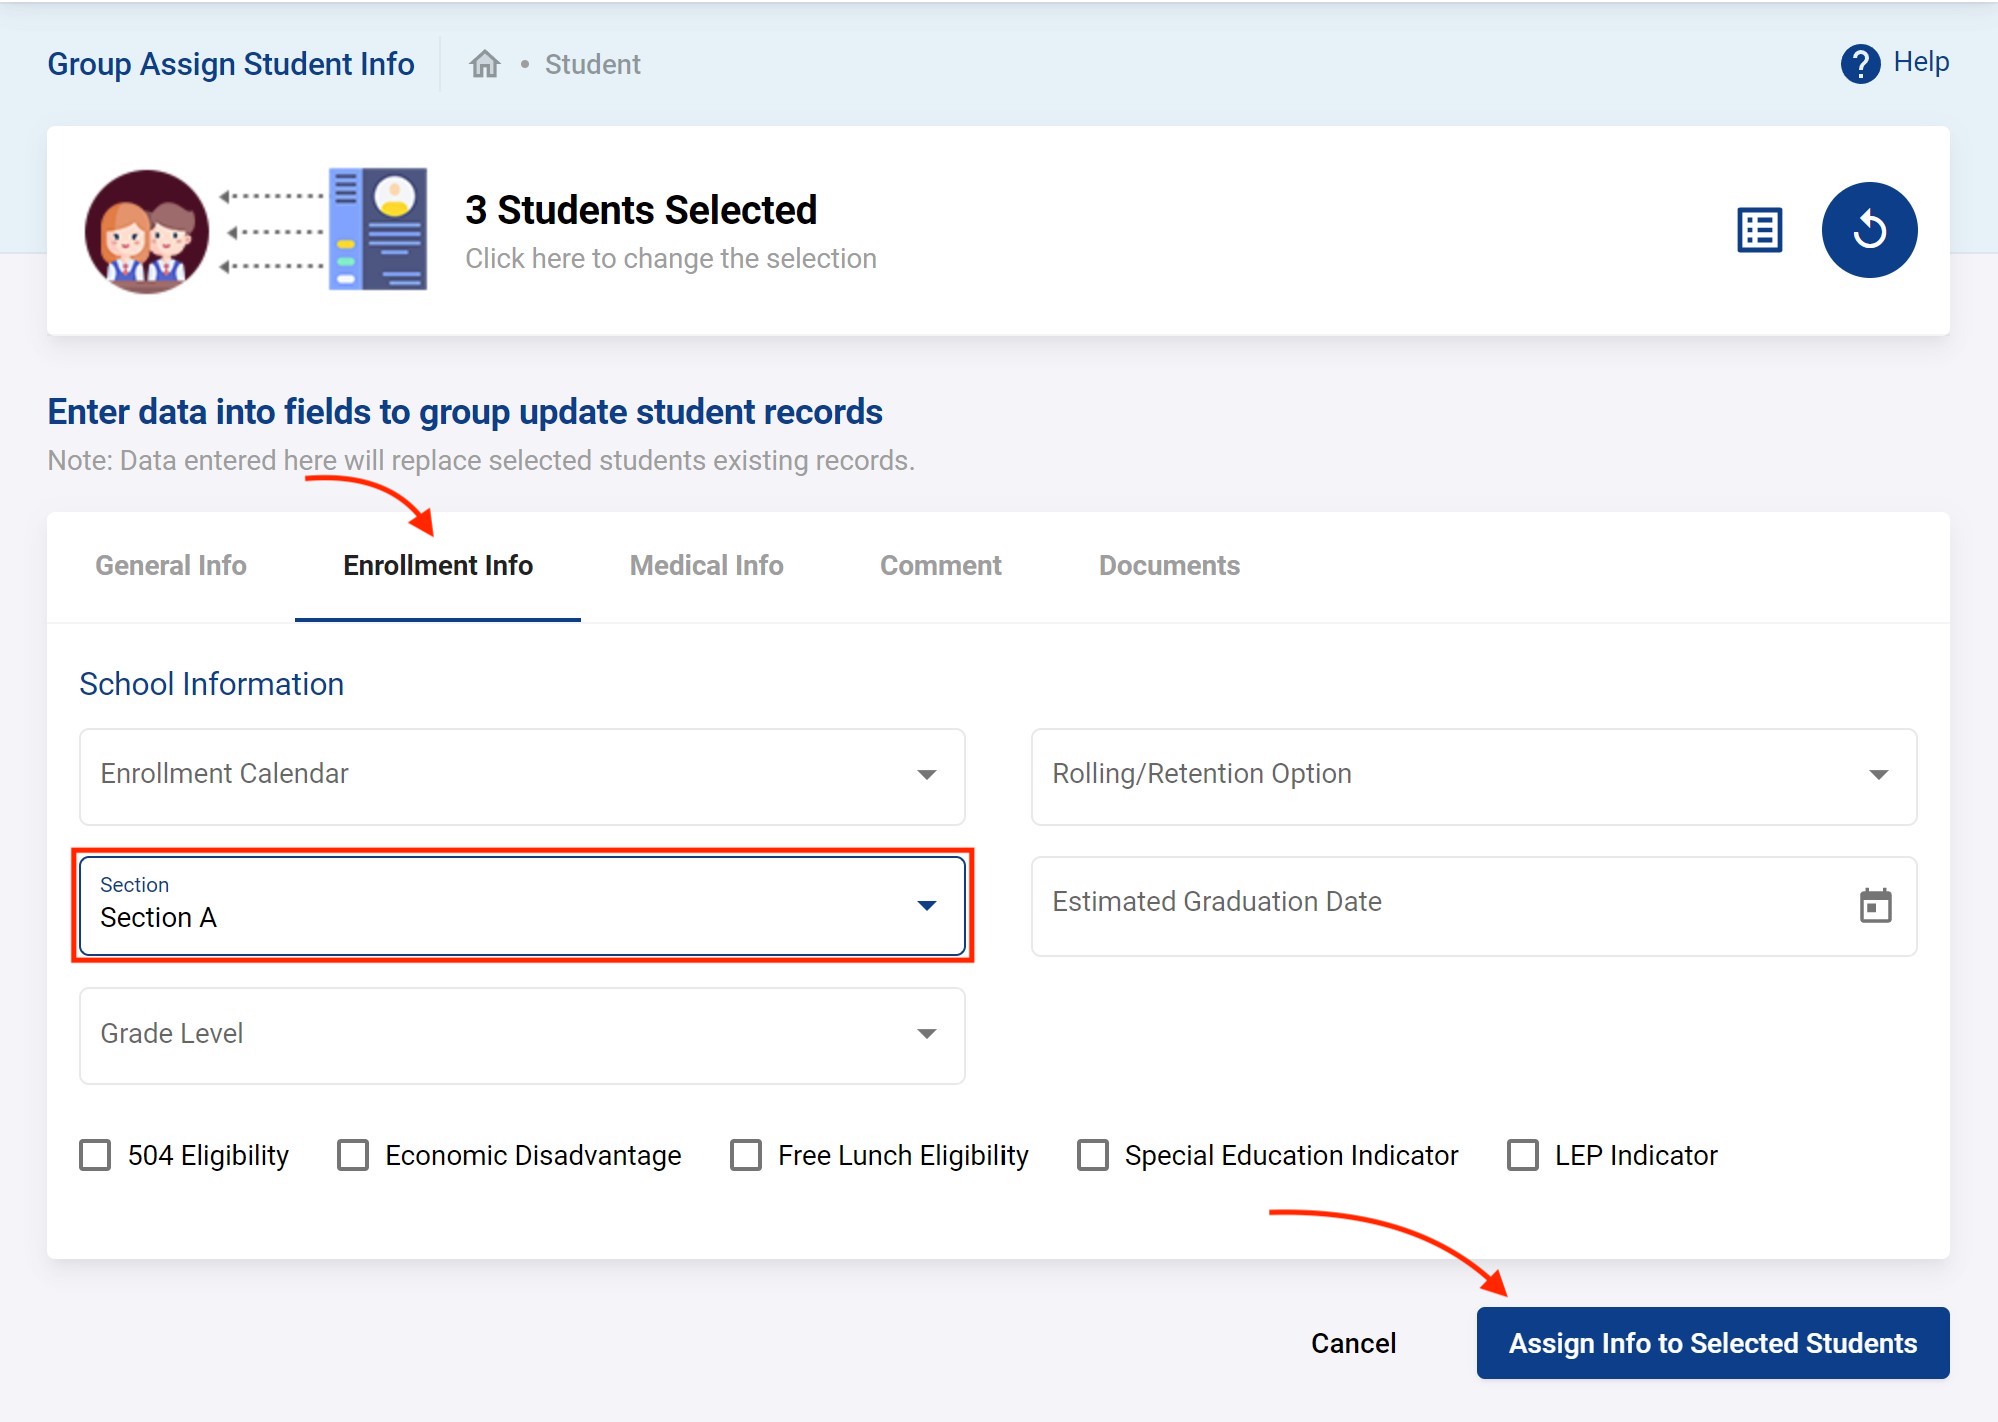
You will see the following in the next steps. This is where you can group assign some info to the selected student. In the example here, we are assigning a Section which is under the Enrollemtn Info tab as shown below. Select the section you want to assign to the list of students and then click on Assign Info to Selected Students.
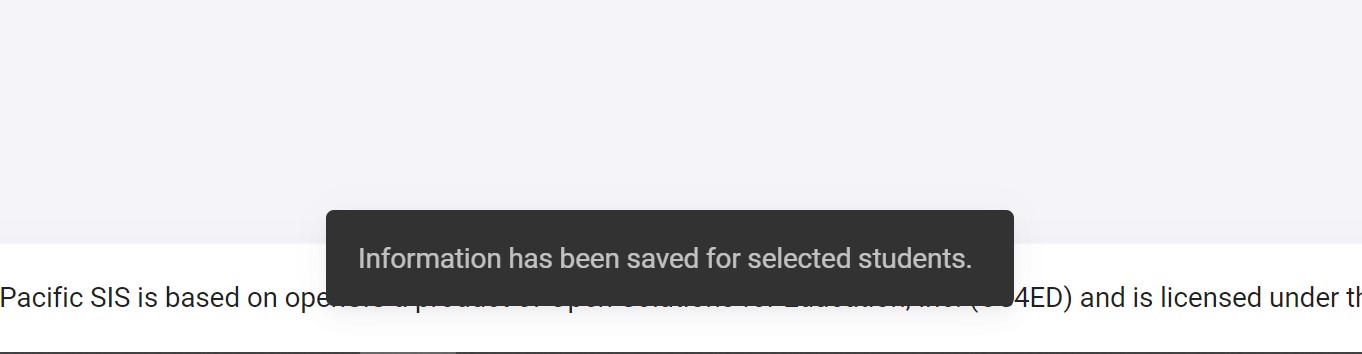
You should see a successful message if all went well like below.
You can also optionally at any time there view the list of students for which the group assign info will apply by clicking on the icon as shown below.
Student Transfer Out
Occasionally you have a student transferring out to another schools. You can do this in the Student's profile Enrollment Info tab. Go to Student → Student Information and locate your student and the click on Enrollment Info and then Edit Information. You should have something like this where you can enter the “Exit Date” and “Exit Code” indicating when the transfer out is taking place and then the “Transfer to School” and “Grade Level” indicating to which school the student is transferring and into what grade level.
The results should looks something like this.
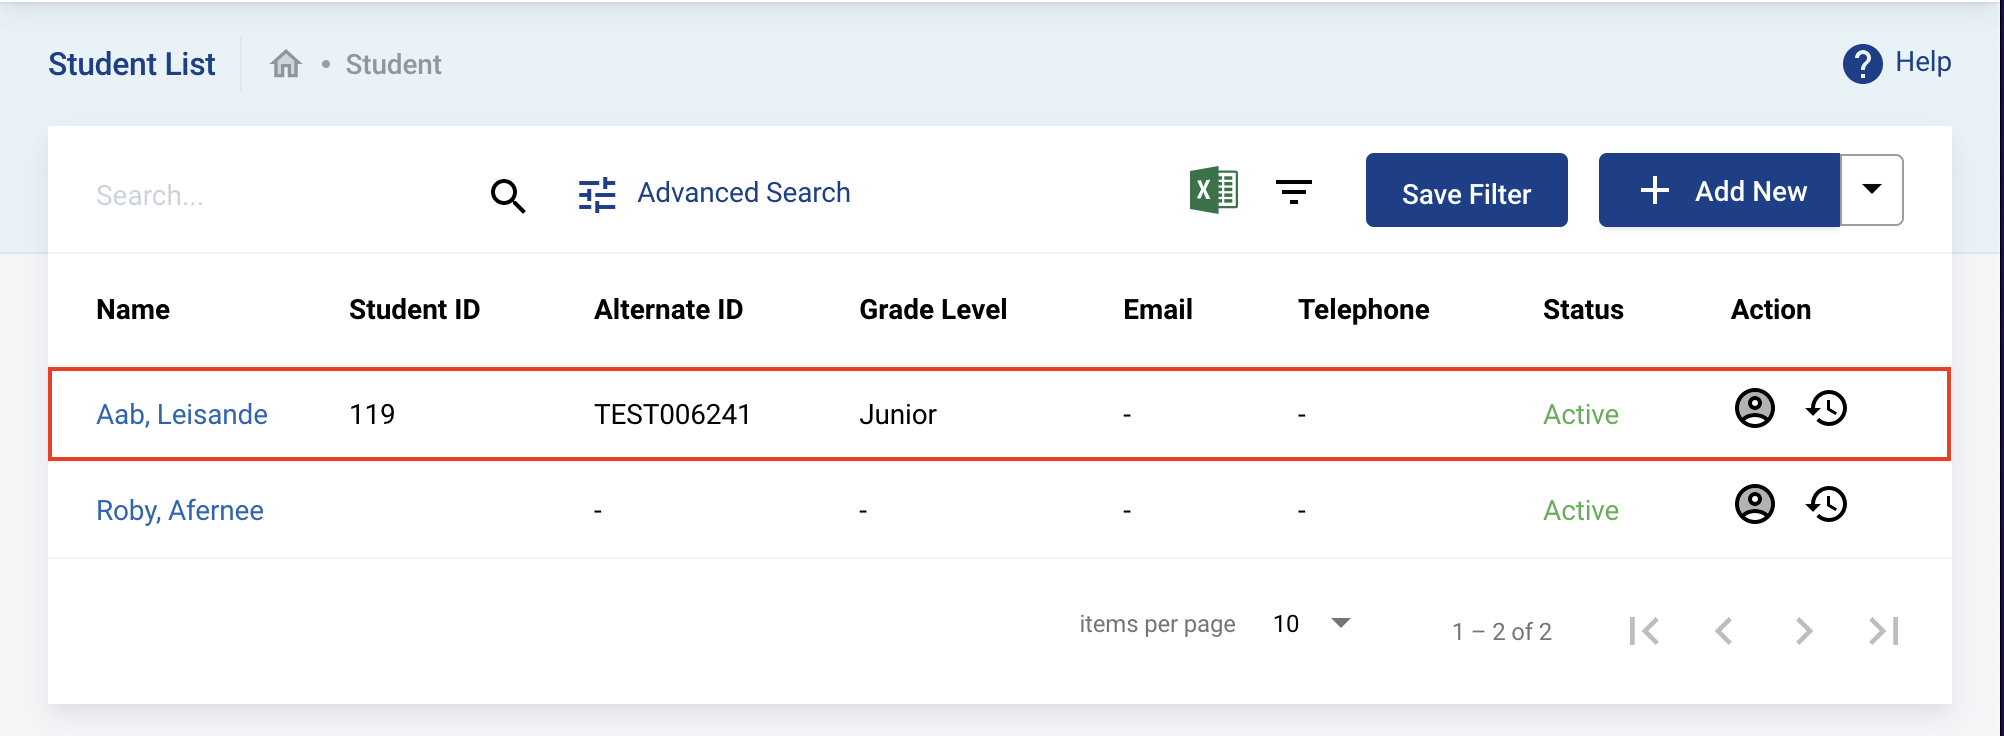
Naturally, the student will disappear from the list of available student in the school (since it has transferred). However, since the student was in this school it can still be found there by searching for “Inactive” students as shown below.
You would then see the student listed (as inactive) as shown below.

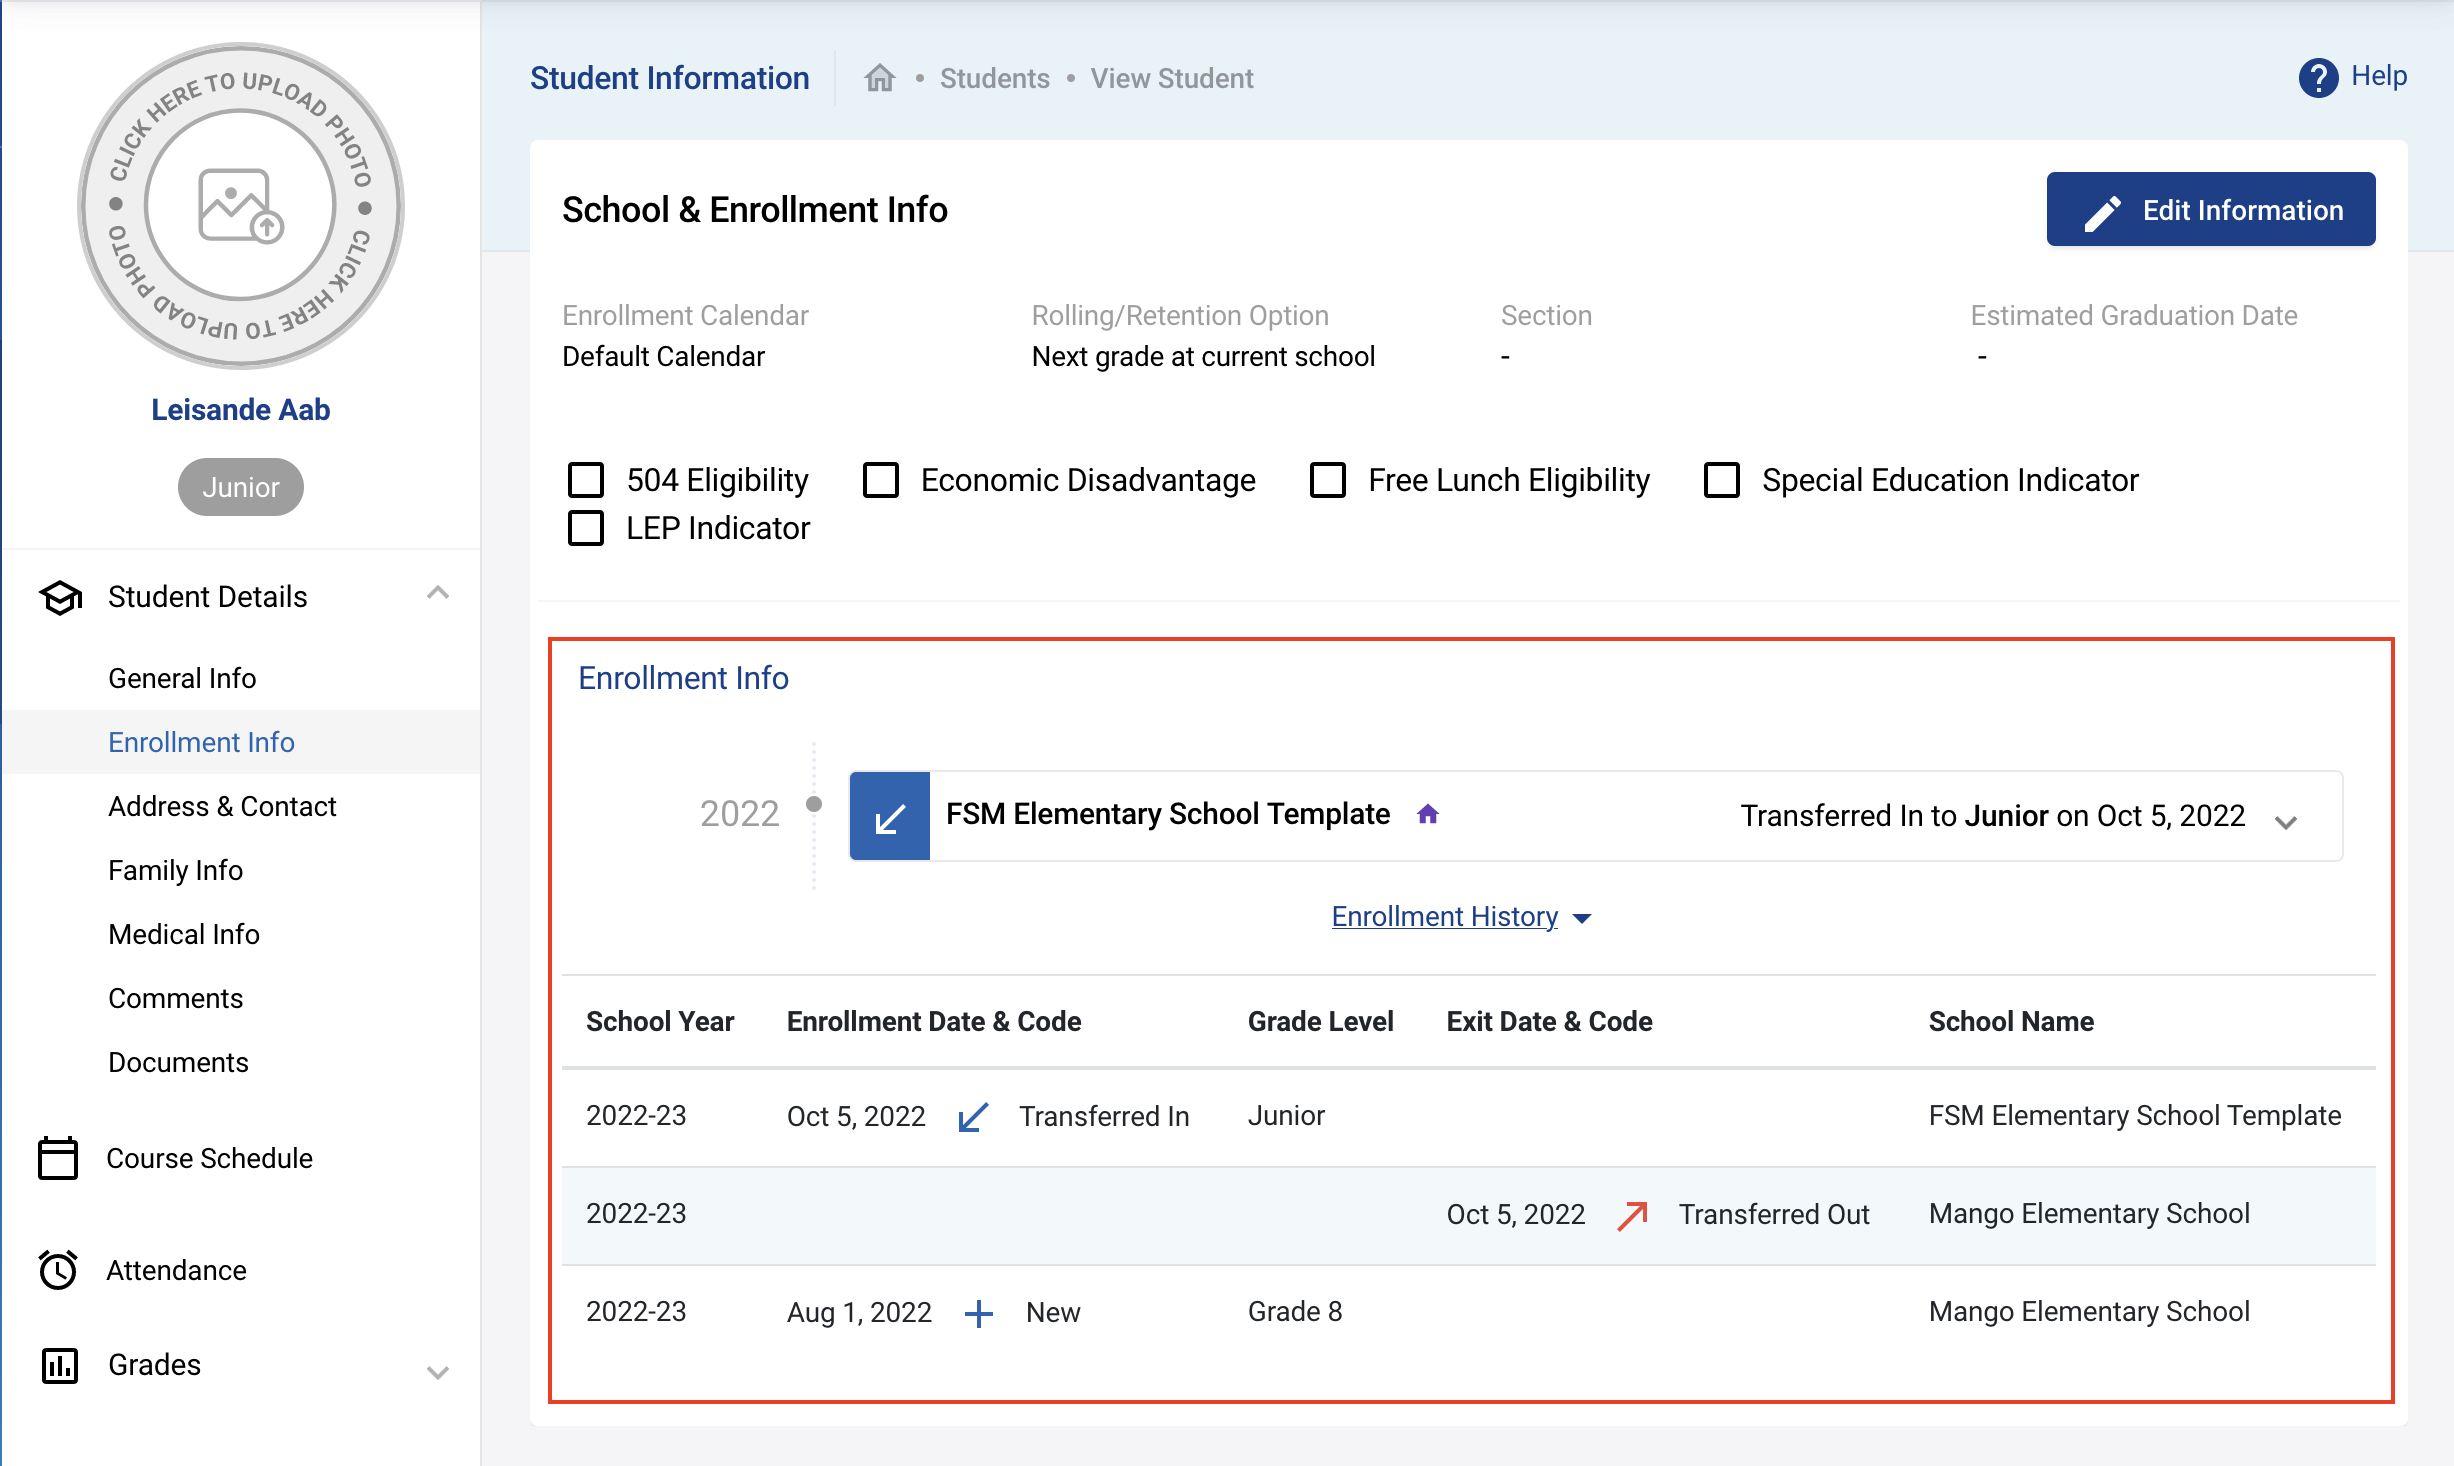
If you switch to the school to which the student was transferred it would be listed there as active student as shown below
And viewing this student's profile you would see the full enrollment history is there also.
Student Dropout
Based on its Enrollment Info it is a new student in Grade 8.
By clicking Edit Information you will be able to edit the enrollment information. Adding an Exit Date and Exit Code as shown below will drop the student from the school.
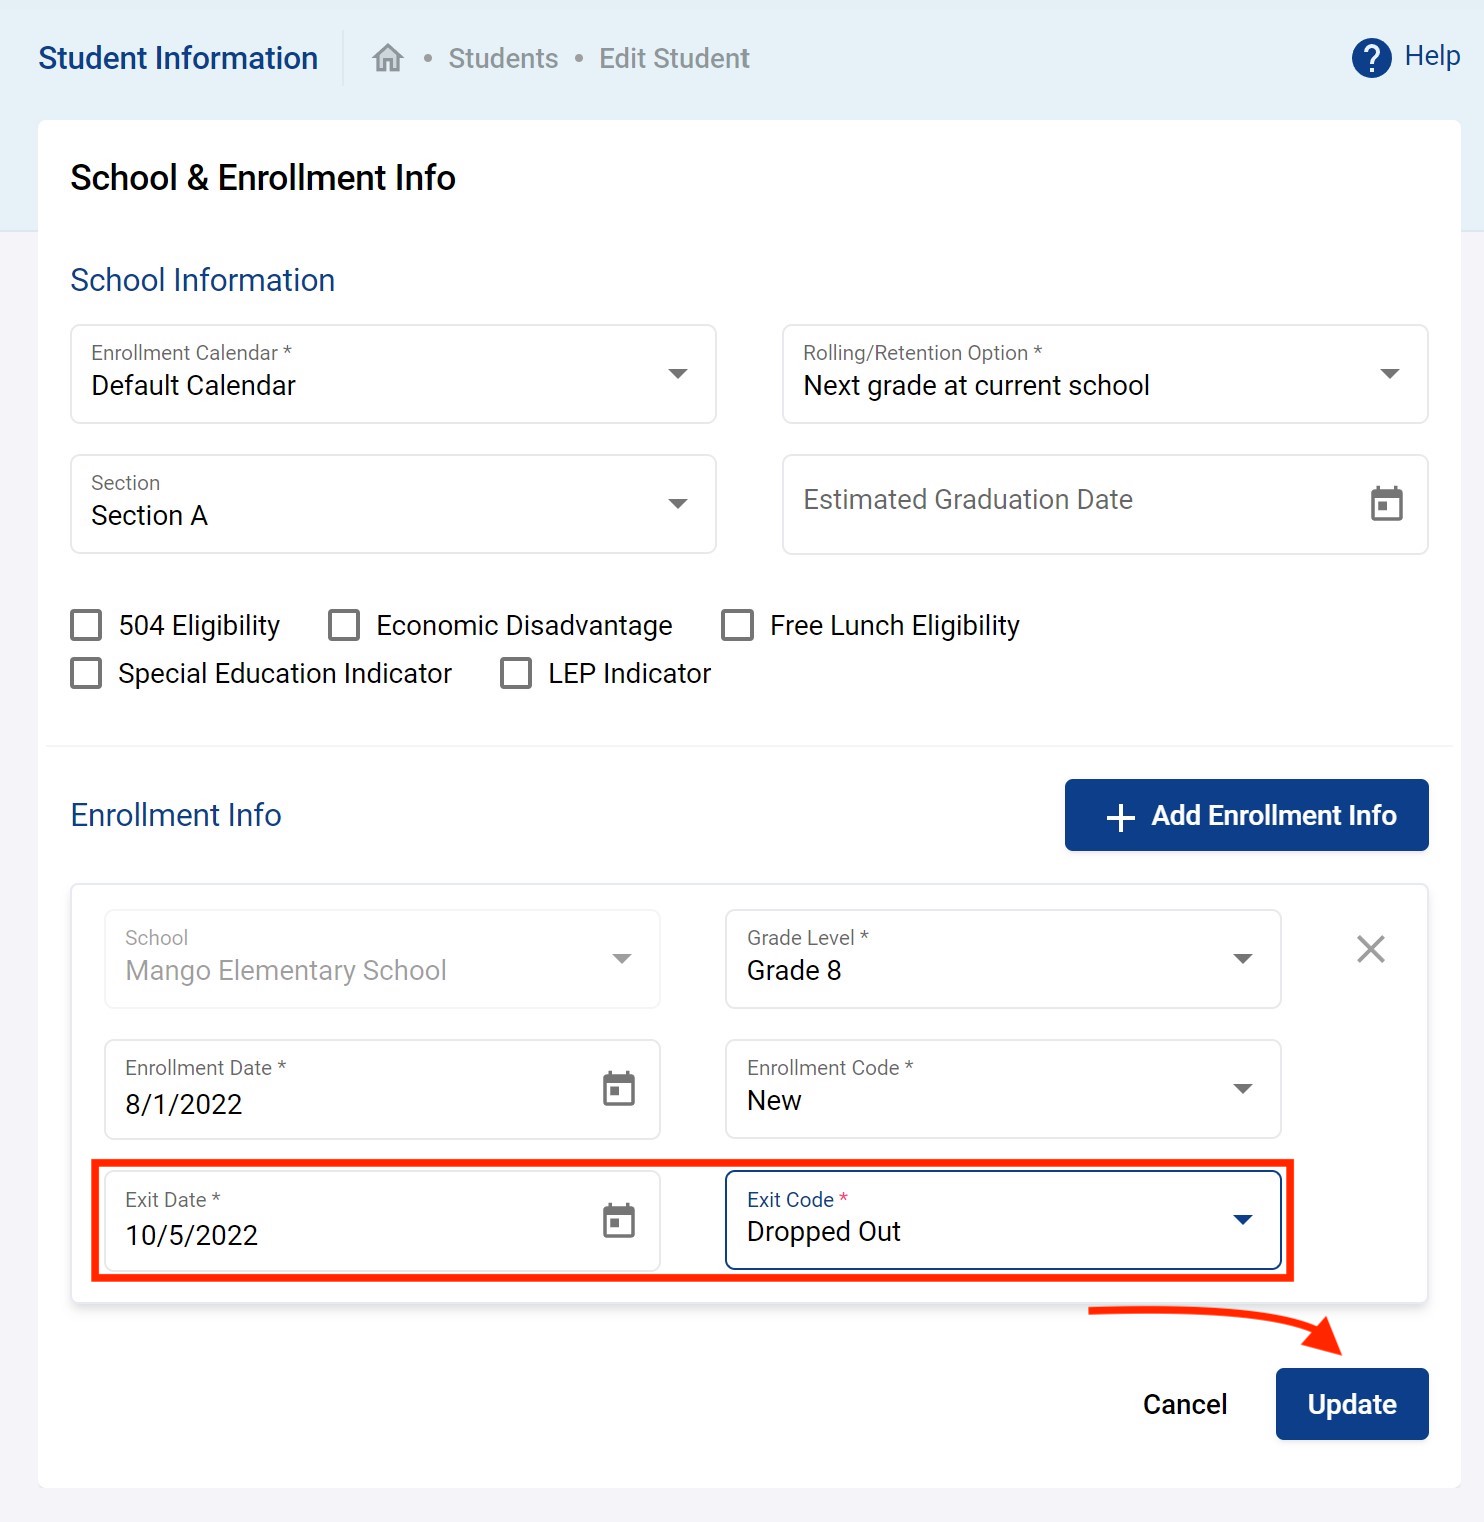
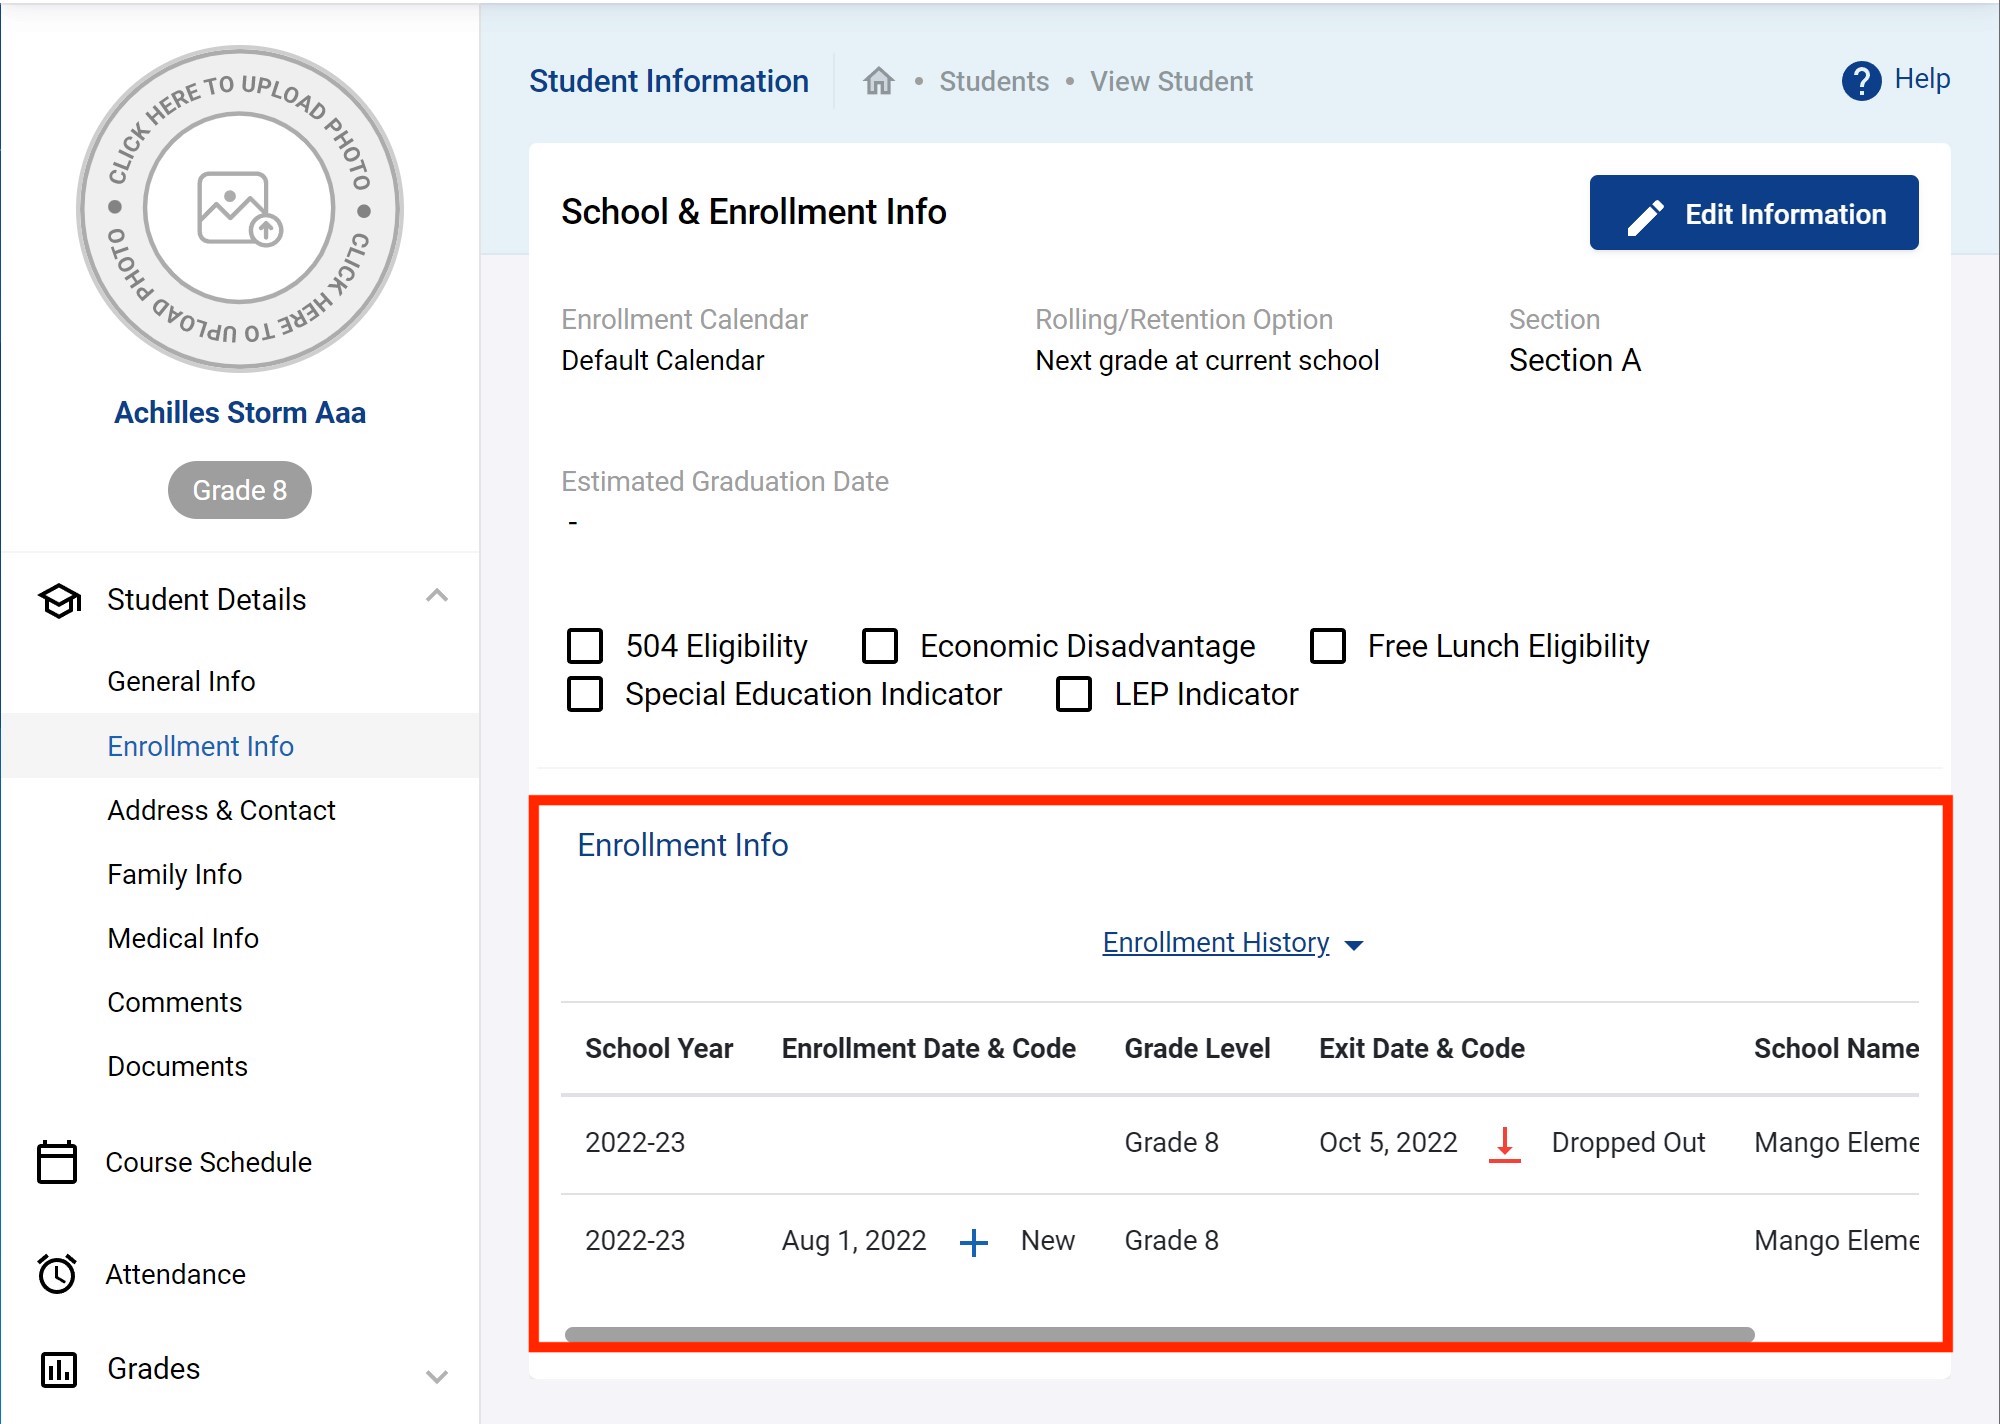
You should then see the dropped record in the Enrollment Info as shown below.
Student Re-enroll
There are two common use case for re-enrolling students:
- Re-enroll a student that dropped out of school (into the same school or maybe another school)
- Re-enroll a student that ends at a school (e.g. a primary school) and moves on to another school (e.g. a high school)
Both cases will be discussed in following sub-sections.
Student Re-enroll a dropout
Here the first case is discussed. Sometimes, students drop out from school & re-enroll again into the school. When a student is dropped from the school, the system keeps that student's data as an inactive student. Since the typical process when a student comes to enroll or re-enroll in the school is to
- Go to
Students → Student Informationand try to search if that student already has a record. - If student exists in the system already, you
Re-enroll. If student does not exist,Add Student.
Adding a student is discussed in section Add a Student above. Here, Student RE-enroll is discussed. To re-enroll the student below it was actually dropped out as explained in the previous section Student Dropout.
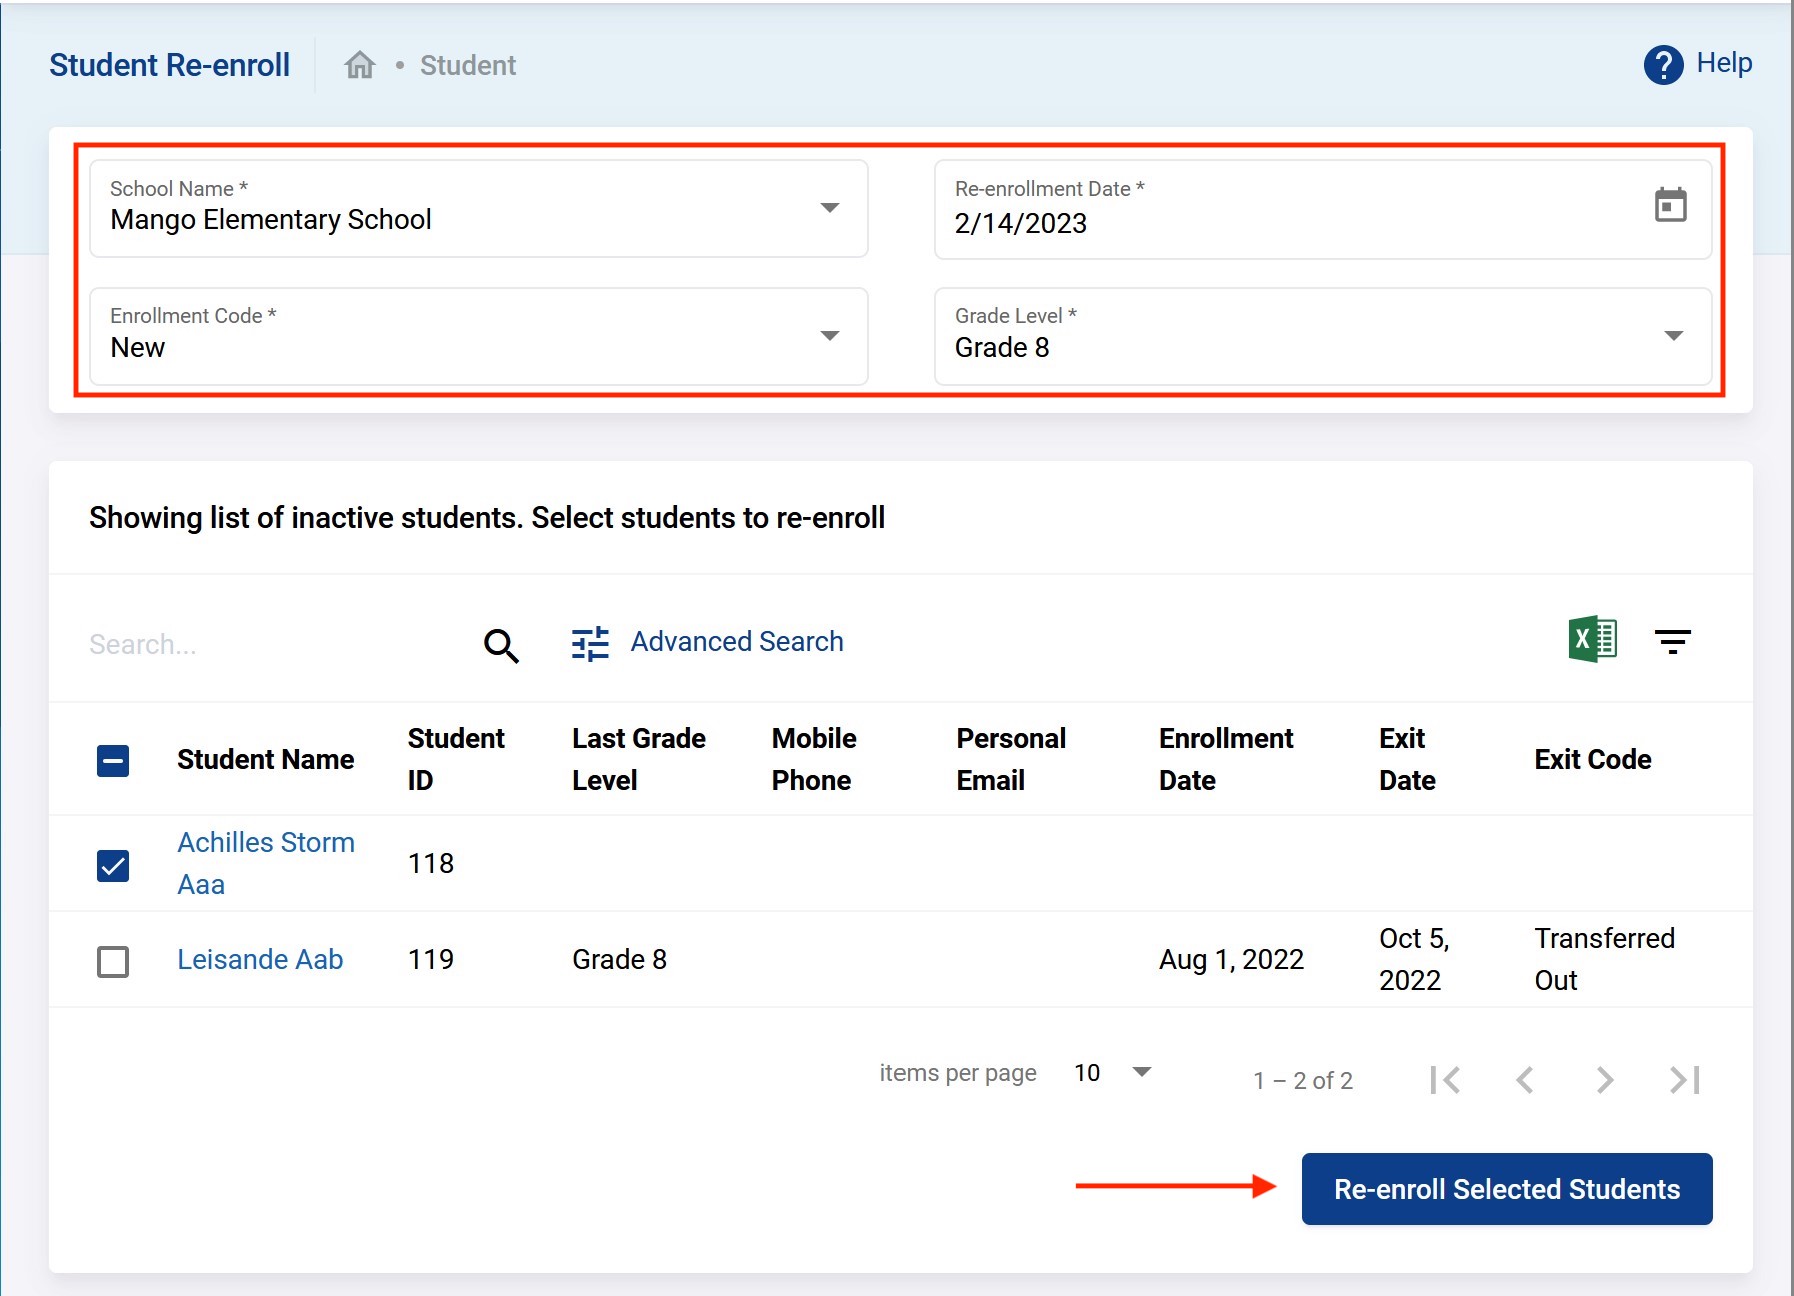
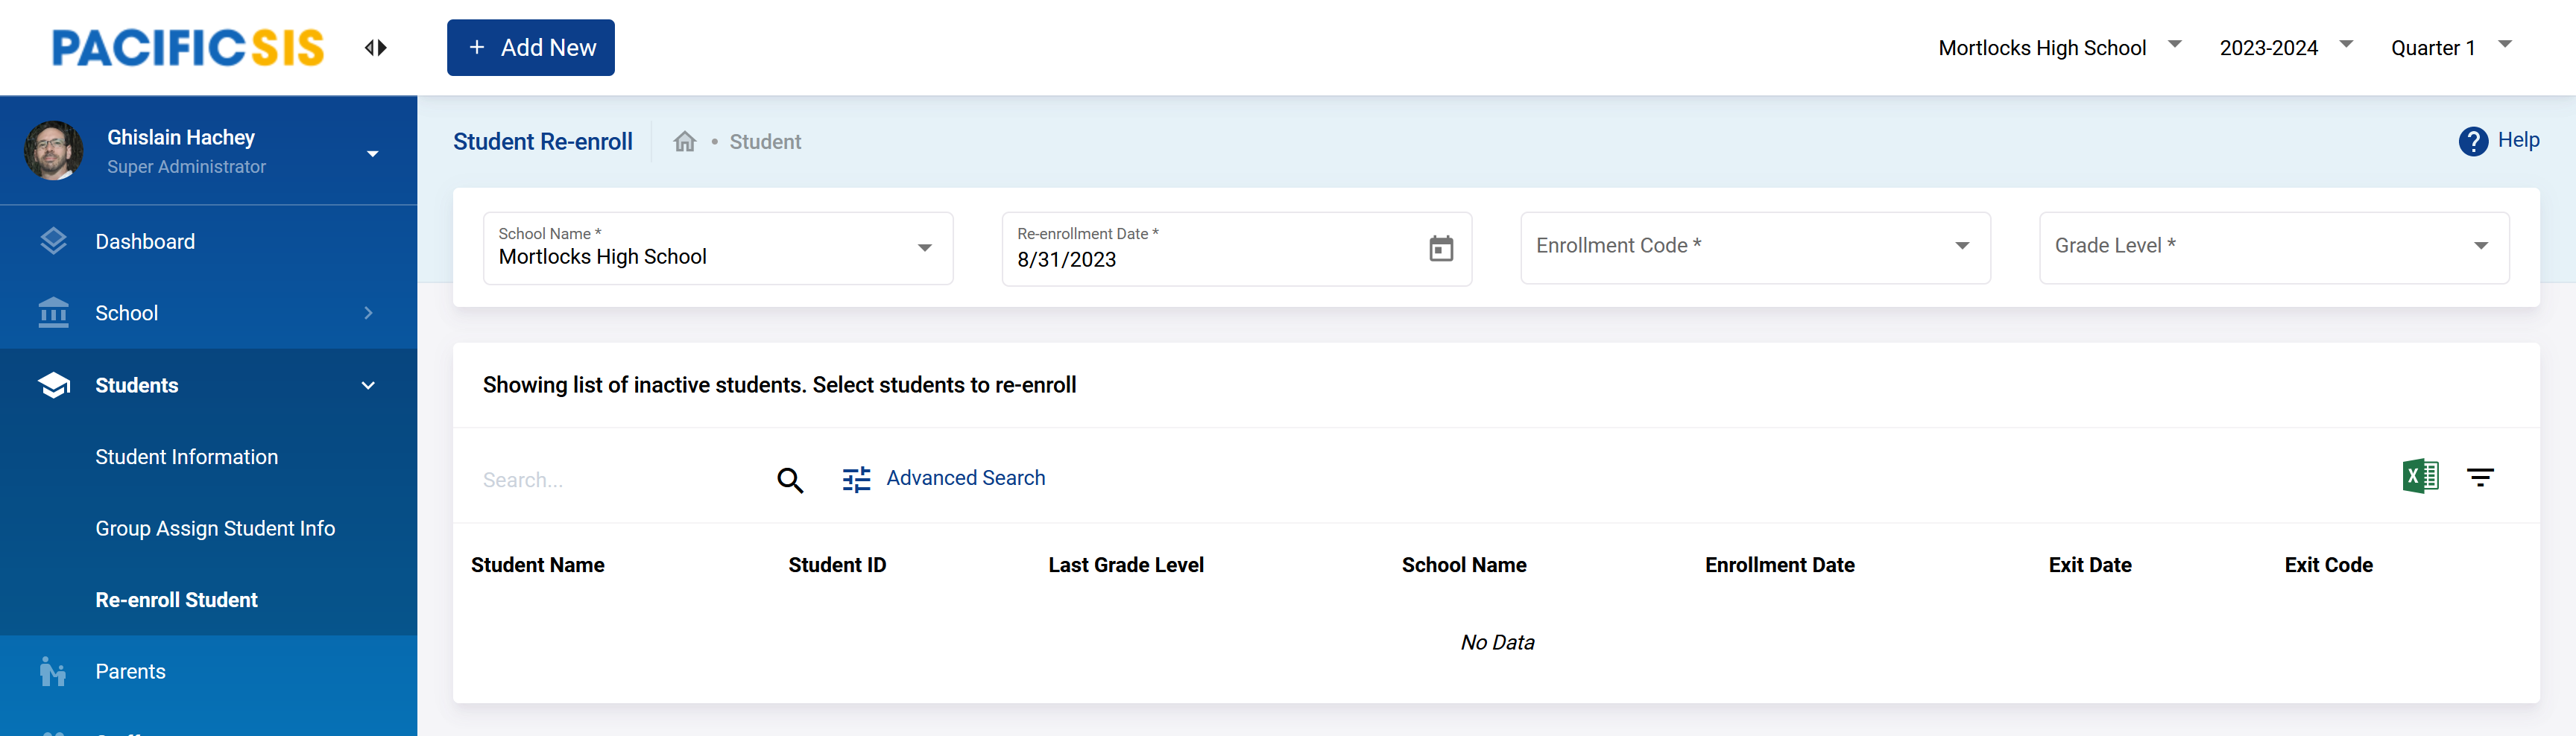
To re-enroll go to Students → Re-enroll Student. Define the re-enrollment data. Select the school to which the student will re-enroll into (same school or new one), the re-enrollment date, the enrollment code and into which grade level. Then select the student from the list of inactive students and click on Re-enroll Selected Students. You could re-enroll more then one at the time. The Enrollment Code are defined below:
- New: say the student is merely re-joining the same school, New might be the best code in this situation
- Rolled Over: say the student is re-enrolling but the following year.
- Transferred In: say the student is re-enrolling but into another school. For example, kid dropped out of school, family moved to different village and kid is re-enrolling there.
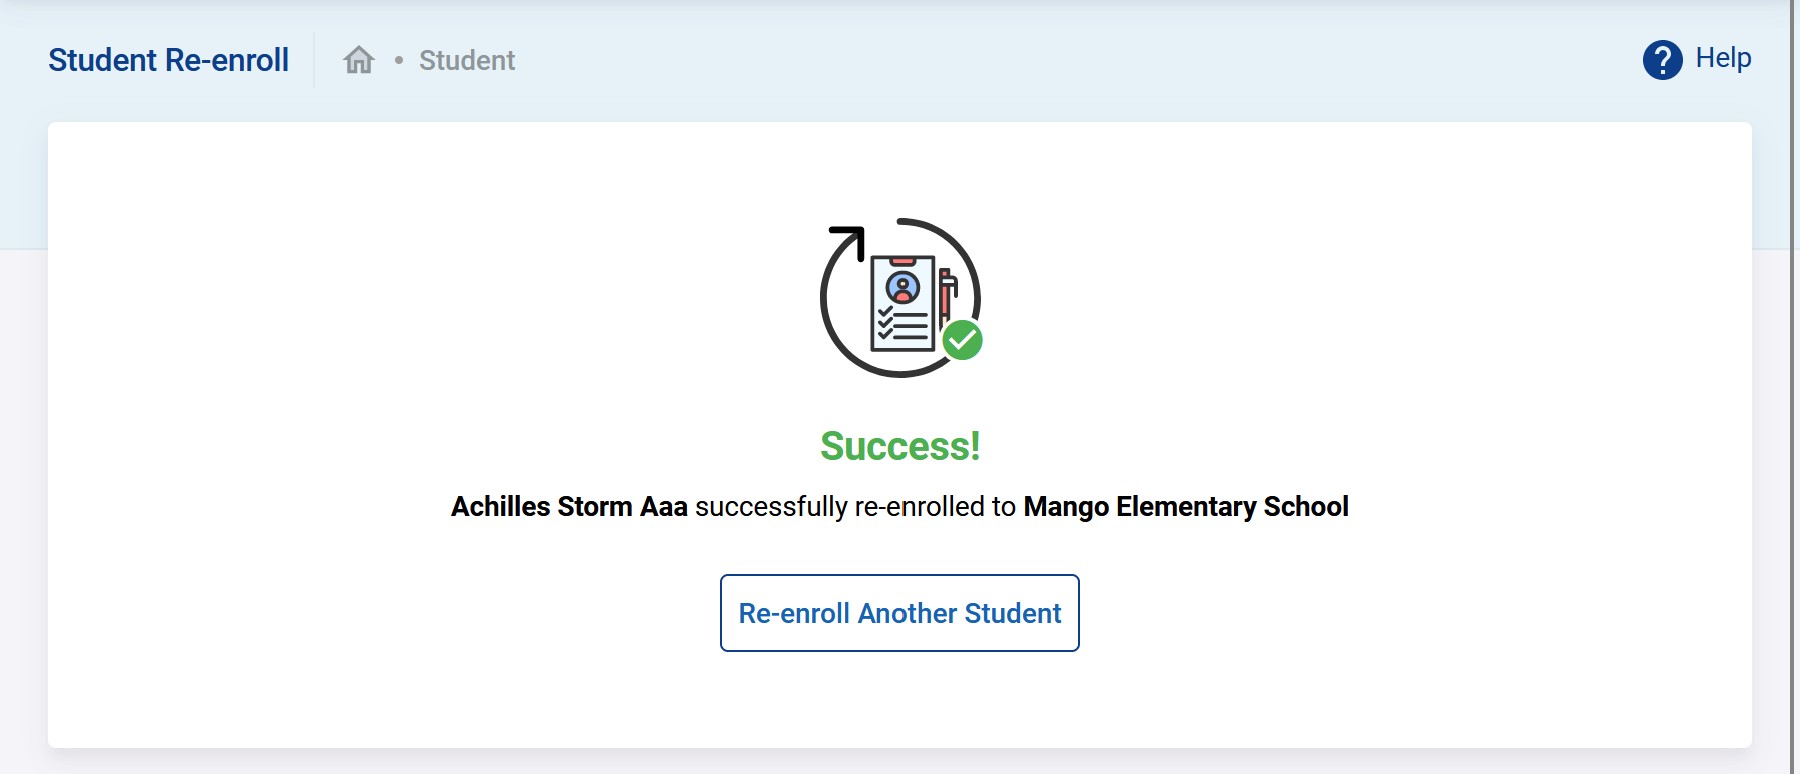
You should see the success message as shown below.
You can also go into the re-enrolled student's profile and you will now find it active with a new enrollment record from the date entered above.
Student Re-enroll to another school
Here the second case is discussed. At the end of primary school, students typically move on to another school. Before a rollover, a common method is to set the “Rolling/Retention Options” for students to not enroll into the school after say grade 8 as detailed in https://docs.pacific-emis.org/doku.php?id=sis_user_manual#student_setting_rolling_retention_options. Those students then become inactive students until picked up again by someone else, typically a high school. This is what this example will do. A high school will re-enroll a bunch of inactive students (graduated from elementary).
- Go to
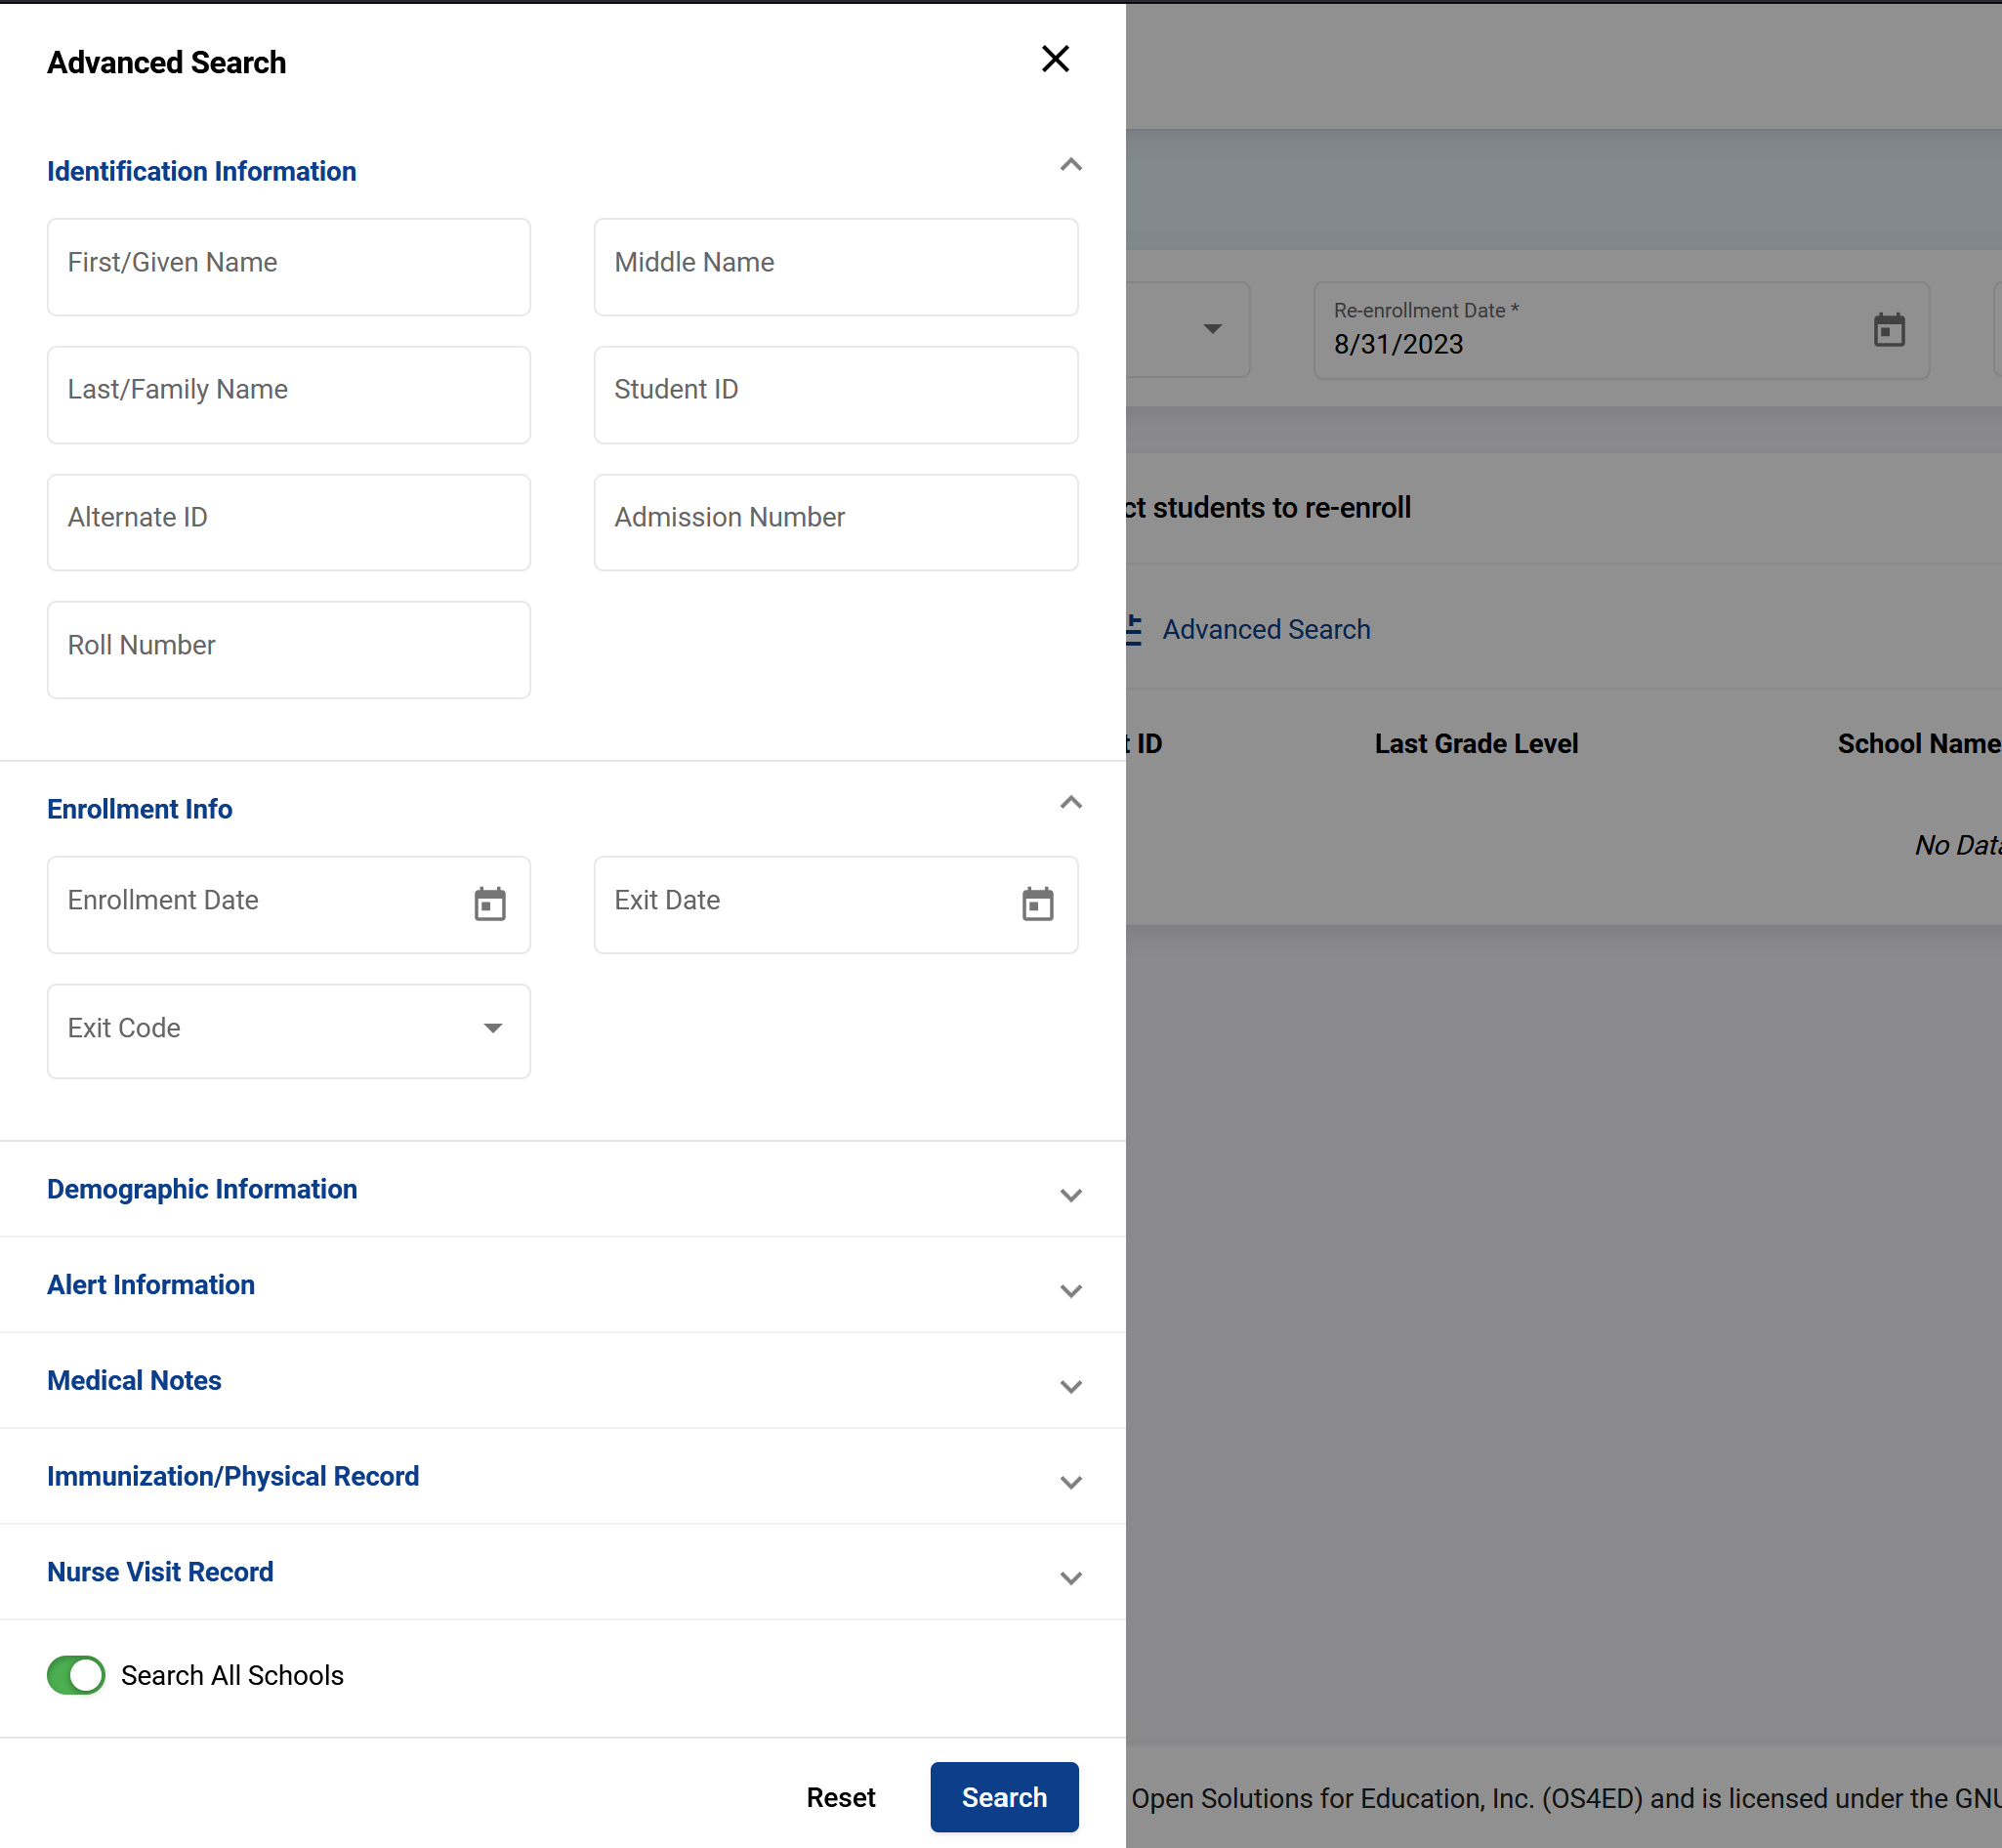
Students → Student Informationand try to search for all the new students you expect coming into your school. Use the Advanced Search and . - If student that are coming fresh into your high school exists in the system already, you
Re-enroll. If you can find the student,Add Student.
To re-enroll students that were set to not enroll again in their primary school you go to Students → Re-enroll Student as shown below.
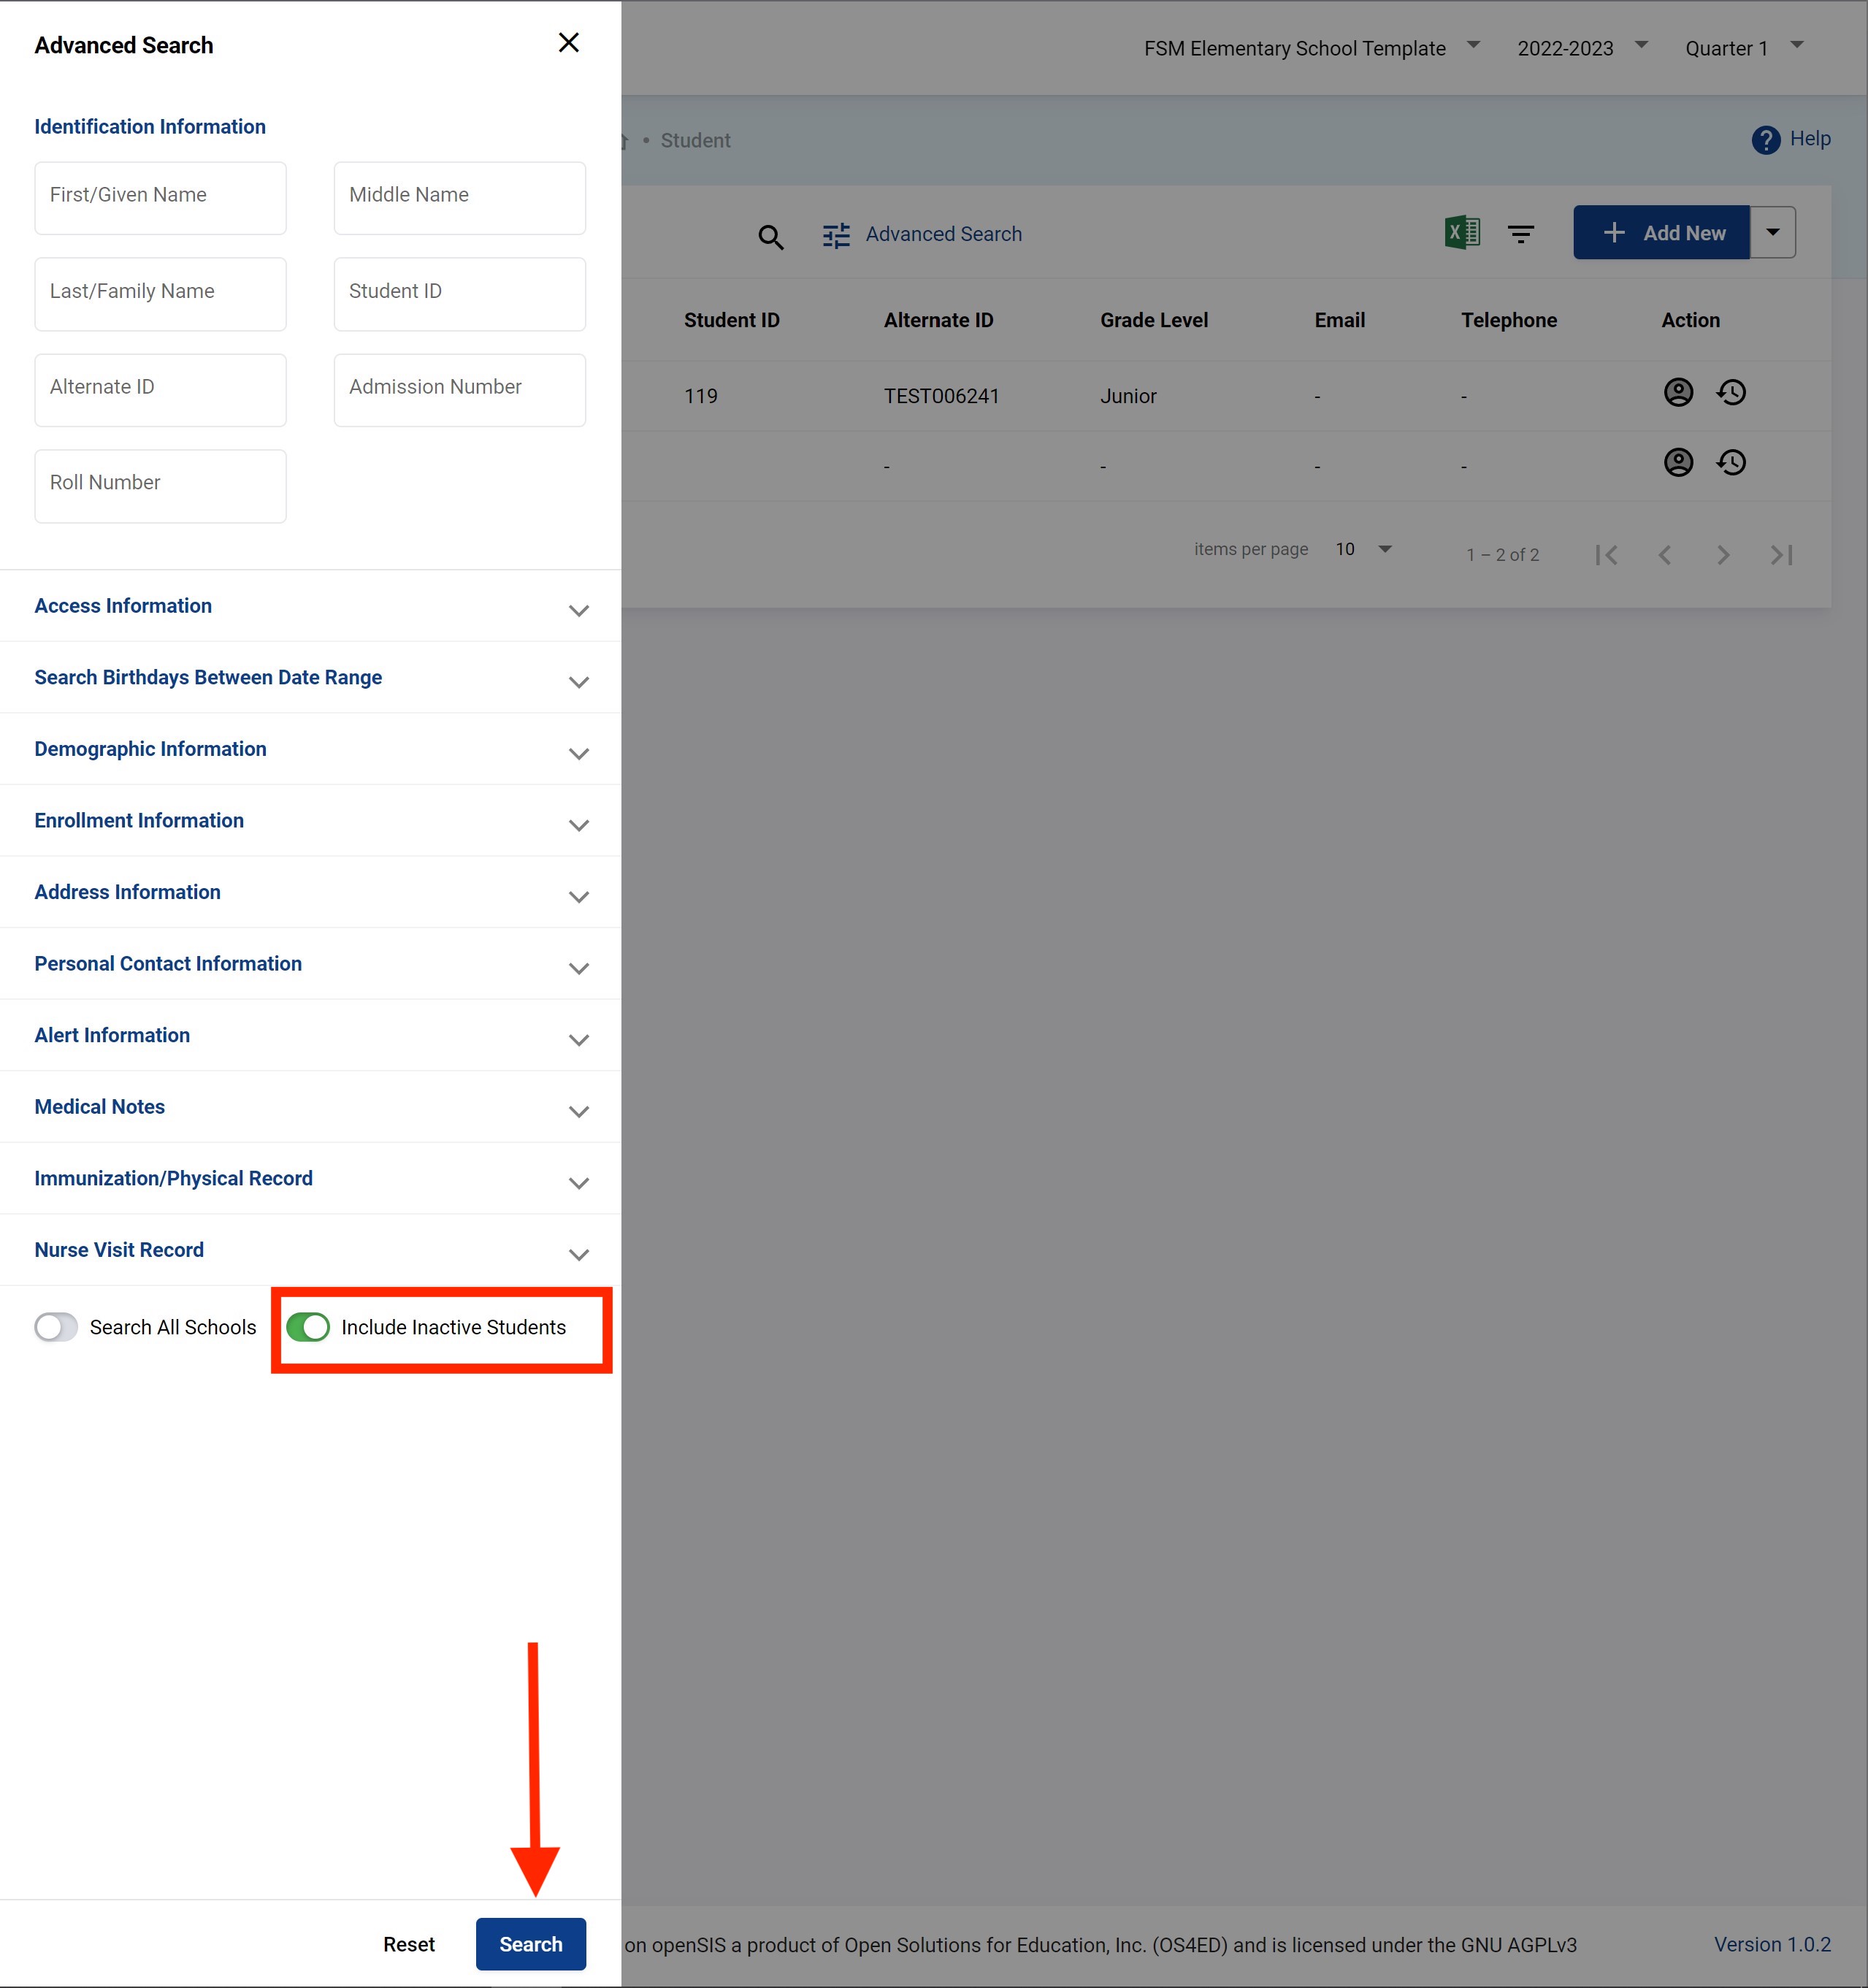
Search for your expected students using the advanced search. Make sure you search with “Search All Schools” as shown below as students may be coming in from any school.
Select the students that are coming to your school. Make sure you put the correct “School Name”, “Enrollment Date”, “Enrollment Code” and “Grade Level” as in the example below.
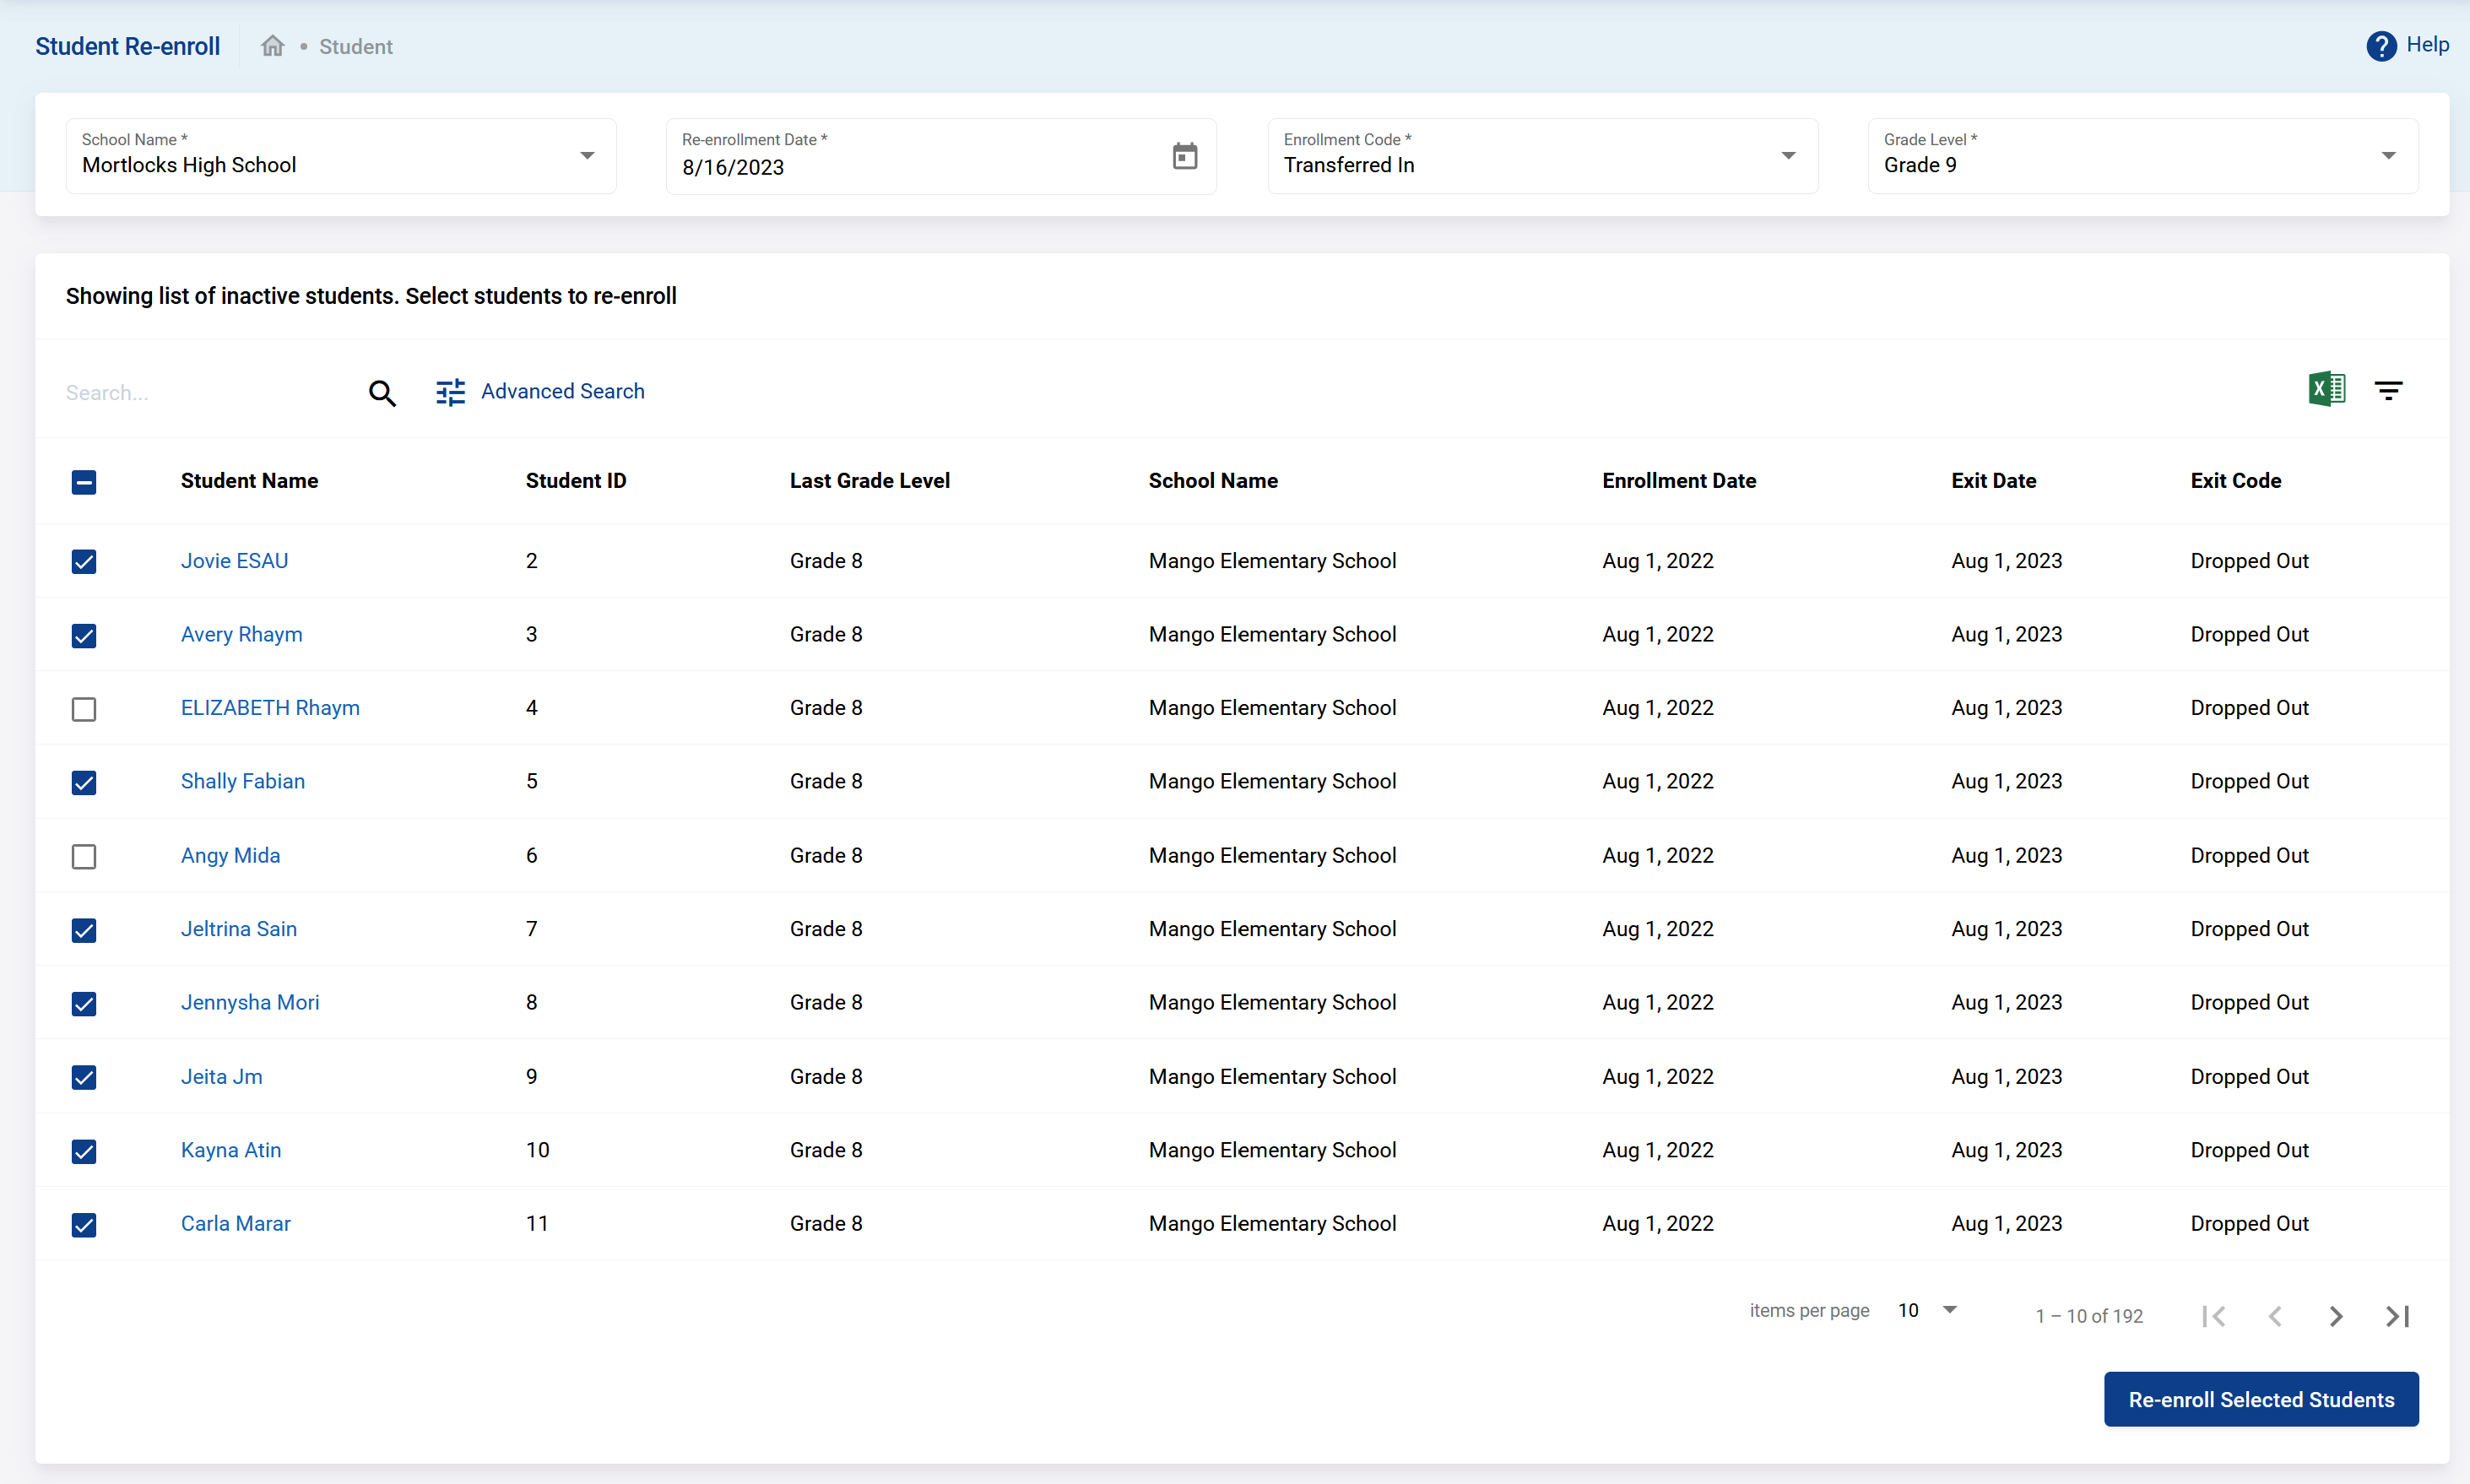
Click on “Re-Enroll Selected Student” and you should see the success feedback below.
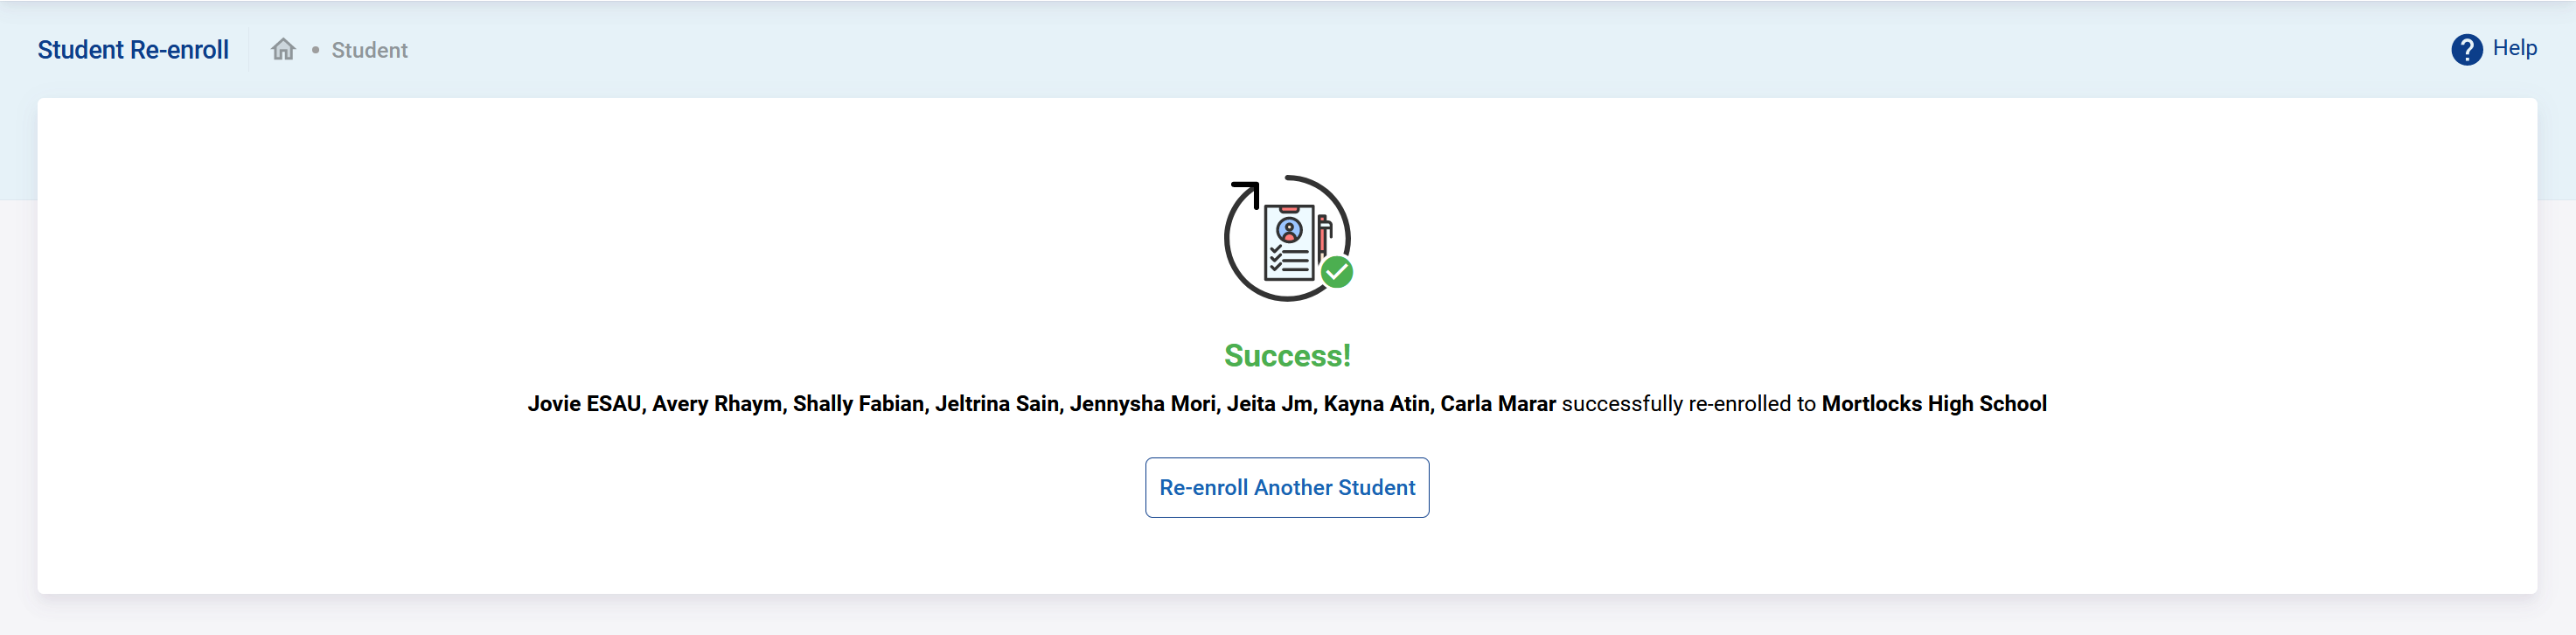
Now if you go and checkout one of those newly re-enrolled students as shown below. You will notice that the enrollment history (and all other data) remains nicely associated with the same student account. And that is the advantage of re-enrolling an existing student versus created a new student account (a duplicate).

Student Setting Rolling/Retention Options
Another data that is important to understand well is the Rolling/Retention Options which is shown in two screenshots below for one student as an example. This is how to tell the system how the student is to progress into the next school year after a rollover. It is an operation that usually you will at the end of each school year.
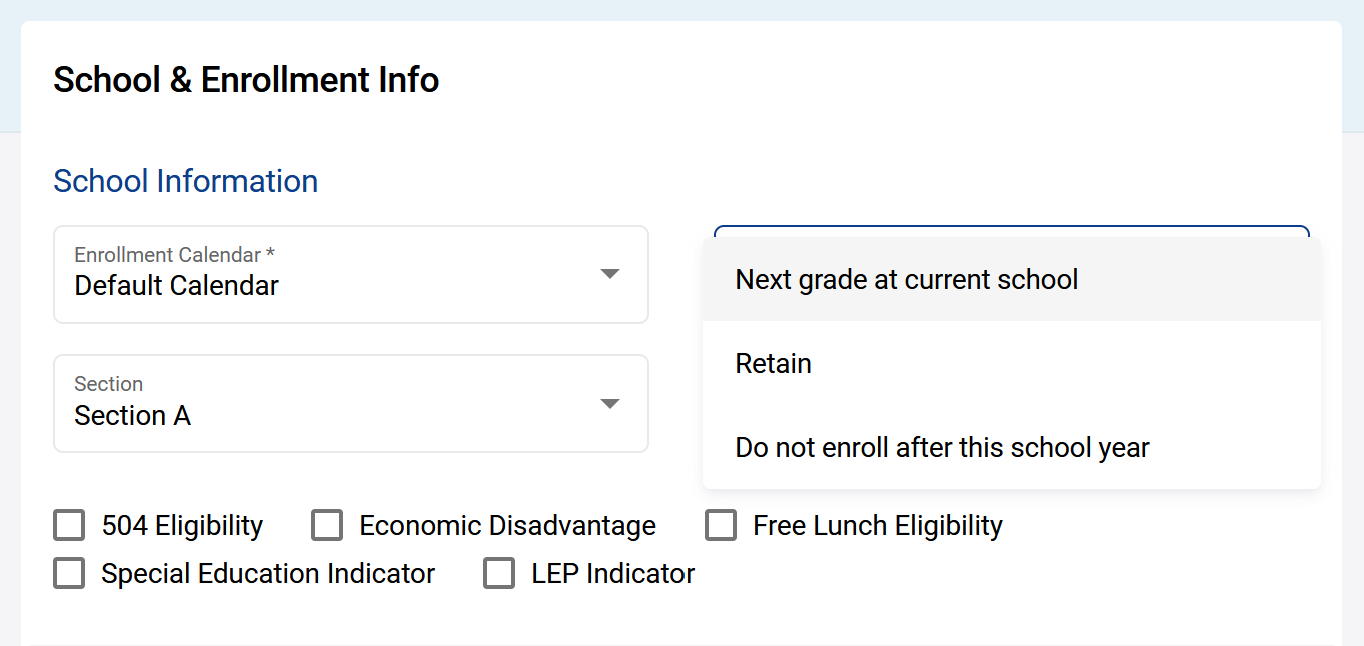
The choices for the Rolling/Retention Options are explained below:
- Next grade at current school: A typical promotion where a student moves on to the next grade (e.g. a student meeting all requirements goes from grade 1 to grade 2 in same school when rolling over). This is the most common and default option.
- Retain: A student repeating would be retained in the same grade (e.g. a student in grade 1 repeating will remain in grade 1 in the same school after rollover)
- Do not enroll after this school year: The student either does not promote or is set to move to another school (e.g. all grade 8 students from an elementary school going to another high school)
Now, setting this Rolling/Retention Options for each student in the school individually would take a long time. A better approach if to use the Group Assign Student Info feature as detailed in https://docs.pacific-emis.org/doku.php?id=sis_user_manual#student_group_assign_info.
The recommended approach is to do the following:
- Group Assign Student Info to set all the graduating students to Do not enroll after this school year. For example, you could do a search in the Group Assign Student Info window for all Grade 8 students. Select them all and set the Rolling/Retention Options to Do not enroll after this school year.
- Group Assign Student Info to set all the repeating students to Retain.
Courses
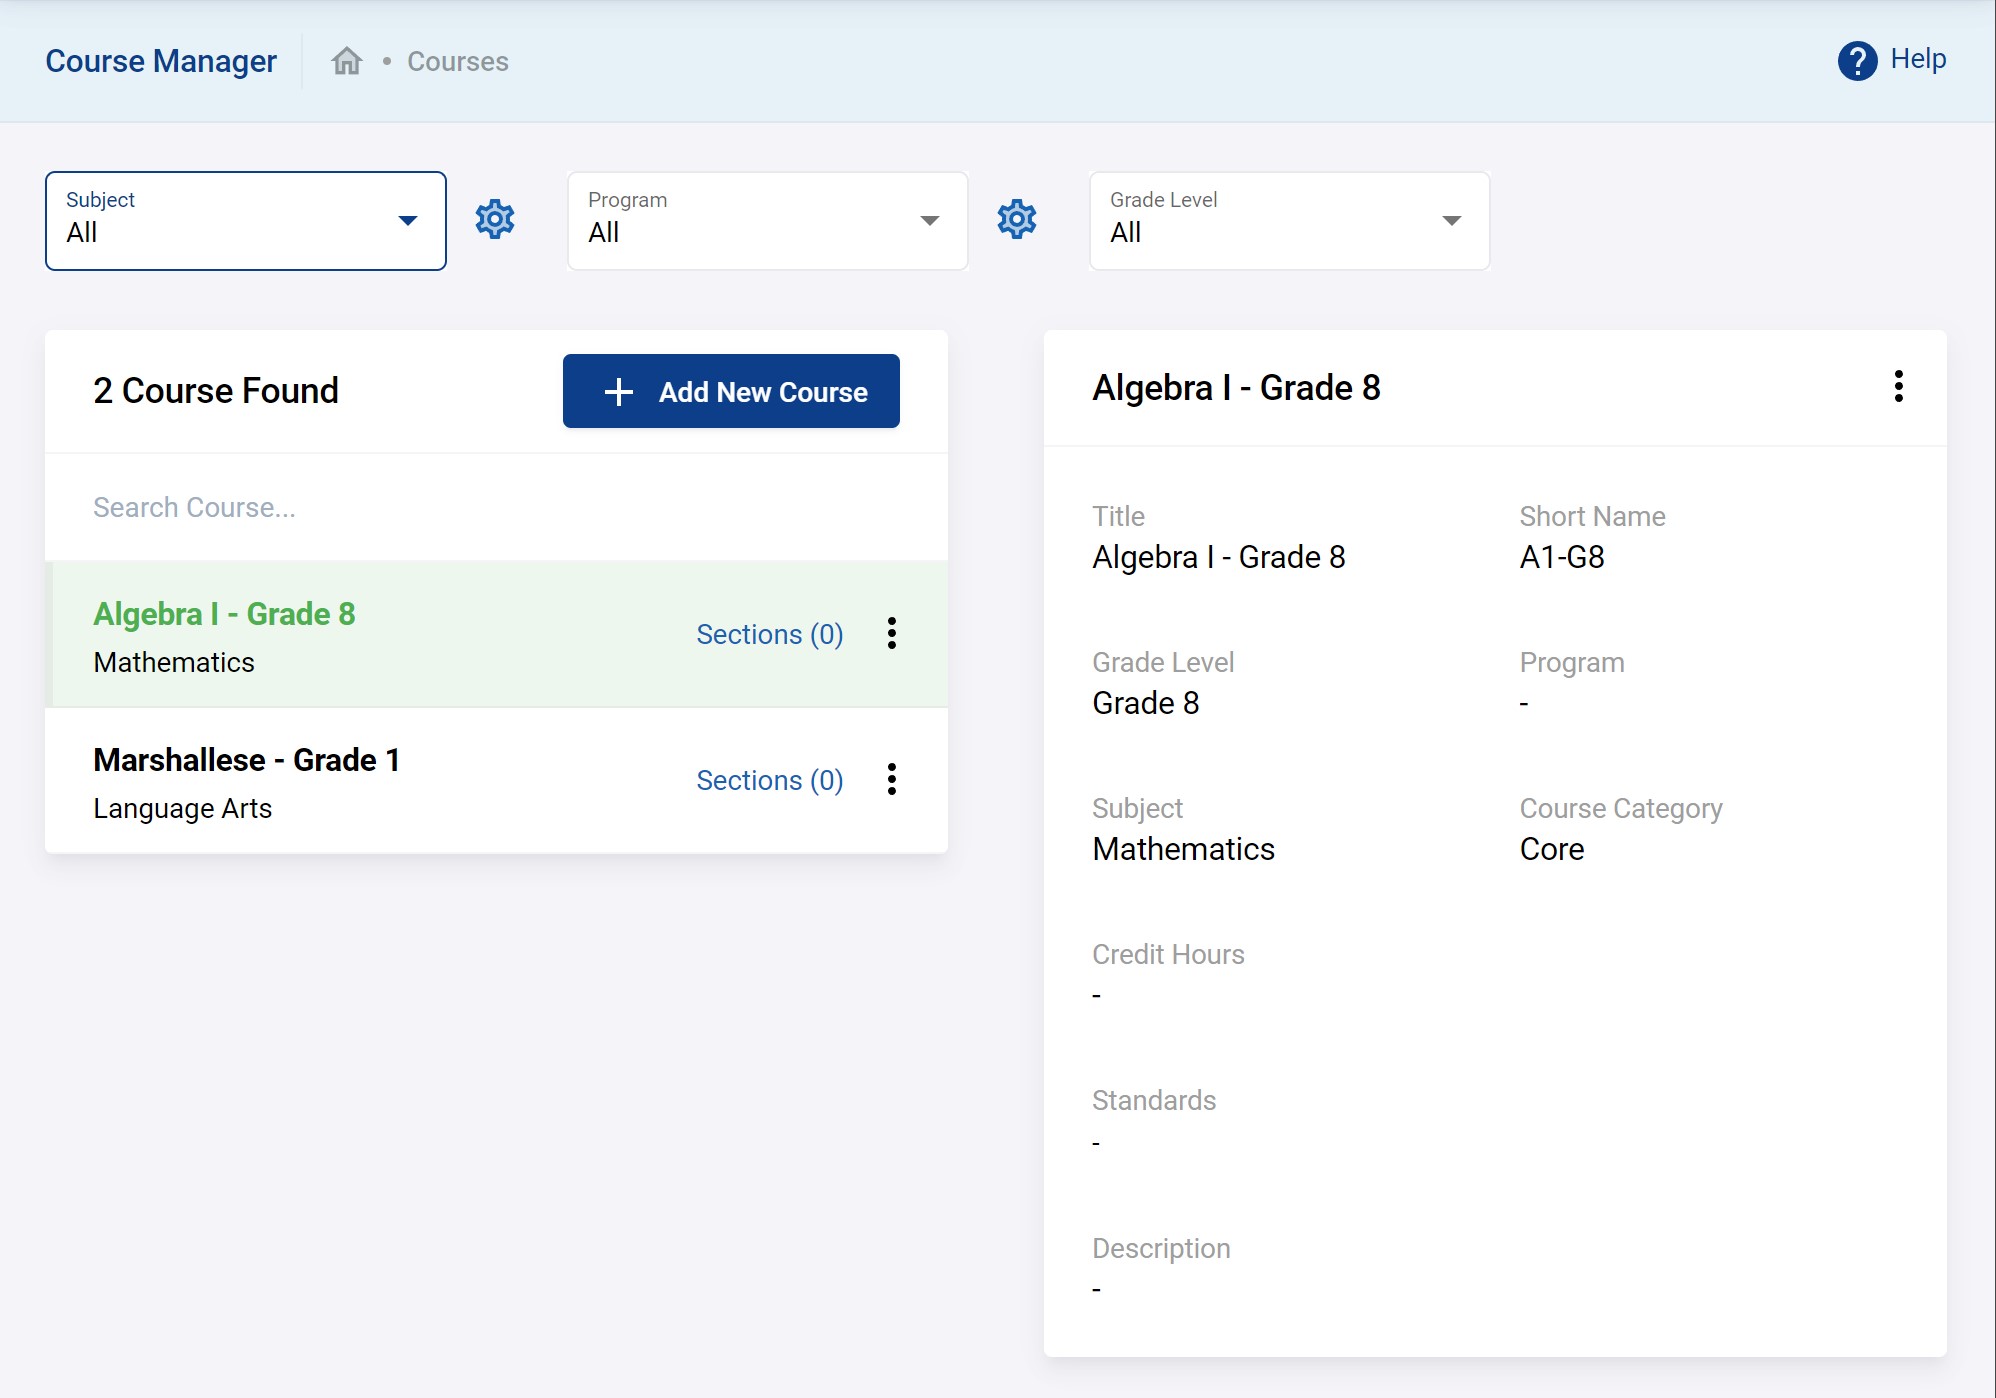
Course Manager
To be able to assign students and teachers to courses you must create courses. You do this in Courses → Course Manager. Courses can be organized by the following
- Subjects: think of subject as simply a high level way to organize your areas of study (e.g. Mathematics, Arts, Social Sciences)
- Program: optionally you could organize courses into Program (often used in larger schools and learning institutions)
- Grade Level: mostly used to filter courses by grade levels
To create a new course click on Add New Course.
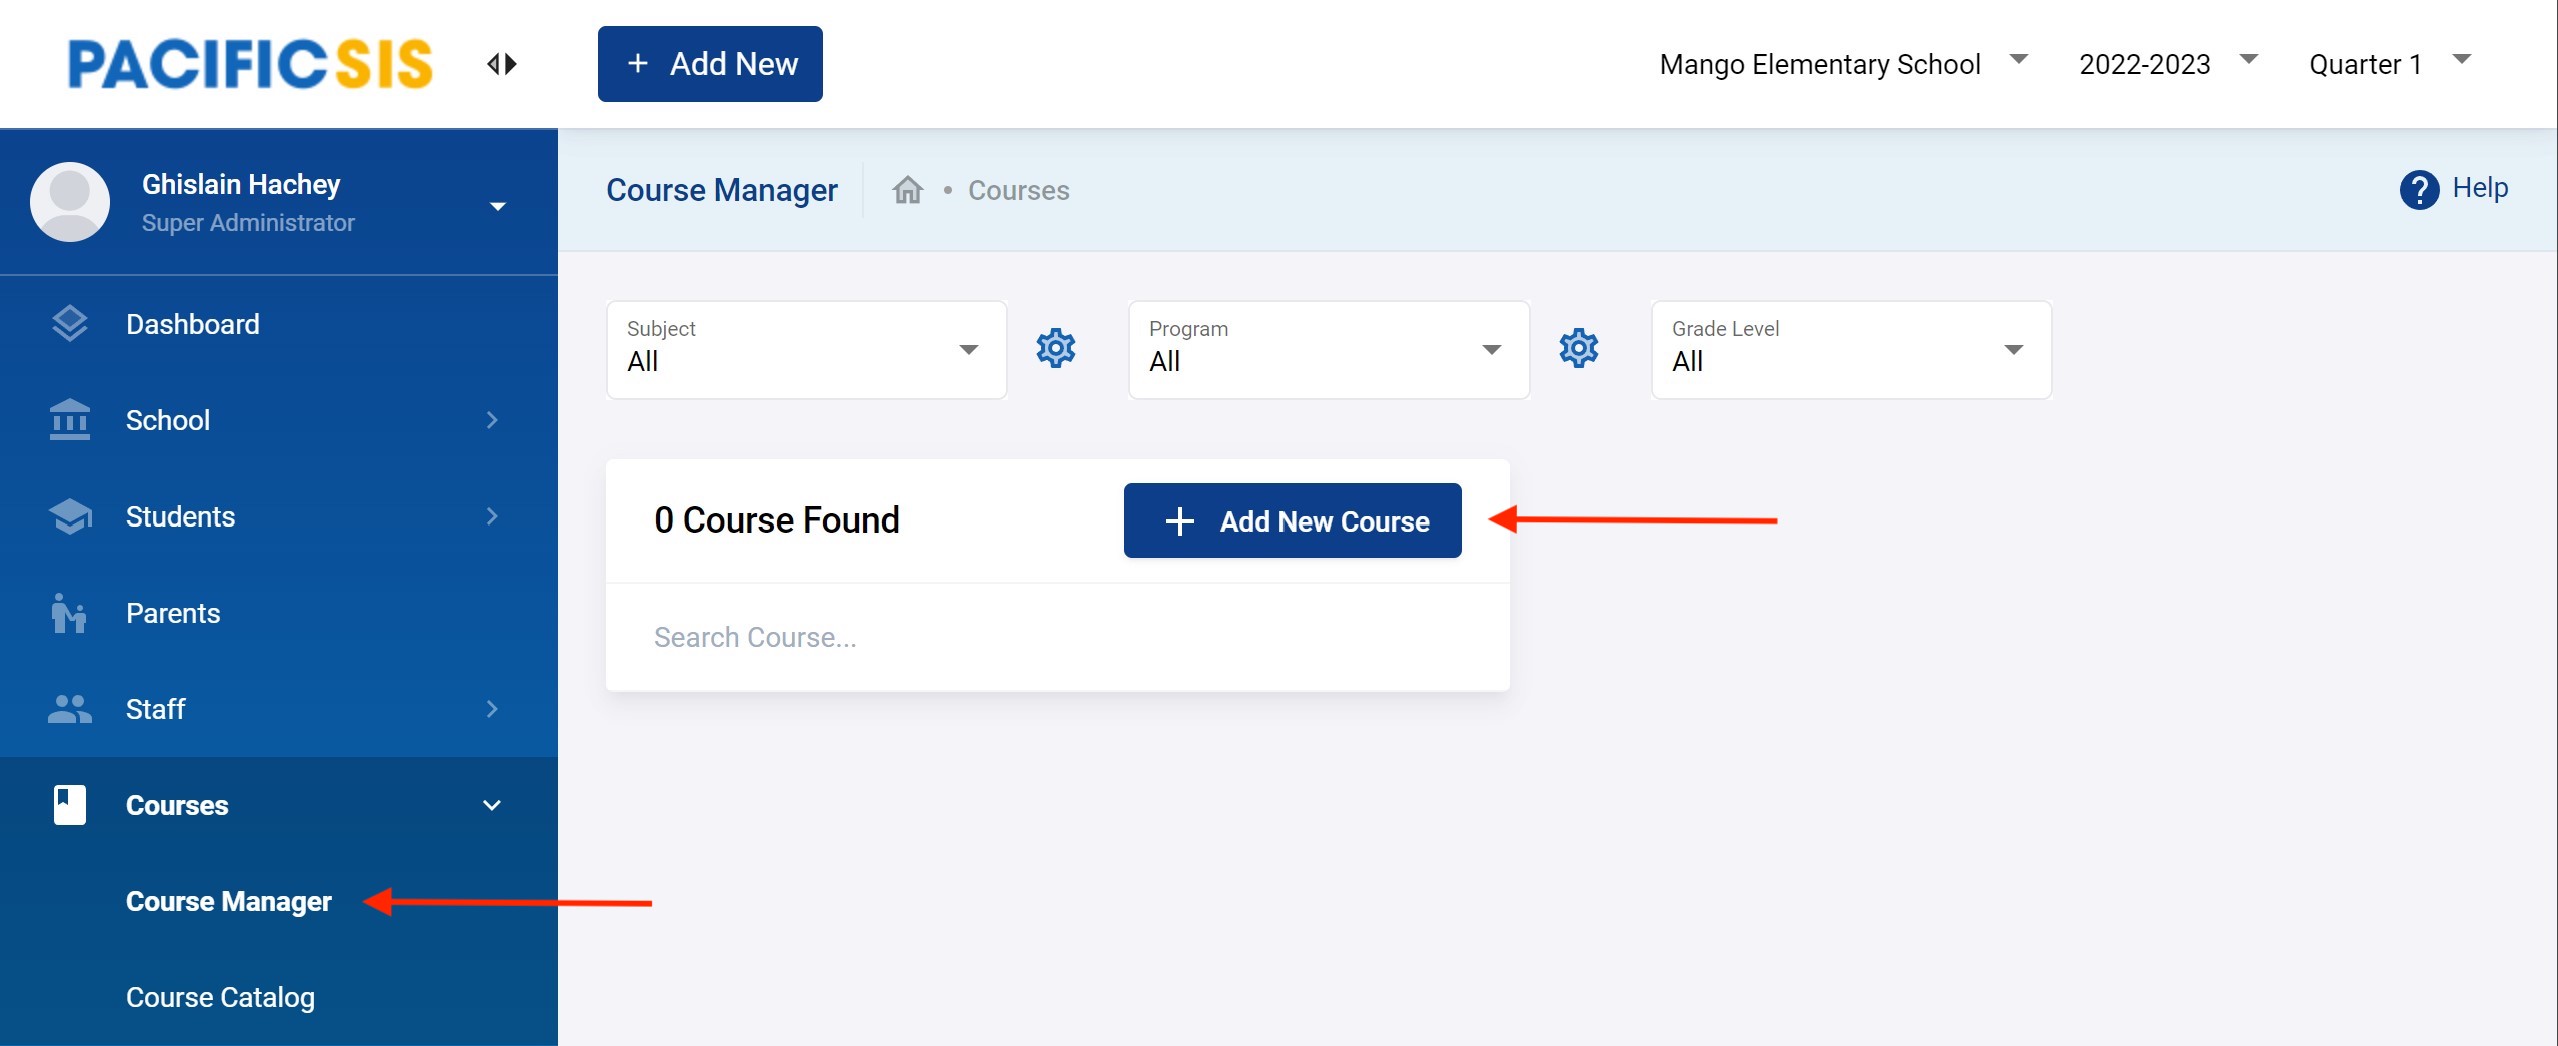
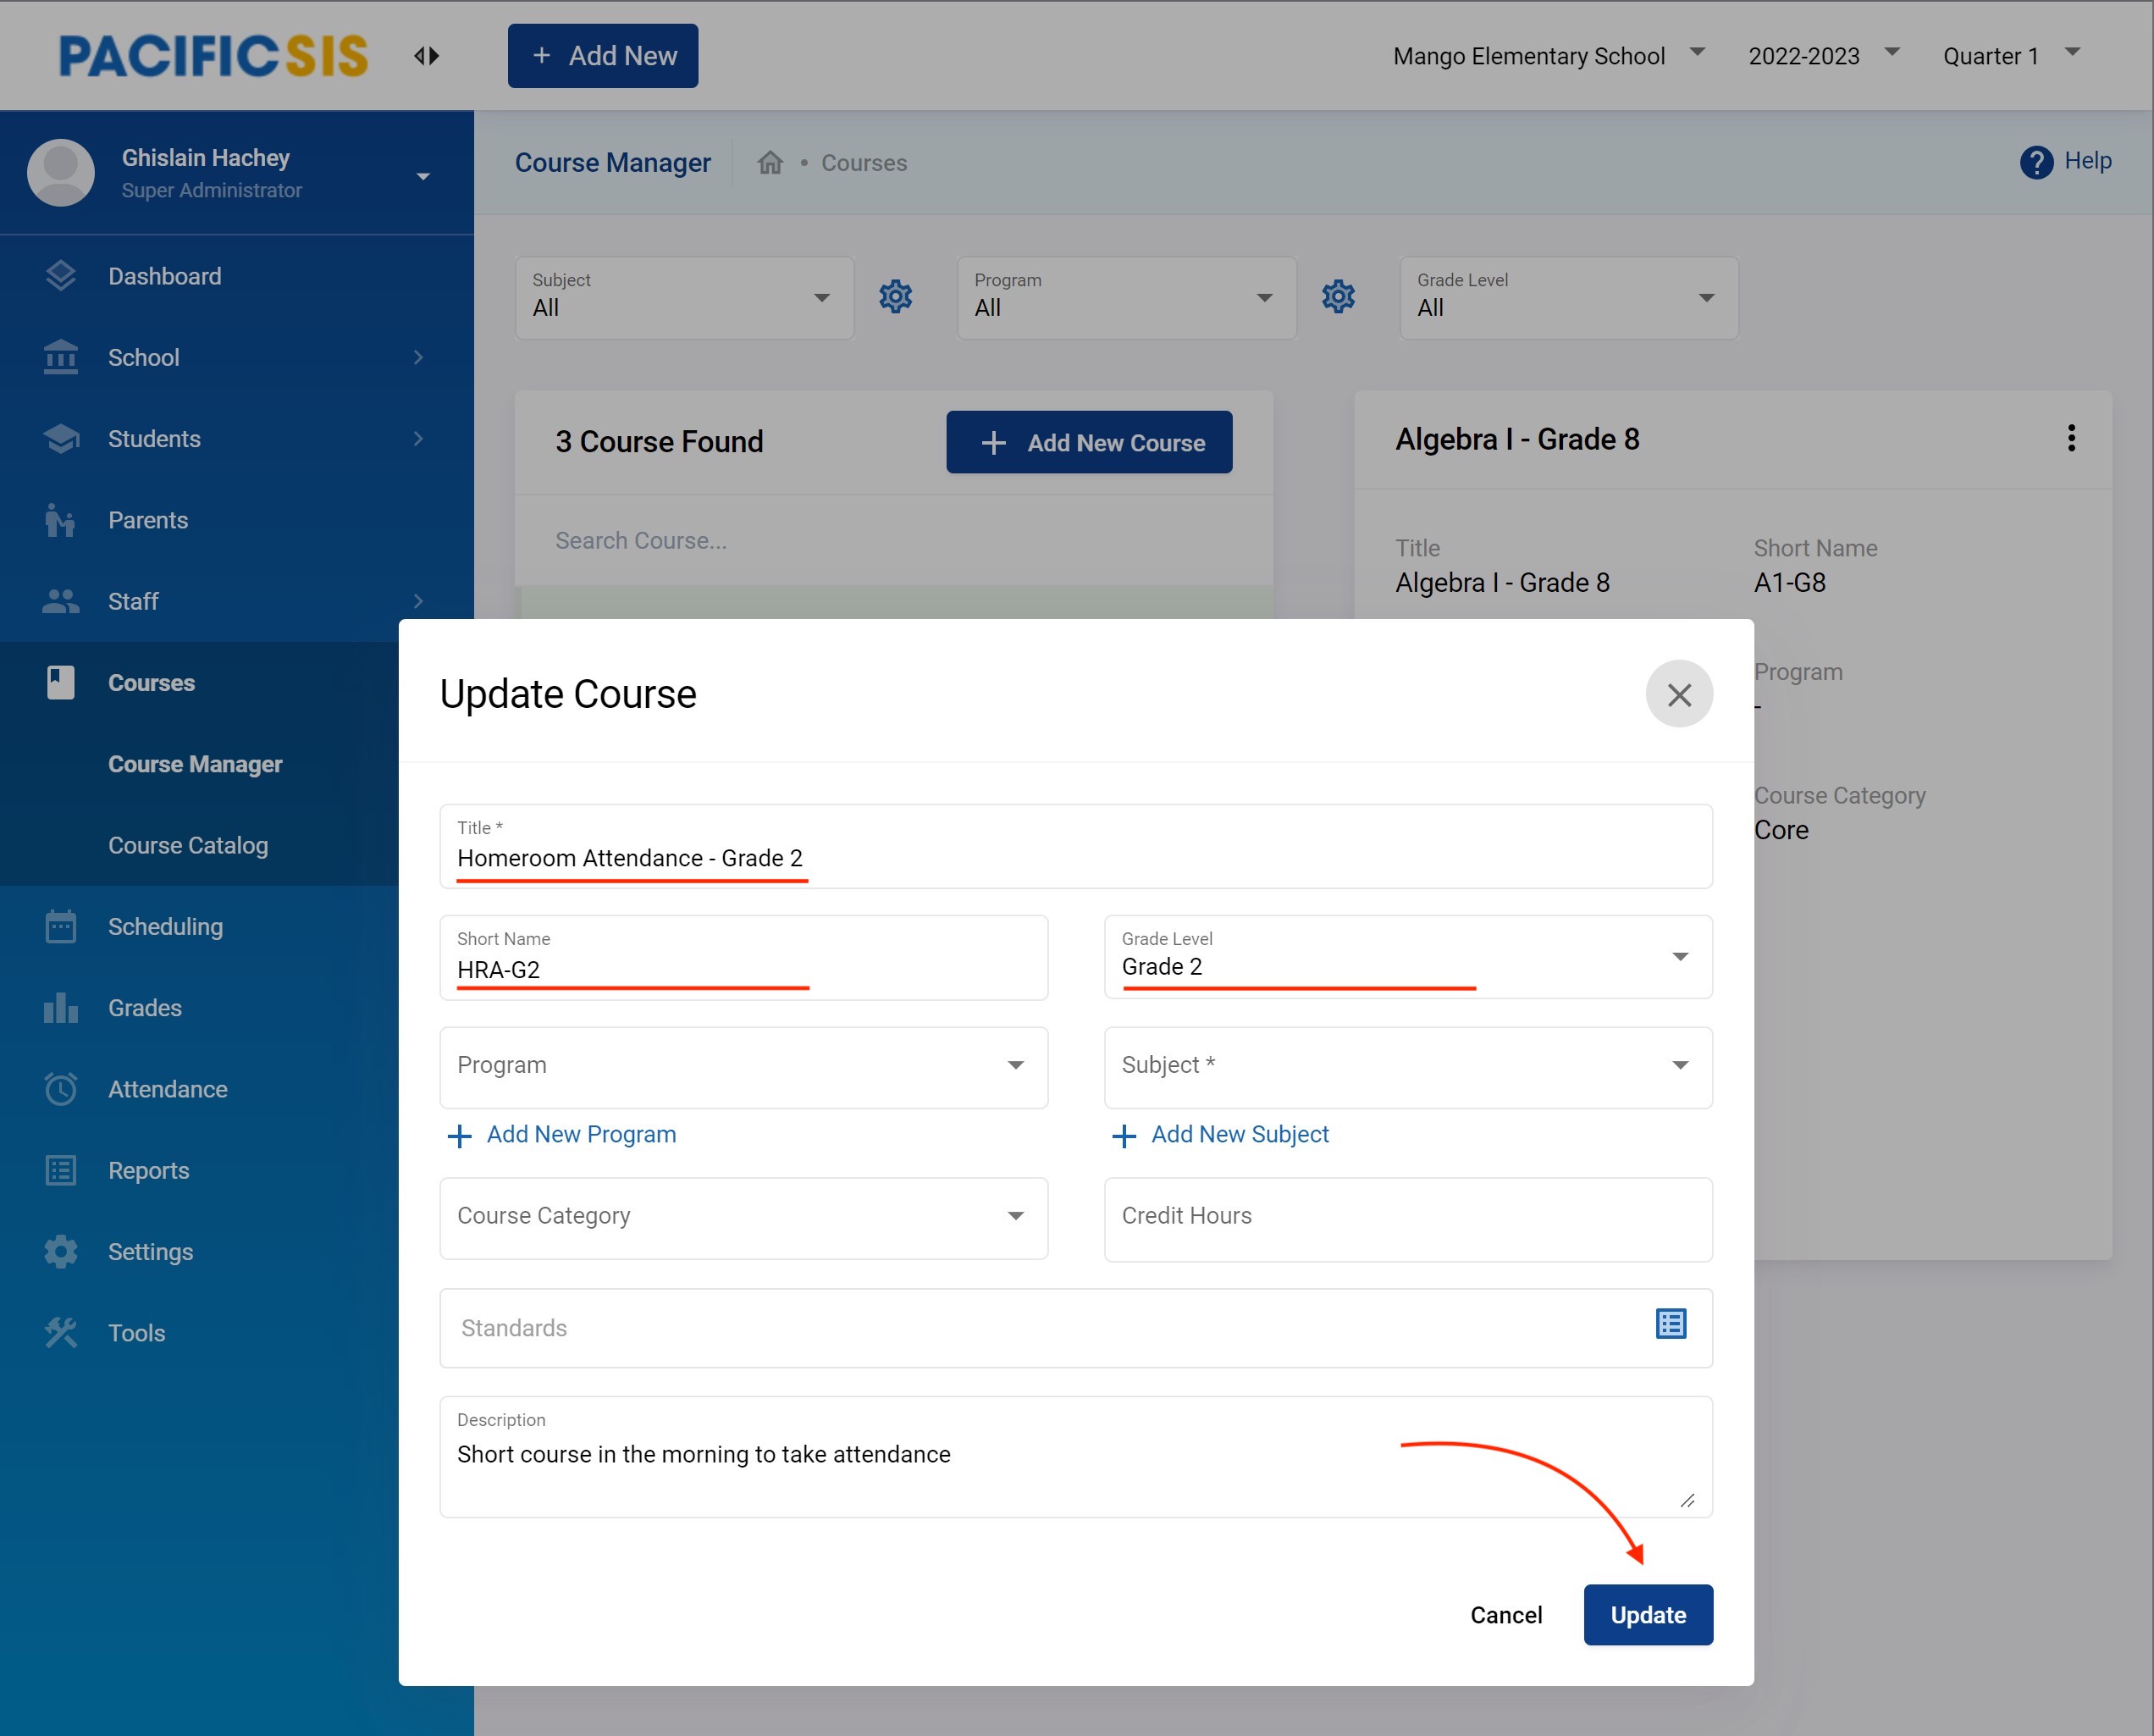
You create your new course by filling up the details as shown below. The most important data to enter is underlined in red. In particular, the Subject may or may not exist. If you already have a subject satisfactory you can simply select it, if not, you can create it right there directly.
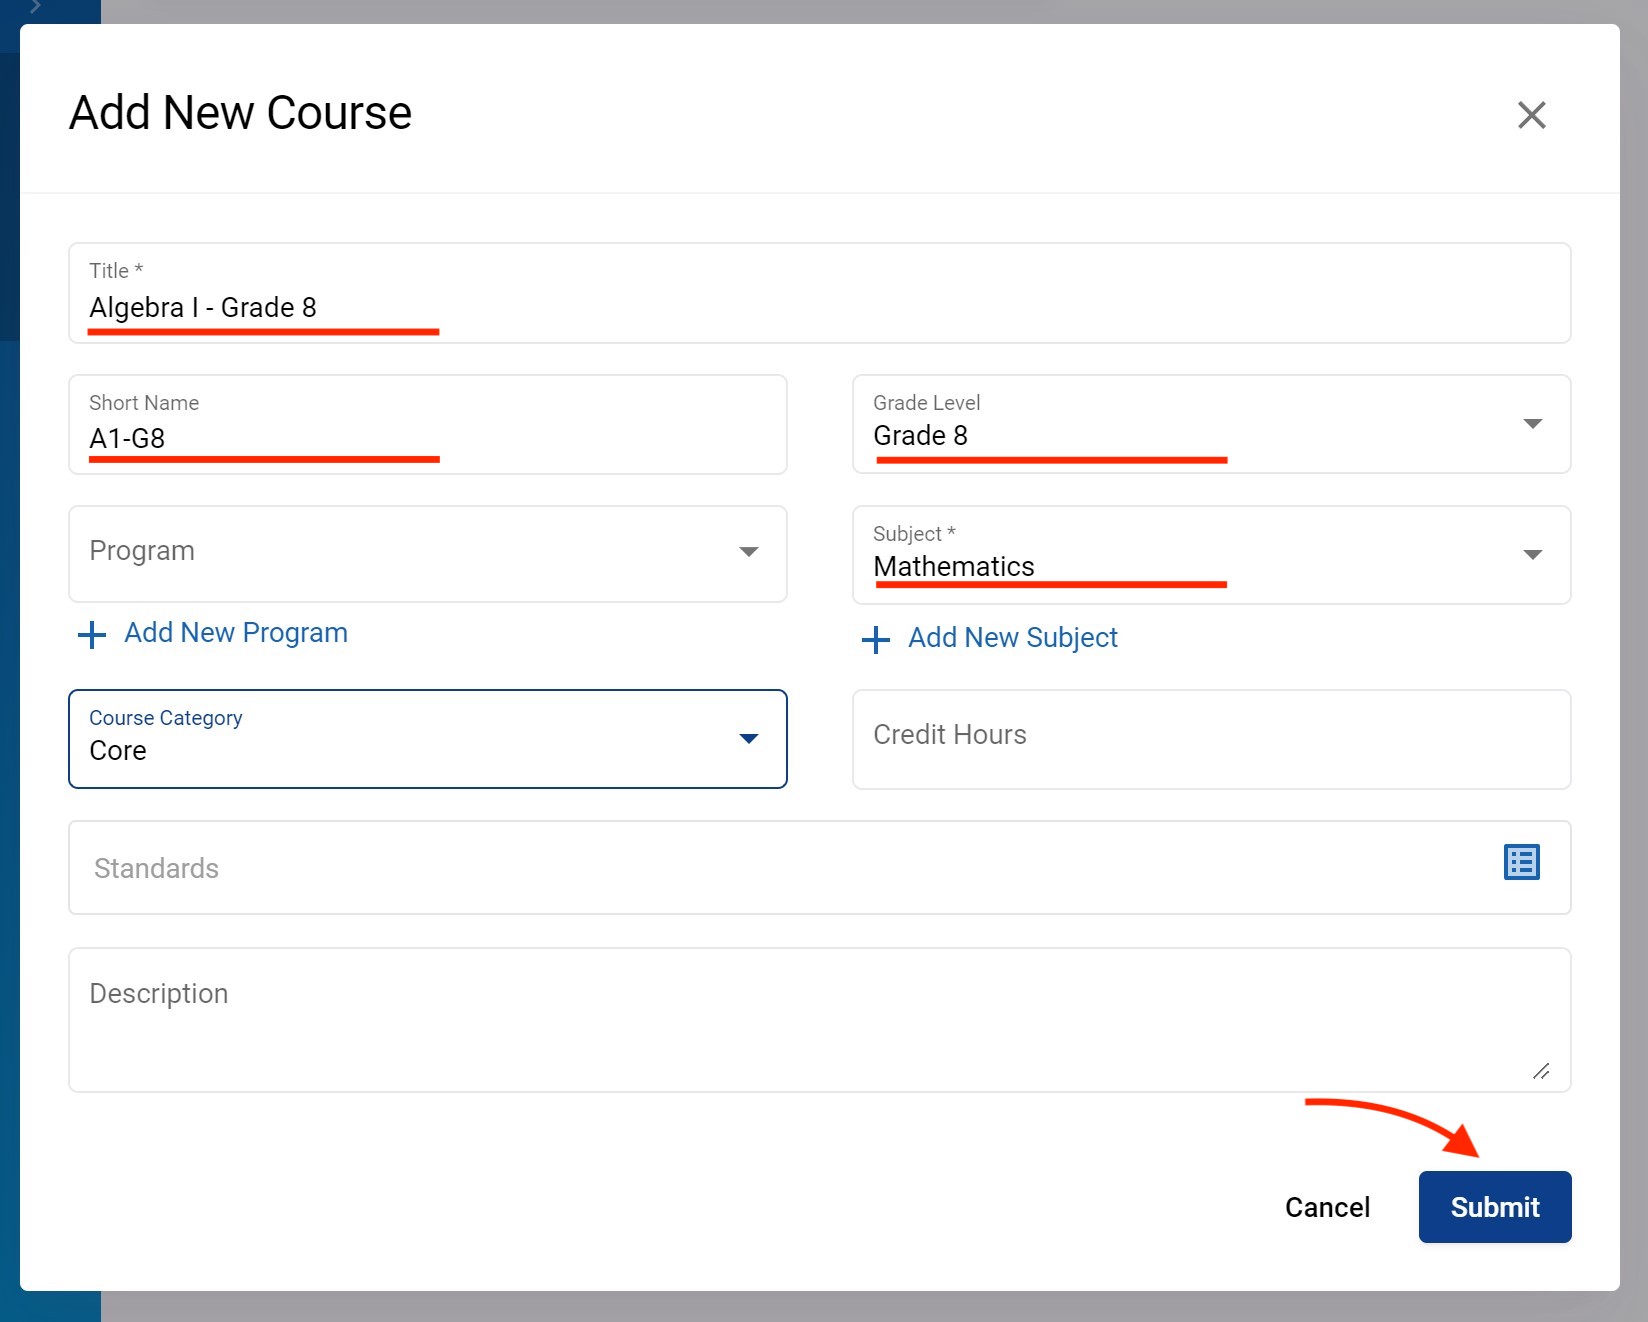
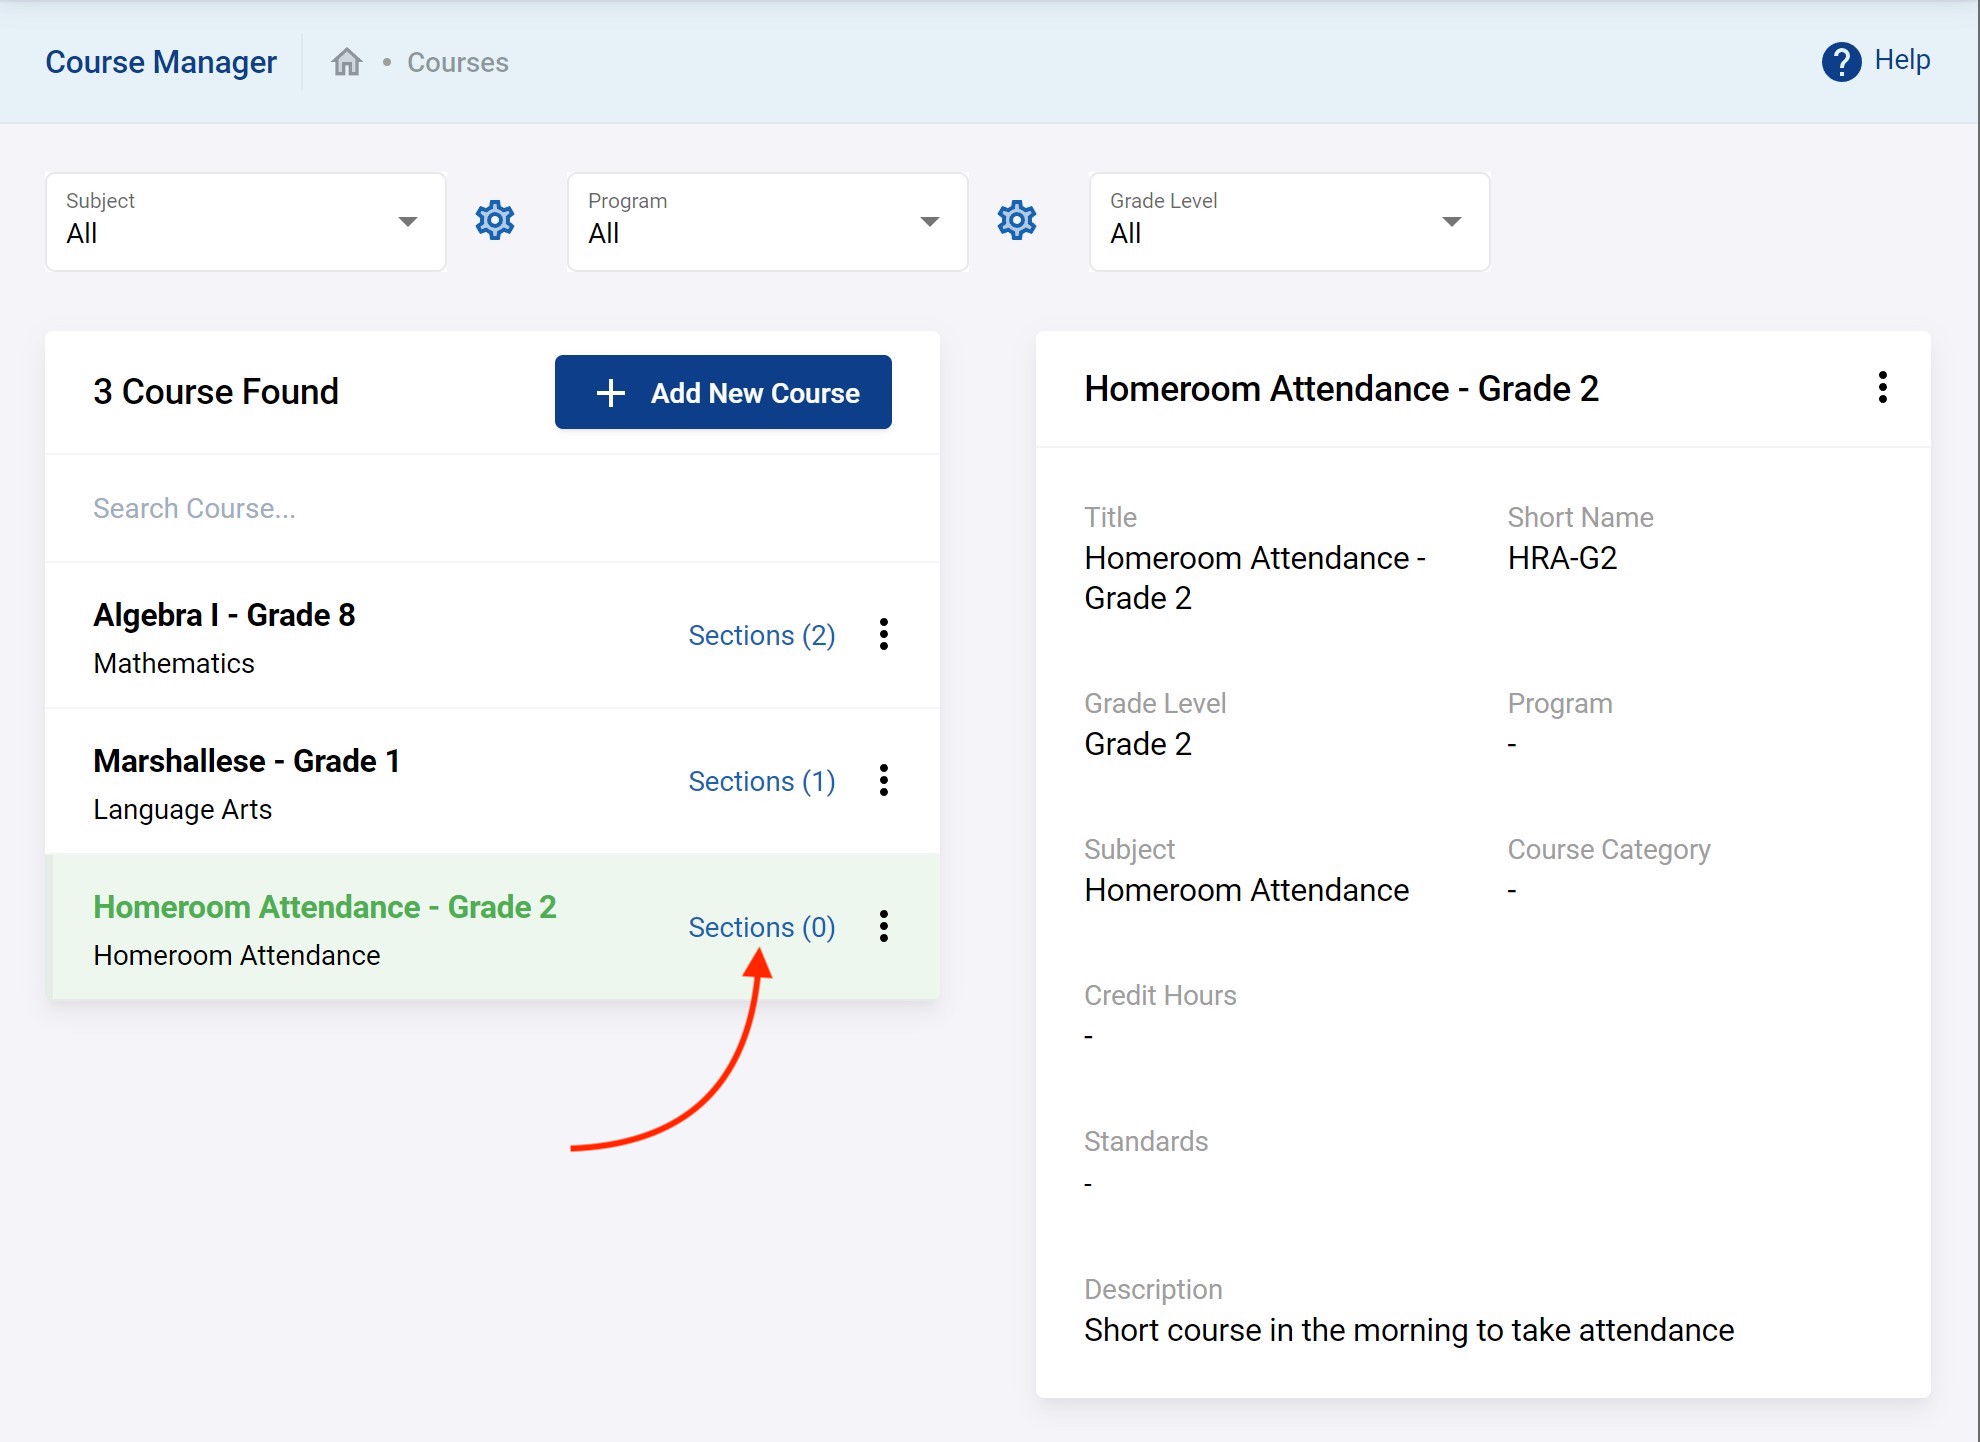
Once you Submit your course you should return to the list of courses which should look like below.
We'll create one more course.
Now we should have two course as shown below.
At this point you have entered the courses but what happens if you have more then one teacher teaching the same course in two different classrooms and periods? For this, the concept of course section is used. Think of a course section as an instance of a course. A course section is where you can provide all the additional details of a course like where it will take place (i.e. which classroom), when it will take place (which day, which period, etc.)
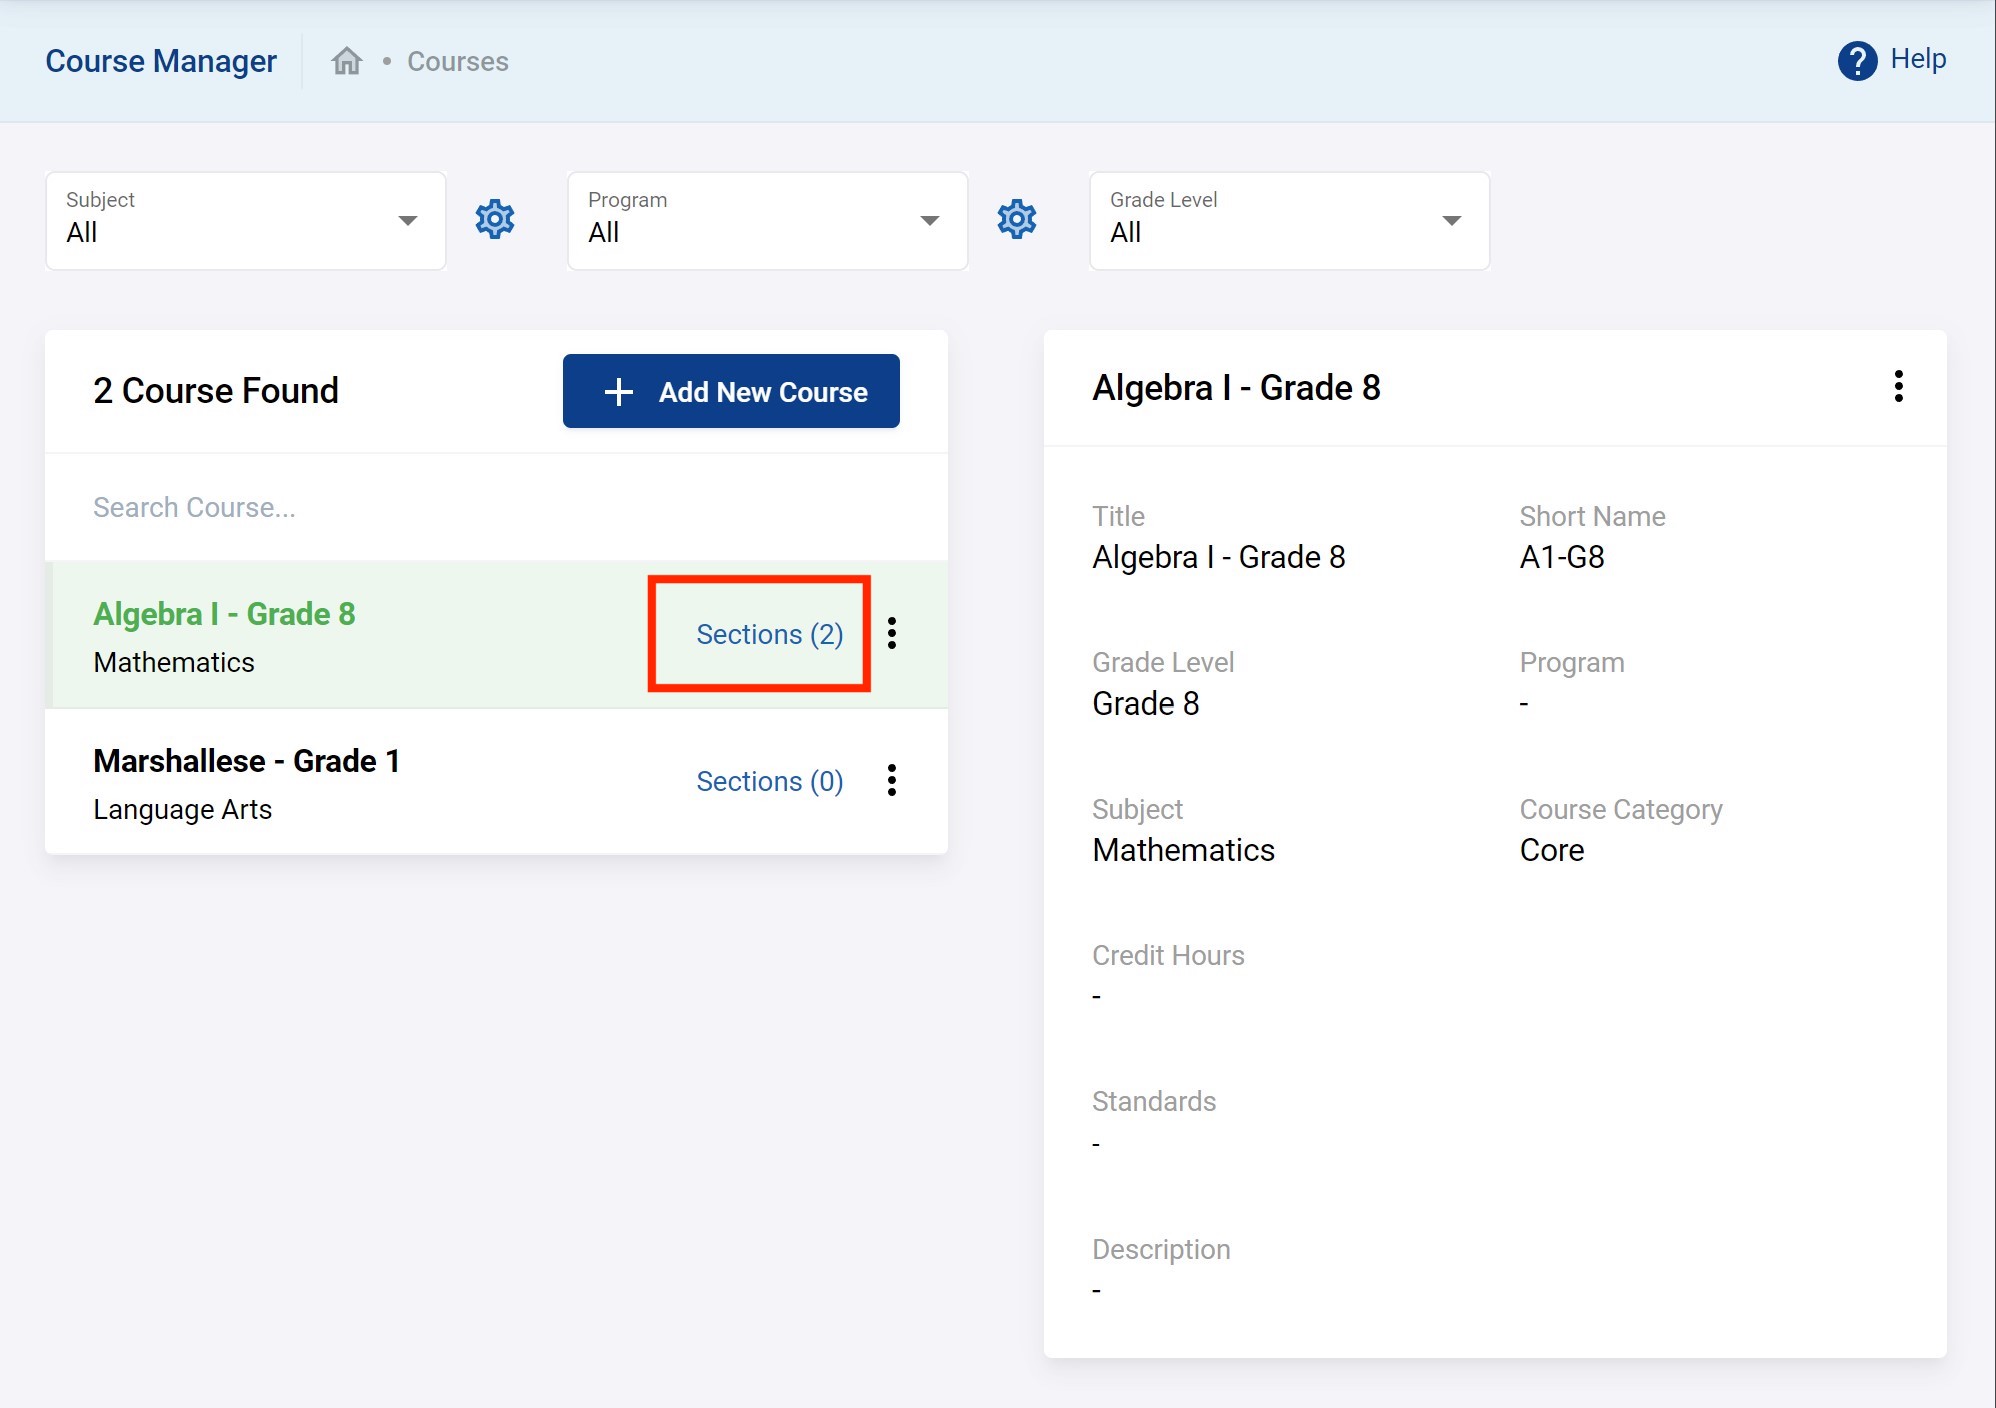
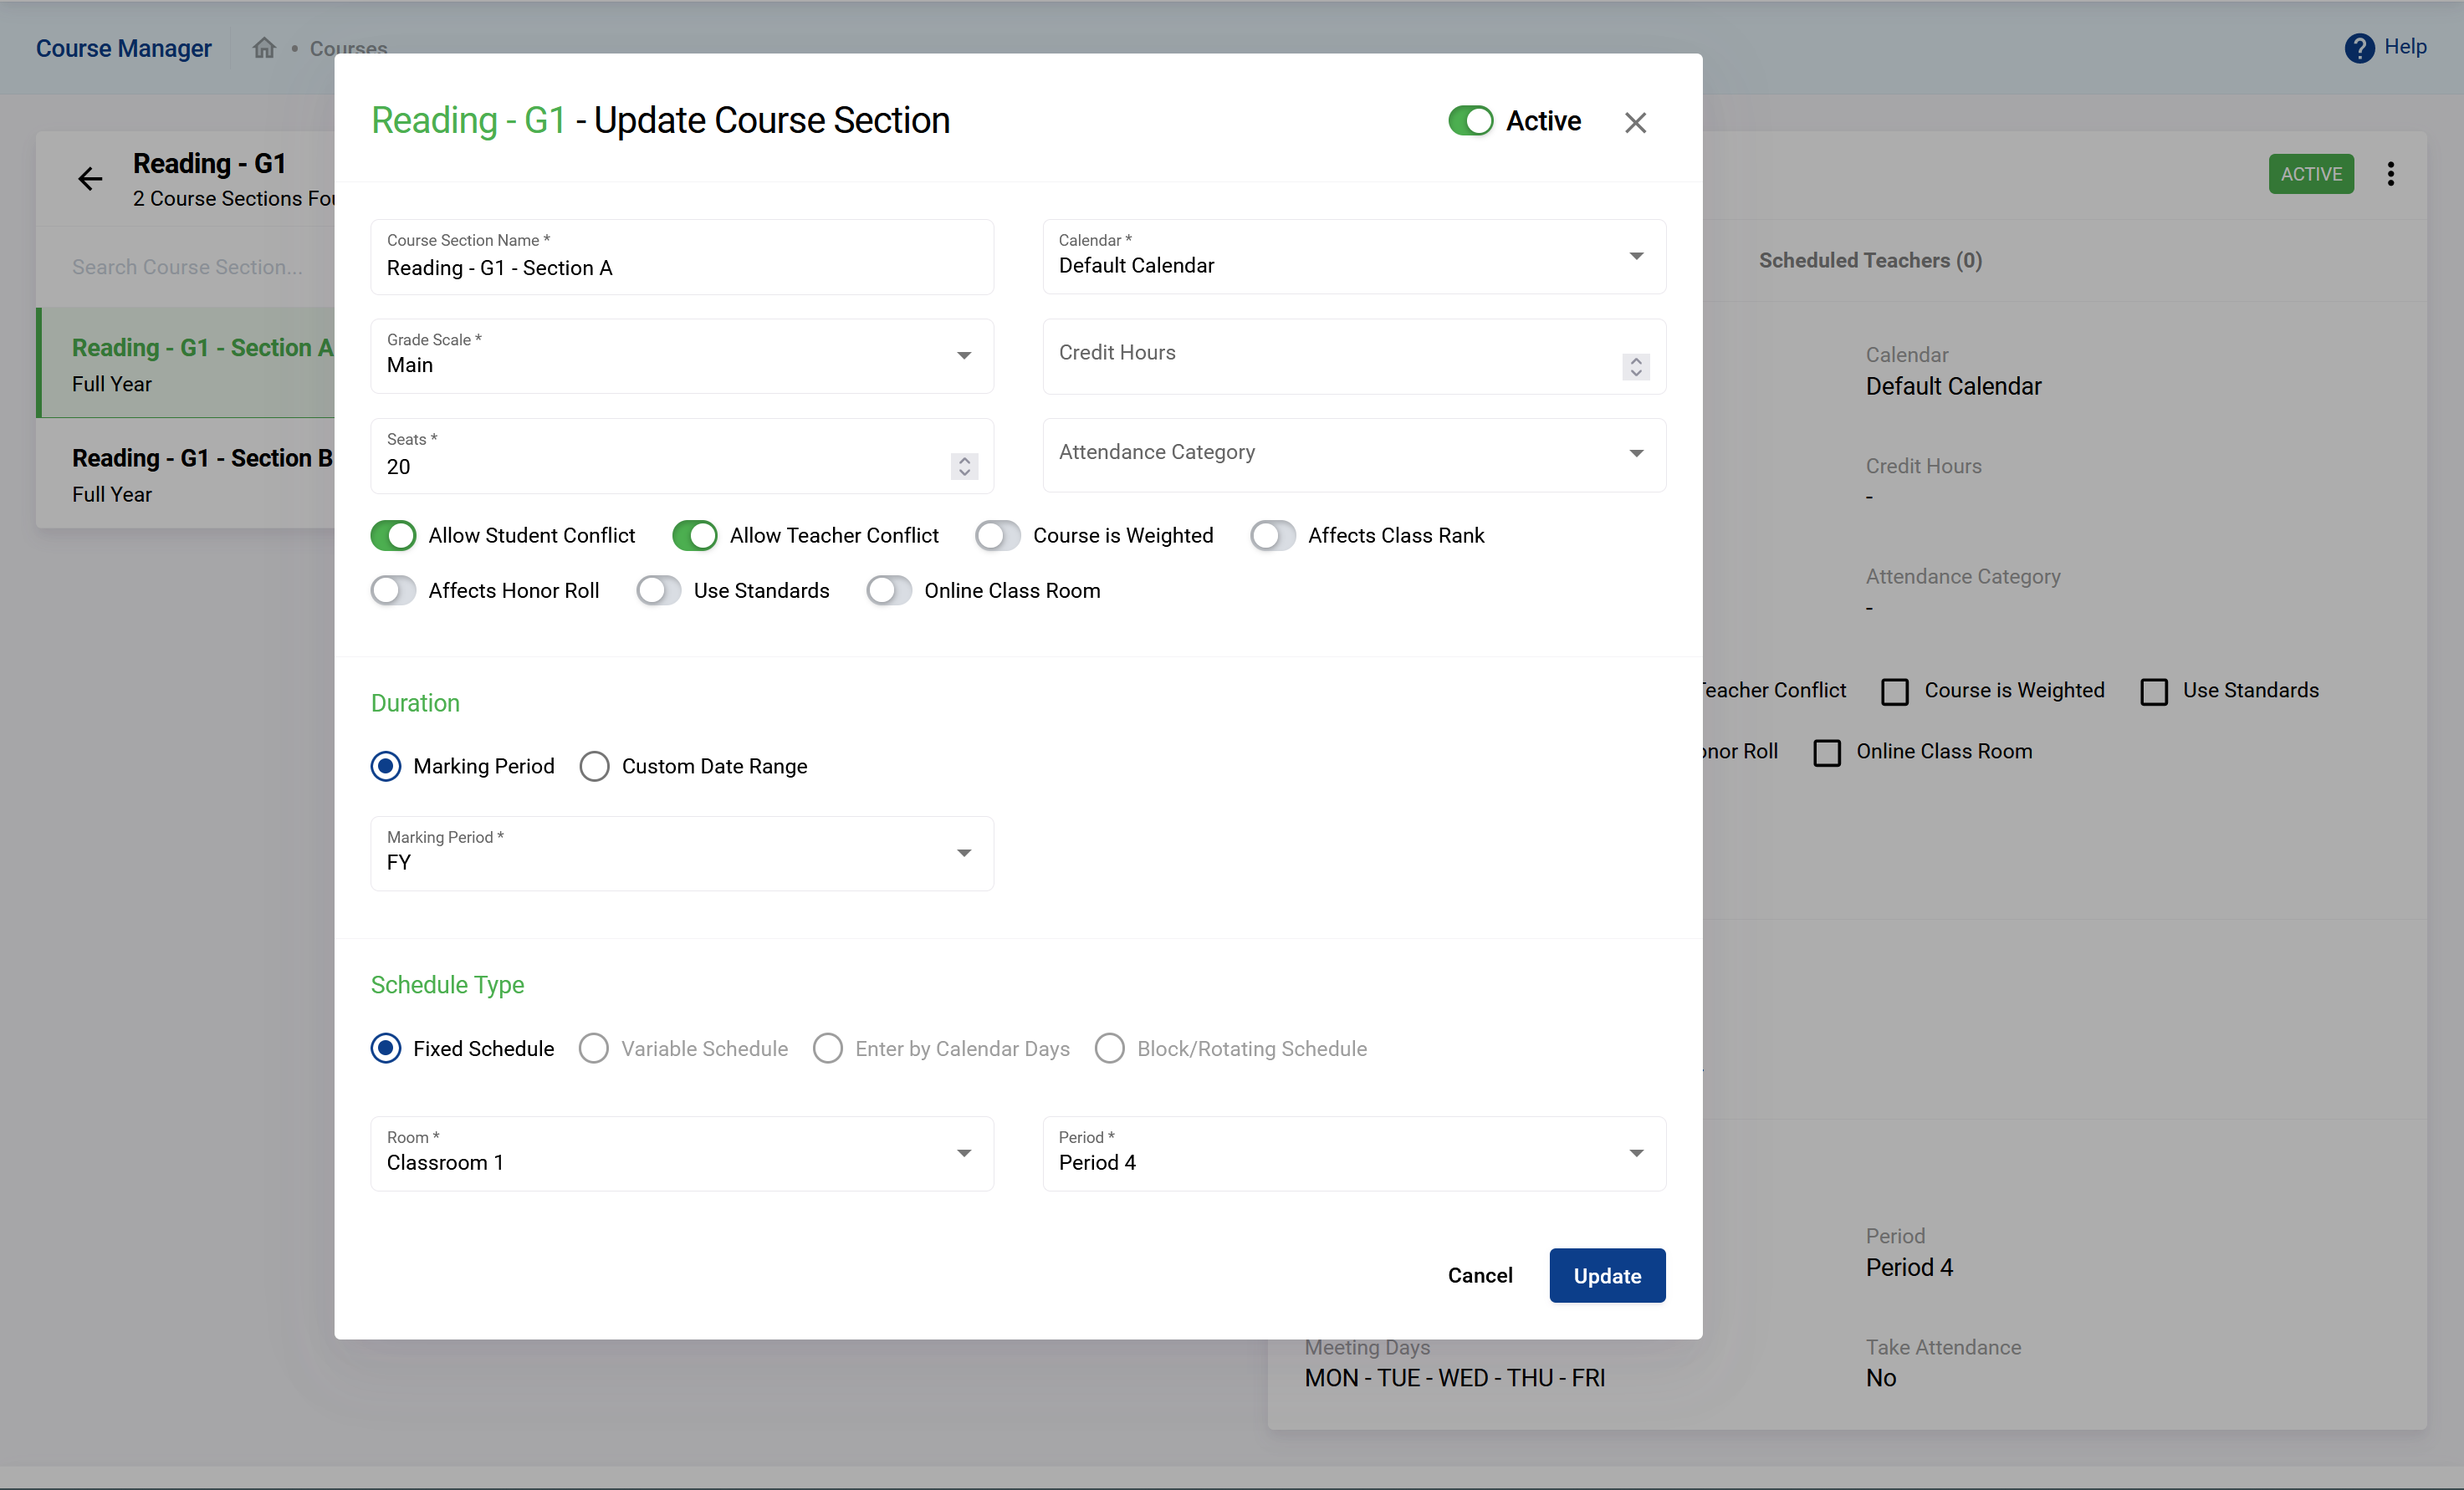
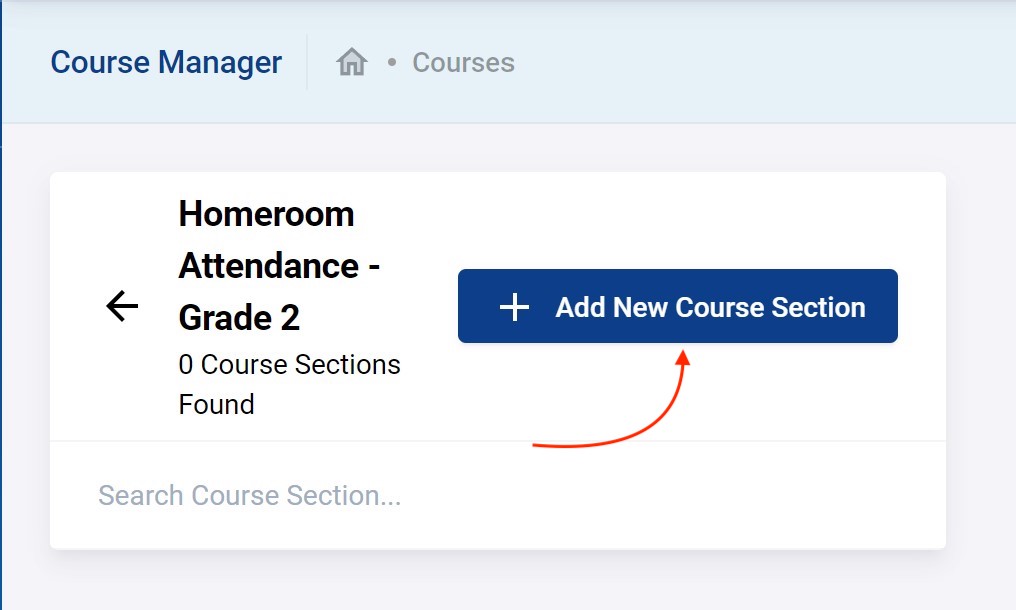
For example, we will have Algebra I - Grade 8 taught in two different classrooms by two different teachers. We need two course sections. Simply click on Sections for the course Algebra I - Grade 8. You will see the following where you can click on Add New Course Section.

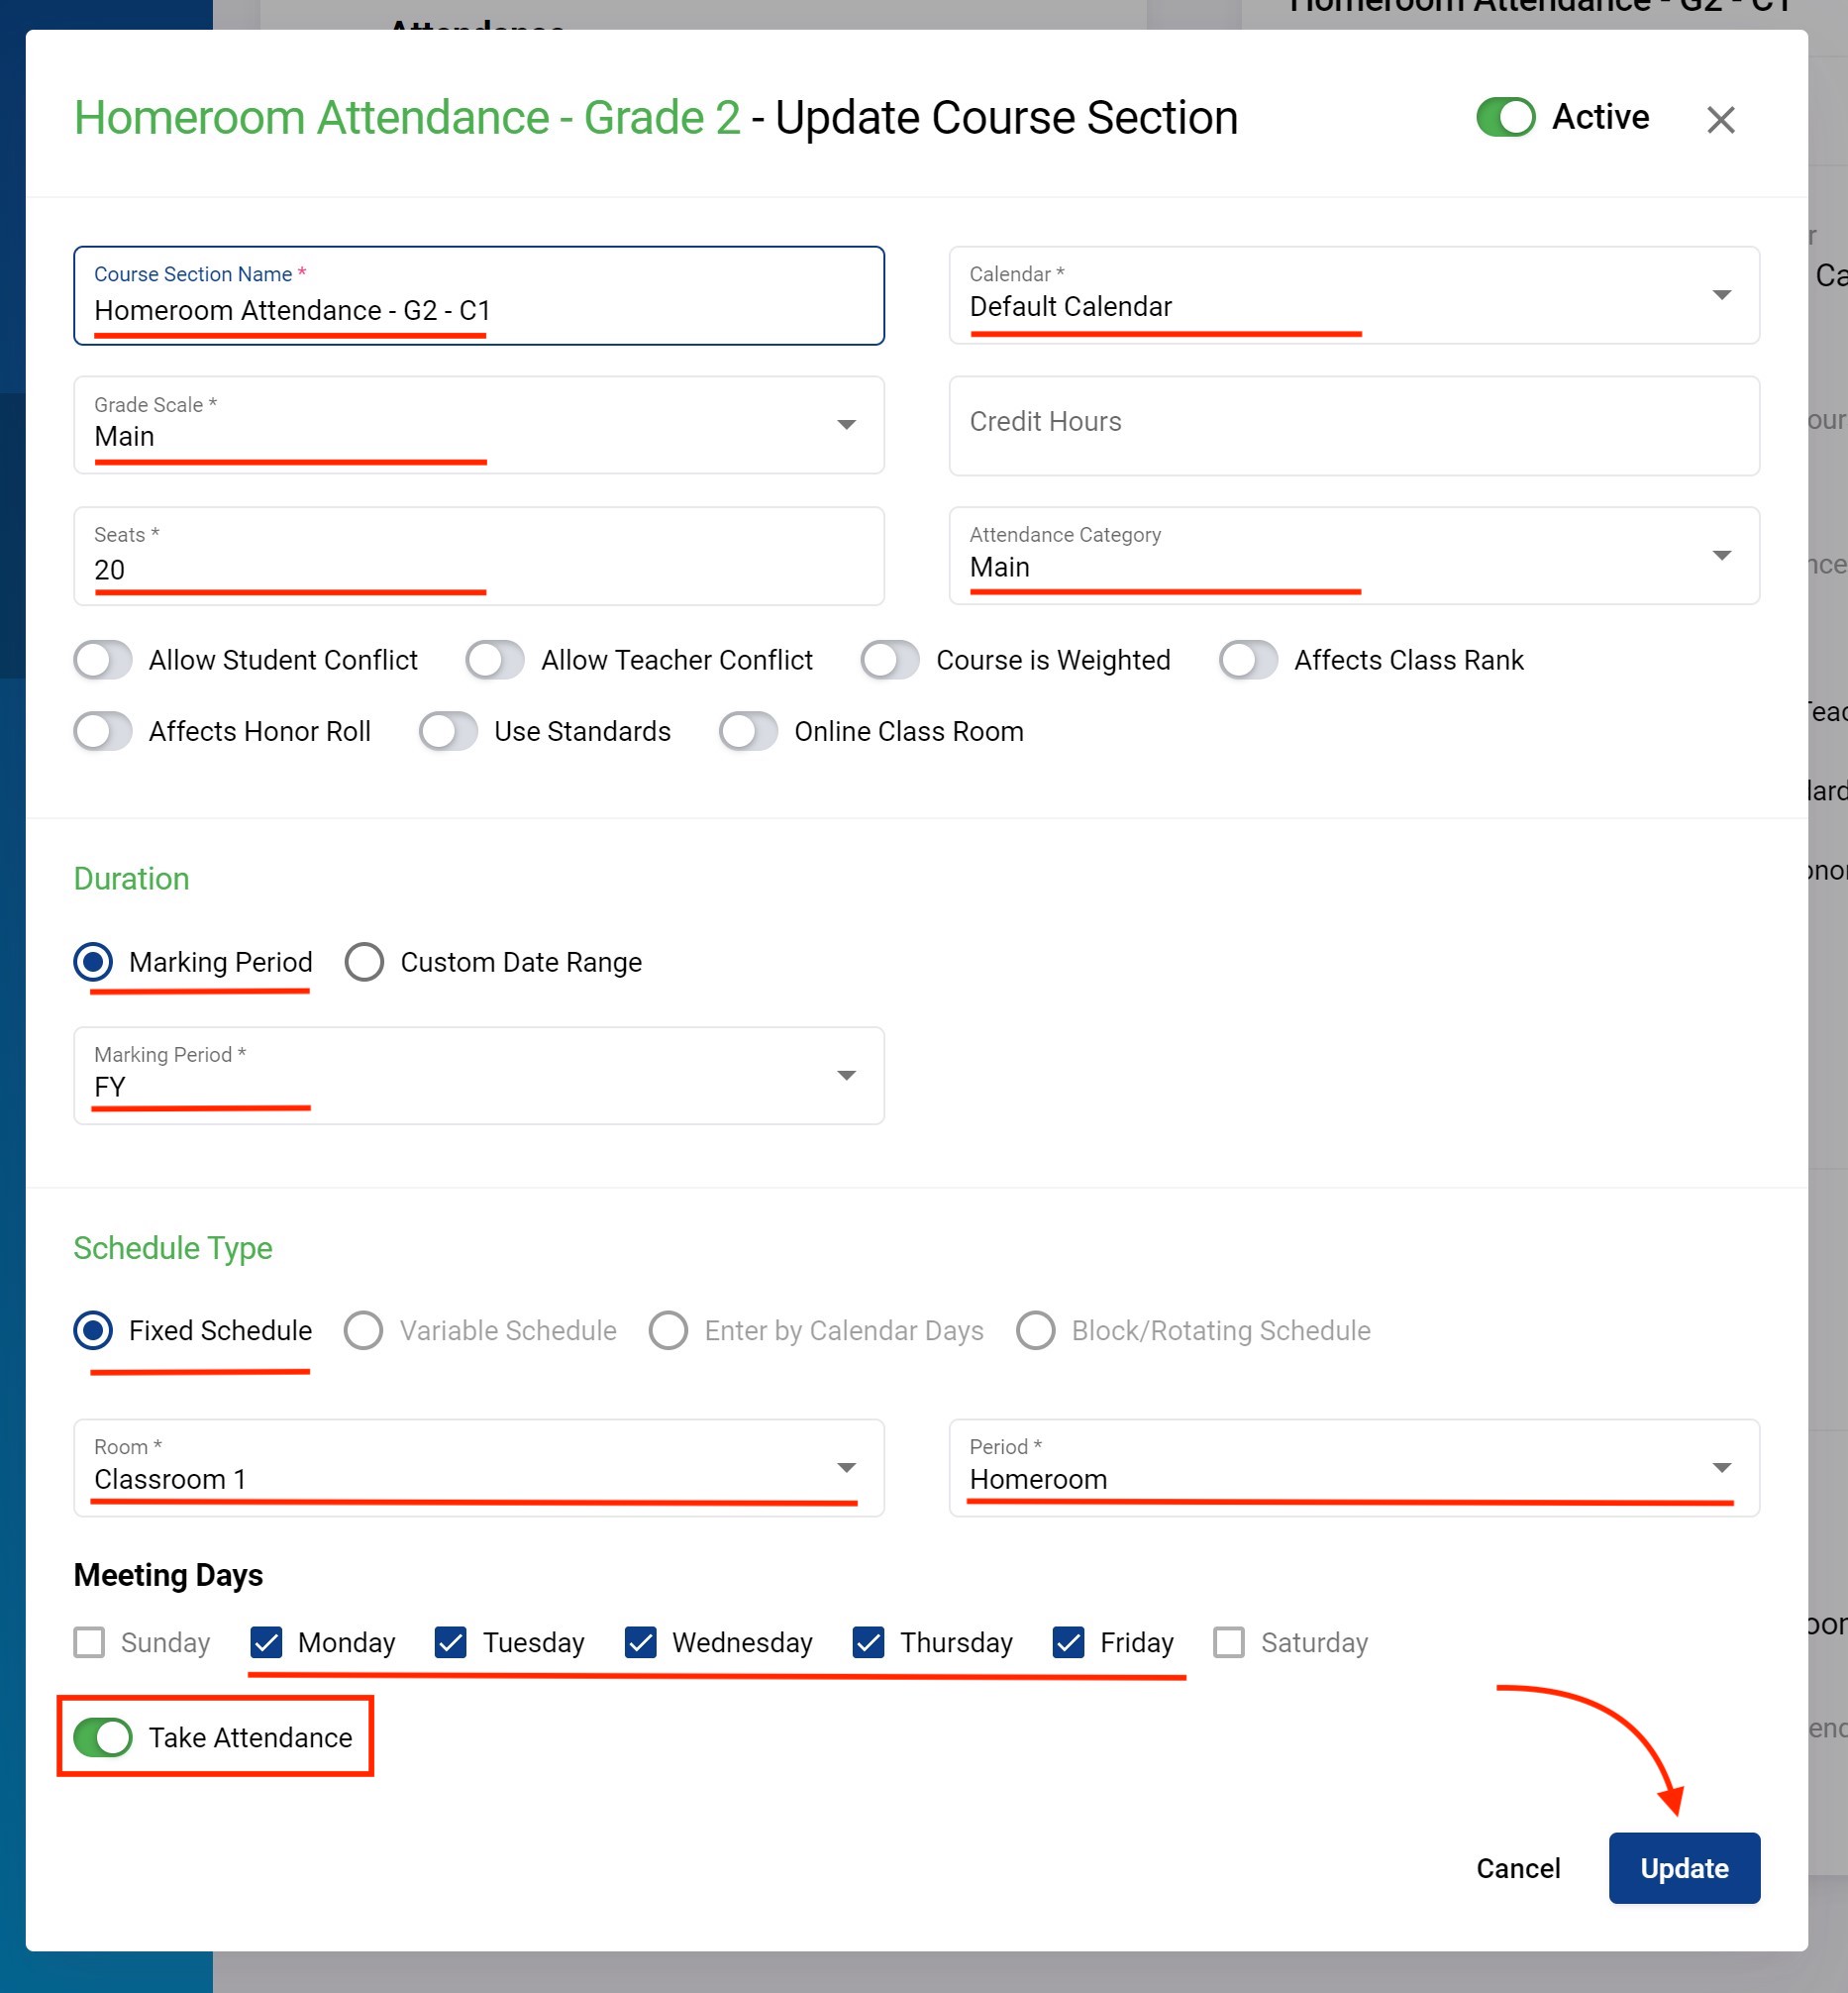
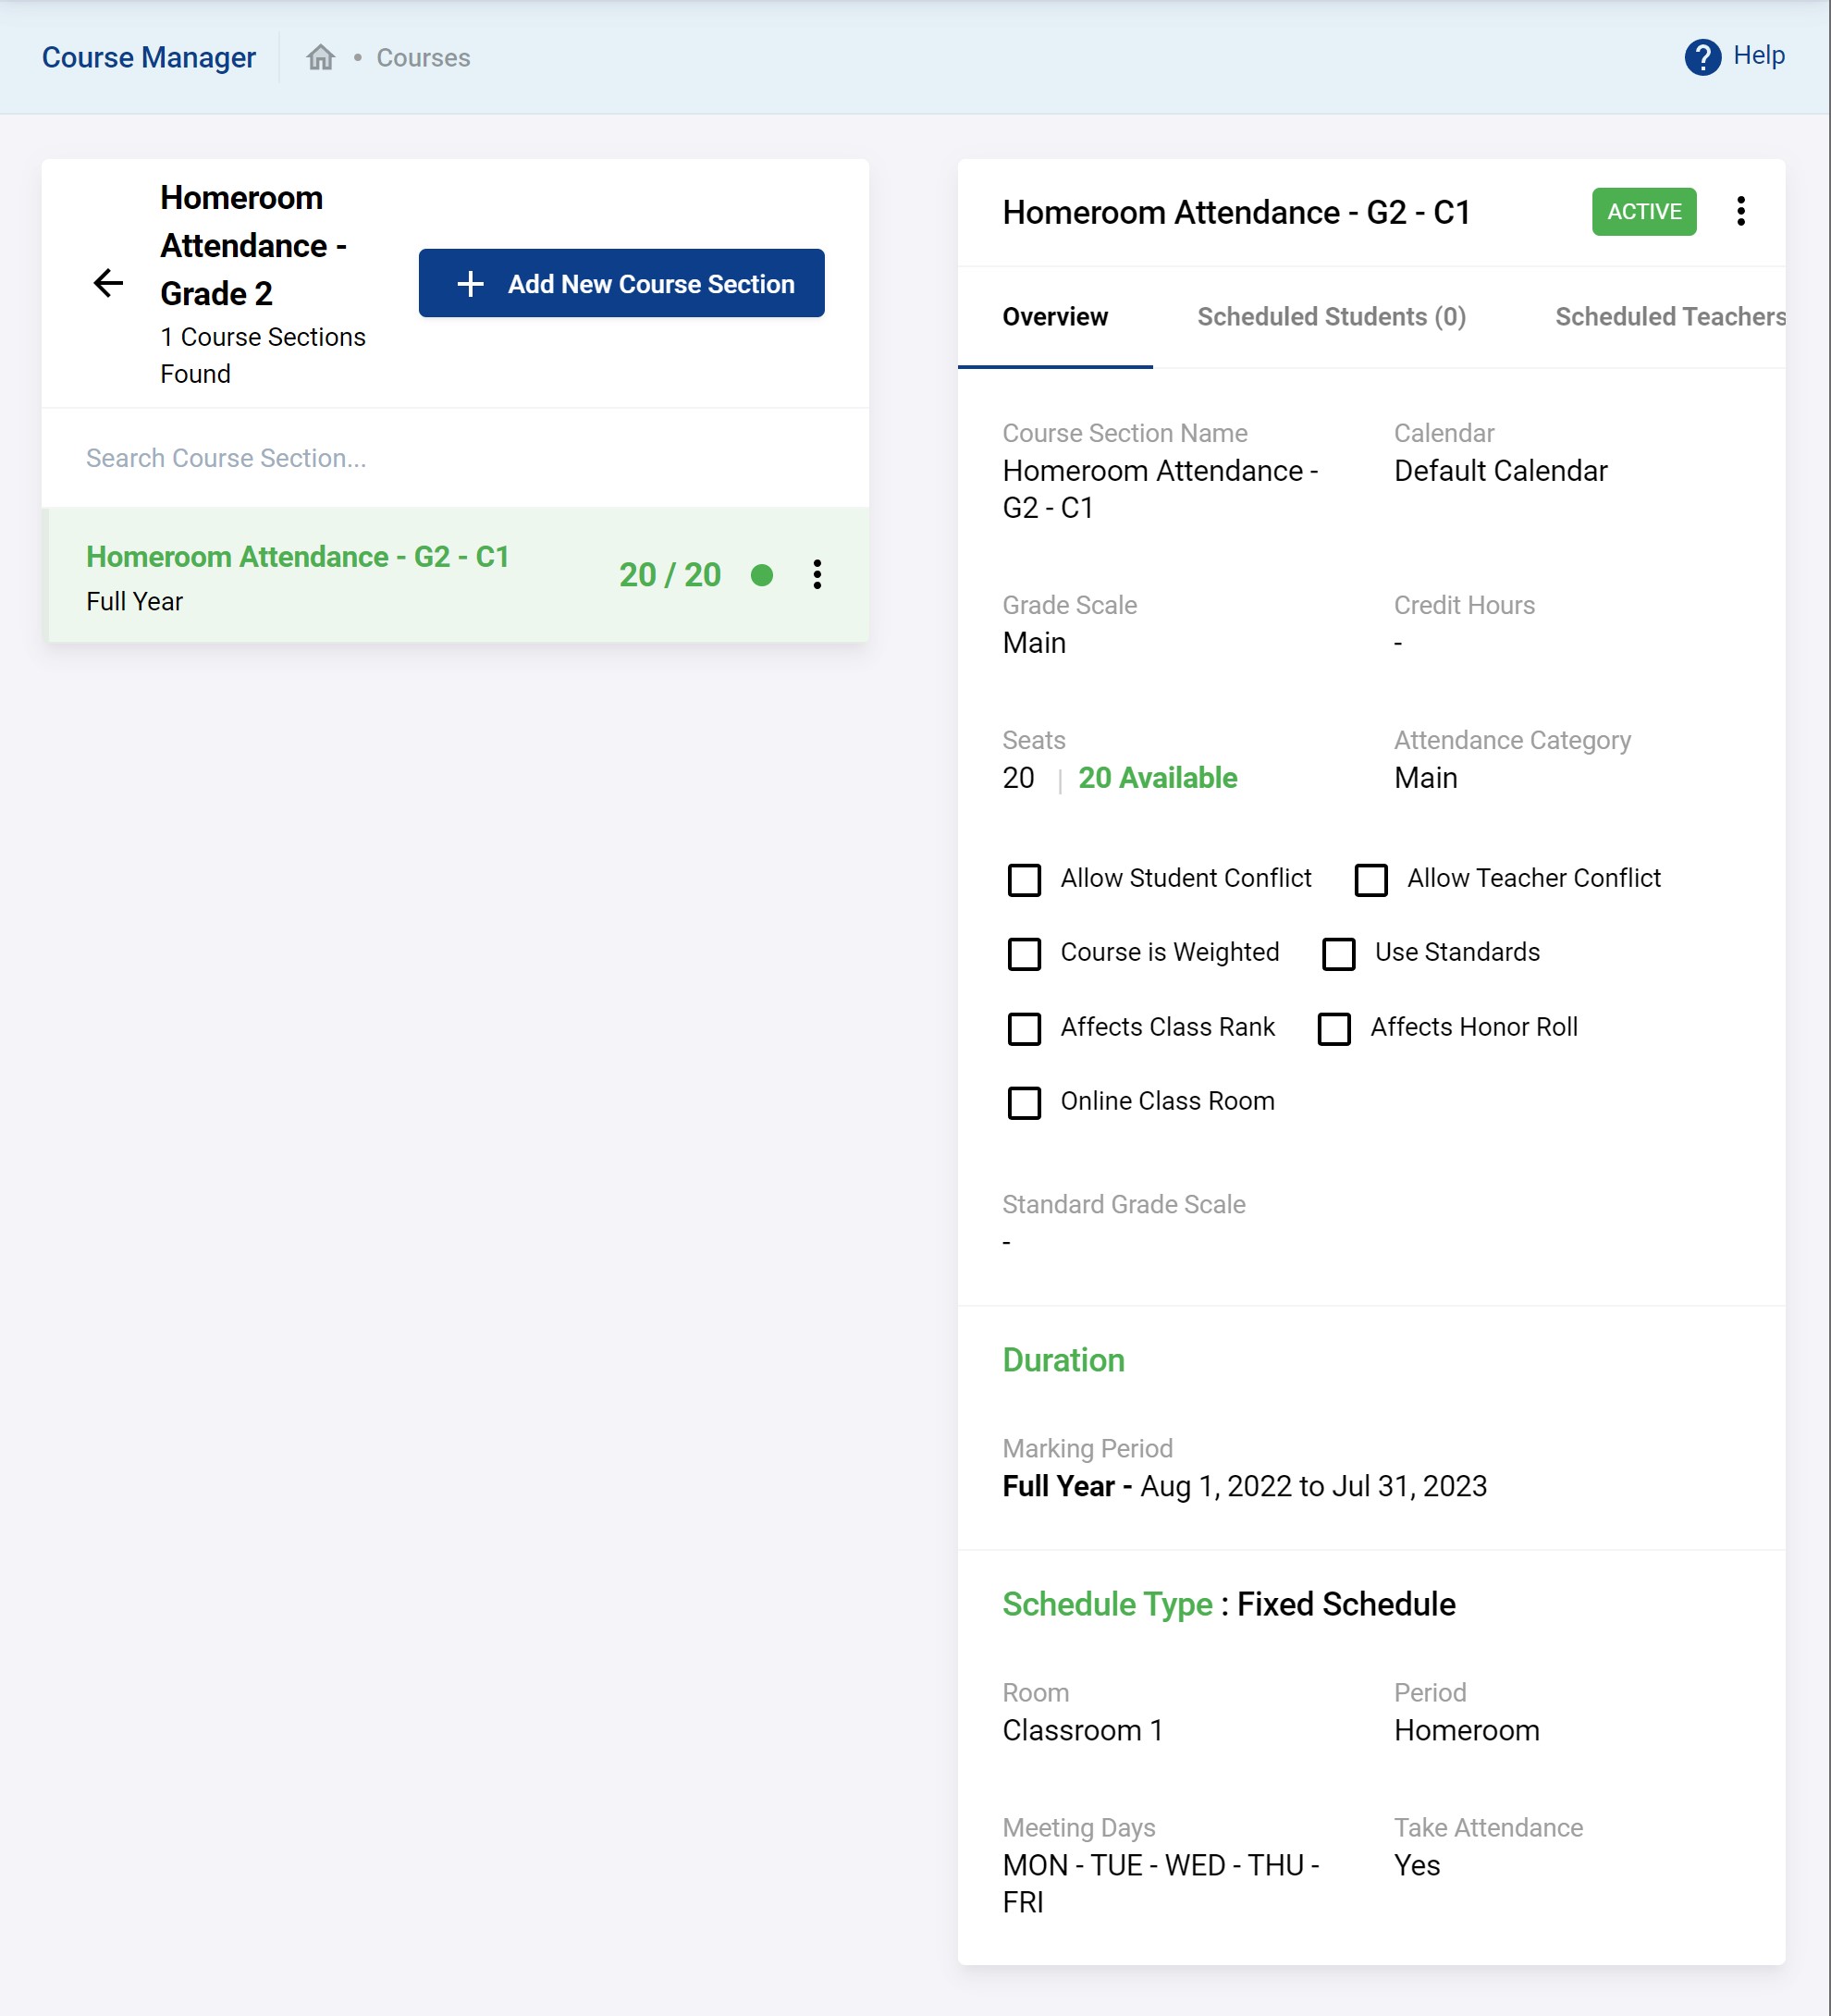
Then you will need to enter all the data for the course section. The field underlined in red is the minimum what will always be needed for a course section. However, the system is highly flexible and supports various more advanced contexts as well. For complete descriptions of all the fields for a course section as shown below refer to https://docs.pacific-emis.org/doku.php?id=sis_user_manual#course_section_options
Will all data entered click on Submit.
You will return to the course's list of course sections. You can add as many course section for a course as you need.
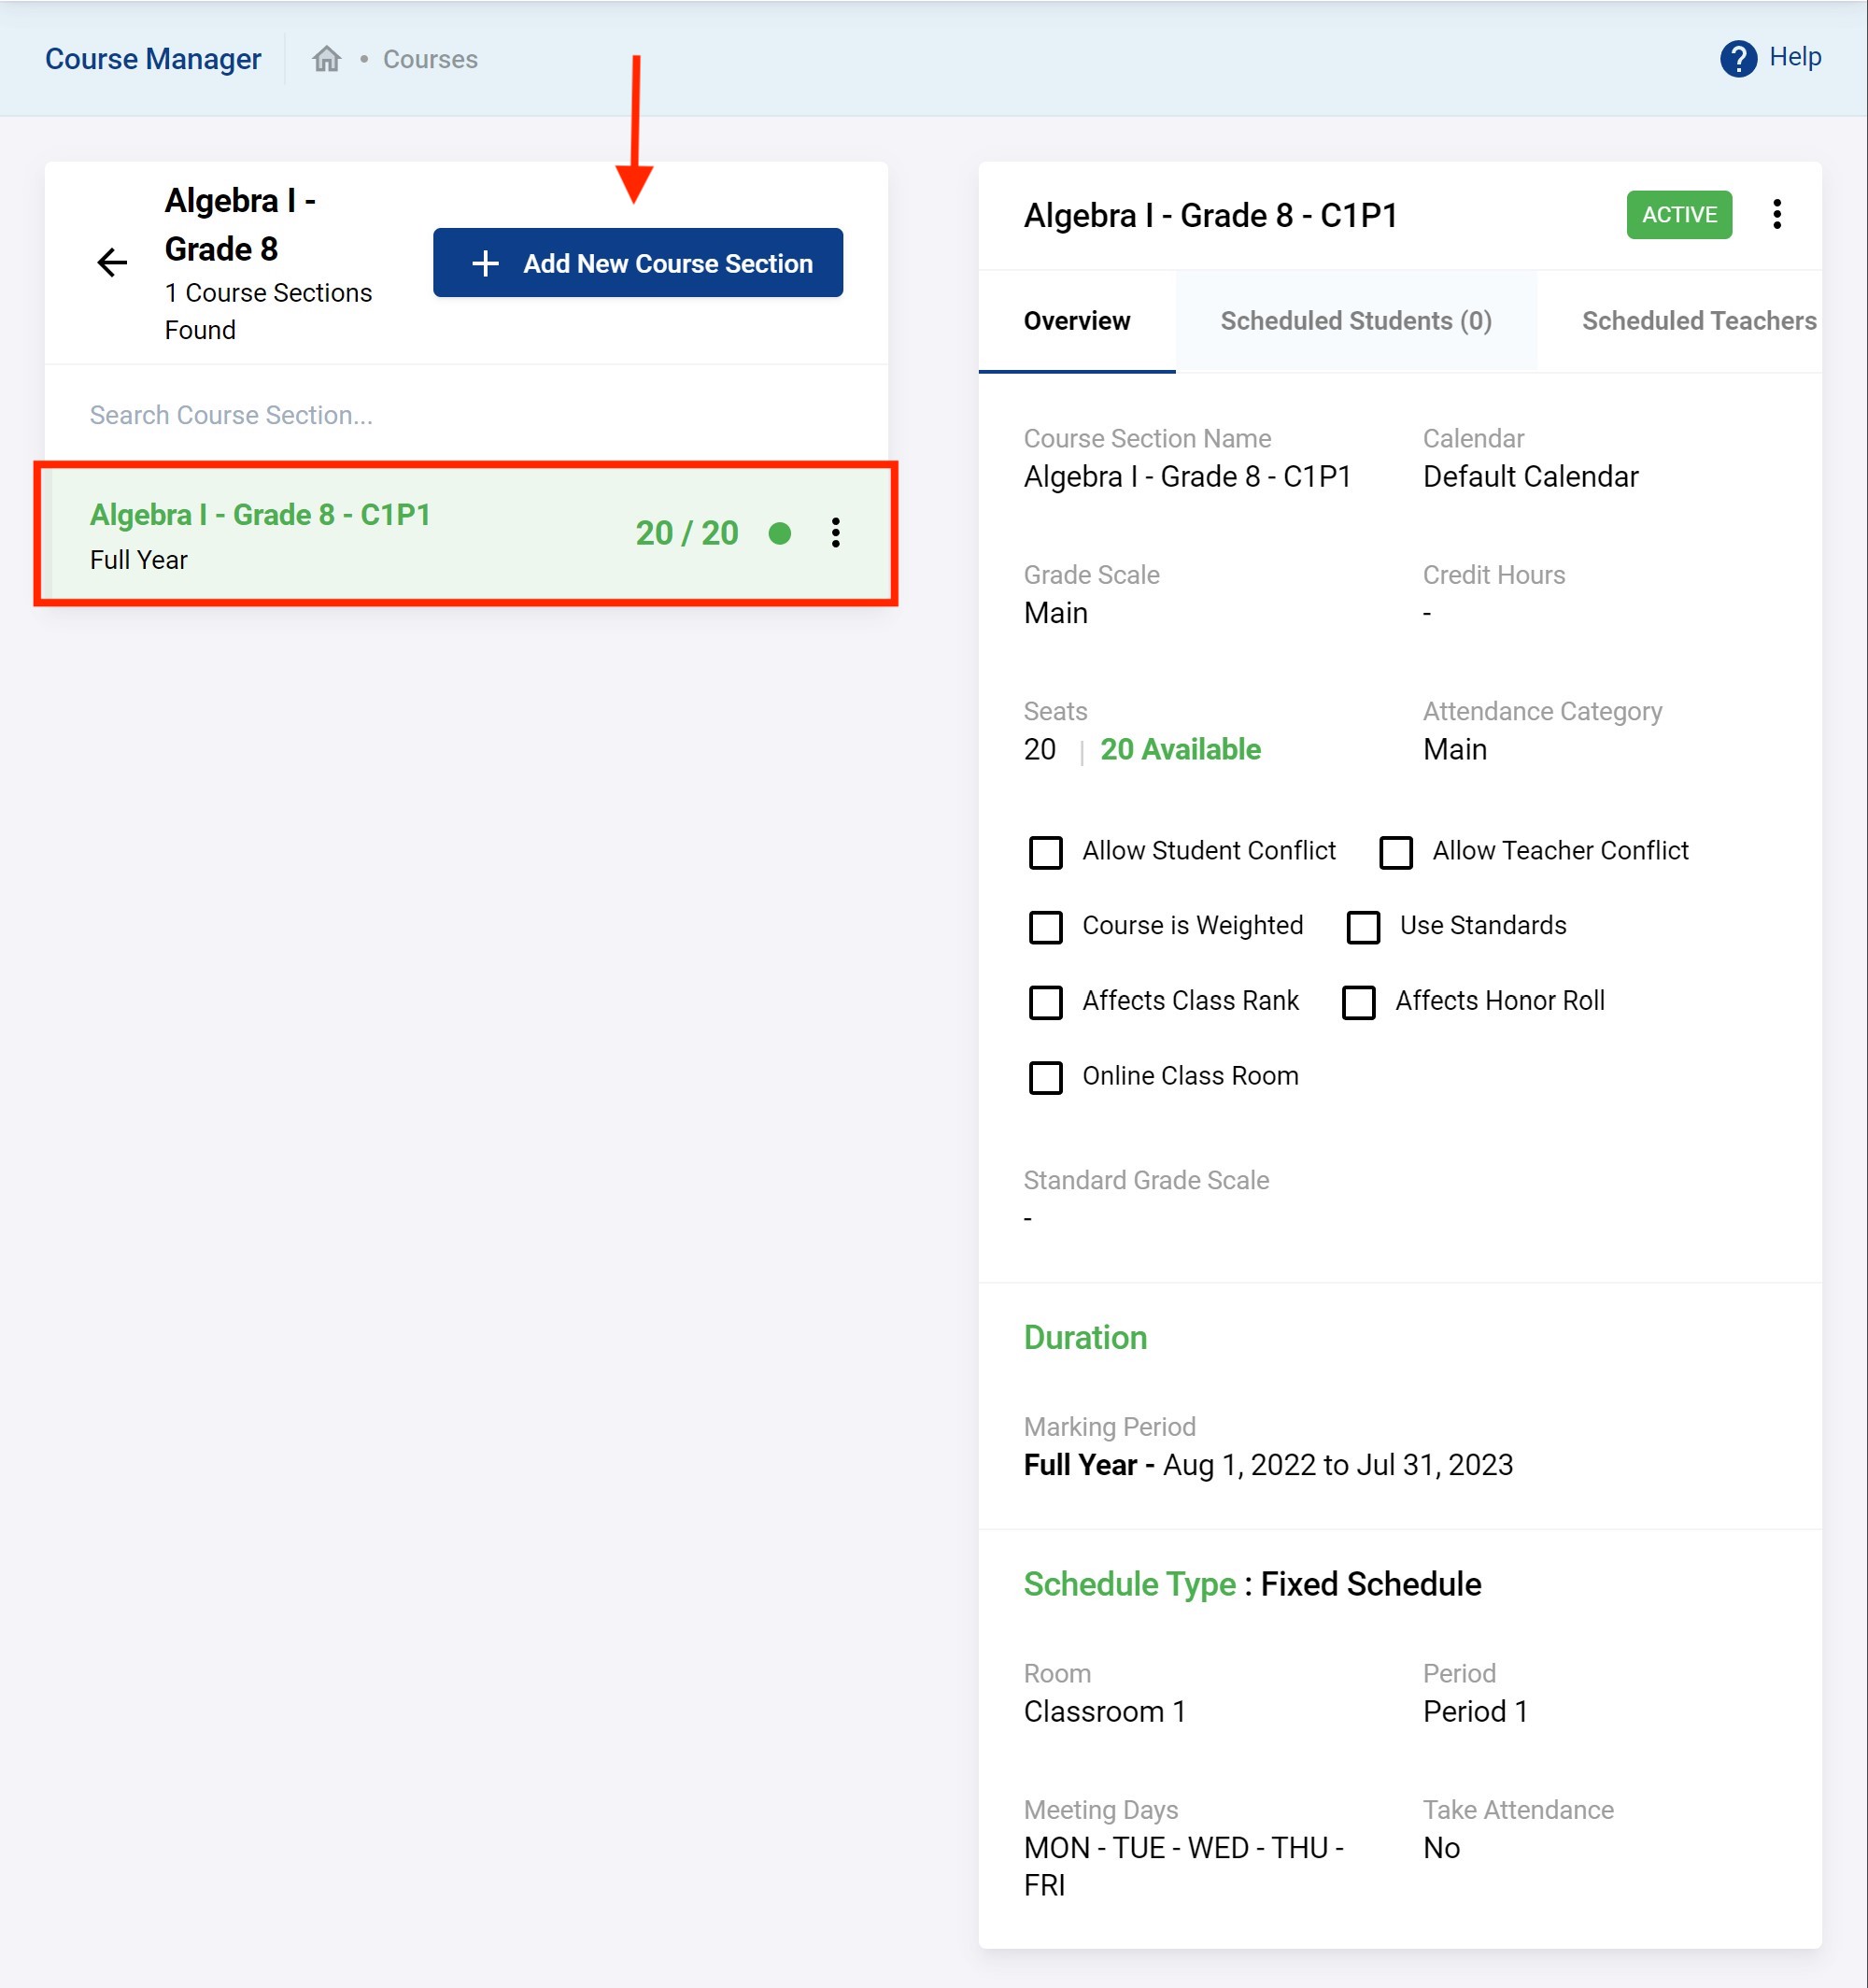
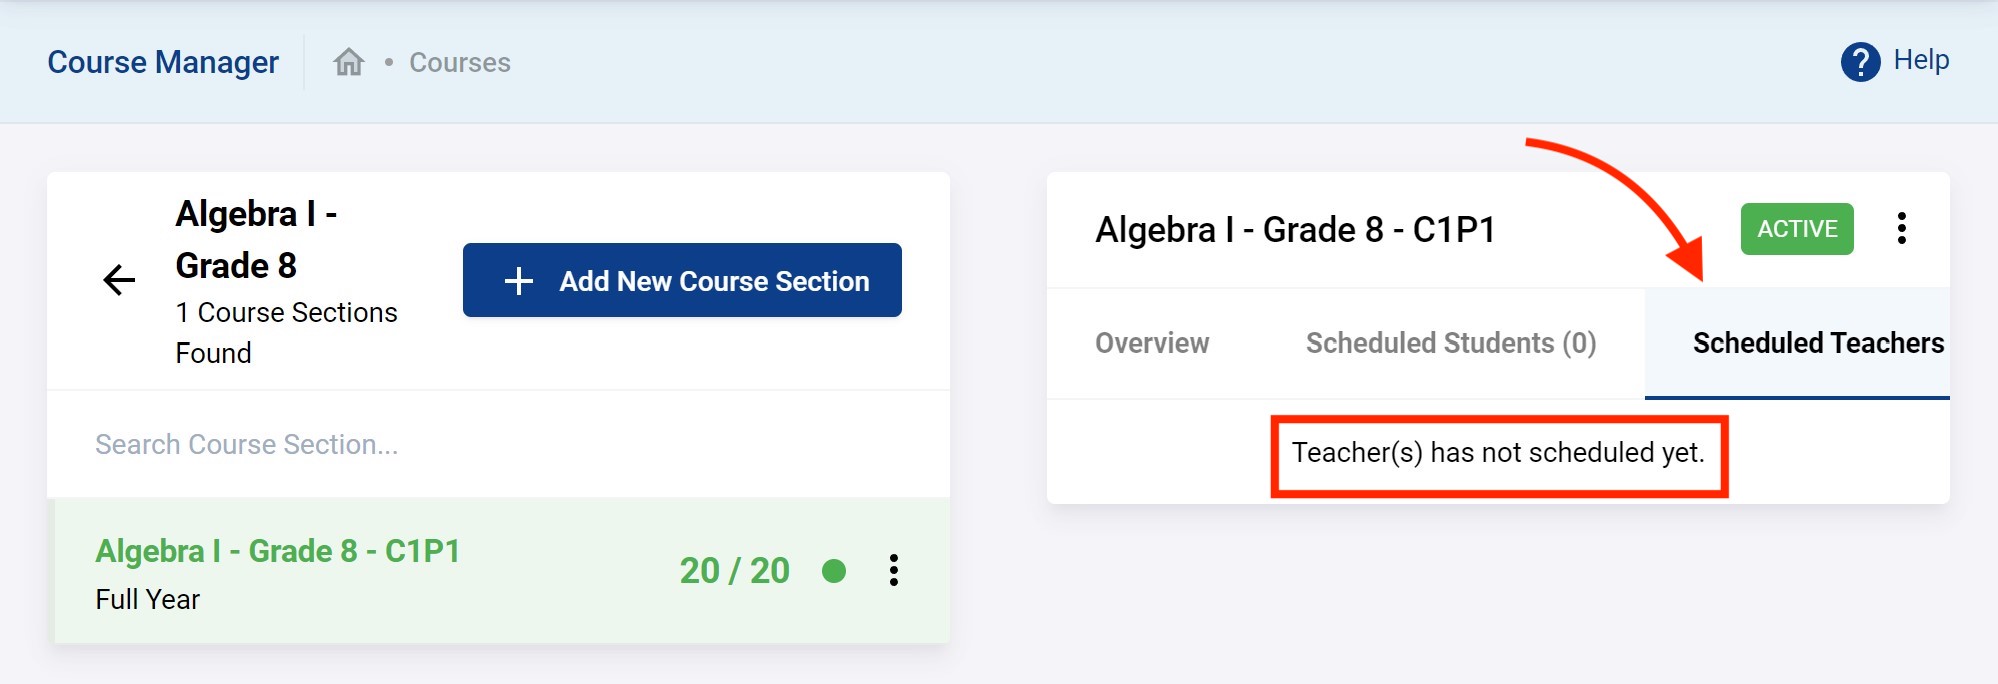
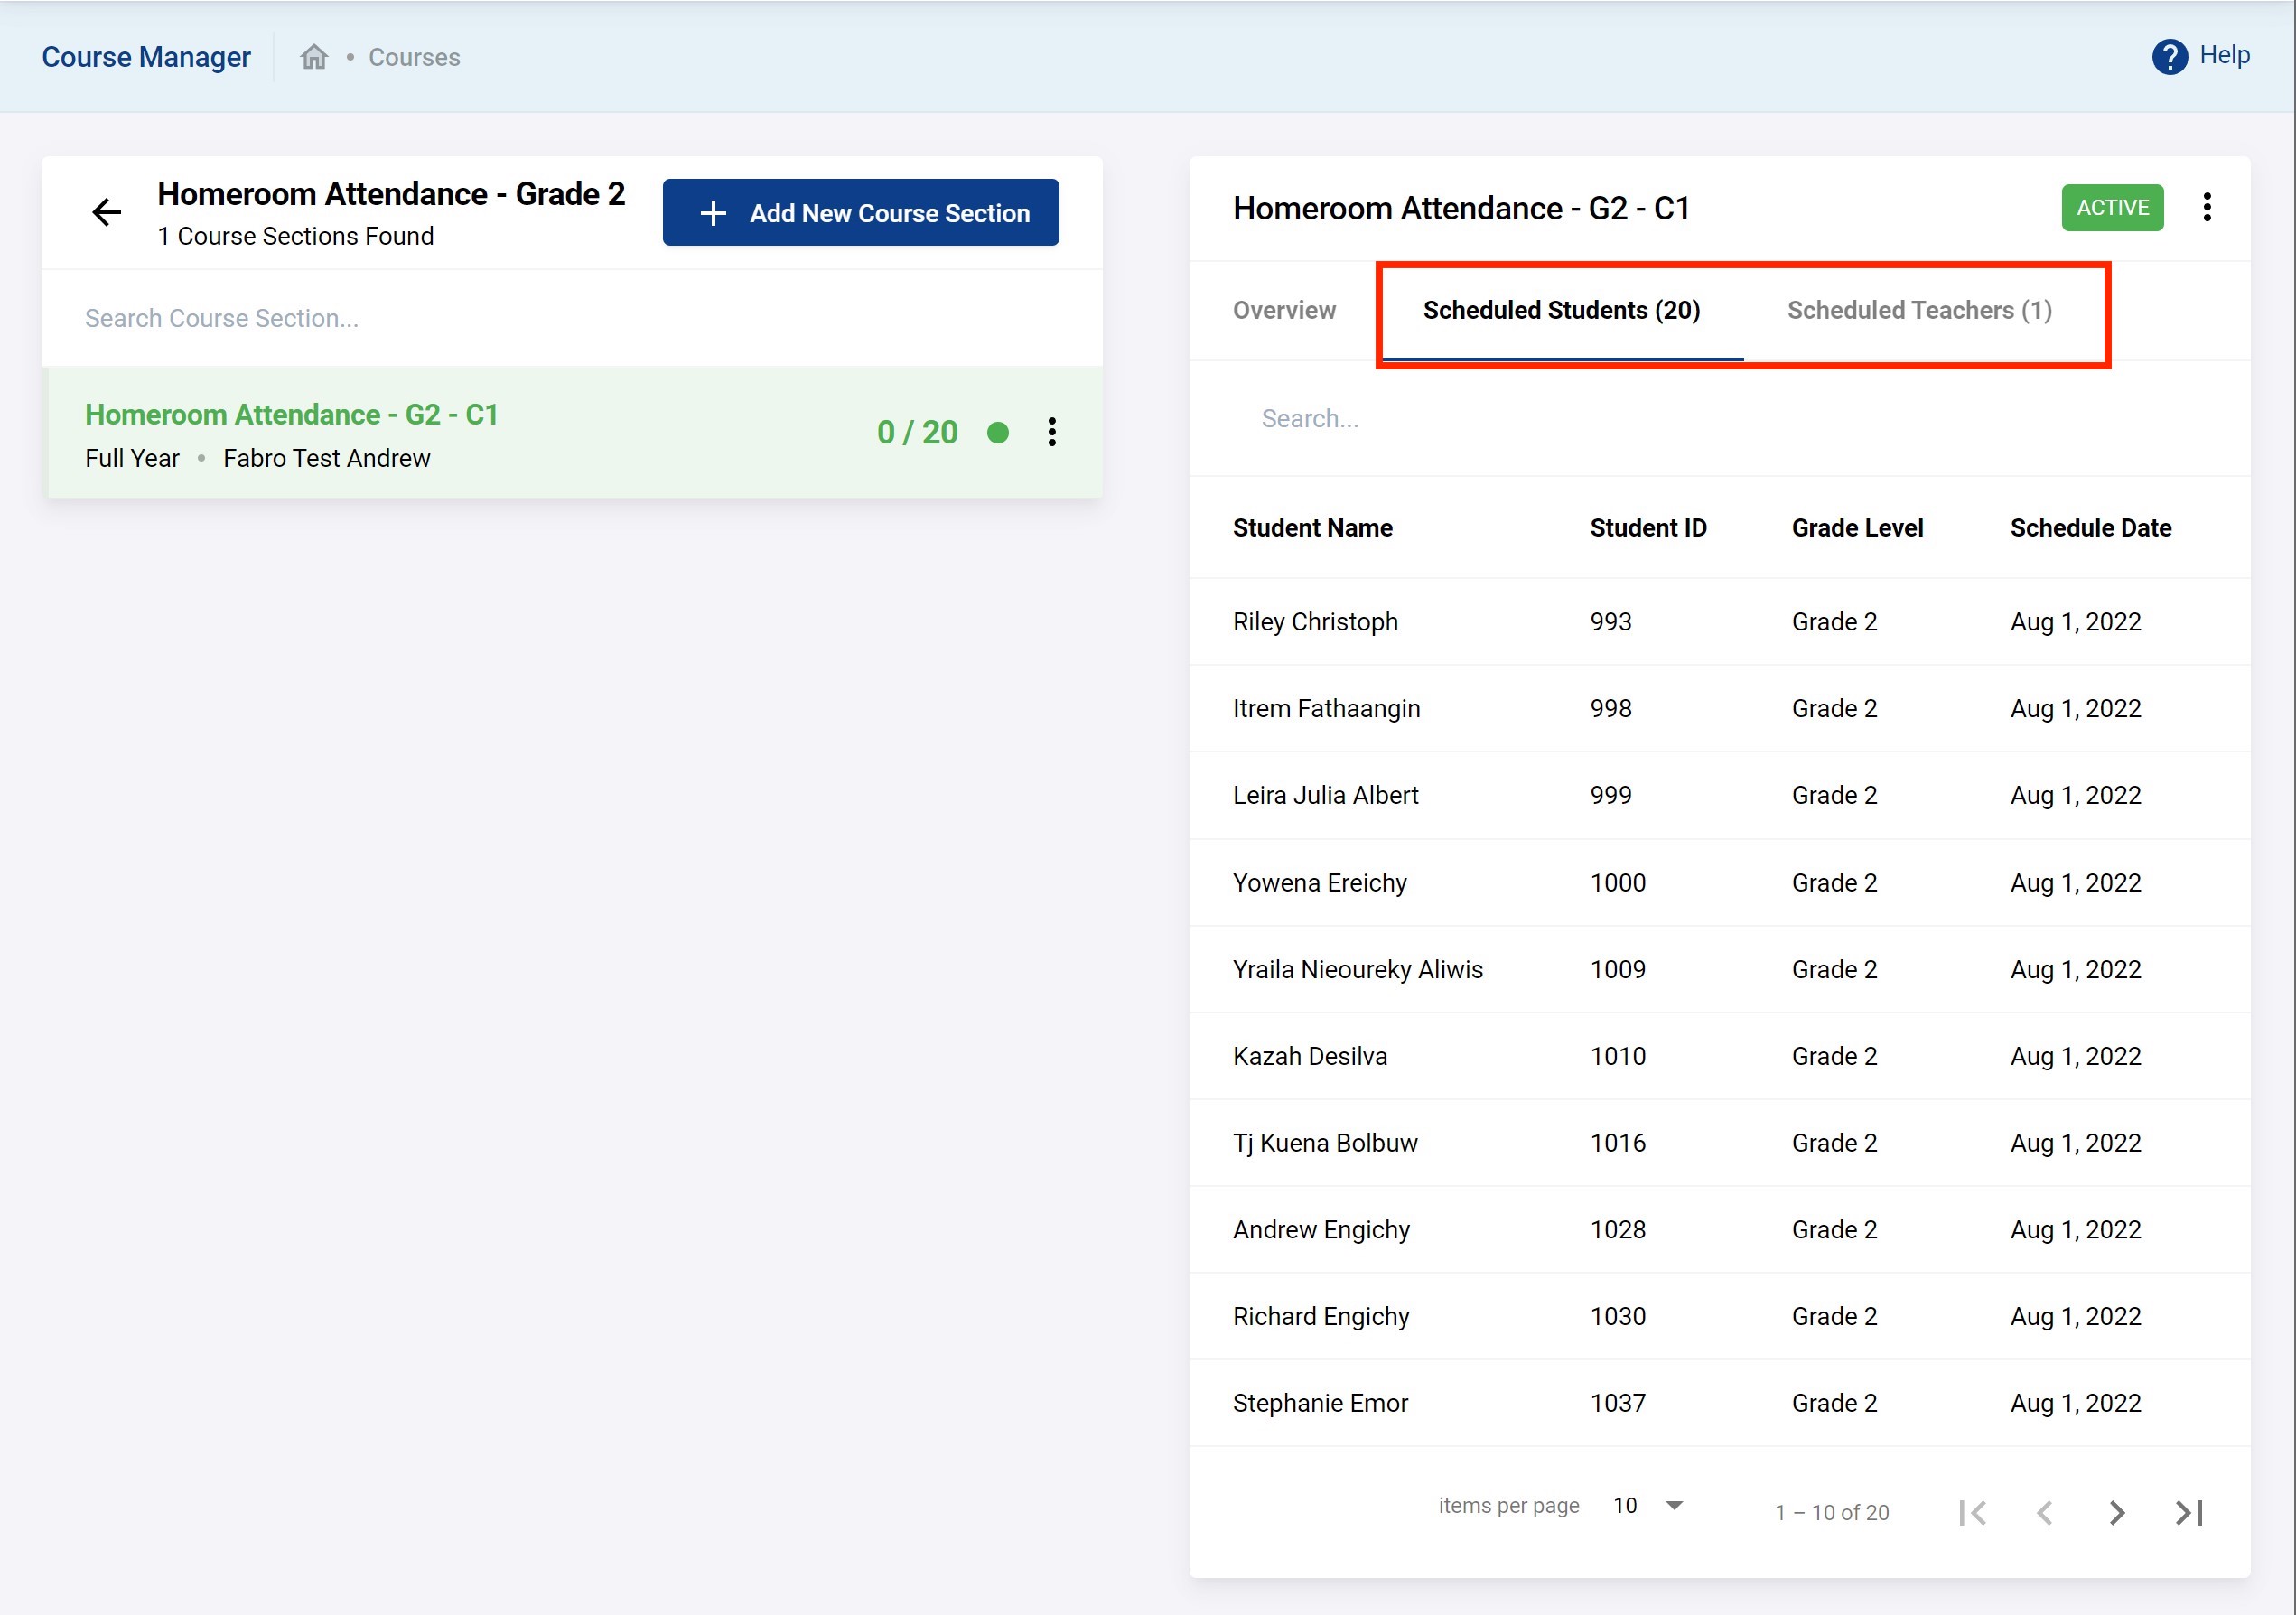
Note if you click on the Schedule Students and Scheduled Teachers tabs as shown in the following two screenshots you will see there is no students or teachers in there yet. We'll be doing this soon.

Back at the Course Manager you can see your courses and the number of course sections in each.
Course Catalogue
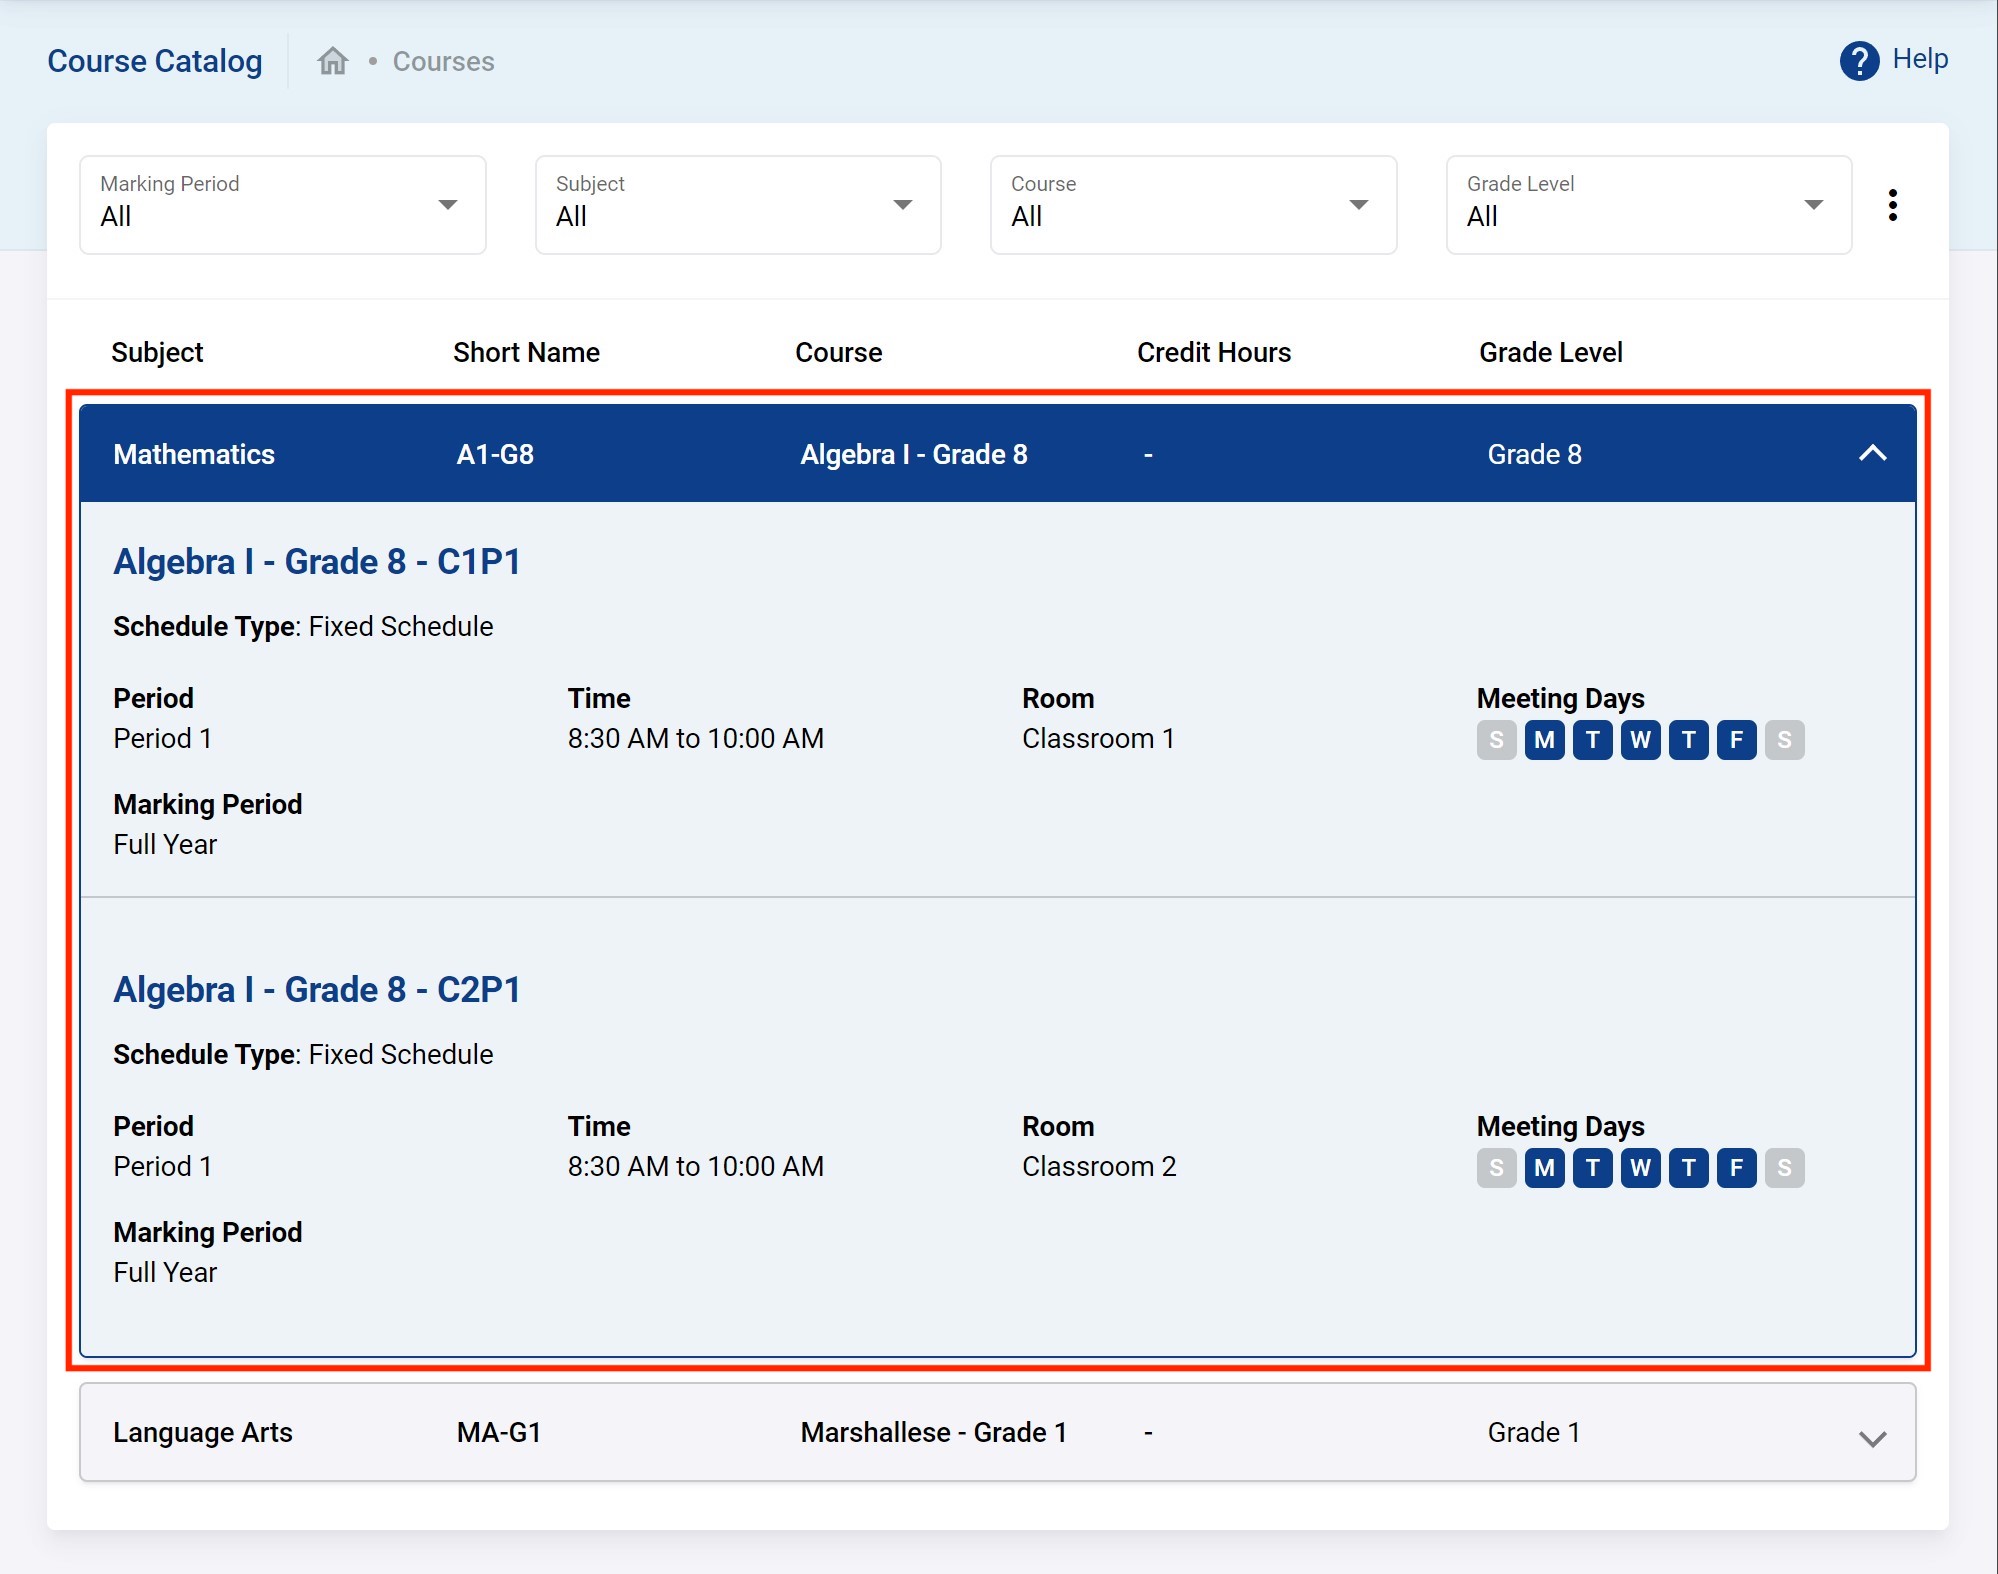
You can browse your course periods by going to Courses → Course Catalog. You should see the whole school course catalog.

The default view compresses (i.e. summarizes) the course sections setup in the school. You can click on them to view more details.
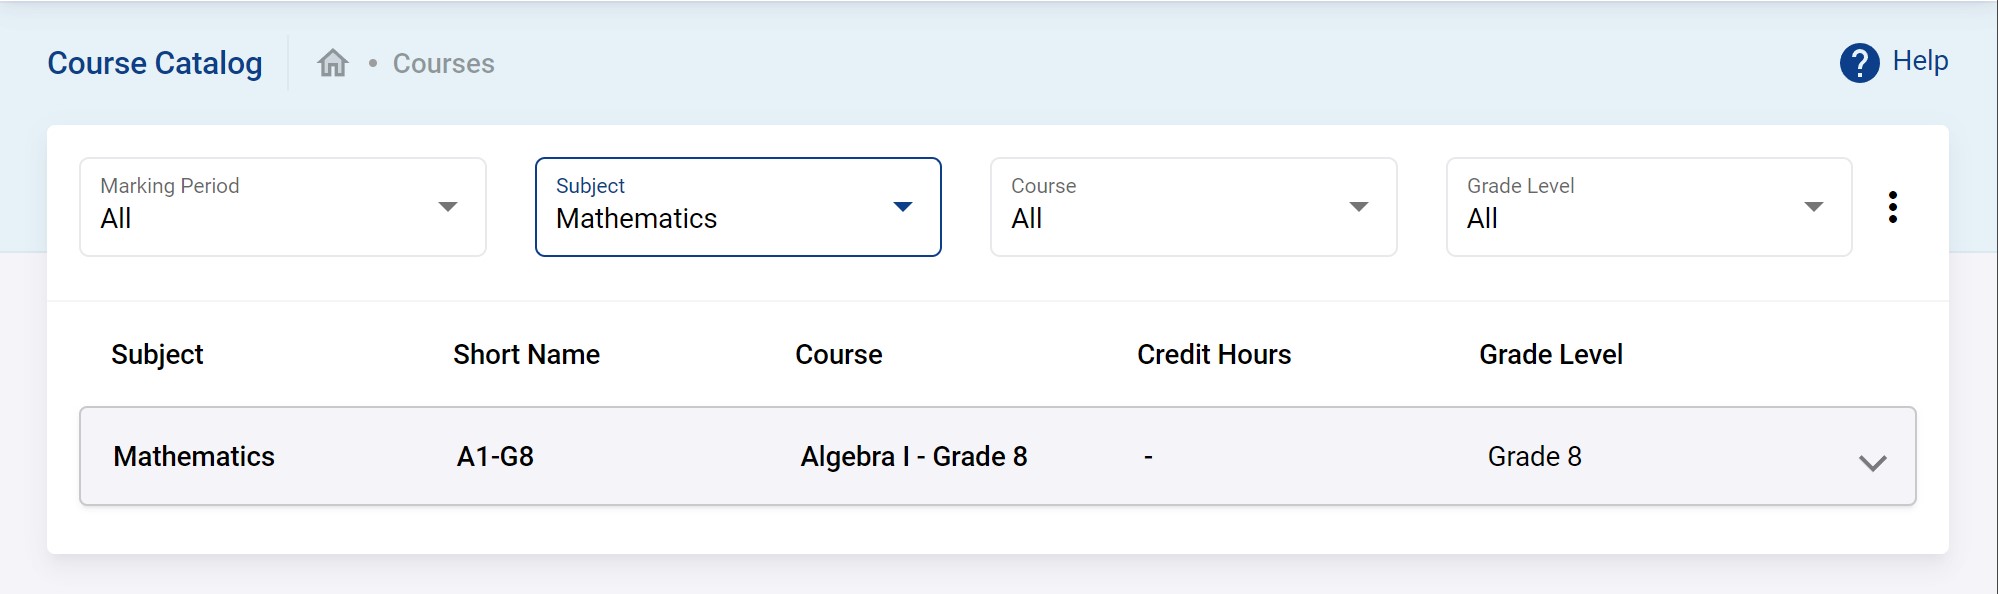
You can filter as usual which one to display. For example, below we are filtering all course periods in the Mathematics subject.
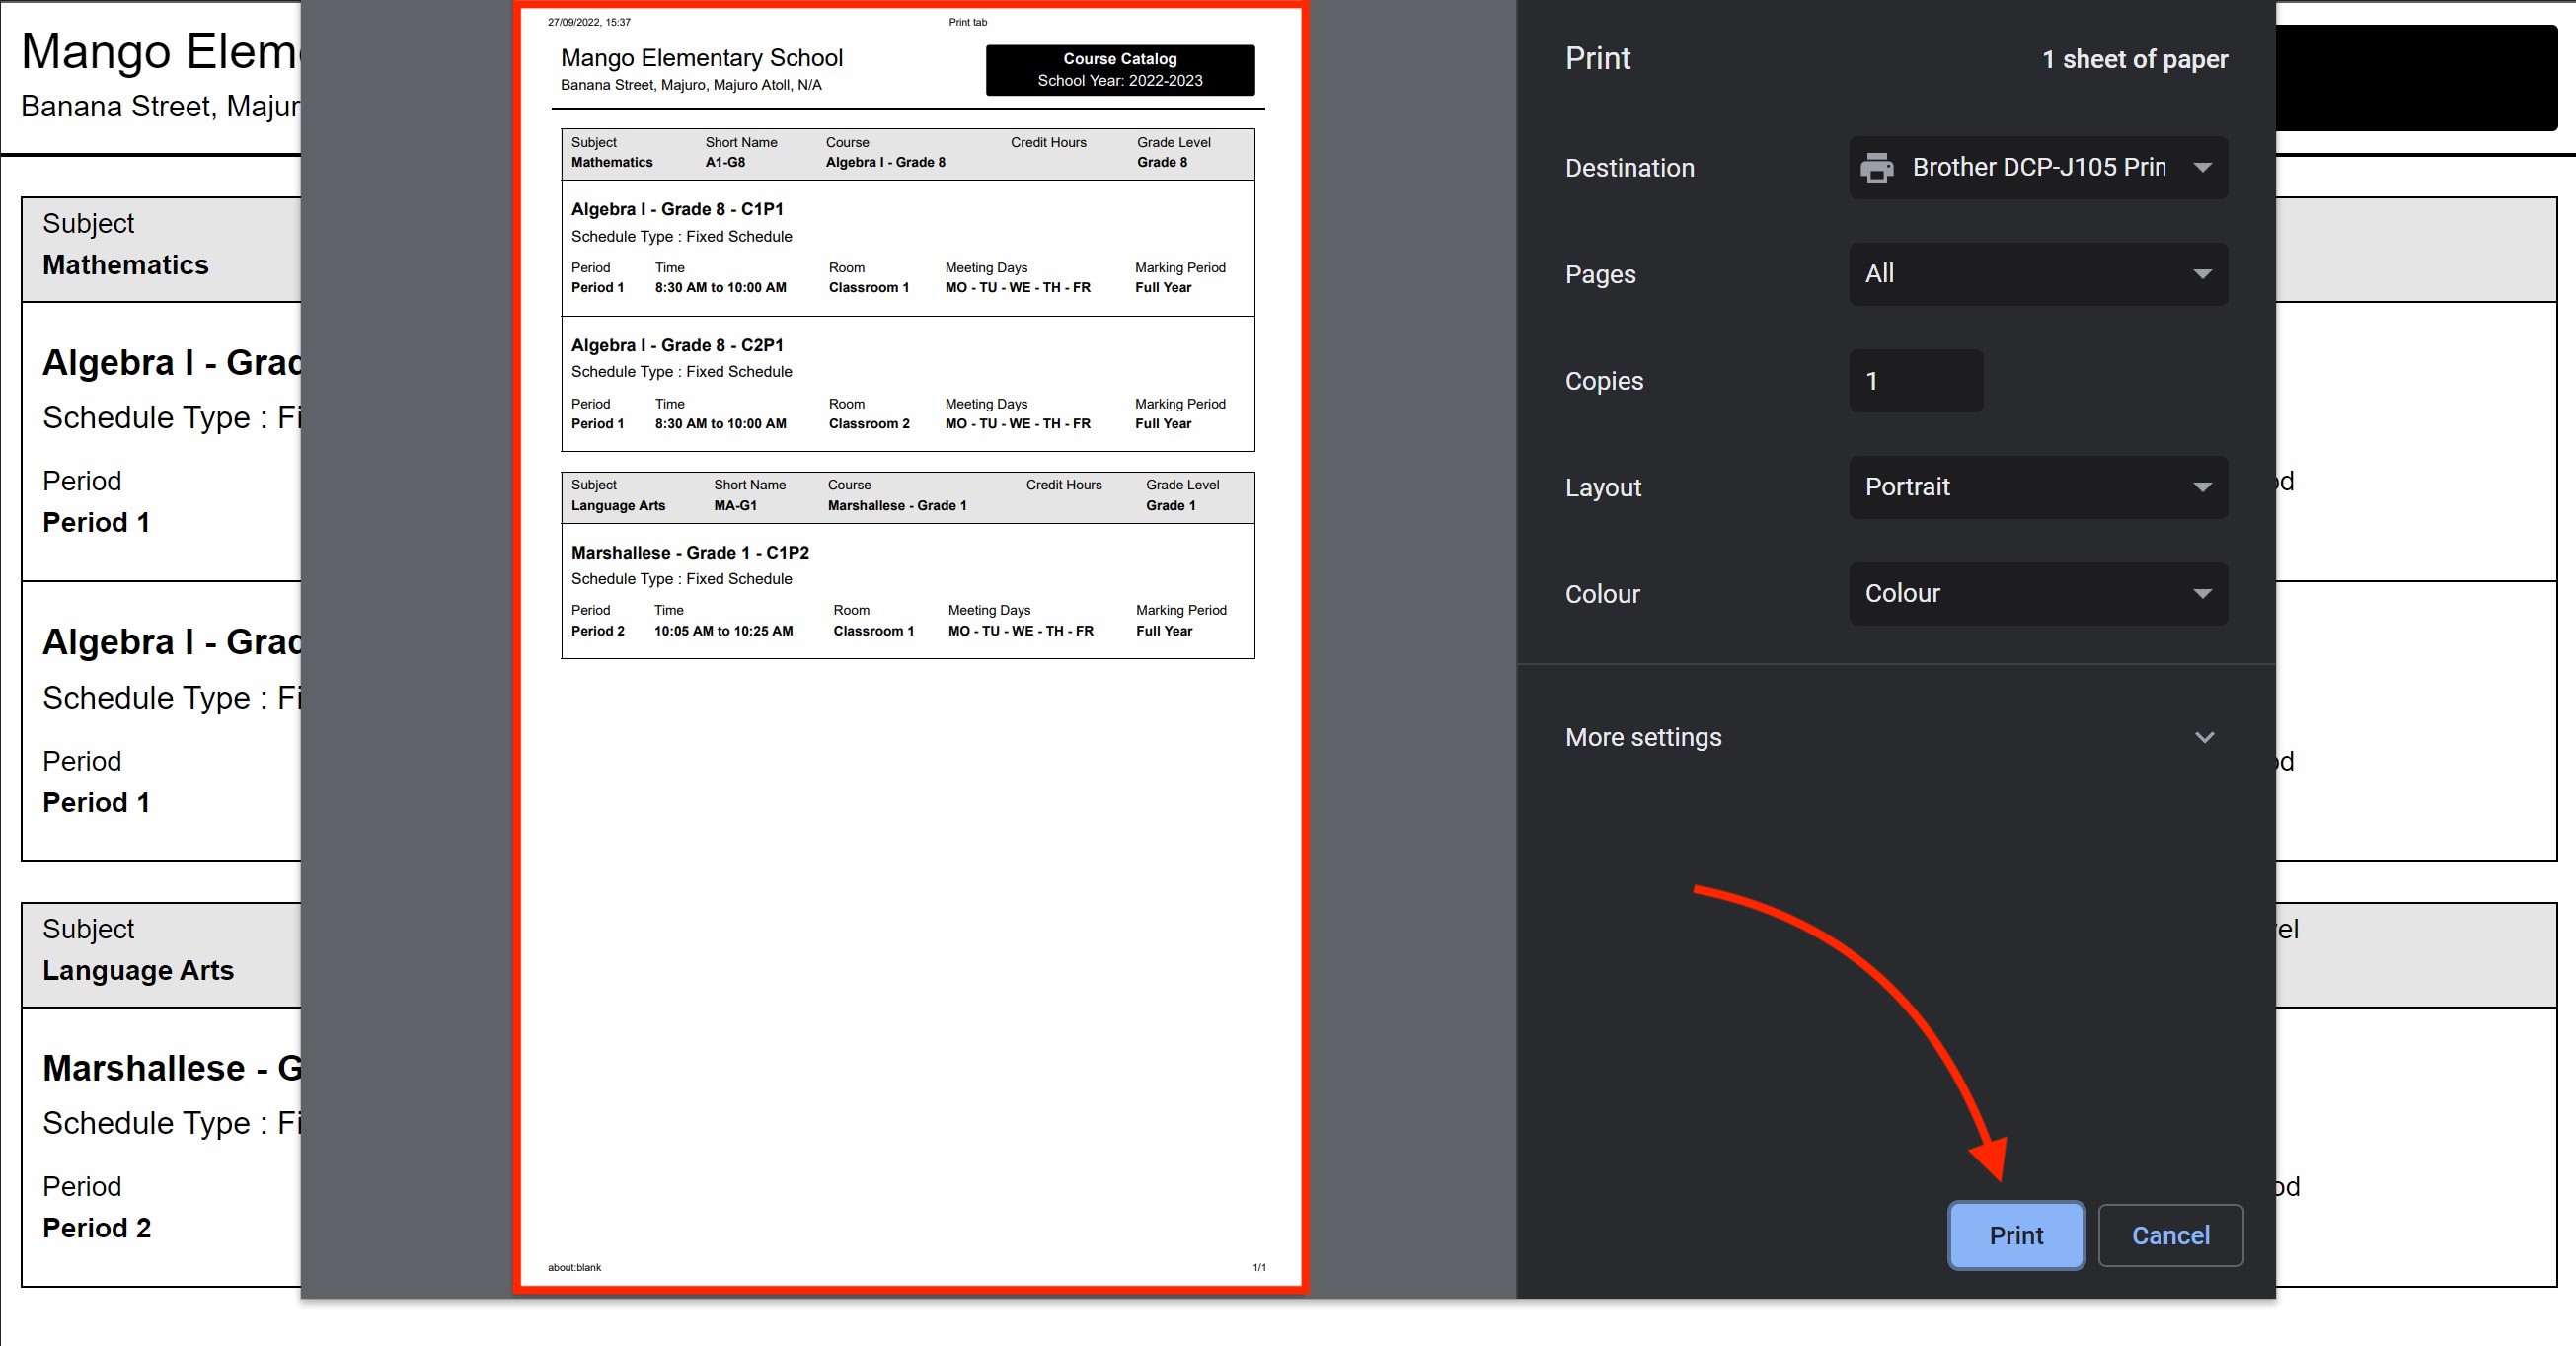
You can also print your catalog by clicking on the vertical three dots and then Print Course Catalog.
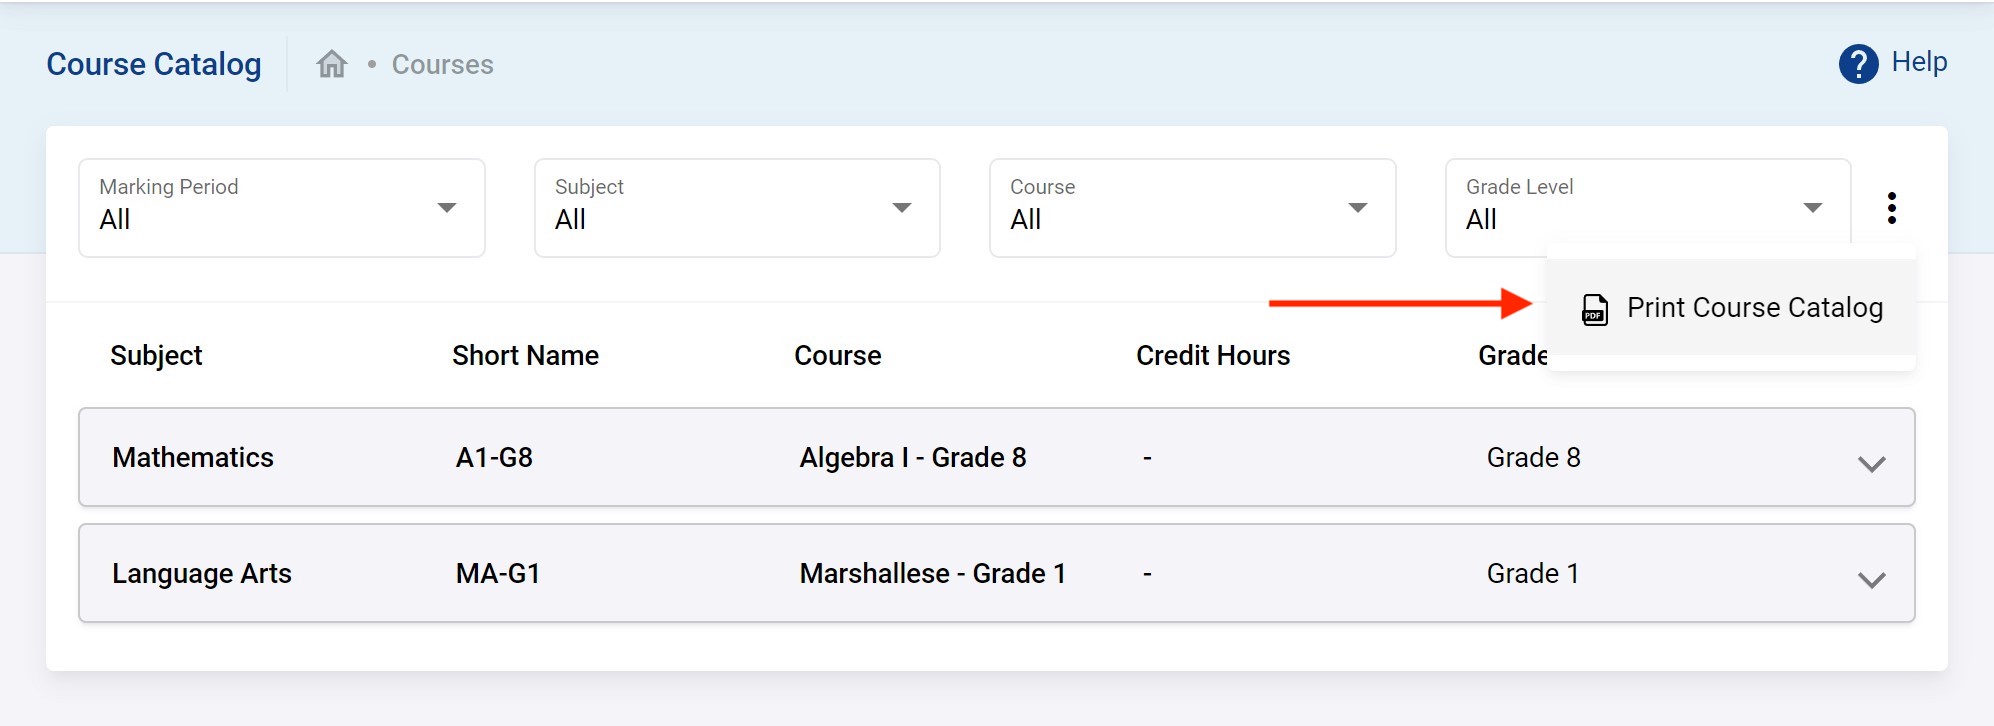
You'll see this where you can either print to a printer or save as a PDF electronic copy for distribution by email or other file sharing tool.
Course special use cases
Every now and then you may encounter special cases that require slightly different setup then mentioned in the https://docs.pacific-emis.org/doku.php?id=sis_user_manual#course_manager above. They will be discussed in following course sections.
Two courses at the same time
Some schools combine two courses into the same period and classroom. For example, Reading and Writing are two different courses with each their grades and slot in a Student Report Card. But they are taught in the same period essentially together. In this case, you simply enable Allow Student Conflict and Allow Teacher Conflict as shown below for courses taught at the same time in the same place.
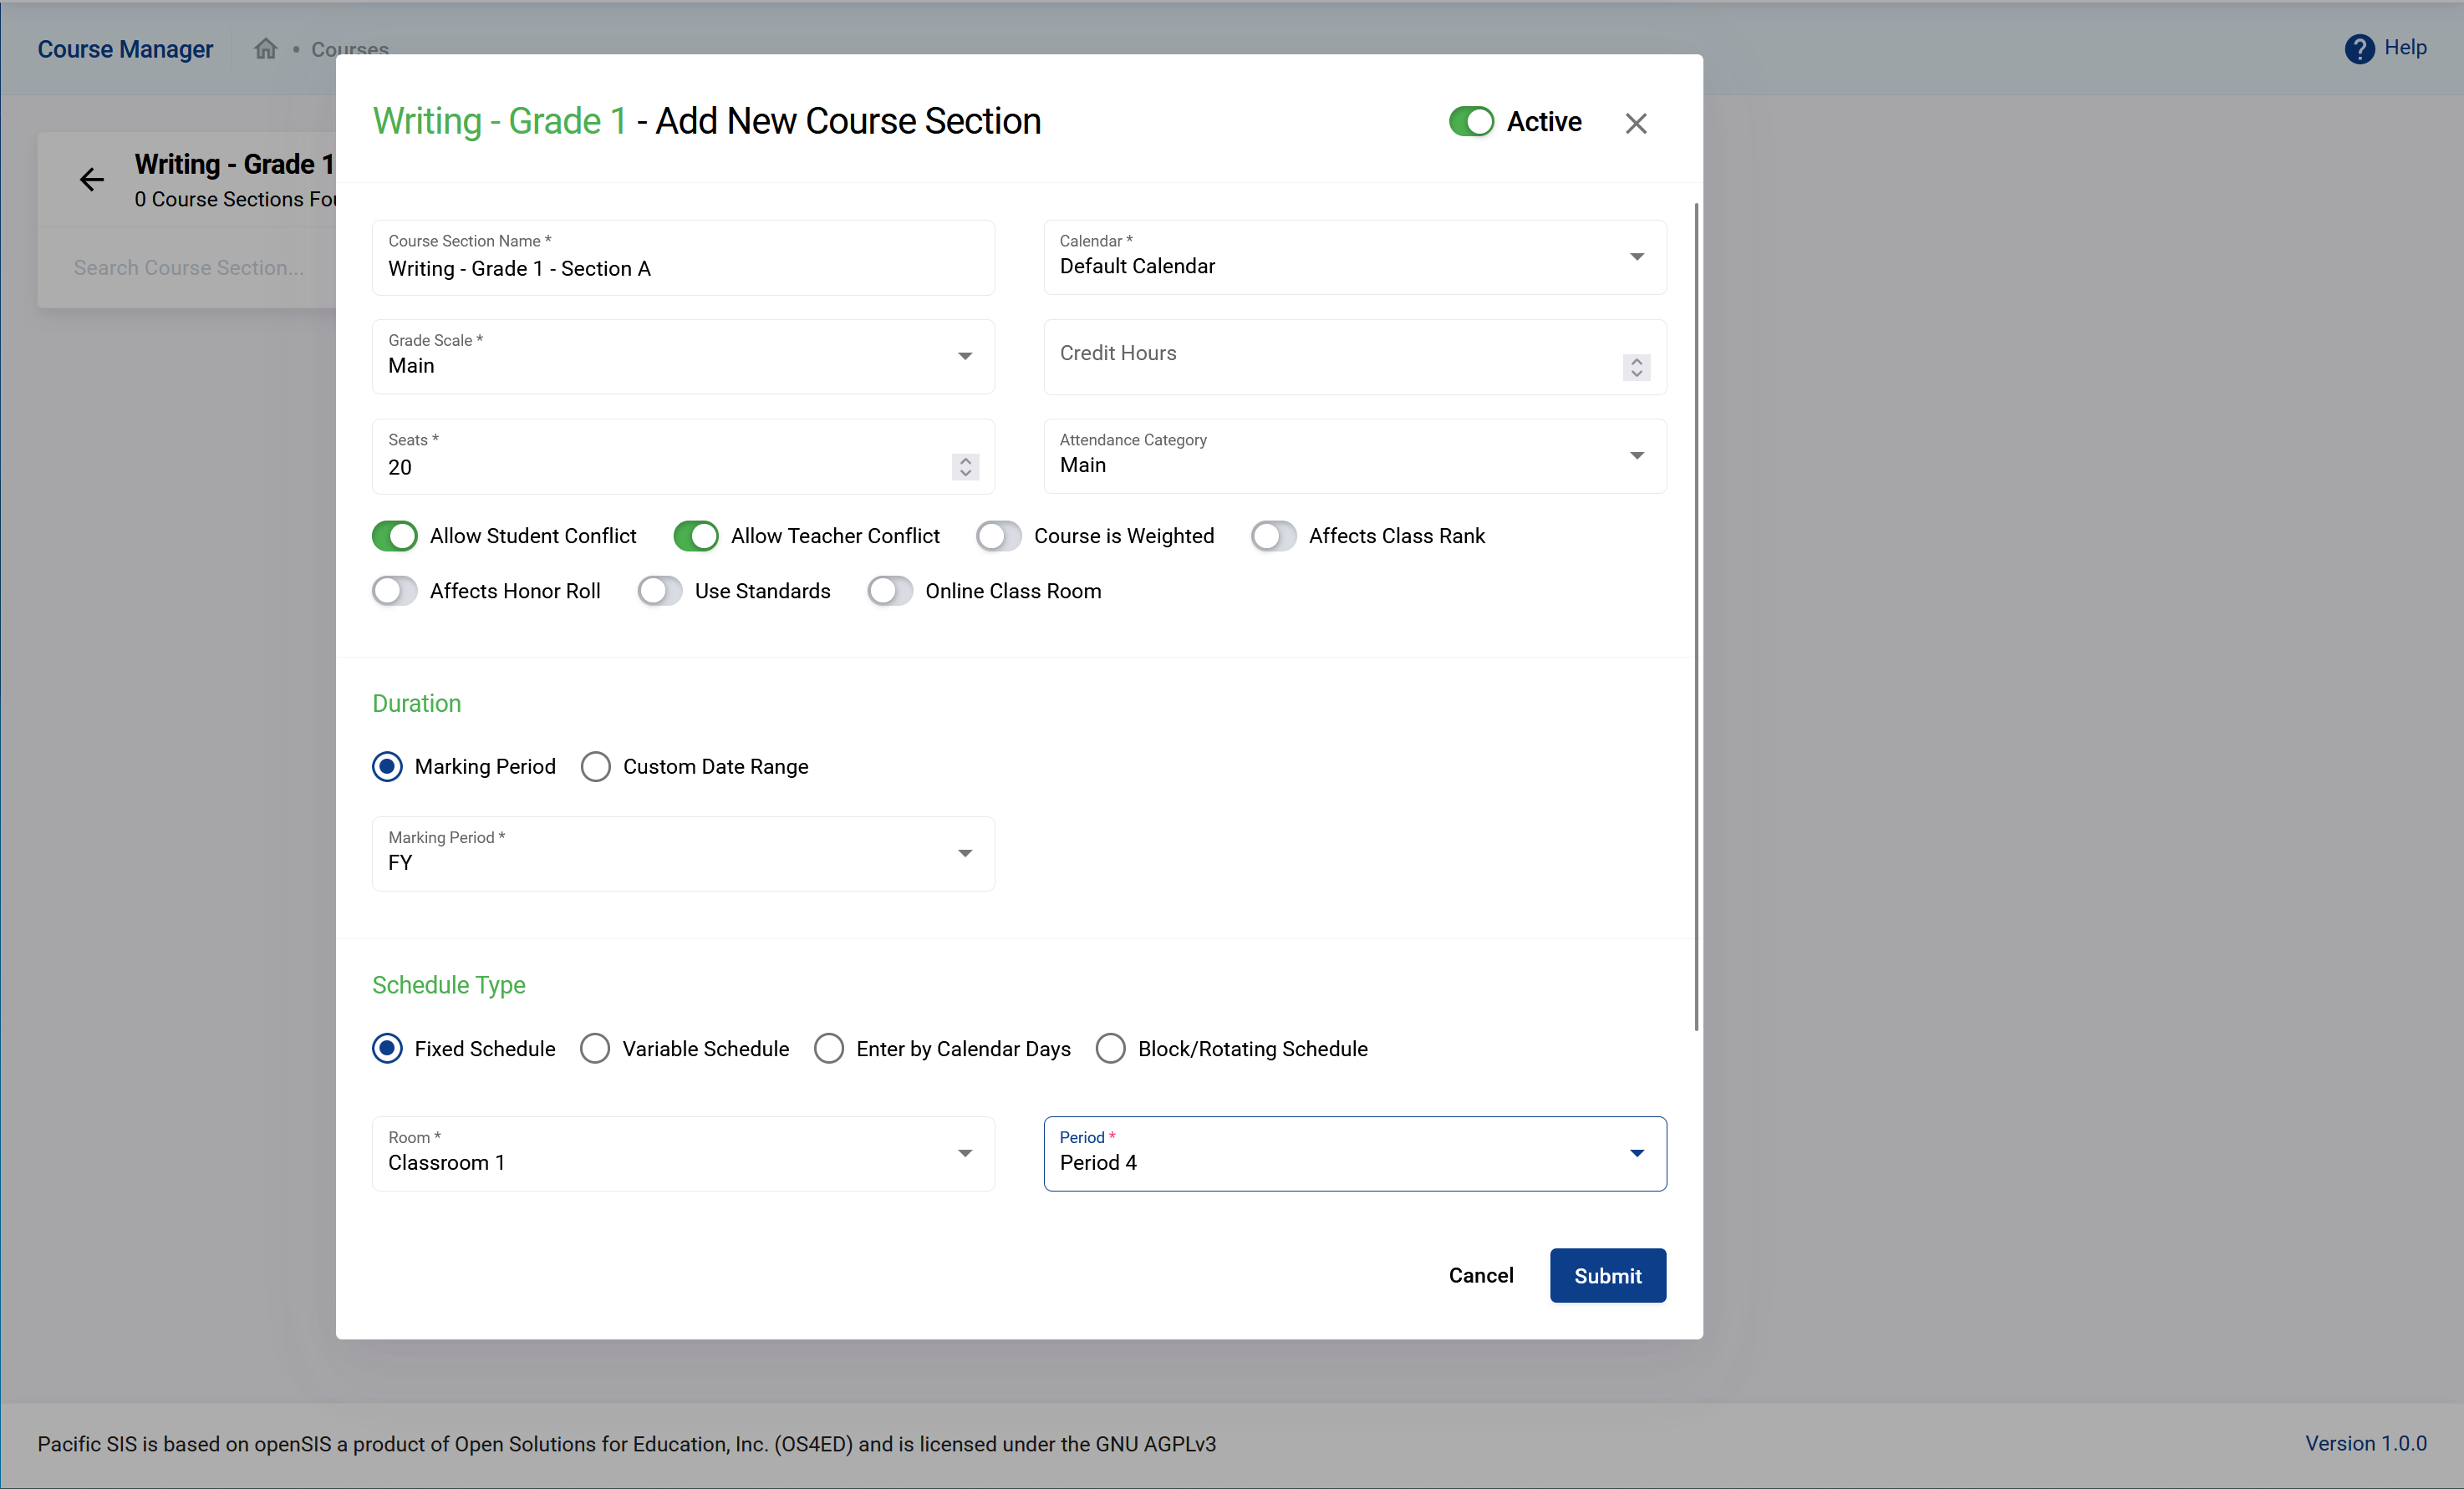
And then you would simply schedule students and teacher in both the courses just as you would normal ones.
Scheduling
This is where you can define what student takes what course so that you can later mark attendance and grade student carefully for each courses.
Schedule Students
Most commonly, students are scheduled in bulk at the beginning of the school year, ideally, just before it starts.
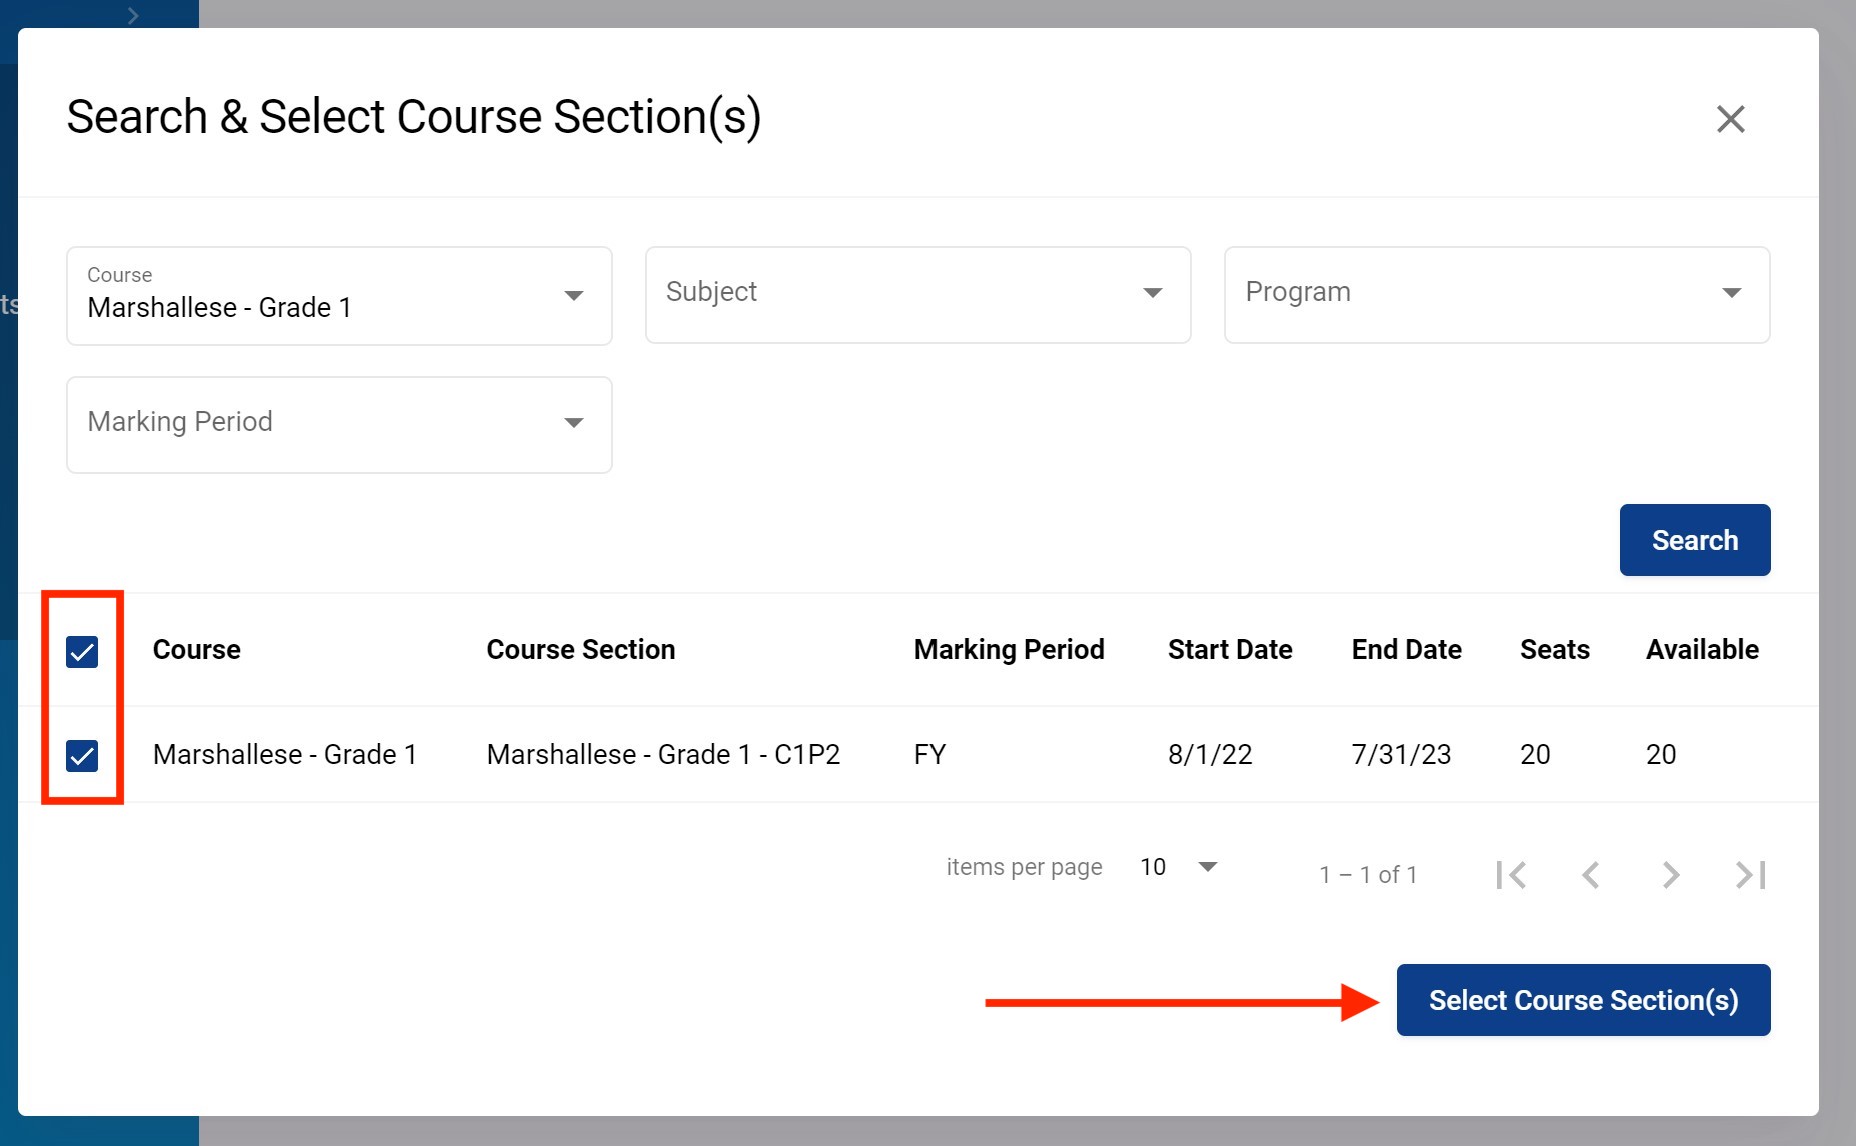
You can do this by going to Scheduling → Schedule Students. On the left you can add Students to be Scheduled and on the right you select to which course sections they will be added.
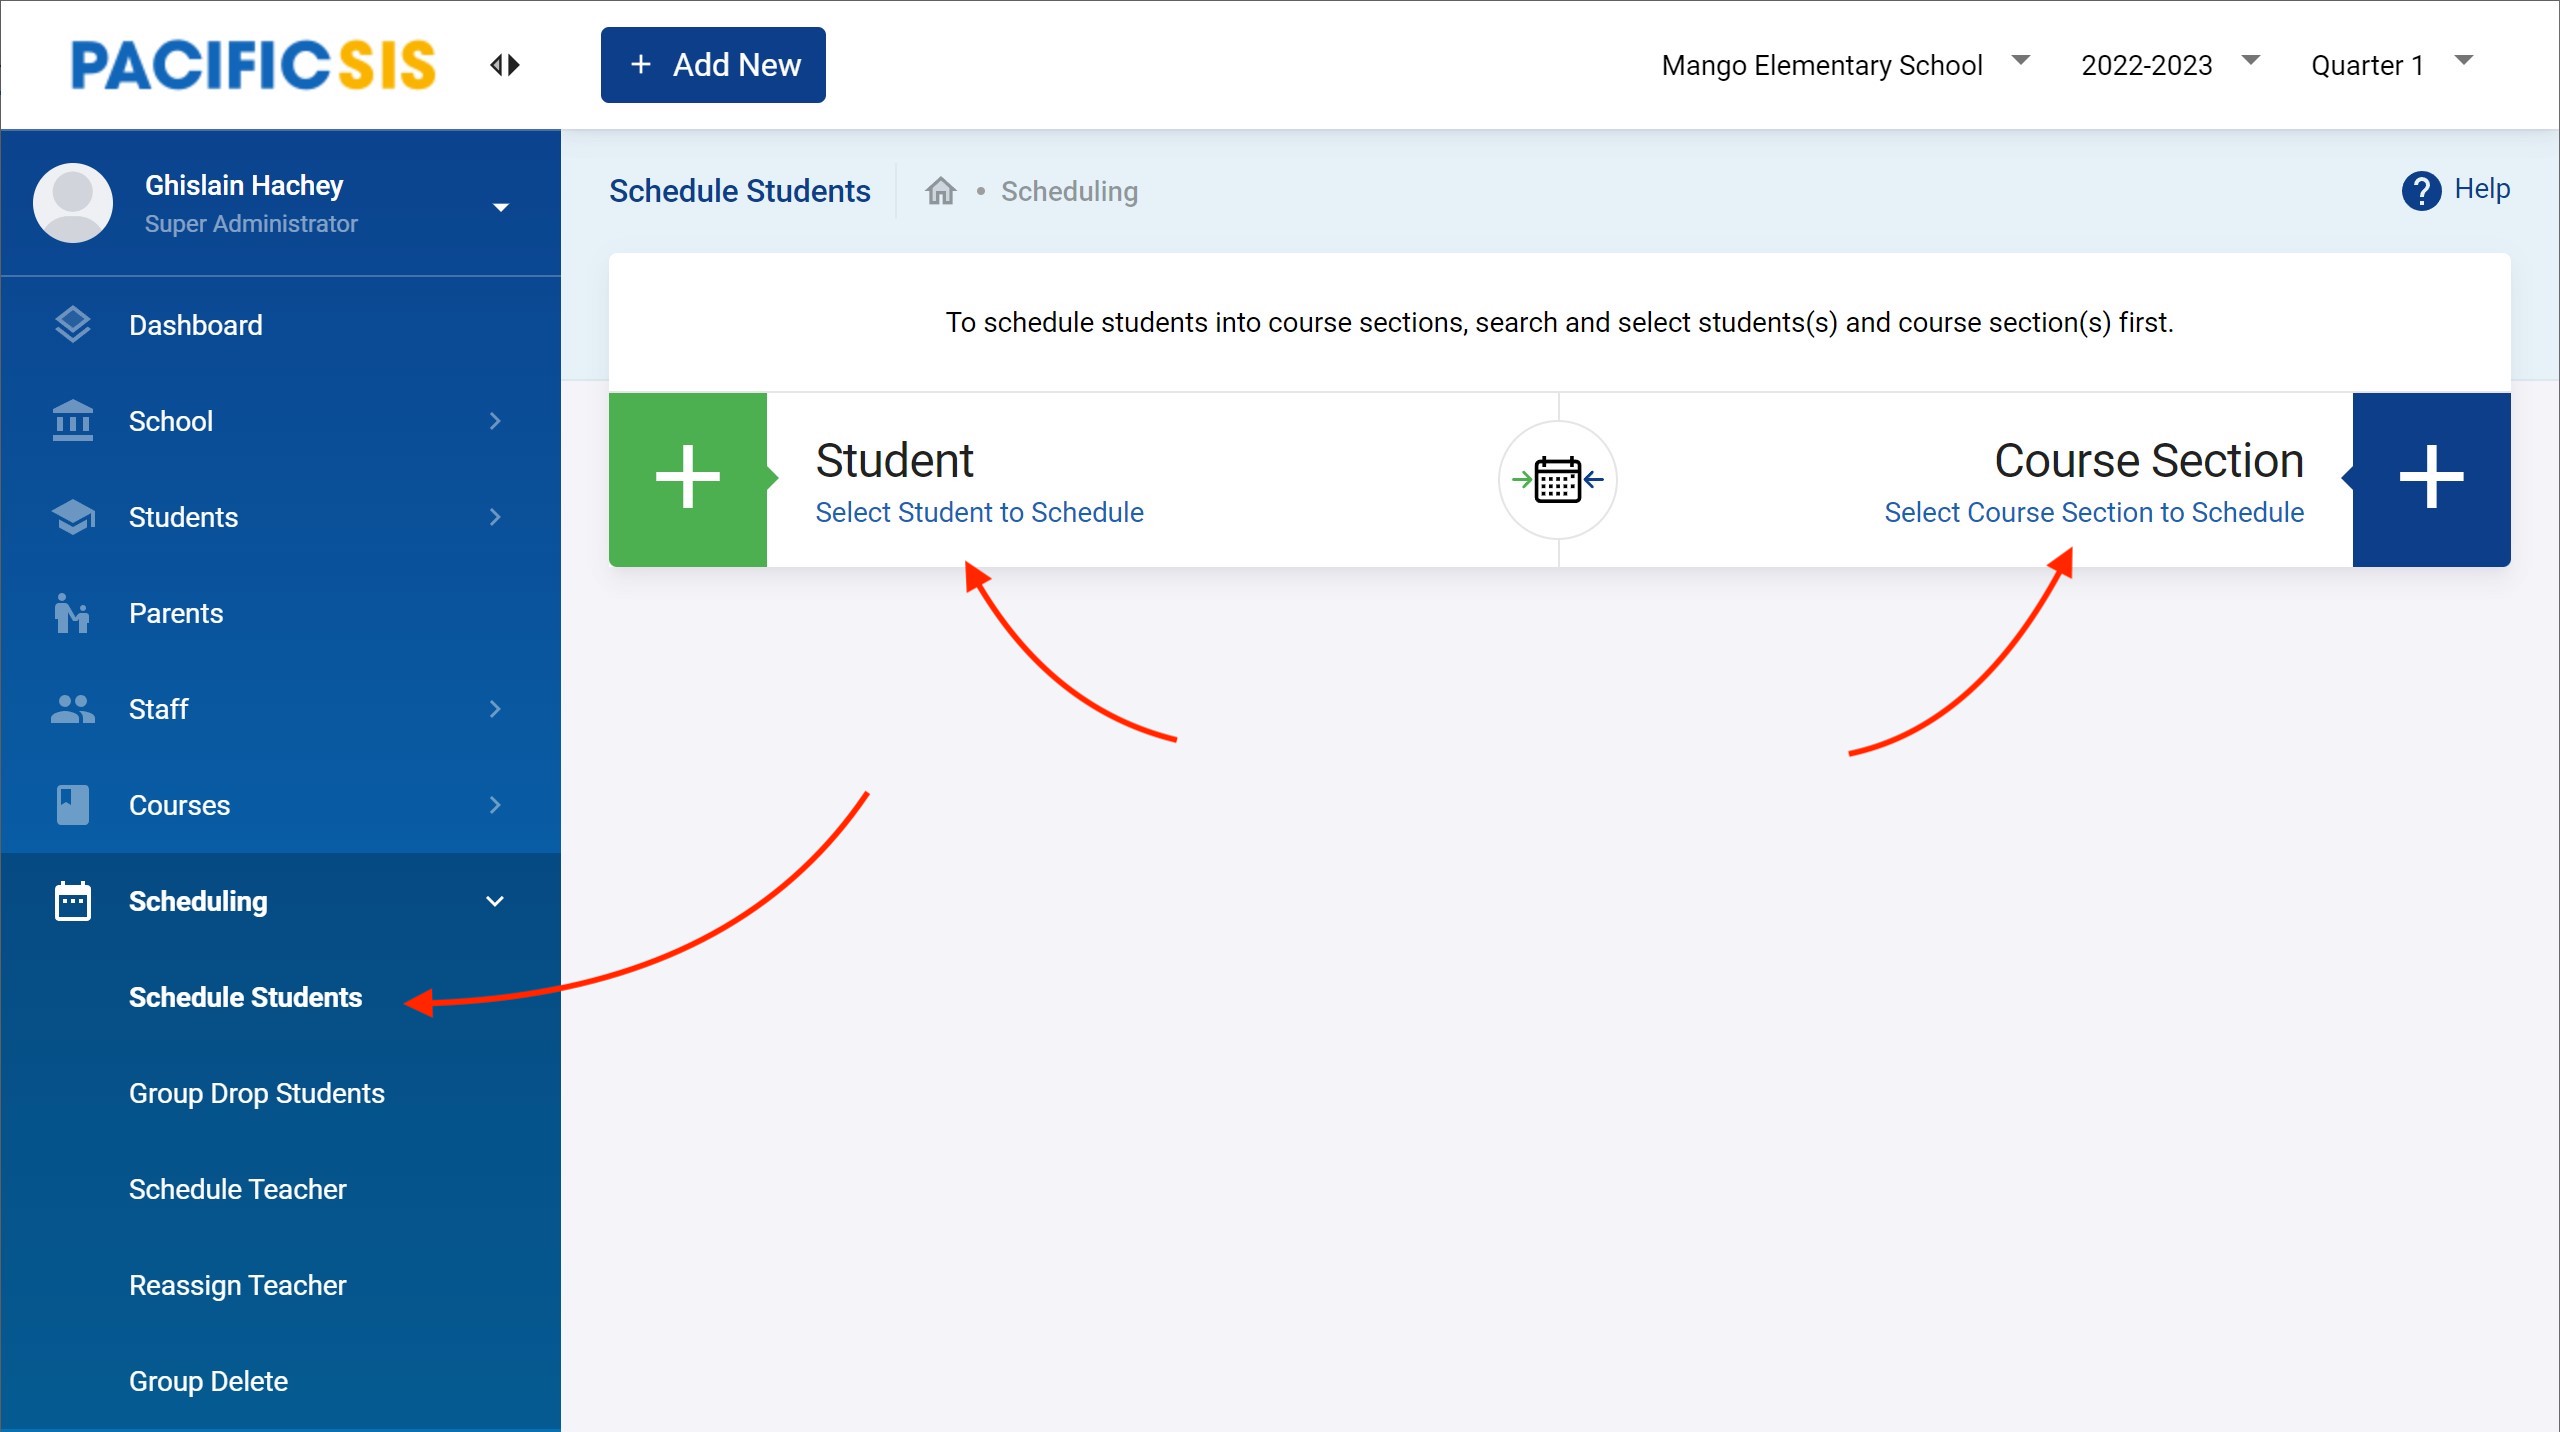
We start with Students though the order should not matter. Click on Select Student to Schedule and get the following. For example, we want to schedule a group of grade 1 students into one of their course sections. Use the filter to only filter Grade 1 students of interest.
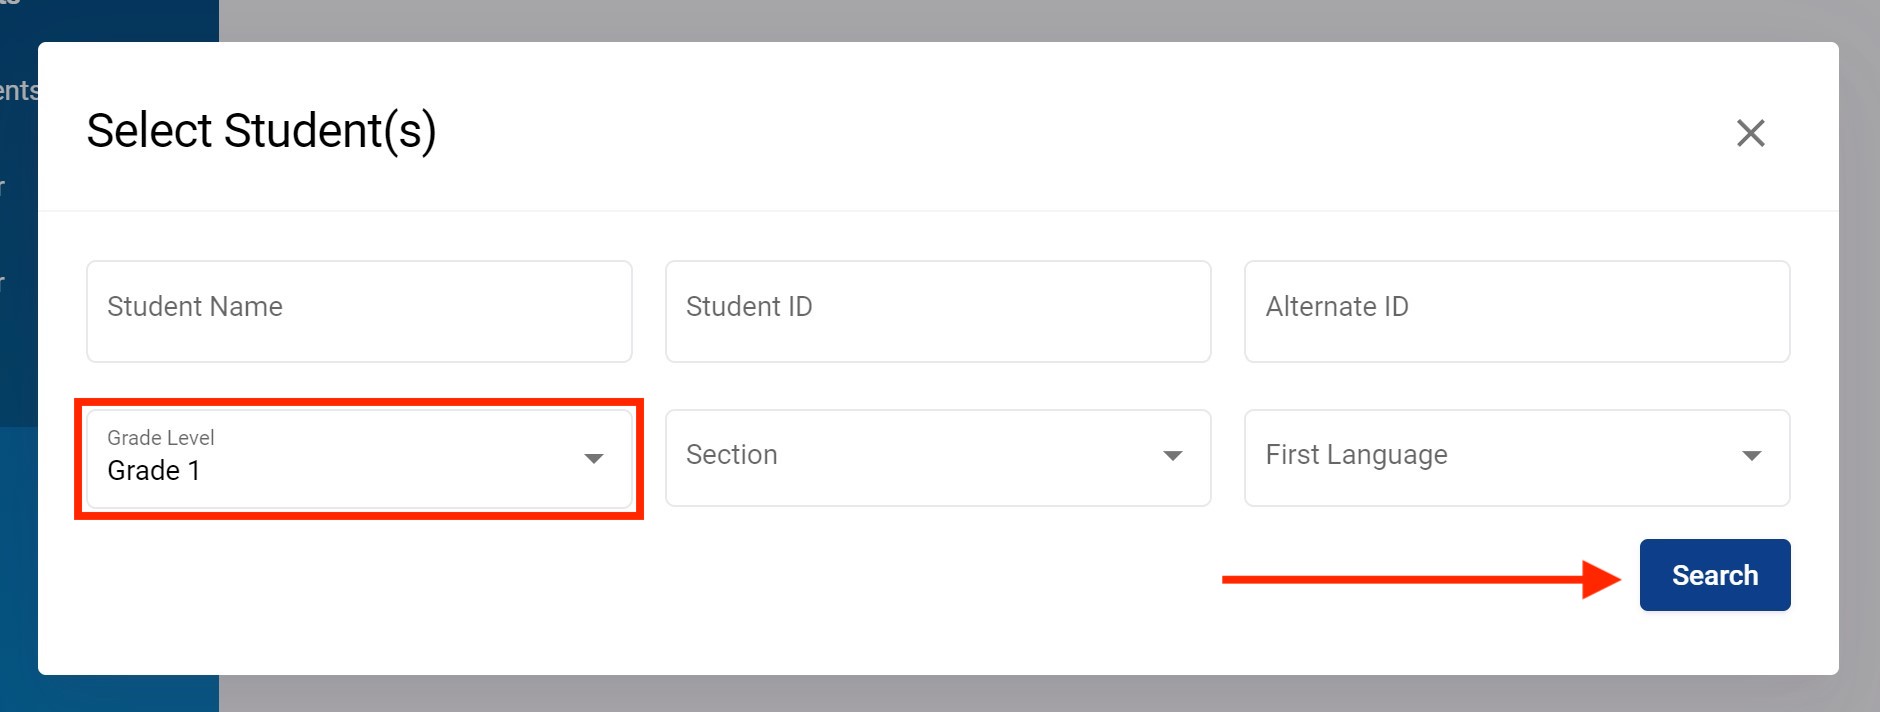
Select all students that should be scheduled into the course section, possibly all of of the Grade 1 in a small school (larger school might want to filter also using the sections). Finally, click on Add Selected Student(s).
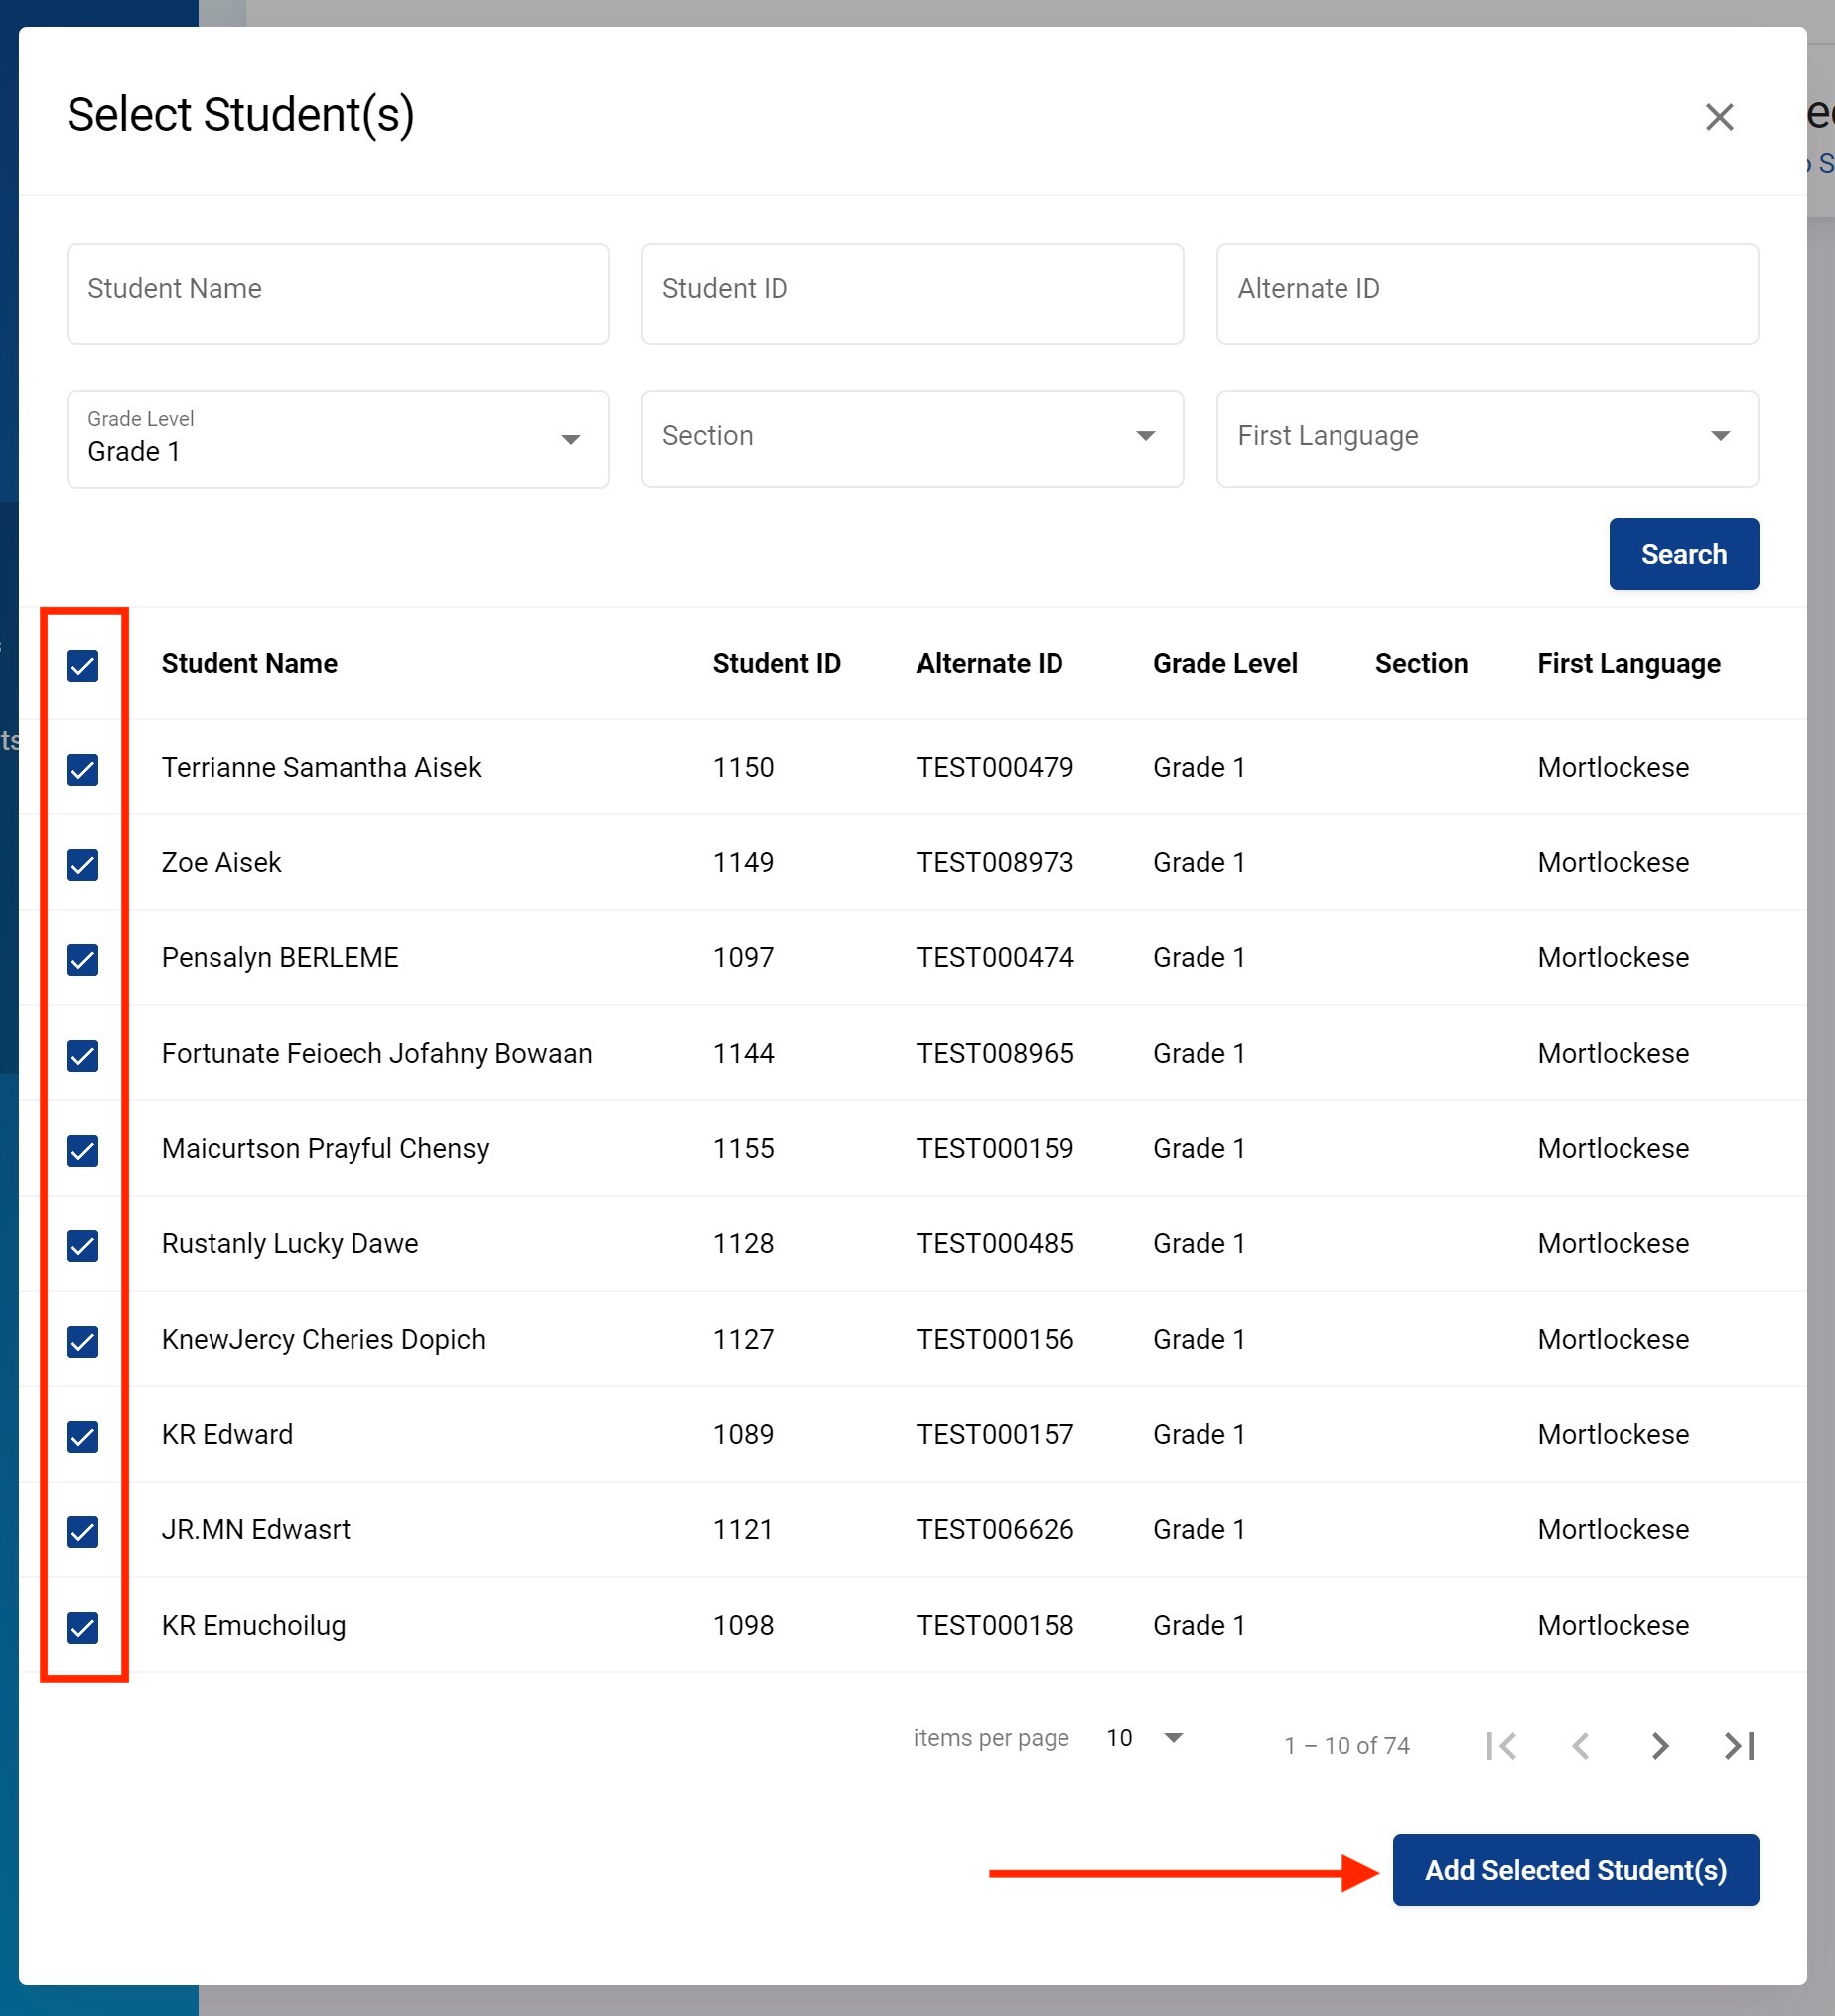
You should see a summary of the number of students on the left side as shown below.
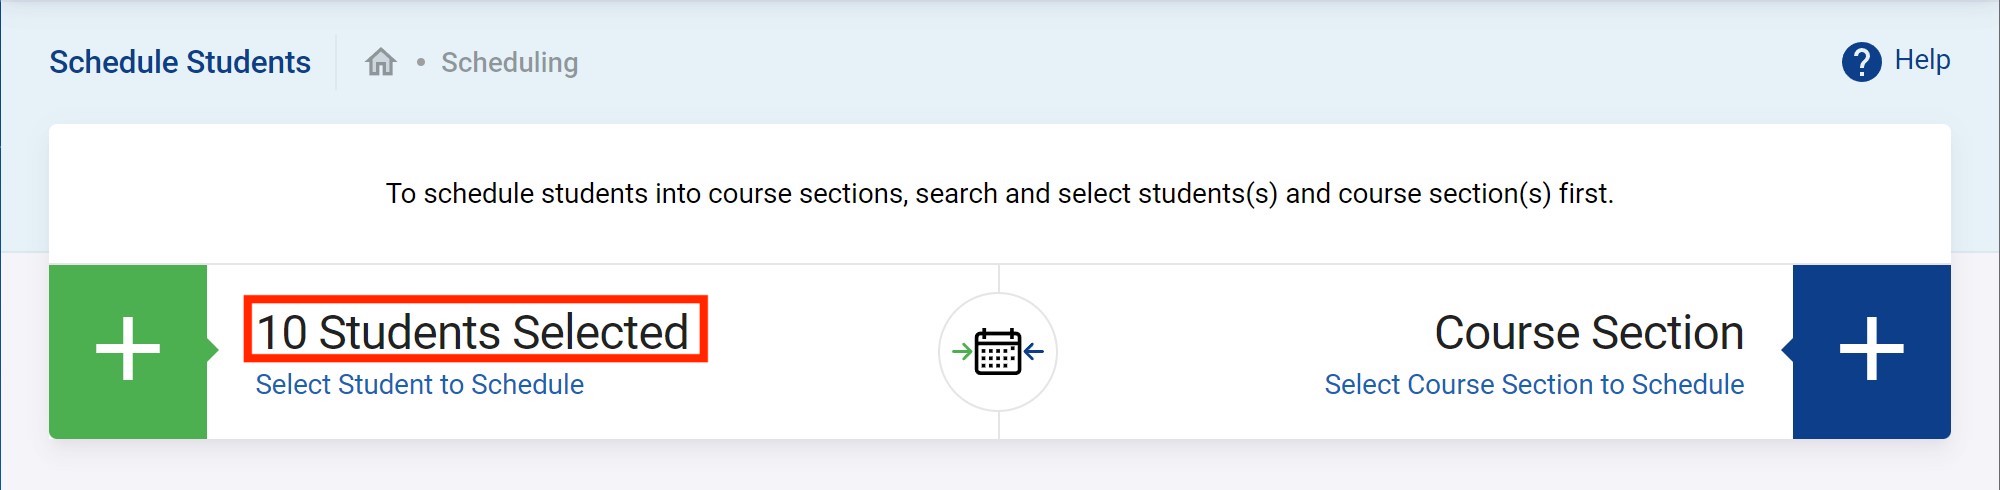
Now, click on Select Course Section to Schedule.
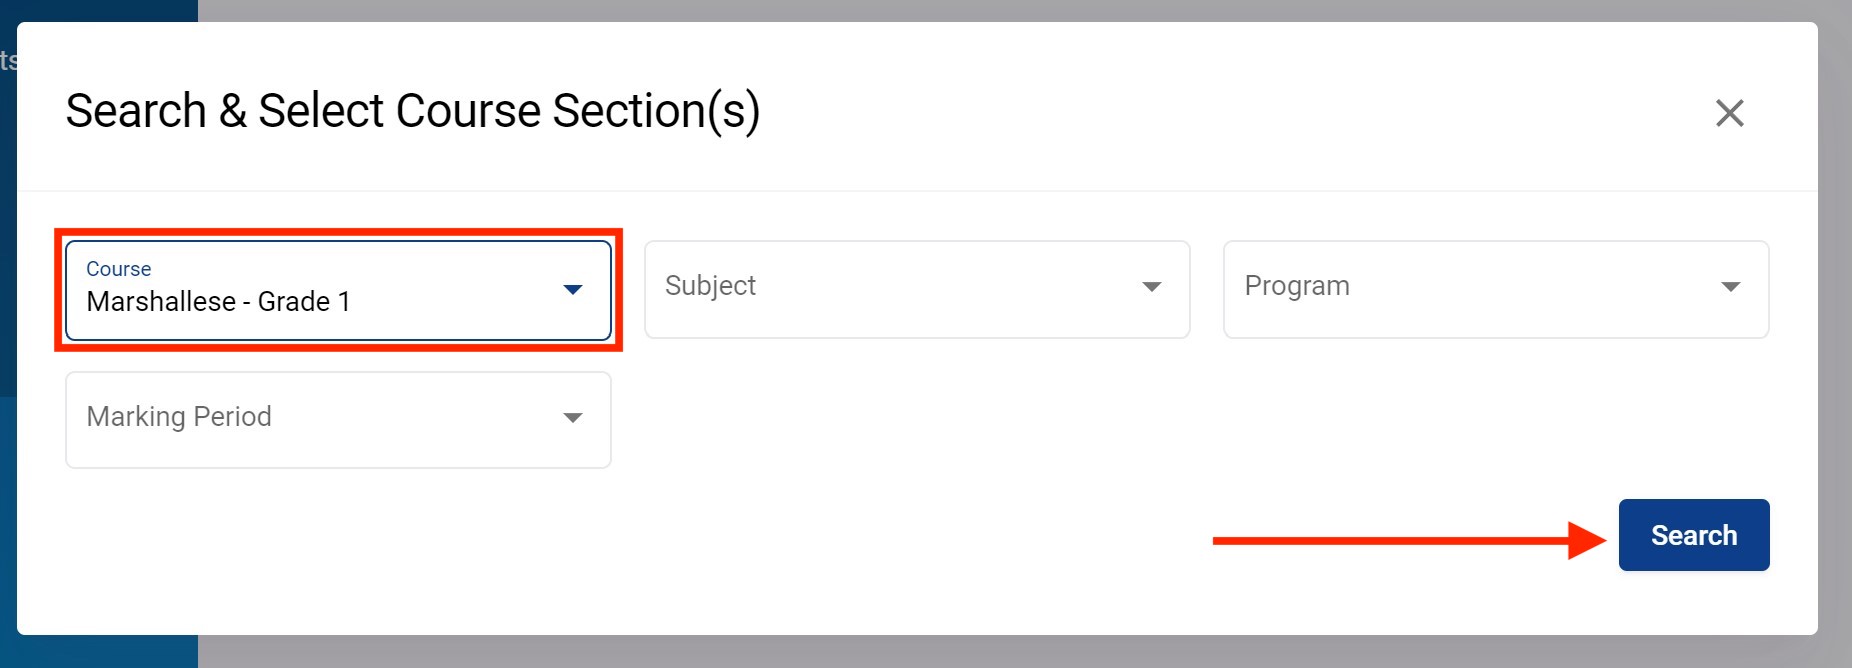
Search and select the course sections the list of students will be scheduled into. This could be one or more than one (even of all their assigned course section) in one go. The following examples schedules into a single course section.
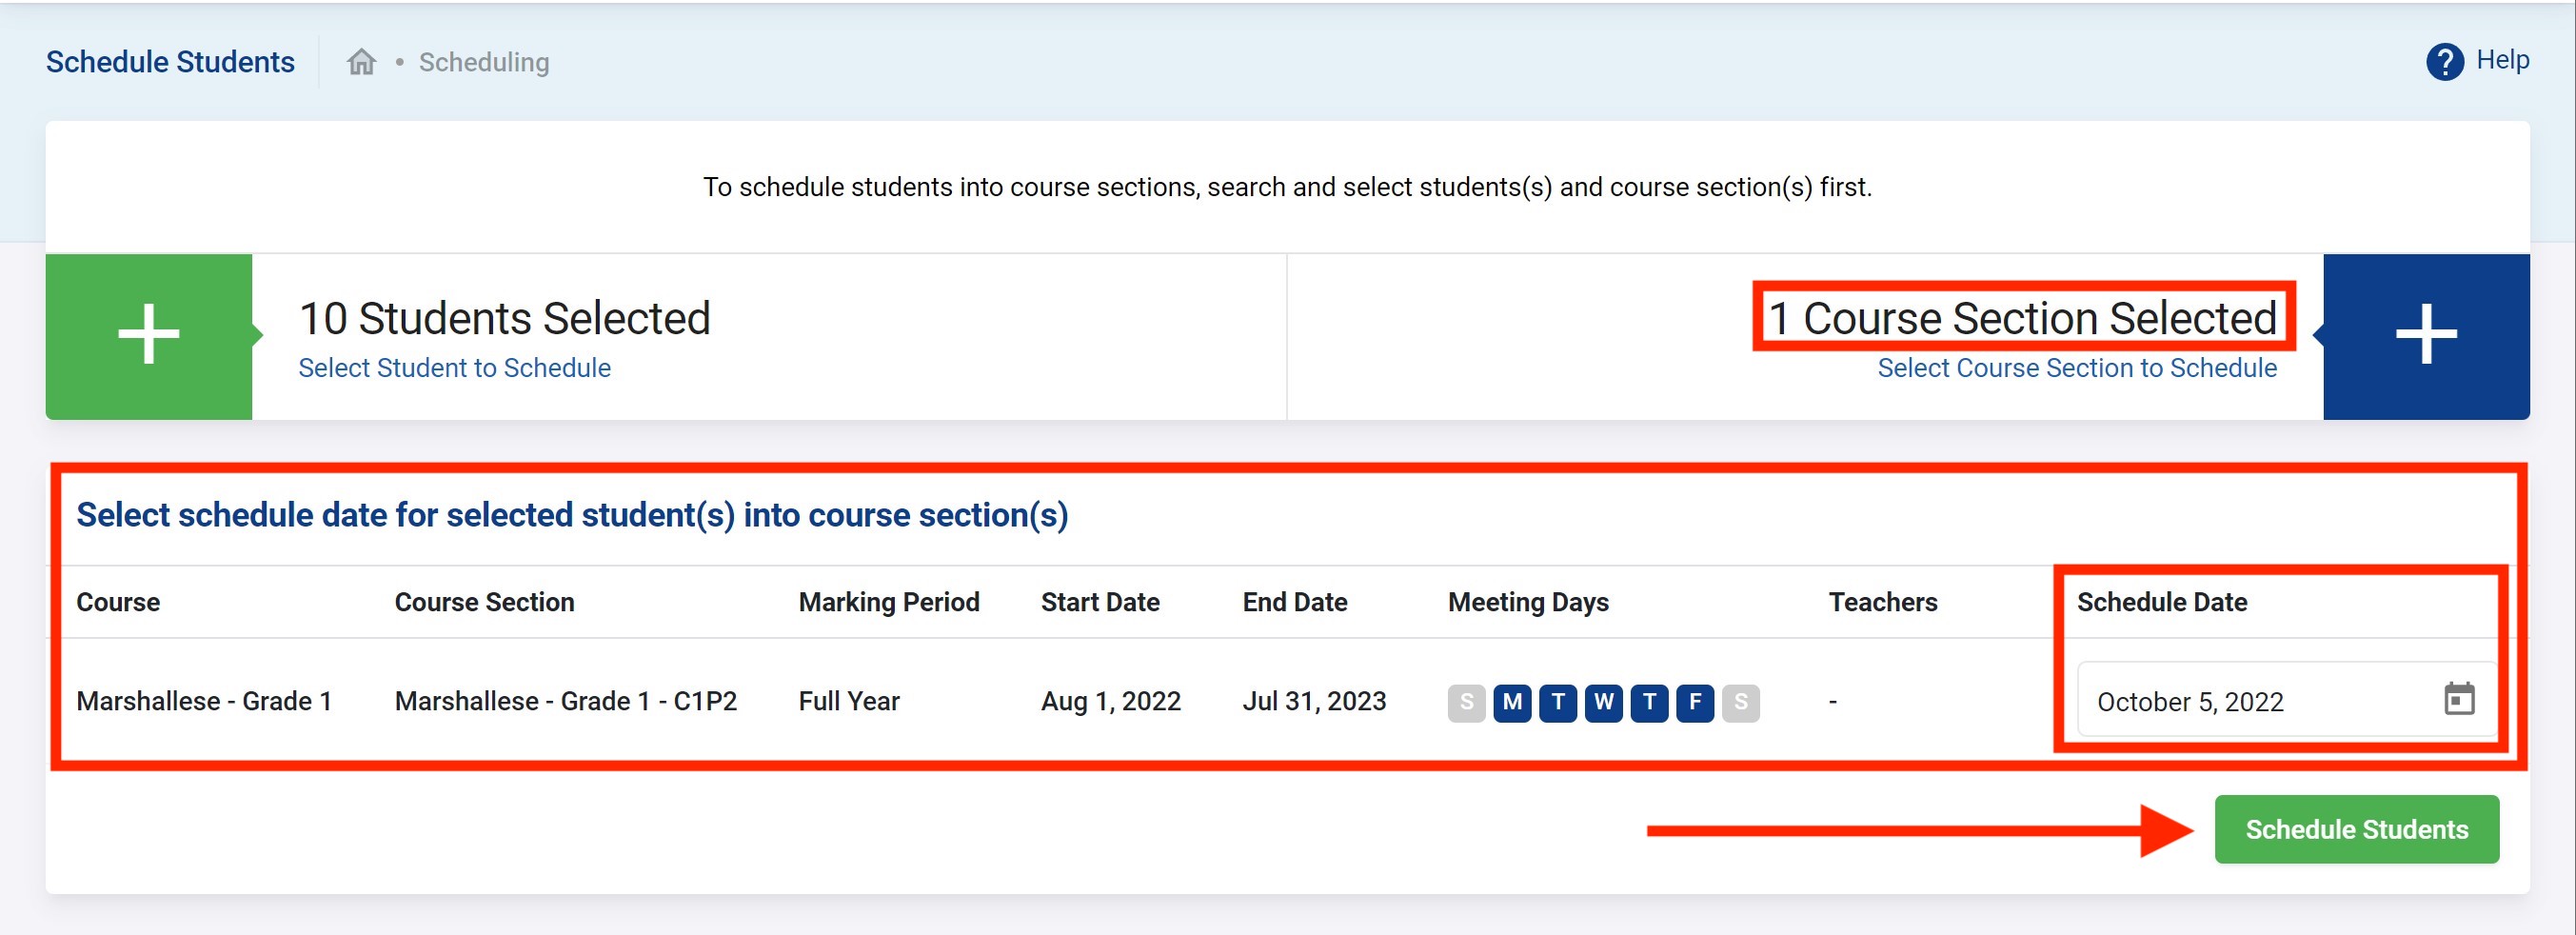
You will then see the following where you can edit the date on which those students will be scheduled into those course.
When ready click on Schedule Student.
You should see the following success message if nothing went wrong.
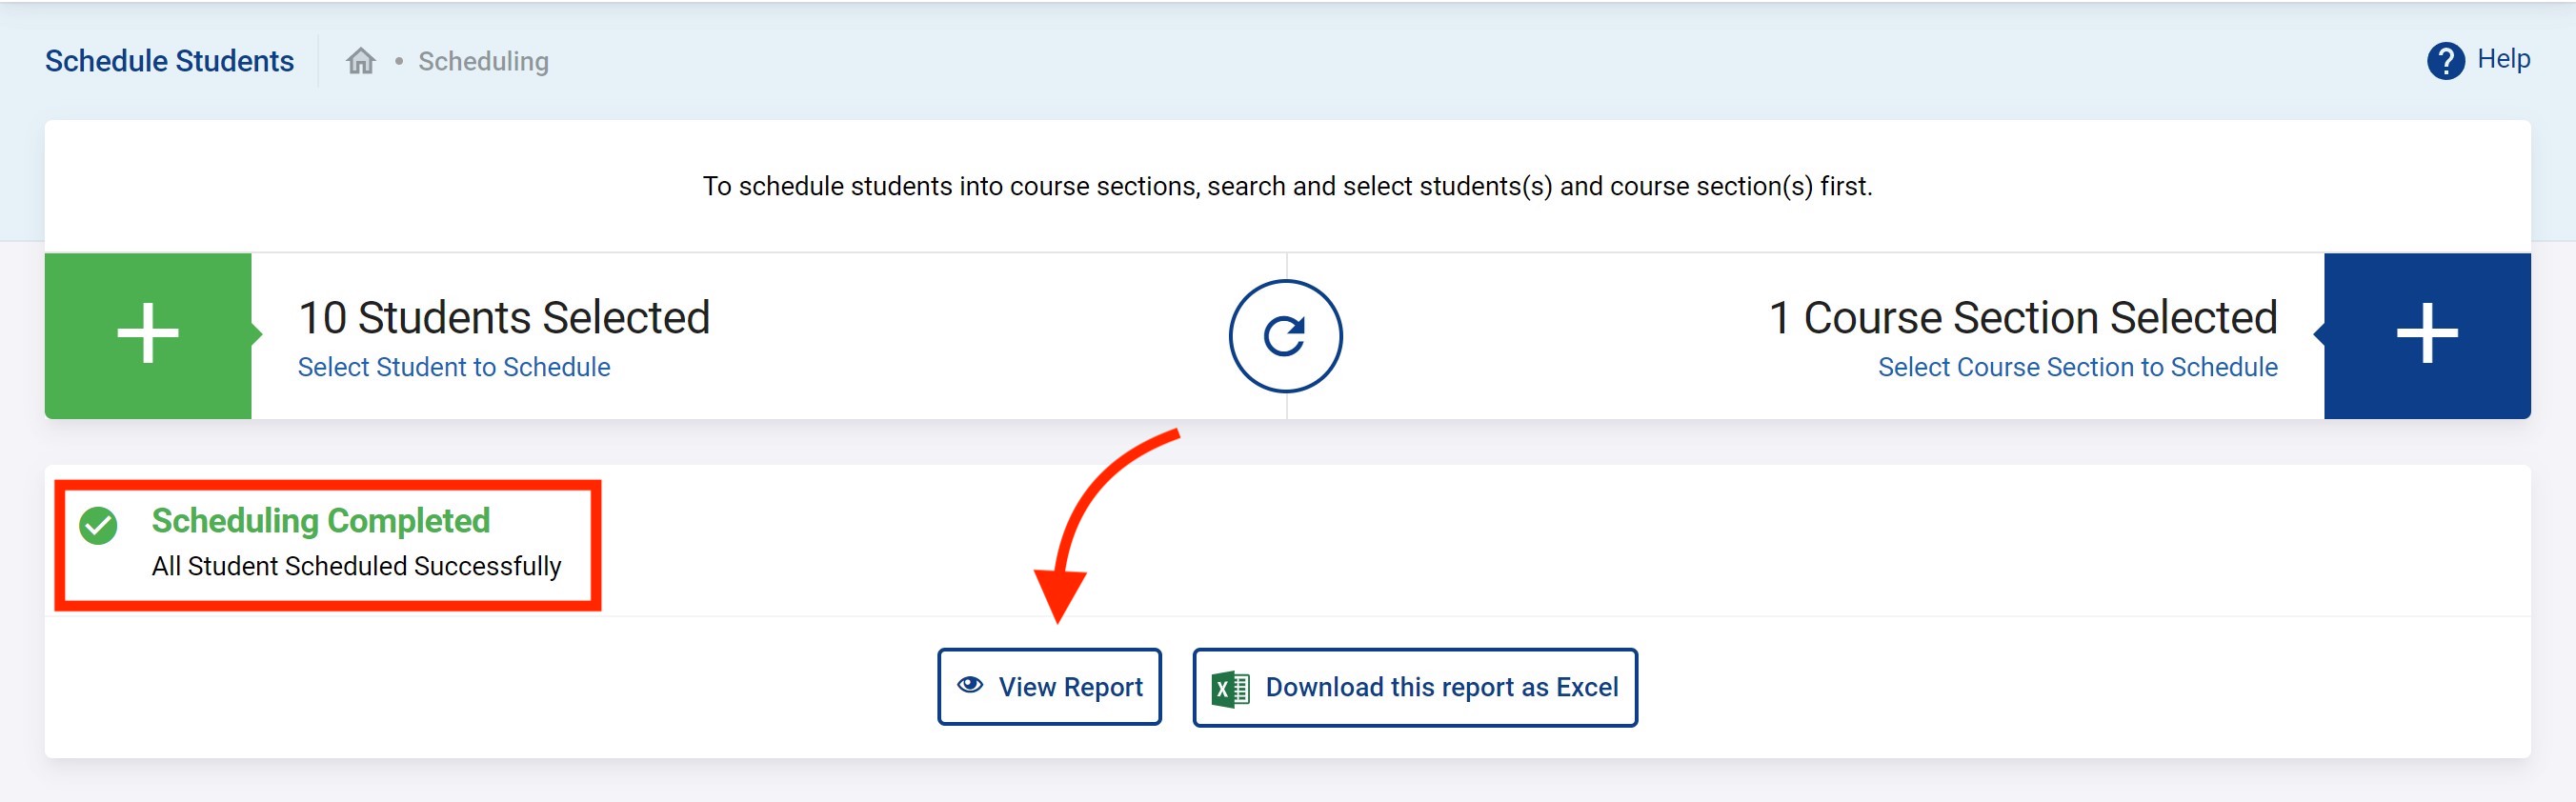
You can then also view the report of this action directly online and also download an excel export of it.
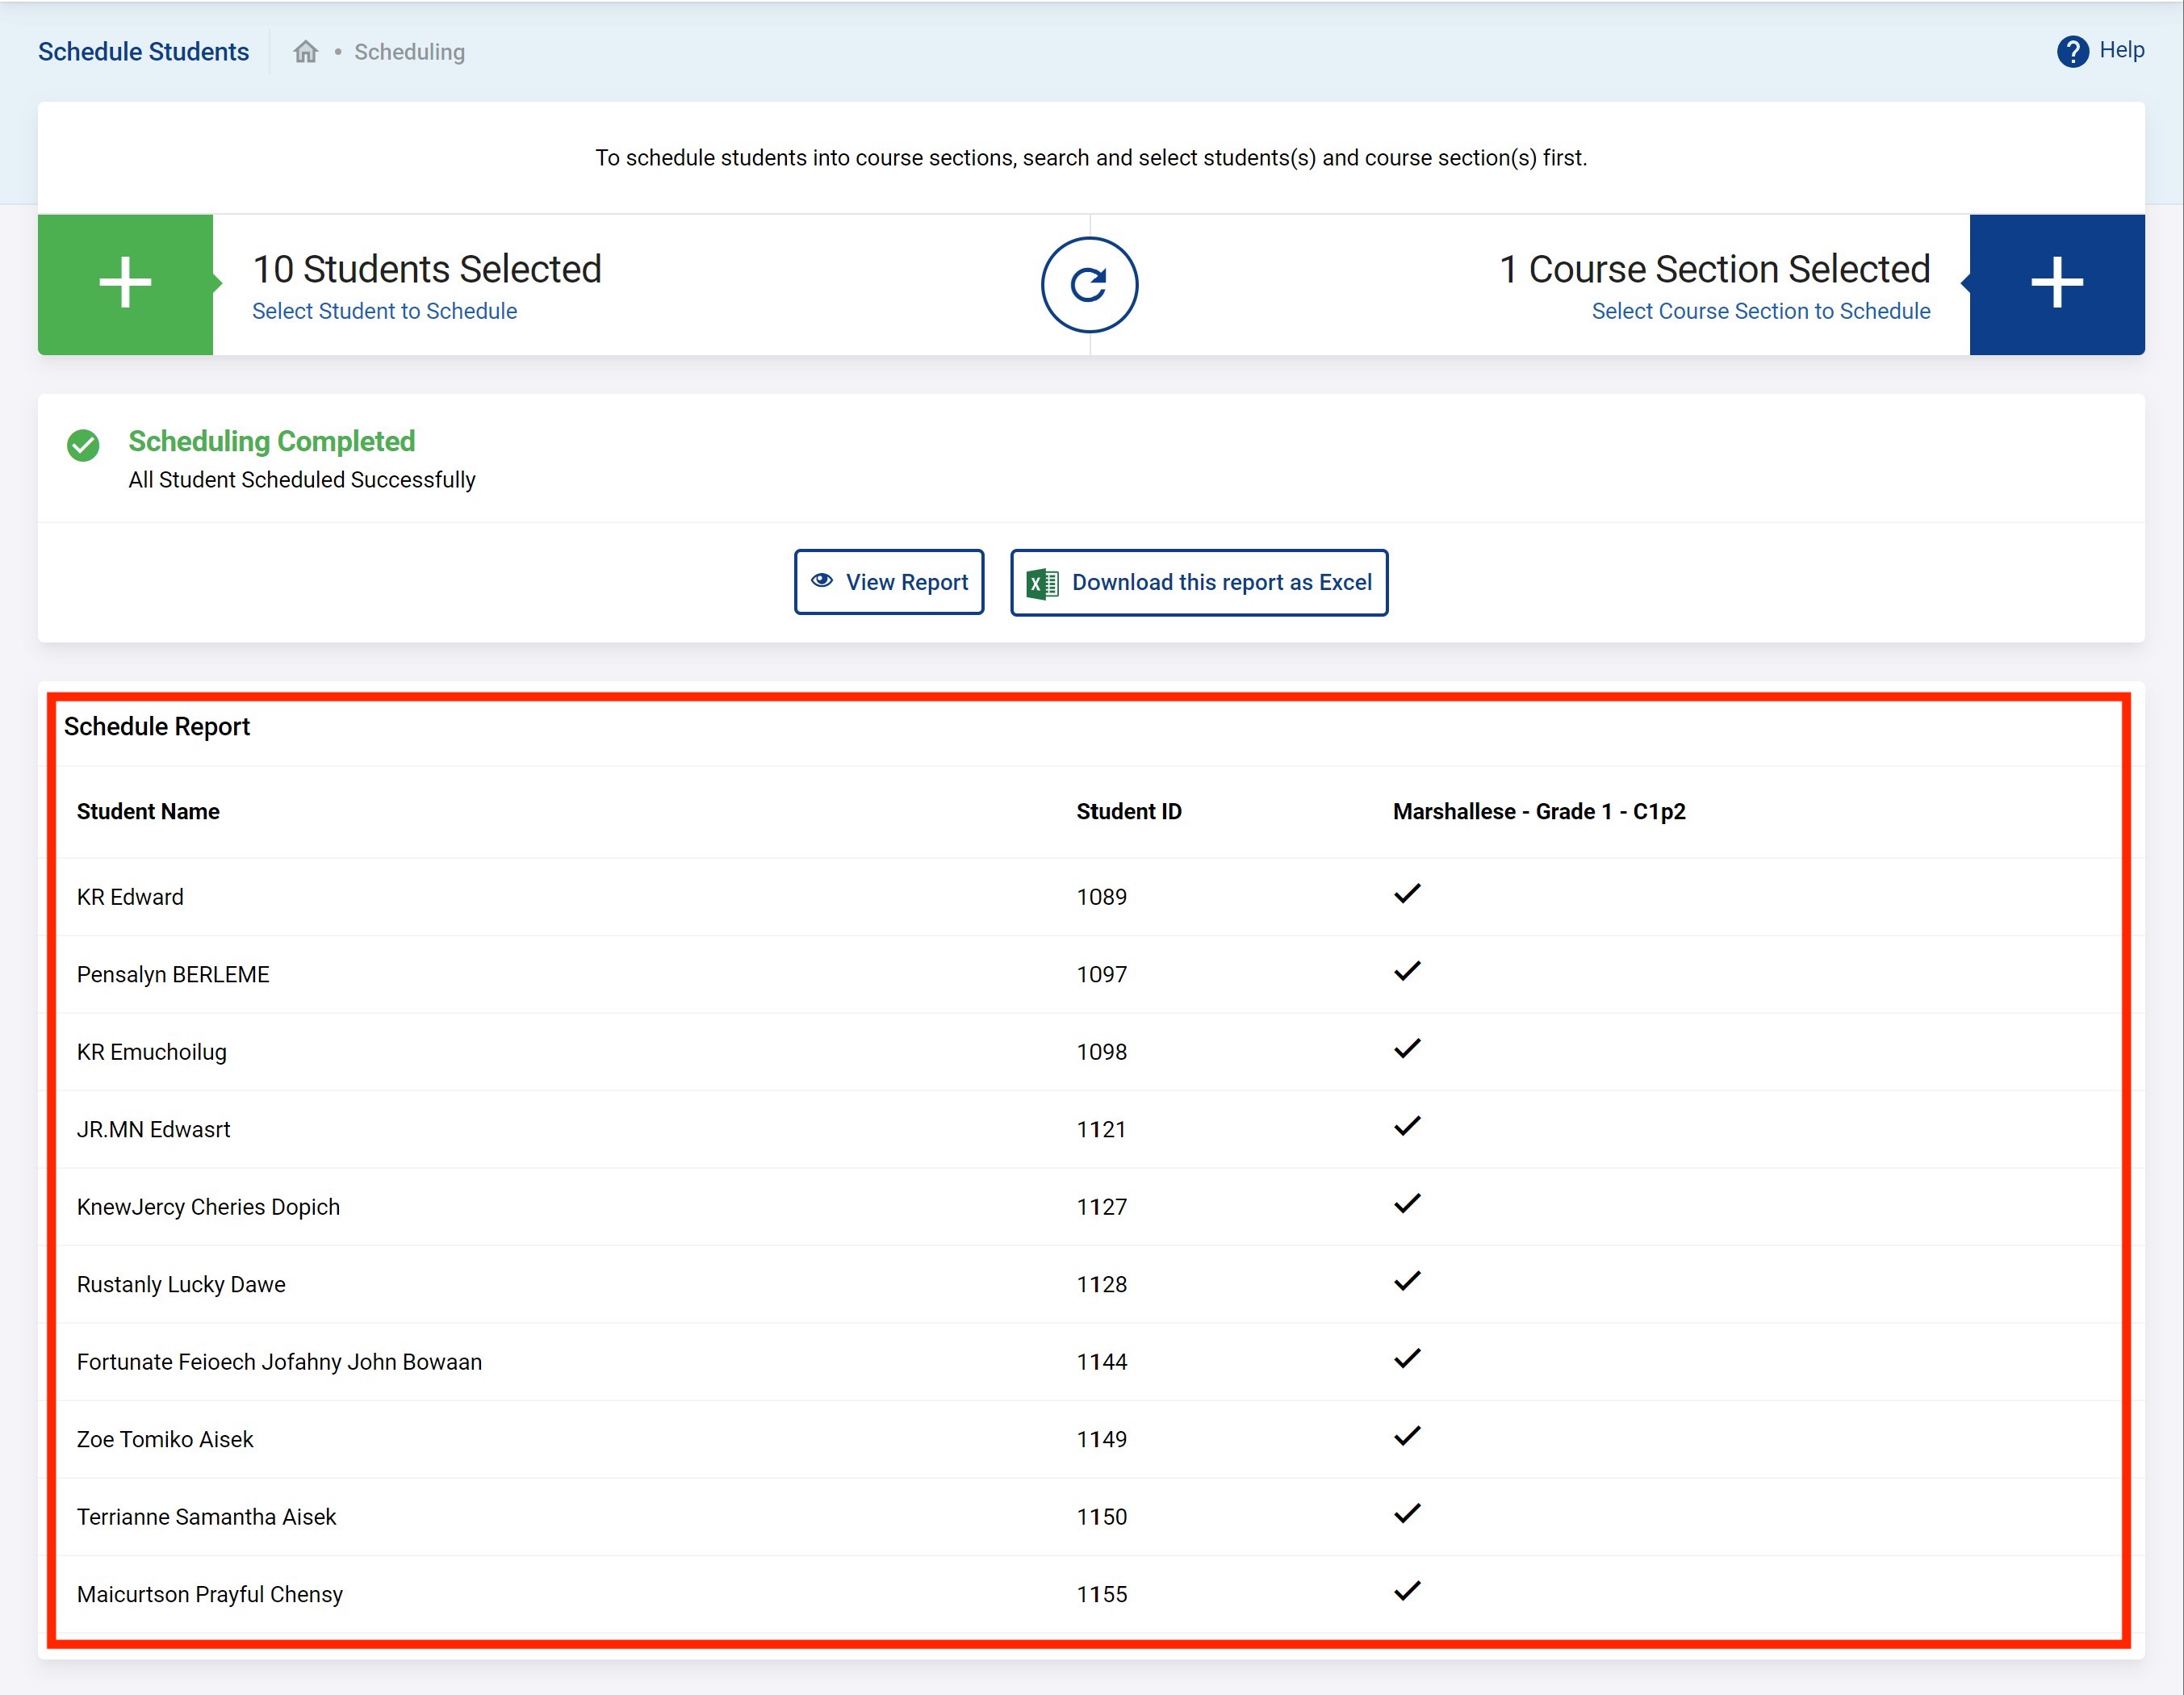
Verify this worked as expected by browsing to one of the newly scheduled students and verifying their course schedule. The demo student shown below is now enrolled into this course section.
Schedule an Individual Student
Less commonly, you may want to schedule an individual student. You could do it as above and only select the individual student. But it can also be done directly in the student's profile page. This may happen when a student joins the school later when the other students have all already be scheduled into the course.
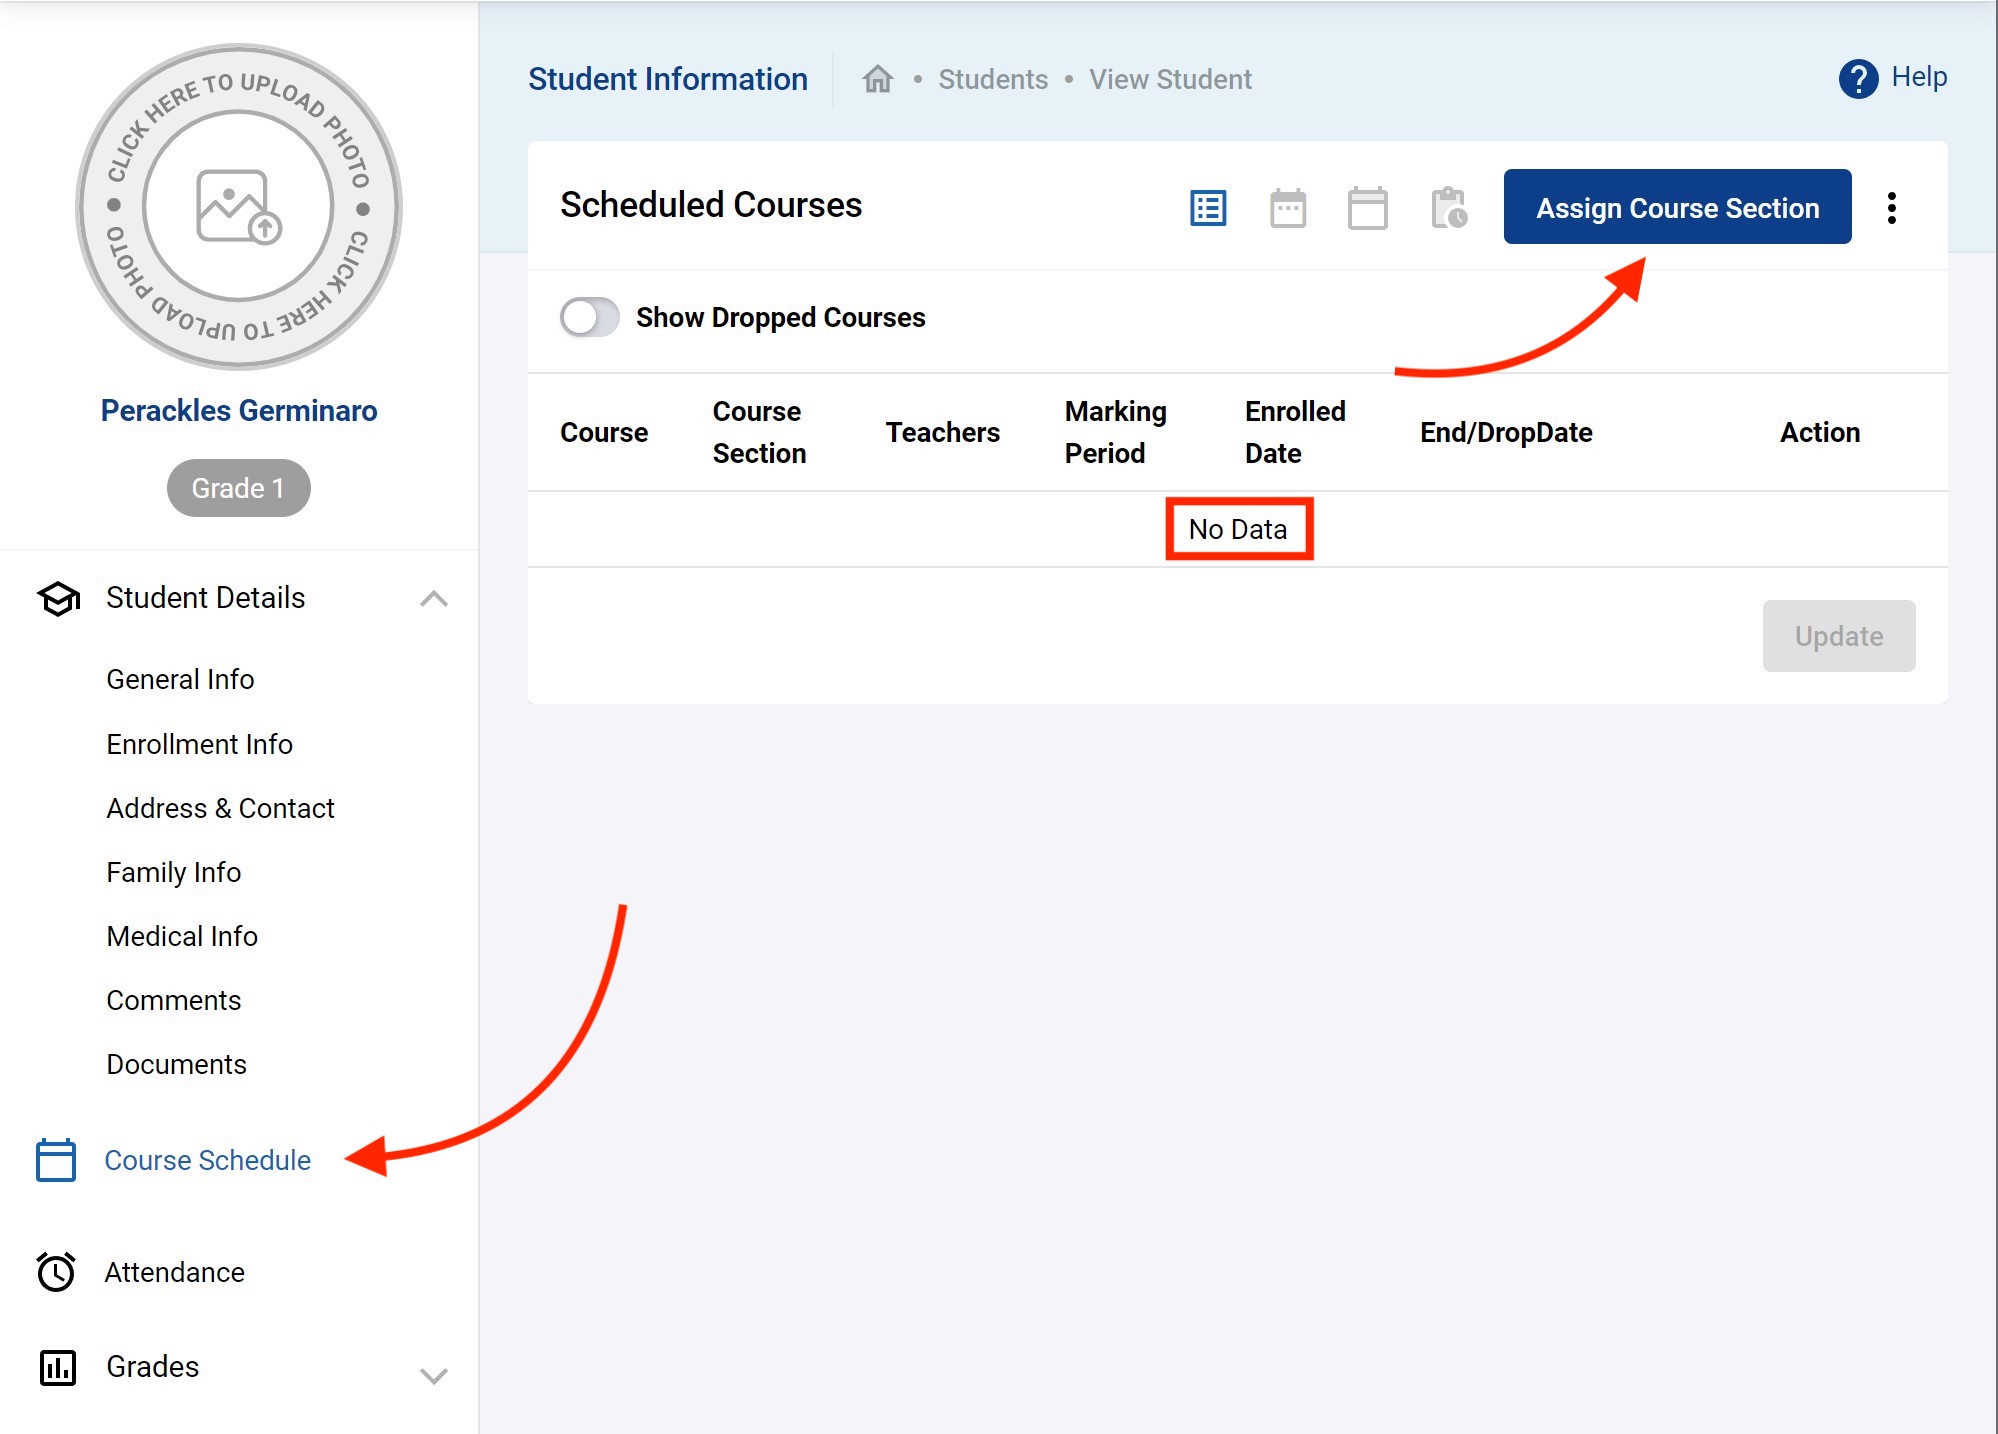
Directly from within the student's profile in the Course Schedule. The example student below has no enrollment into any course section. Click on Assign Course Section to add one or more course sections.
Use usual filter to search course section to enroll student into, select them and click on Assign Selected Course Section(s). The below example is a single course.

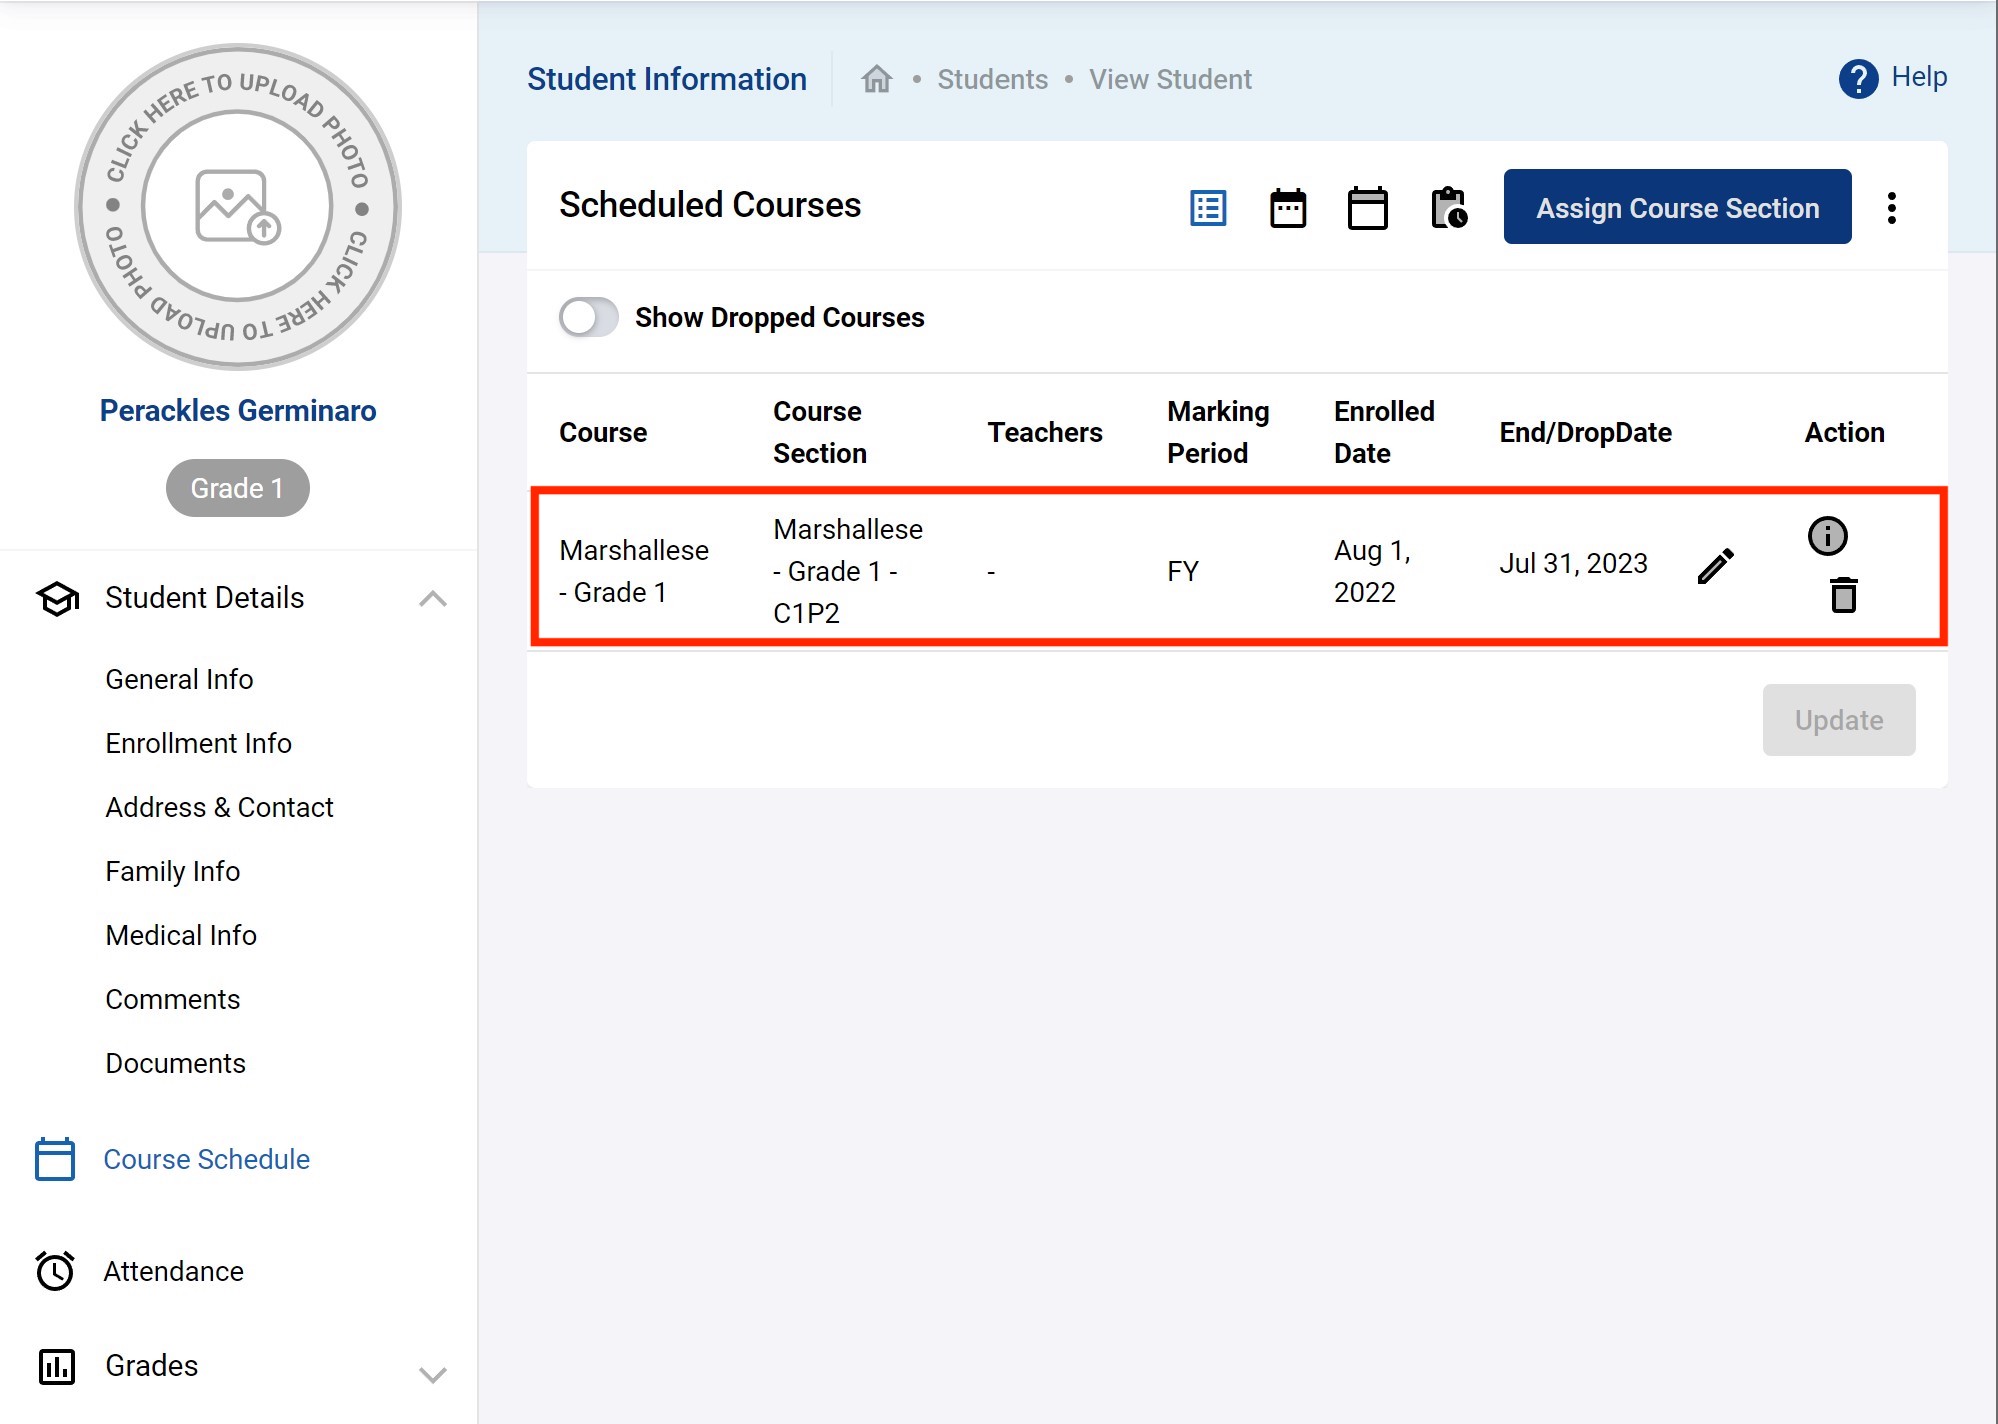
The result shows that student now has a new enrollment to the course section.
Dropping Student(s) from Scheduled Course (Sections)
The drop student from a scheduled course section is what you want if you want to keep any existing data up to a certain date and “drop” the student from that date. Use case examples for dropping include the following:
- The student(s) dropped out of school at a specific date in the school year
- The student(s) left the school (to migrate to another country)
- The student(s) died in the school year (hopefully not)
- The student(s) left school in the middle of school year for what ever other reason
There are two ways this can be done:
- Individually dropping a student from its scheduled course section(s)
- Group dropping students from their scheduled course section(s)
Individually Dropping
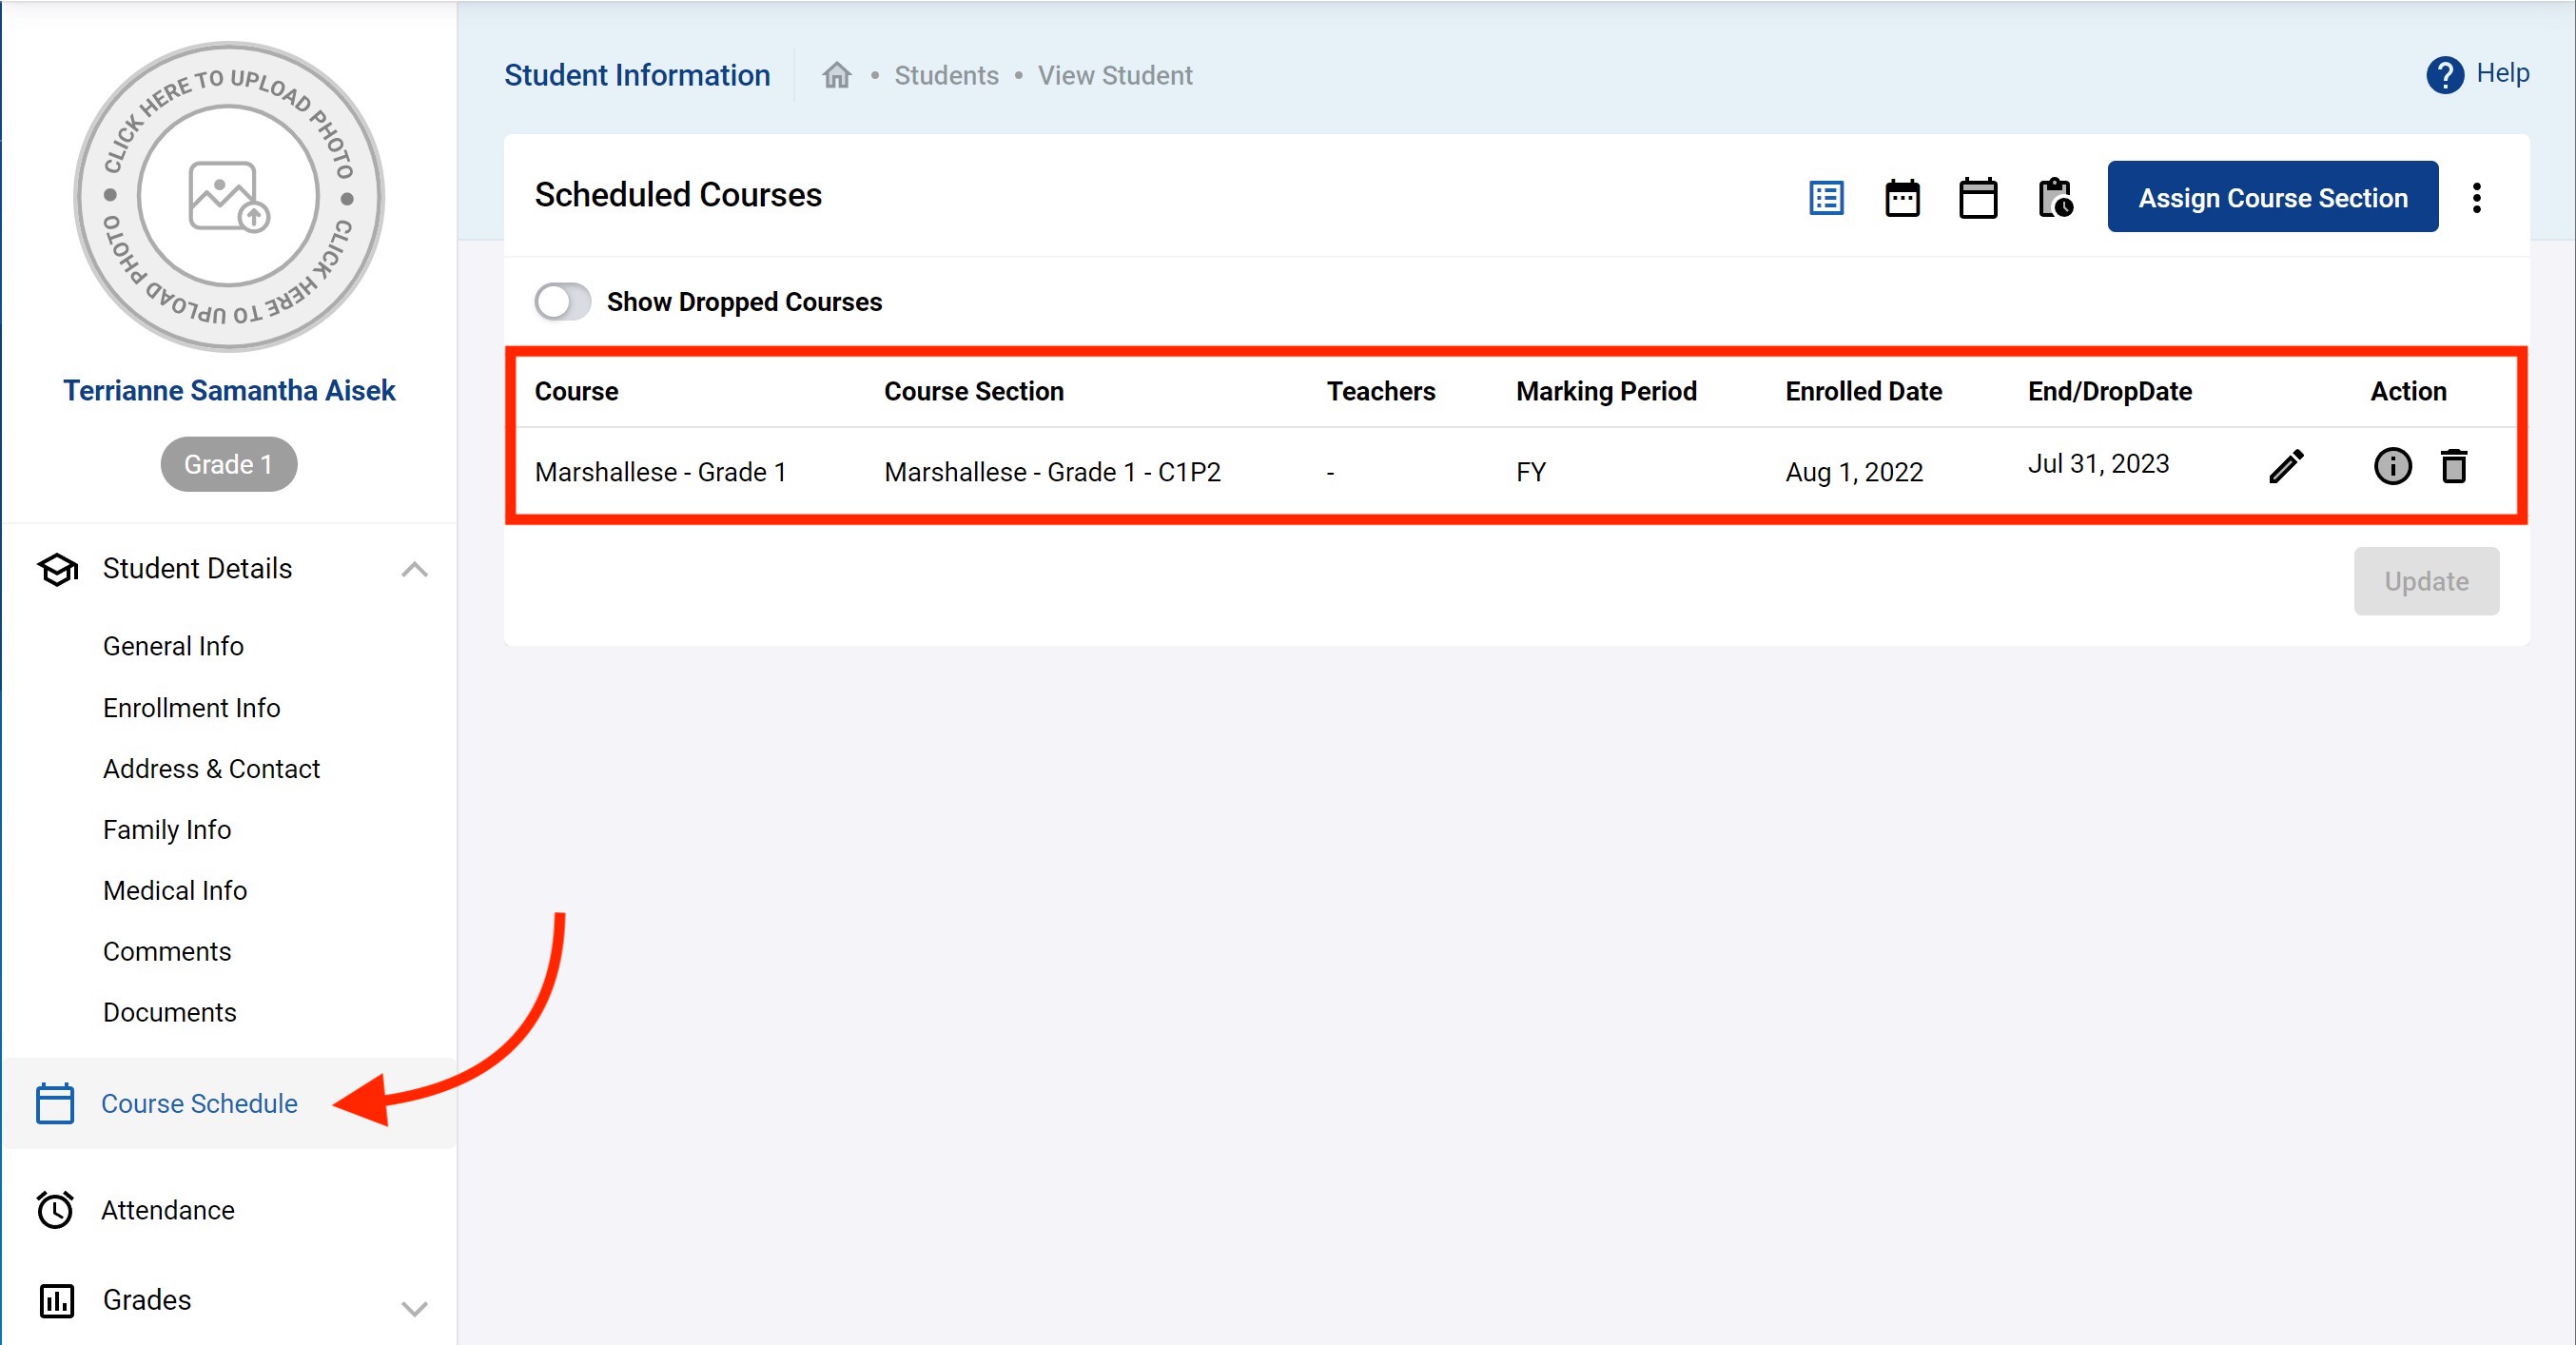
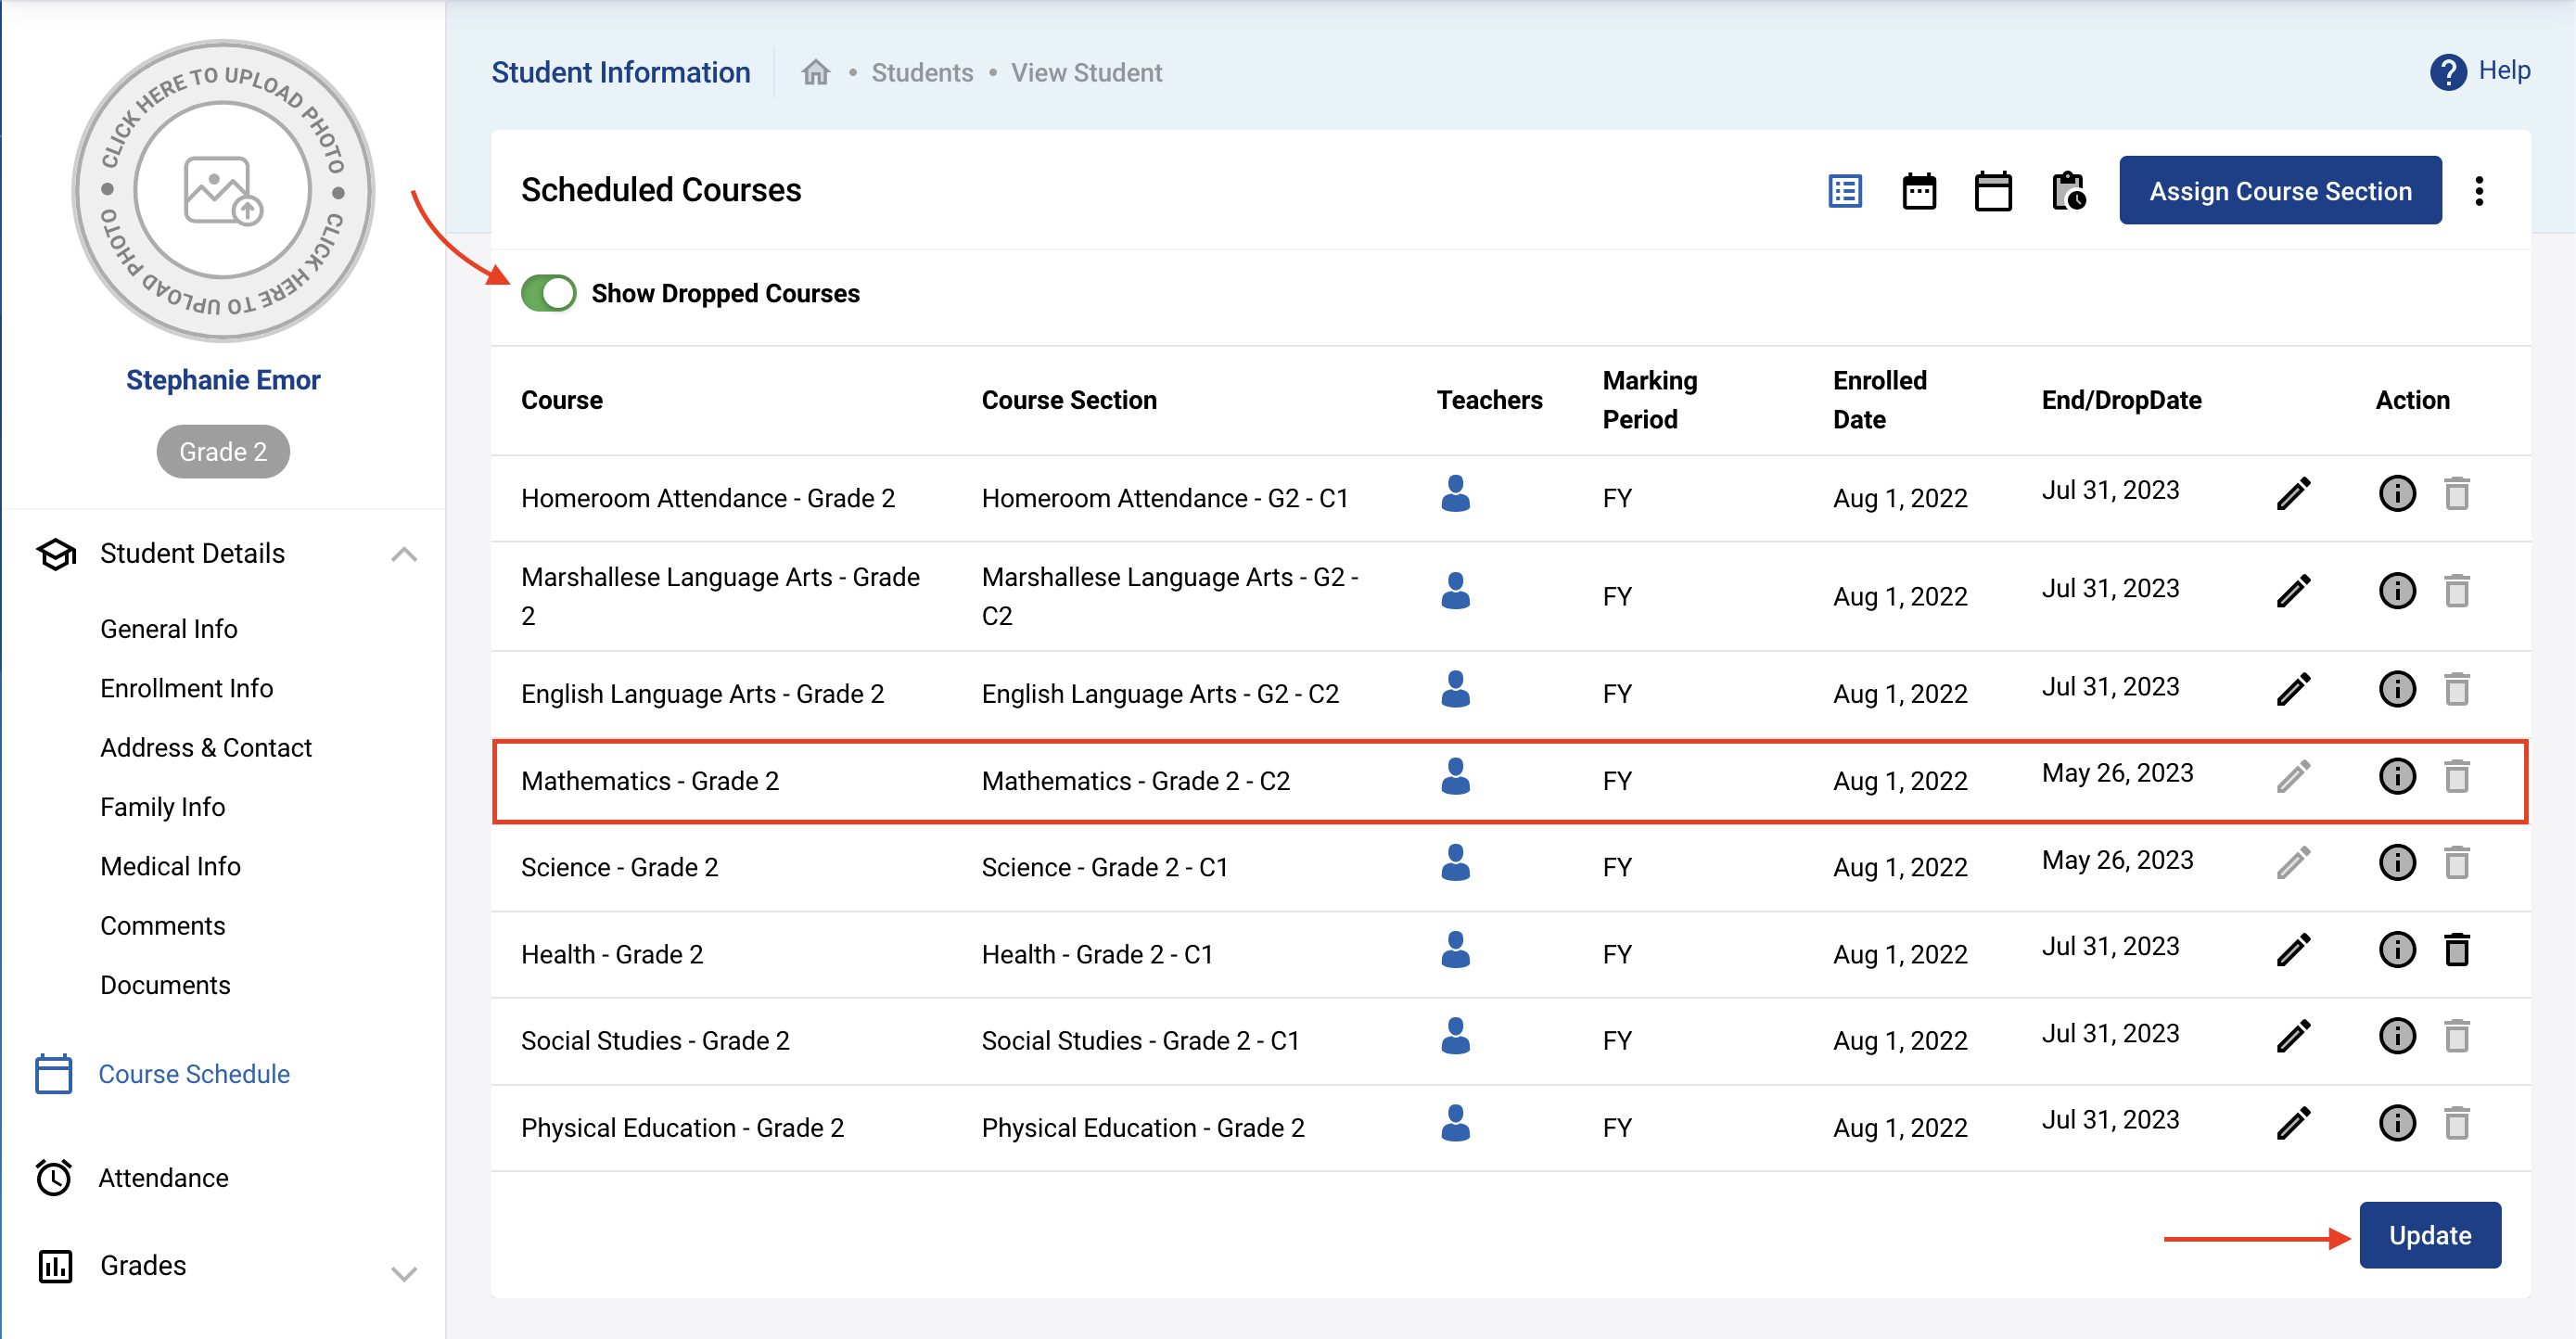
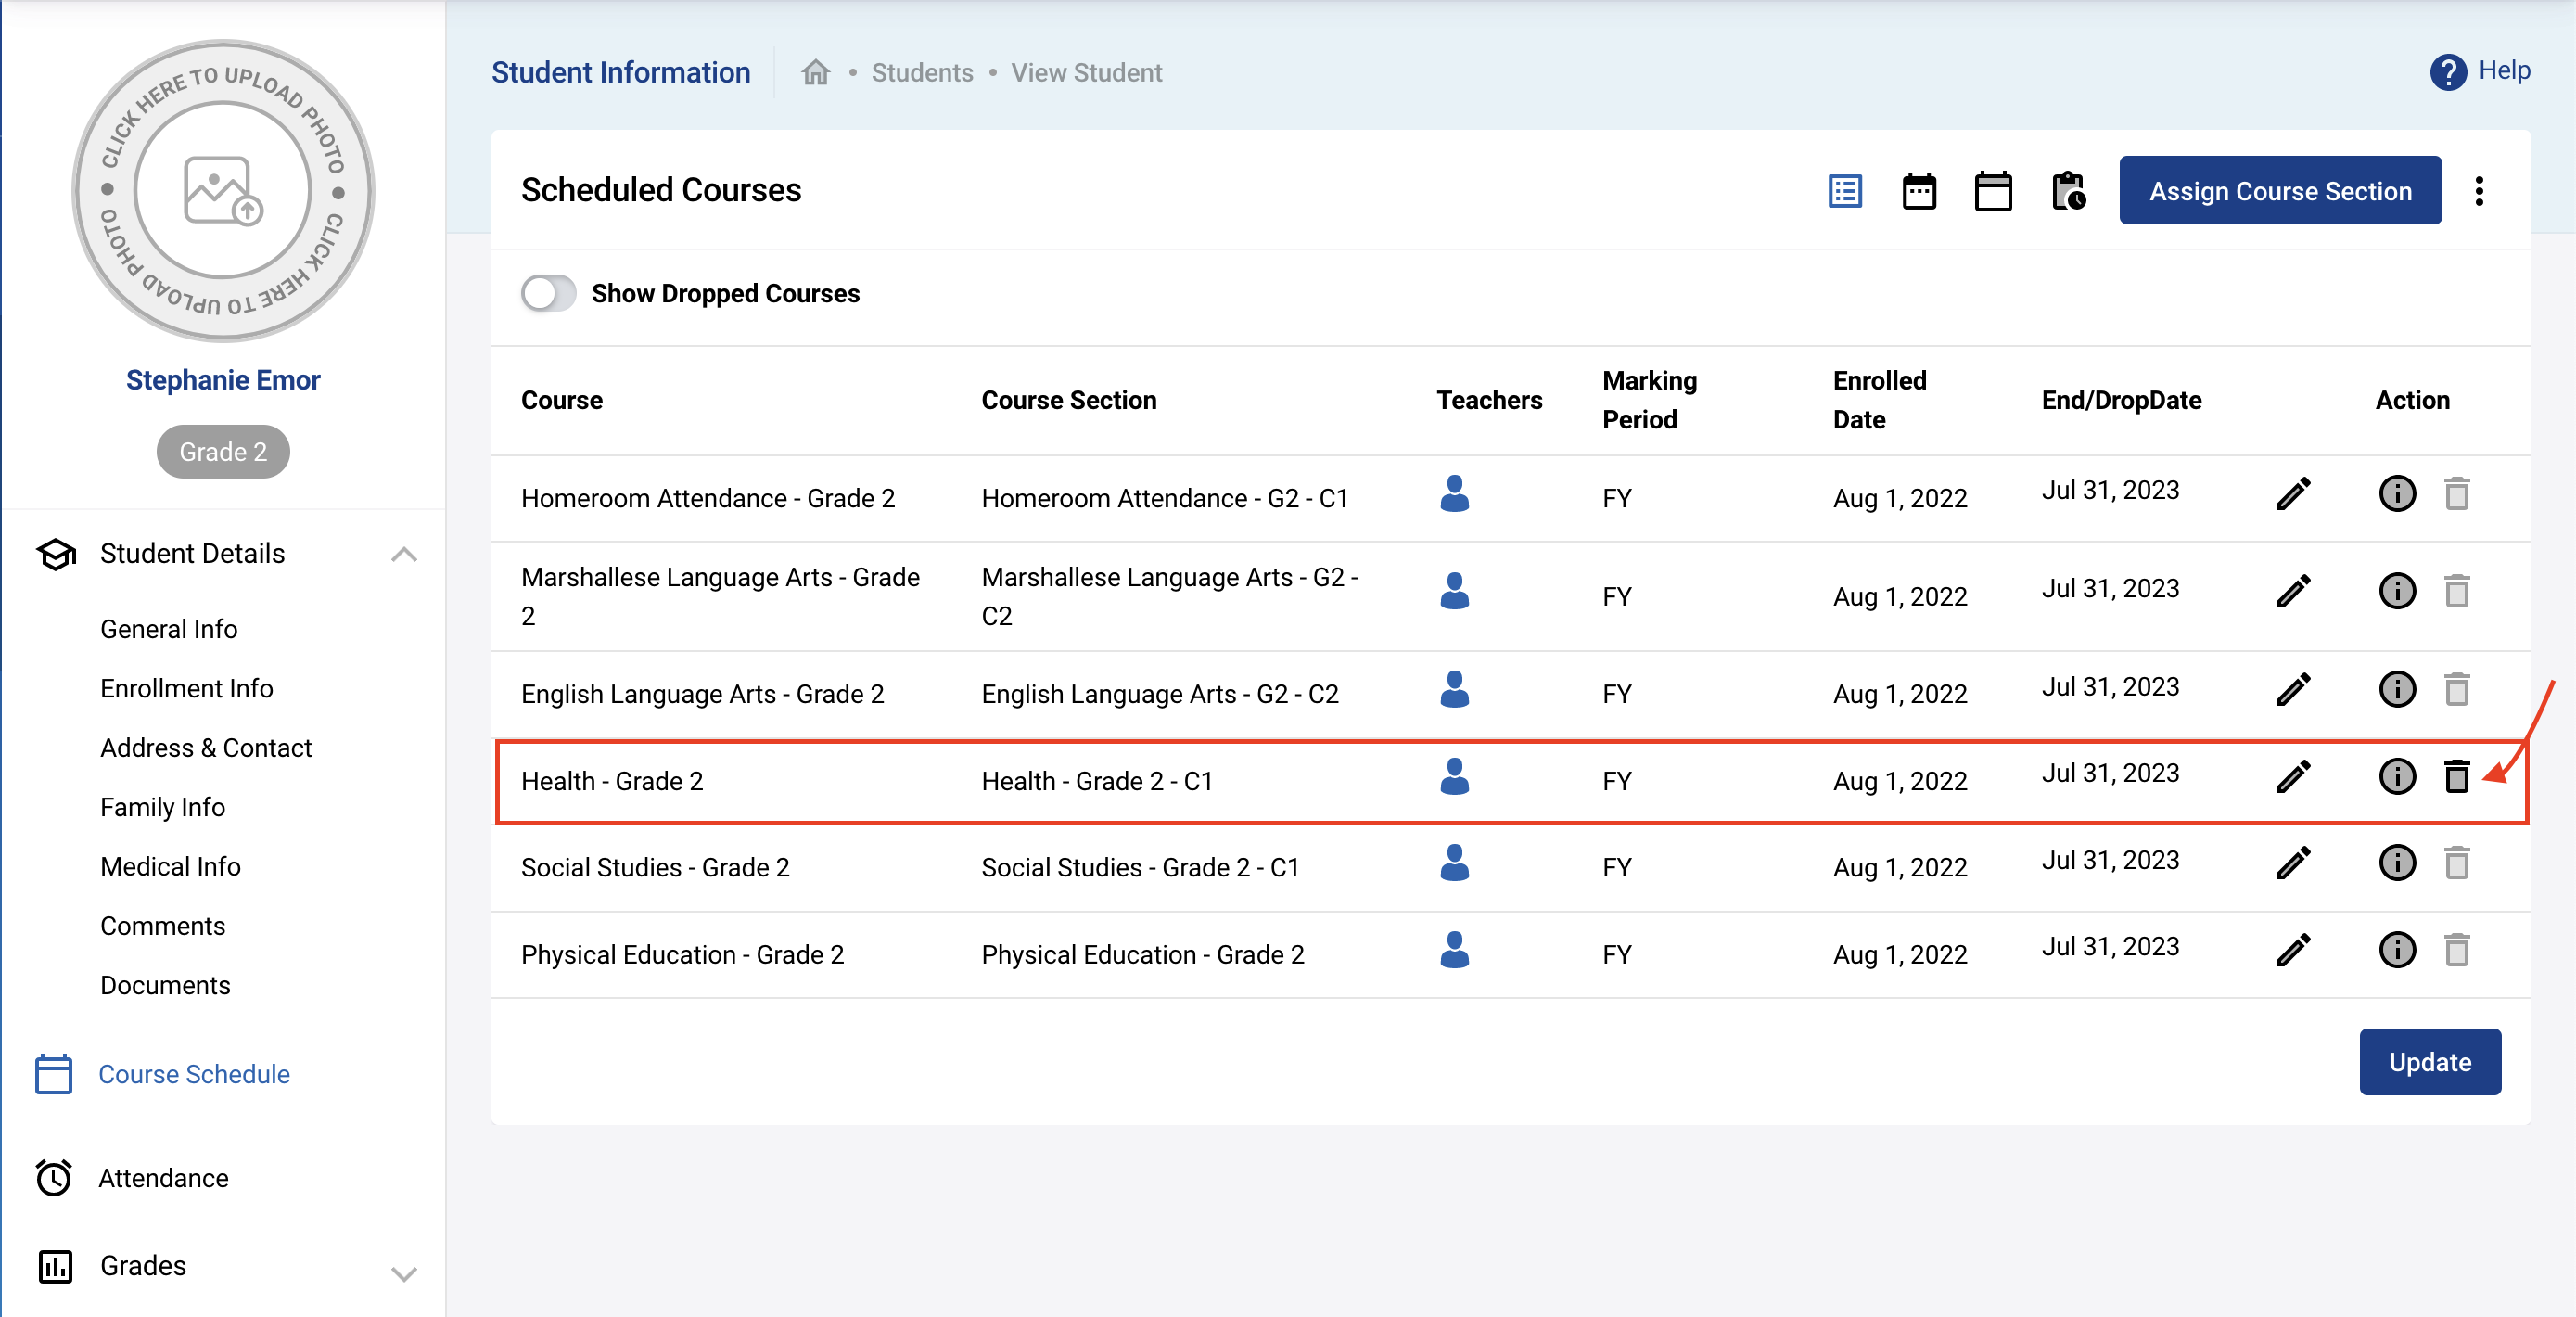
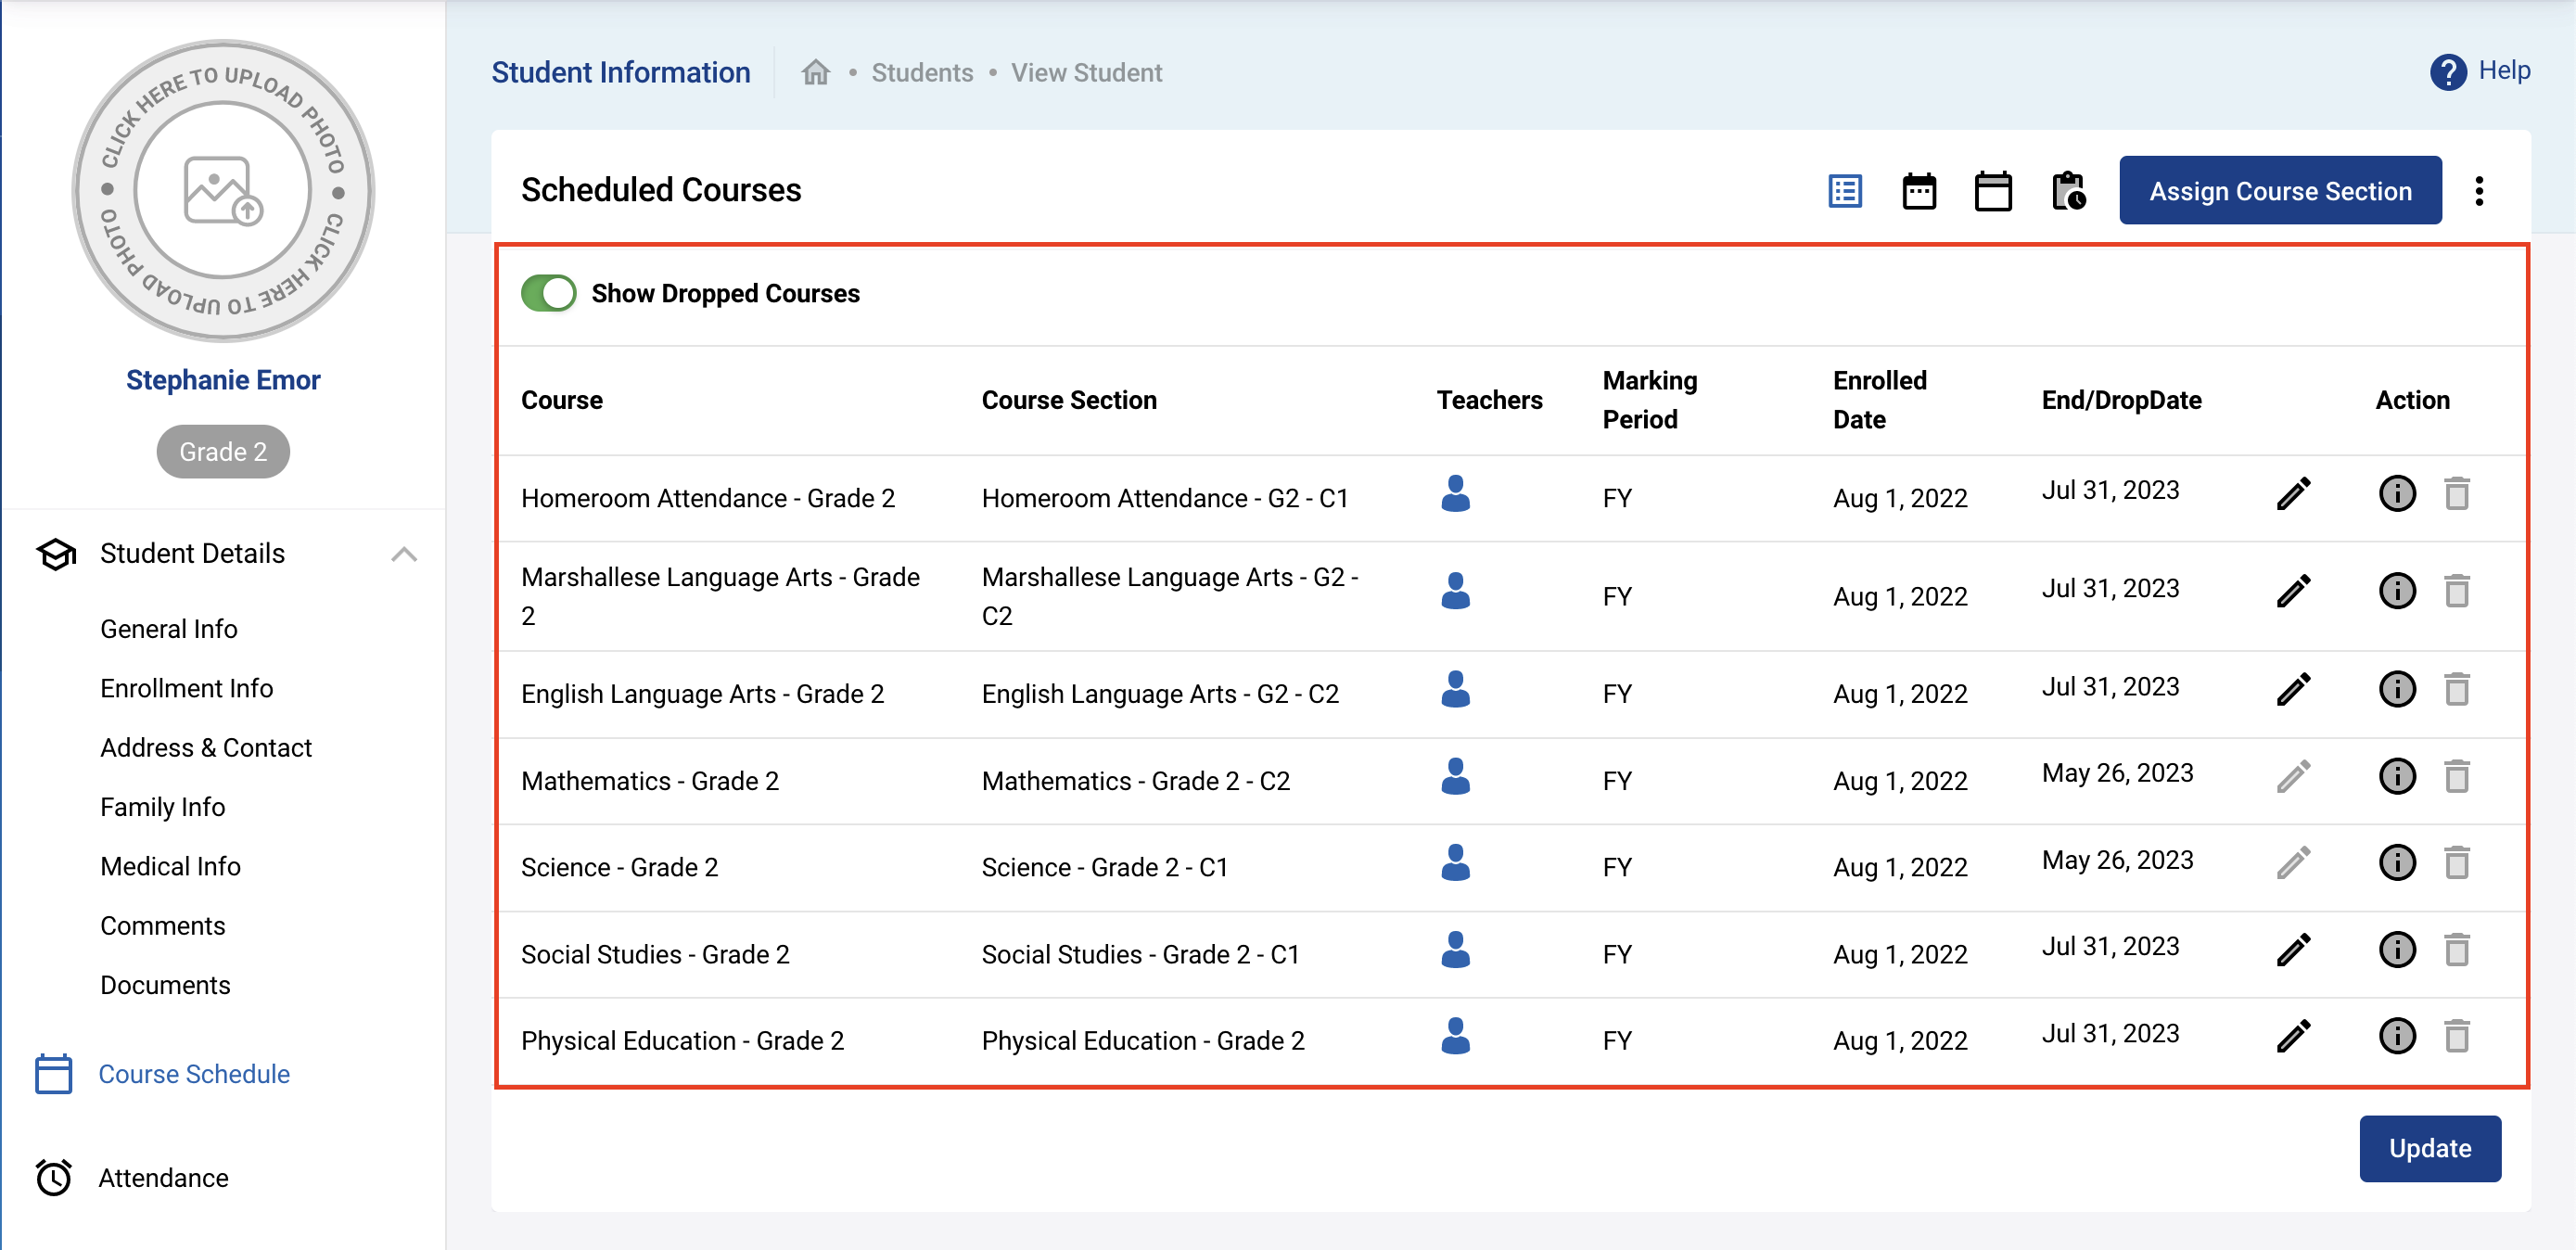
If a single student needs to be dropped out of a course this can more naturally be done directly in the student's profile in Students → Student Information by finding the student and opening the profile. Then click on the Course Schedule tab and locate the course to be dropped from. Click on the Edit icon.
You will then be able to edit the End/Drop/Date and then click Update.

The dropped course will then disappear (though you could see the dropped record by clicking on Show DRopped Courses.
Group Dropping
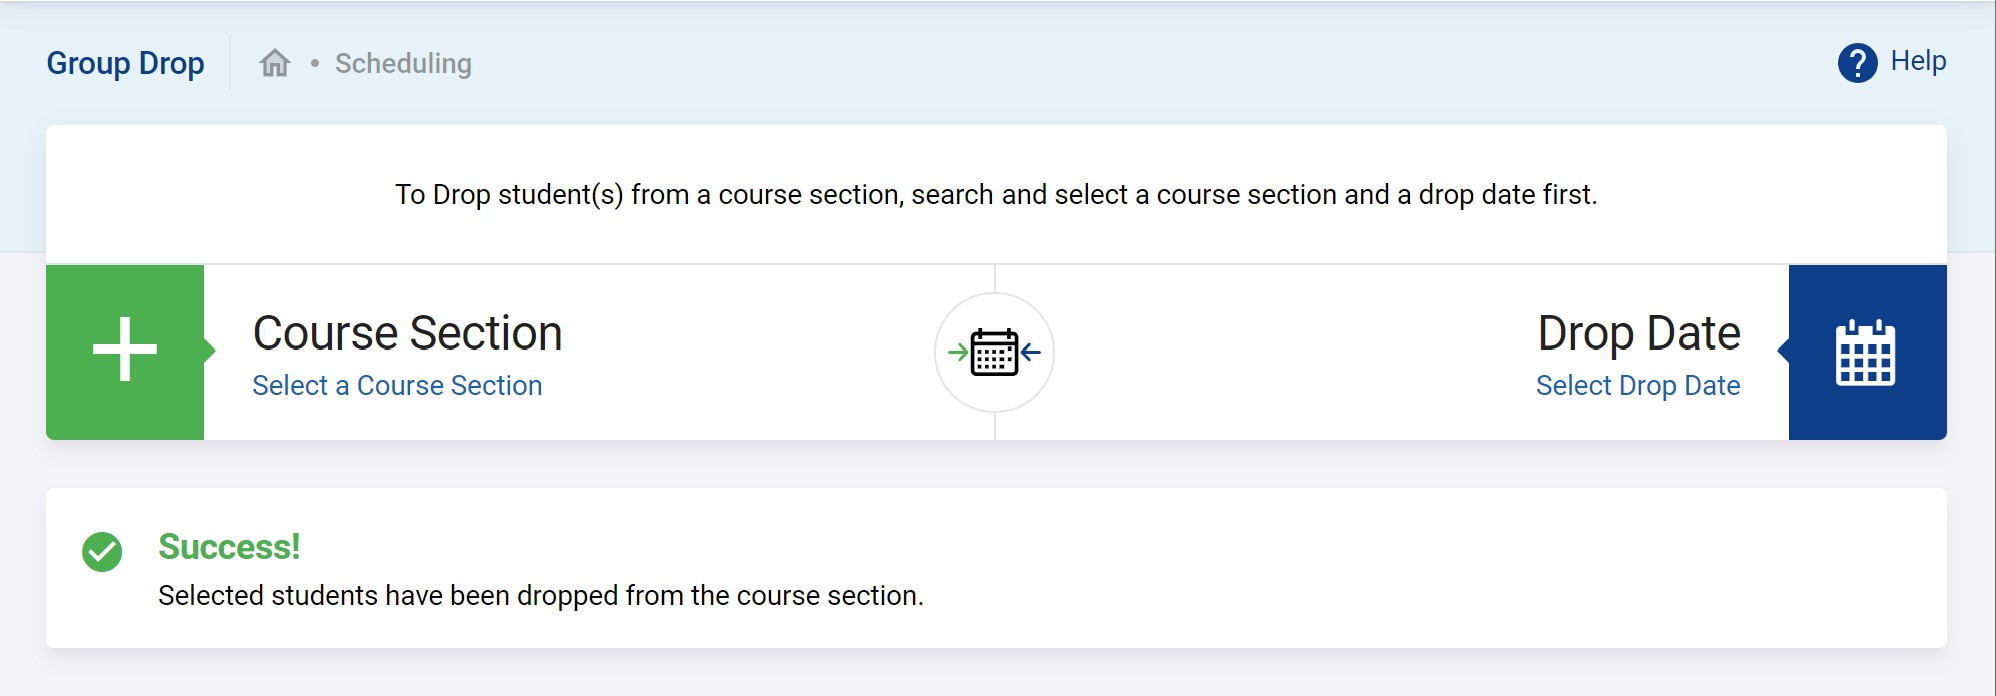
Group dropping students can be done by doing to Scheduling → Group Drop Students.
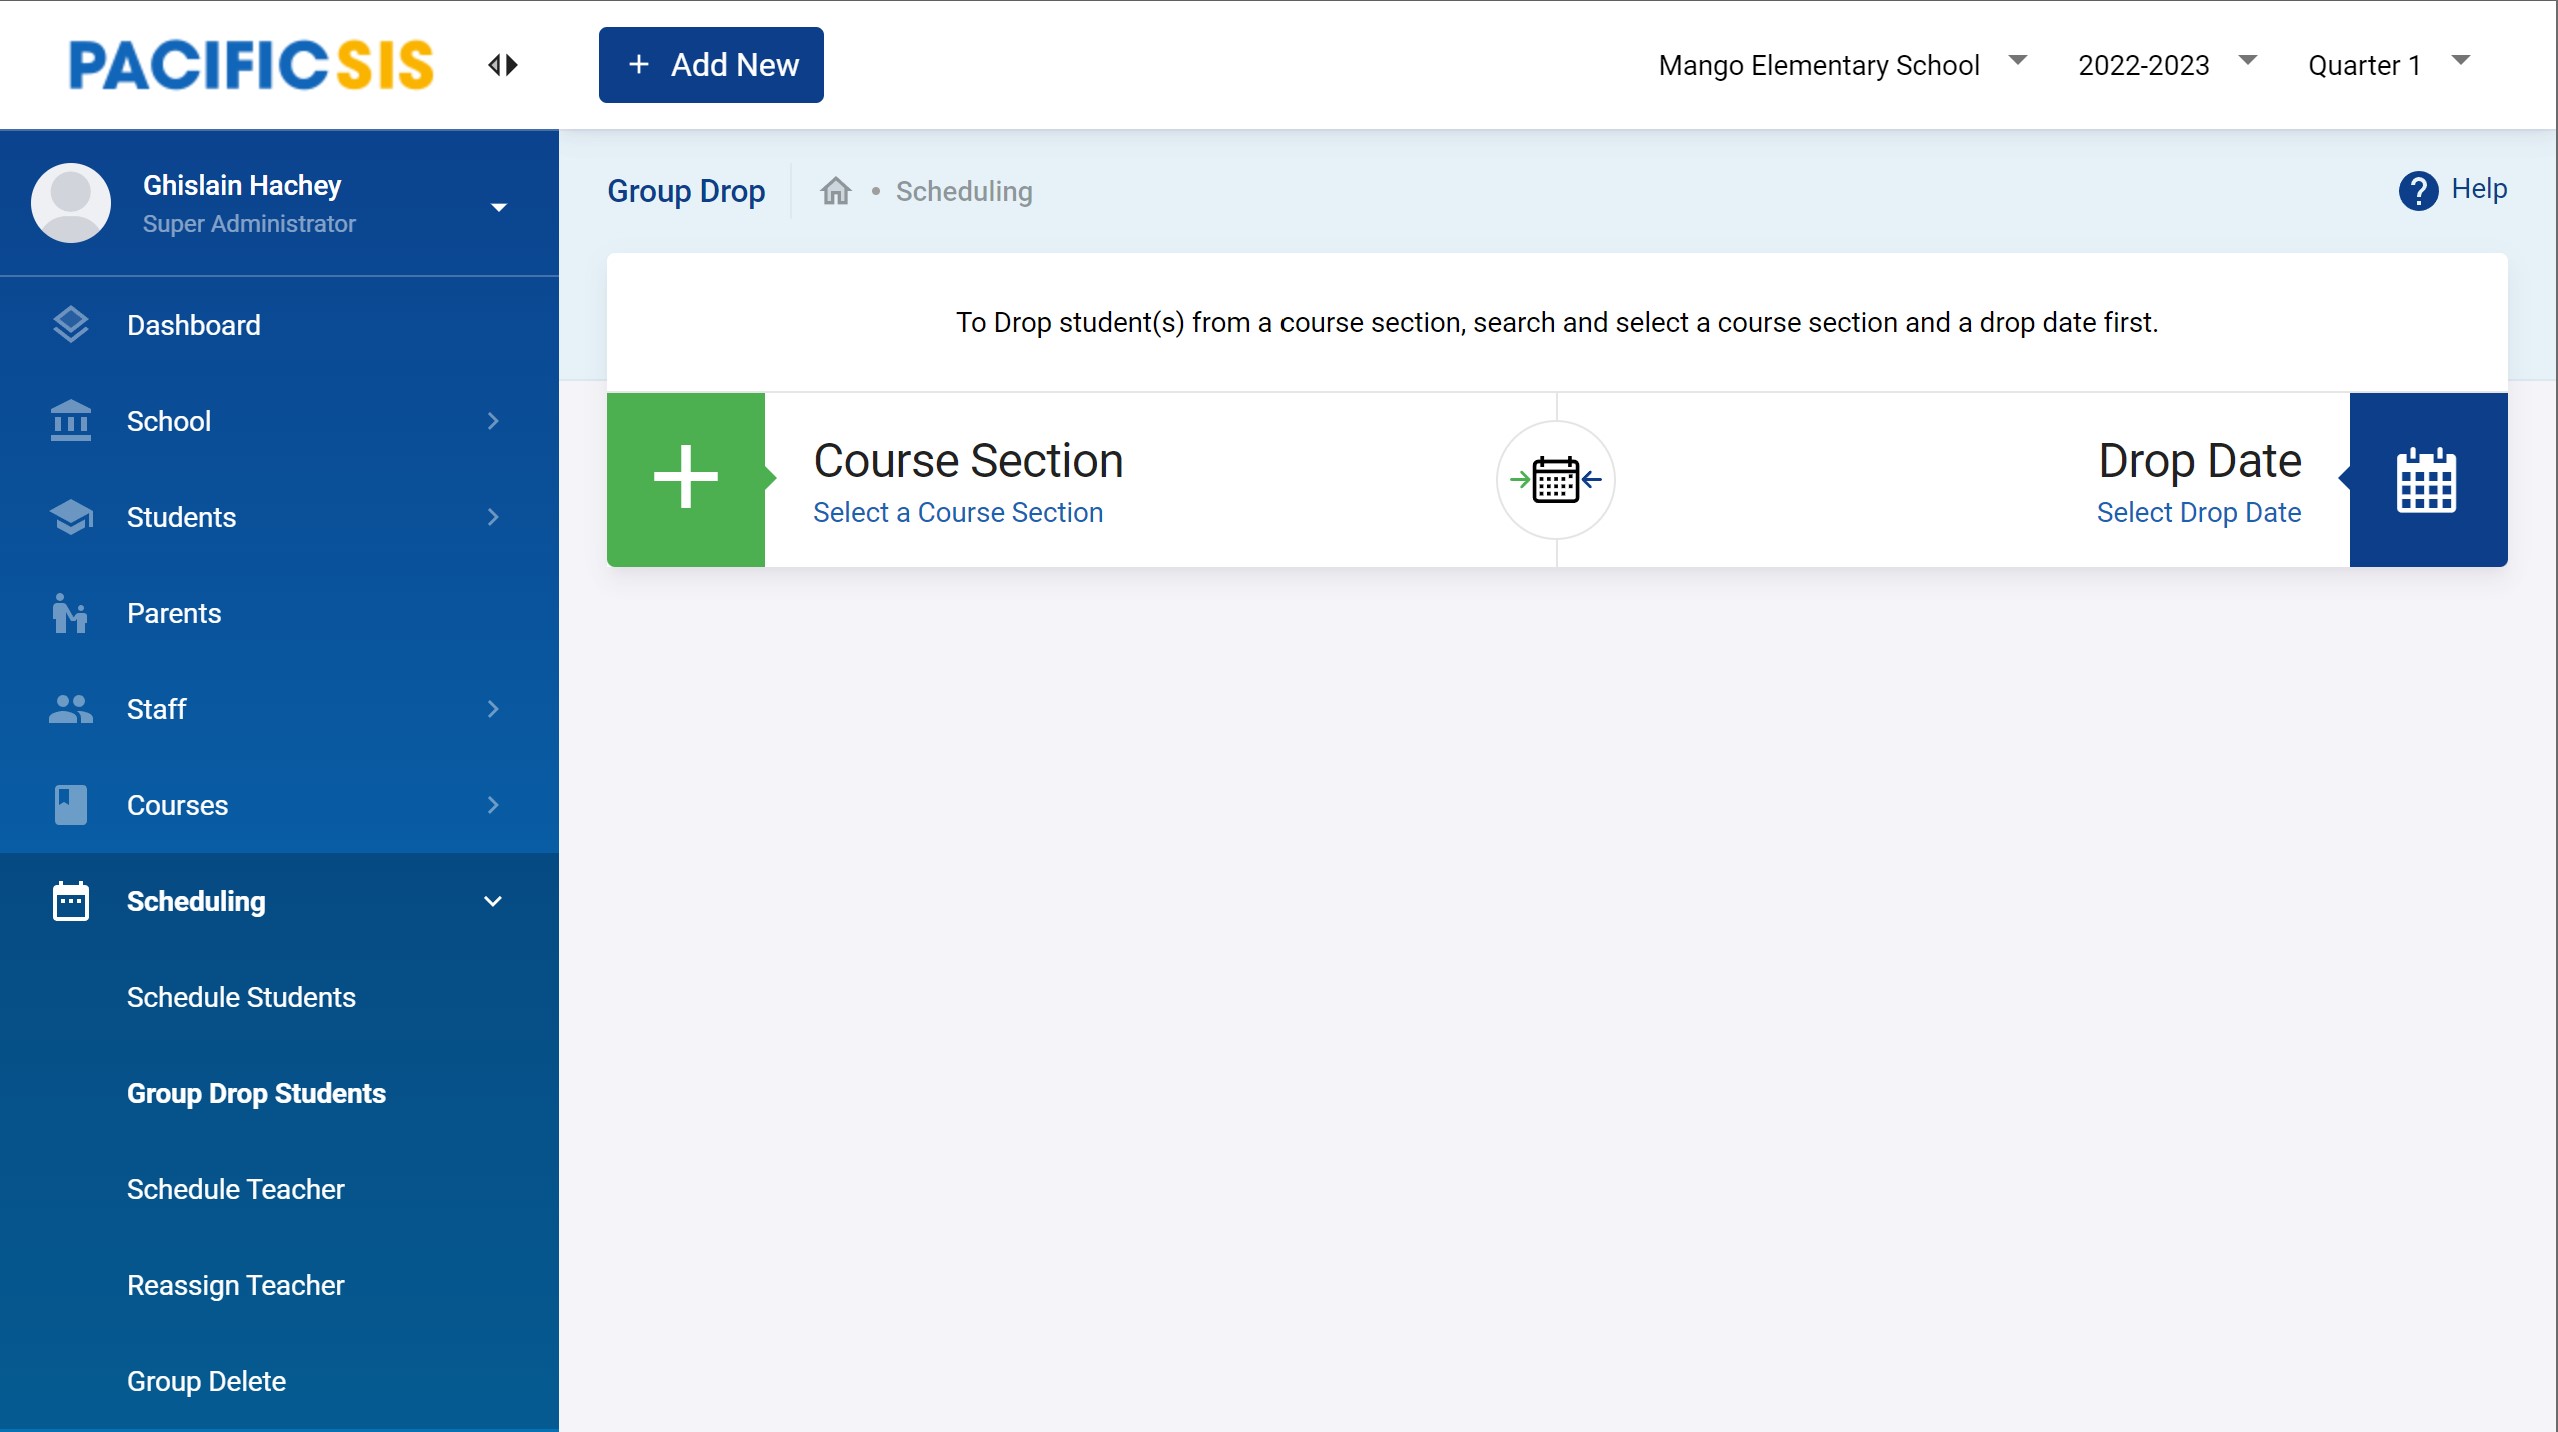
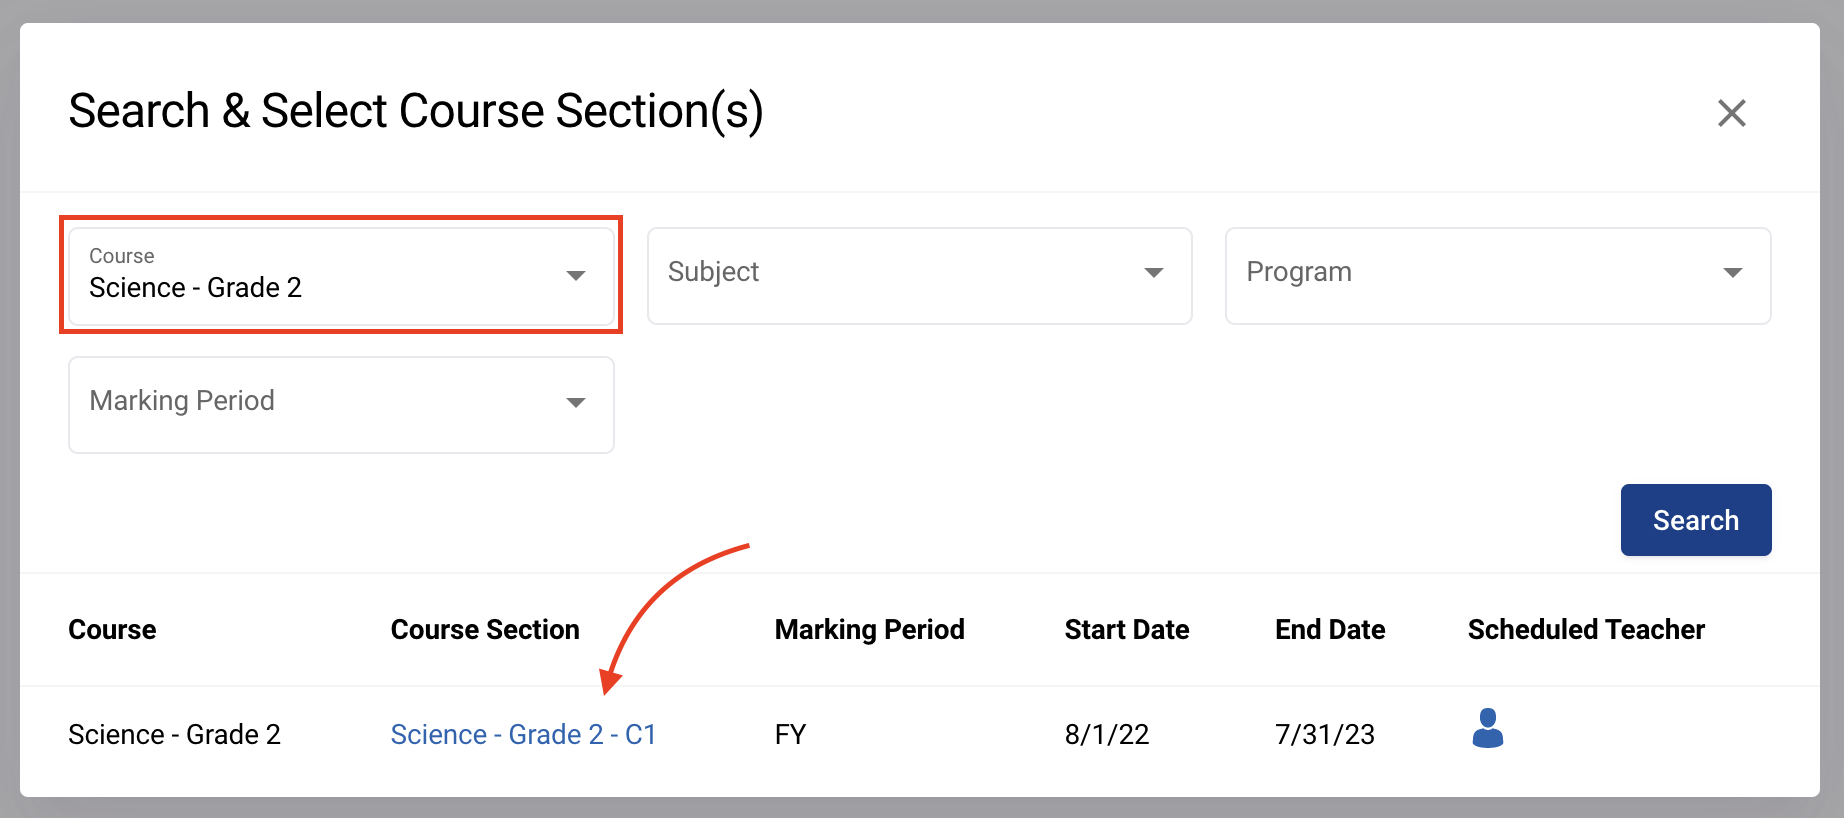
First, you need to identify the course section from which you want to drop a group of students by clicking on Select a Course Section. Use filters as usual to locate the course section and click on it.
A list of scheduled students into the selected course section will appear. Select the ones you want to drop and then click on Drop Selected Student. Click on Select Drop Date to set the date on which this group of students dropped. Finally, click on Drop Selected Students.
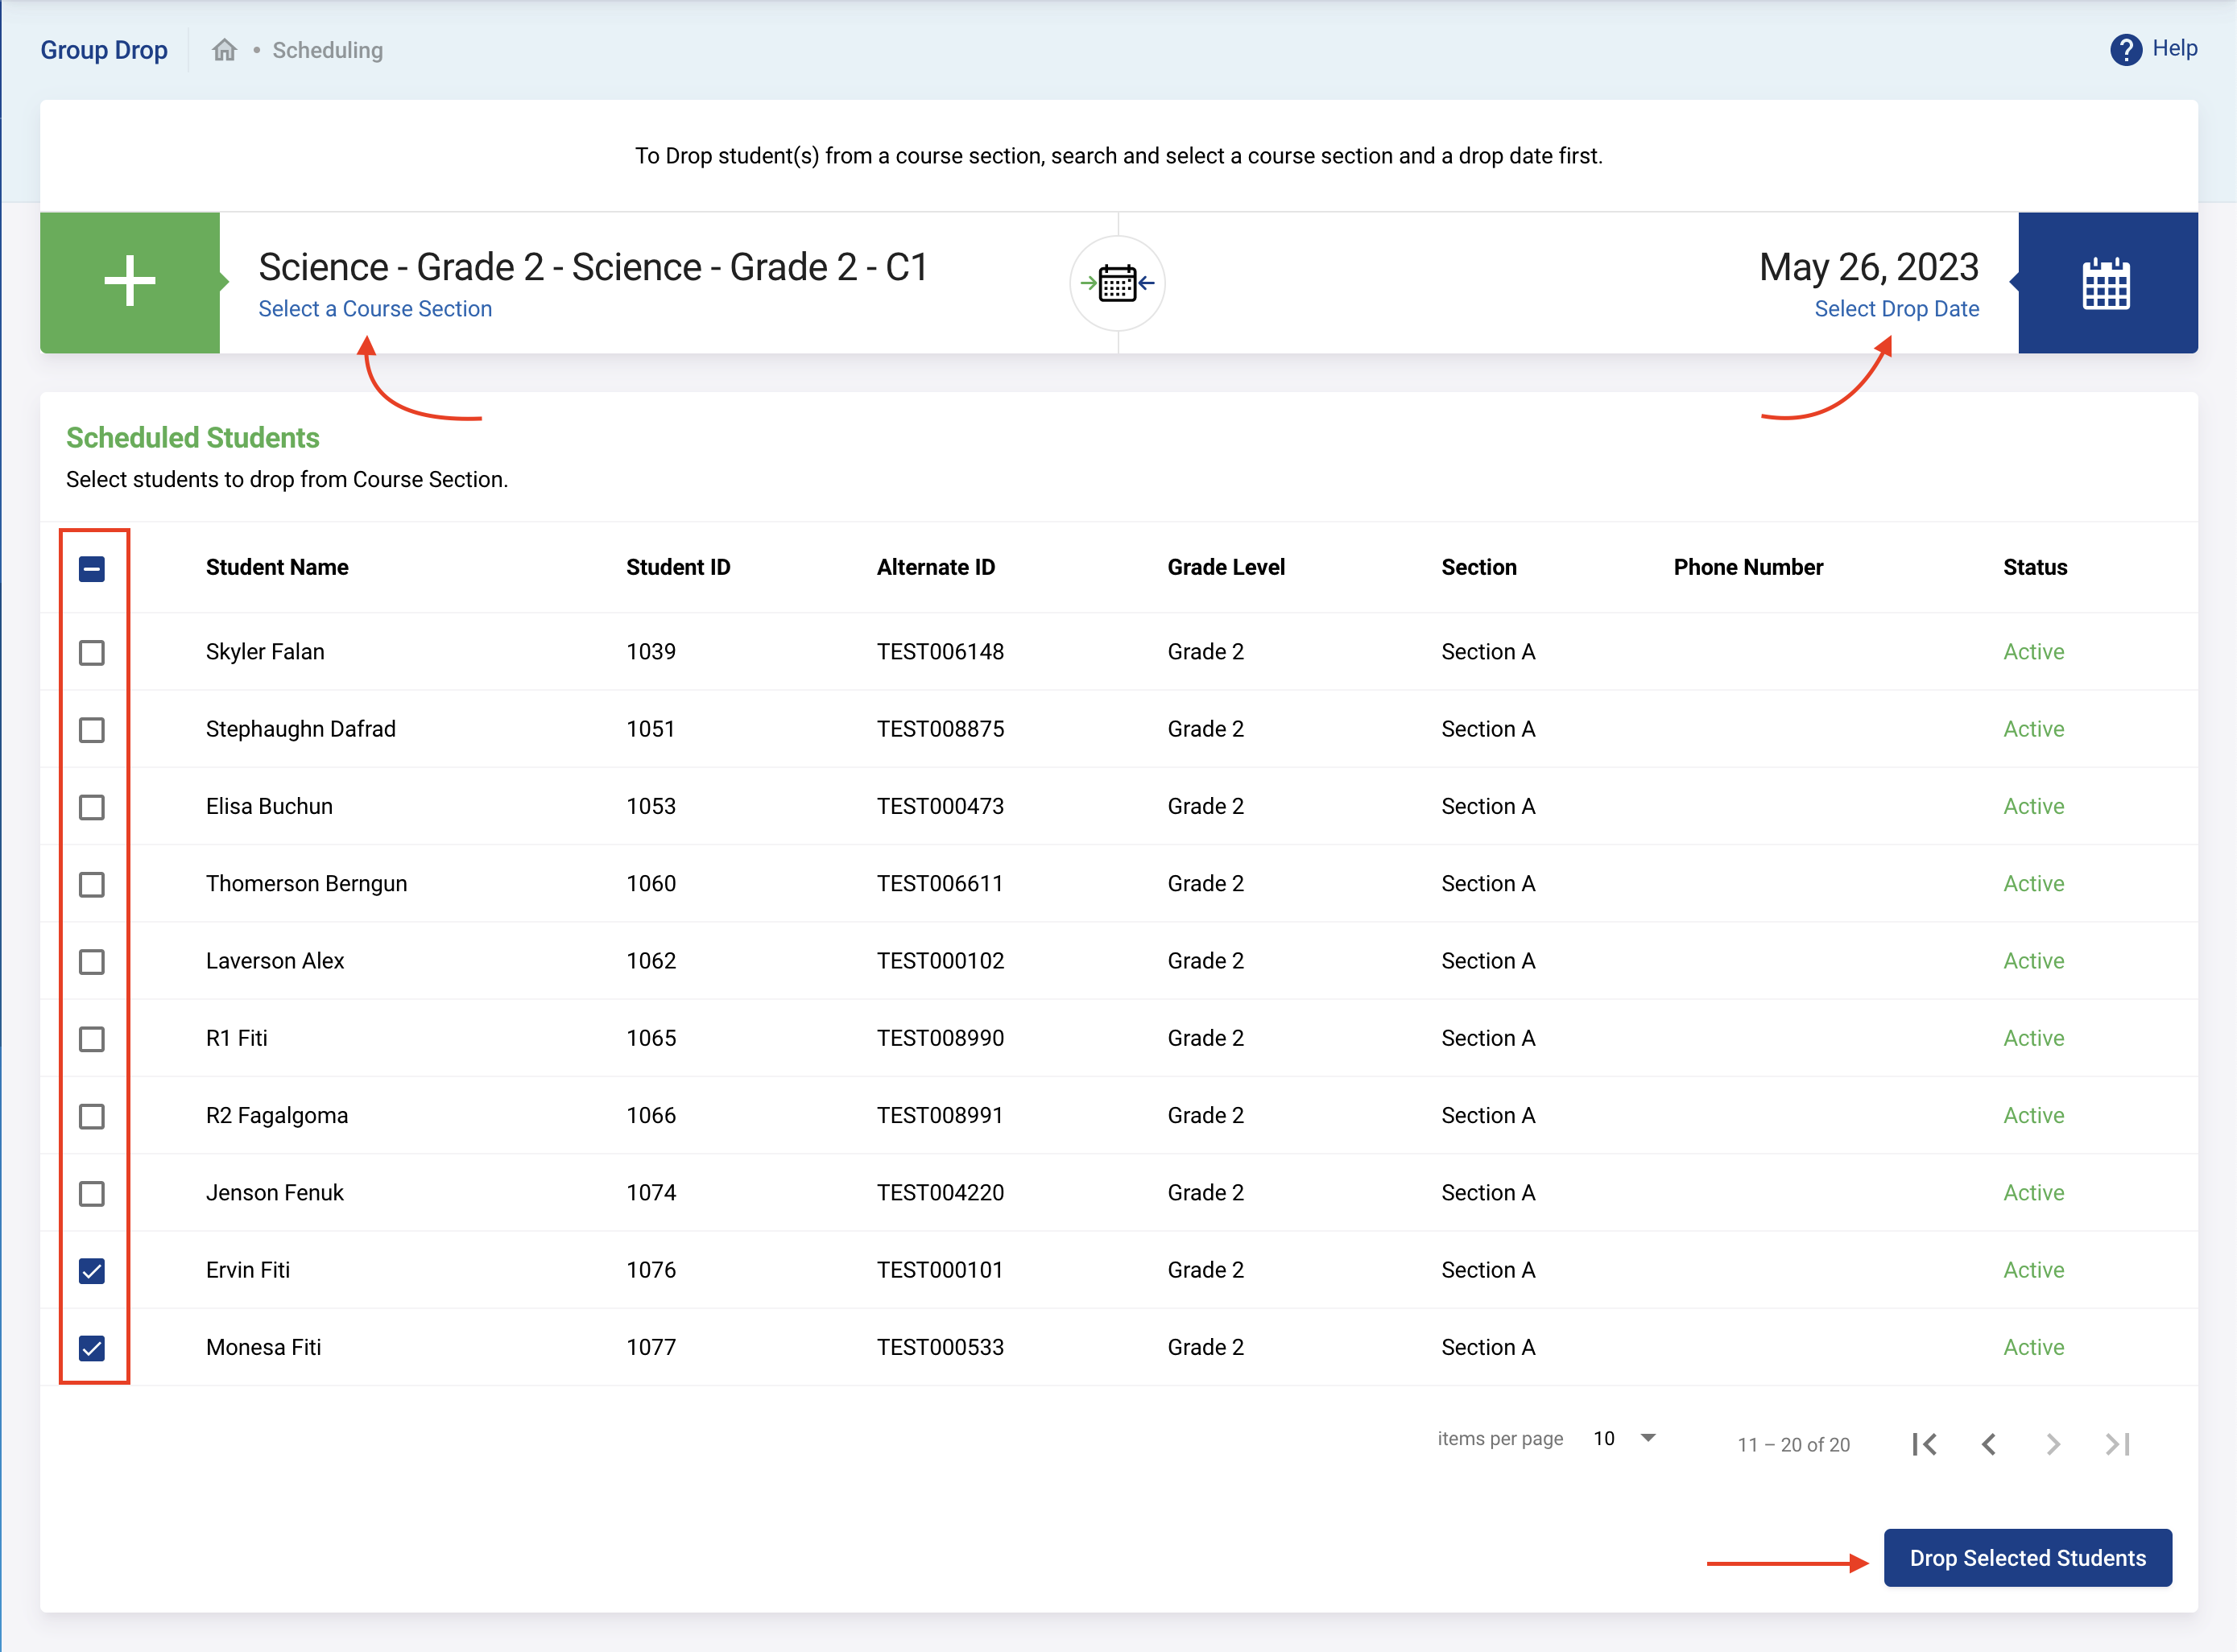
If successful you should see something like follows.
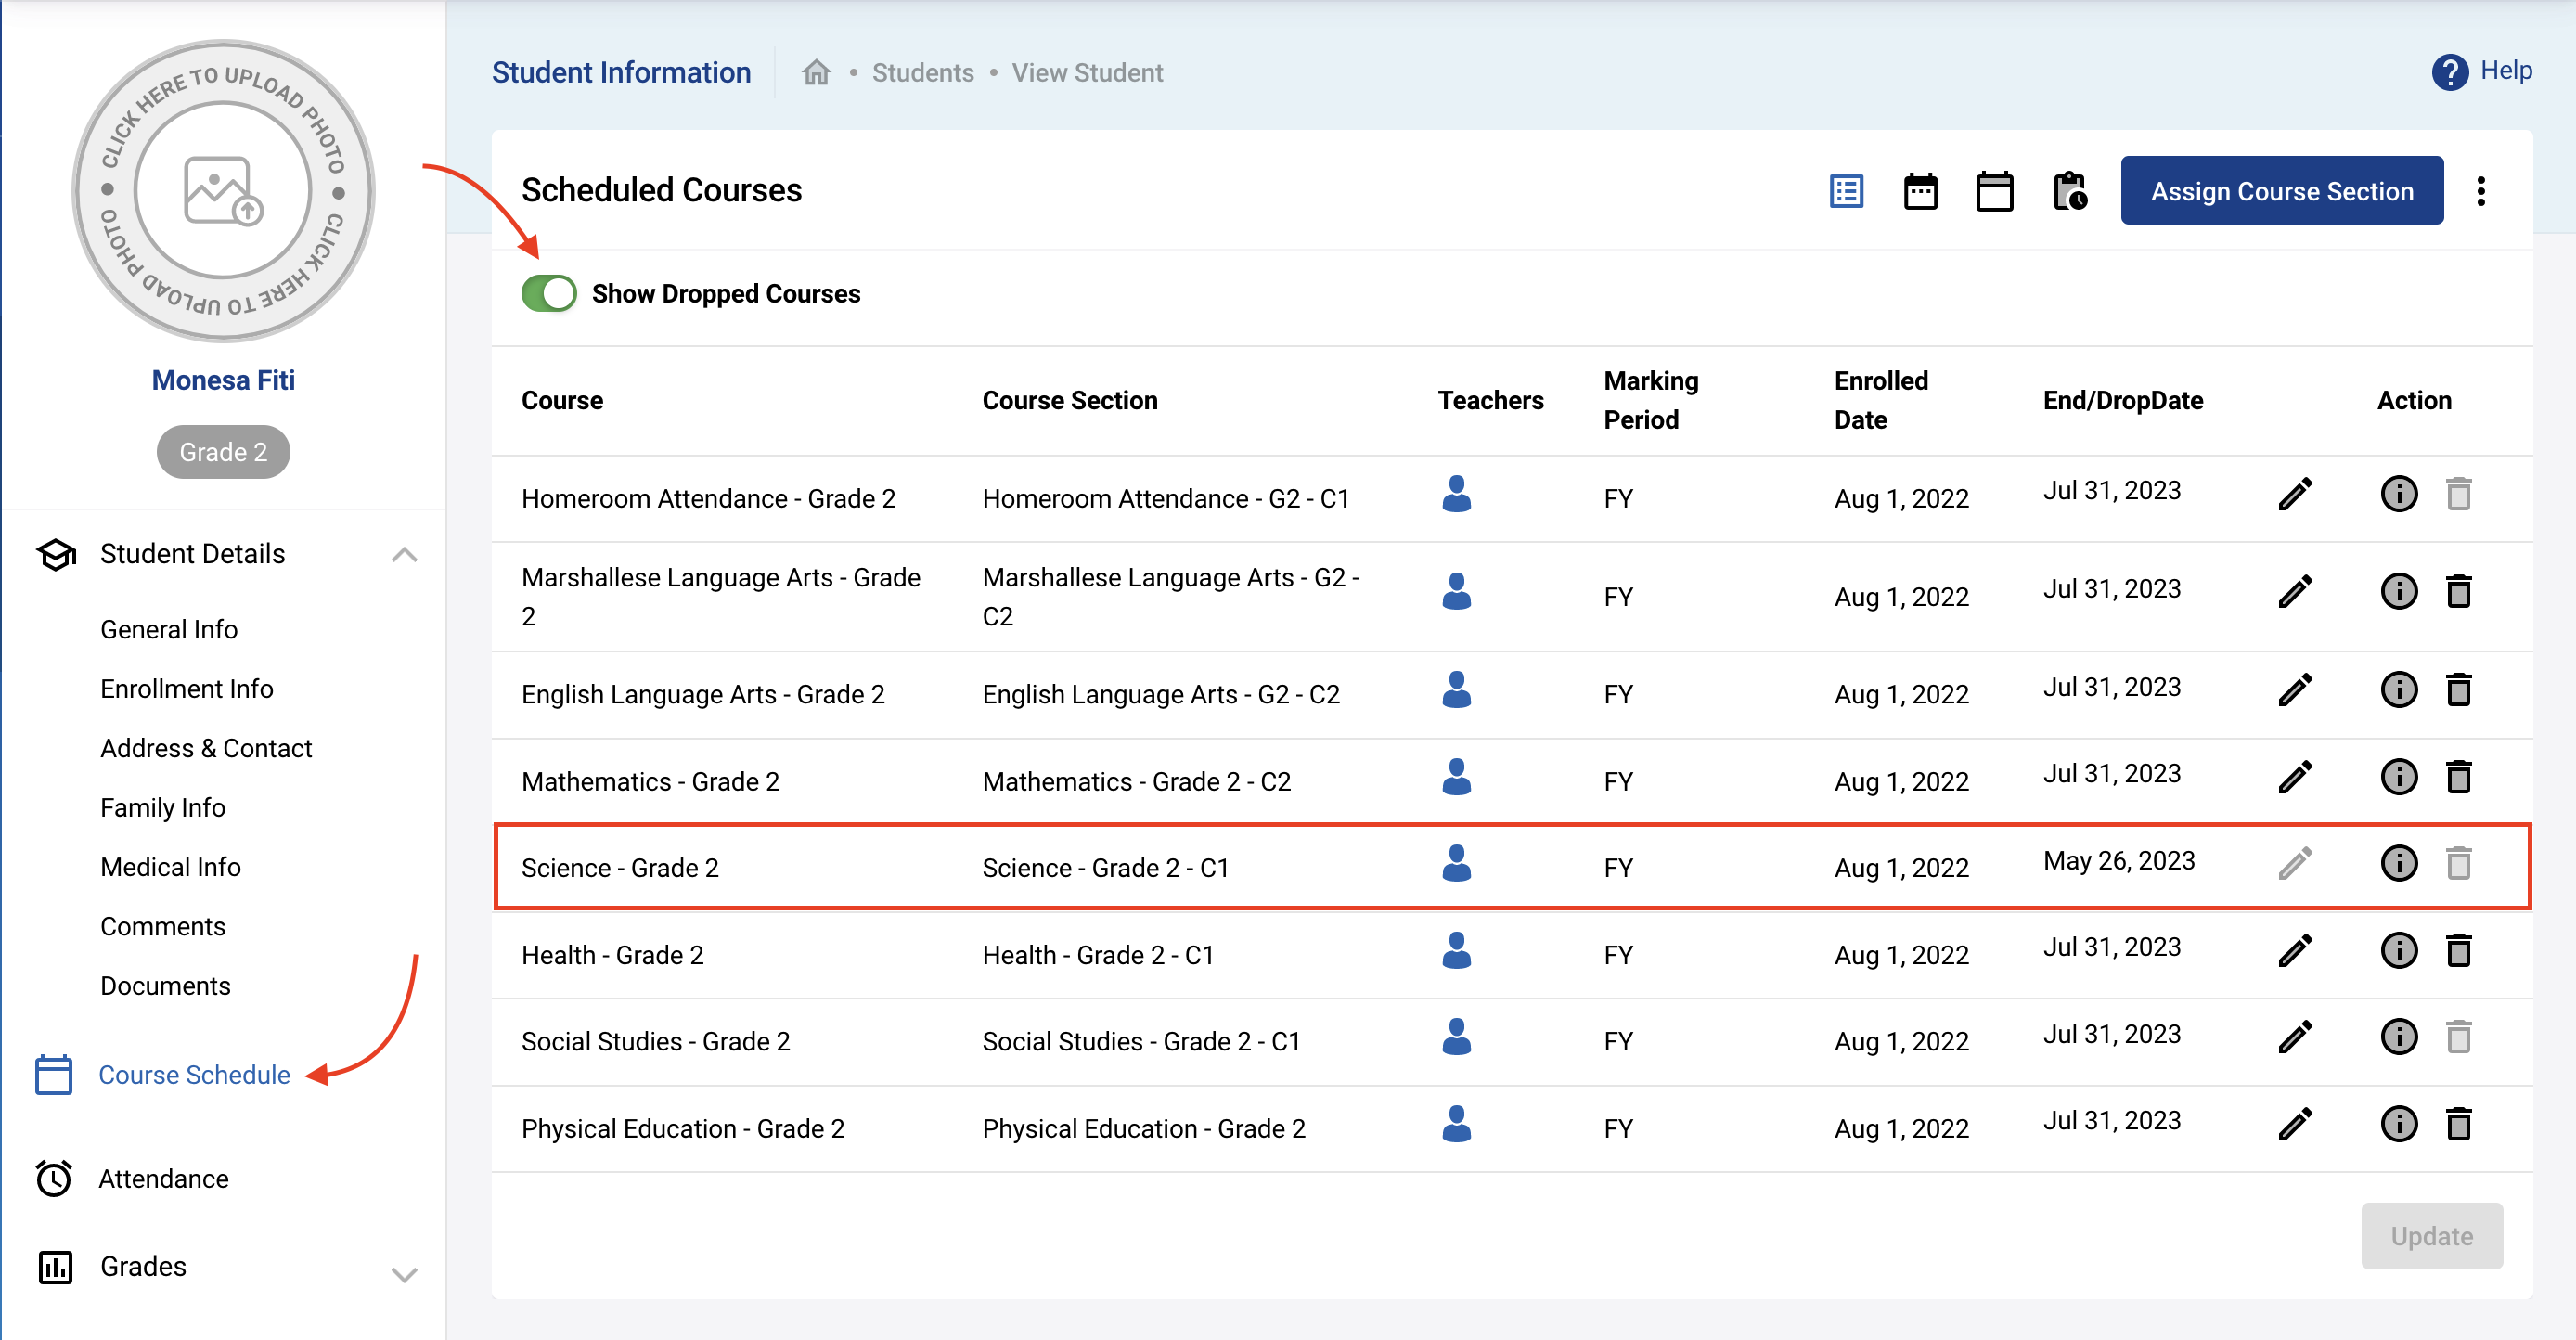
This can then be verified. Pick one of the students from the list. Open its student profile and check its Course Schedule. The dropped course section is still shown under the student's course schedule but it now has a End/Drop Date set and thus will no longer be required to enter new attendance of grades beyond that date.
Deleting Student(s) from Scheduled Course (Sections)
The delete student from a scheduled course section is what you want if you have not started any transaction data (e.g. no attendance, no grades, etc.) and the students should never have been in those scheduled course sections in the first place. Use case examples for dropping include the following:
- The person entering the data scheduled some students into the wrong course sections
- The students were entered in correct course sections but then the requirements in the school changed (before any transaction data)
There are two ways this can be done:
- Deleting scheduled course section(s) for an individual student
- Deleting scheduled course section(s) for a group of students
Individually Deleting
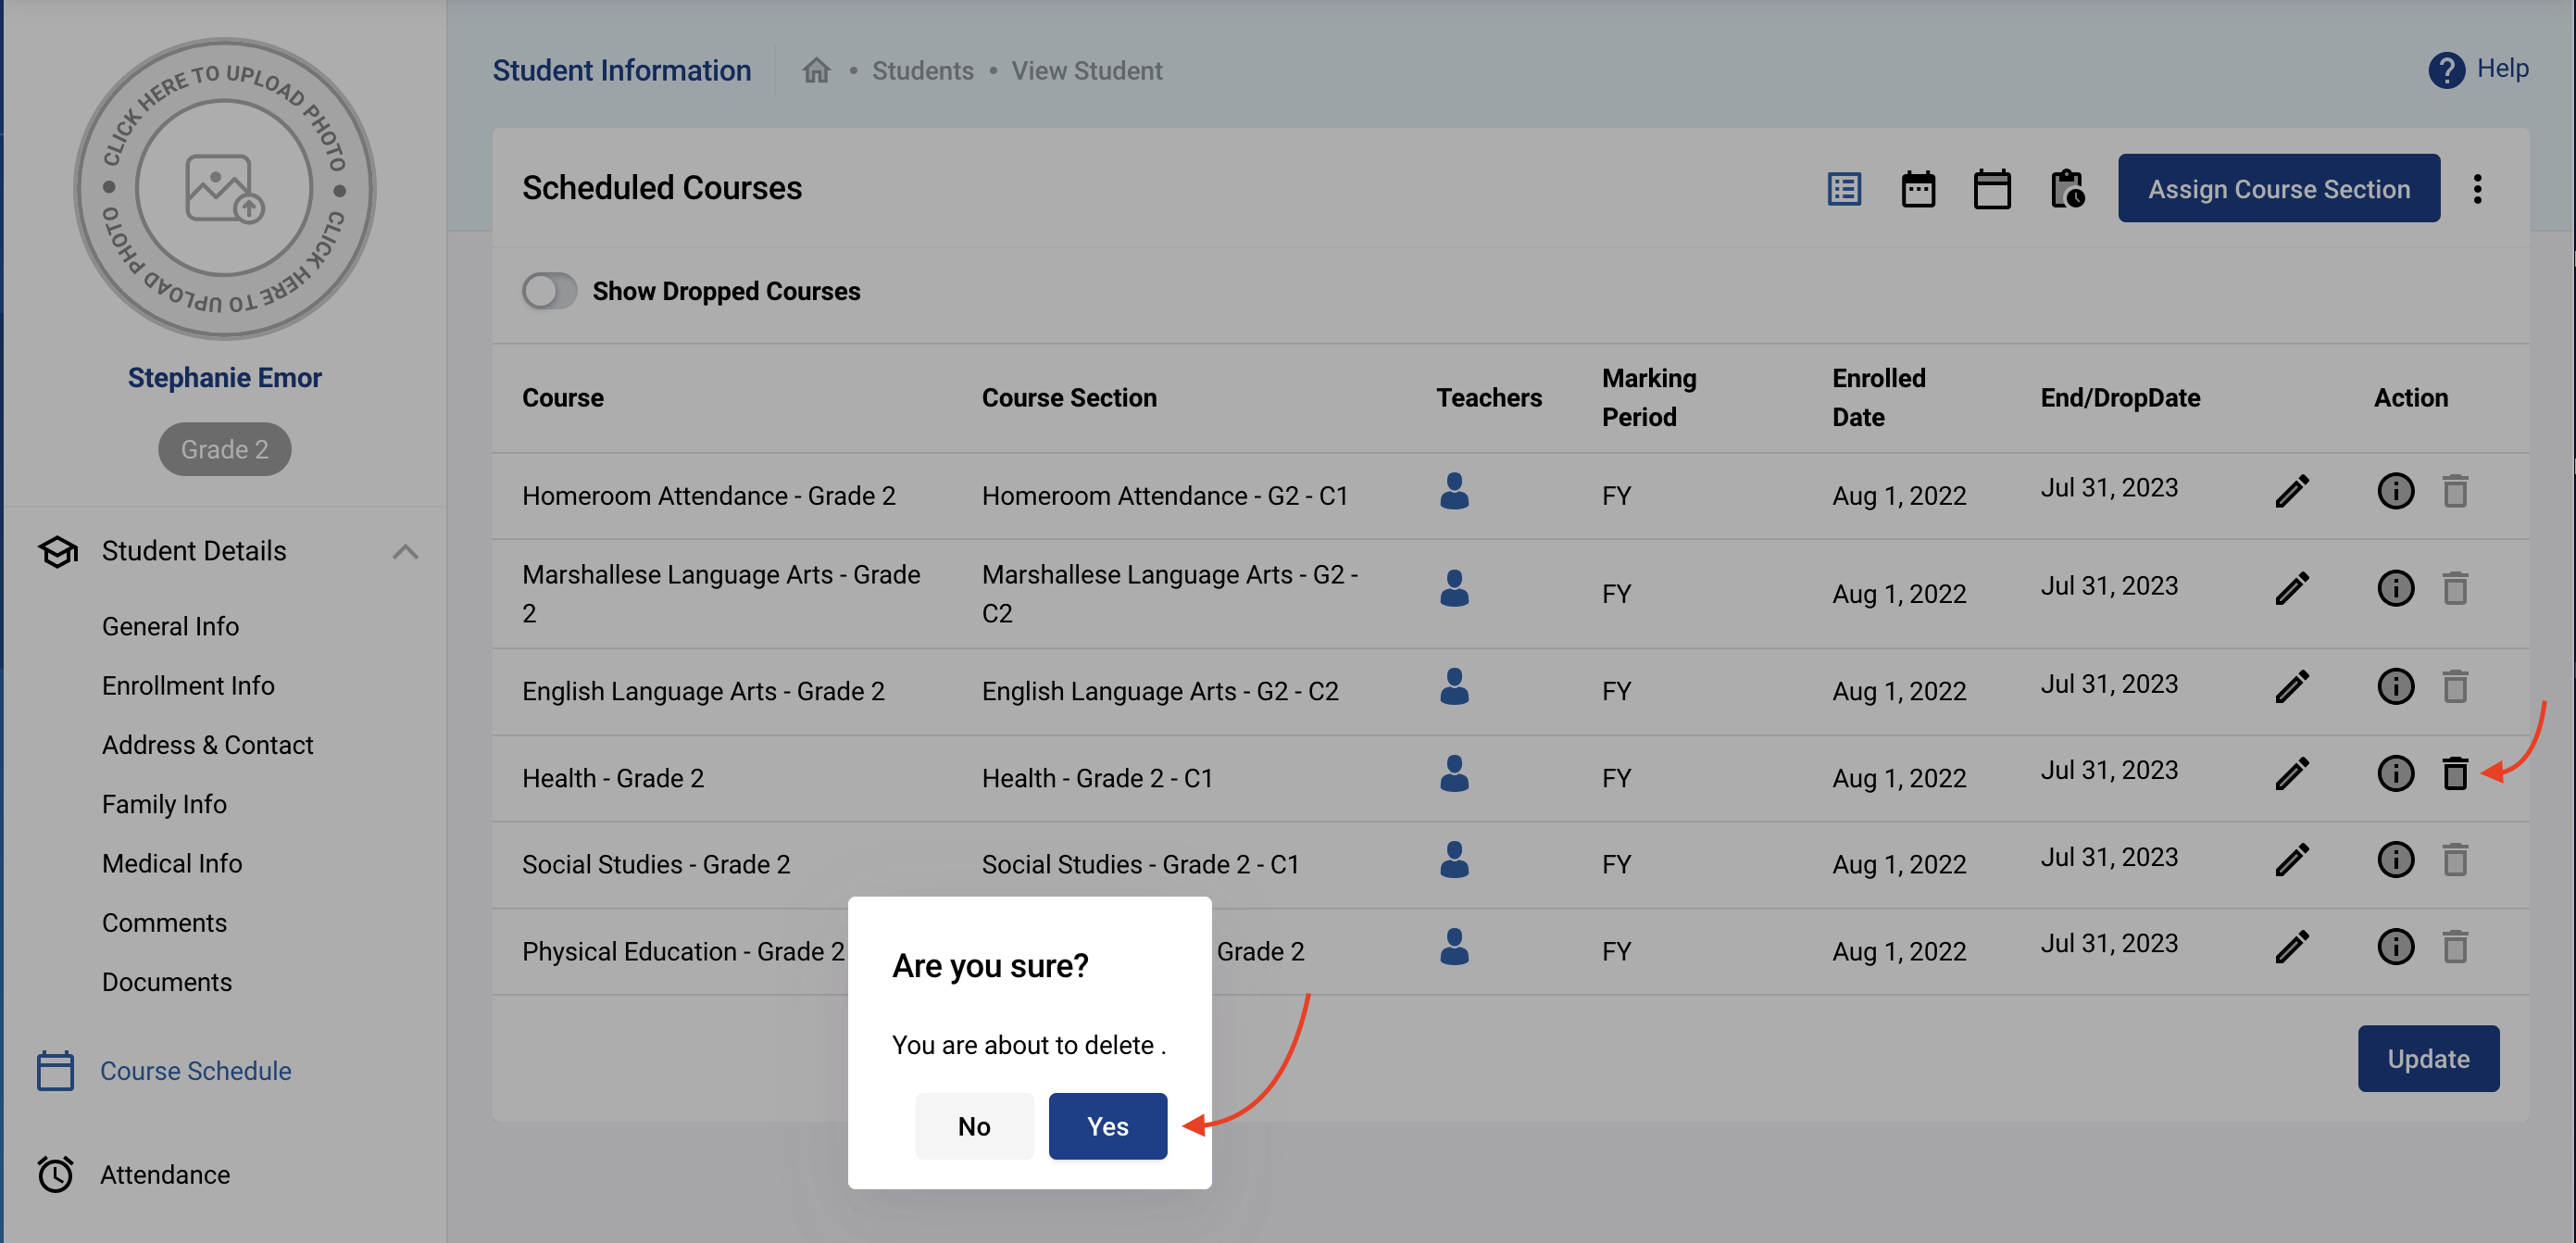
If a single student needs to have a course completely removed (never started it and never should have been scheduled in the first place) this can more naturally be done directly in the student's profile in Students → Student Information by finding the student and opening the profile. Then click on the Course Schedule tab and locate the course to be dropped from. Click on the Delete icon (i.e. Trash).
You will then be prompt whether you are sure you want to delete this course.
The deleted course will then disappear completed (even if you were to also shown dropped courses by clicking on Show Dropped Courses.
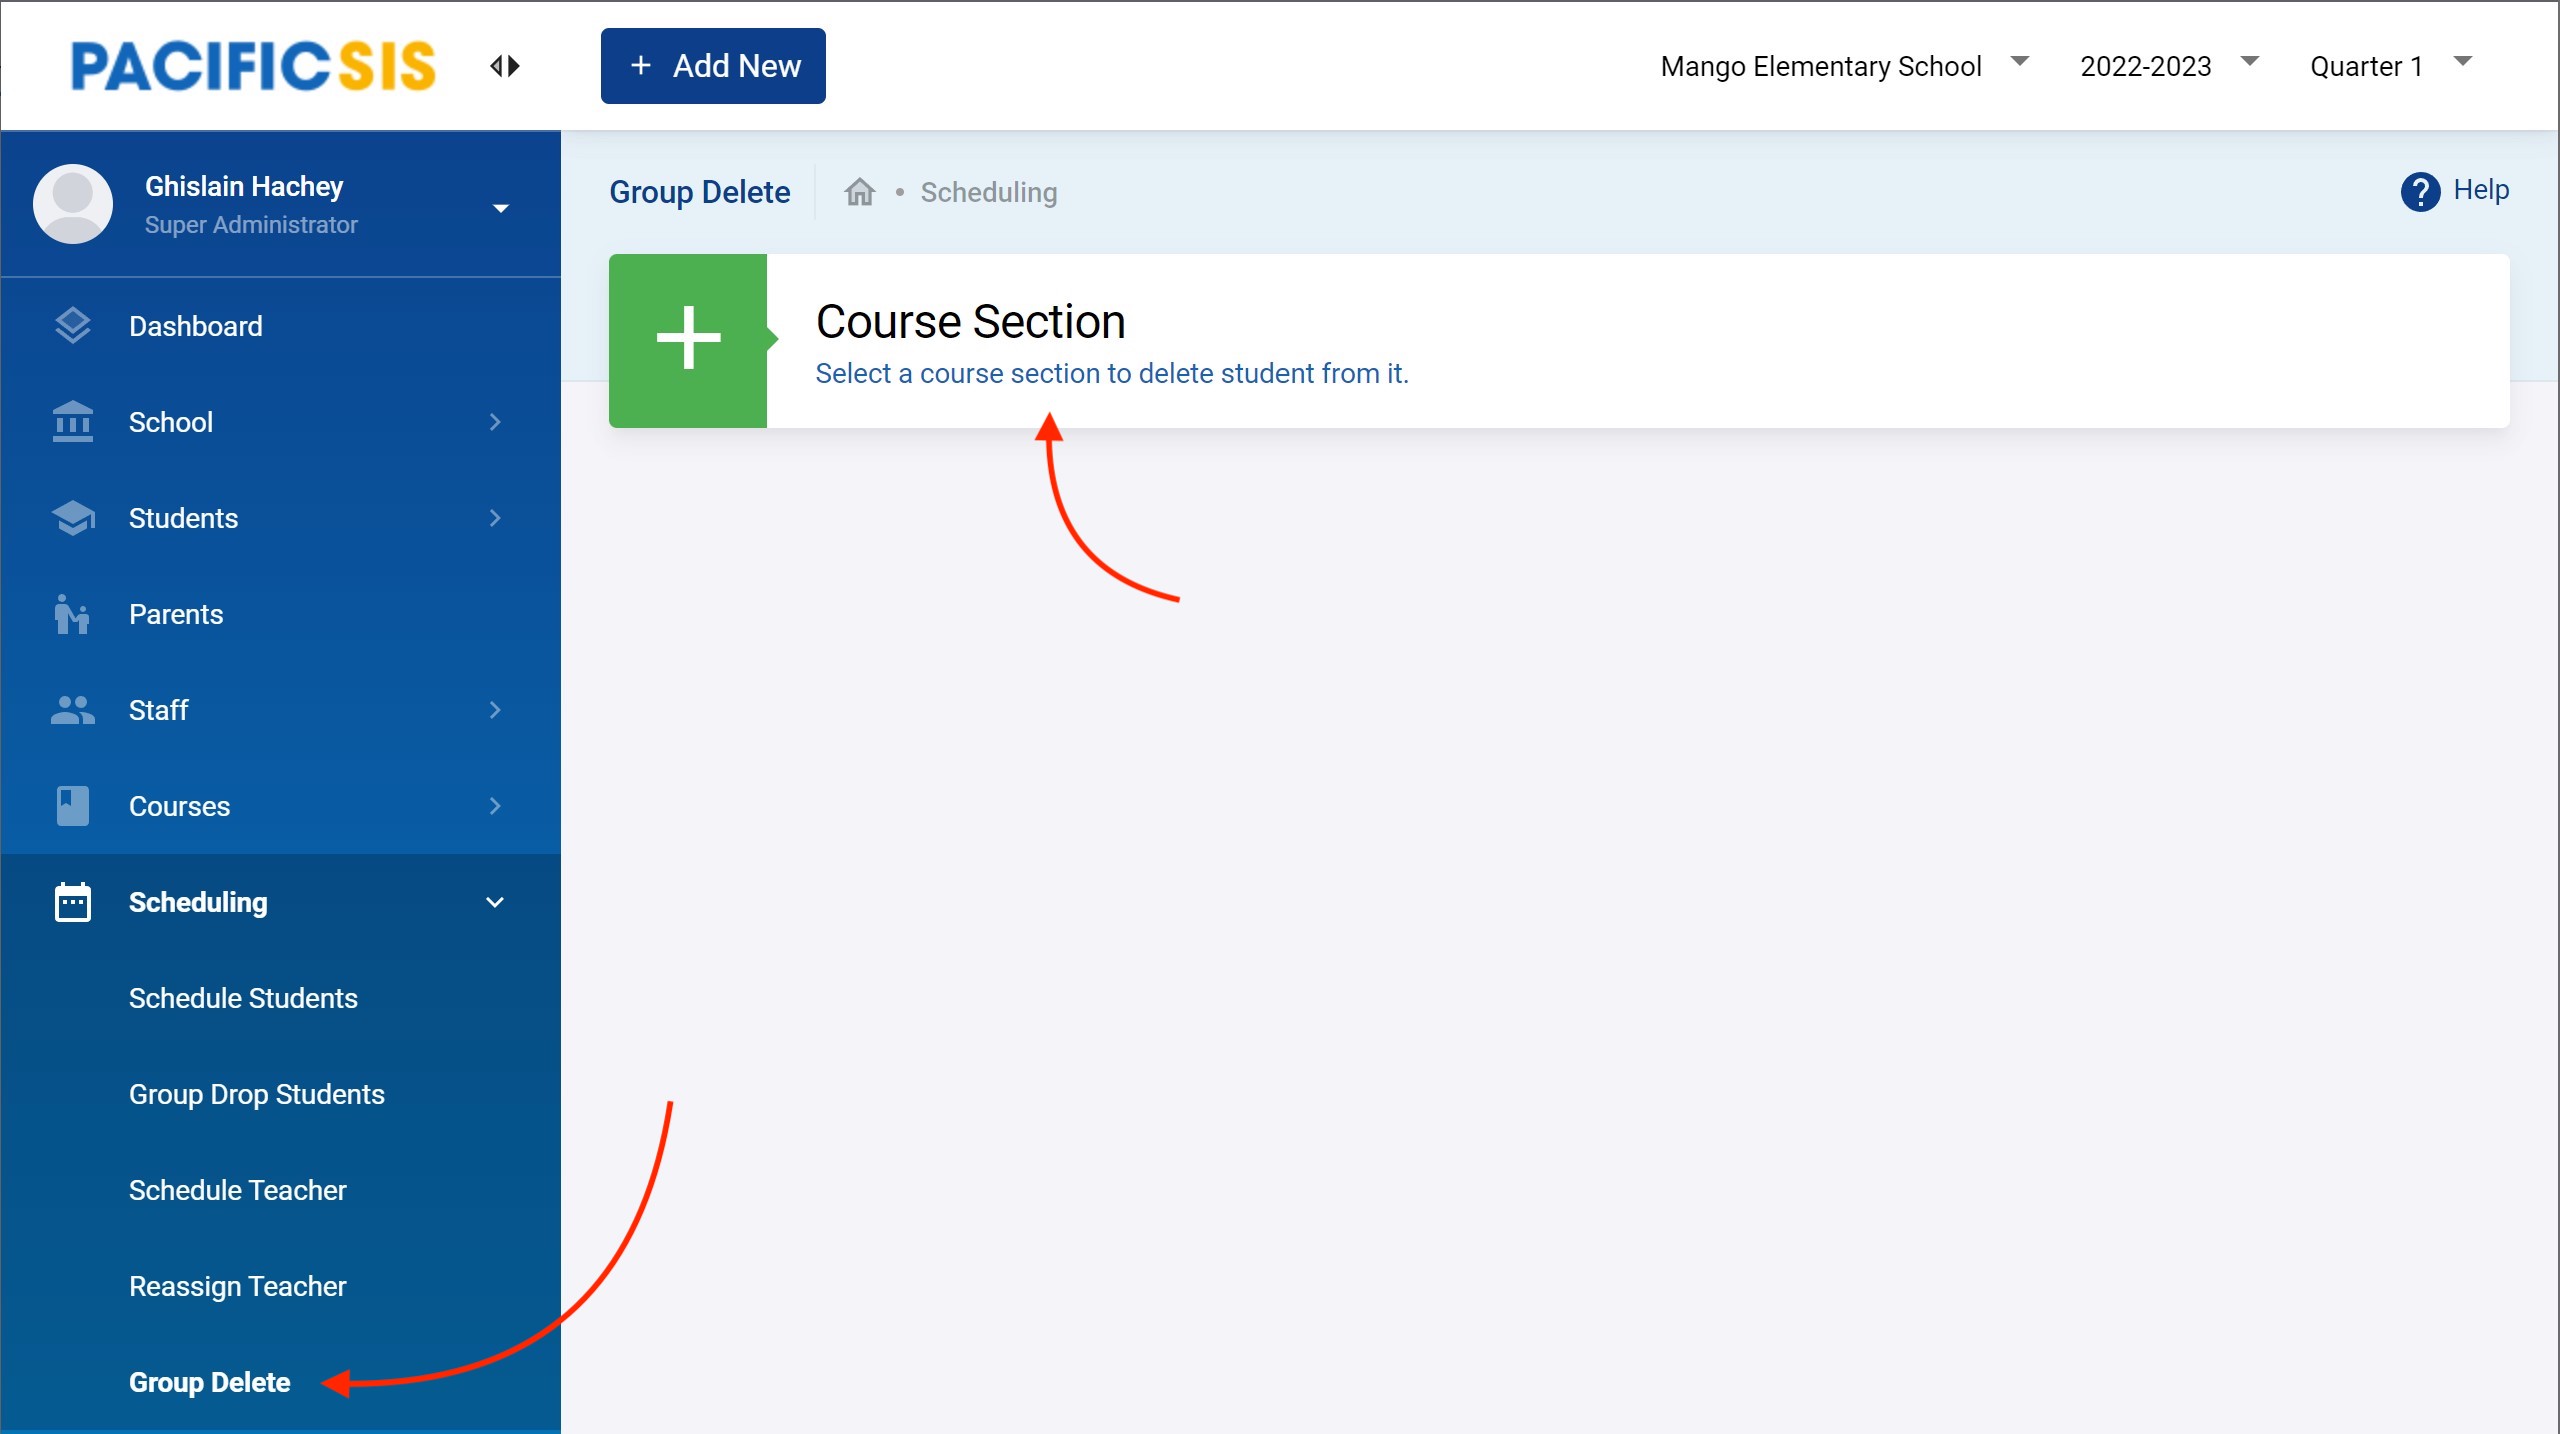
Group Deleting
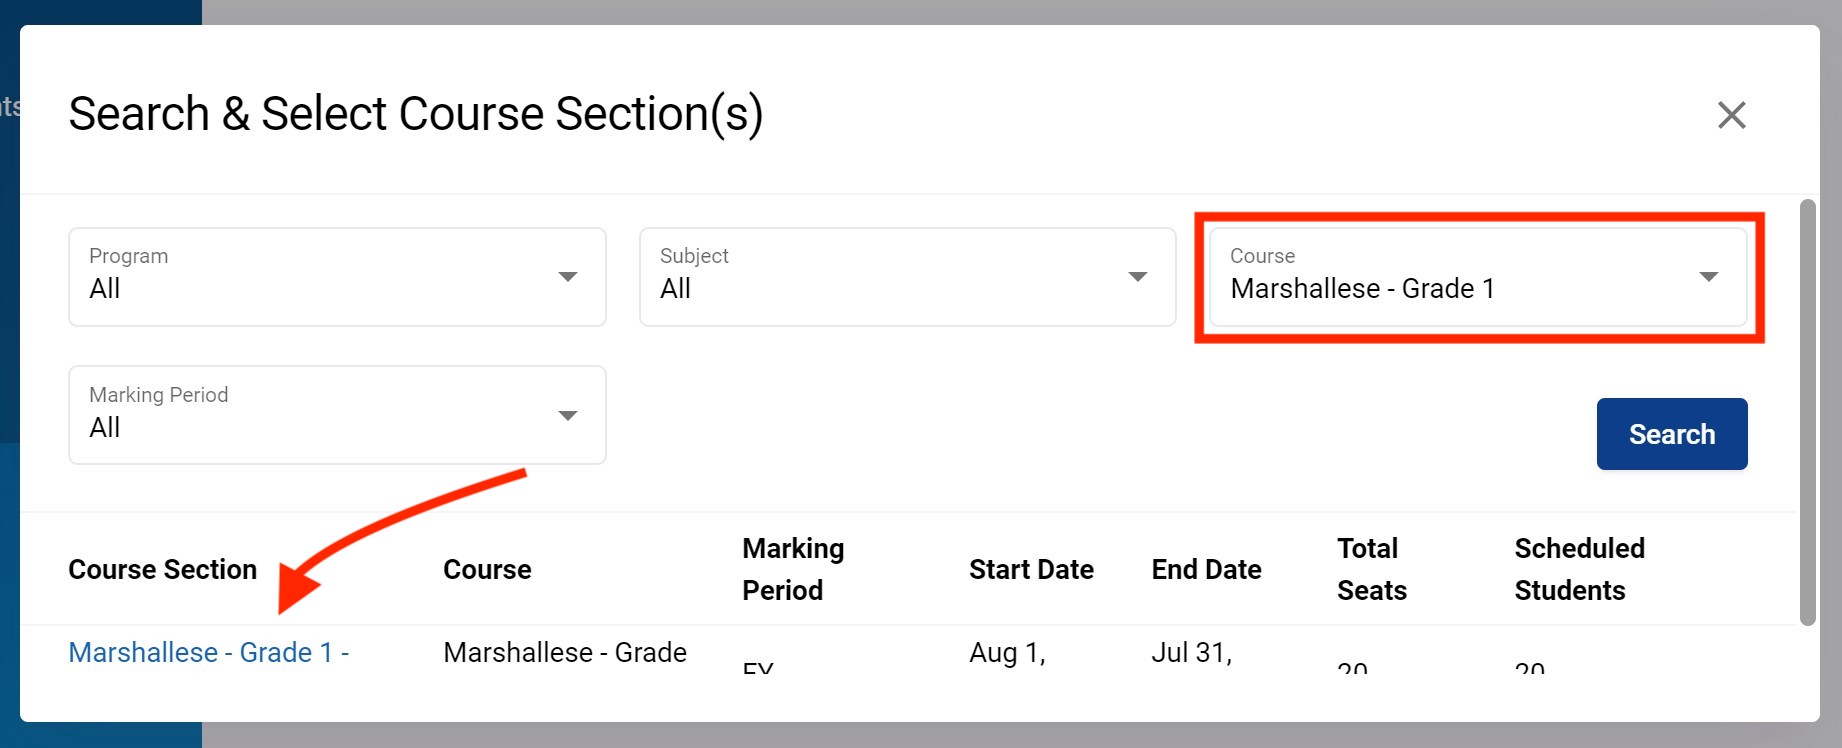
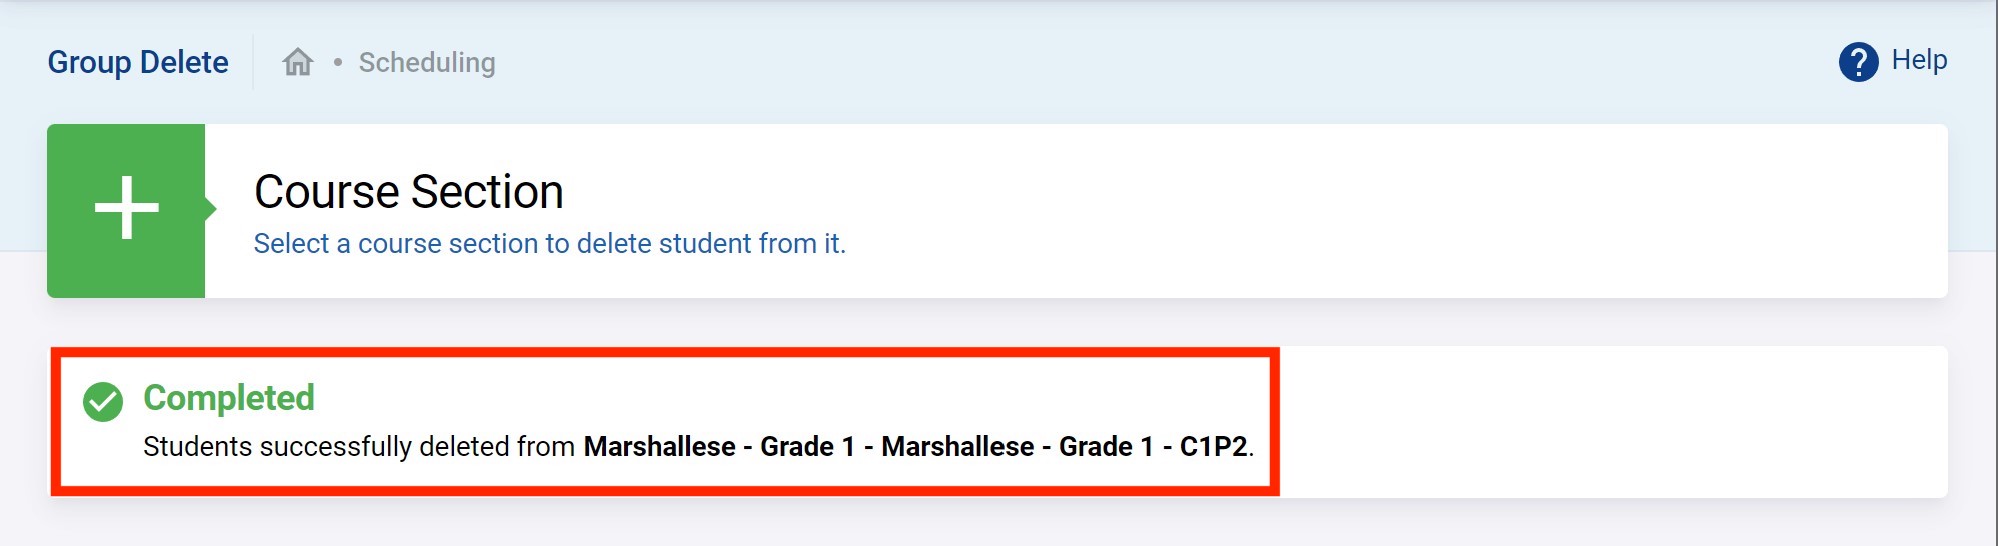
Deleting a group of students from a course section can be done by going to Scheduling → Group Delete. Click to select a course section to delete a group of students from it.
Use filters as usual to locate the course section and click it.
A list of scheduled students into the selected course period will appear. Select the students to delete from this course section and click on Delete Selected Students from Course Section.
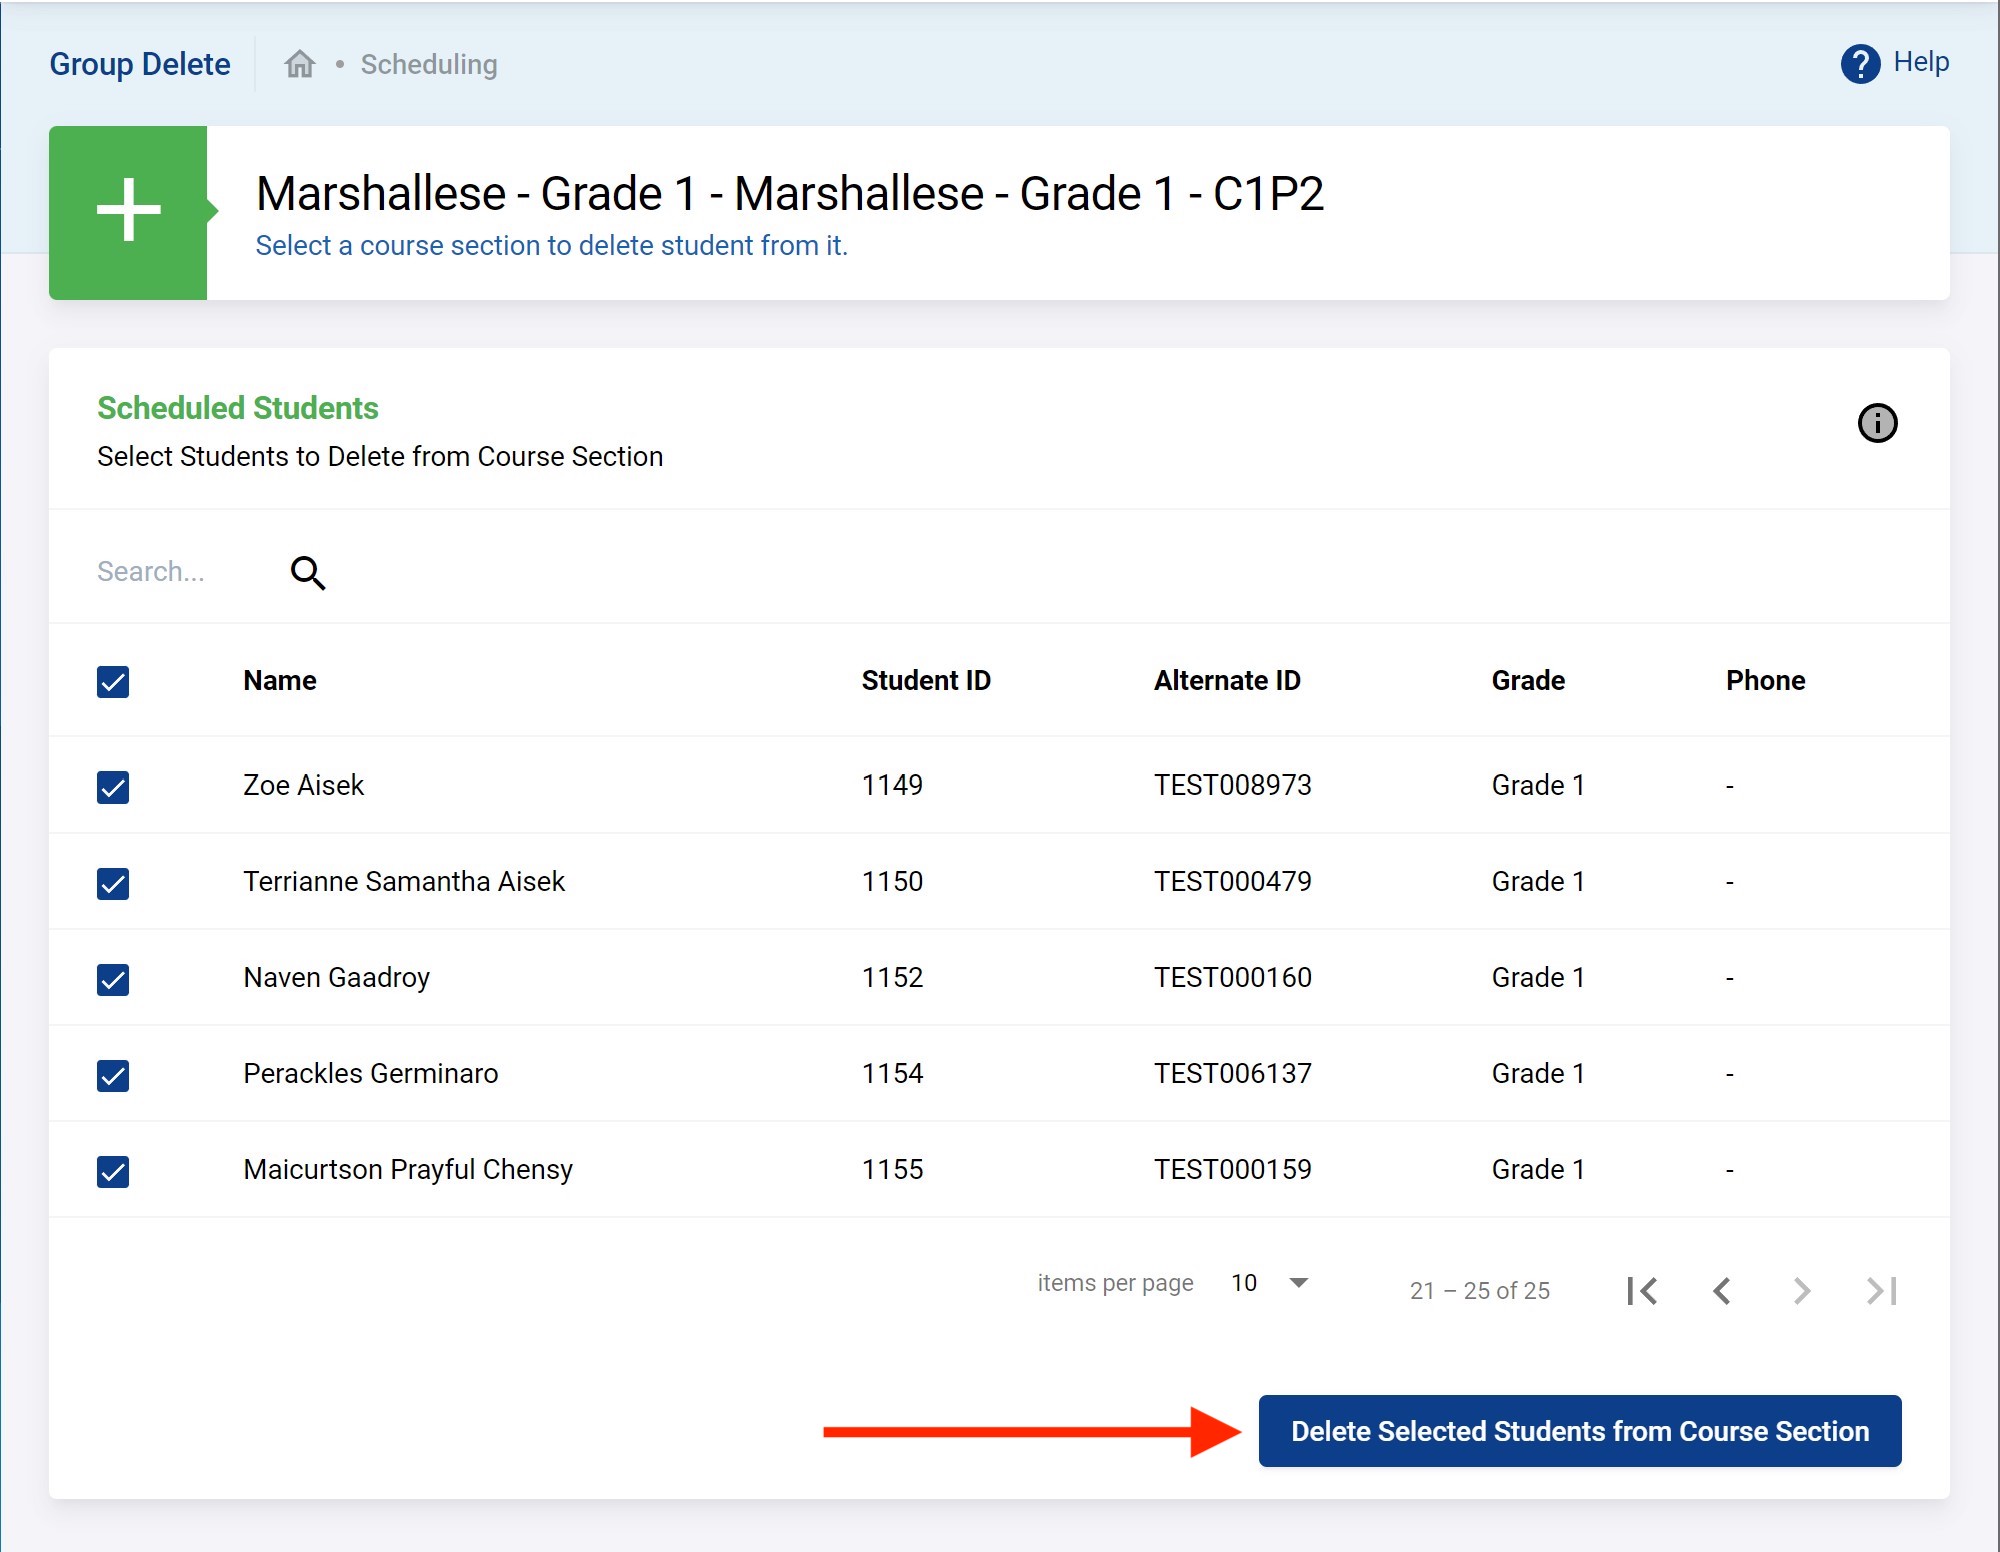
You should see the following if it successfully deletes all students from the course section. Remember, this is a complete removal and this can only be done if no transaction data was already entered.
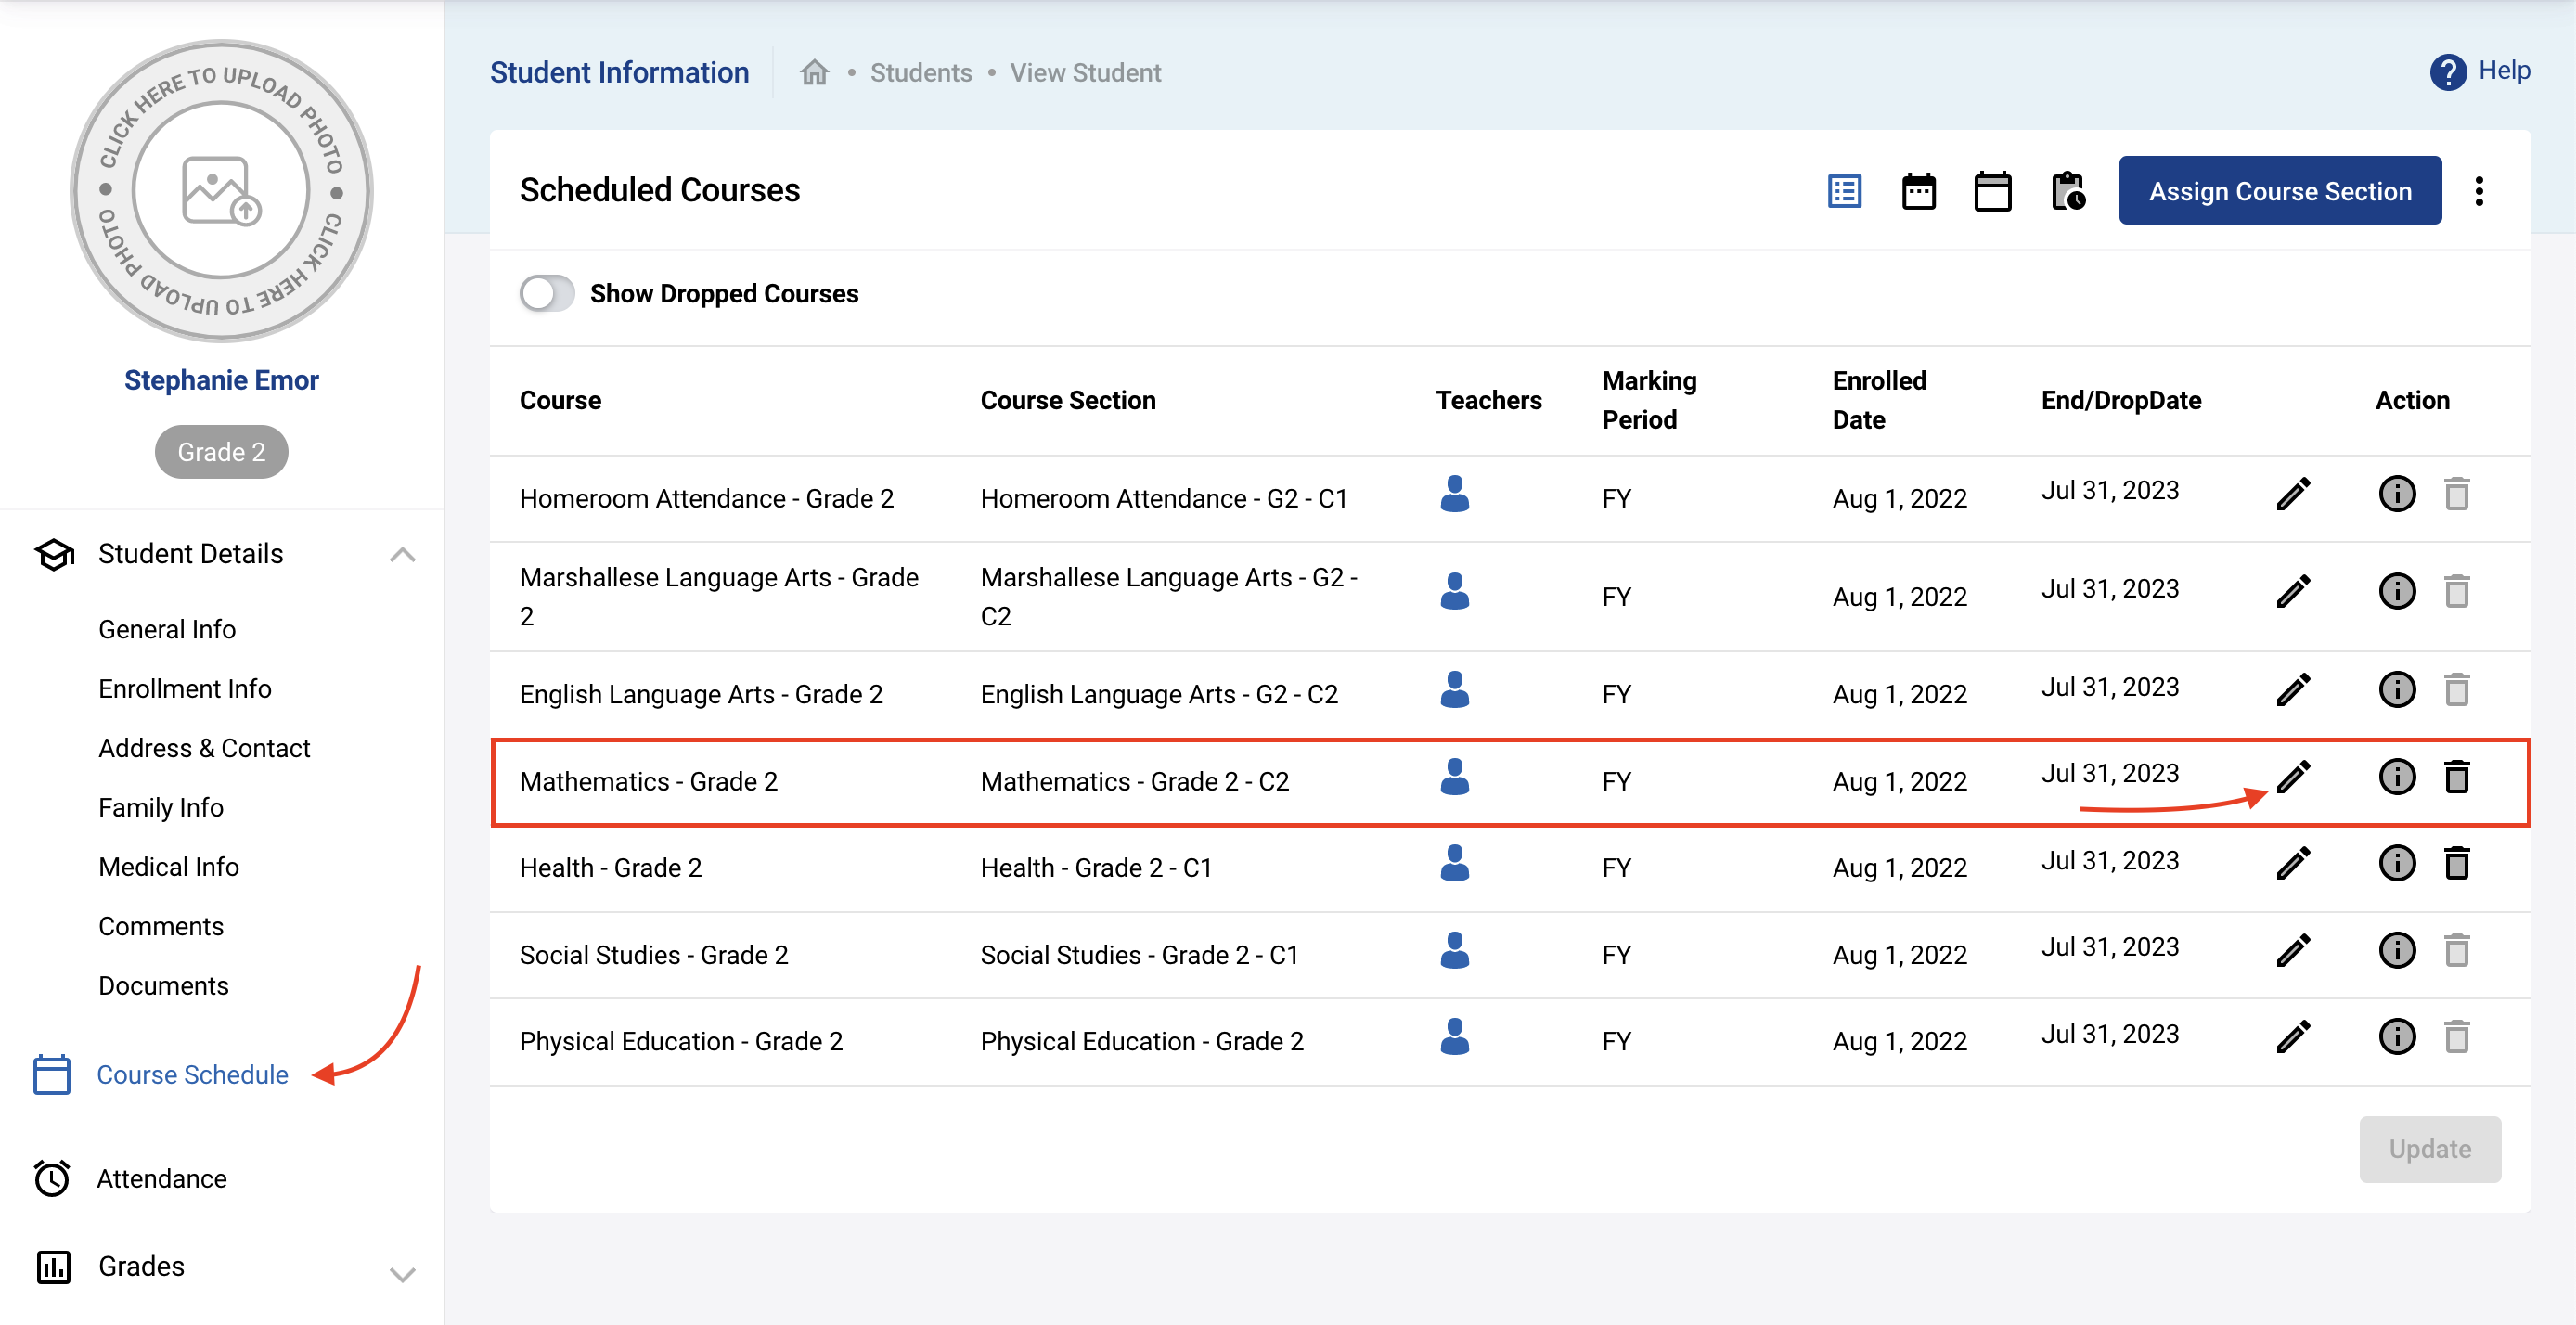
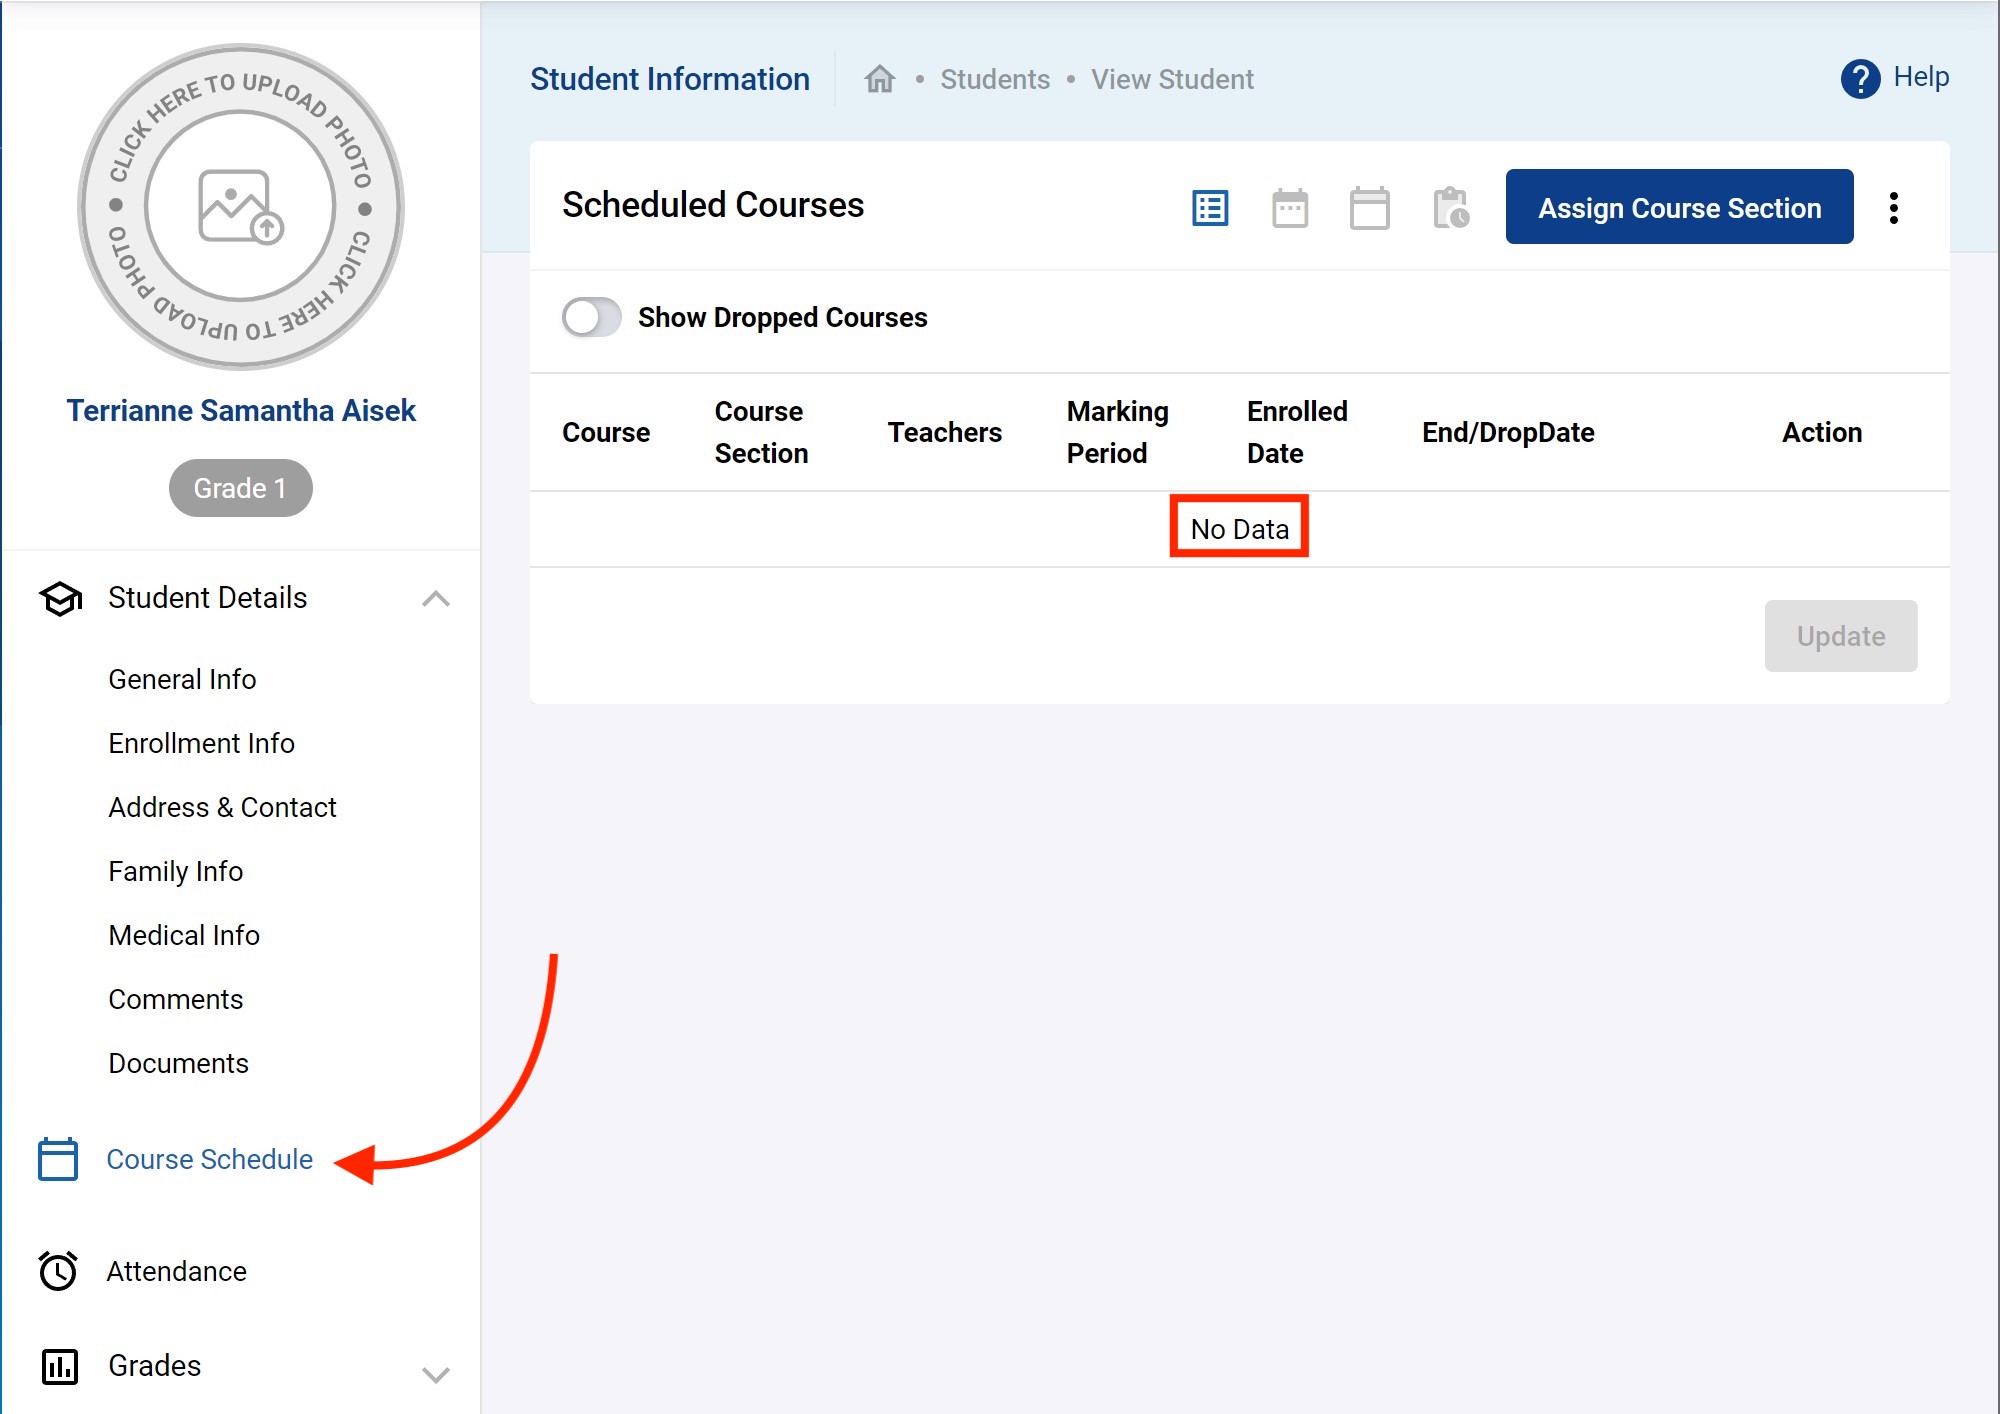
To verify this. Open the profile of one of the students. Browse to its Course Schedule and note that the course period is not there at all.
Schedule Teachers
This is done in the exact same way students are scheduled into course sections as detailed above. There is an additional Check availability feature with teachers to make sure the teacher is available for teaching that course section.
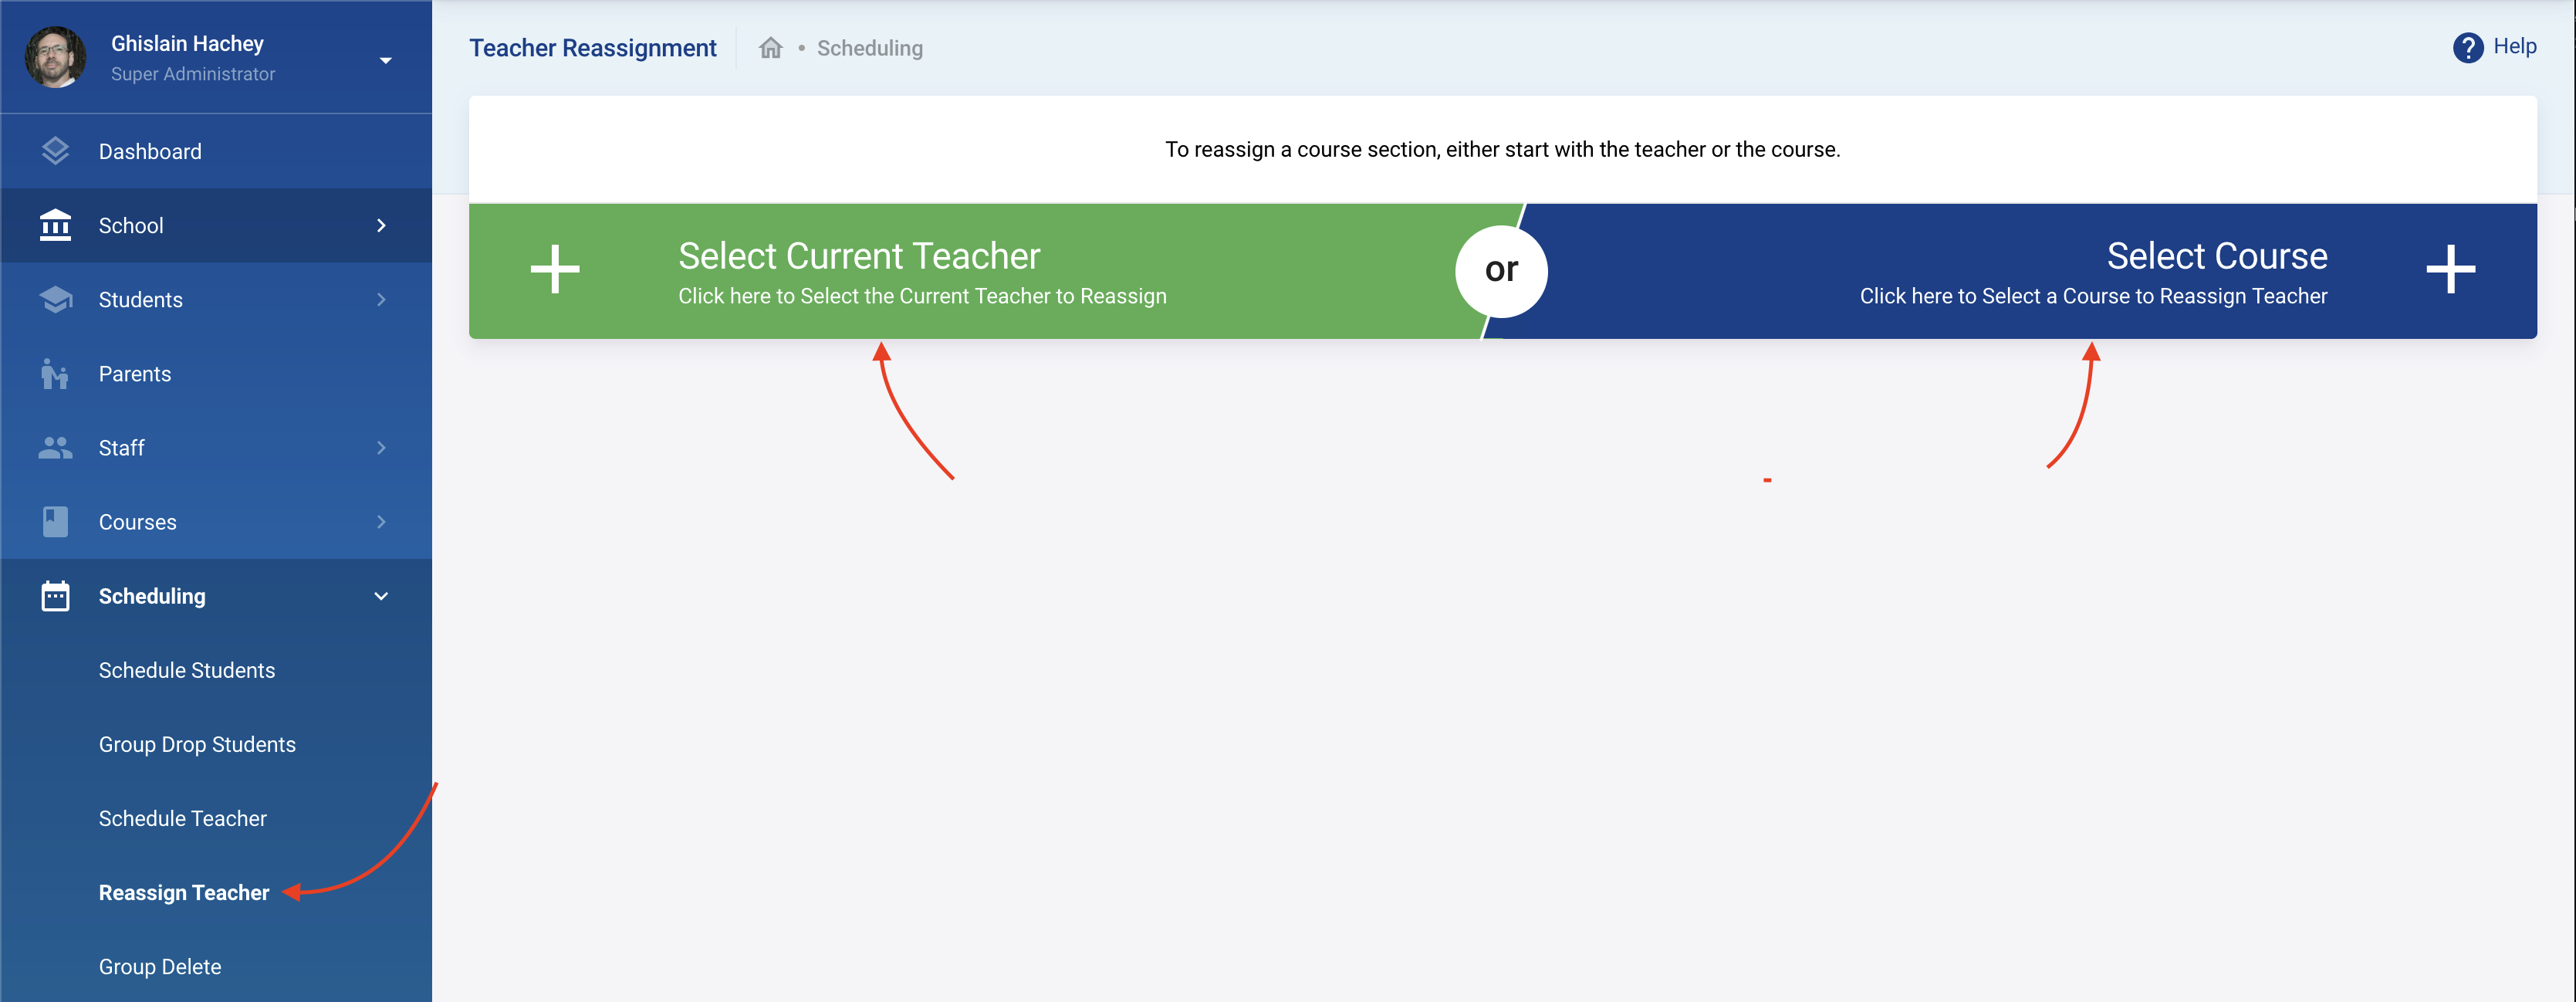
Reassign Teacher
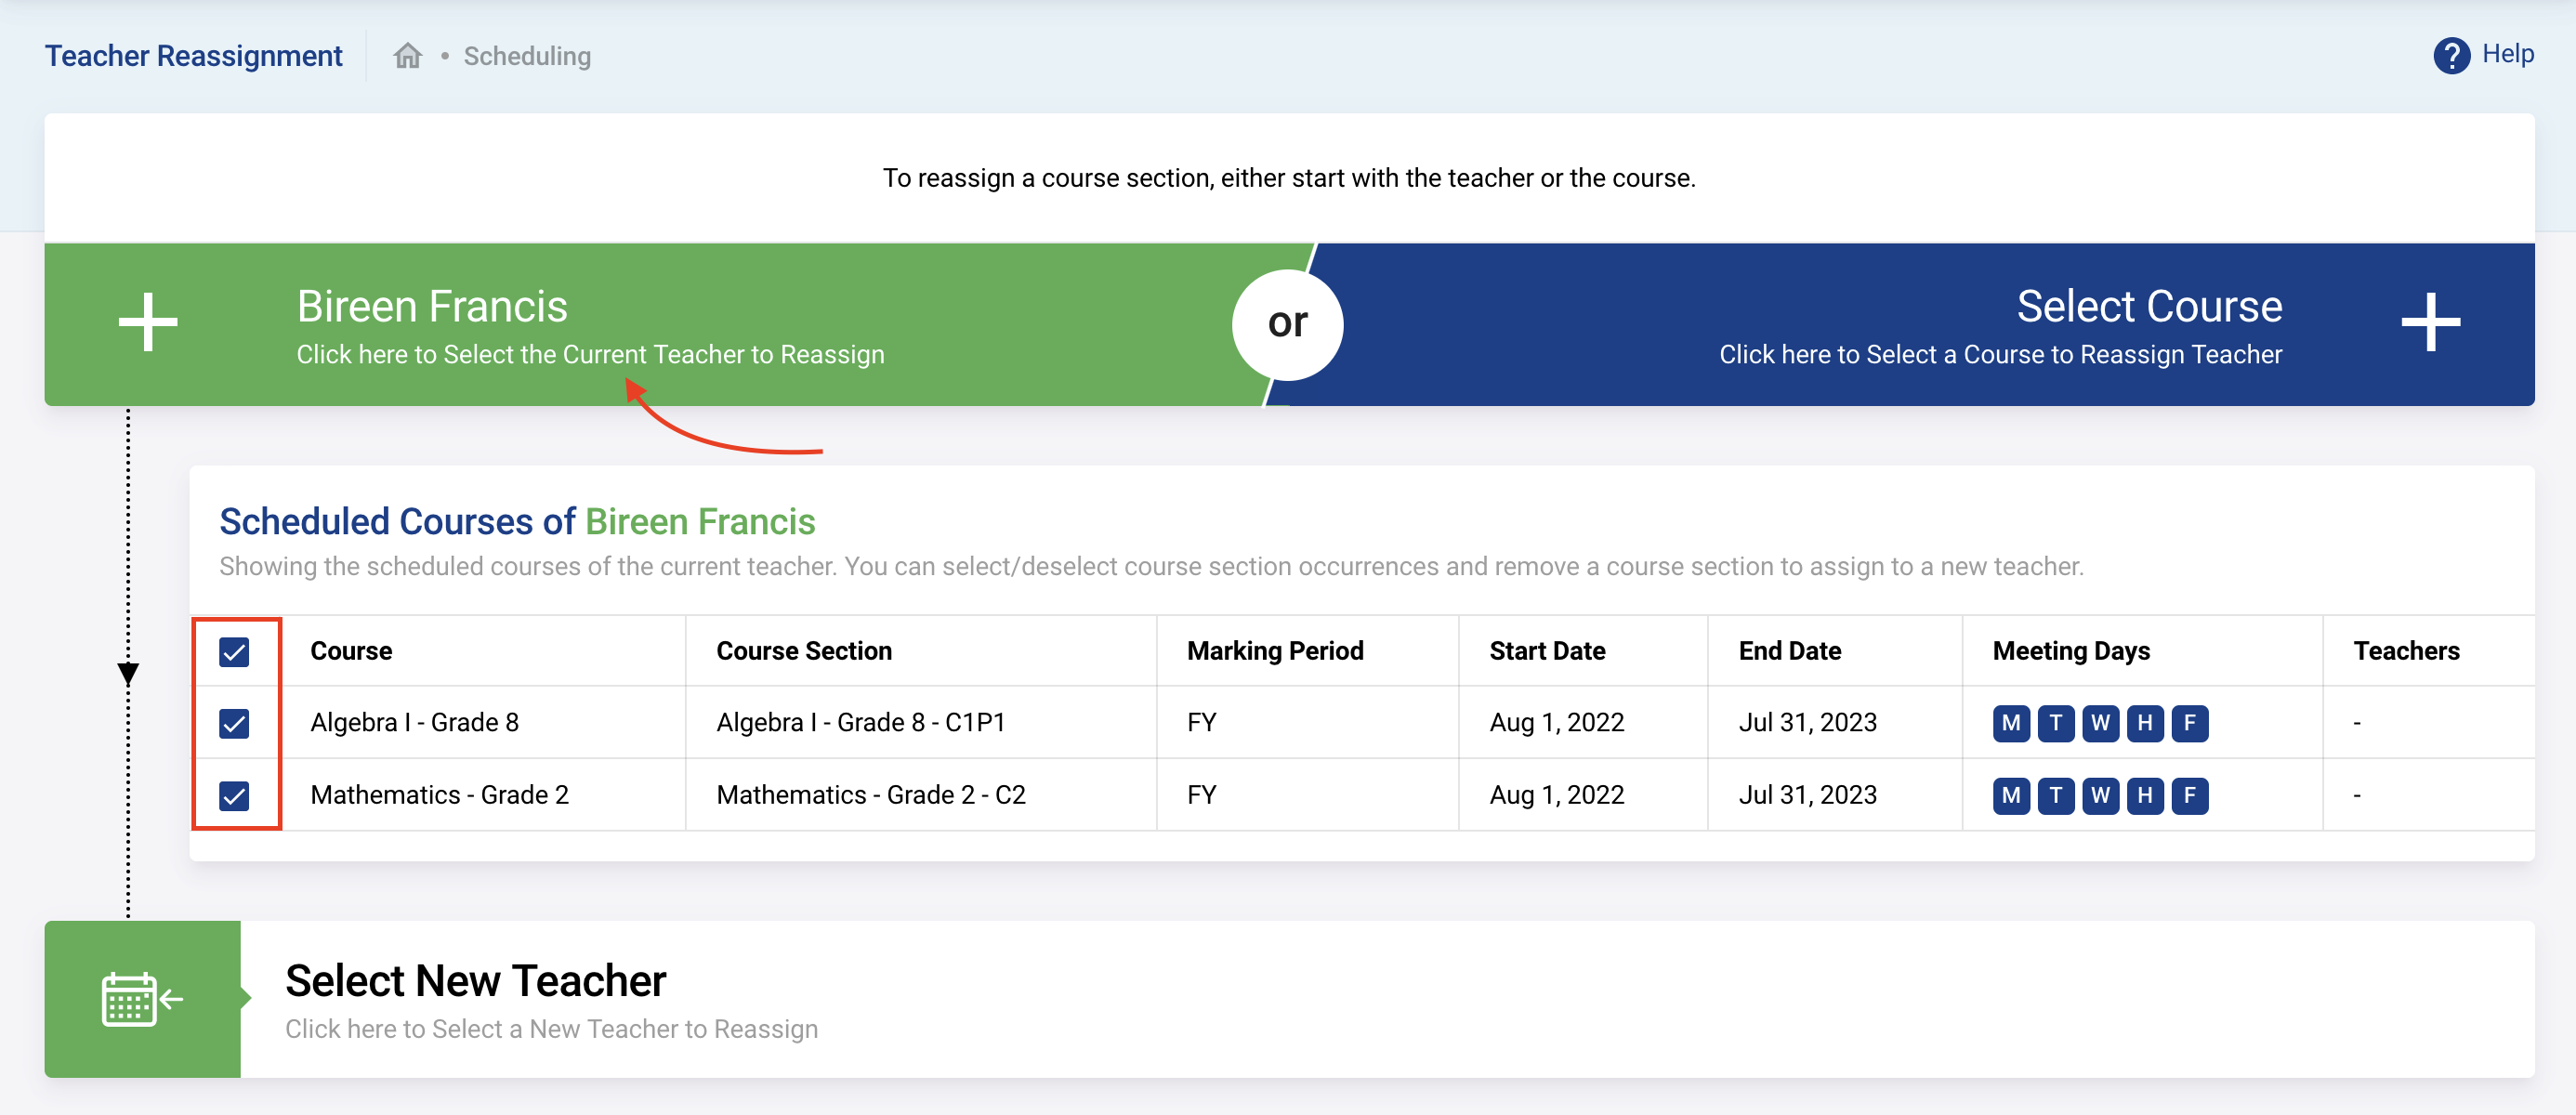
If you need to re-assign teachers after the school year is under way and your whole catalog has already been created you can do so in School Setup → Courses → Teacher Re-Assignment. For example, a teacher is transferred to another school, leaves the country or is otherwise no longer available and must be replaced by another.
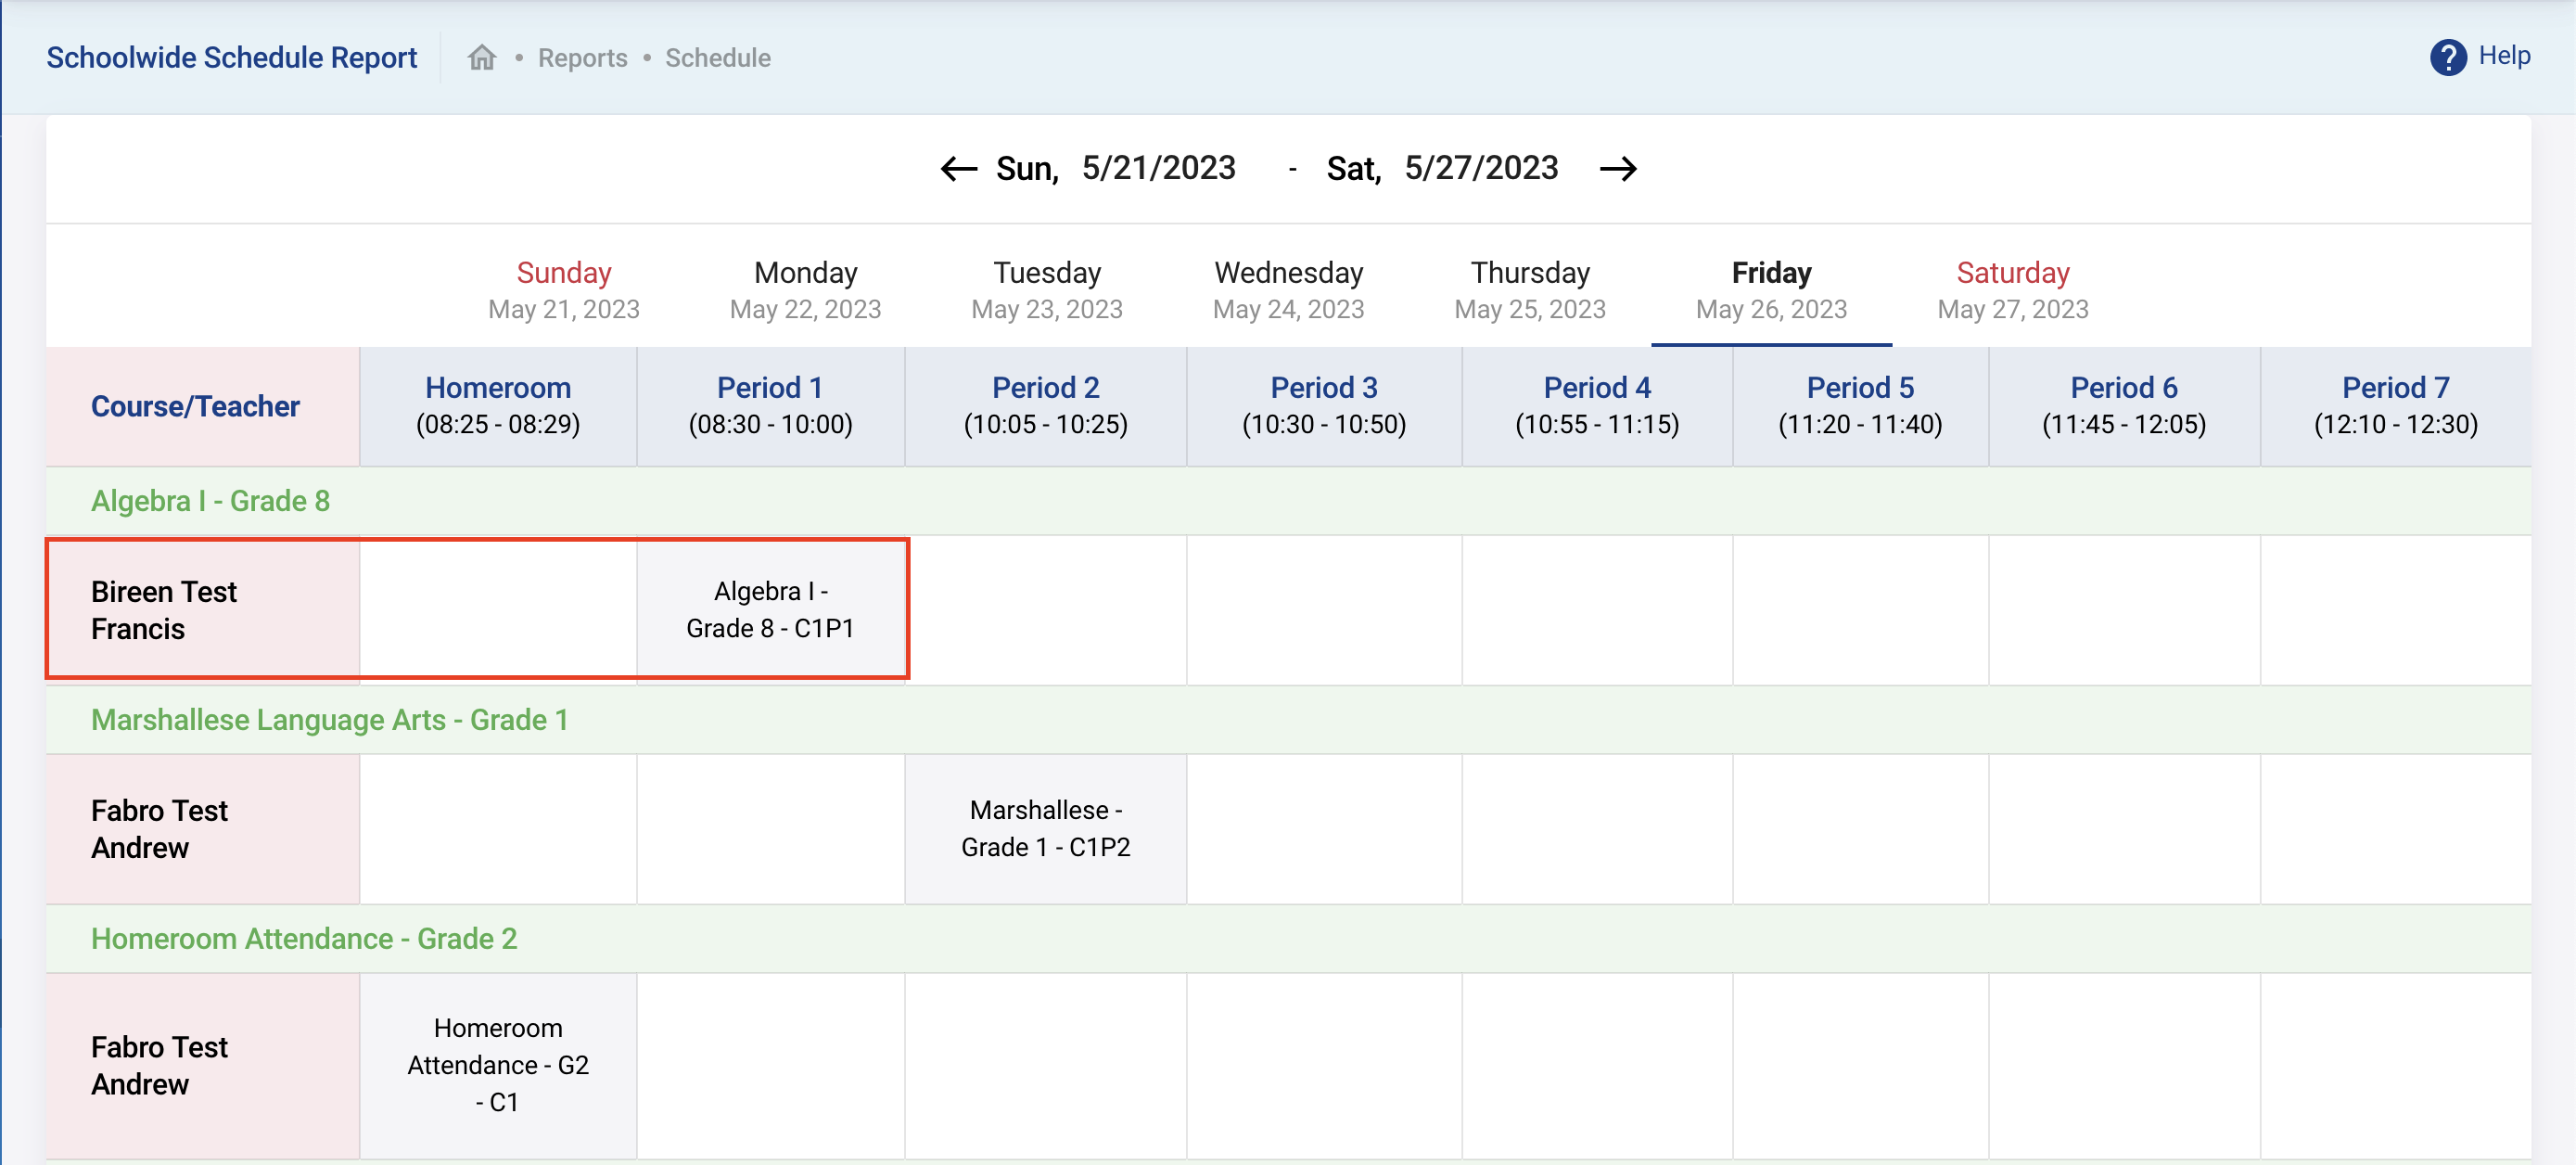
A quick look at the Schoolwide Schedule Report in Reports - Schedule we can view the scheduled teachers in their courses. In this example, teacher Bireen Test Francis is no longer able to teach course (Section) “Algebra I - Grade 8 - C1P1”.
You can do this easily by browsing to Scheduling → Reassign Teacher. You can then decide to find the teacher needing a reassignment or the courses the teacher is teacher.
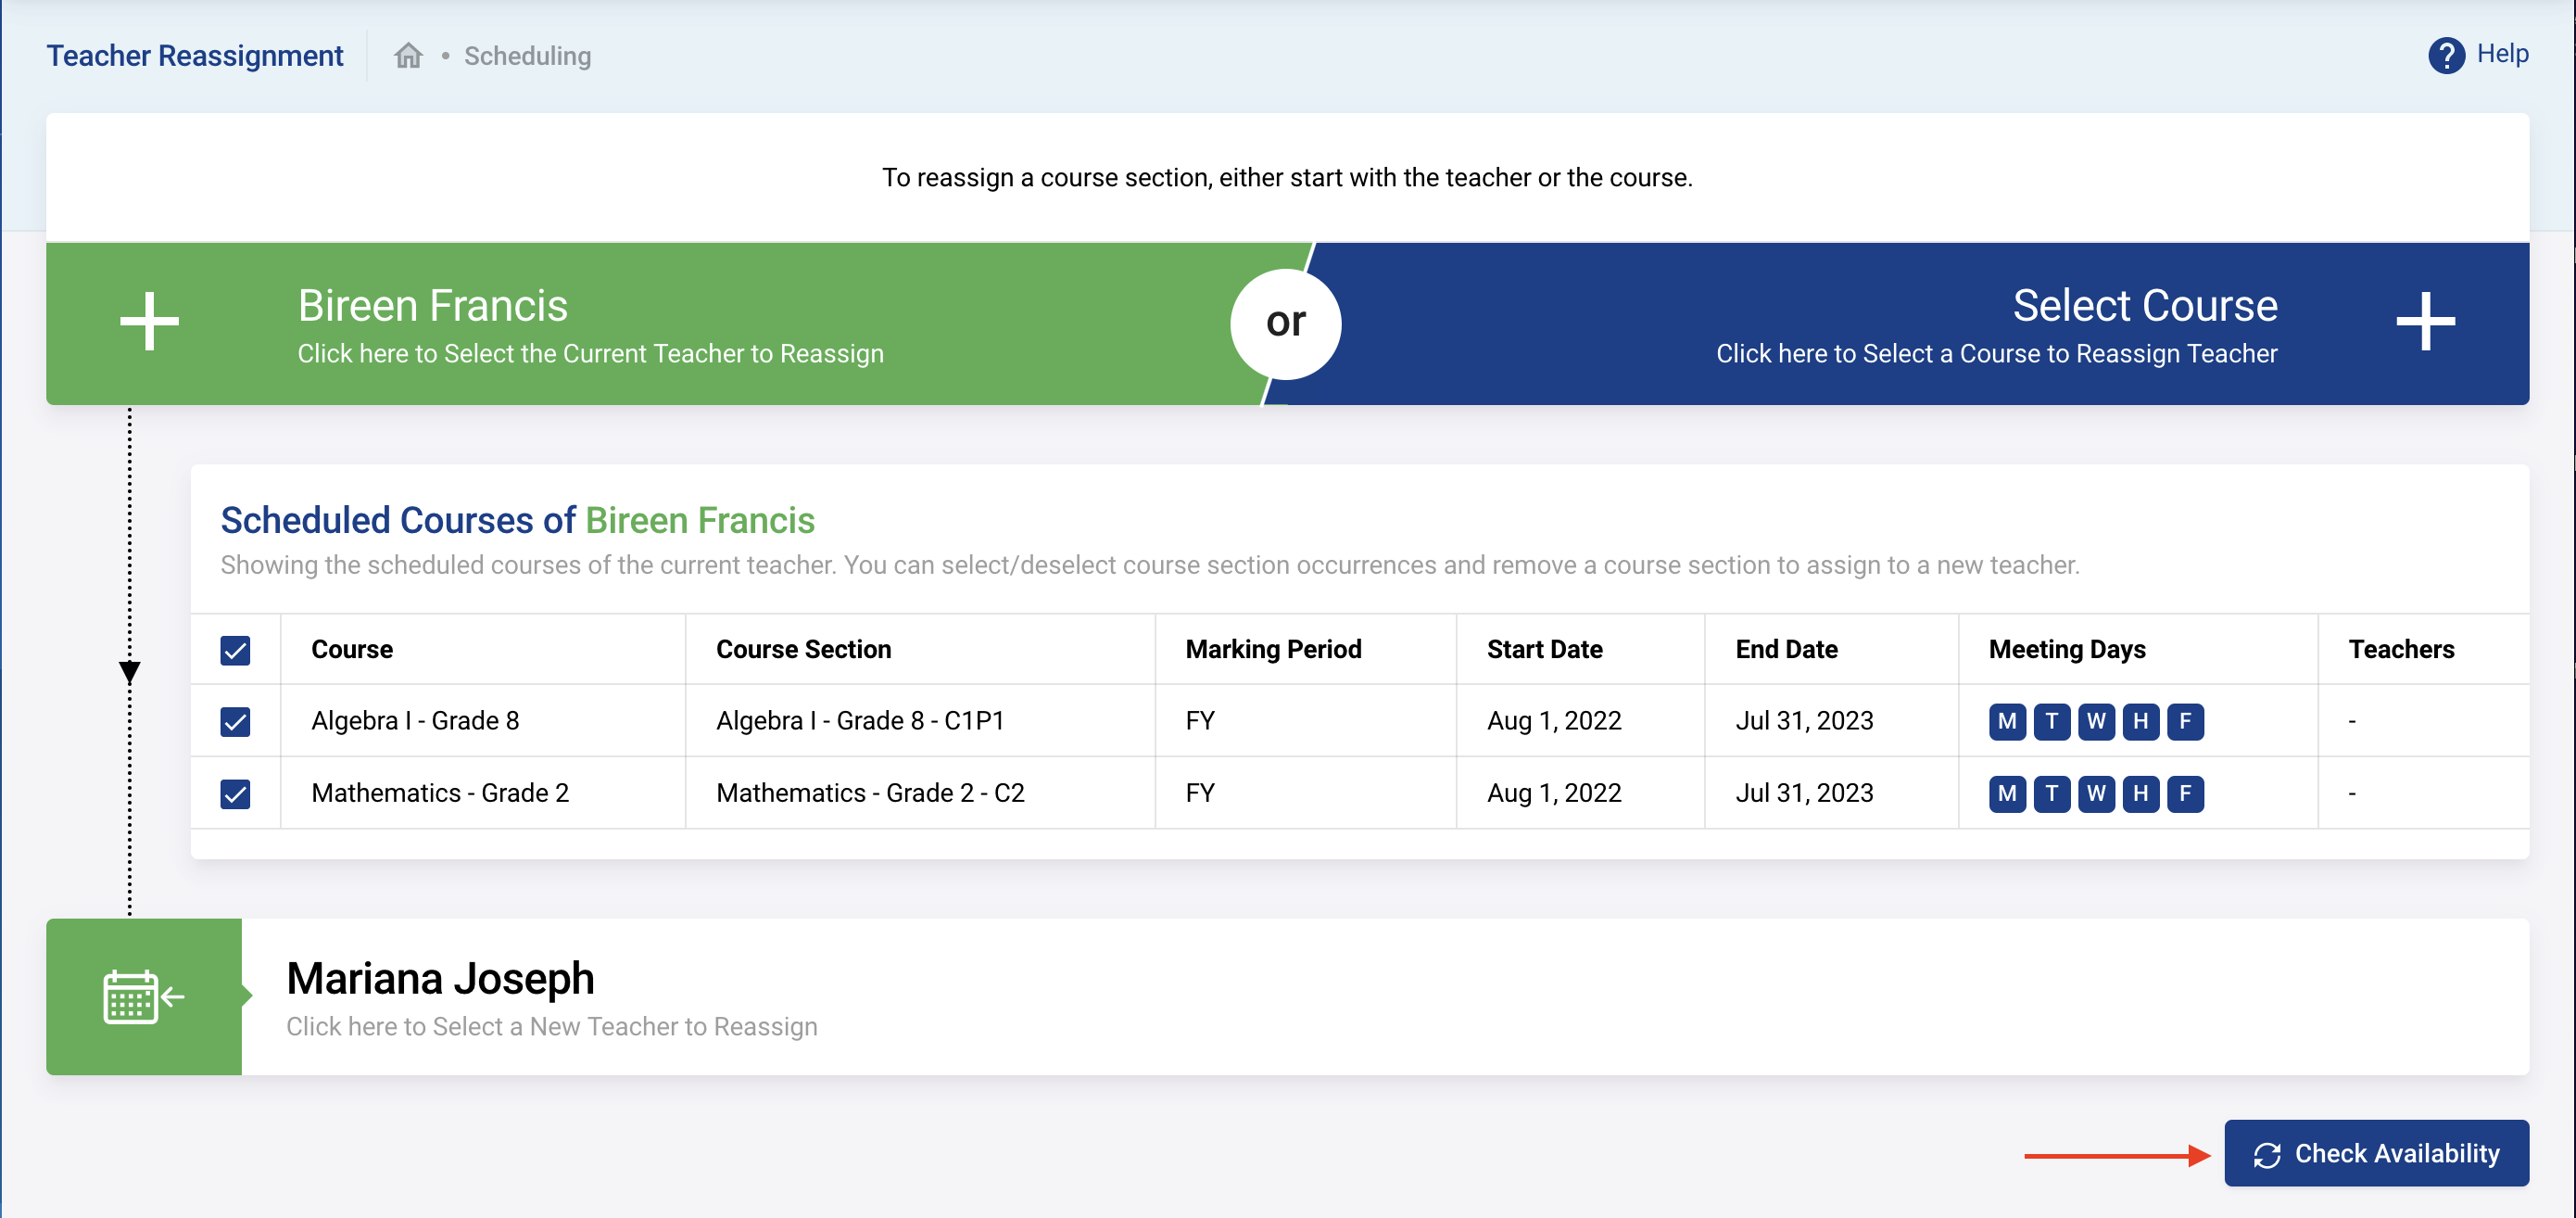
In this example, we look for the teacher. You can search by name if you remember or simply click on Search. With the teacher chosen you can then select all the courses taught by that teacher if they are all to be reassigned to another teacher.
Then select and find the new teacher that will replace the current one. Check availability will make sure the newly chosen teacher is available for those classes (i.e. not teacher anything else at those time).
Once there are no conflicts detected you can to the reassignment.
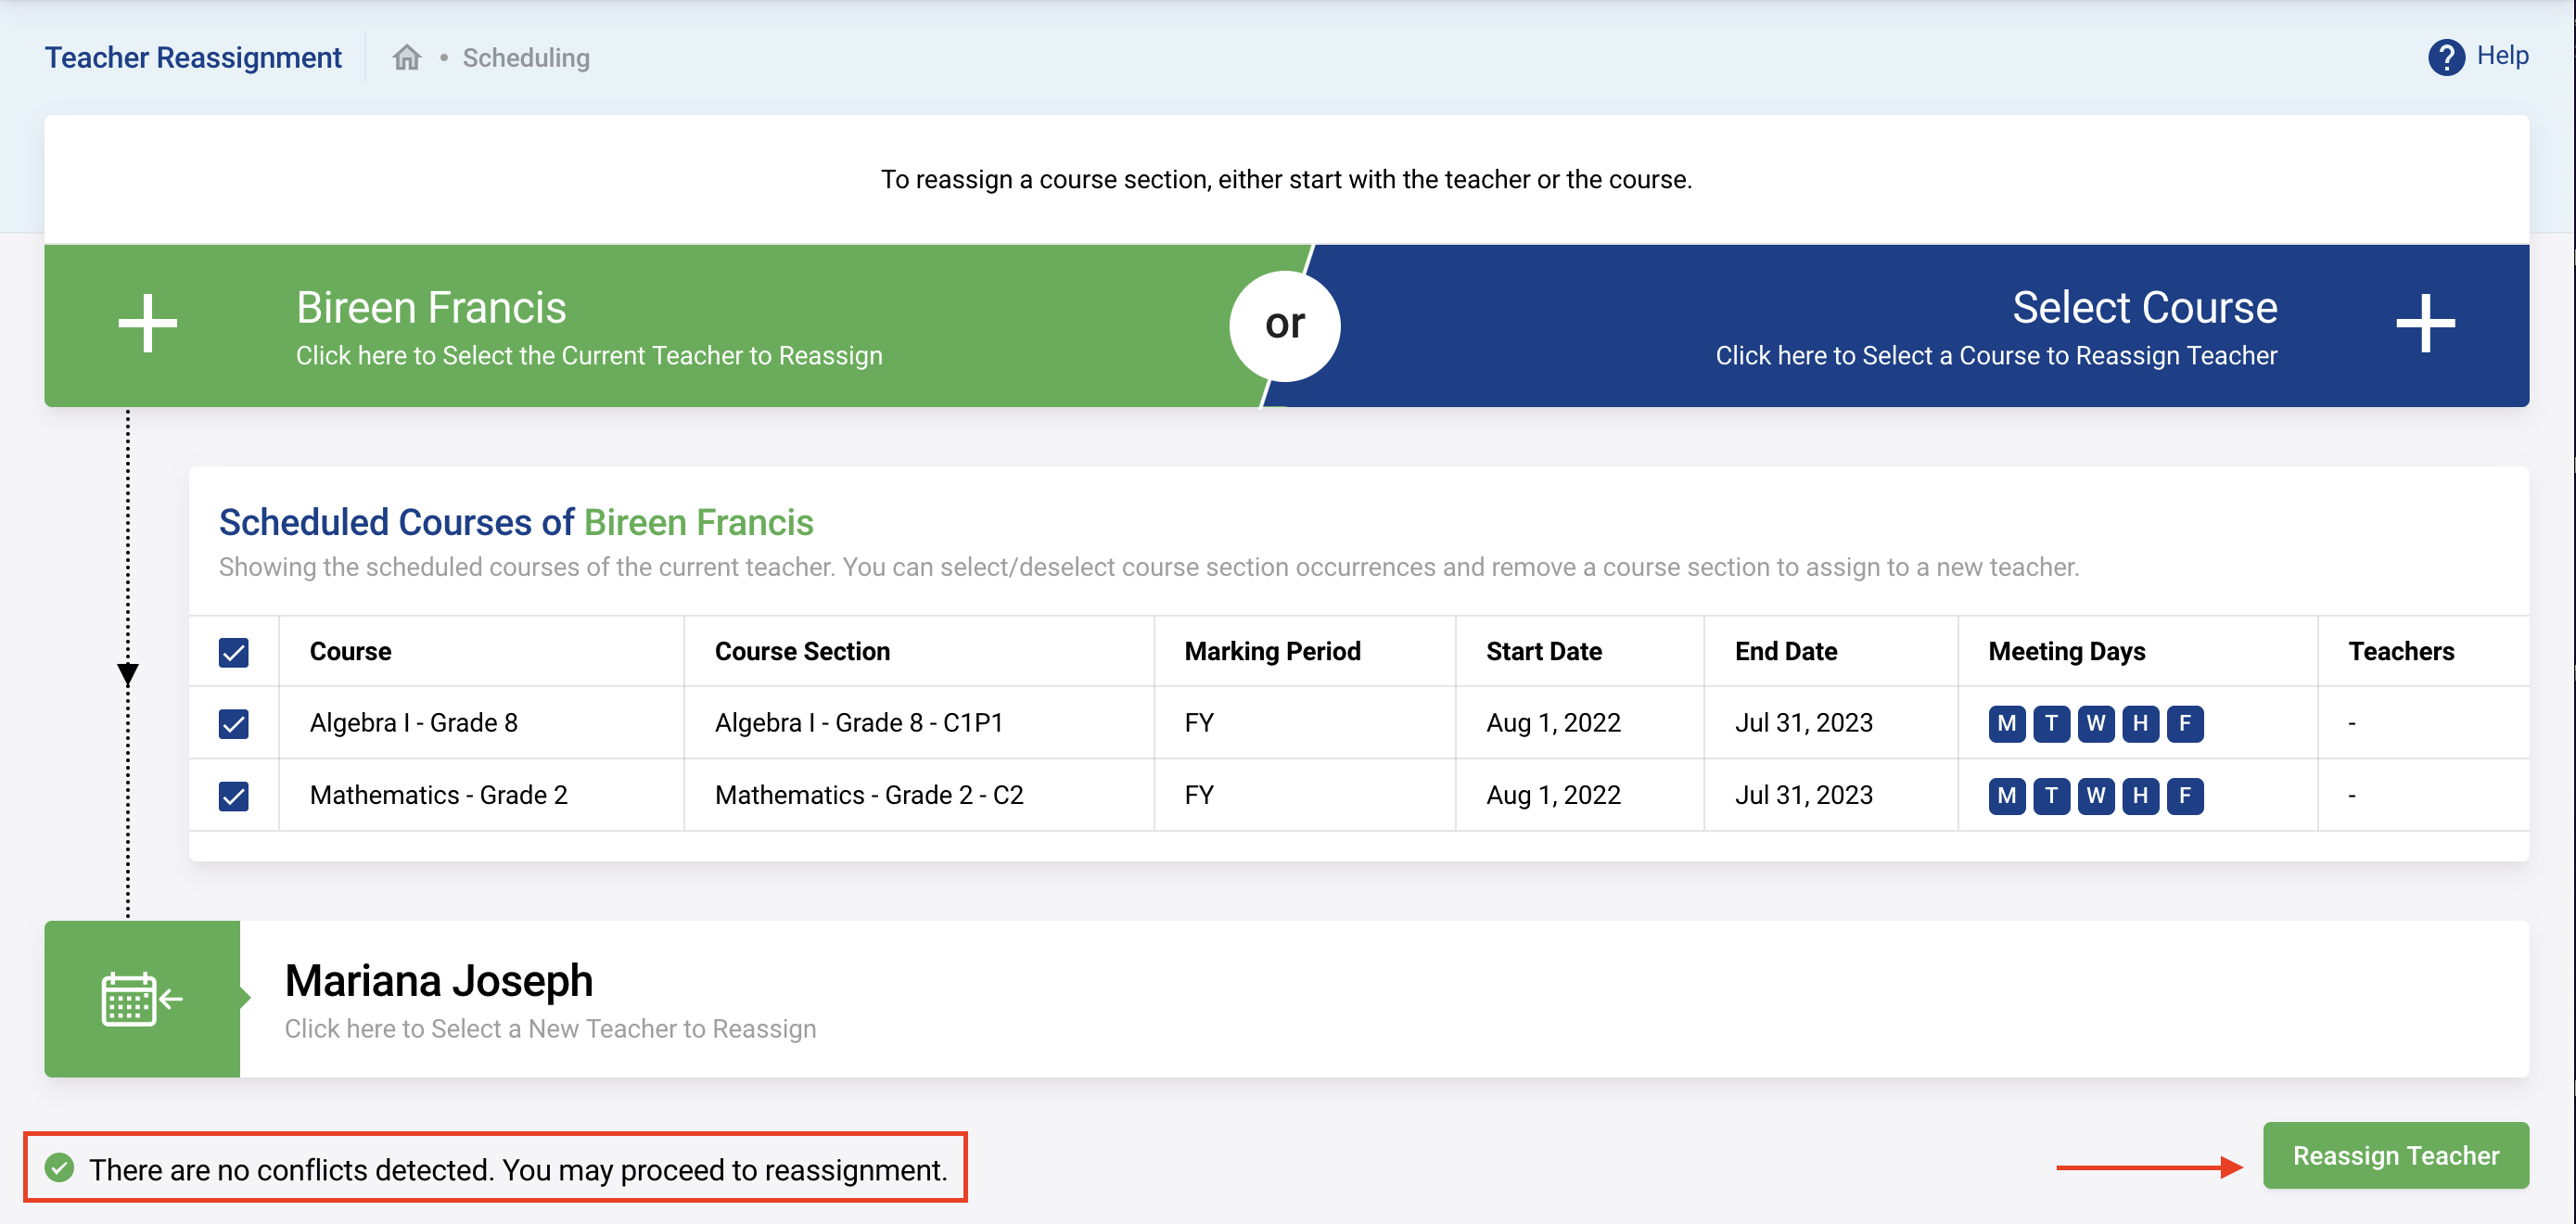
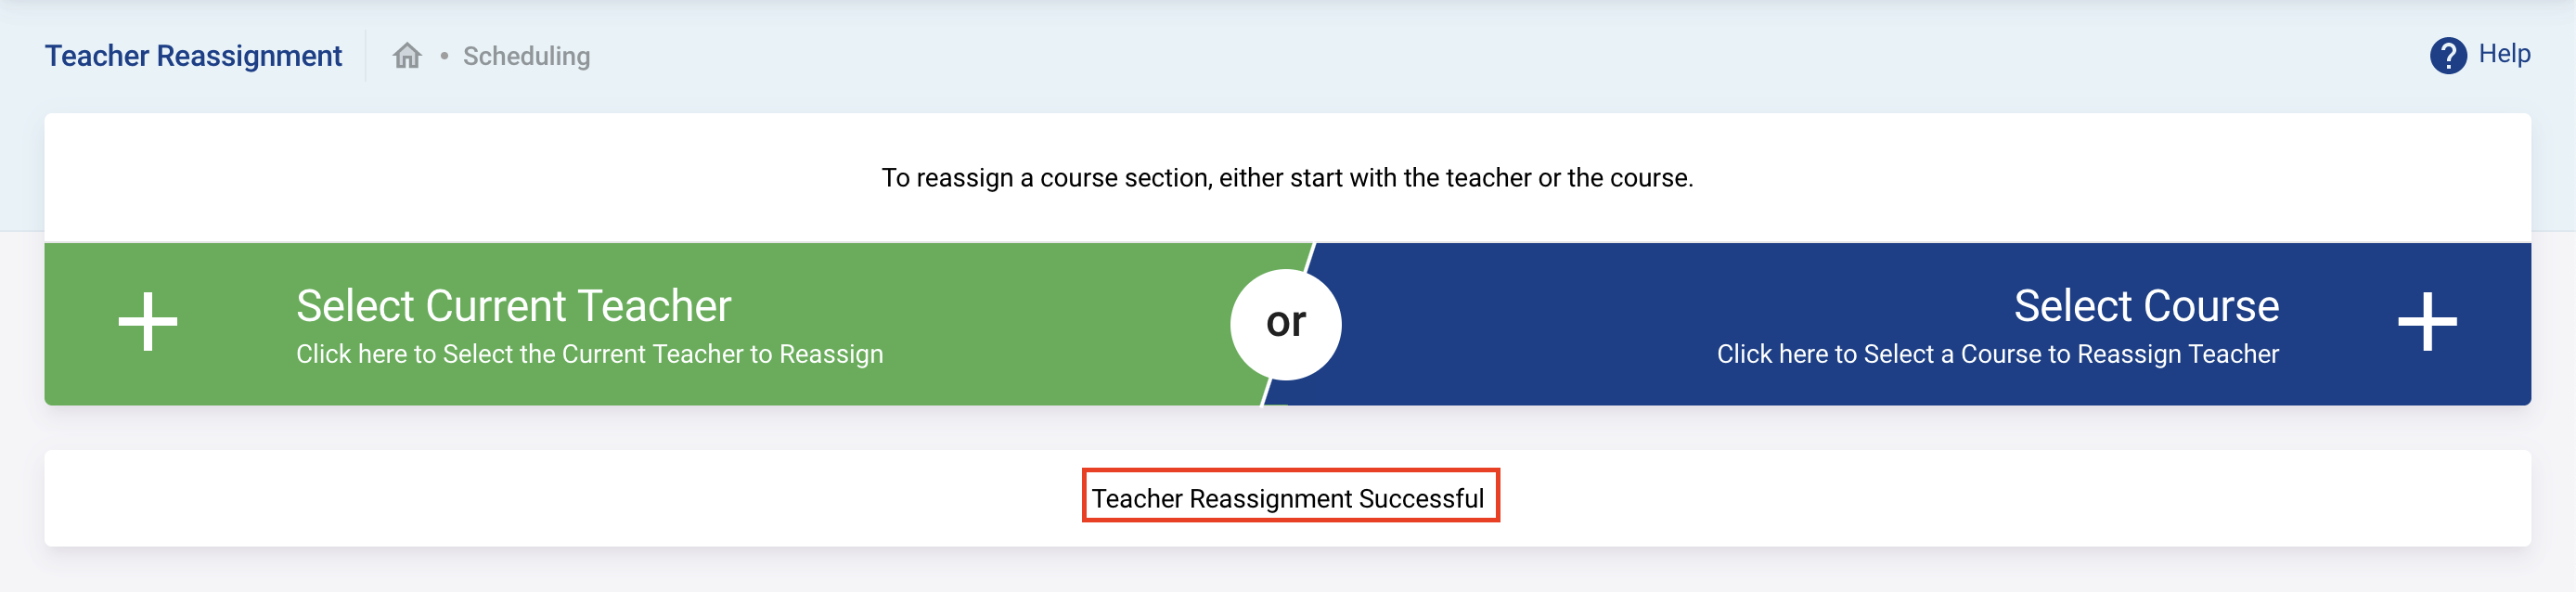
And it should return the following successful message if all went well.
Attendance
The system can record attendance in flexible ways. For example, you could have a single homeroom attendance in the morning to mark your student attendance which may be more suitable for primary schools. In secondary school you may want to mark attendance for each individual courses as students are getting old enough and may choose to skip individual schools without telling parent. Here are suggested ways:
- Single Homeroom Attendance: Homeroom Attendance course period where all kids of the school regardless of grades are scheduled into. Suitable for small schools with a simpler setup.
- Homeroom Attendance for each grade: Homeroom Attendance course period for each grade of class (e.g. Homeroom Attendance Grade 1, Homeroom Attendance Grade 2, etc.) where kids are scheduled into their respective class groups.Suitable for small to medium elementary schools.
- Attendance in each individual courses: No homeroom attendance at all. Attendance is taken in each scheduled courses of the day for all students. The most comprehensive and demanding data entry approach suitable for larger schools such as High Schools.
Regardless of the approach taken taking attendance works much the same way. The example setup in the following section is based on the Homeroom Attendance for each grade.
Setting up Course Section with Attendance Taking
If you followed this user guide then only the “Homeroom attendance” period can take attendance because it was configured as such in School Setup → Settings → Creating Periods. So in this case we create specific course sections to take attendance during the homeroom attendance in the morning.
First, as detailed in Courses → Courses Manager create create your course sections for taking attendance. We create one below for Grade 2 class of students called “Homeroom Attendance - Grade 2”.
We created the course now at least one course section is needed as usual.
Complete the course section as usual making sure you enable Take Attendance.
When the course section is complete it will look like this.
Before you can take attendance you will need to schedule some teacher and students into this new course section. This is done as detailed in the chapter Scheduling above. When you have scheduled students and at least one teacher you should see something like this if you come back to your course manager in your course section. Note the students and teachers are now schedule in this course section.
At this point you are ready to take attendance. Attendance can be taken in a few different ways:
- As a teacher: the teacher itself will login the system and take the attendance of their course sections. This is the preferred way especially in larger school setup like high schools.
- On behalf of teachers: a dedicated data entry staff can login the system with appropriate permission (e.g. School Administrator or Admin Assistant profile) and take attendance for all teachers of the school.
- By the administration office: something the admin office can step in an do some attendance data entry. For example, adding absences in advanced, overriding some attendance, and other slightly more advanced workflows.
Taking Attendance as a Teacher
To take attendance as a teacher the teacher must have the Portal Access enabled as detailed in Staff Management → Adding a New Staff and must be setup as “Teacher” profile. If the teacher is scheduled to teach course sections they will be shown in the dashboard when login in the portal.
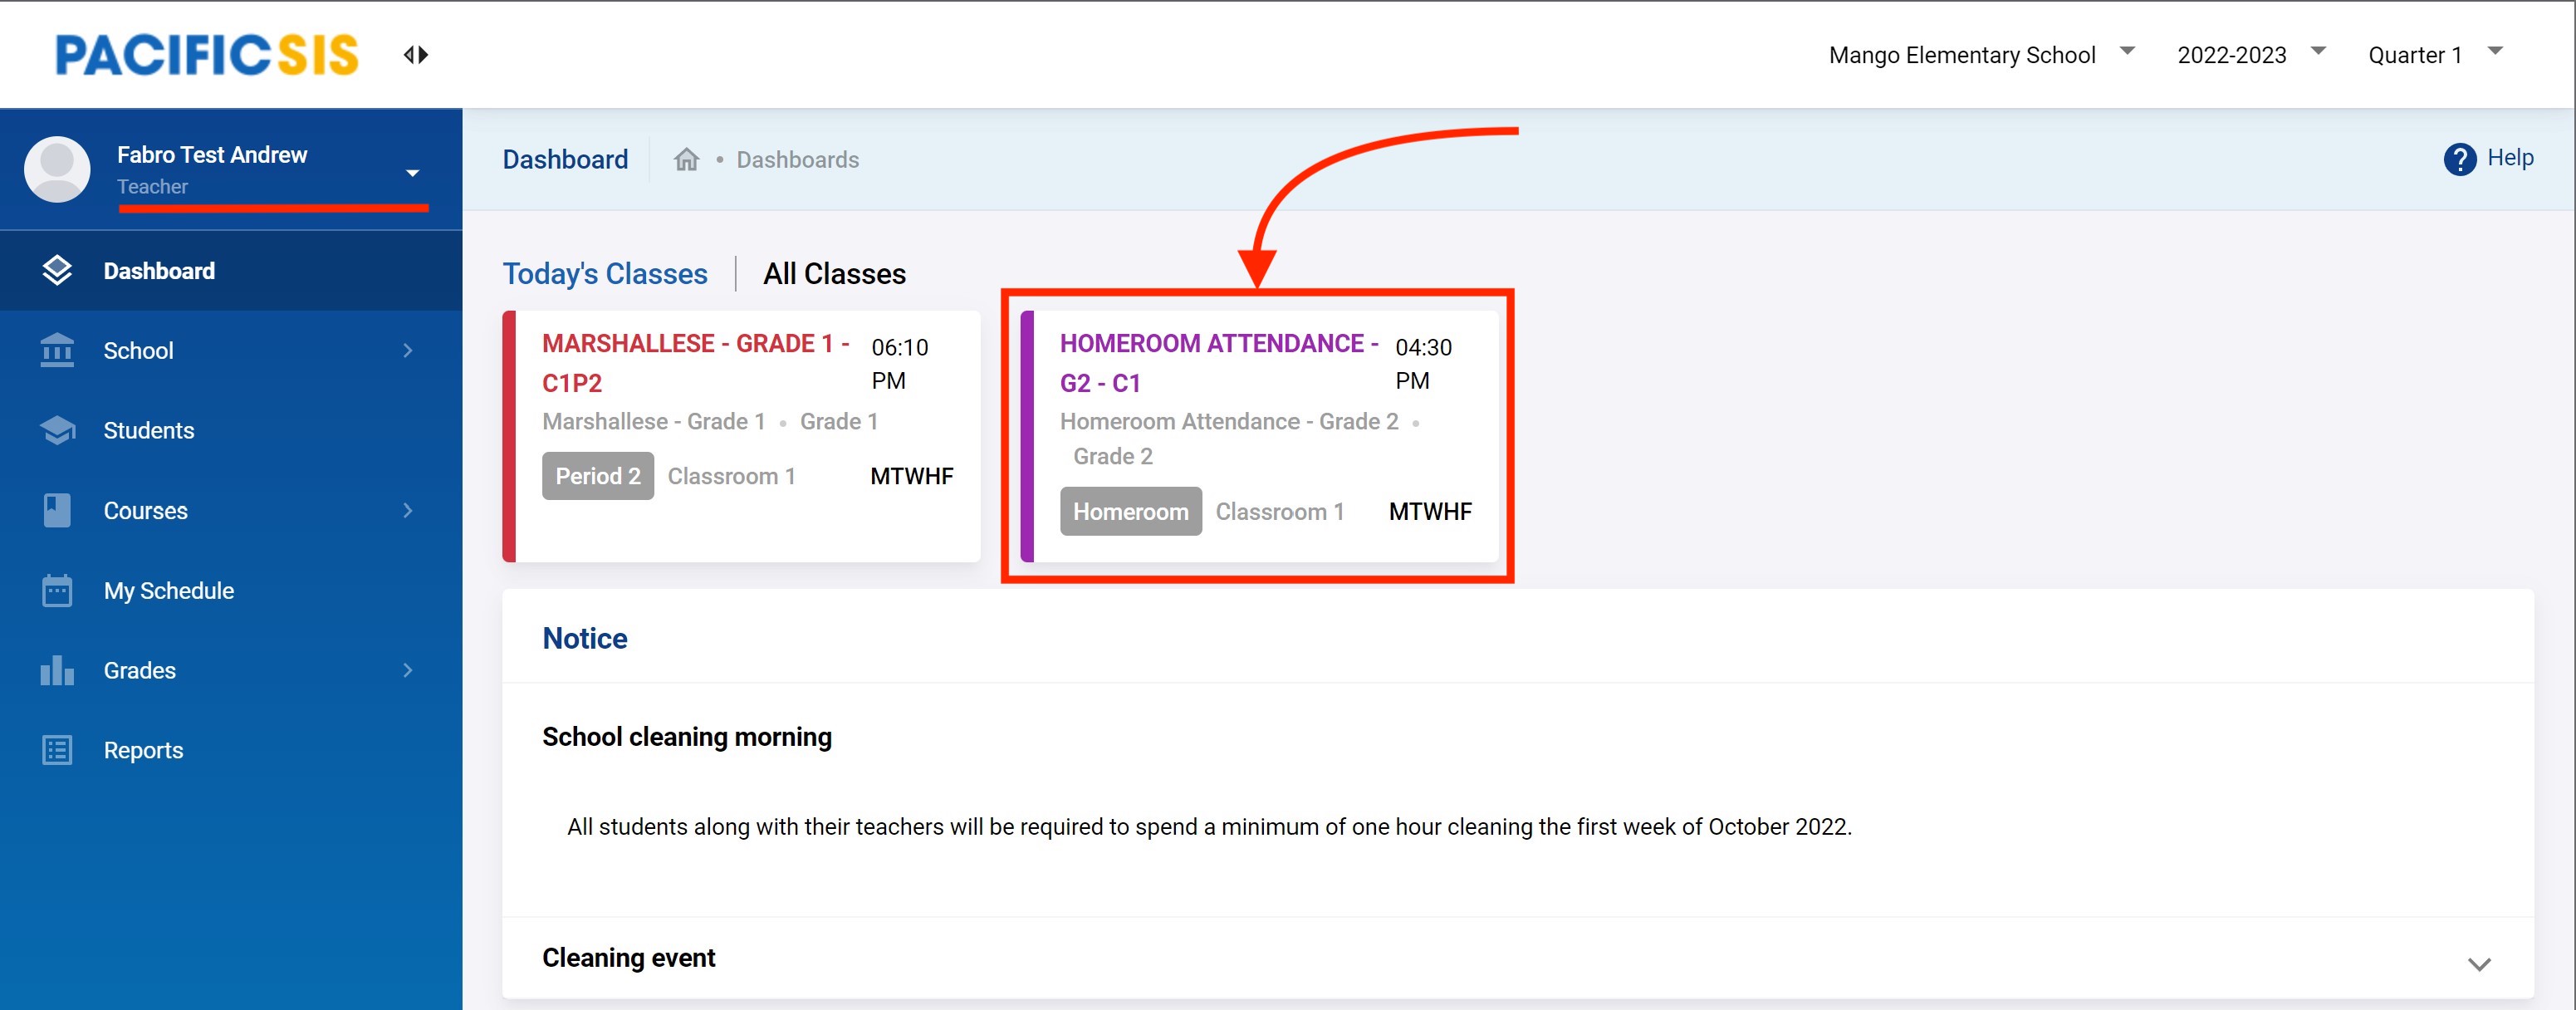
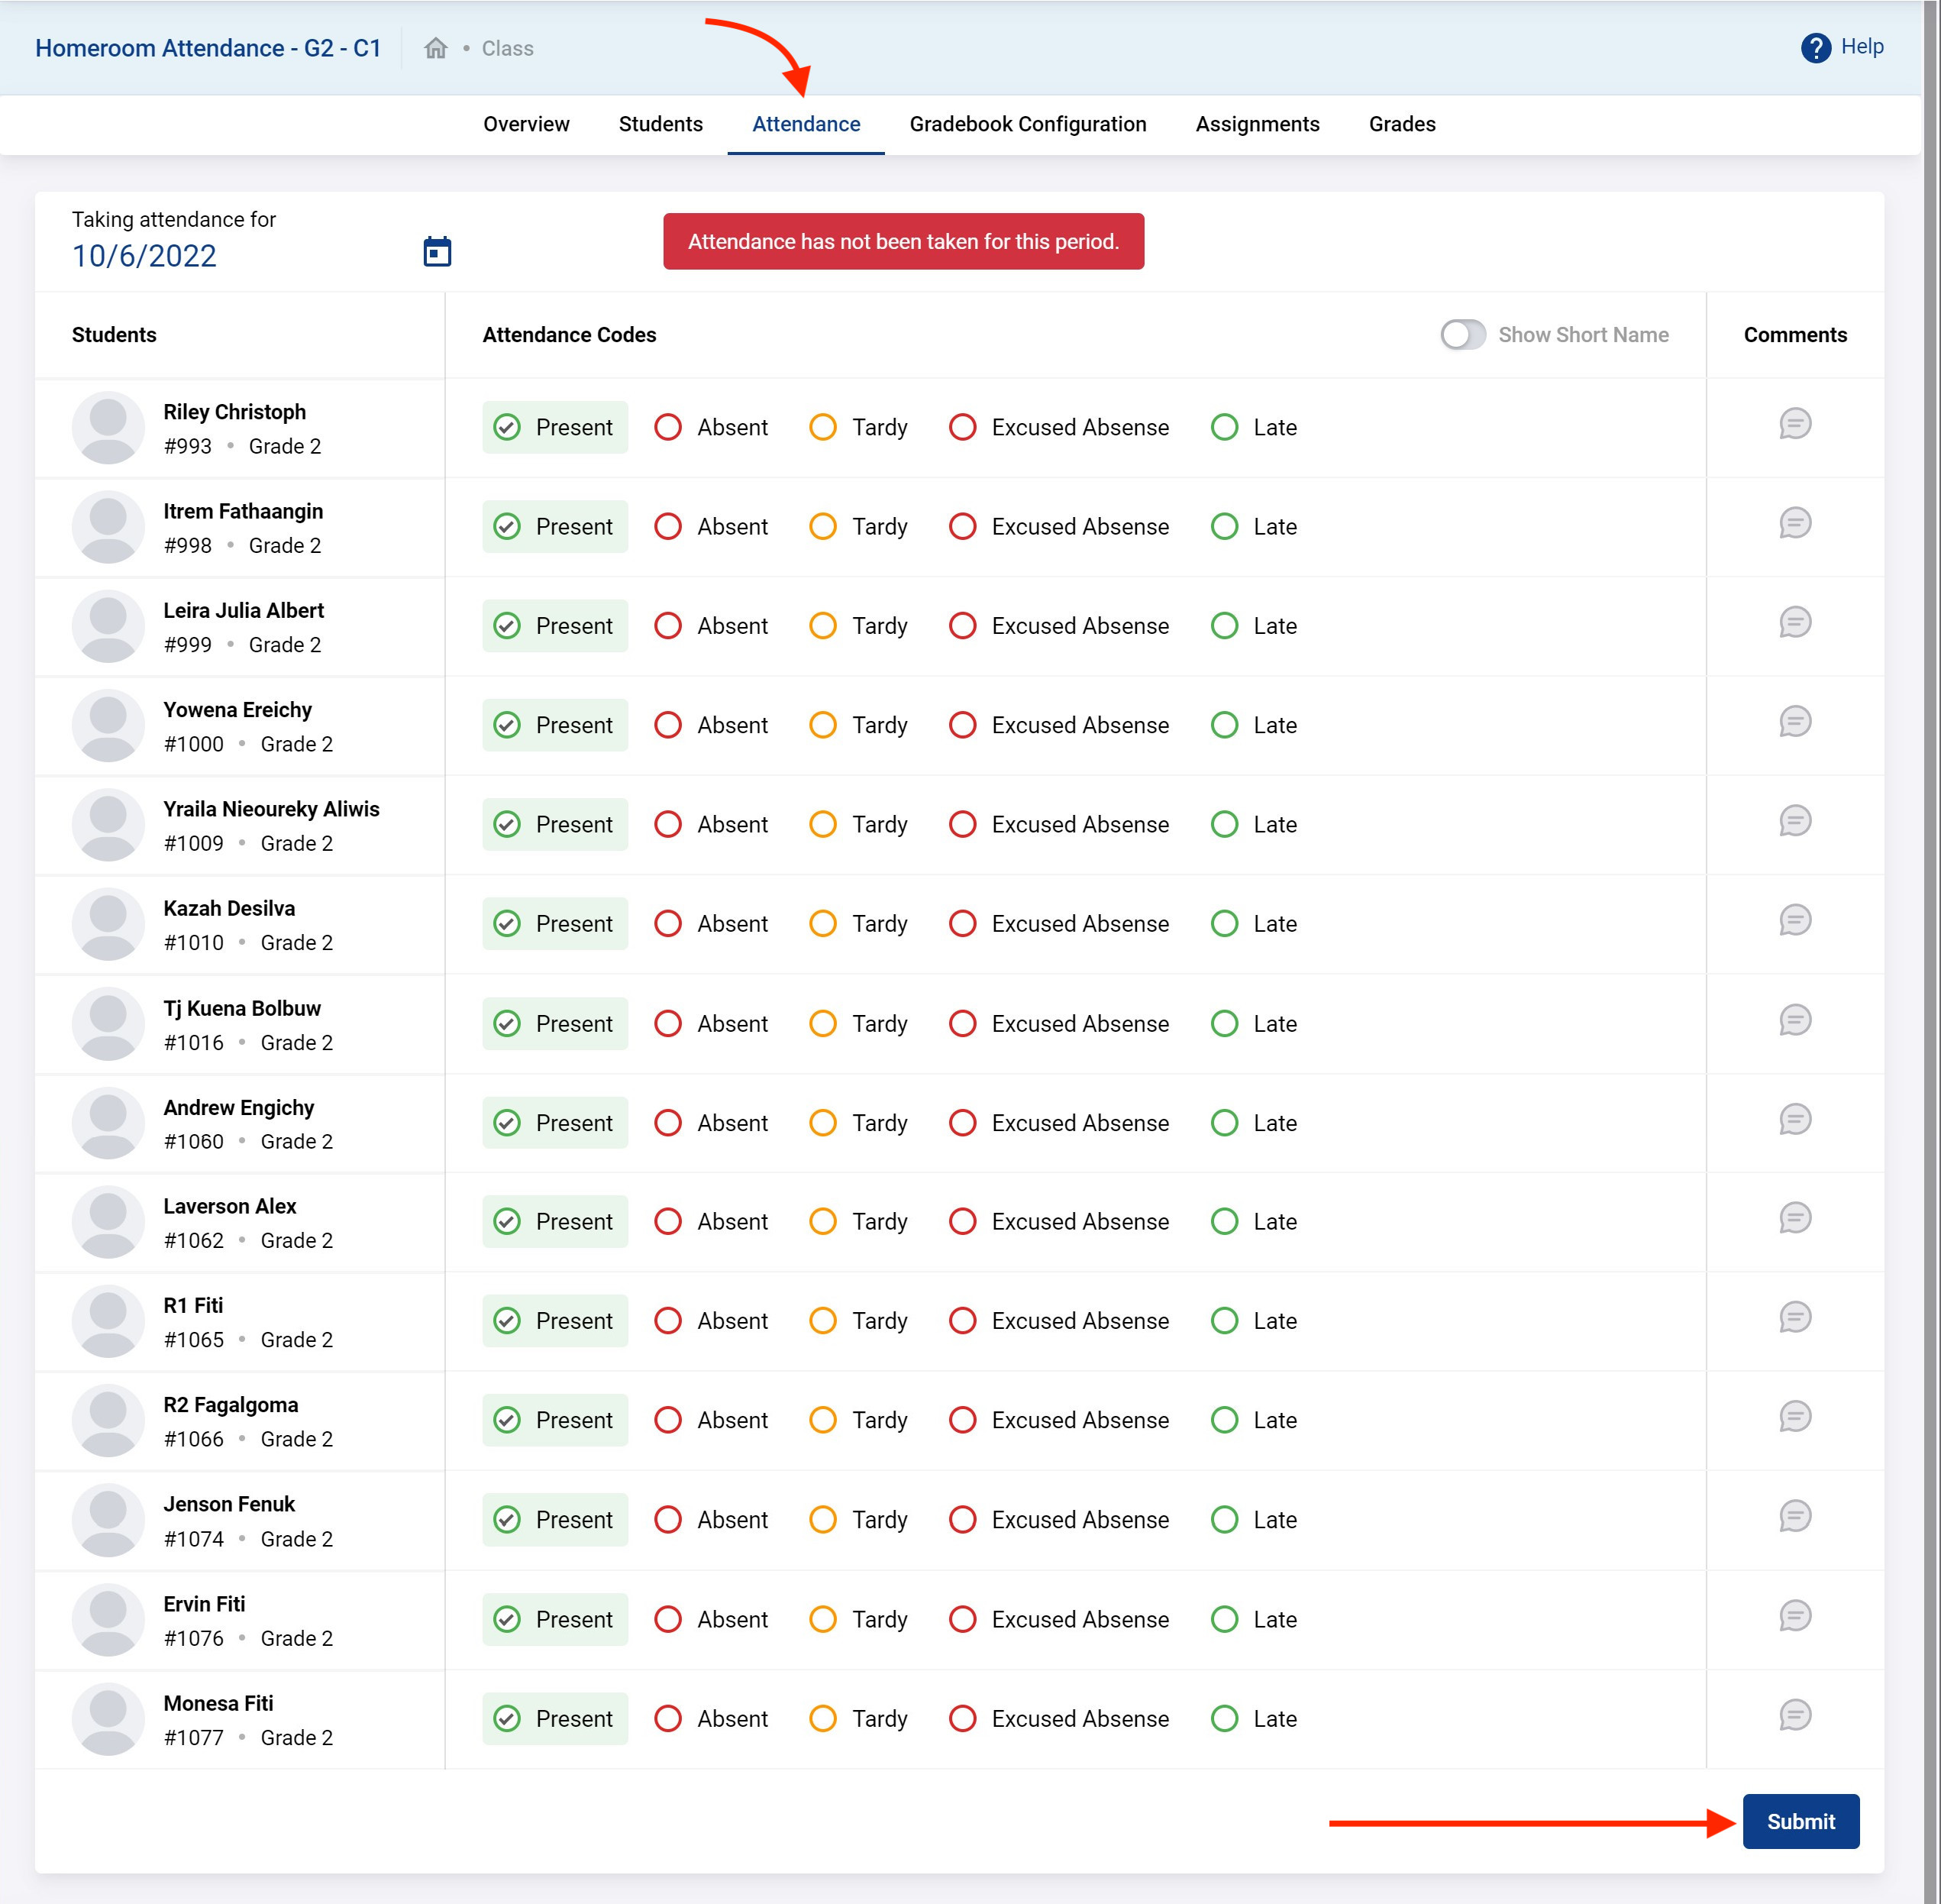
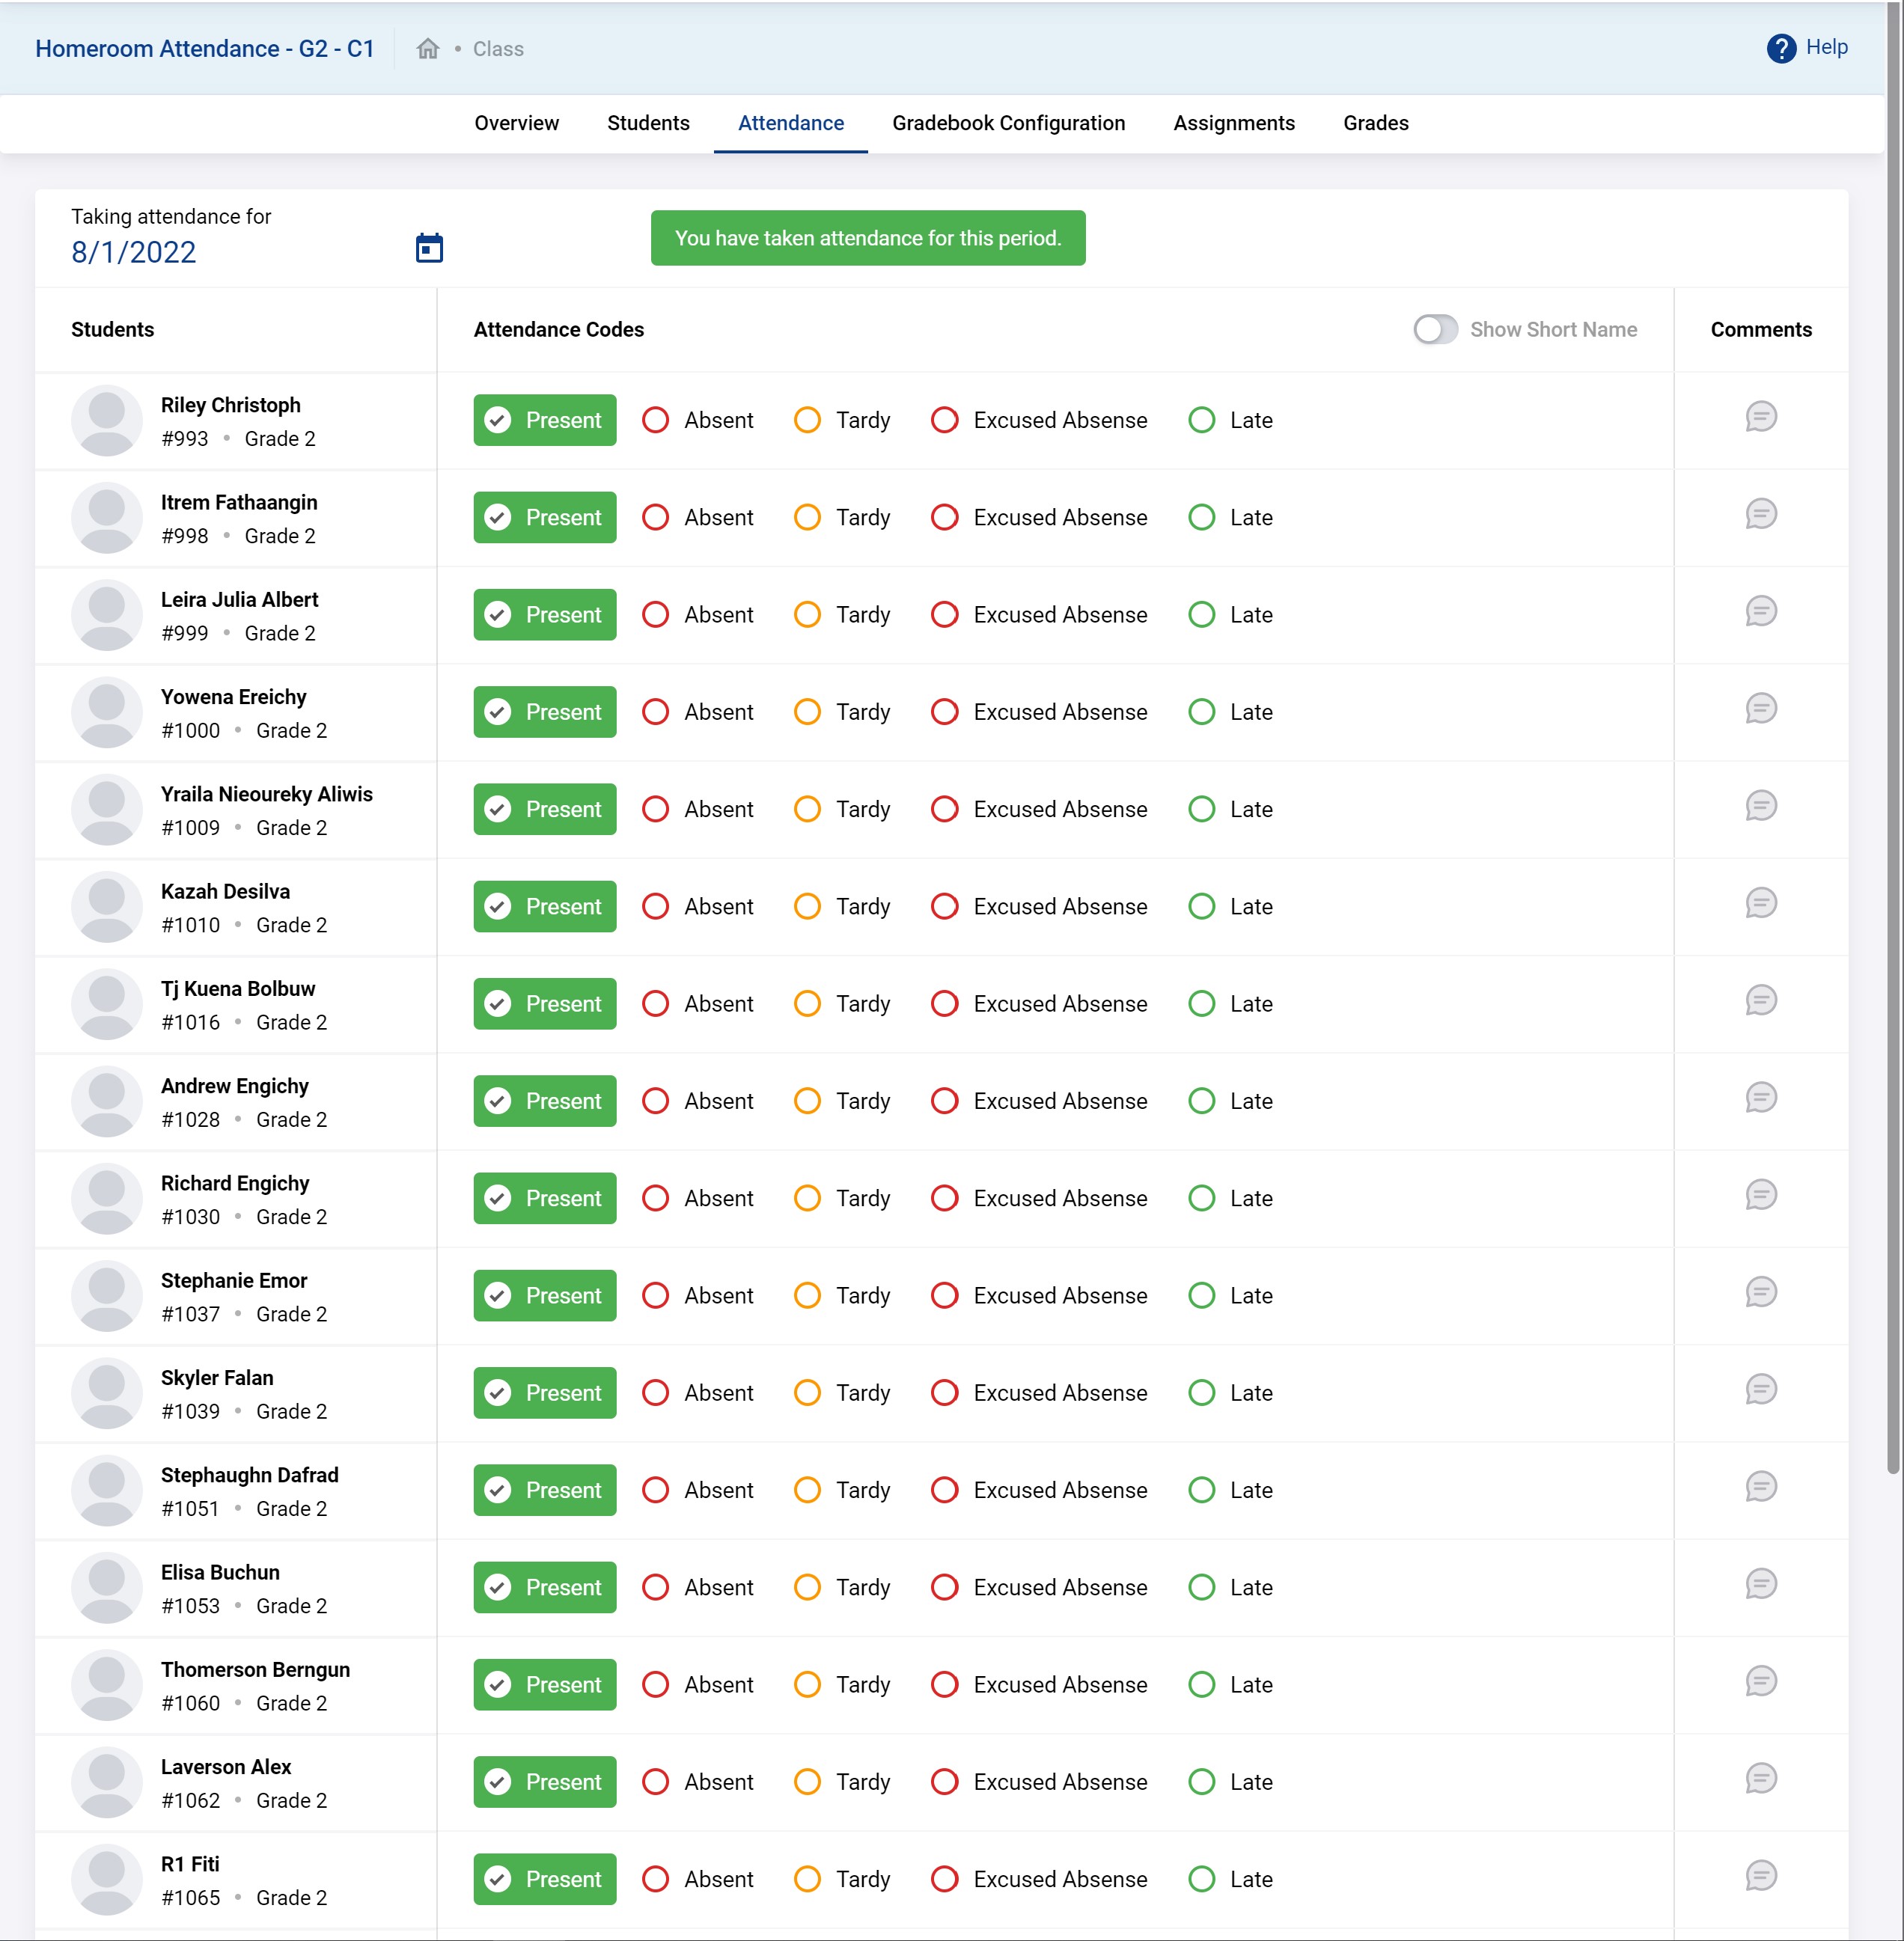
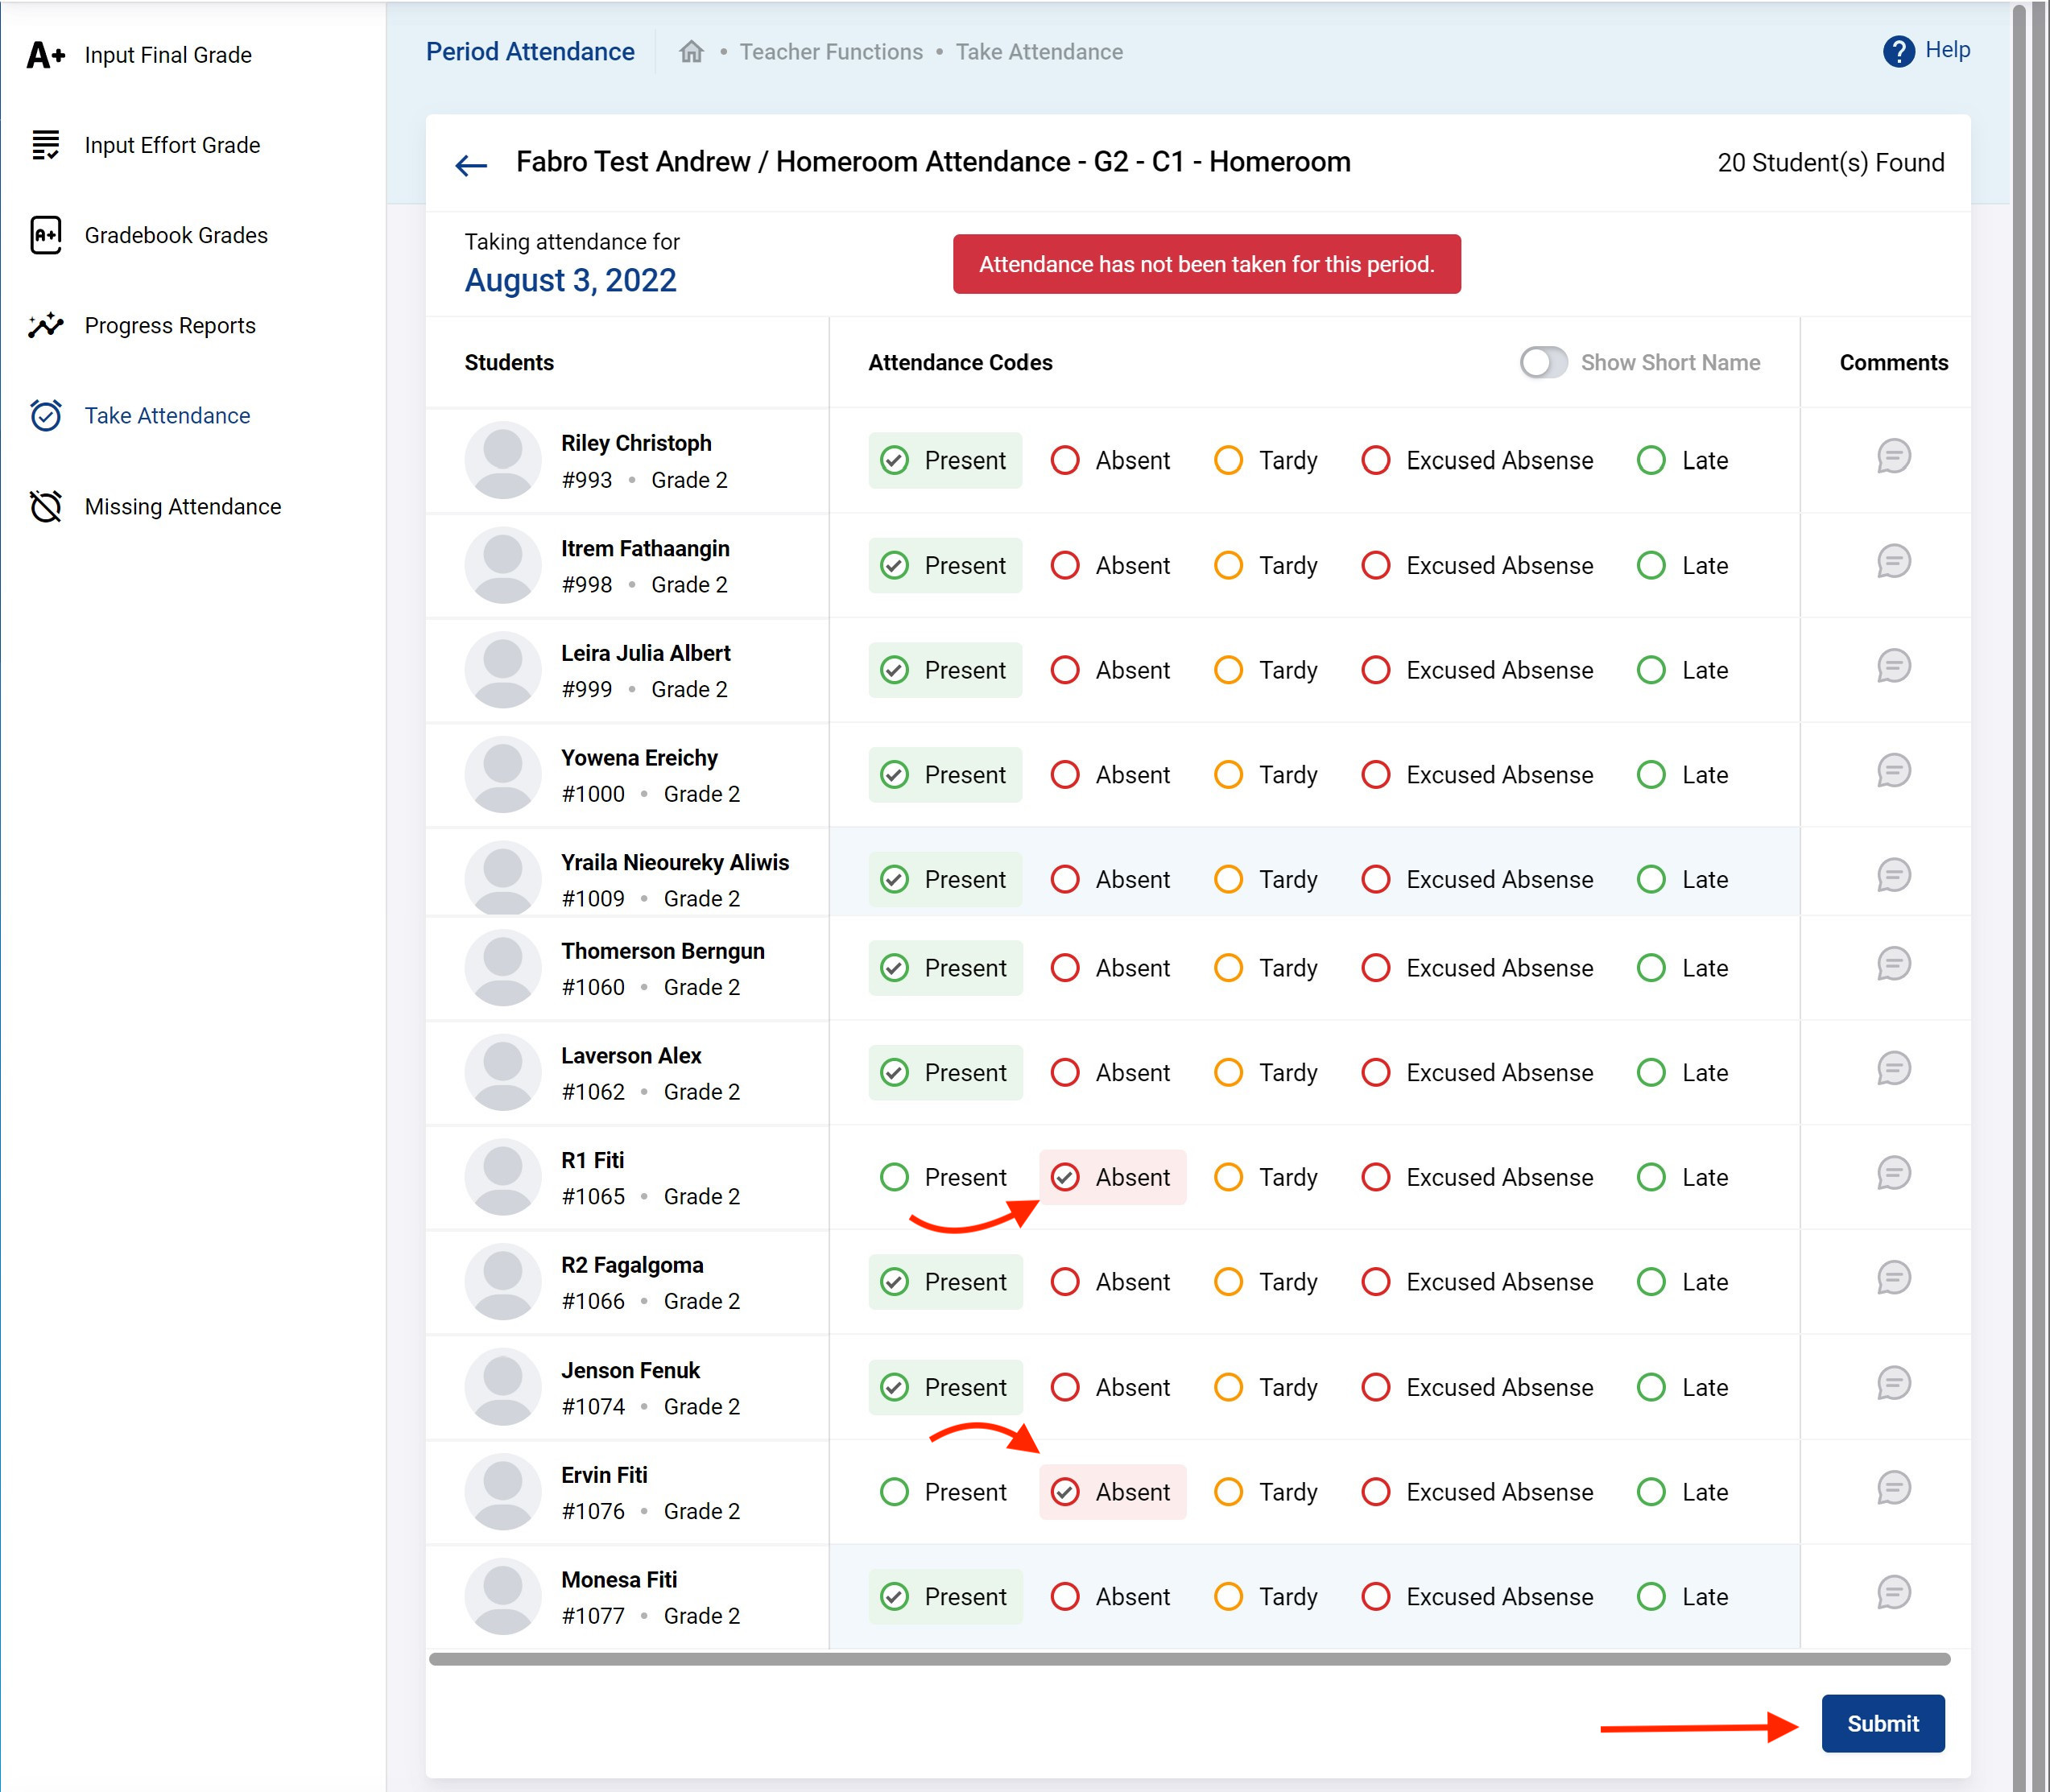
In our case, we know we take attendance in the course section Homeroom Attendance - Grade 2. So accessing that course either through the dashboard shortcut or by browsing at Courses → My Classes we can get to all the features for that course section including taking attendance. Clicking on the Attendance tab will show all the students as shown below. You can change the date to take attendance for any day (except future dates).
You only have to set the attendance for those that are not Present as present is the default. When done click Submit.
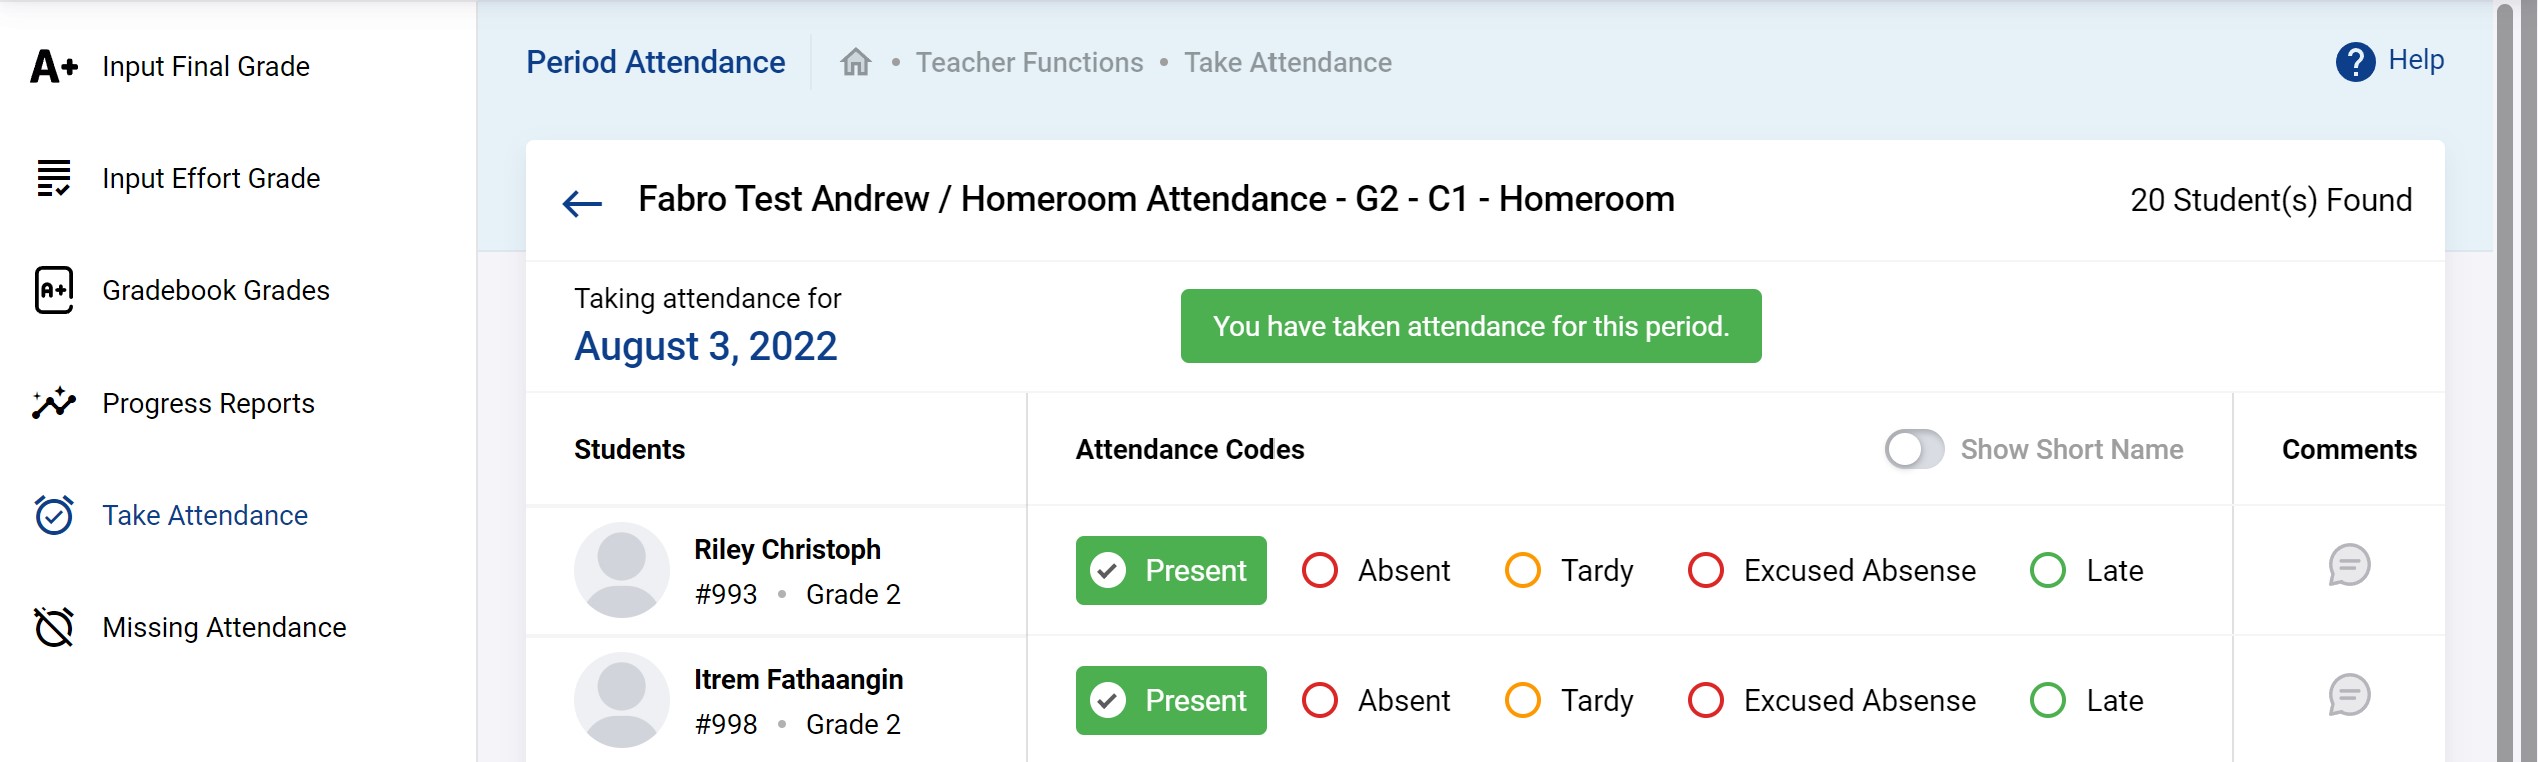
You should see something like below.
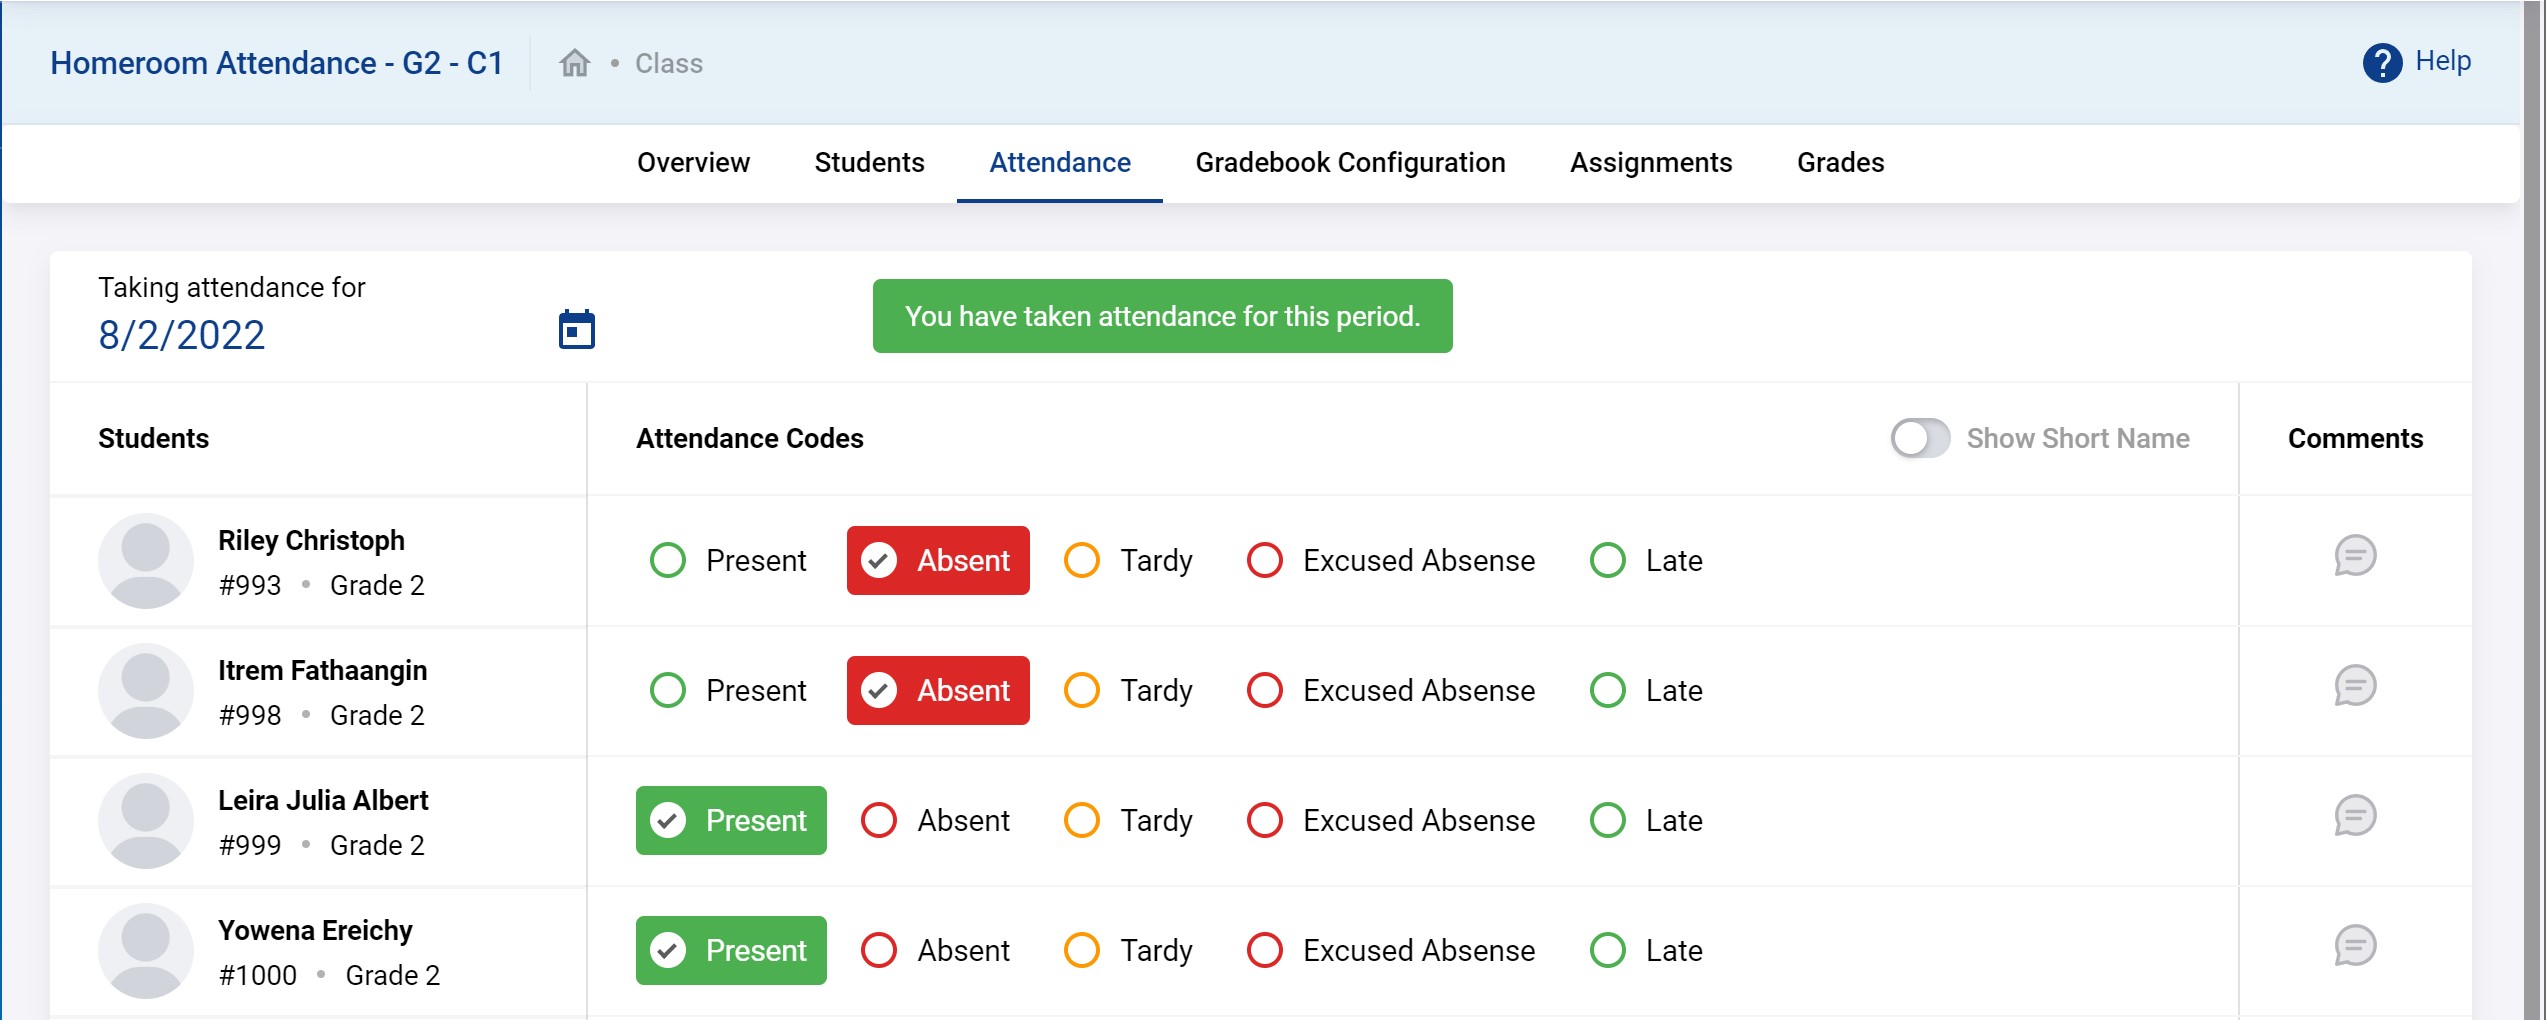
Another day with some Absences example is shown below.
Taking Attendance on behalf of Teachers
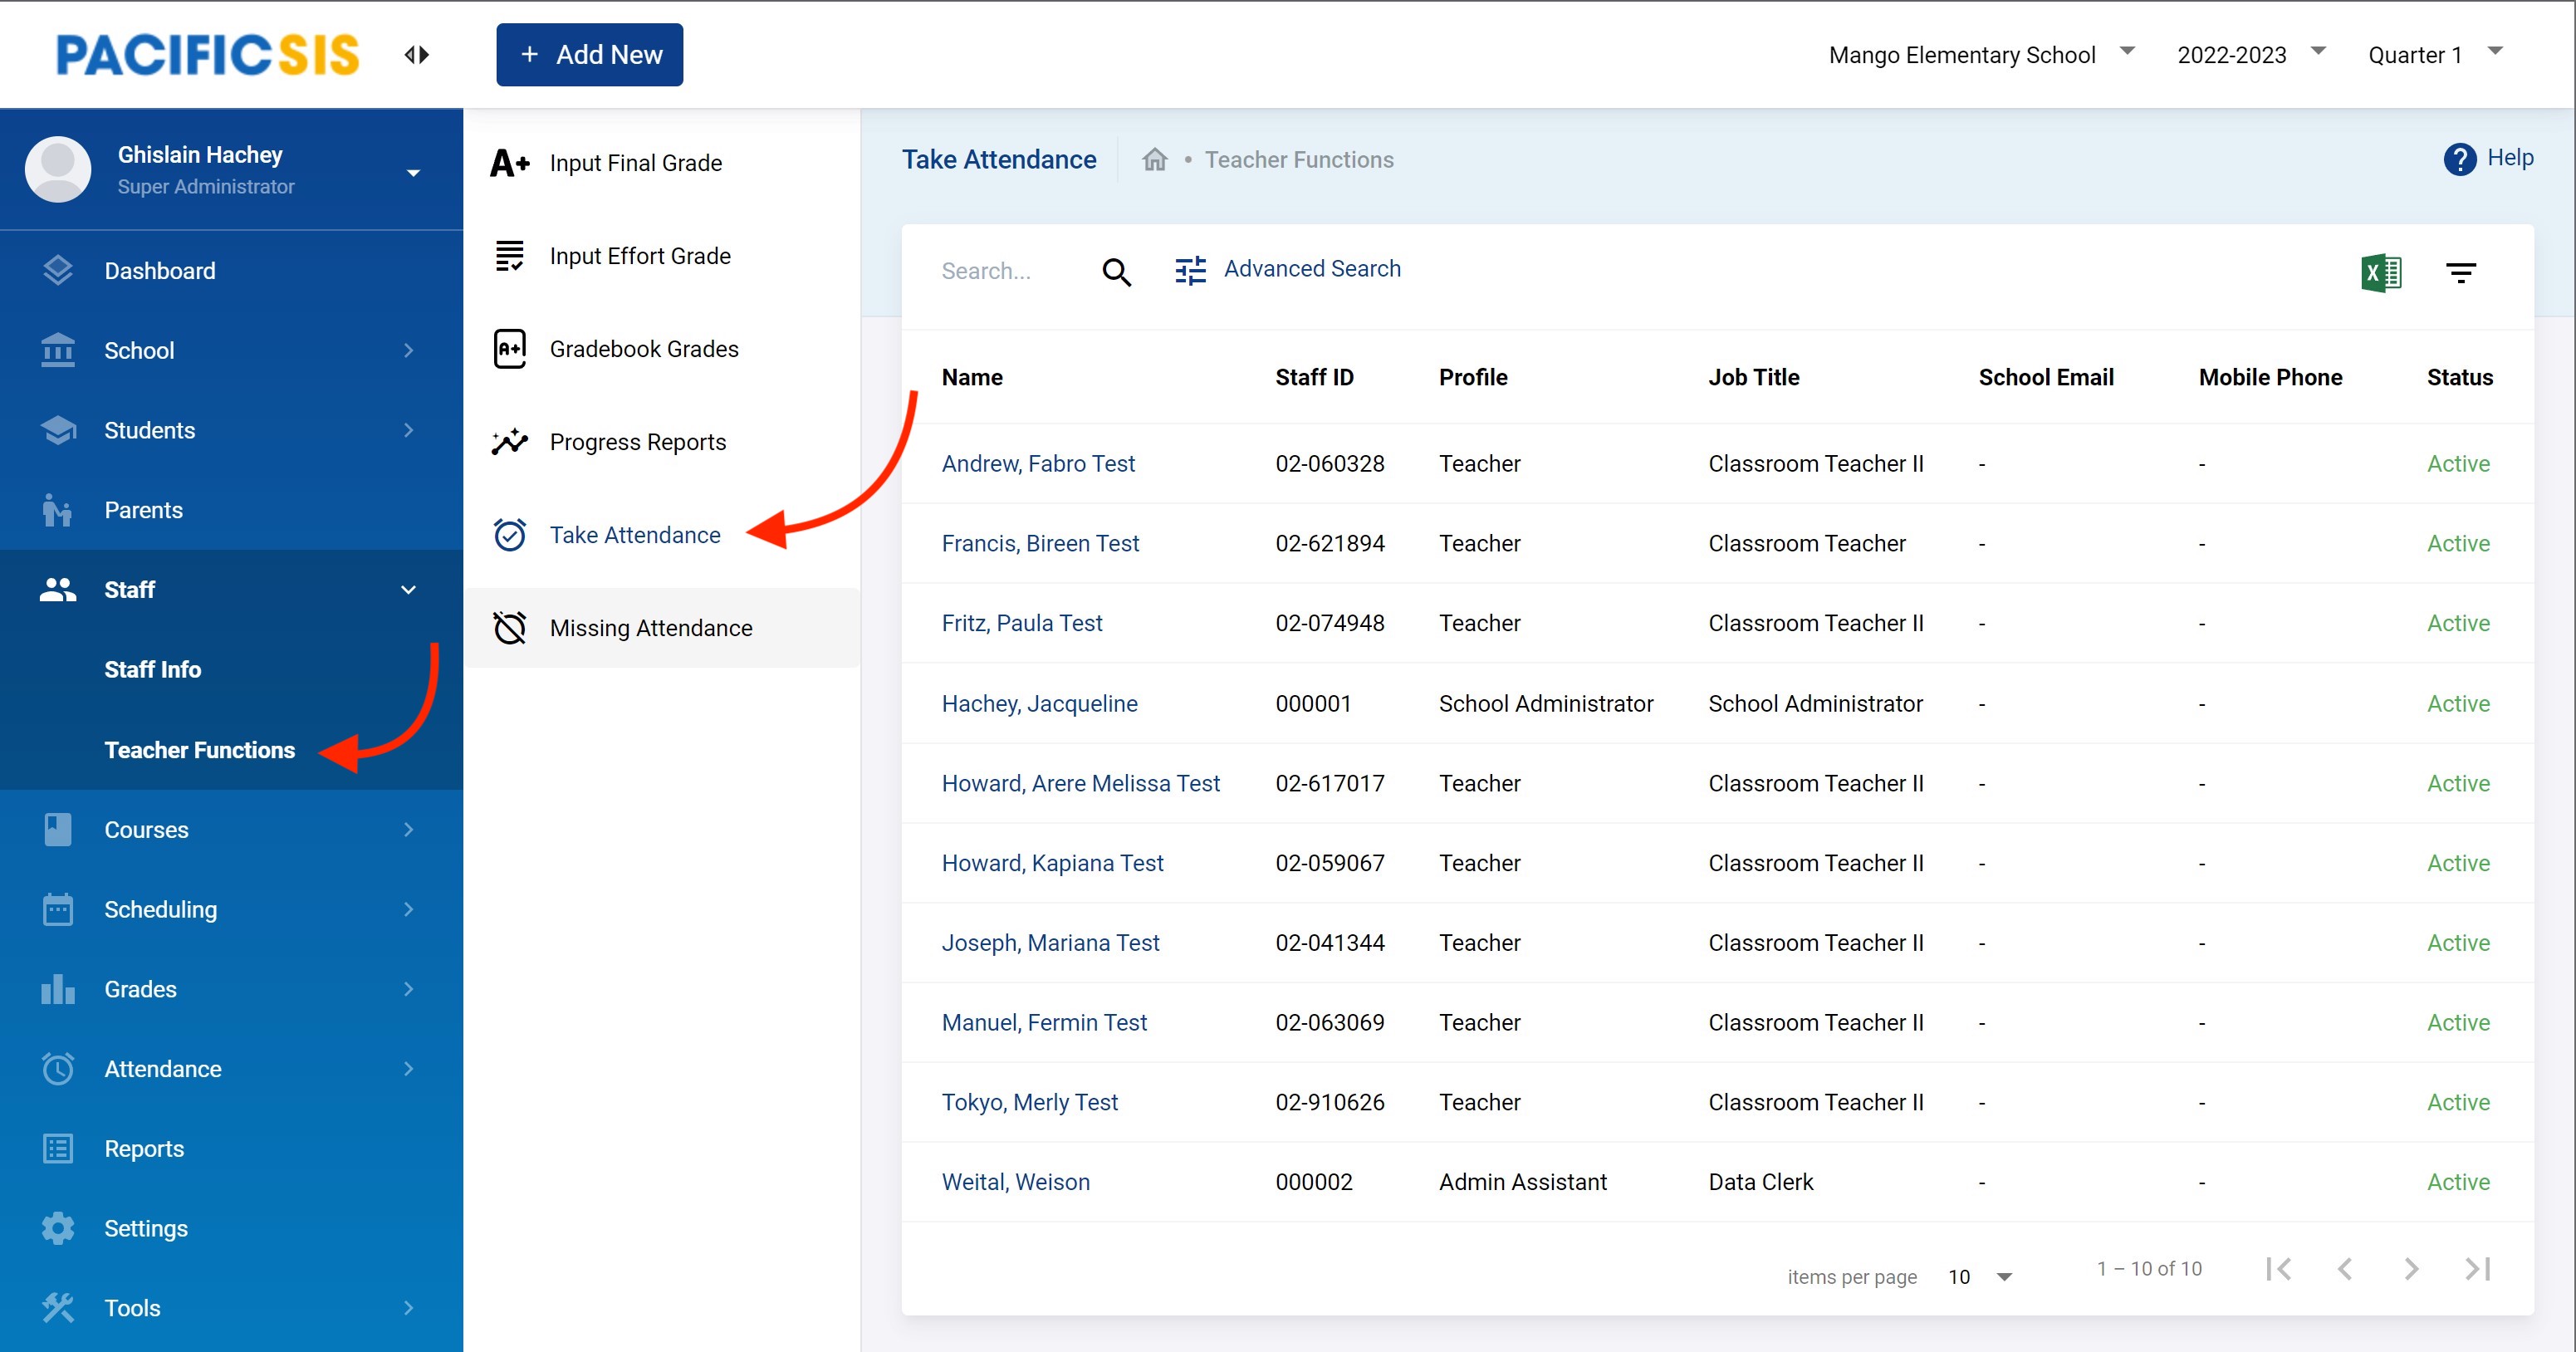
Smaller schools with teacher that are not as computer literate and limited access to a computer can use a data entry staff to do the job of the teachers. This works much the same way but with small differences in how the menu looks. Now the user that logs in is not a teacher but either a School Administrator or Admin Assistant.
For that kind of user, attendance is take in Staff → Teacher Functions. There you will see both the following tabs:
- Take Attendance: The usual place to take attendance on a daily basis or as regularly as possible.
- Missing Attendance: A convenience feature that does the same thing but lists all the attendance the system considers are missing. If you are up-to-date you should see none listed here.
If you click on Take Attendance you will see the whole calendar with the course sections that need attendance taking. You can click on then individually to take attendance.
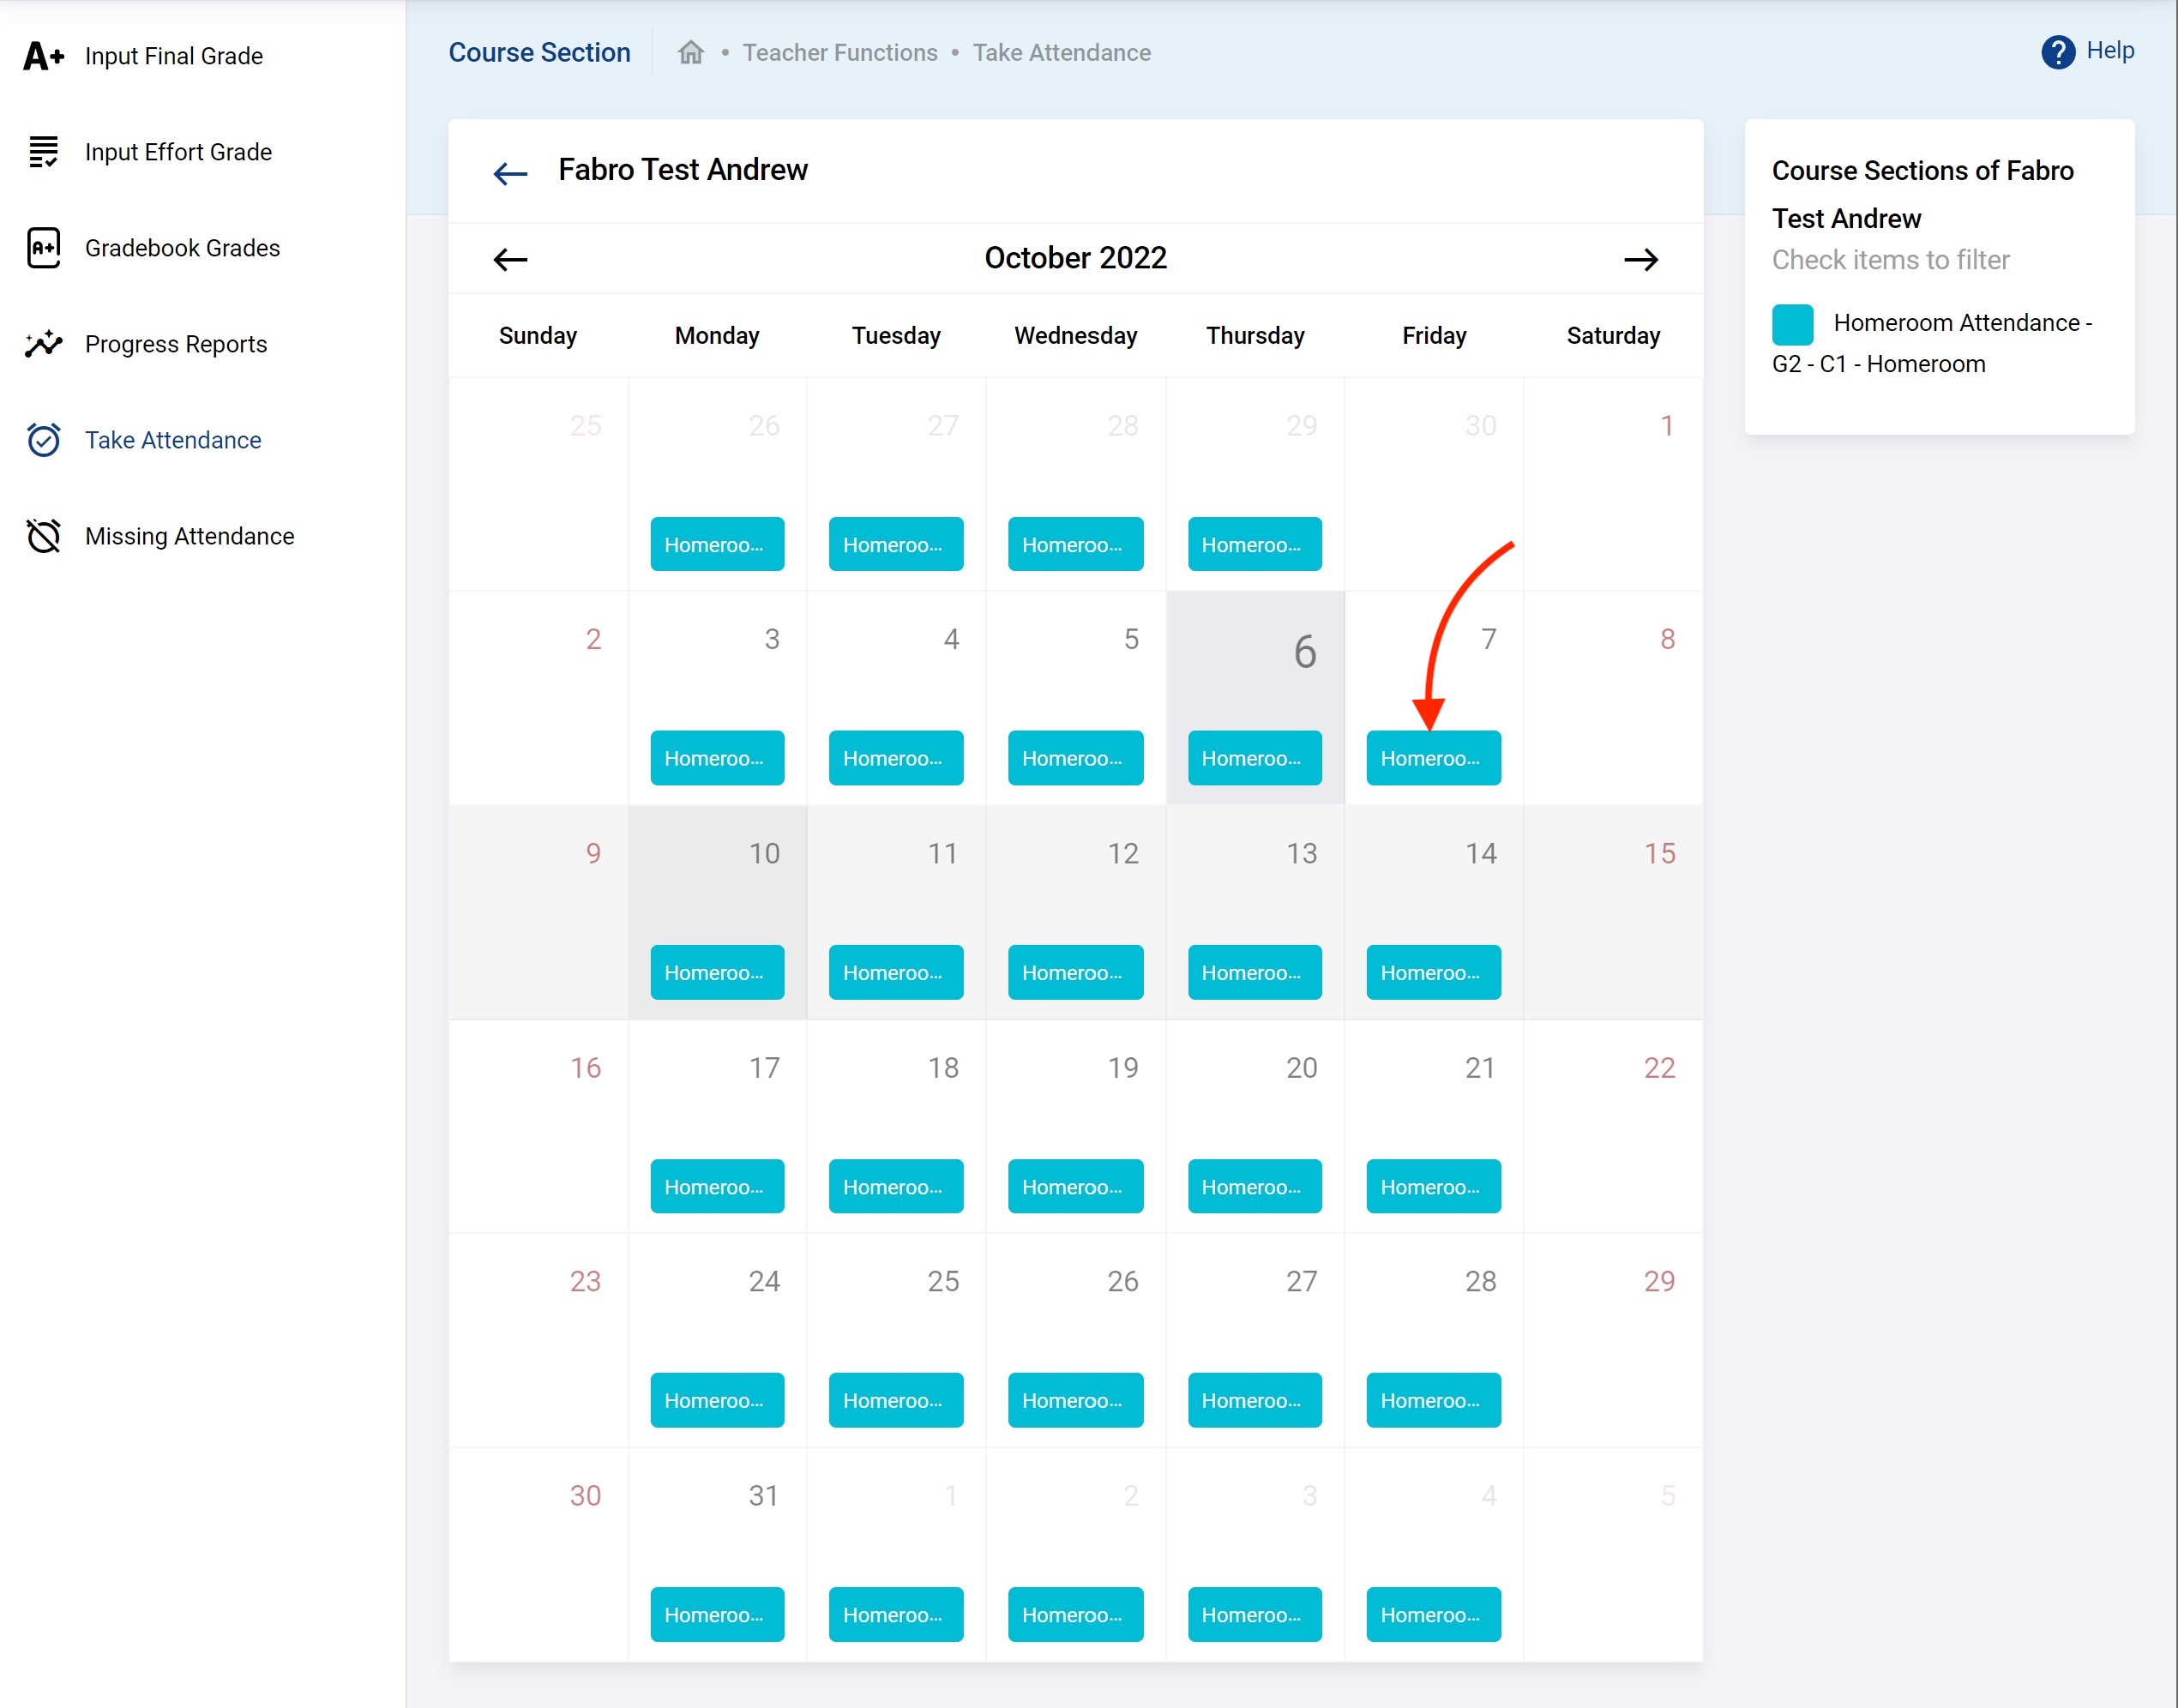
You will see the same familiar attendance taking grid. It works the same way. Click Submit when done.
And you will see the below.
You can either use the Take Attendance or Missing Attendance, the important is that you take all the attendance correctly and in a timely manner.
Taking Attendance by the administration office
A less commonly used, slightly more advanced workflow and optional approach is to get the admin office do some attendance also in some specific use cases. Examples uses cases could be:
- A parent comes to school and discusses an important absense of their kids the next weeks for medical purposes. The admin office does not need to wait and can just go and add excused absences for that student optionally in advanced.
Usually Attendance by Administration Office features are accessed in the menu Attendance and includes:
- Administration
- Add Absences
- Recalculate daily attendance
- Missing Attendance
Administration
This is a place where Administration can search for attendance data that was already taken to either override it or add some comments. For example, let's say the Admin office just got some additional details from the parents: a doctors note on the absence of the kid on the 3rd of October 2022. The admin office goes through it and decides this should be changed from Absent to Excused Absence. Go to Attendance → Administration. Enter the date and optionally the Attendance Code to filter data further. This should list all the attendance data already taken that meet that date and attendance code criteria as shown below.
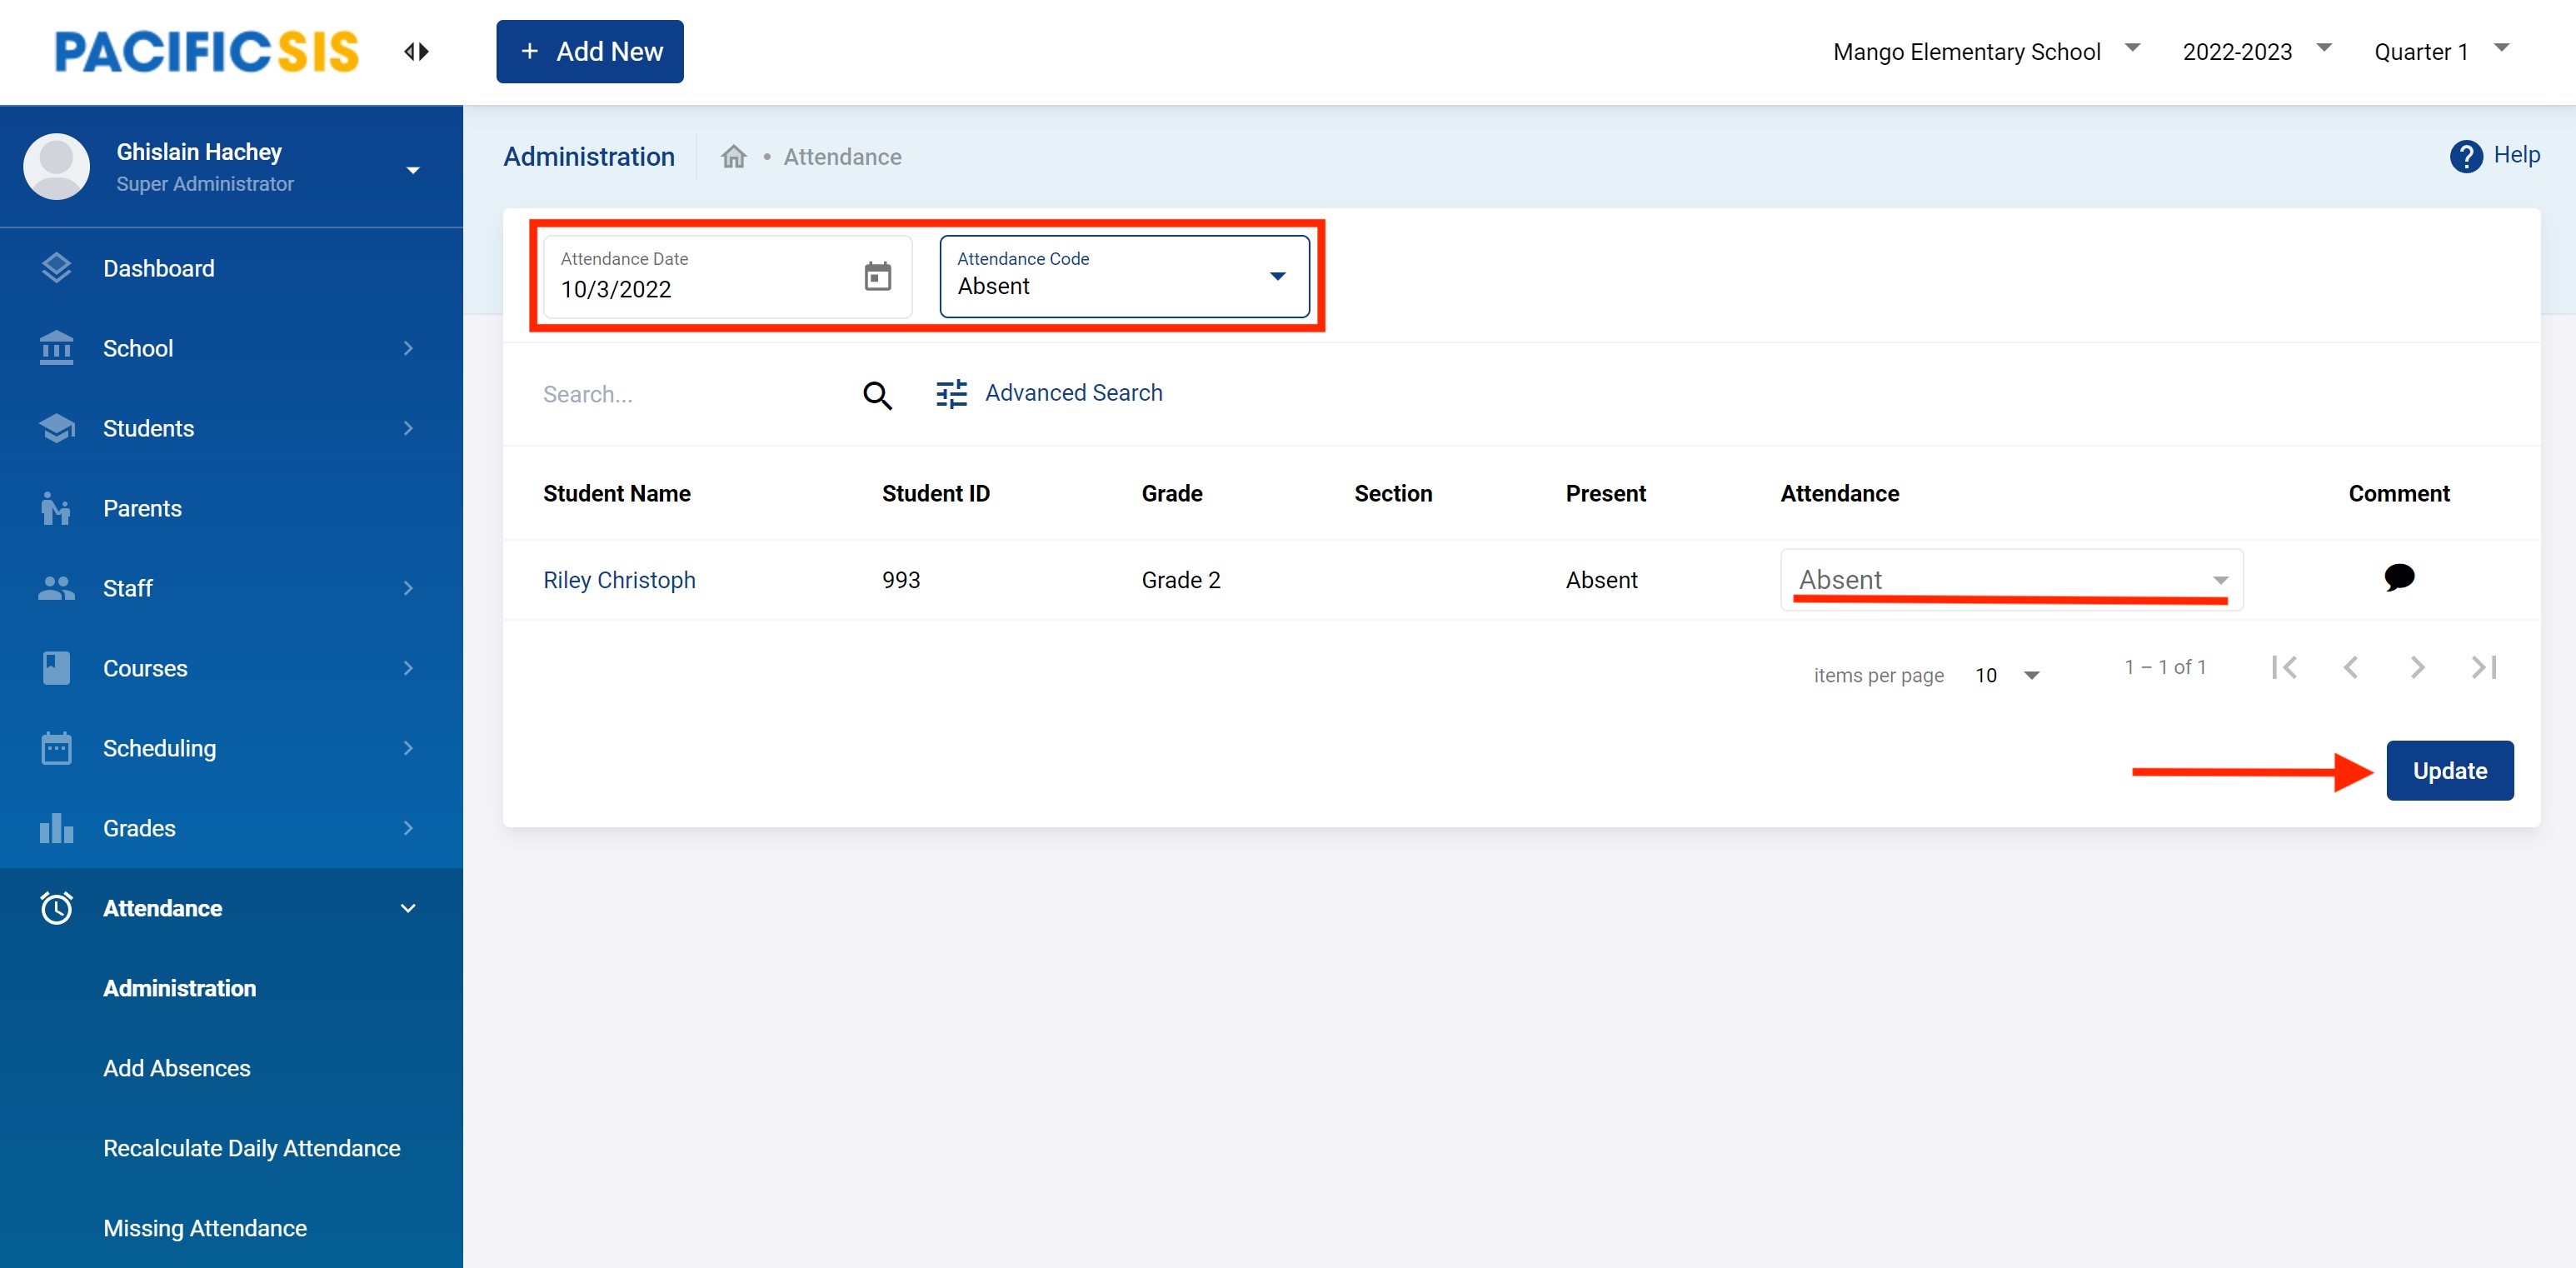
The kid was marked as Absent and is now changed to Excused Absence with an added note.
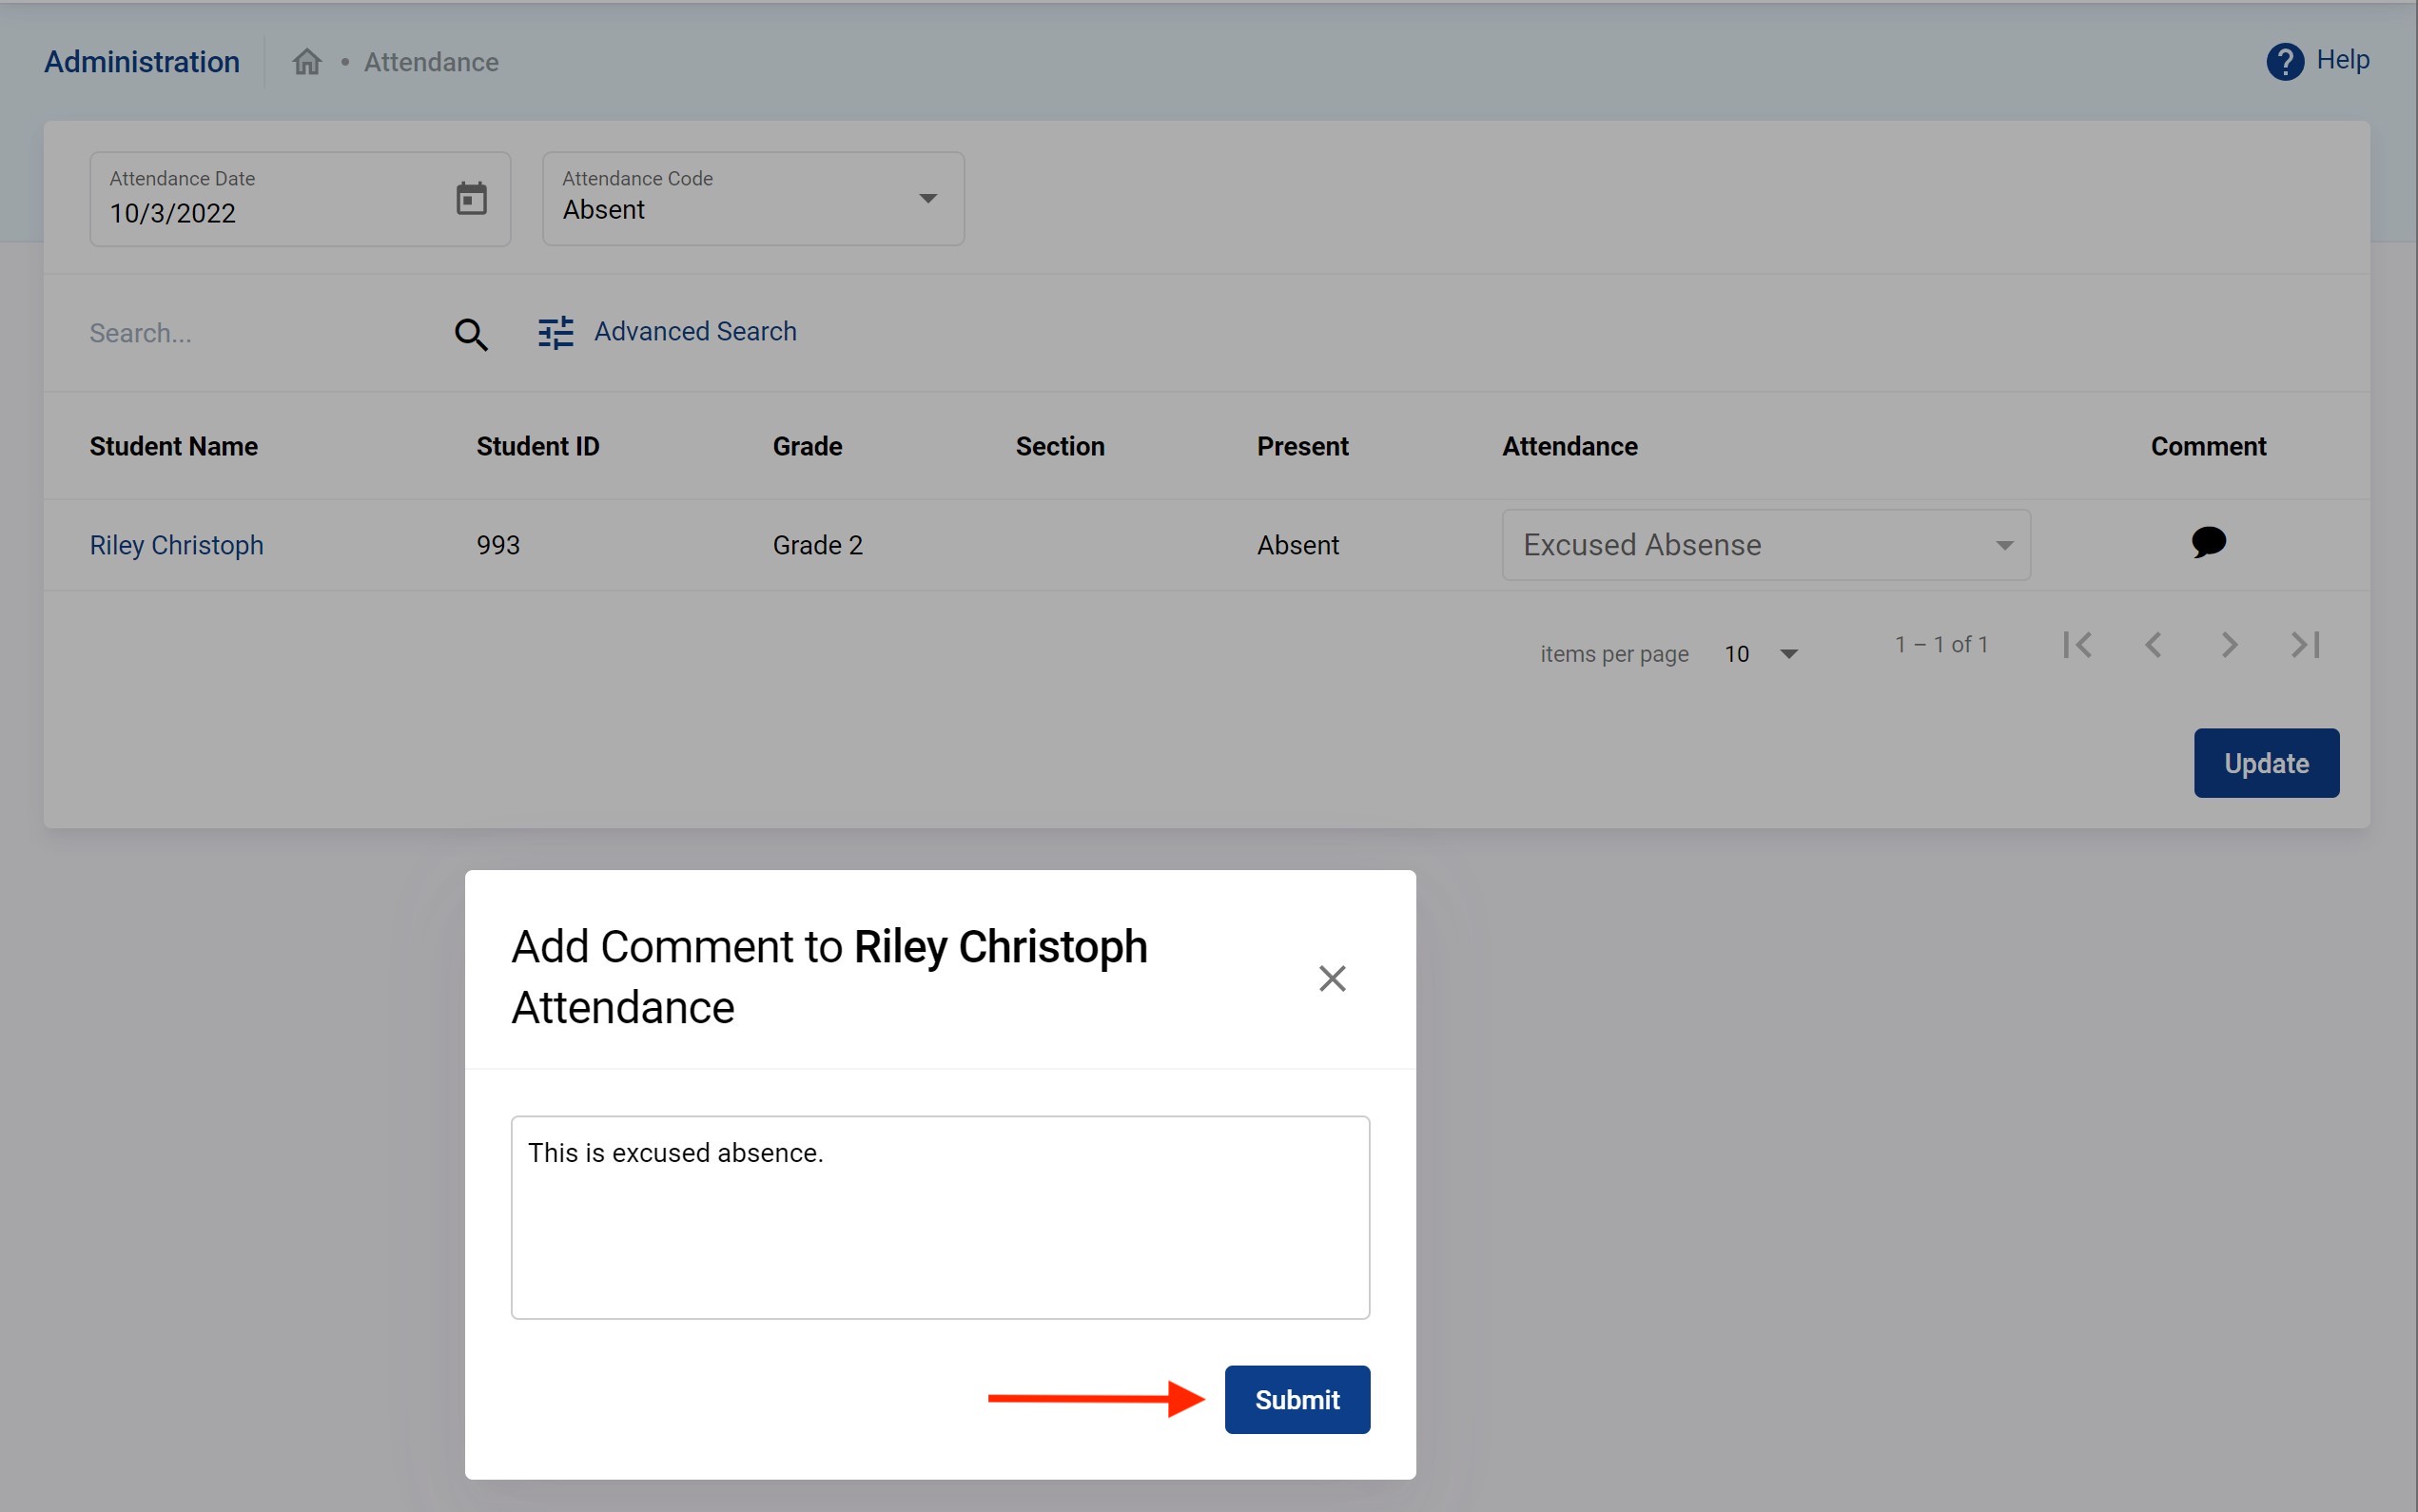
It then shows the history of the attendance data in an intuitive way as shown below for the kid.
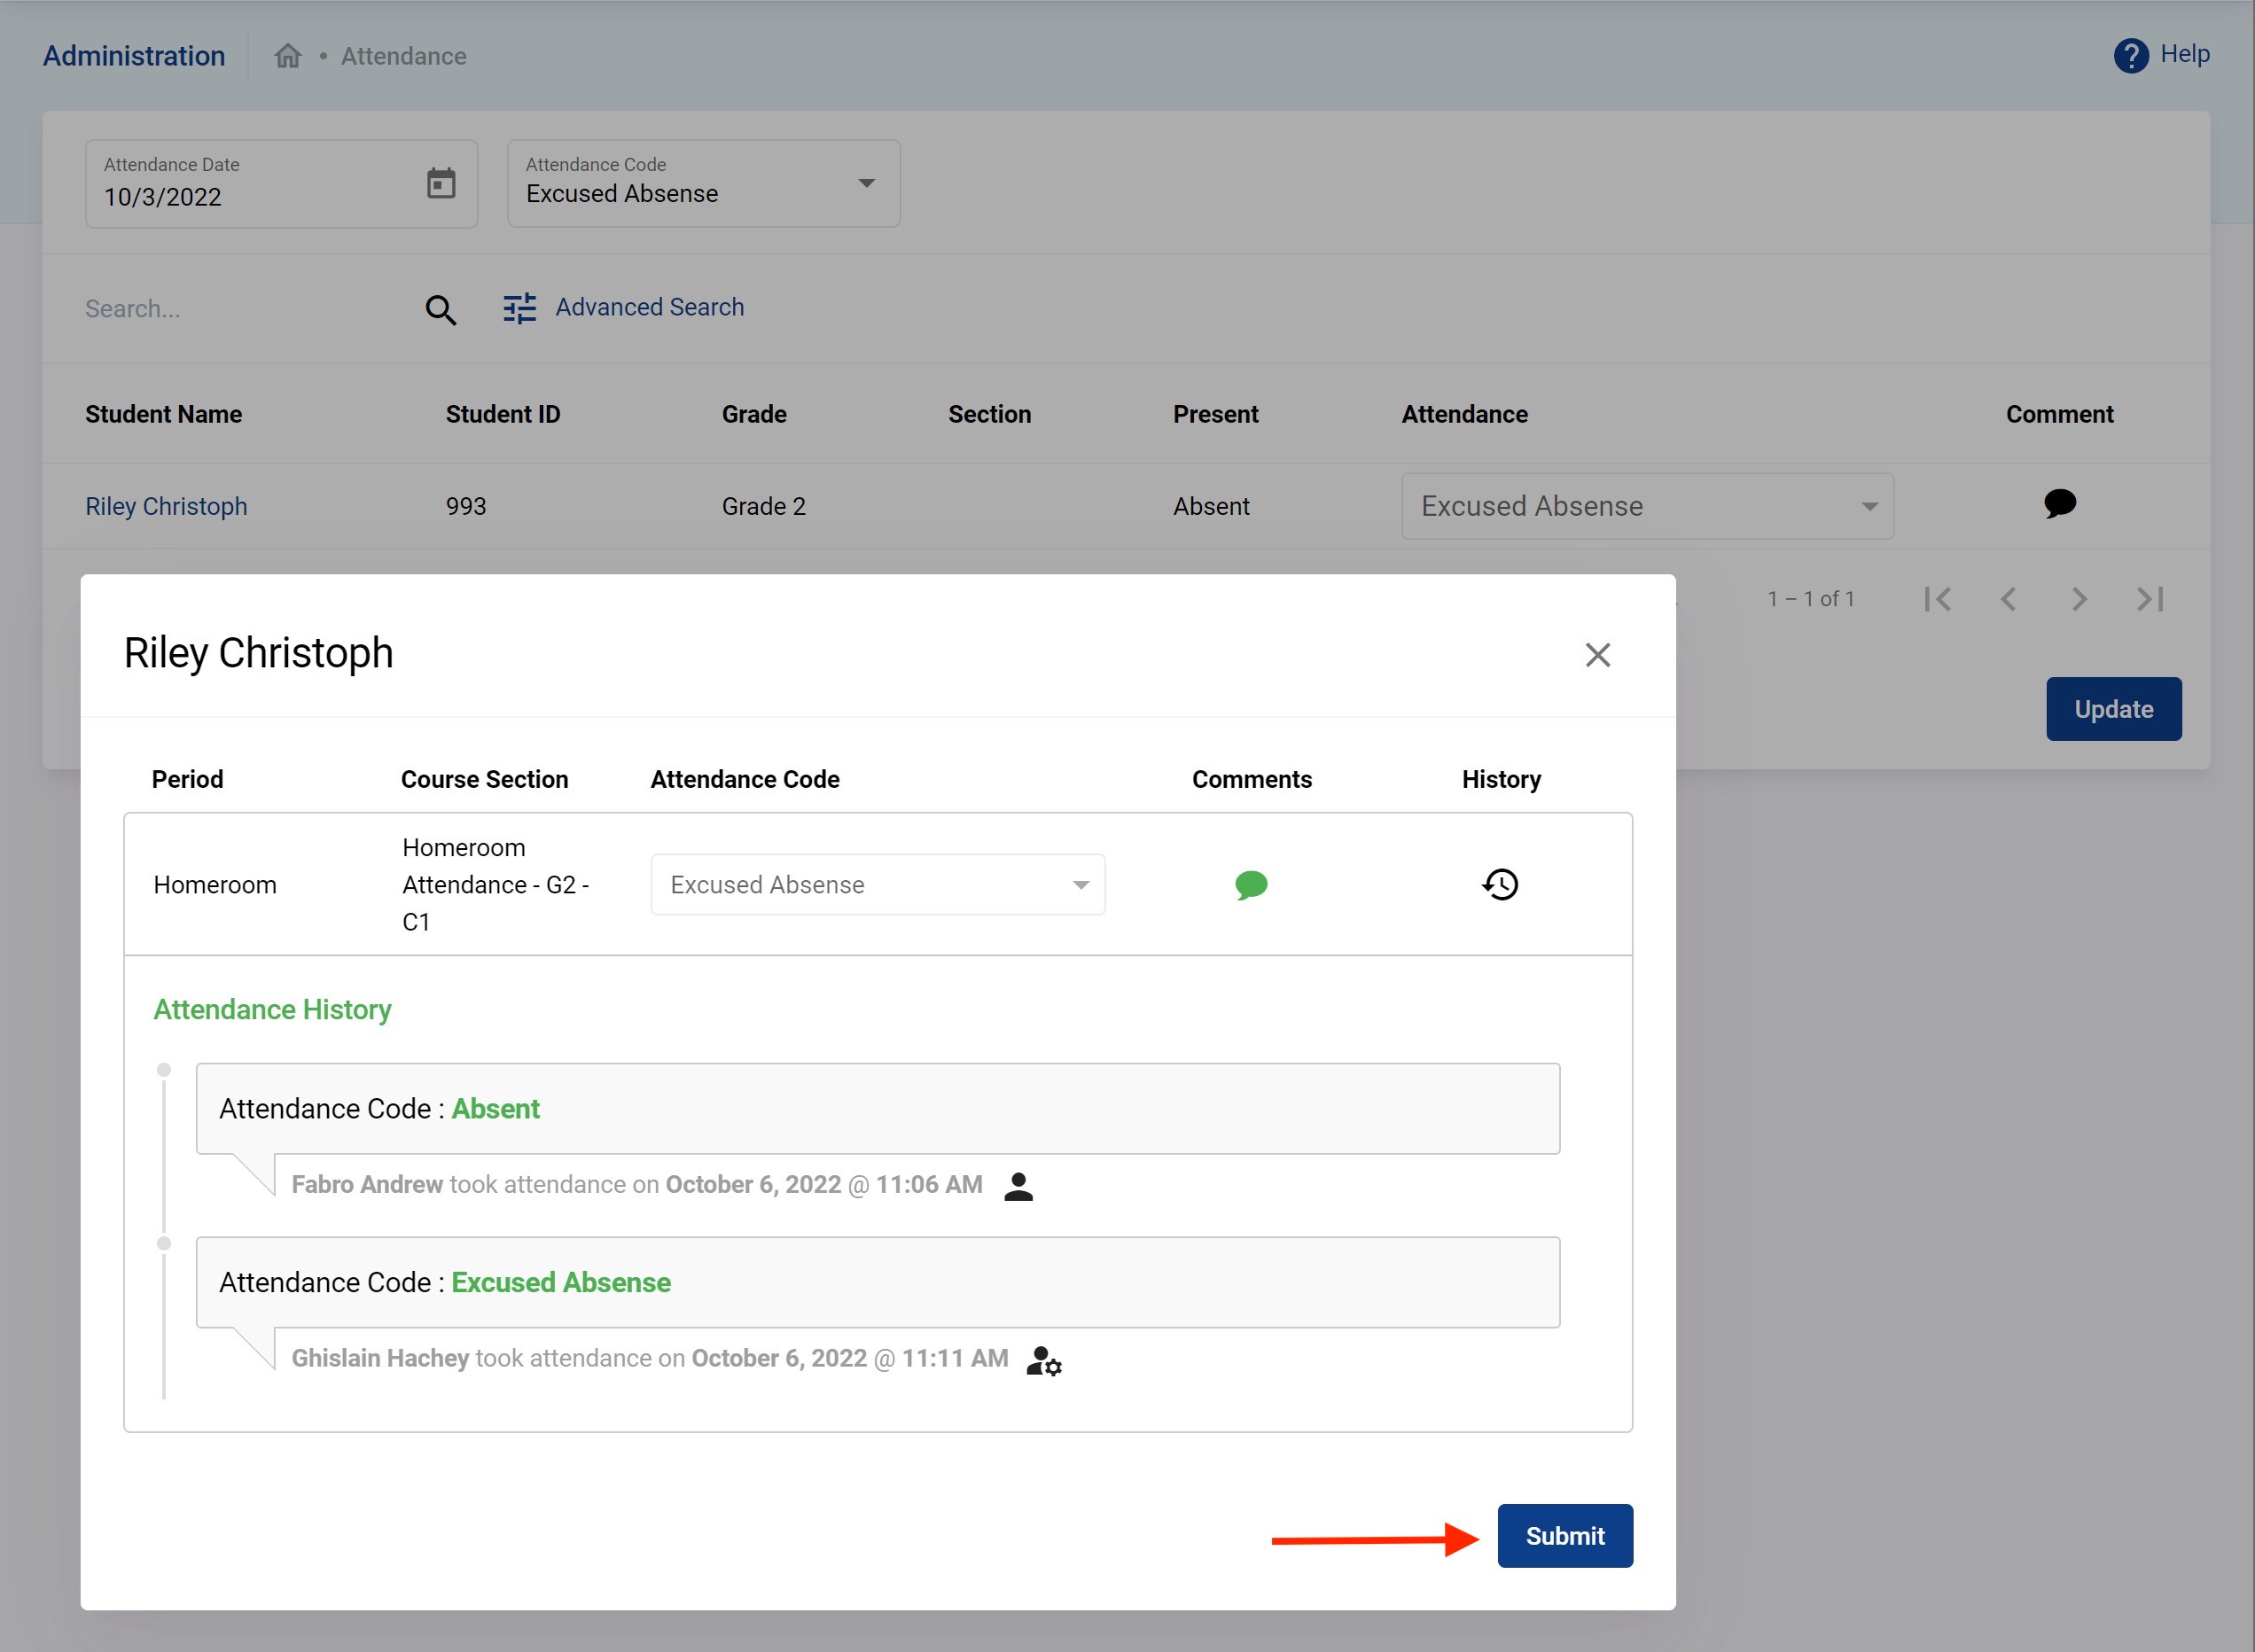
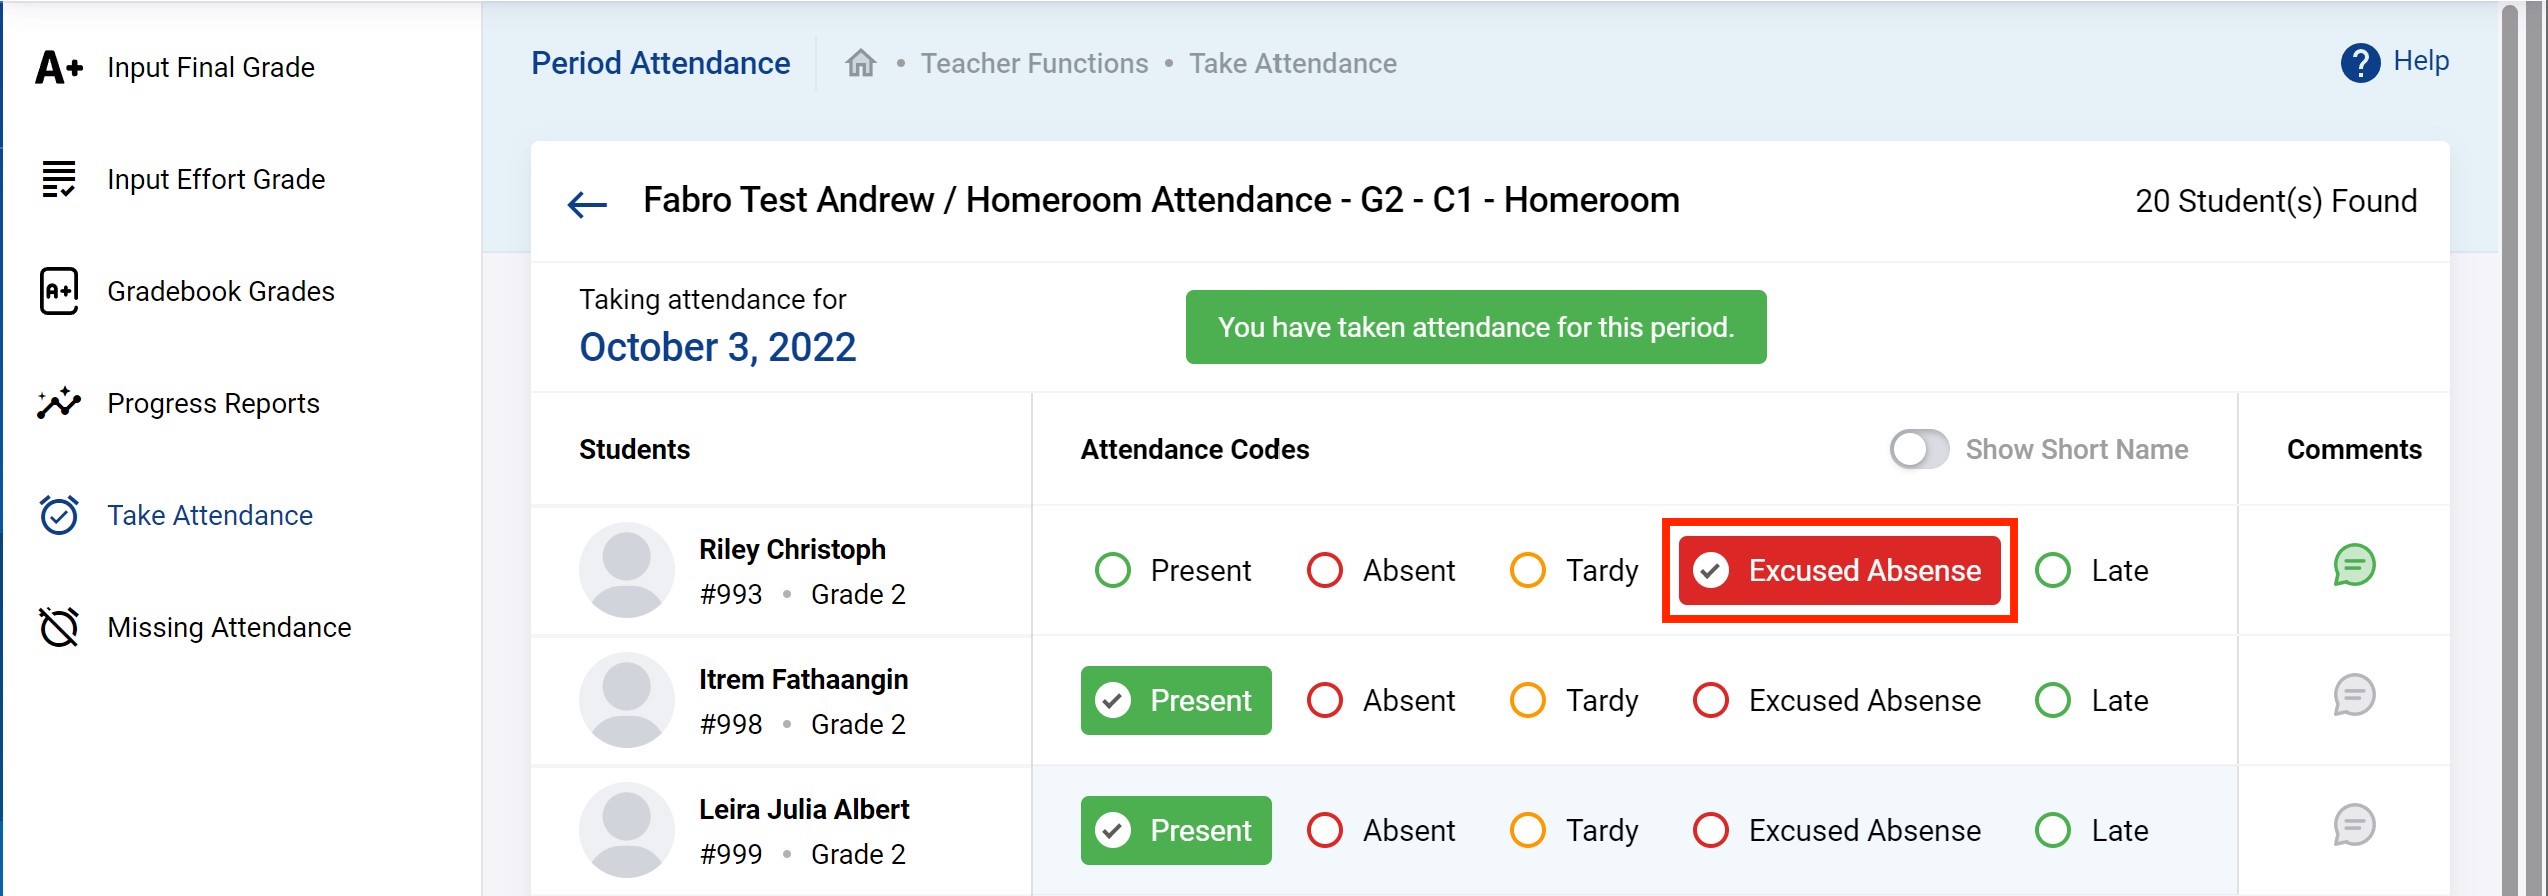
Now if you were to return to where the data entry officer (or the teacher itself) originally took the attendance you will see it is now Excused Absence as shown below.
Add Absences
Adding absences here is particularly useful when the admin office wants to add absences
- In advanced
- Several students at a time
- Several dates at a time
Similar to the example above. The admin office receives details from parents of a kid that he will be absent for 5 days from Oct 3 to Oct 7 2022 for medical reasons. They decide to go straight ahead and add those absences.
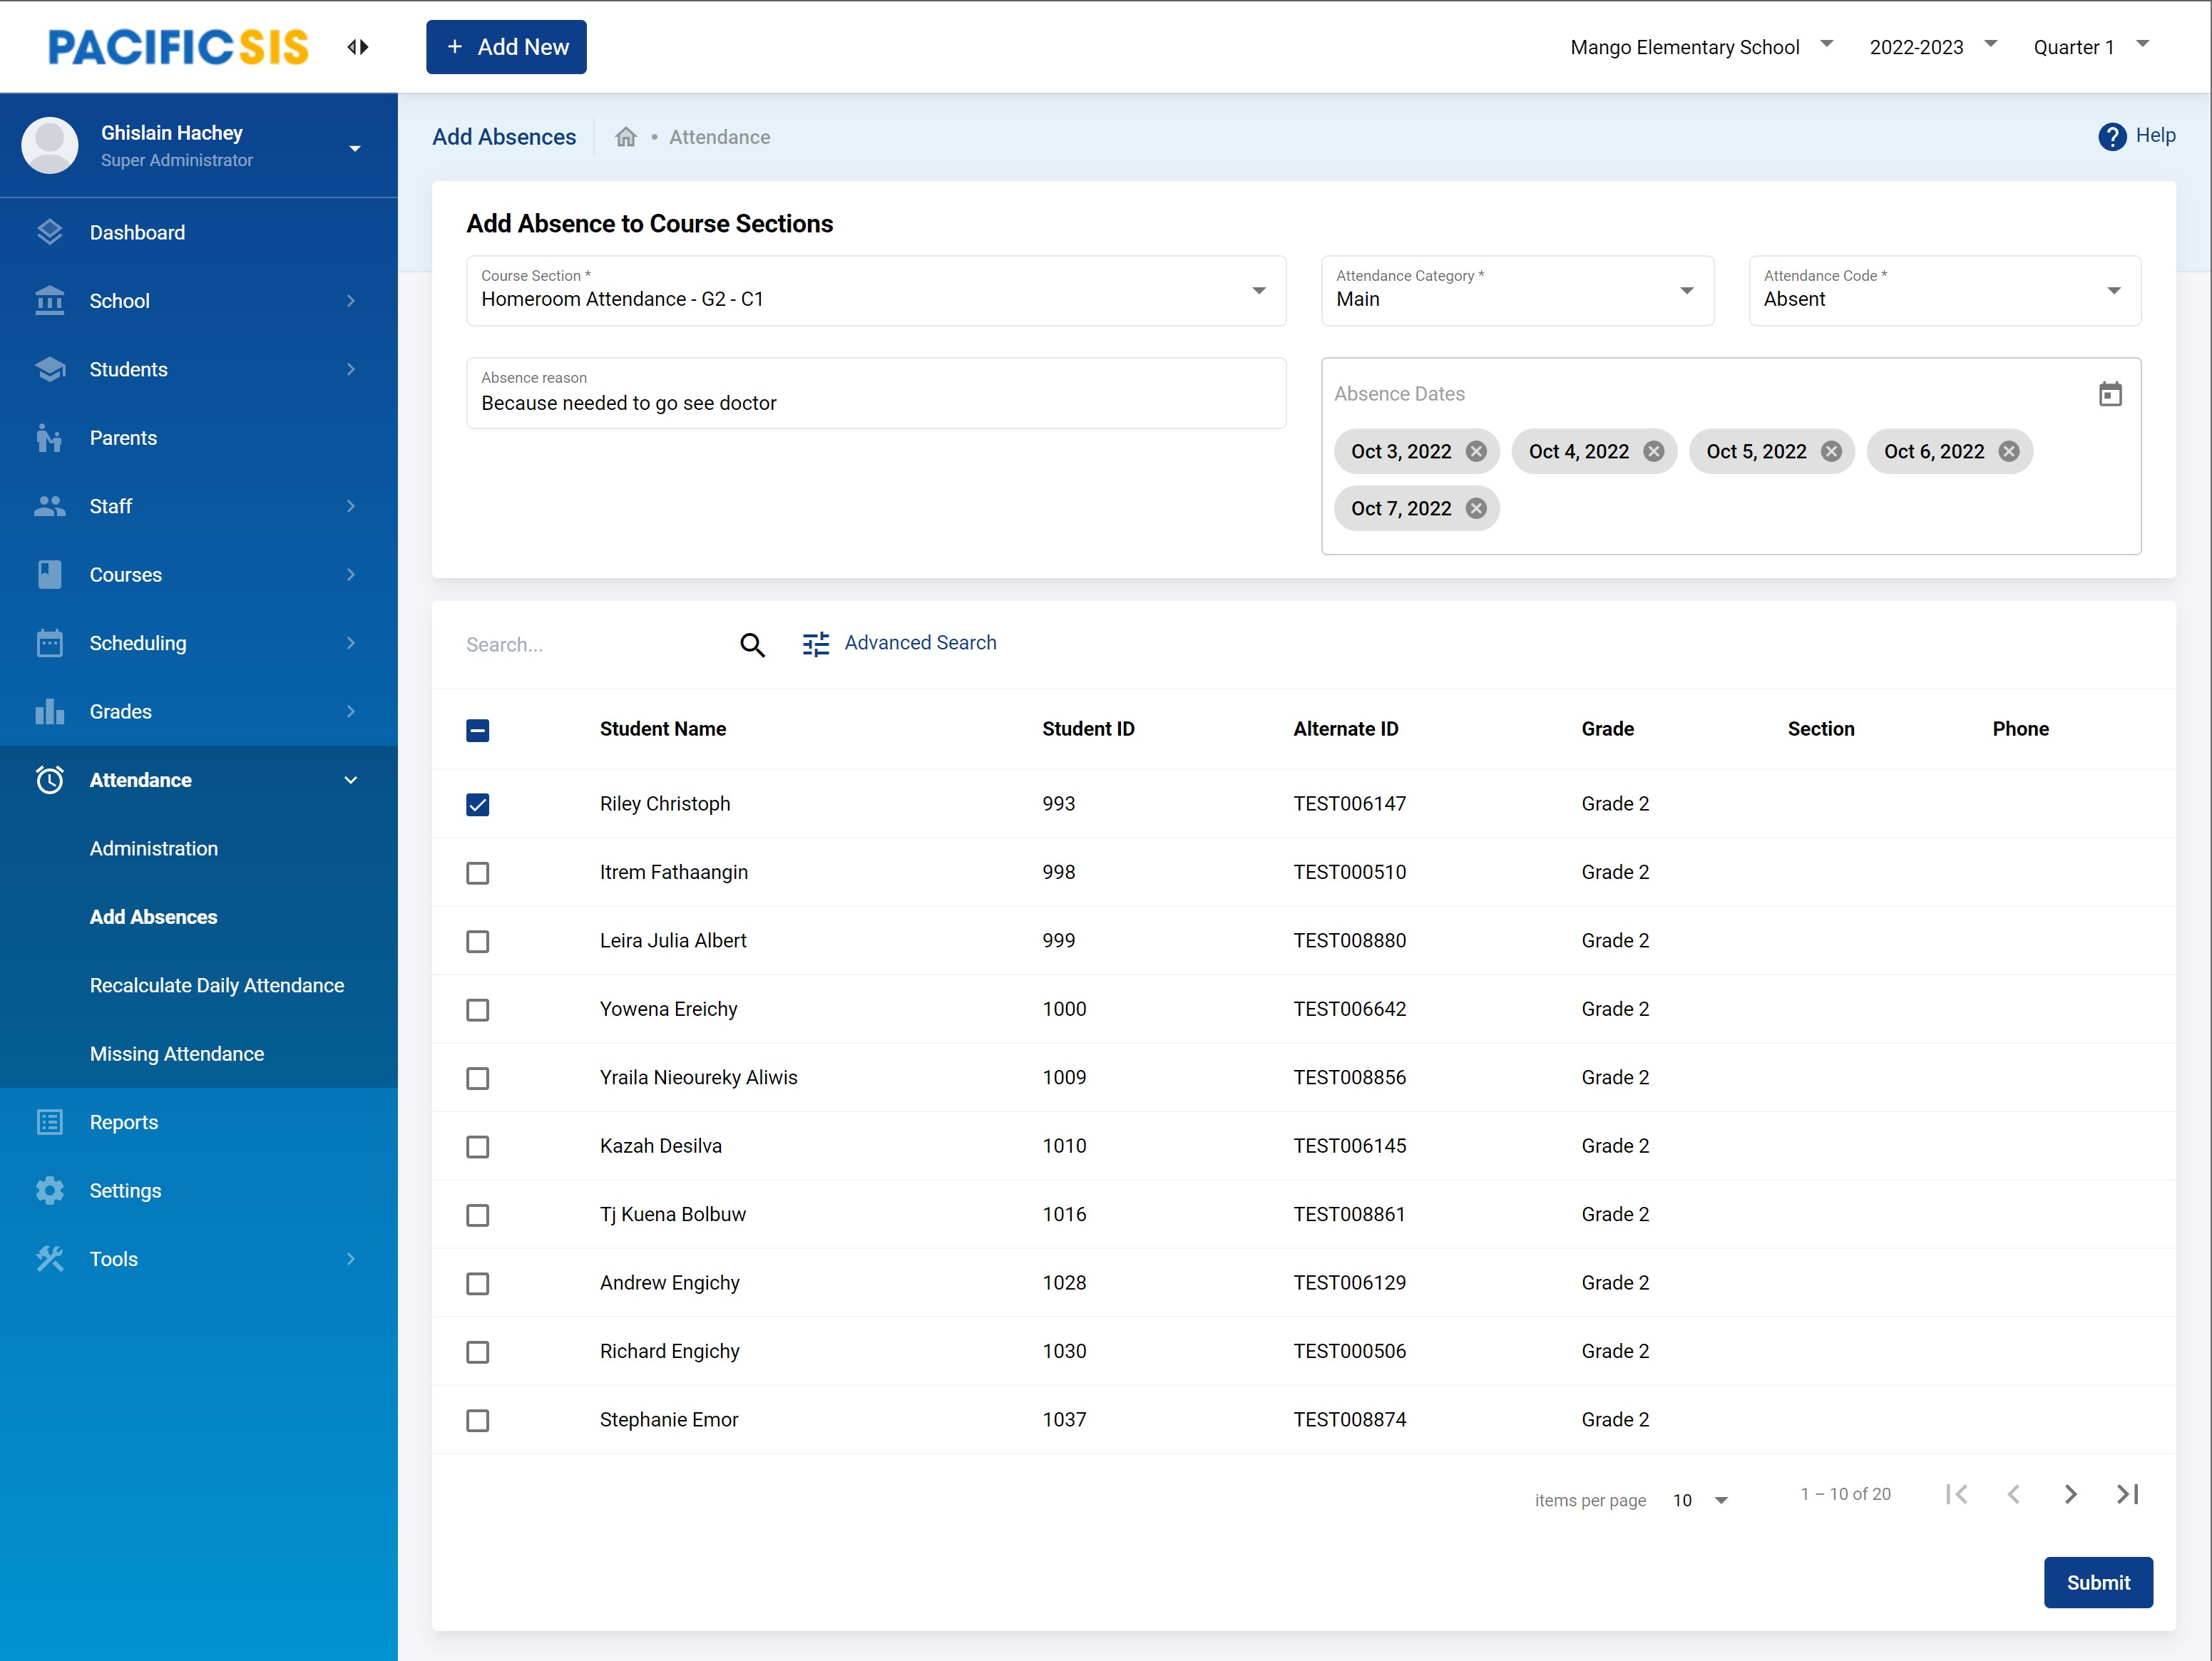
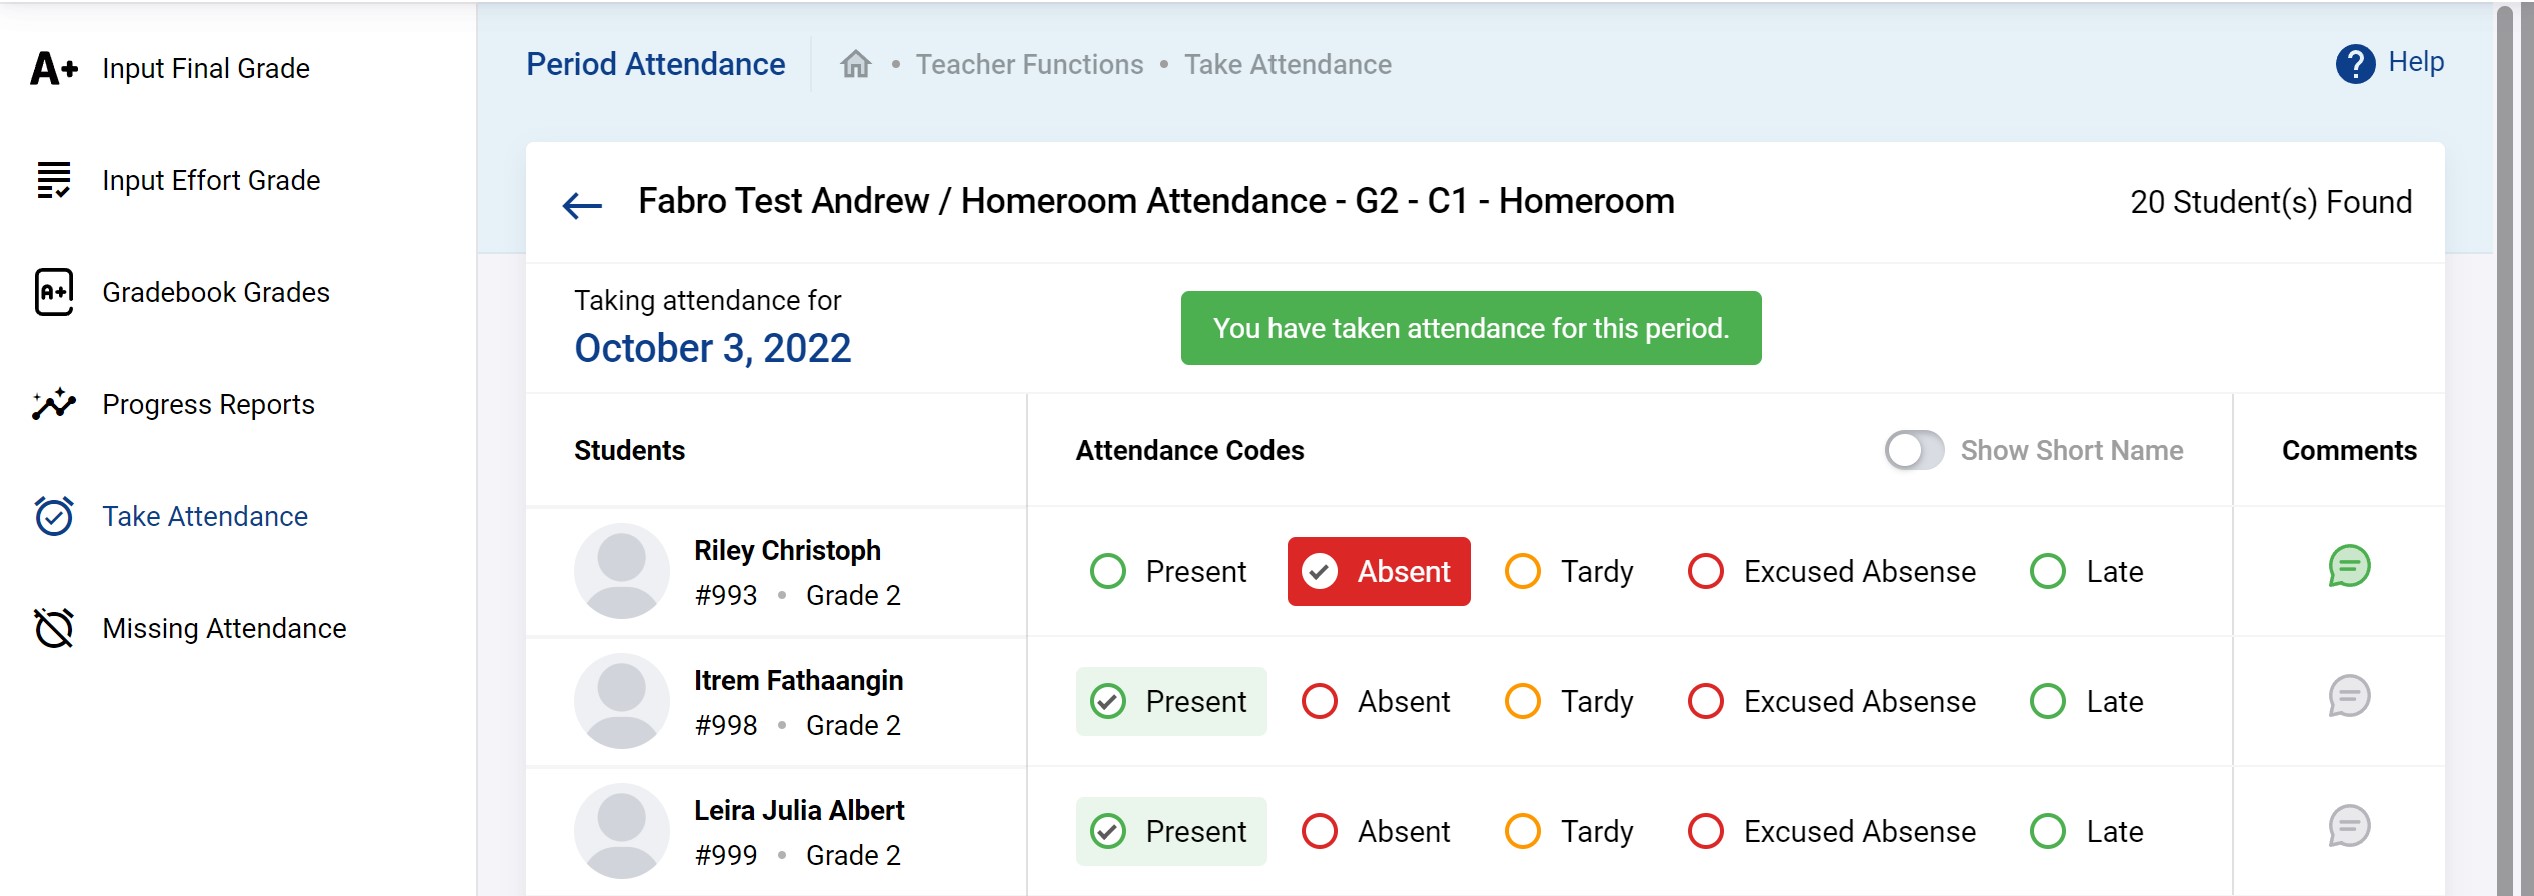
Again, if you then go to the normal place to take attendance for all students together you will see the attendance of that student as Absent already when those days arrive.
Recalculate daily attendance
Only needed if there are changes to the configuration of attendance, in particular the number of minutes that is considered a full day and half day. It just recalculates attendance data for reporting based on the new configuration.
Missing Attendance
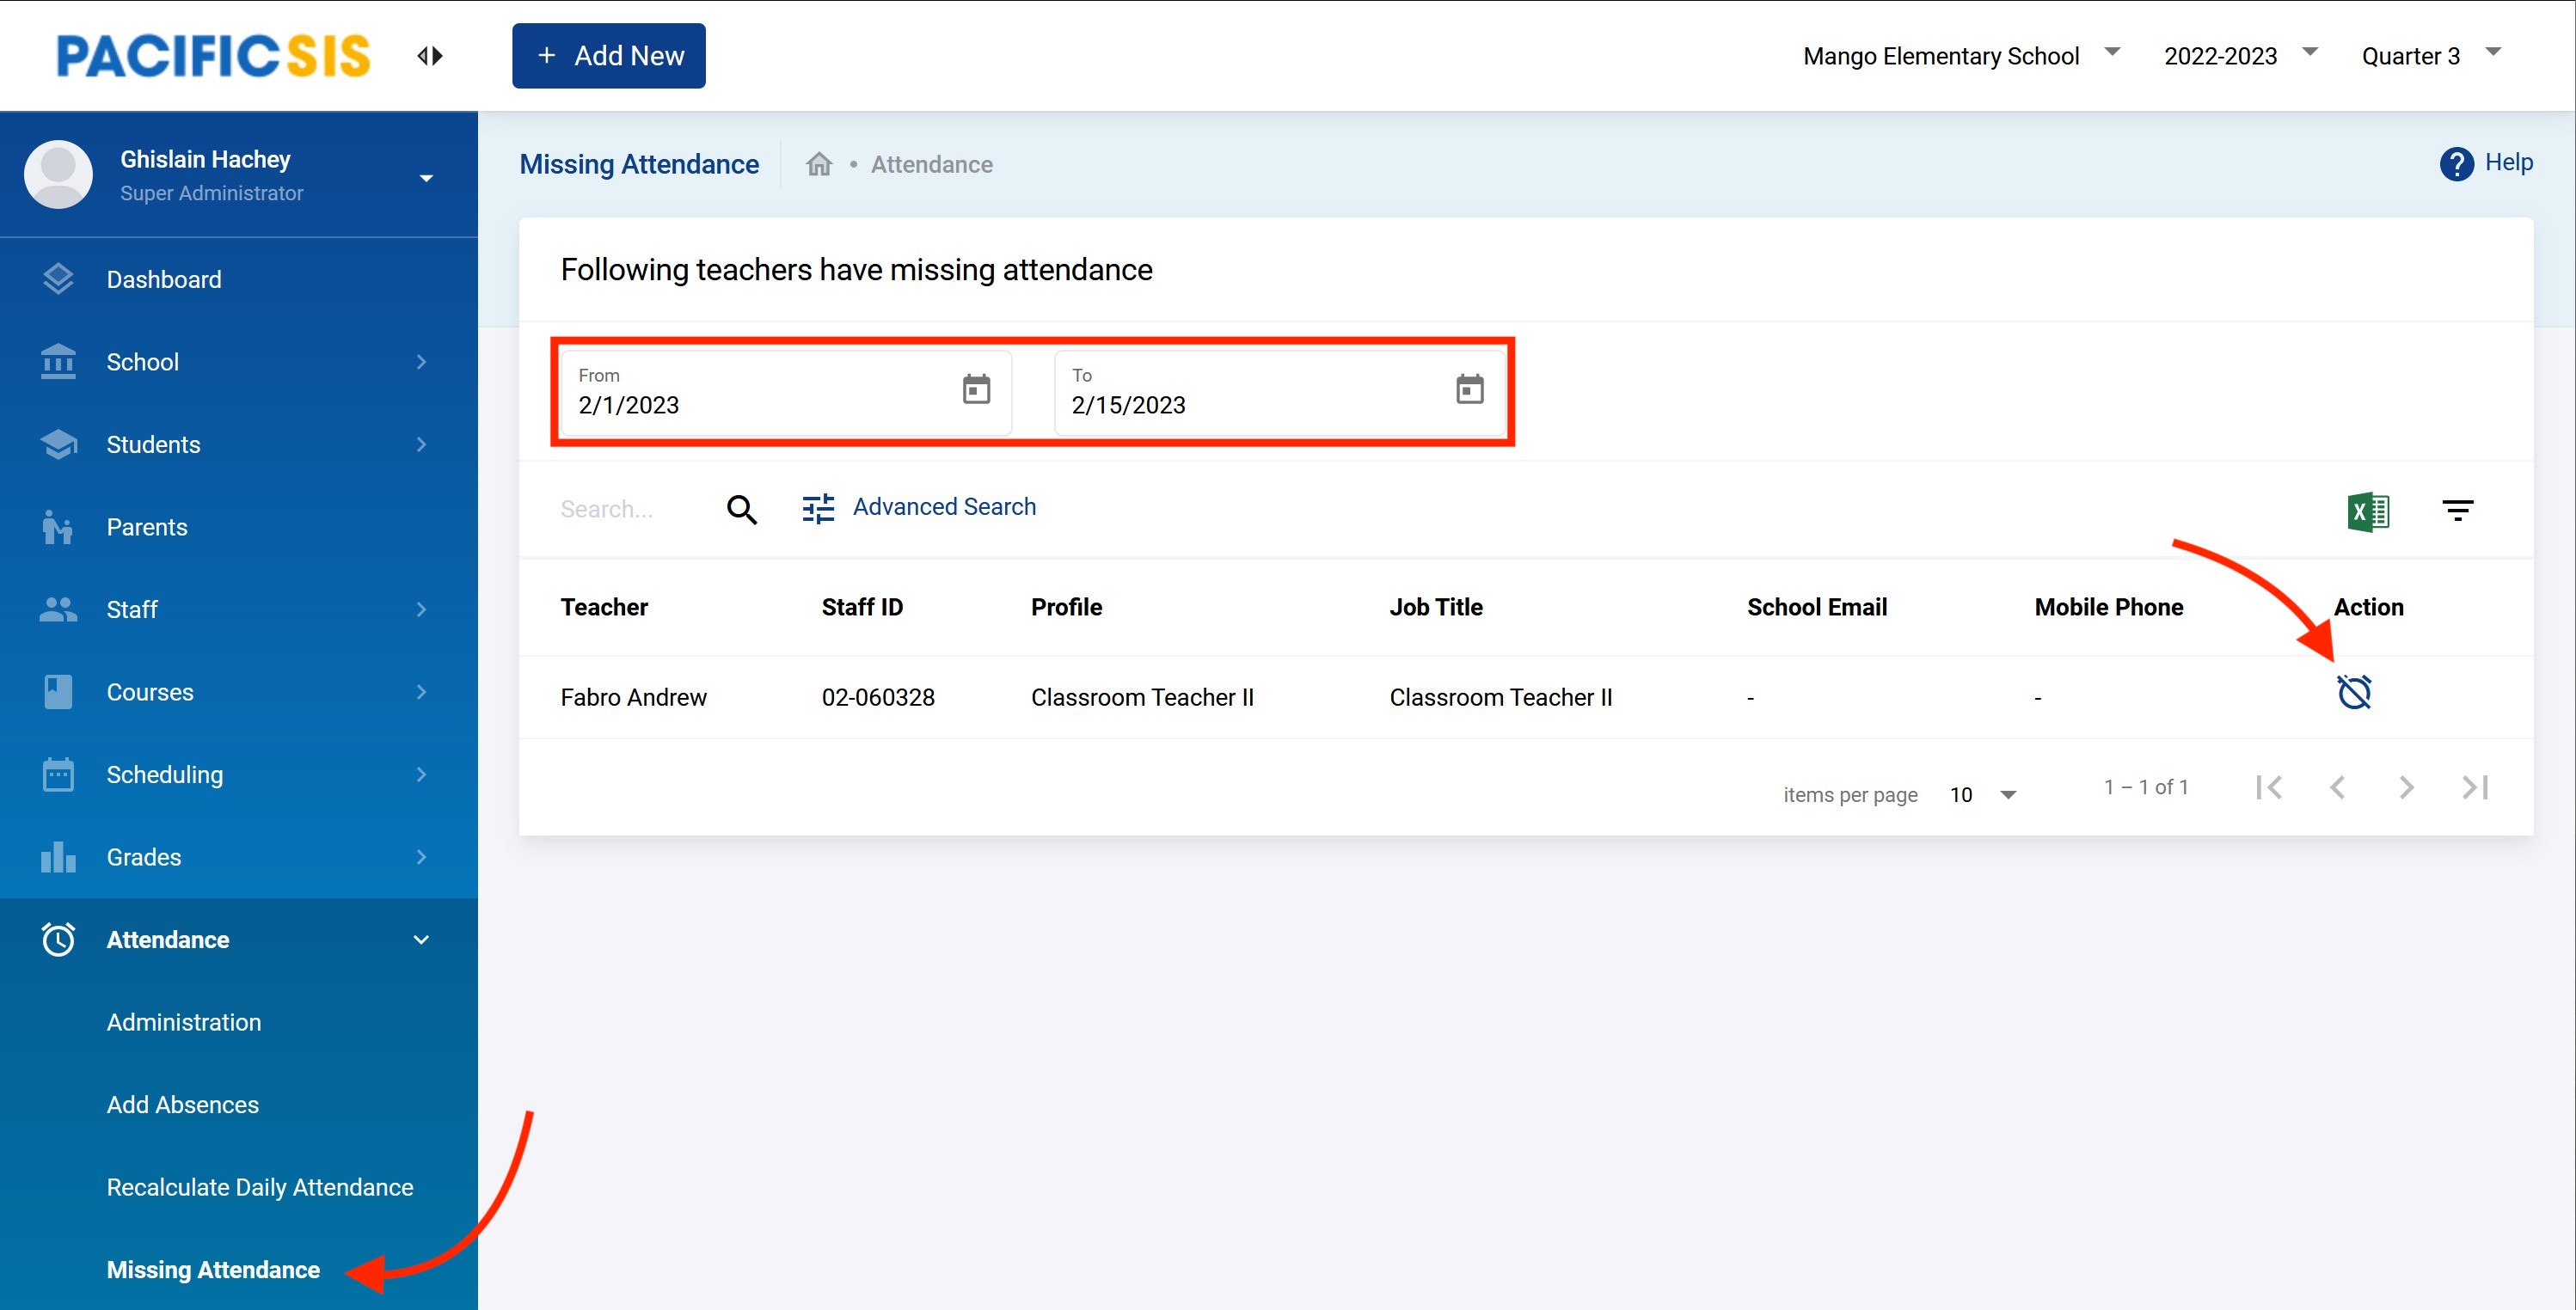
The feature Attendance → Missing Attendance is a place where admin office can go and see all the missing attendance by all the teachers in the school. There can can take action by reminding teachers of their attendance taking obligations or take action by taking attendance right there also.
For example, enter the date range of interest to look for missing attendance. Below there is only one teacher with missing attendance for those dates.
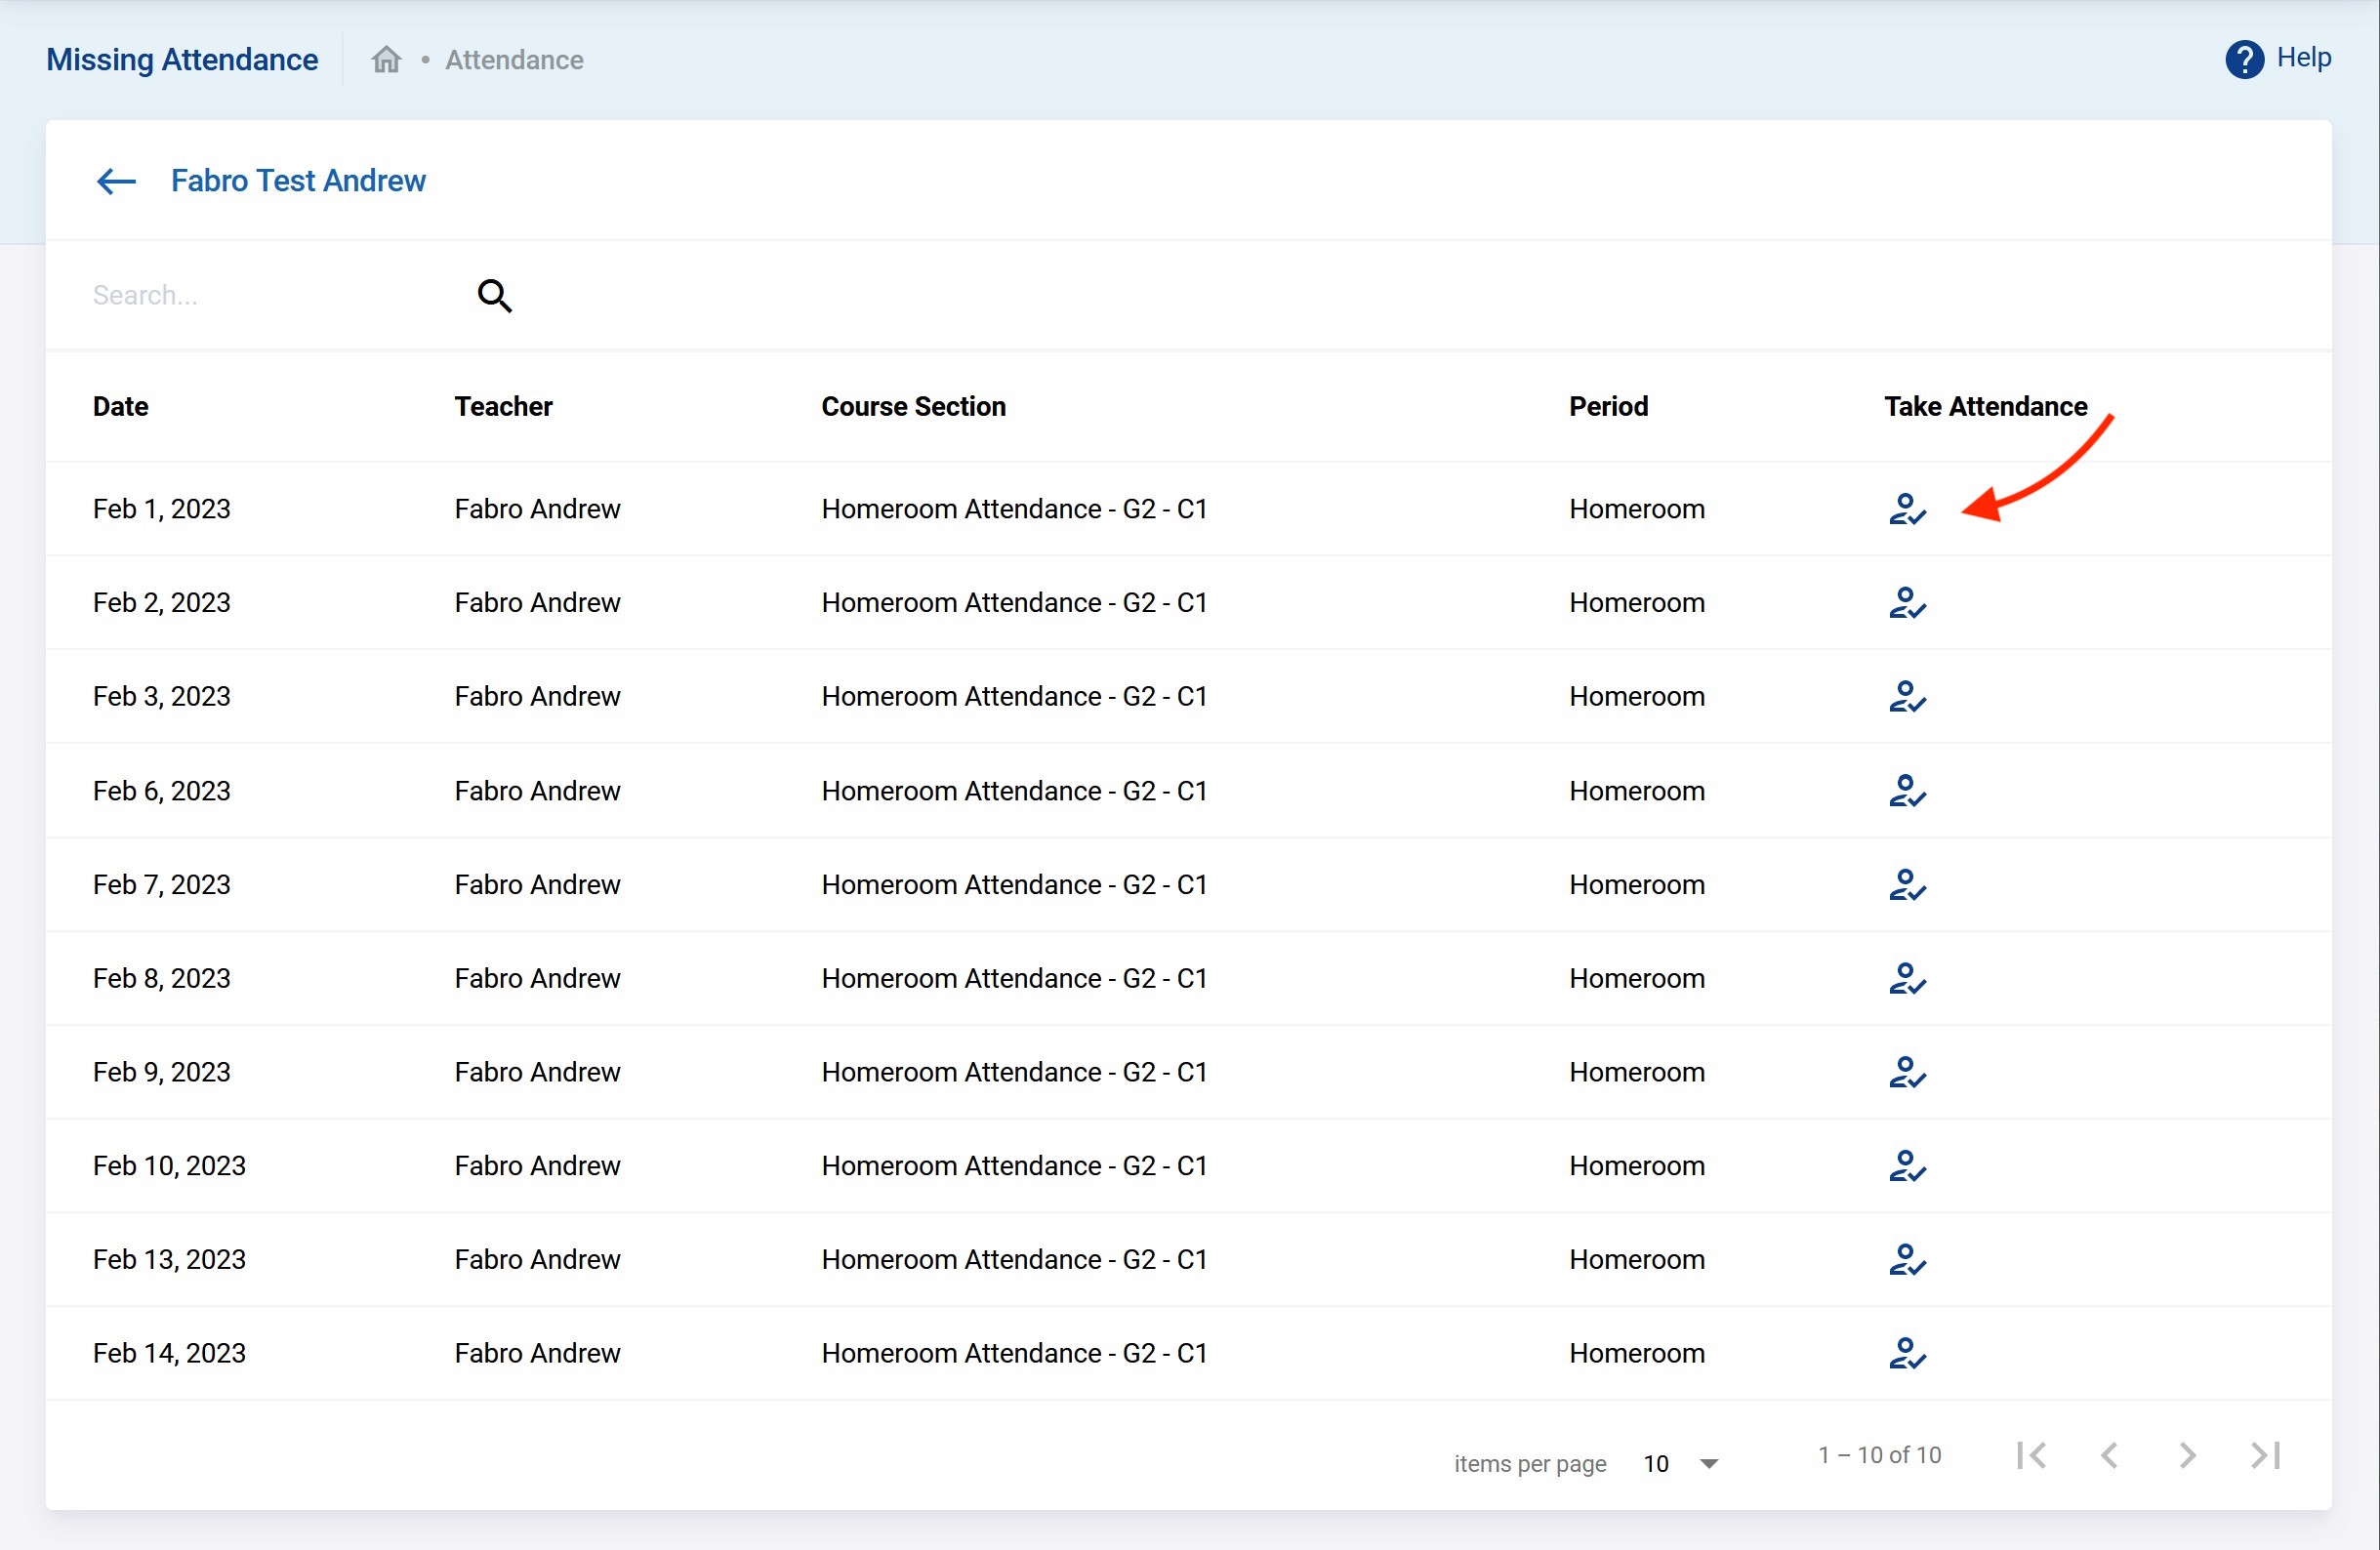
Clicking on that teacher will list all that teacher's missing attendance. Clicking on Take Attendance will lead you to a page where the admin office can take attendance on behalf of that teacher in a similar way as previously discussed above.
Grades
The grading module has several useful grades data management features from basic to very flexible and comprehensive. Examples include the following:
- Simple Grades (aka. Report Card Grades): The simplest and most common way to get started by just entering the final grades for each course section and graded marking period. This is typically percentages and/or letters.
- Gradebook Grades: A more comprehensive framework enabling teachers to record all the gradings for all assignments, projects, etc. and automatically producing final grades based on configured rules.
- Standards Grades: where students are graded on various metrics (Similar to Standard Based Assessments using standards and benchmarks for example). This could be something like the US common core or the school or country's own custom standards
- Effort Grades: A simpler variant of the Standard Grades commonly used in Kinder.
Simple Grades (aka. Report Card Grades)
Simple grades also known as Report Card Grades are the simplest and most commonly used. They are discussed in this section starting from necessary configuration to how to input the grades data.
Basic Configuration
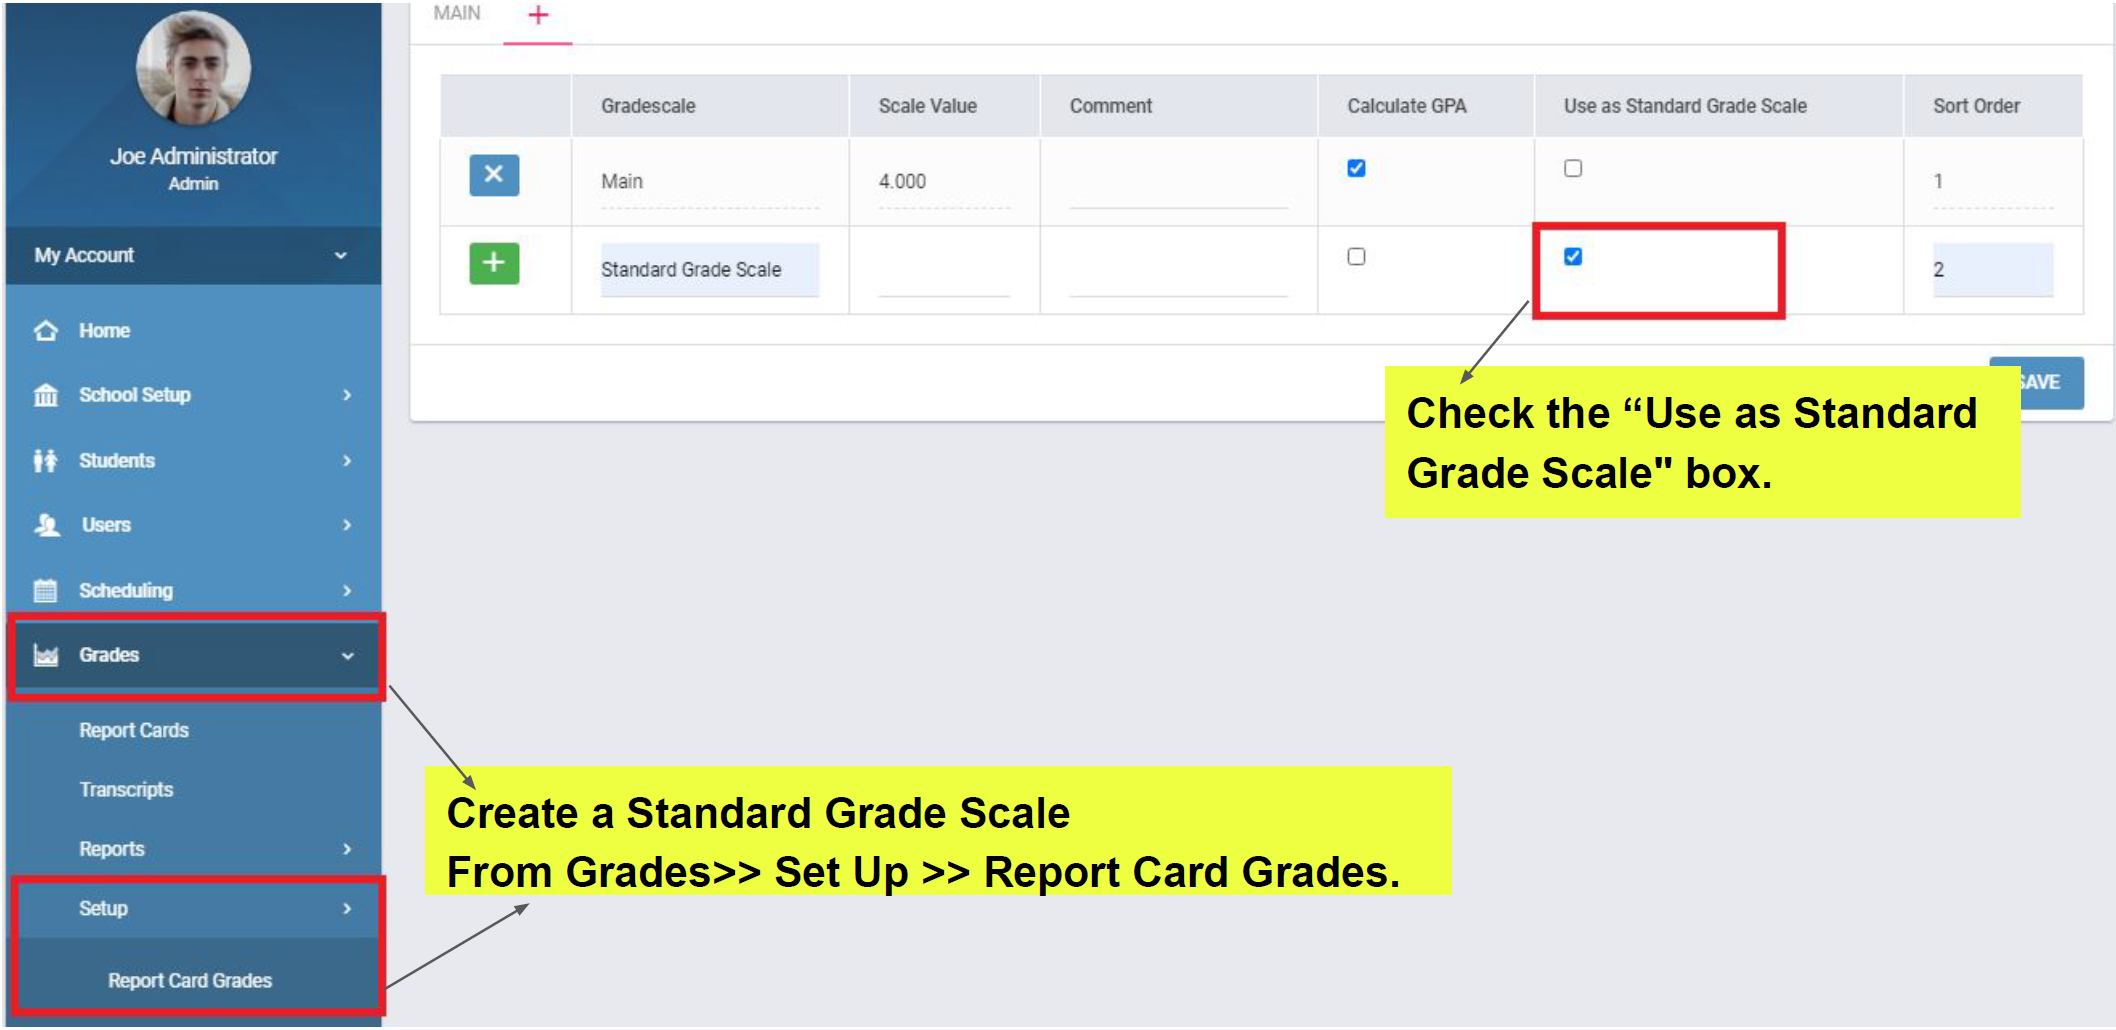
This section will discuss configuration of the simplest, most common method to input grades (i.e Simple Grades or Report Card Grades). Report Card Grades scales are created to enter letter grades with the actual scores. A one time setup for the school will be required. Go to Settings → Report Card Grades →.
The example below is for the simple common use case that a school uses a single grade scale. Enter the Grade Scale Name, Scale Value and any Comment and click on Submit.
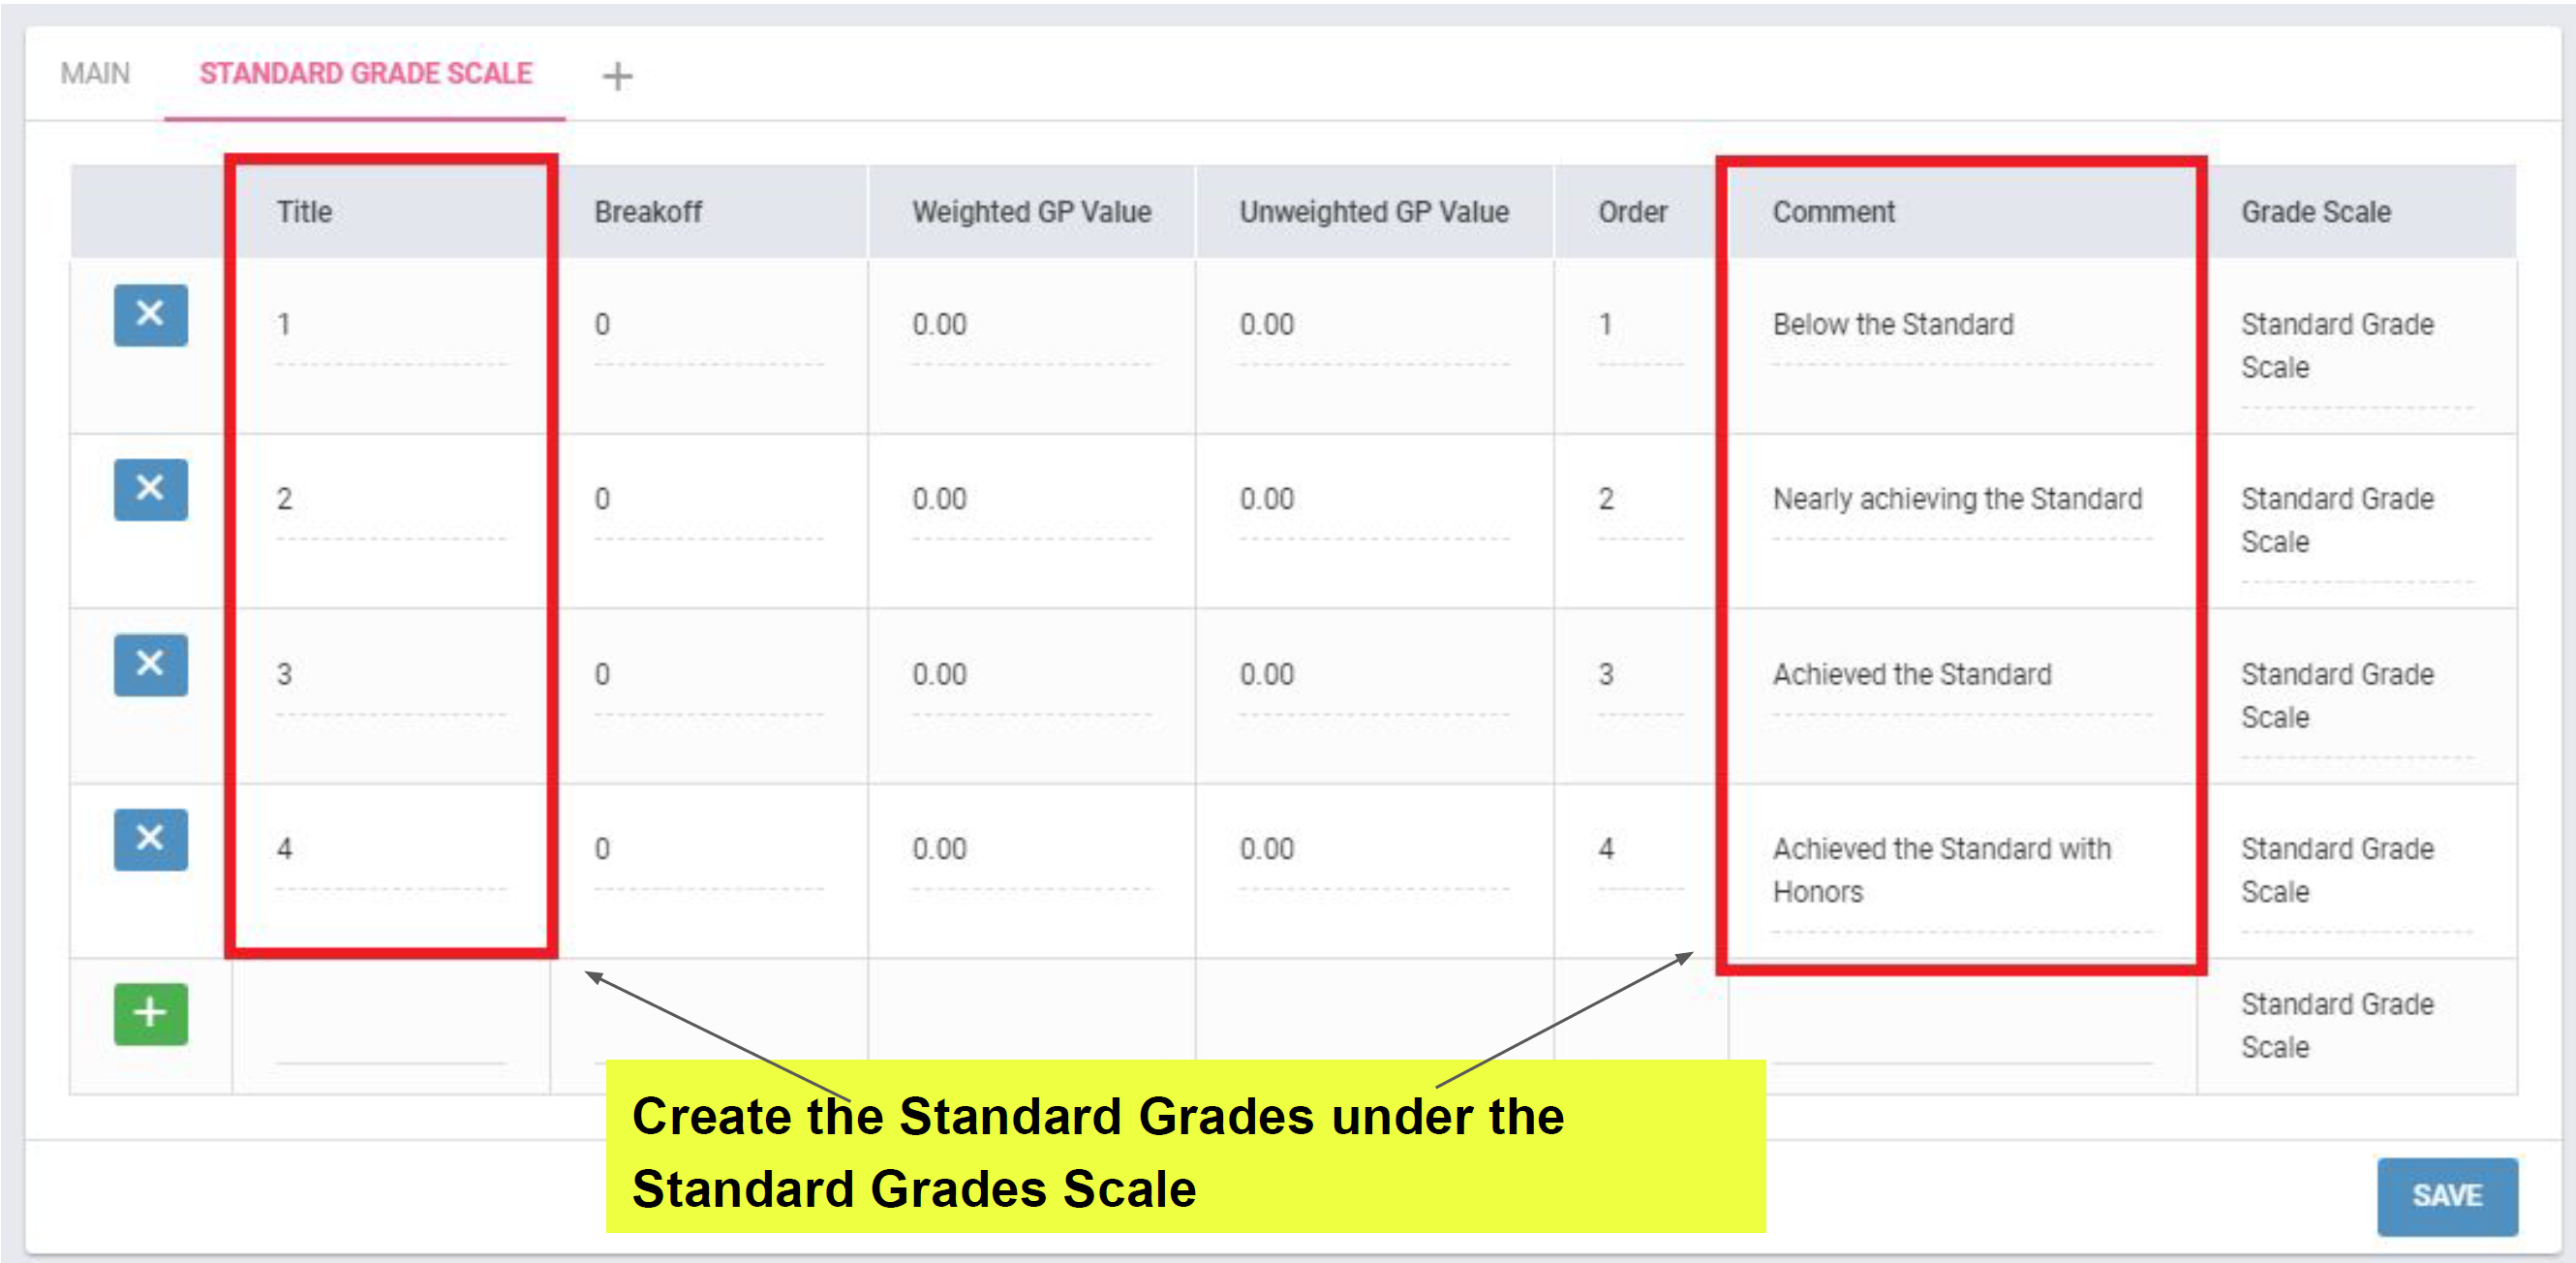
After the grade scale is created (as shown in red rectangle below), letter grades need to be entered one by one as per requirement into this new grade scale.
Put the Title, Breakoff, Weighted GP value, Unweighted GP value & sort order & then click on Submit.
- The Breakoff fetches the letter grades as per the scores. Here, A=90; when a student gets 90 & above he will be entitled to get an A.
- The Weighted GP Value is entered to calculate GPA of the weighted courses (where “Course is weighted” option is on).
- The Unweighted GP Value is entered to calculate GPA of the unweighted courses (where “Course is weighted” option is off).
Basically, creating this section would help to get the letter grades on the report card and to calculate GPA while creating Transcript. A complete setup might look something like the following.
Configuration of Grades by Course Section
Before doing any grading related work a teacher has to set their own configuration choices that are much used while evaluating the gradebook grades or final grades. This setup varies with different course section. To setup the configuration, select Grades → Setup → Configuration and choose the course section from the top panel of subject, course & course section. Make changes to the options as per the teacher requirements.

Score Rounding:
- Up - When Up is selected, the grade will always round the decimals to the nearest greater integer. Example, 59.25 will become 60 or 53.67 will become 54.
- Down – When Down is selected, the grade will always round the decimals to the nearest lower integer. Example, 59.65 will become 59 or 53.15 will become 53.
- Normal – This is the regular rounding as we know, i.e. anything equal to or above .5 is rounded upwards and anything below .5 is rounded downwards to an integer without any decimals. Example, 53.67 will become 54 or 53.49 will become 53.
- None – When none is selected, scores do not appear in any rounded integer. It keeps the grade accurate including the decimal points, i.e. no rounding of the integer takes place. Example, for 59.25 it shall remain as it is.
Assignment Sorting: Select one radio button value so as to display the assignments in the respective order in the gradebook assignments.
Weight Grades: Check this option if you want the assignment grades to be evaluated based on a weightage. Once checked, you can add the weight percent in the assignment type.
The percent total of the weight grades can be less or more or equal to 100. The Grades will be evaluated based on the weighted percents.
Assigned Date Defaults to Today: Check this option if you want the assignment’s start date to reflect the present date by default. This option is mostly used when teacher usually creates assignment for the present date so as to skip choosing a date.
Due Date Defaults to Today: Check this option if you want the assignment’s end date to reflect the present date by default. This option is used when the teacher is hosting a surprise test in the class and it shall end the same day.
Calculate Eligibility Using Cumulative Semester Grades: Check this option if you want the eligibility status to be calculated based on the cumulative semester grades instead of the quarter grades.
Allowed Maximum Percent in Anomalous Grades: Enter the maximum value to mark the grades for being considered as anomalous,i.e. if it’s set to 100 then grades if given over 100 will be considered as anomalous.
Days until ungraded assignment grade appears in Parent/Student Gradebook views: Enter the maximum value to keep the ungraded assignment appear in Parent/Student gradebook view.
Default Comment code: You can choose a comment code to appear by default when marking comments for students.
Final Grading Percentages: The Final Grading Percentages helps to calculate the cumulative final scores for the respective marking periods. Here, as per marking period setup we have:
- Q1 = Q1 Gradebook Grades + Q1 Exam,
- Q2 = Q2 Gradebook Grades + Q2 Exam,
- Q3 = Q3 Gradebook Grades + Q3 Exam,
- Q4 = Q4 Gradebook Grades + Q4 Exam,
The grading percentages would fetch the cumulative scores from respective quarters for the semesters and from semesters to Full year. The final grading percentages should not exceed 100%.
Input Final Grades
Final grades can only be entered within the Grade Posting Period of the particular marking period/term which is set by your administrator.
The teacher can view these dates by clicking School Info → Marking Periods and selecting the required marking period for its Grade Posting dates.

To input final grades, first select the Subject, Course & Course Period from the top panel of your portal's screen.

Then go to Grades → Input Final Grades and follow one of the following procedures.
Get Gradebook Grades
Get Gradebook Grades allows you to automatically retrieve the calculated percentage based on assignment grades having impact from the configuration setup from that grading period. Click Get Gradebook Grades to automatically import these values. Click on Save to automatically assign the appropriate letter grade based on the imported percentage.

Assign Percents
Assign Percents allows you to manually enter percentage grades for each student. Use this option if you do not have grades in the gradebook.
Once you have entered the percentages, you can click on Save to automatically assign the appropriate letter grade based on the entered percentage.

Assign Letters
Assign Letters allows you to manually enter letter grades for each student. Use this option if you do not have grades in the gradebook and do not have a specific percentage grade value.
Once you have entered the letters, you can click on Save to automatically assign the average percentage grade based on the entered letter.

Input Final Grades on behalf of a Teacher
Admin can give Input Final Grades on behalf of the teacher. To perform this task go to Users → Teacher Programs → Input Final Grades. Now search for the particular teacher with the search criteria or simply click on Submit to get a list of all the teachers.

Click on the name of the teacher from the list.

You will get a screen where at the top left you can choose the particular period you will give the final grades for and after entering the grades click on save.
To give Final Grades there are a few ways:
- Get Gradebook Grades: Fetches the cumulative scores from the assignments given on that course.
- Assign Percents: Admin can manually enter scores through this option. After entering the percentage, system will automatically fetch the letter grades according to the grade scale set in the system.
- Assign Grades: Letter grades can be entered from this option. After entering the letter grades system will automatically fetch the average percentage according to the grade scale set in the system.
- Clear All: This option helps the user to delete all the grades given by mistake for all the students.
- Include Inactive Students: This option helps you to grade the inactive students as well if required.

The final grades are now given by the admin on behalf of the teacher and the grades will reflect in the teacher's portal.
Gradebook Grades
Creating Assignments
Teachers can create assignments in Grades → Gradebook → Assignments and click on the '+' sign to create the Assignment Type. Give the Title & Weight Percent if required and save it.

After creating assignment type, create assignments under the selected assignment type by again clicking on the + sign marked in red. Give the title, assigned date, due date, points and description and save the details.

Teachers have to create assignments for every quarter for the course periods by changing the marking period drop-down from the top right. Example, for a full year course period assignments should be created for all 4 quarters. The assignment type gets copied in all the quarters for a FY or Semester course periods.
Entering Grades in Gradebook
To enter gradebook grades, go to Grades → Gradebook → Grades. Grades can be entered in three ways here. Selecting the All view from the drop-down enables the teacher to enter grades for the students in all assignments at the same time.

If you want to enter grades for a particular assignment, select that assignment from the drop-down list and grade the students for the selected assignment.

Also you can click on a student's name from any of the views and enter grades for the selected student in all his assignments.


Entering Grades in Gradebook on Behalf of Teacher
To give Gradebook Grades admin has to follow this path Users → Teacher Programs → Grade Book Grades. Then it will give a search box. Search for the particular teacher with the criteria or do a blank search to get the list of teachers in the school. From the list of teachers, select the particular teacher.
You will get a screen where from the top left hand corner you can select the Course Period. Now, gradebook grades can be entered in three ways here.
1) Selecting the All view from the drop-down enables the teacher to enter grades for the students in all assignments at the same time.

2) If you want to enter grades for a particular assignment, select that assignment from the drop-down list and grade the students for the selected assignment.

3) The Totals View shows the assignment score total with respective letter grades.

Also you can click on a student's name from any of the views and enter grades for the selected student in all assignments.

Admin can enter the grades or edit them if the grades are entered by the particular teacher in the same manner. After Admin gives the grades he will have to click on Save to keep the changes.
Exempting scores of an Assignment
If a student is not applicable in any assignment, that specific assignment can be exempted from the total points in openSIS. This feature is used when a student has joined the course later or is absent due to illness or for any reason based on the administrator's decision. To exempt a student from an assignment, go to Grades → Gradebook → Grades and select the student.

Now, enter asterisk(*) instead of entering any score for the particular assignment and save it.

For the selected student the asterisk marked assignment scores will become N/A.

The exempted assignment will not affect the total scores & the final grades.

The total score appears differently for the student with exempted assignment than other students. Student with exempted score for an assignment now appears 25 in point total whereas other students have their point total as 35.
Similarly, the exempted scores have the same impact on the final grades when evaluated. Exempted assignments list gets created under the Anomalous feature for the further reference of the teachers. Go to Grades → Gradebook → Anomalous and the details will appear.

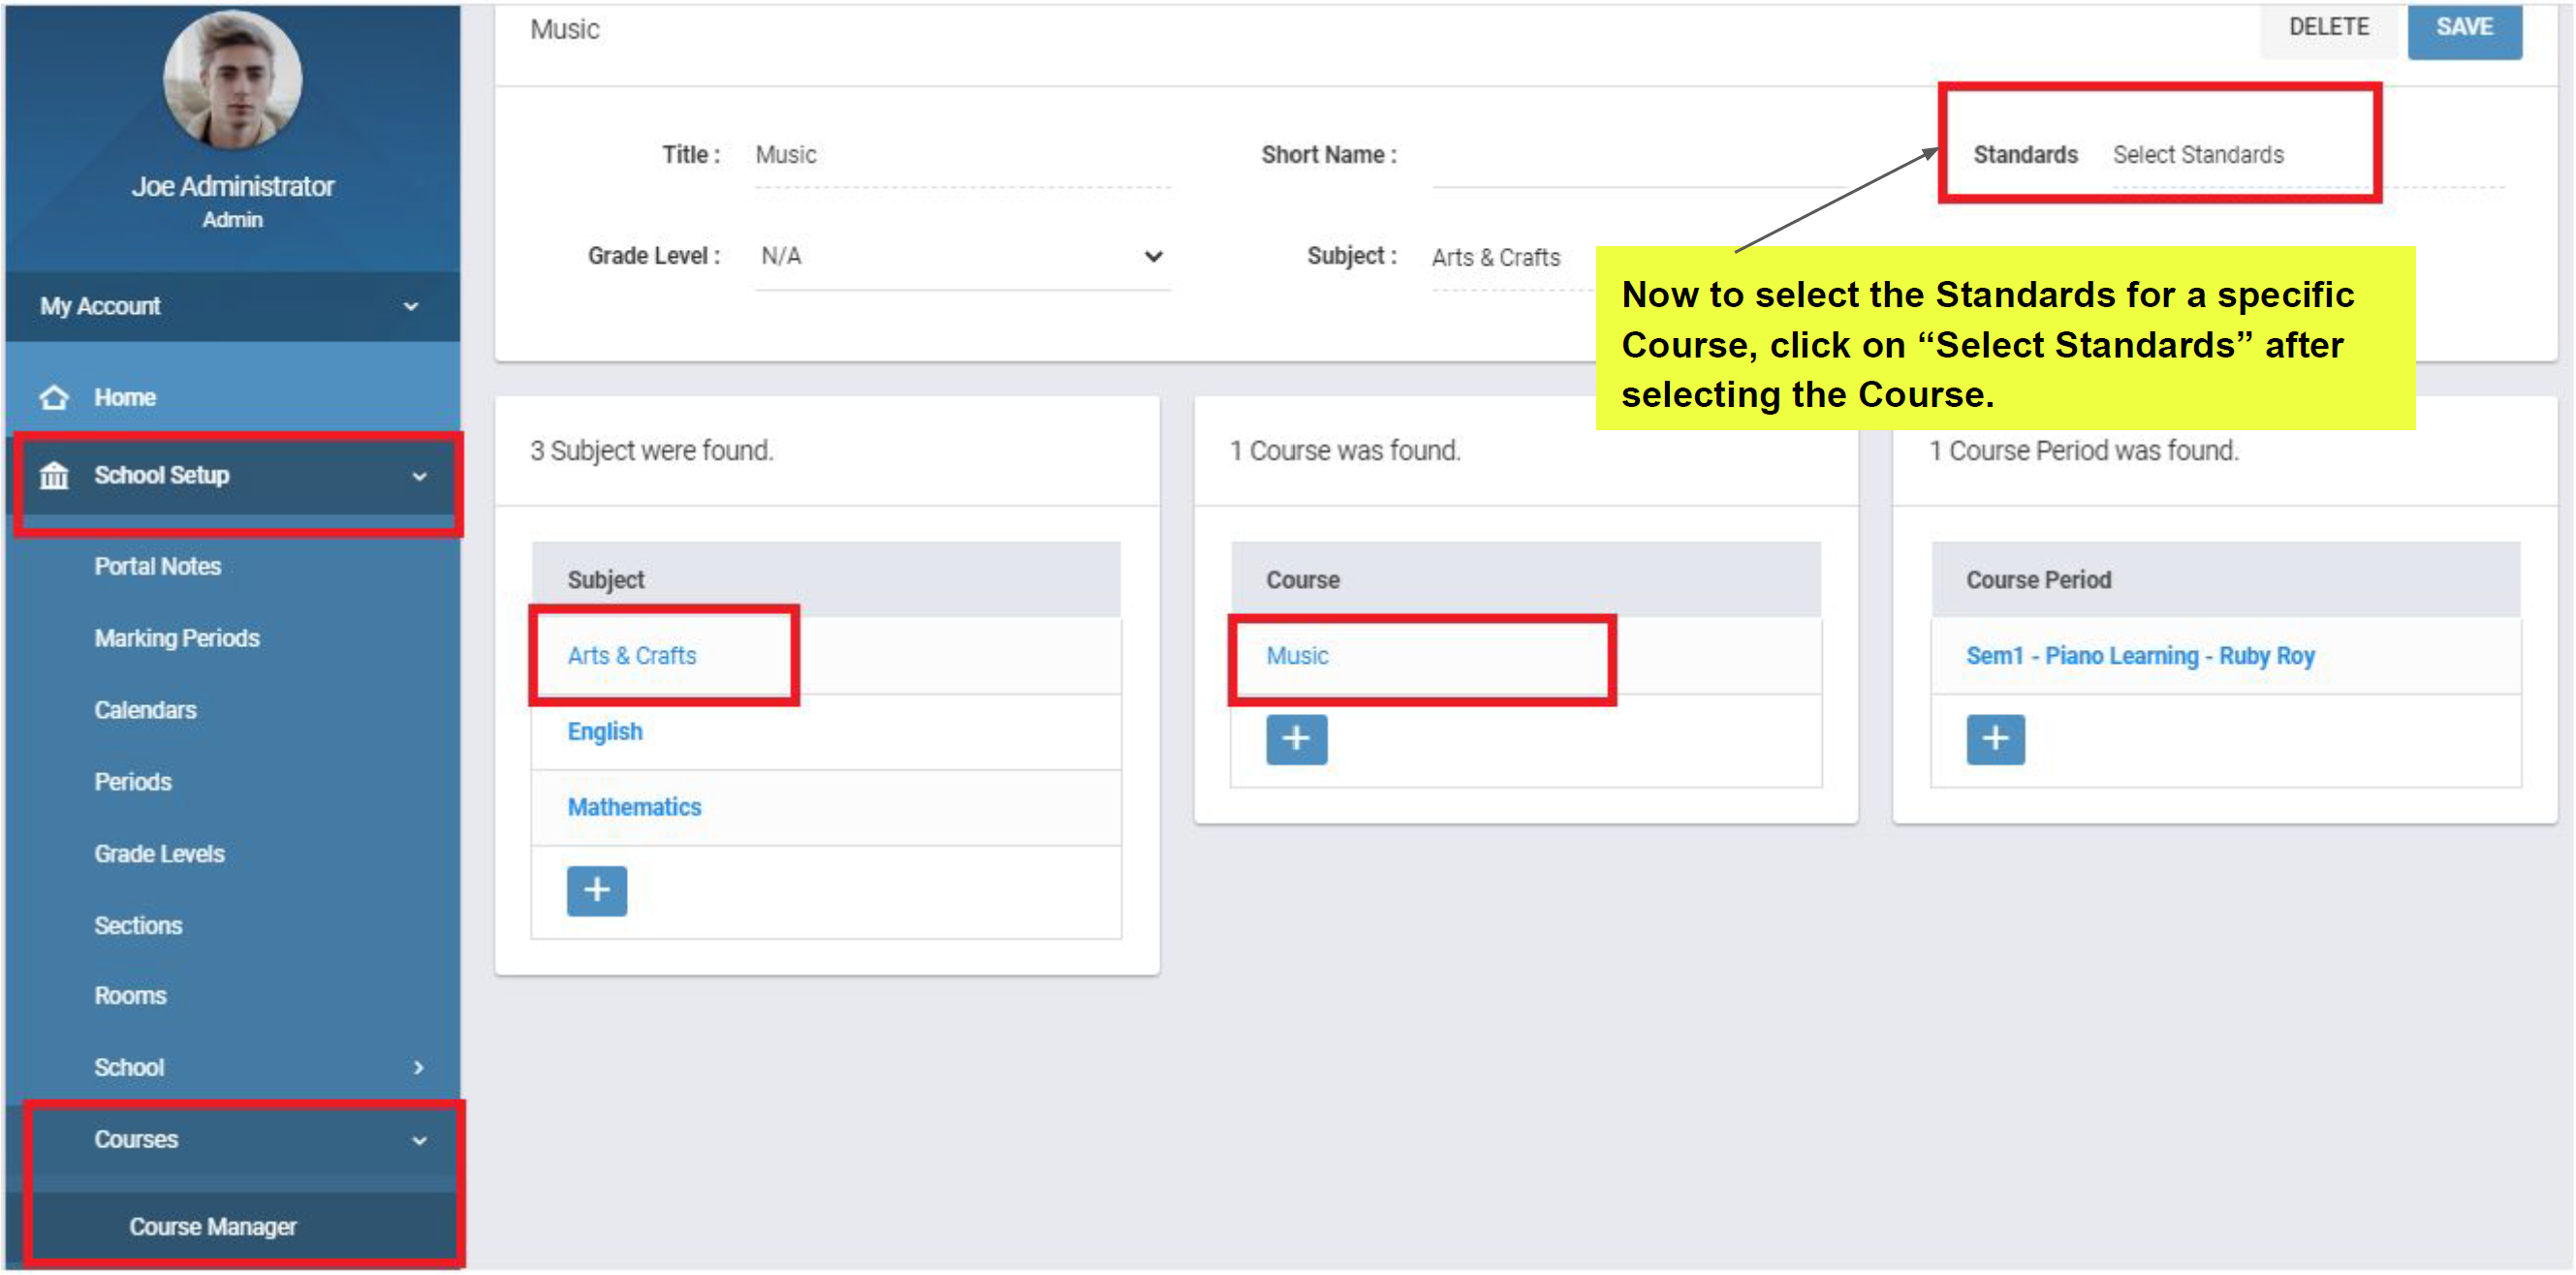
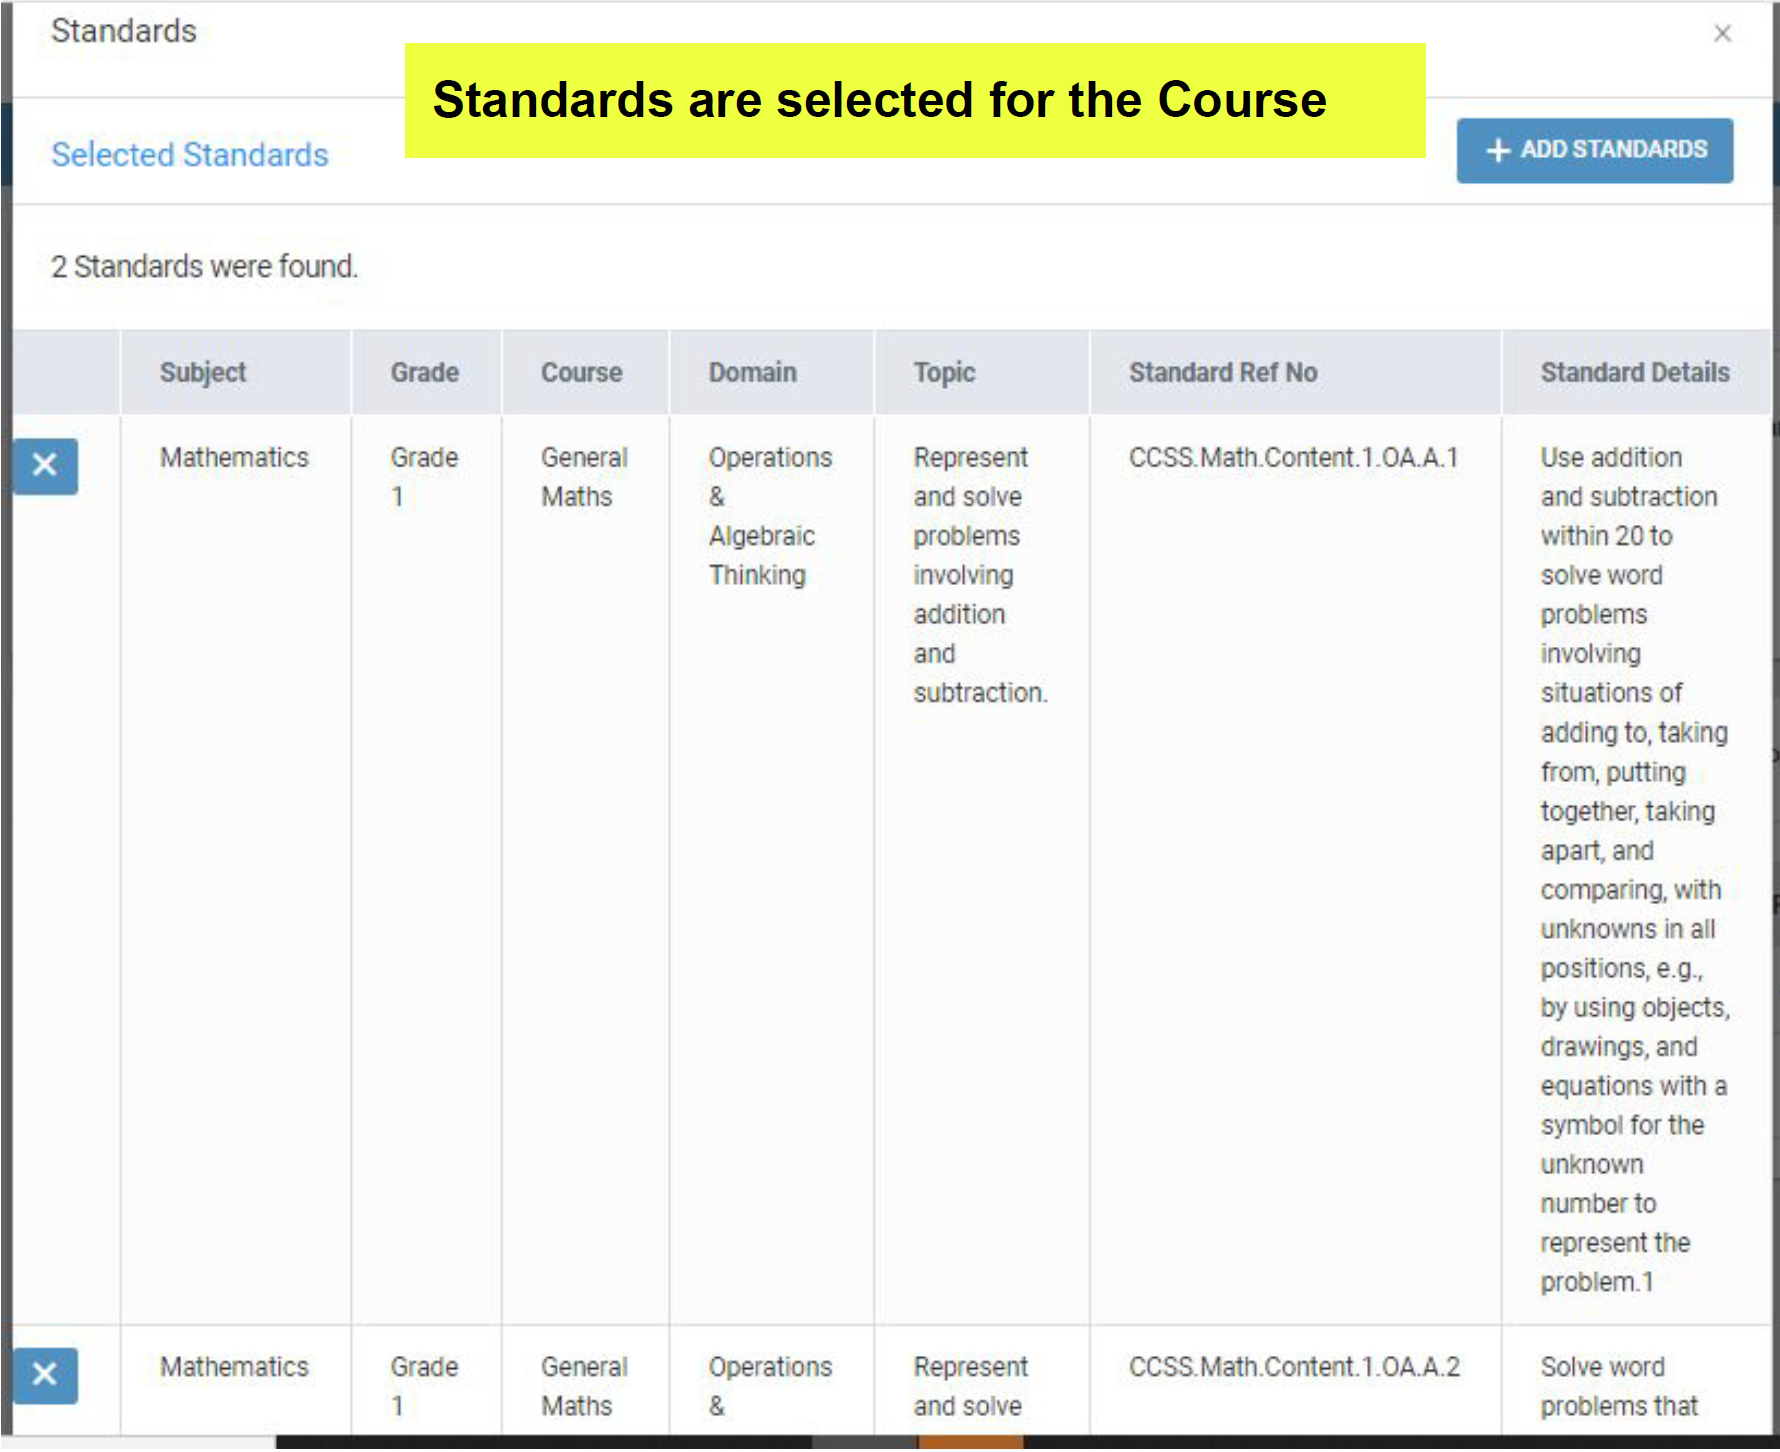
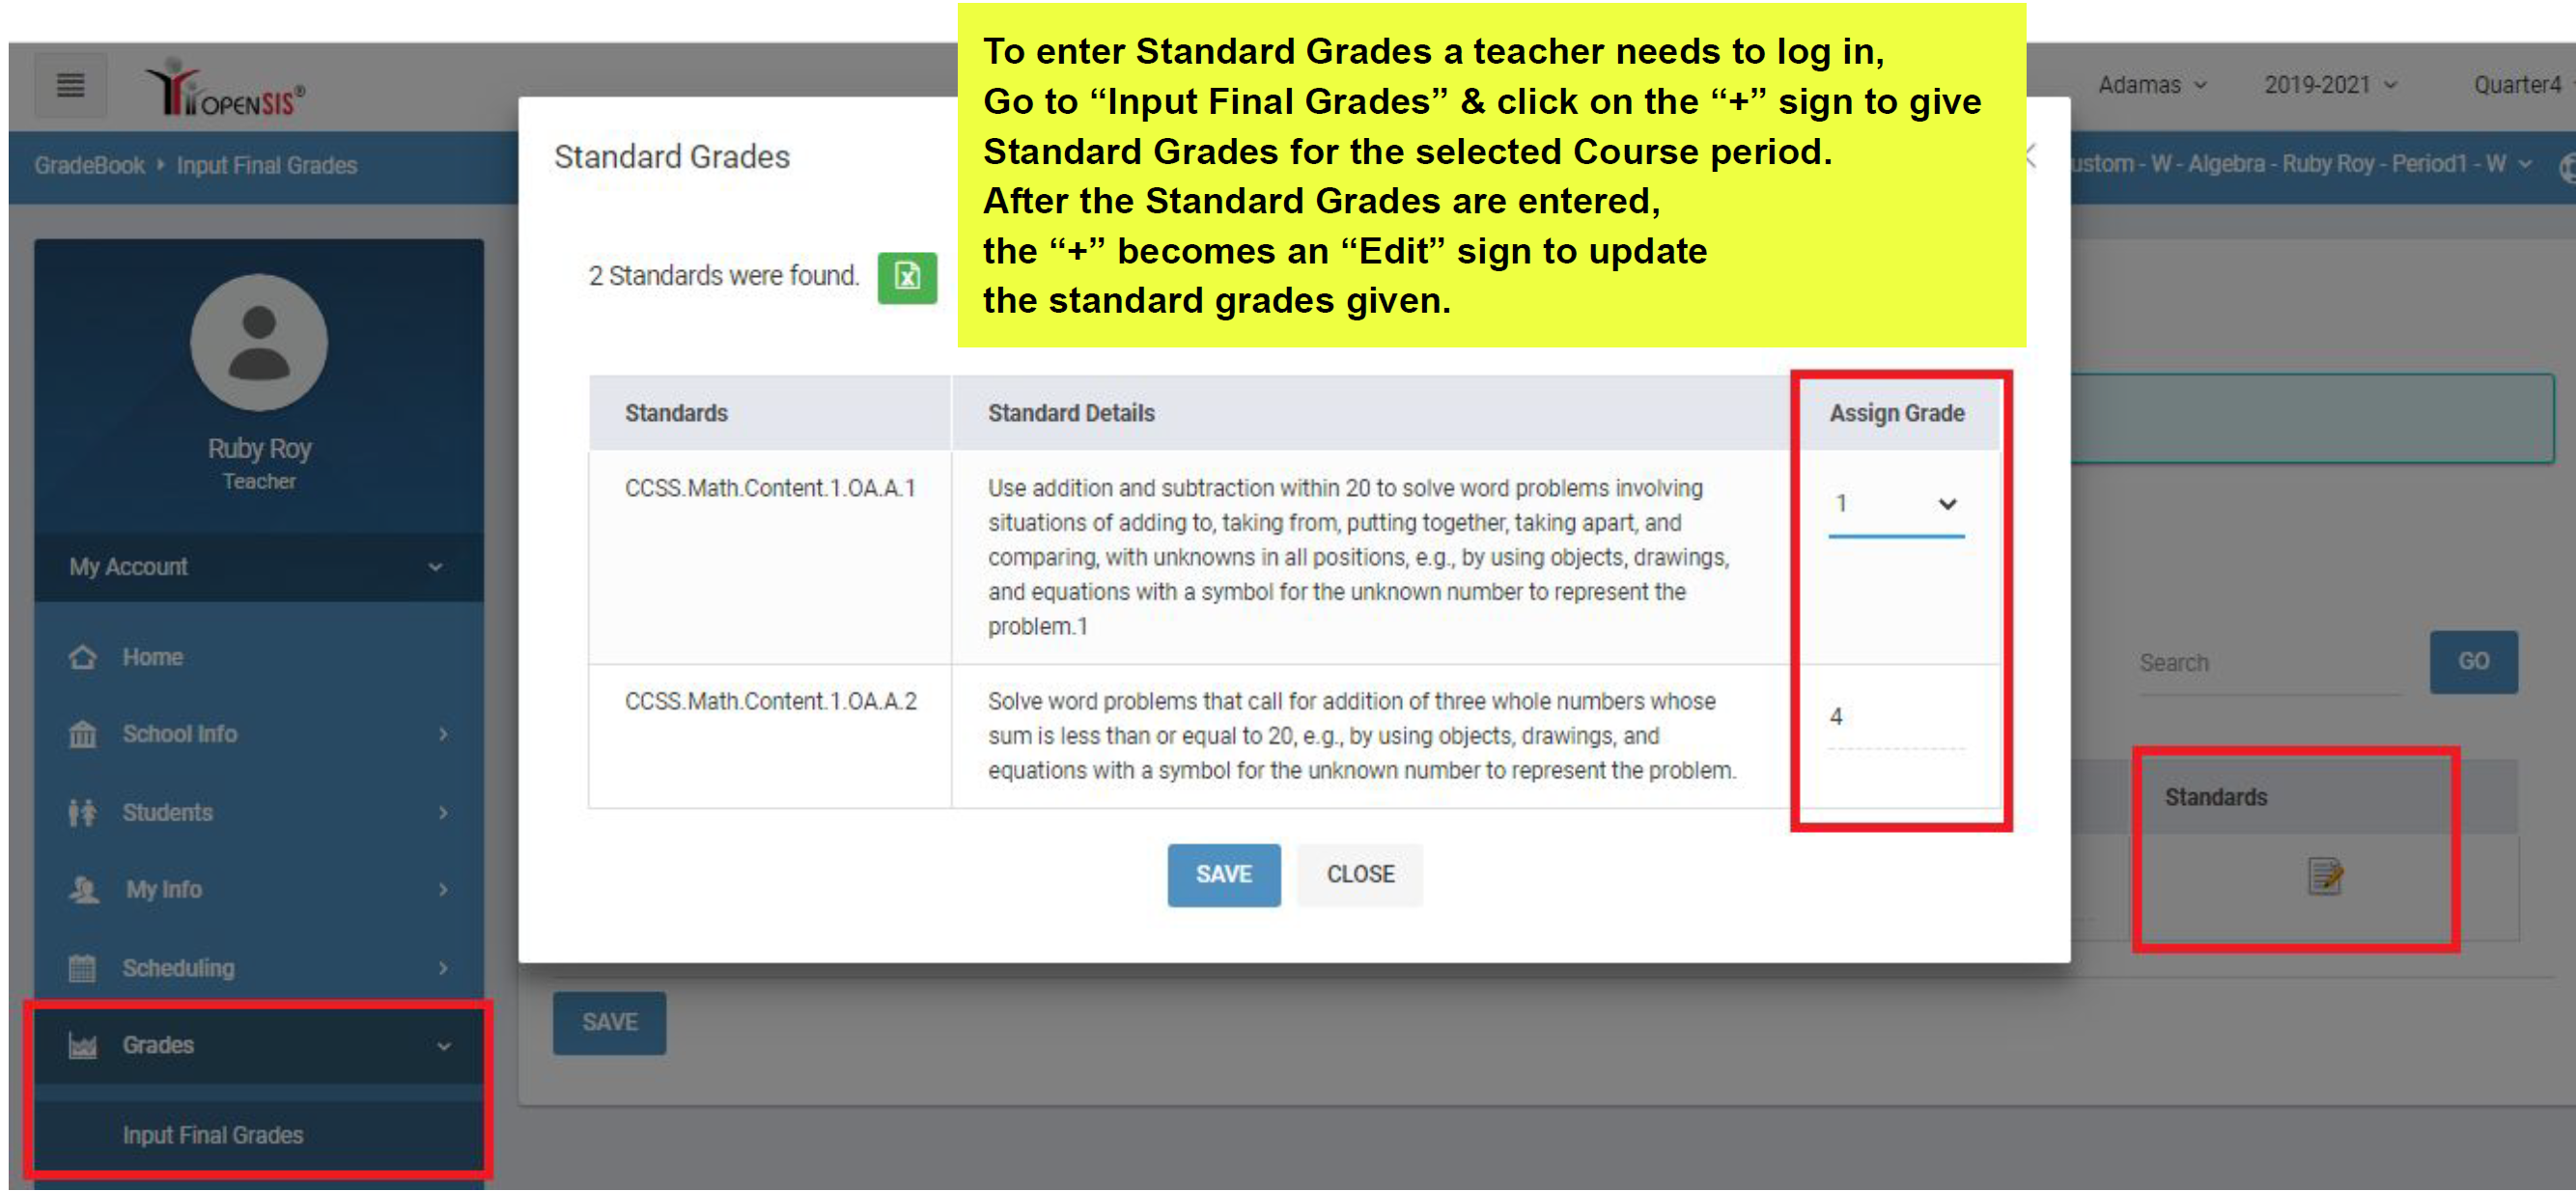
Standards Grades
This includes the following:
- US Common Core Standards
- School Specific Standards
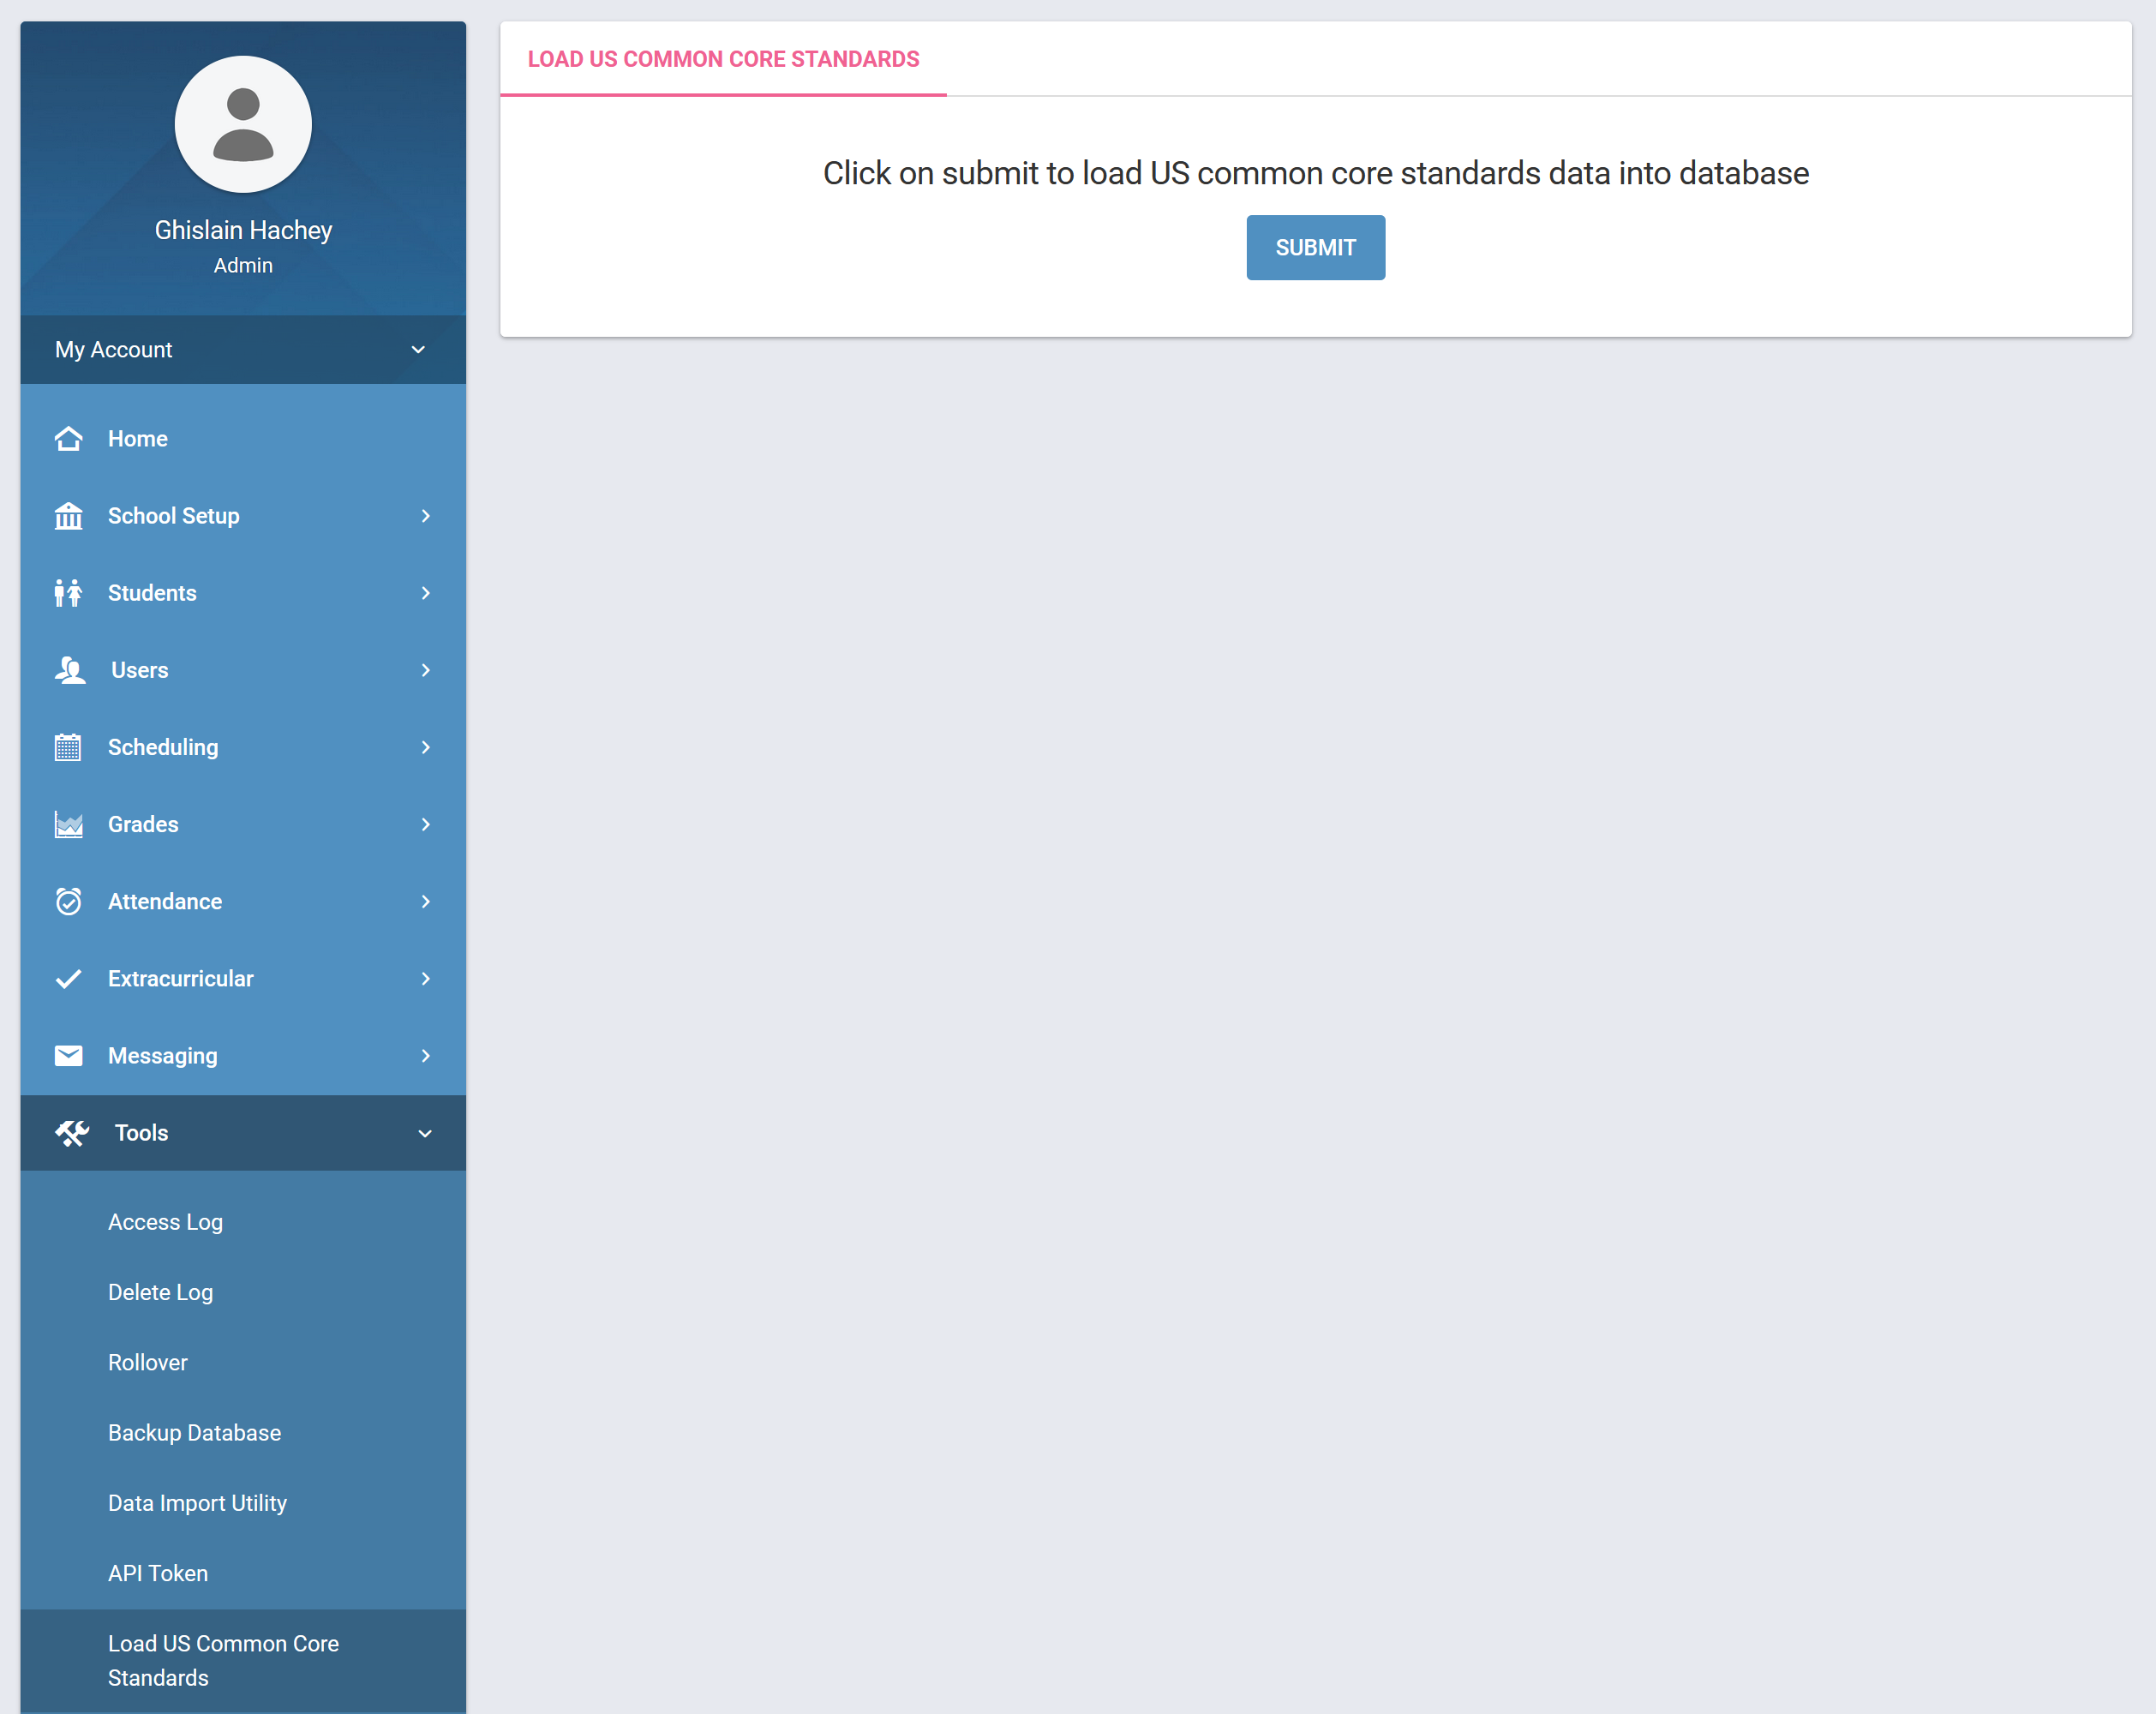
Optionally, you will need to load the US Common Core standard if you need to use them as shown below.


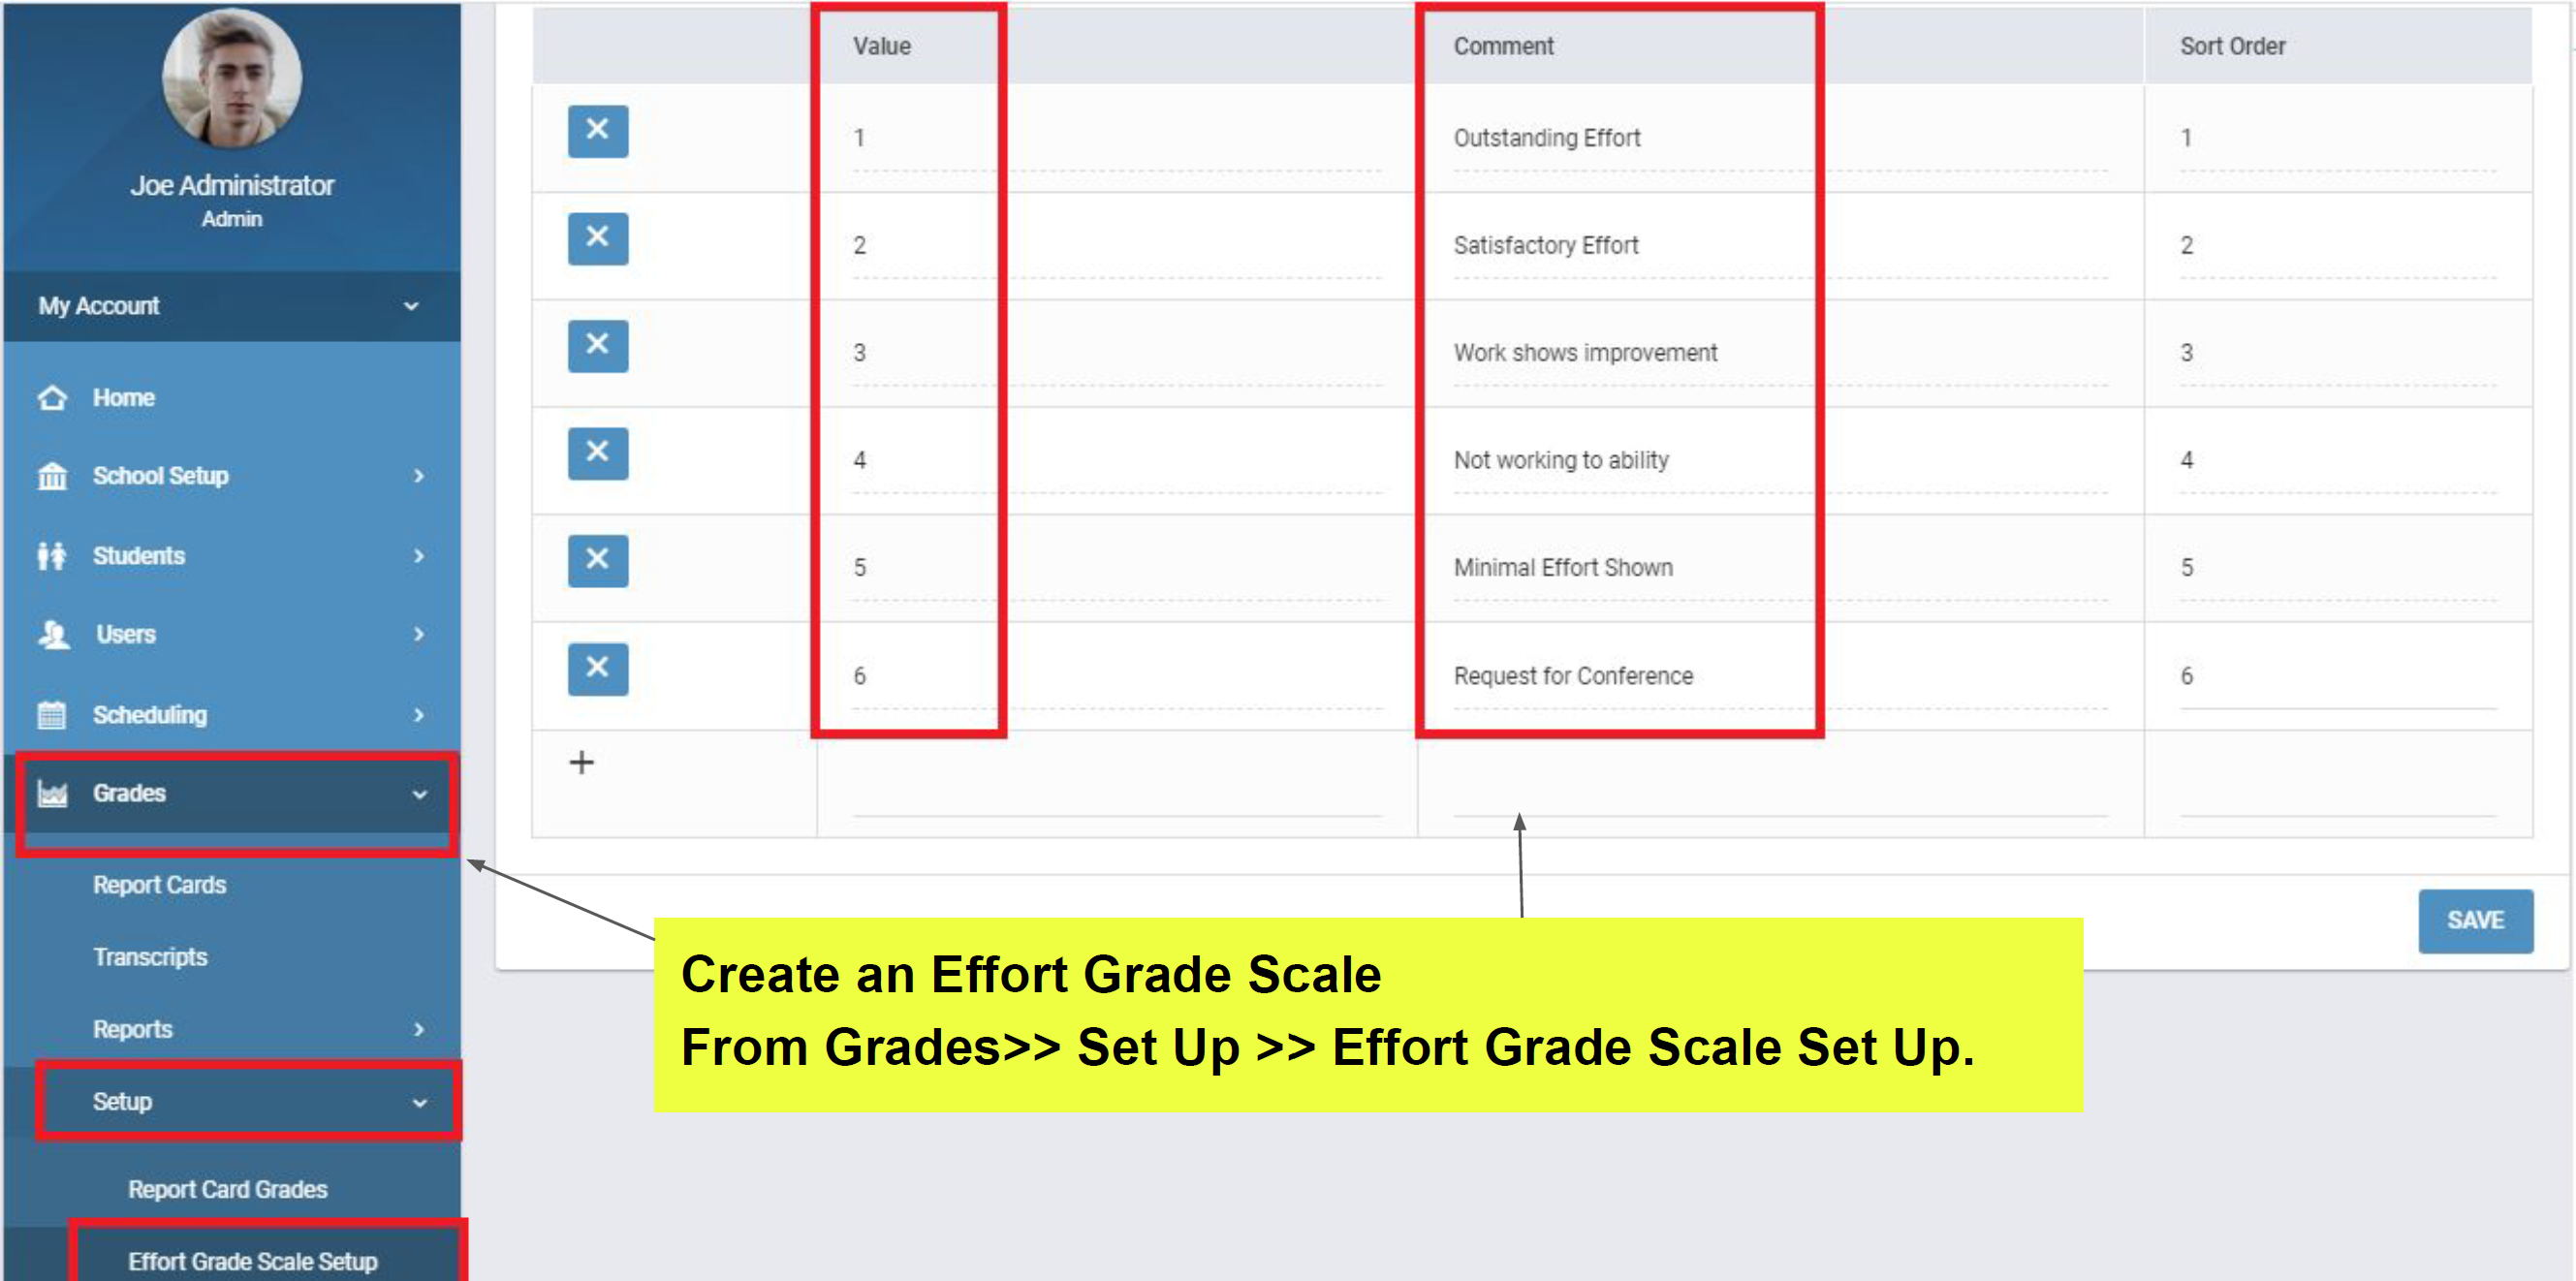
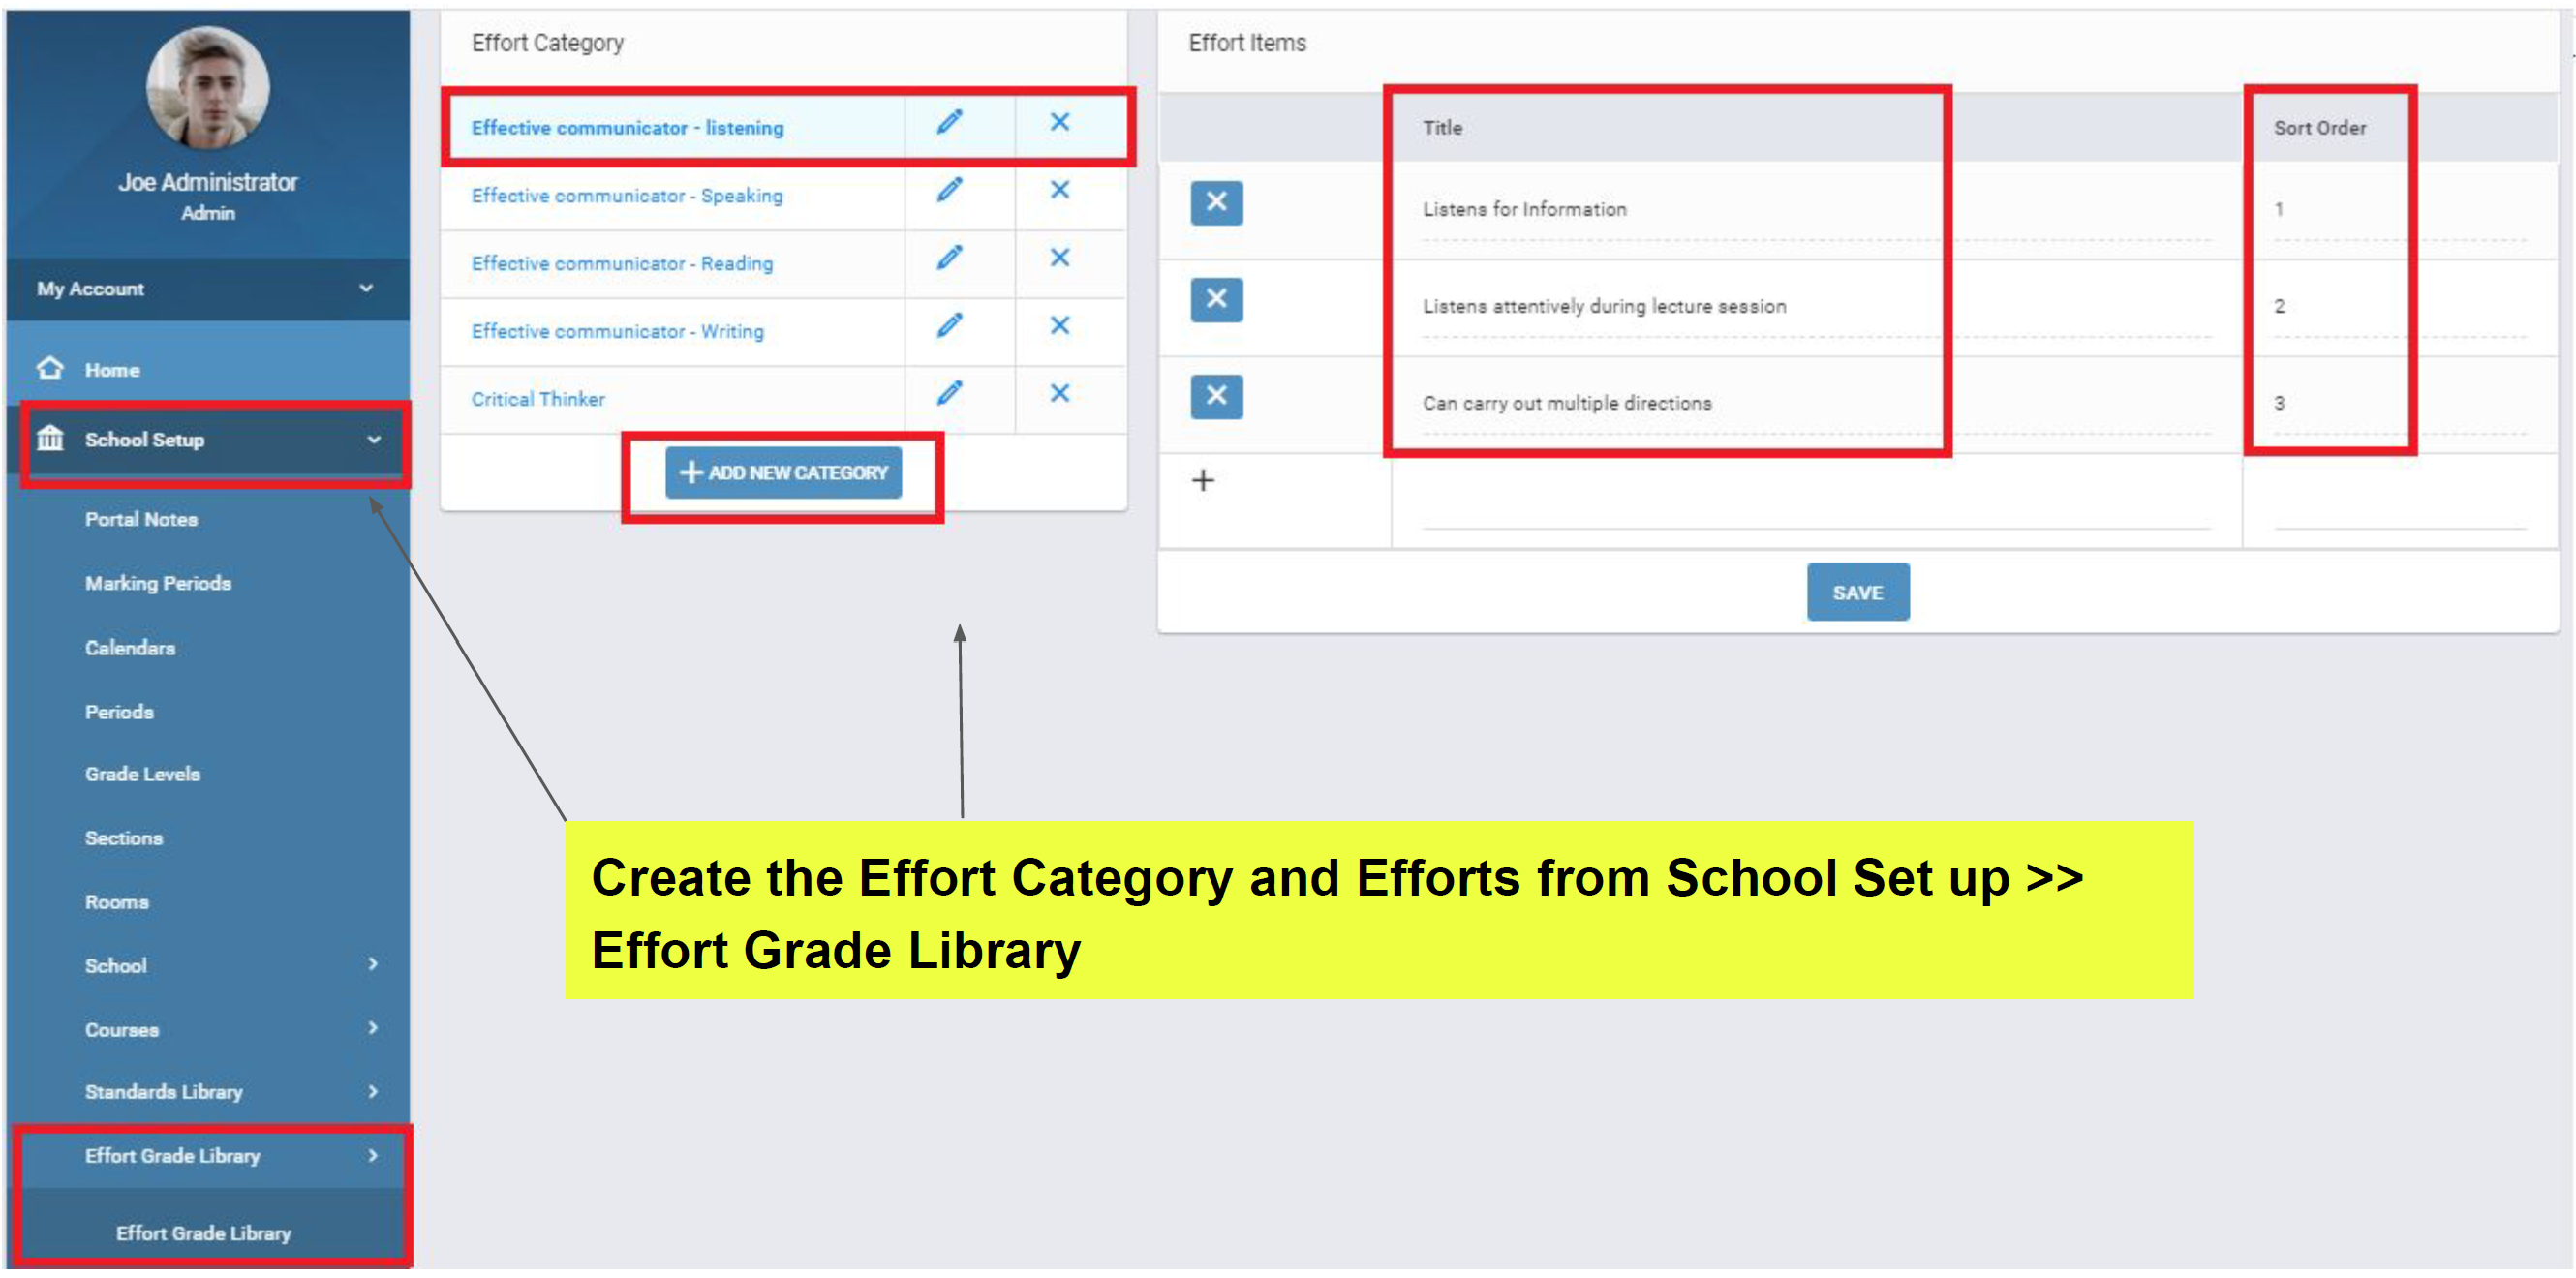
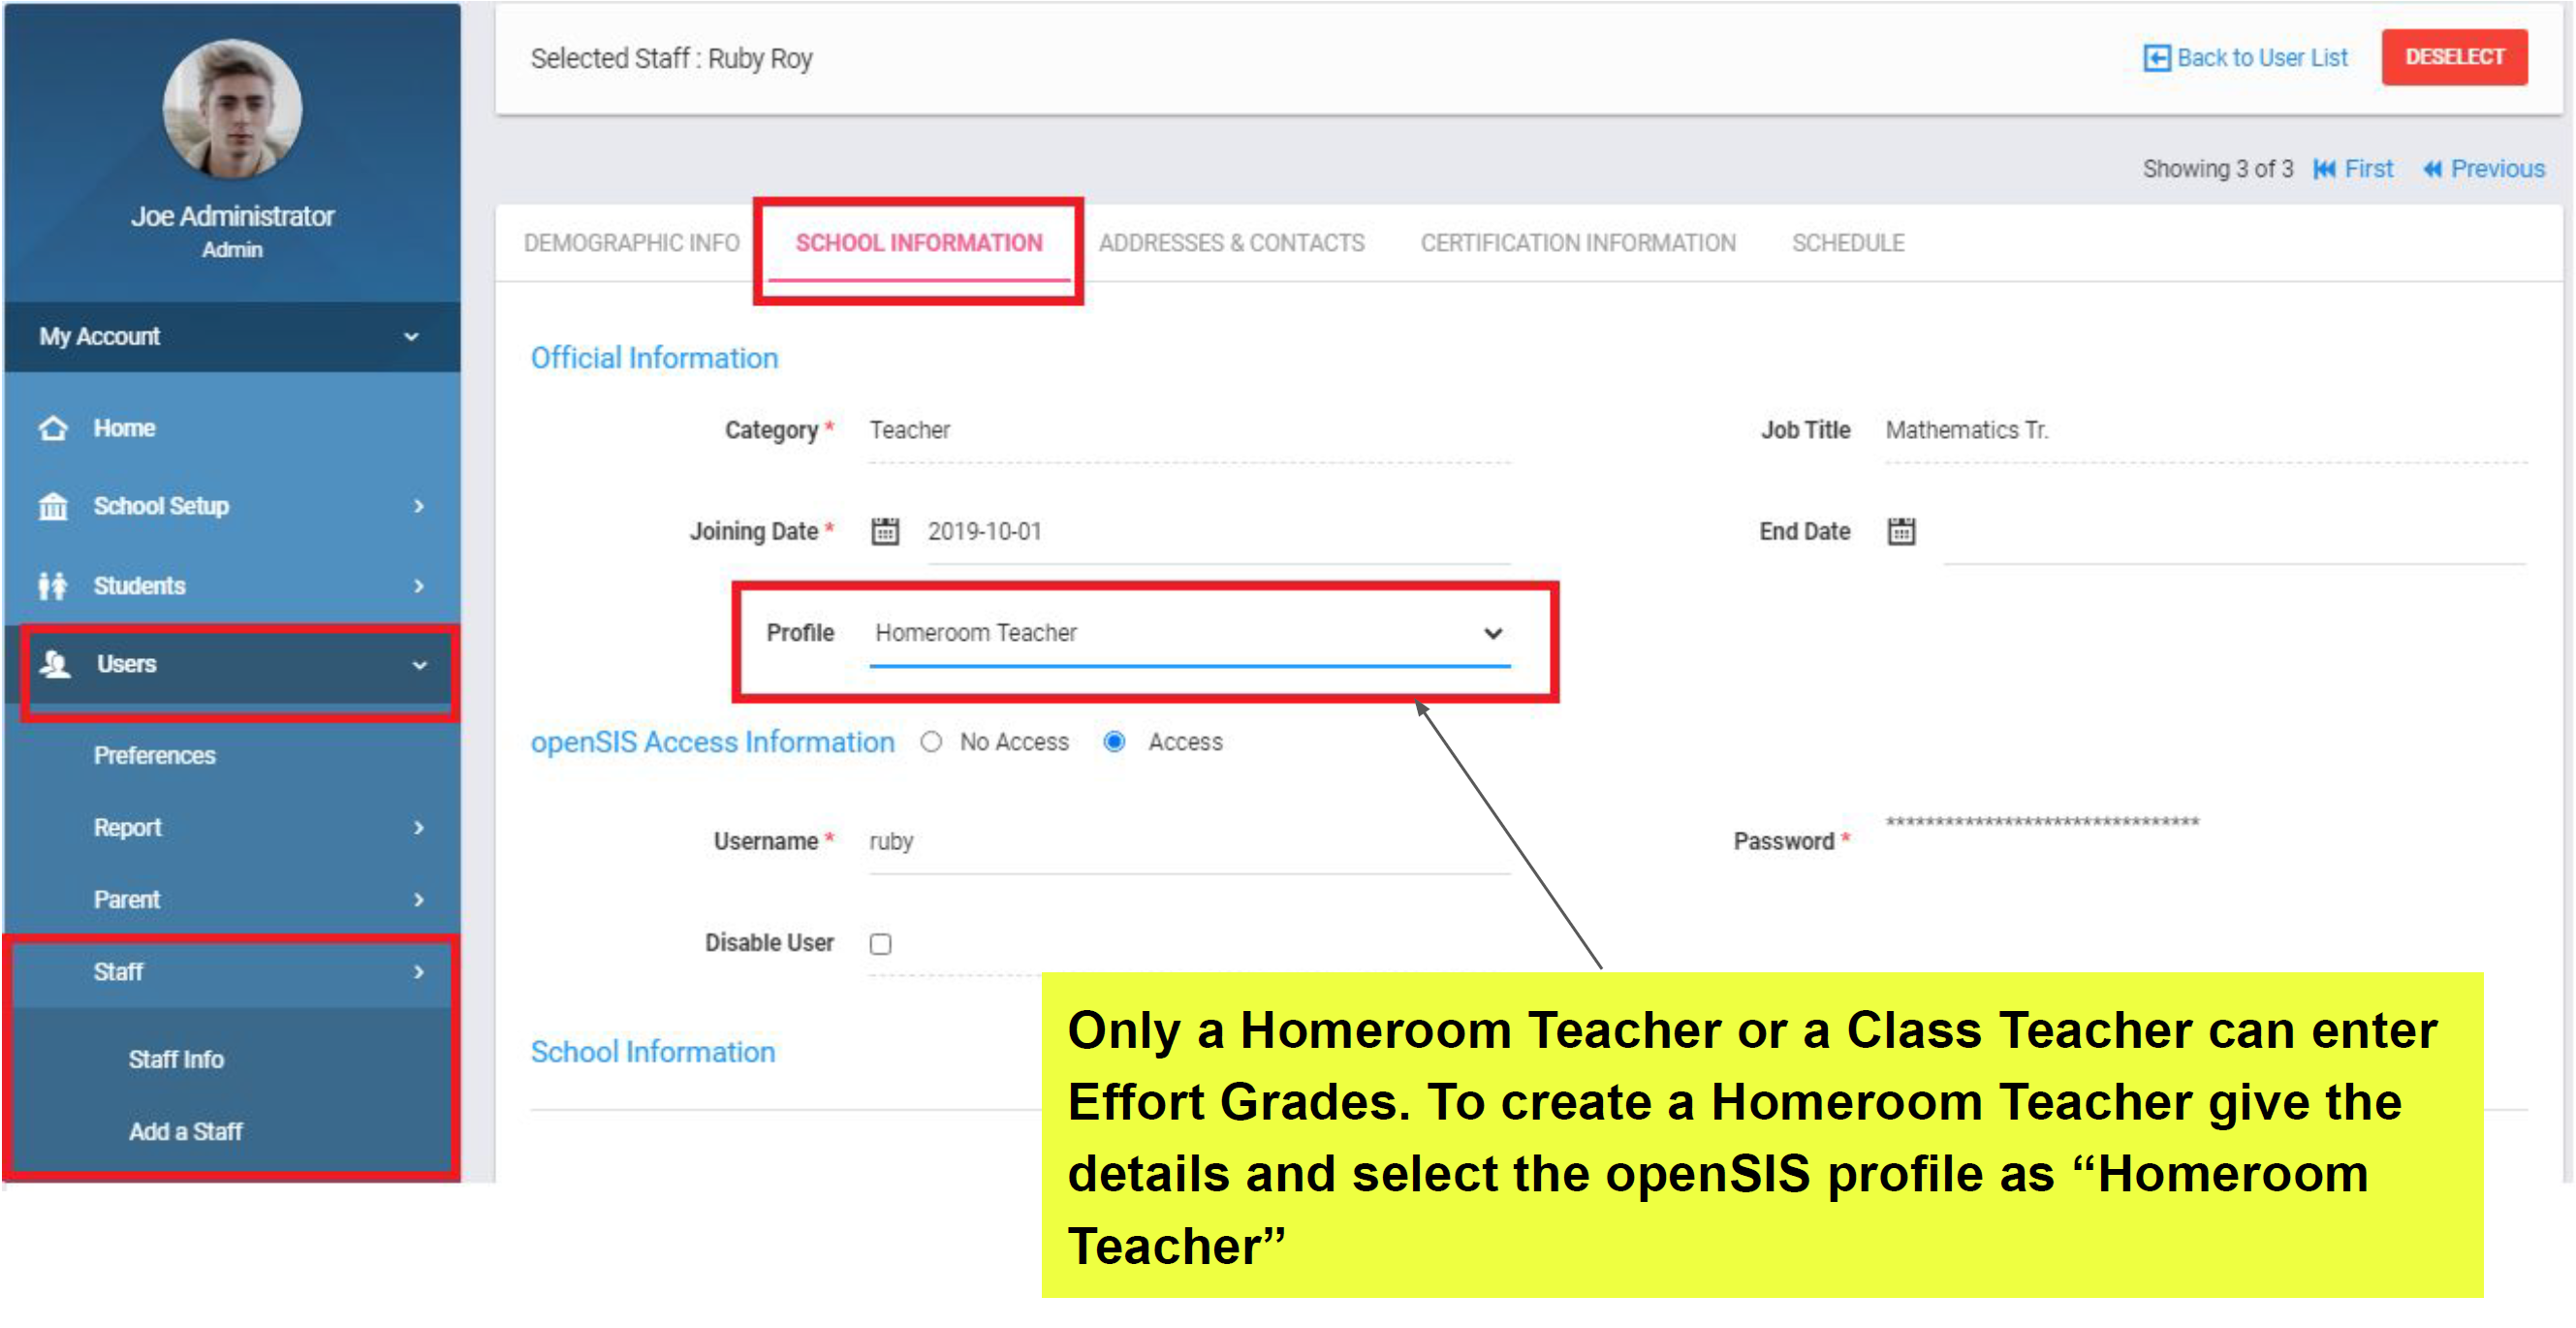
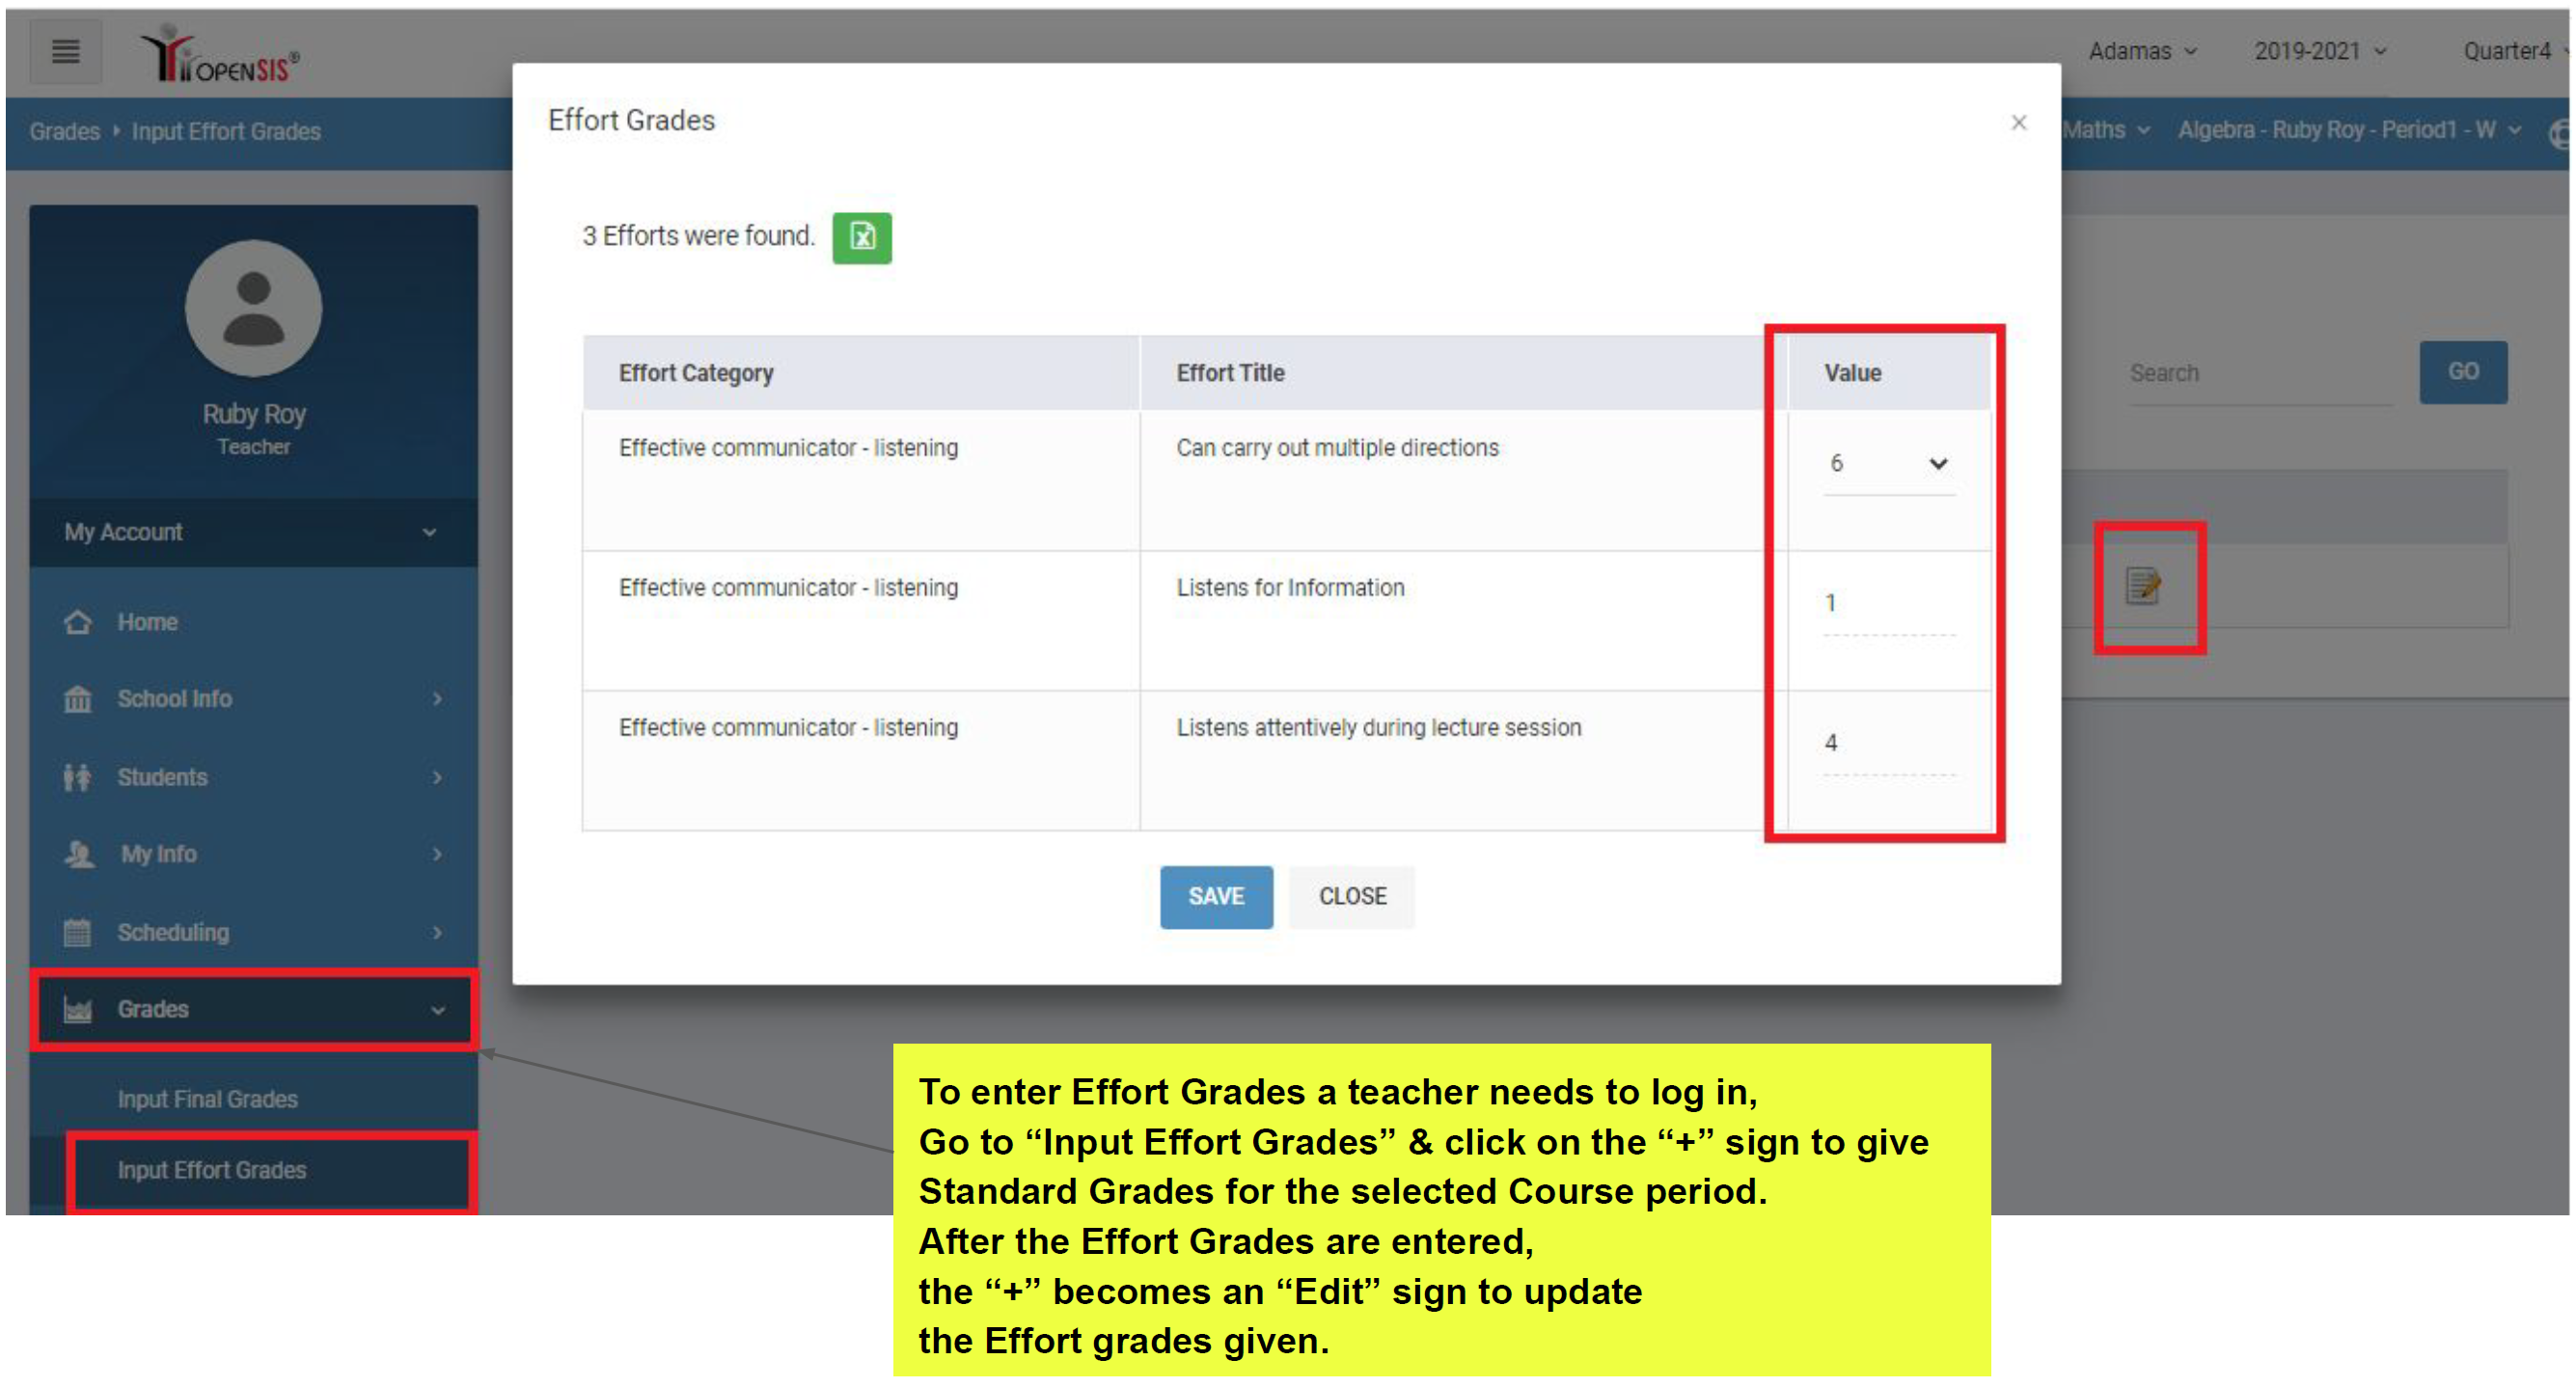
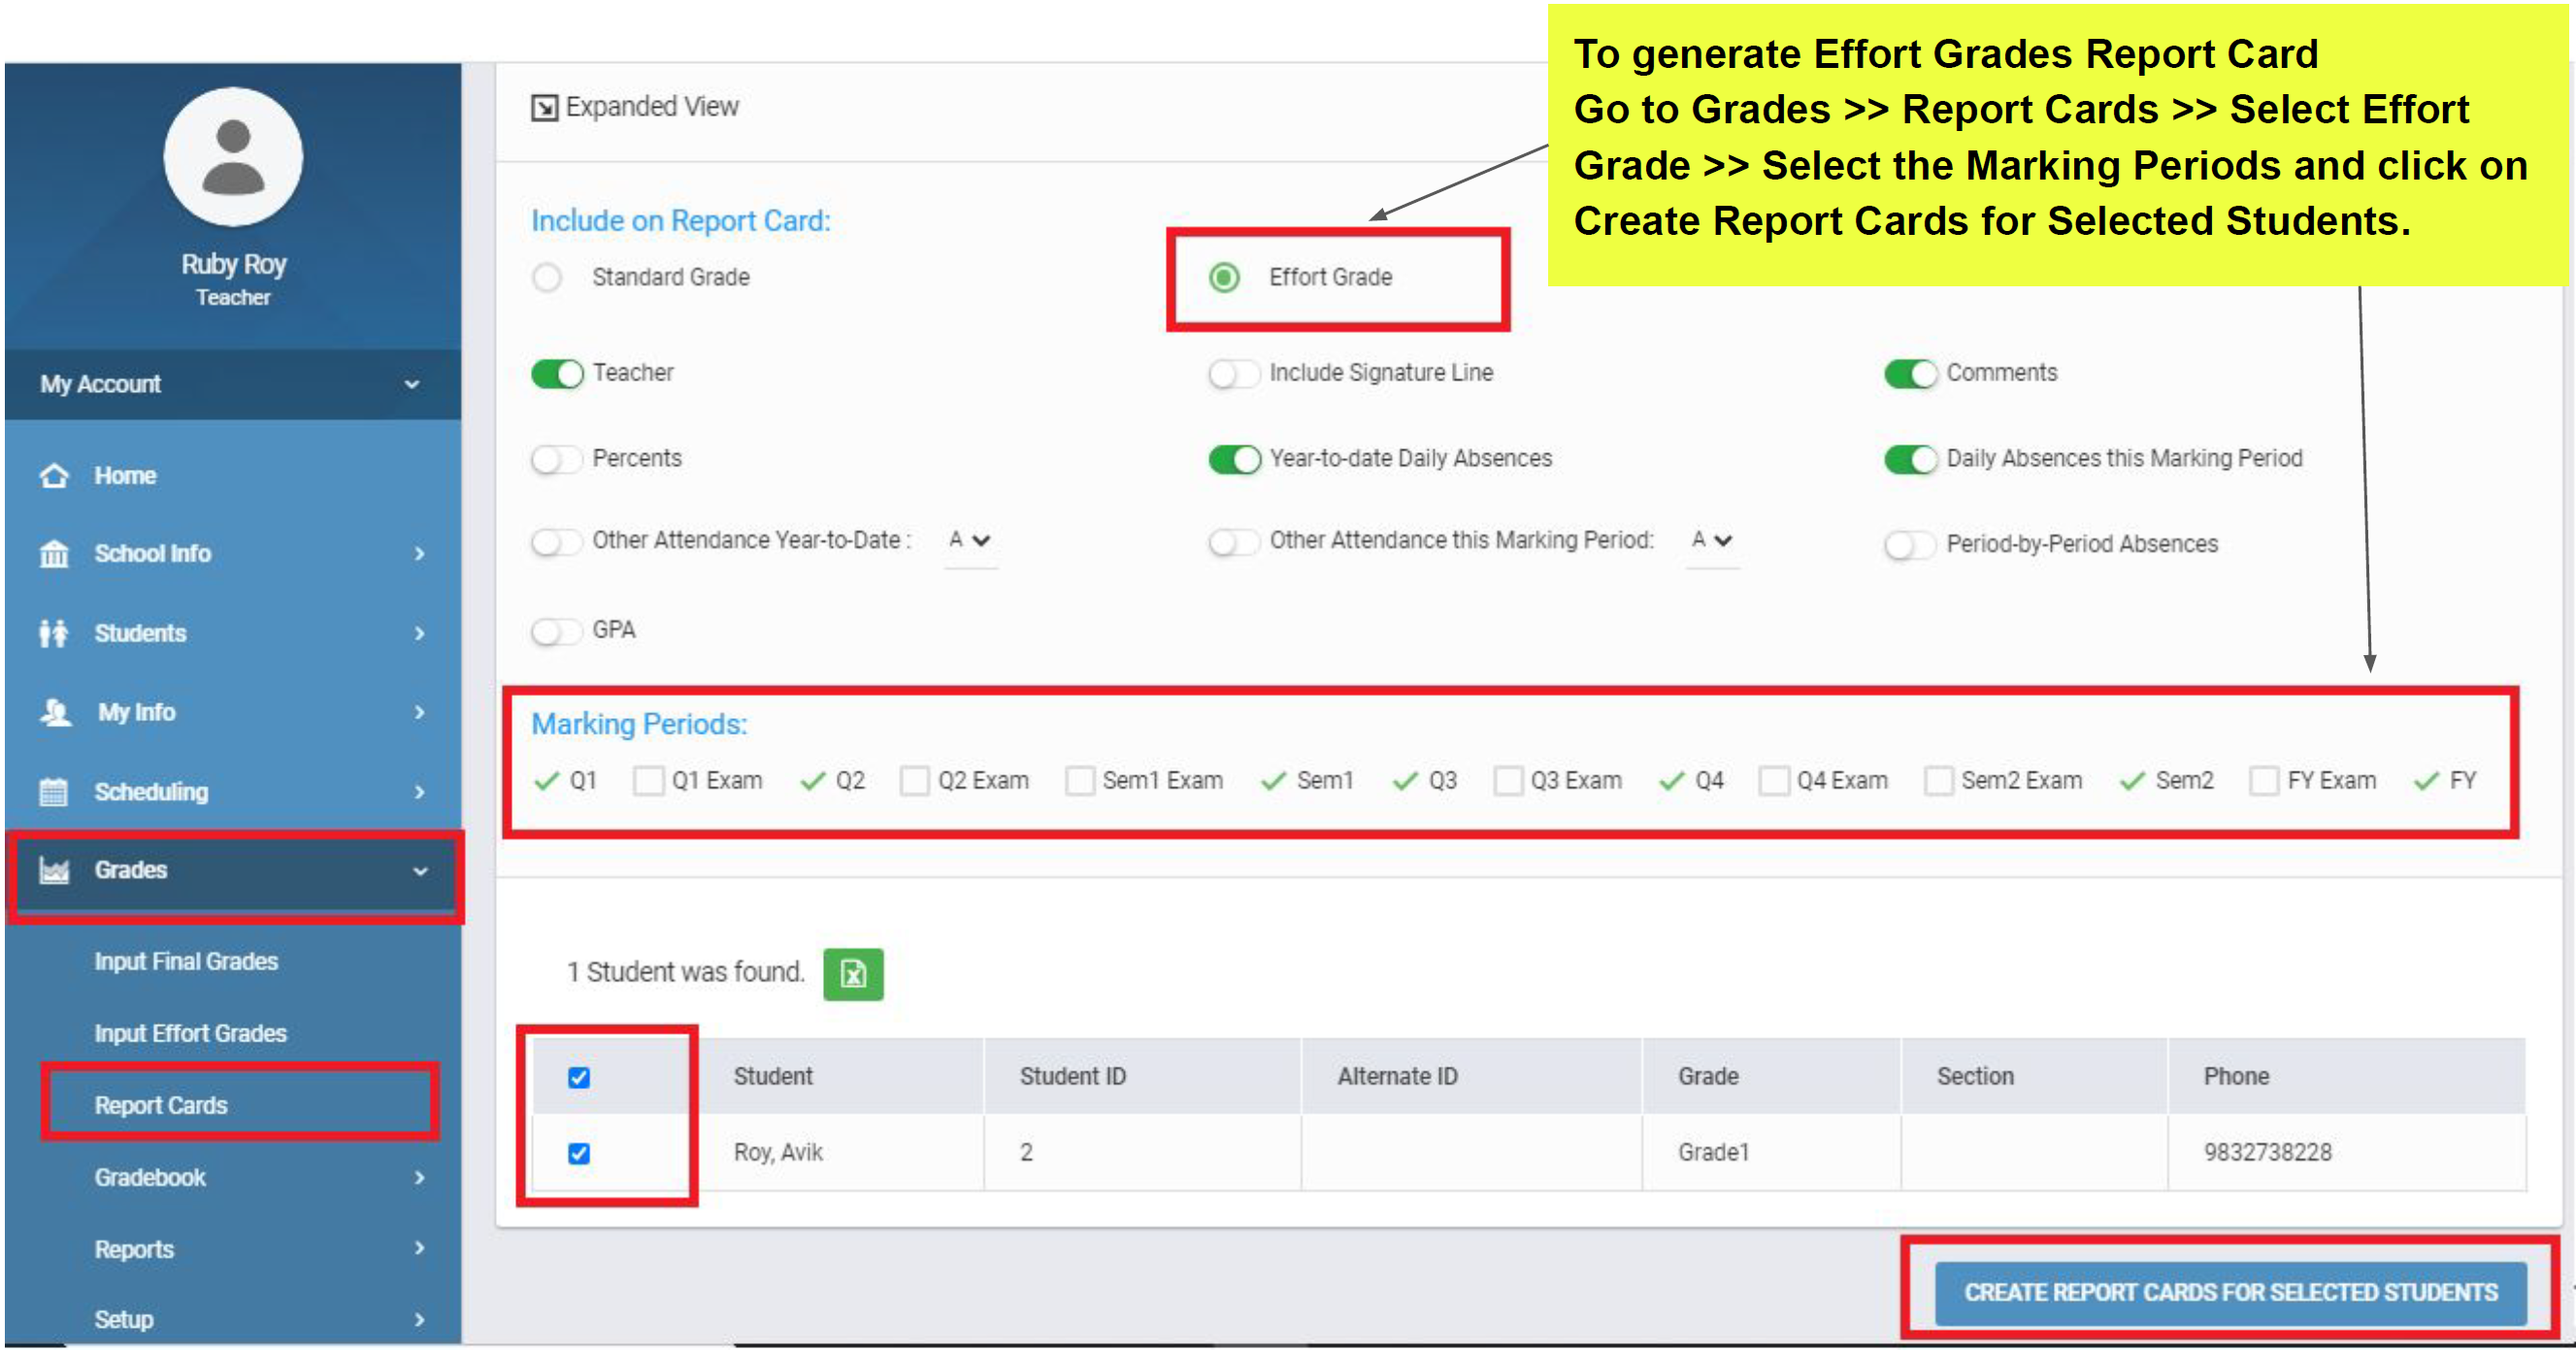
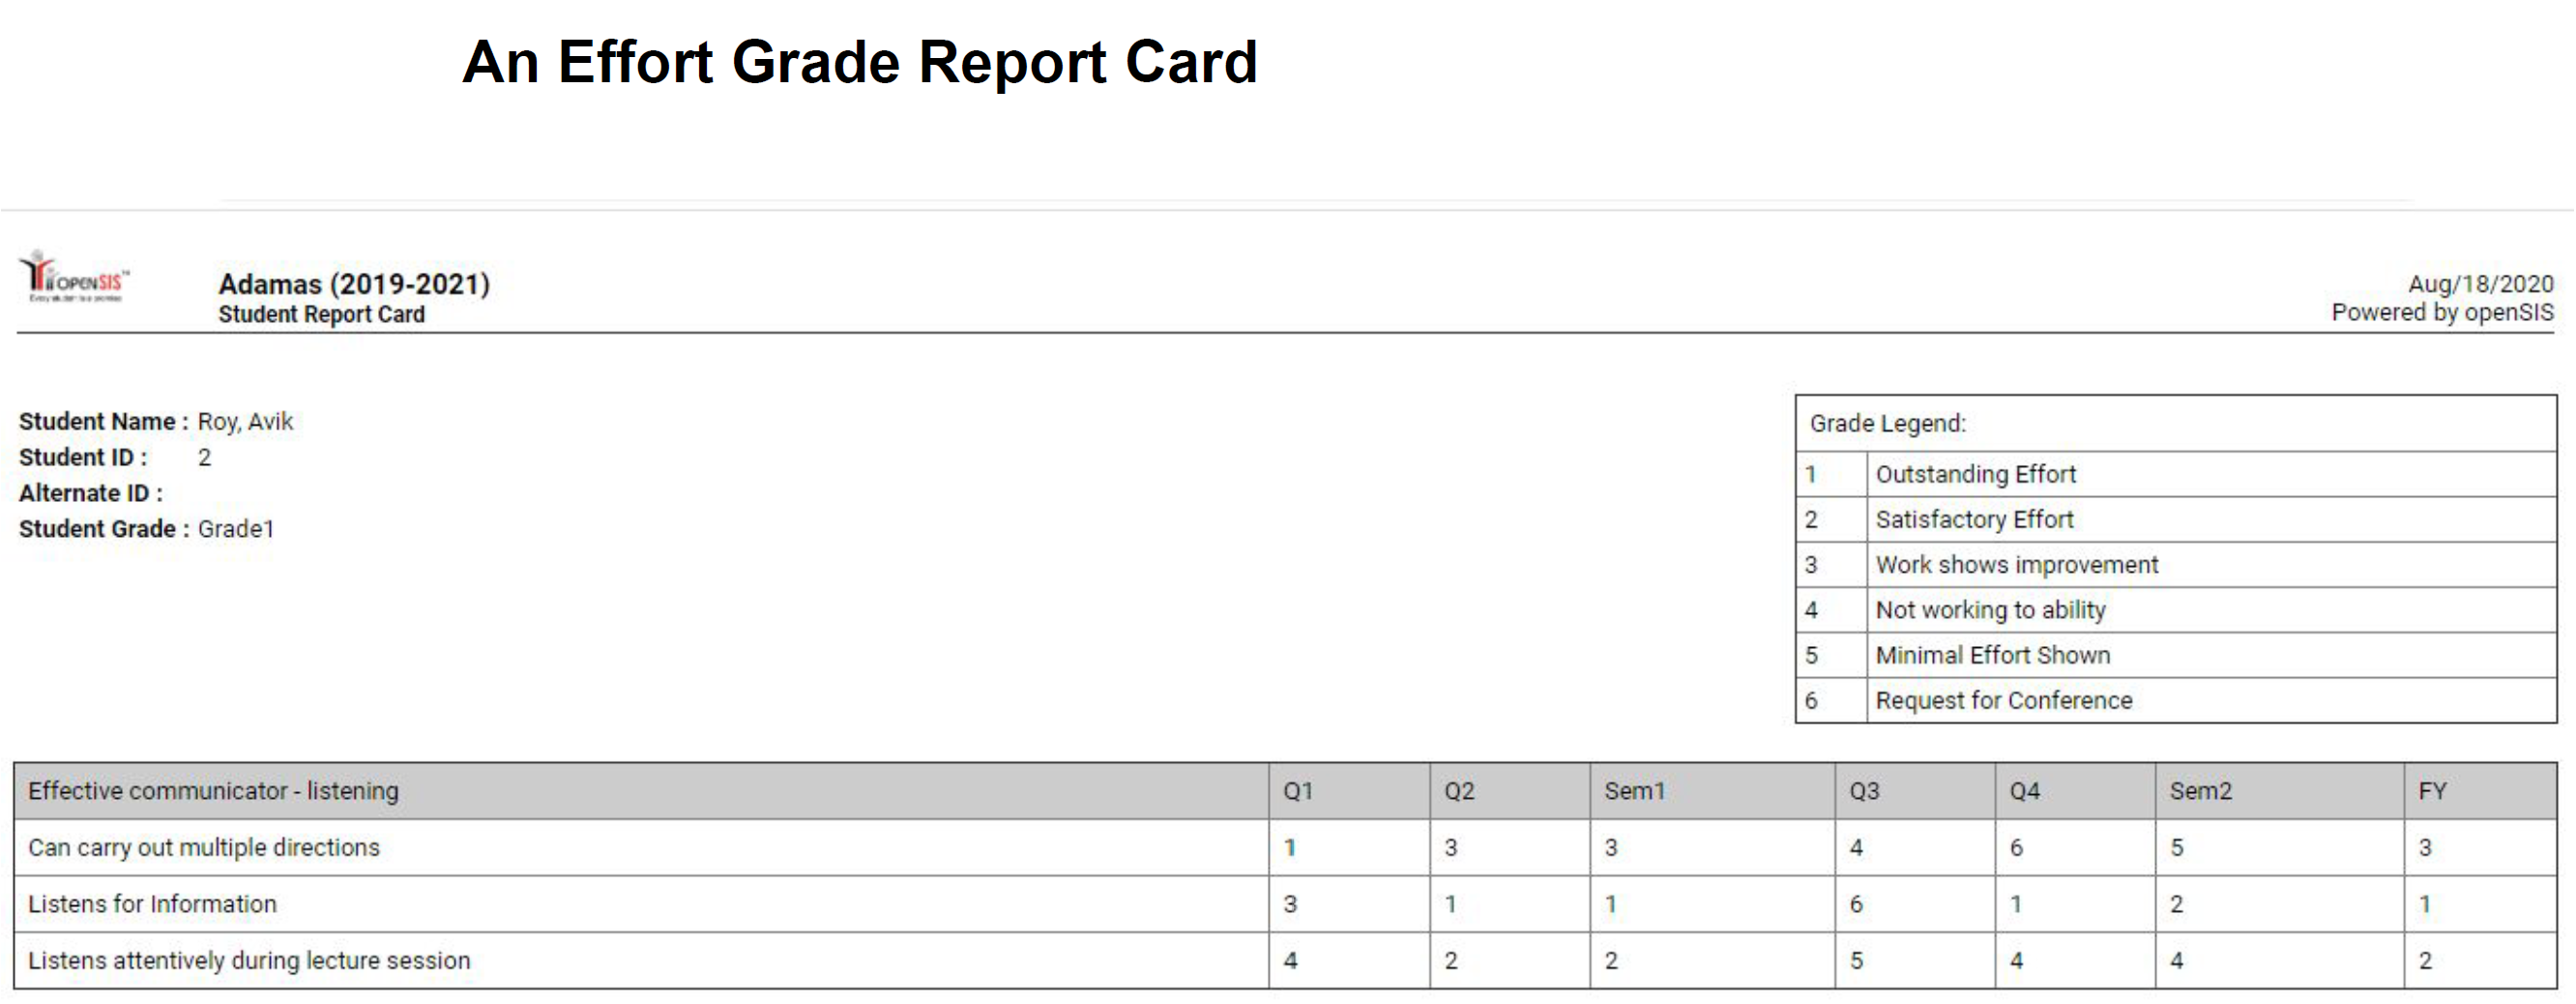
Effort Grades
Effort grades are assigned on a scale of one to five, one being the highest. An effort grade of 3, therefore, may be considered an “average” grade. Effort grades are used to rate a student with basic behavior, dress code, attention in class, maintaining proper decorum in school and all the aspects in general. It’s not course specific. It’s used a complete evaluation of a student’s behavioral, moral, and study related aspects.
Reports
Many types of reports are available; they will be discussed in following sections. The most common reports are
- Student Report Card
- Student Transcript
Generally, those reports require all the necessary data to be entered (i.e. attendance and grades).
Progress Reports
Generating Progress Reports of the Students on Behalf of Teacher
When the teachers have created assignments and completed entering gradebook grades, a progress report can be generated for the students. Go to Users → Teacher Programs → Progress Reports and search the students with proper search criteria and click Submit. List of teachers appear and click on a teacher whose student’s progress reports are required.
Now, a search page for students will appear, click on submit to get a list of students scheduled with the selected teacher. Select the Course period, check desired options to appear in the report, check the checkboxes beside the students and click on Create Progress Reports for Selected Students.

The progress report for the student looks like the following.

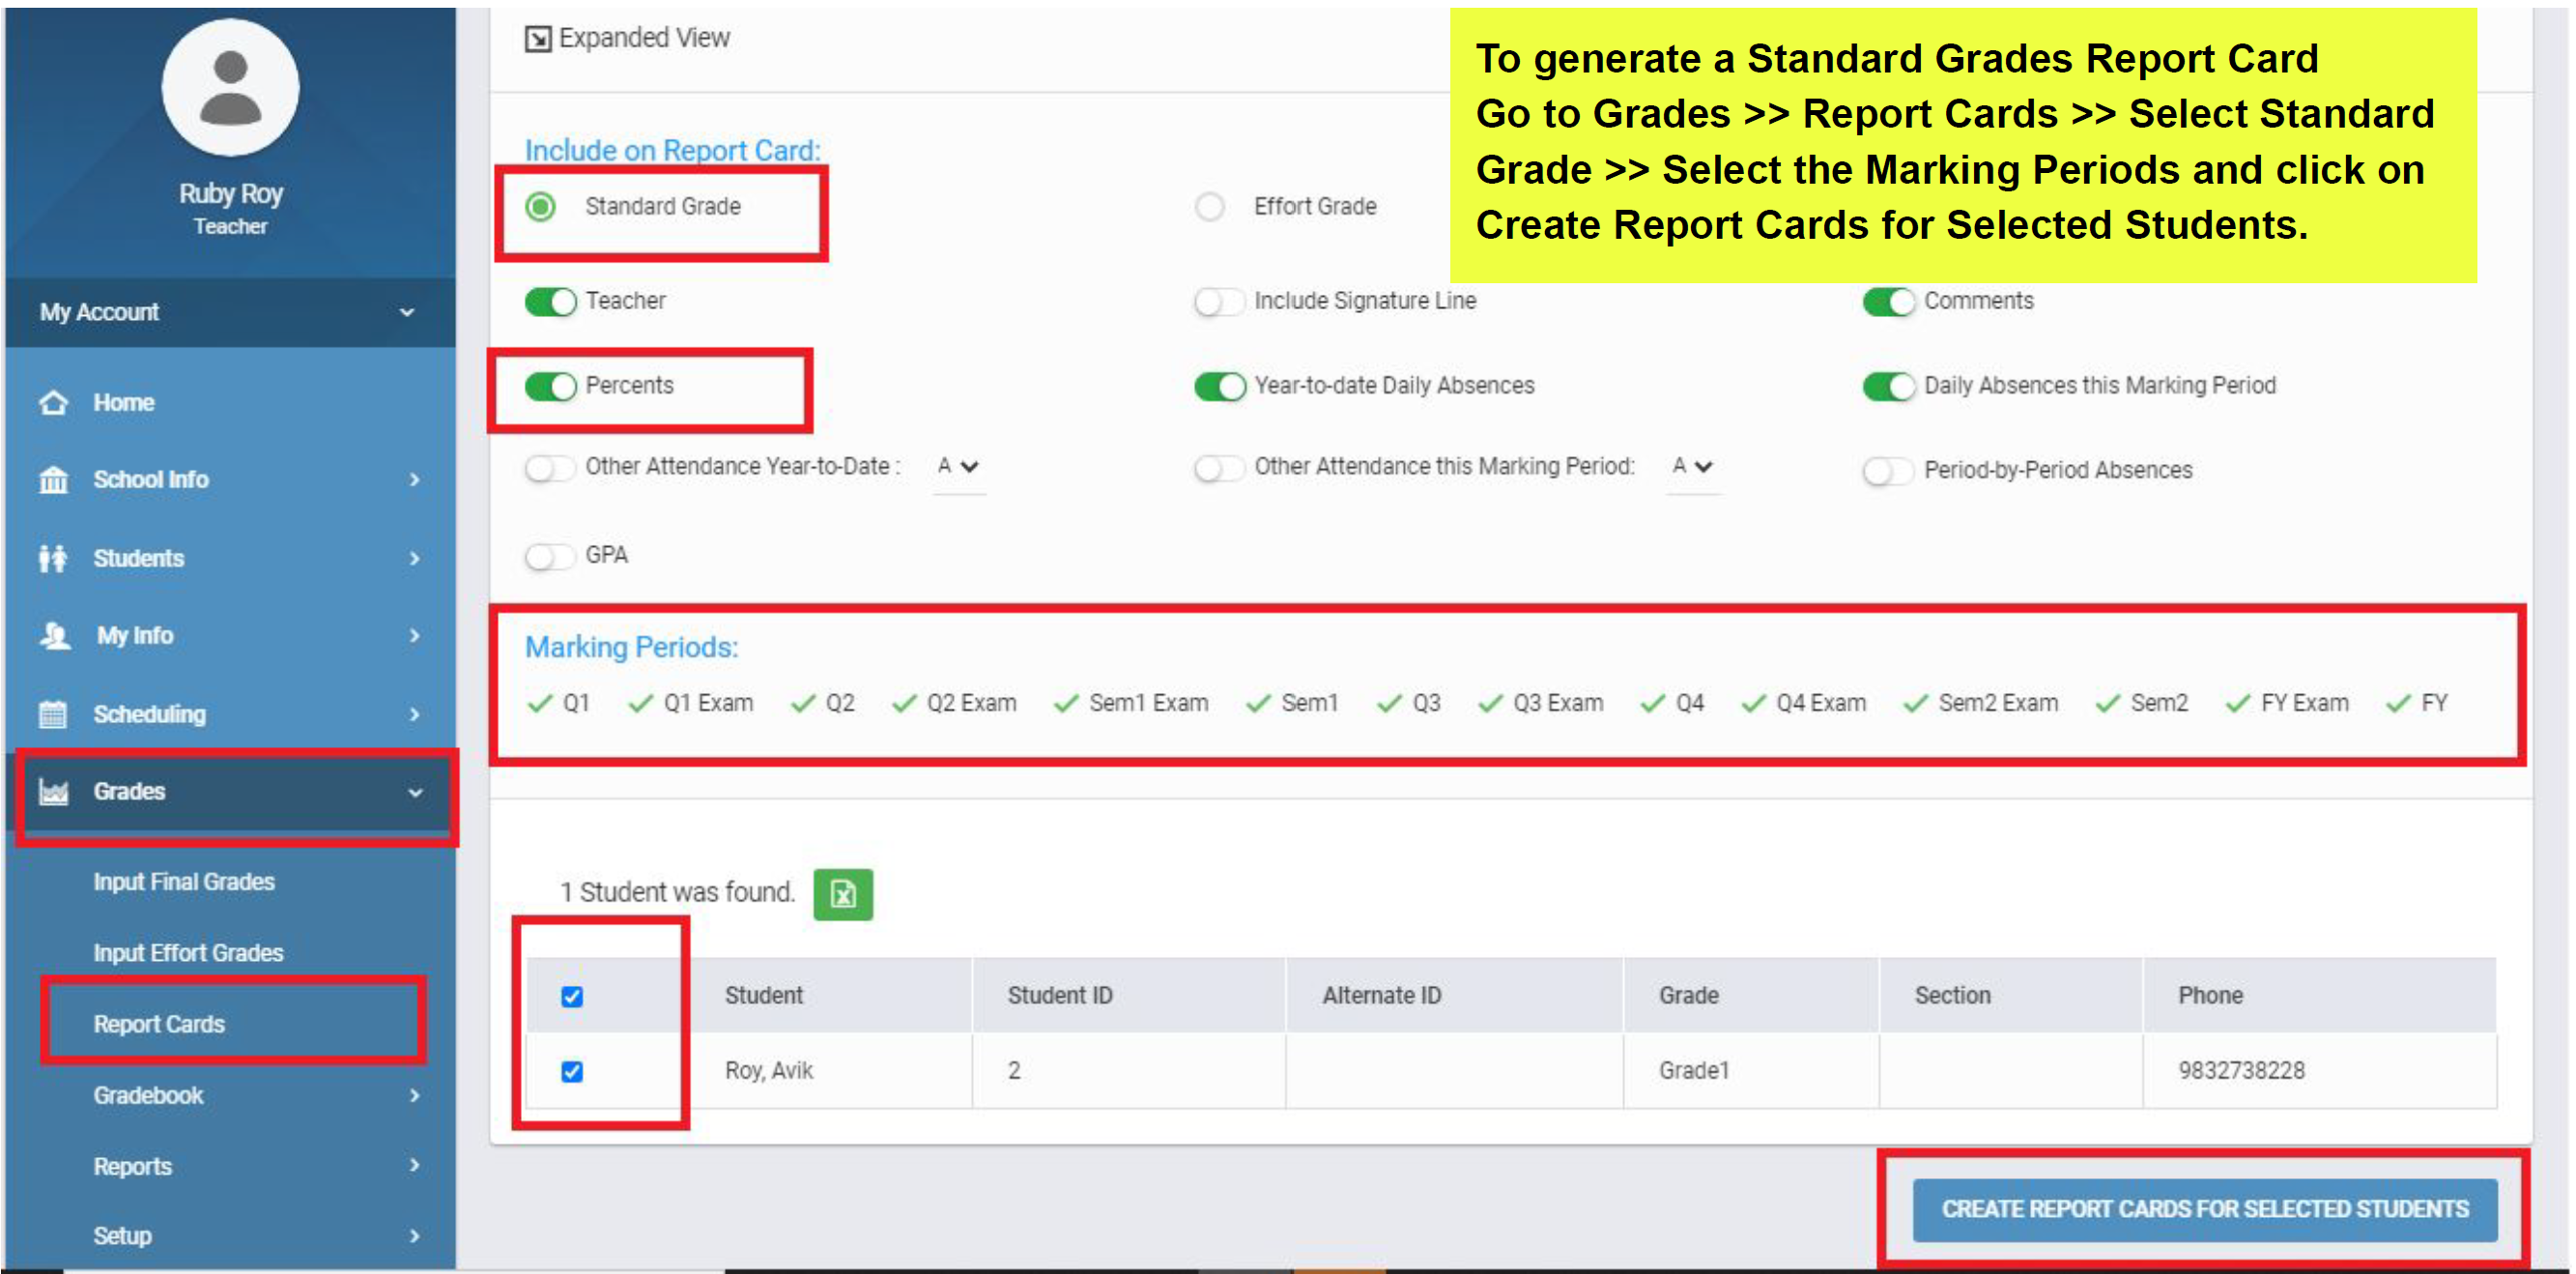
Student Report Cards
After entering the final grades for the respective Quarters, Semesters and Full Year, we can generate a report card from Grades → Report Cards and search students with proper search criteria.
Check the Percents option if you want the percentages to be printed on the report cards.
Check the Comments option if you want the comments entered to show up on the report cards.
Now, select the Marking Period you want to generate report card for and select the students by checking the boxes beside their names, finally click on Create Report Cards for Selected Students.


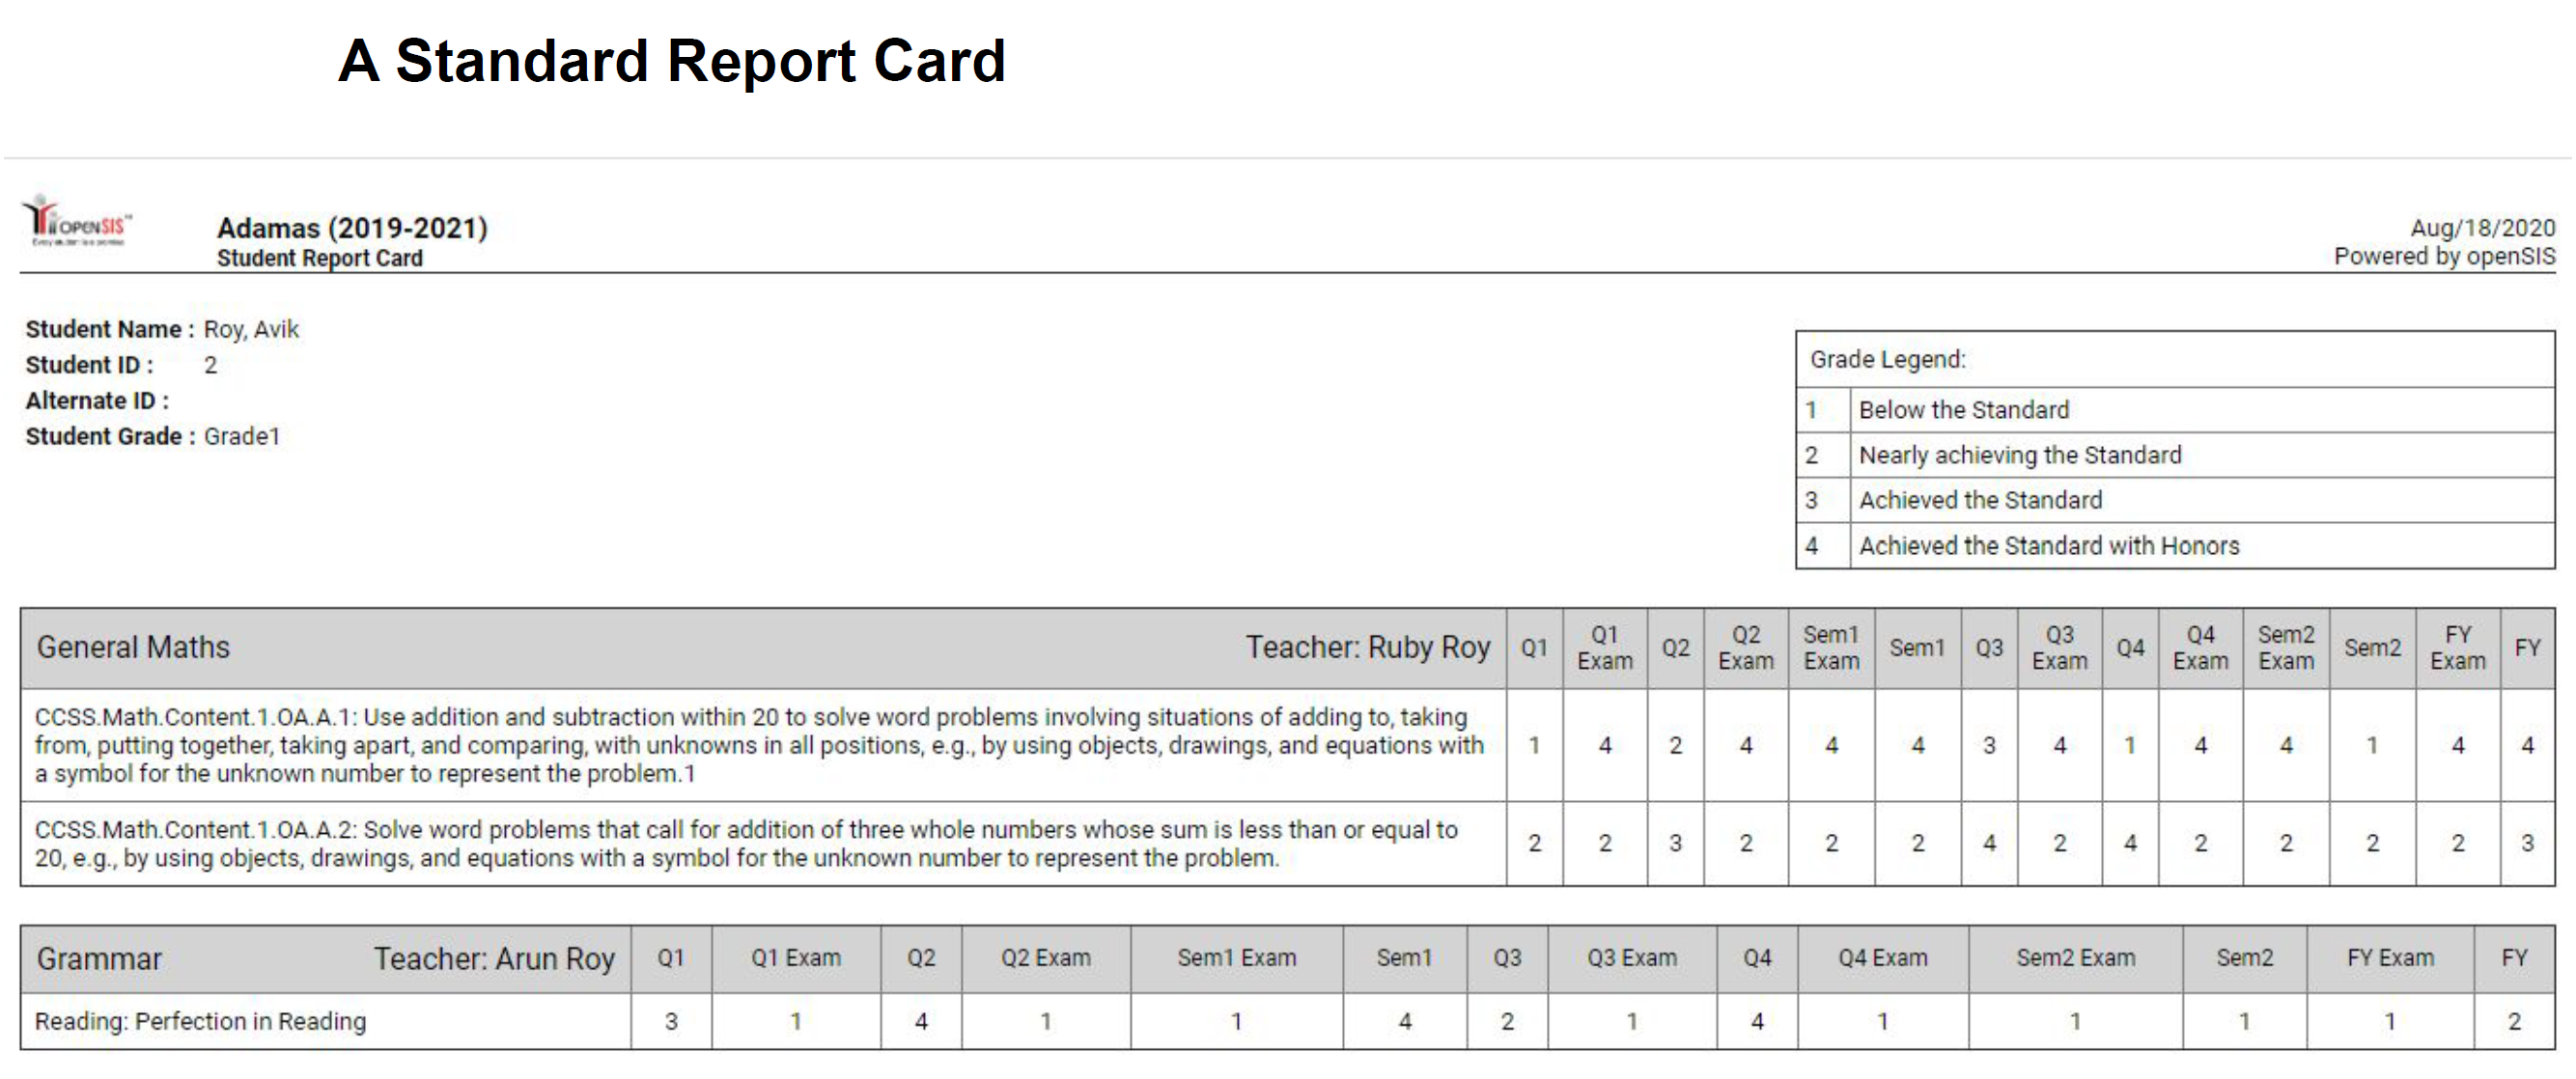
A standard report card will look as follows:

Student Transcripts
Transcripts are generated to view the student's complete academic records in the school including all the grade levels on roll-over basis and the historical grades from other school. To generate a transcript, go to Grades → Transcript and search the student with proper criteria.
The student list will come up with a few options that you can select to add in the transcript report. By checking the Include Student Picture you will get the students photos on the transcript. There are two views of the transcript: “Single” and “Two” column template. Now select the students by checking the boxes beside the student names and click on Create Transcript for Selected Students.

A standard transcript report would look as follows.

Settings
Some settings have already been discussed through this guide. In particular, when they are required for the proper functioning of core features. Other settings will be documented here as needed.
Staff Fields
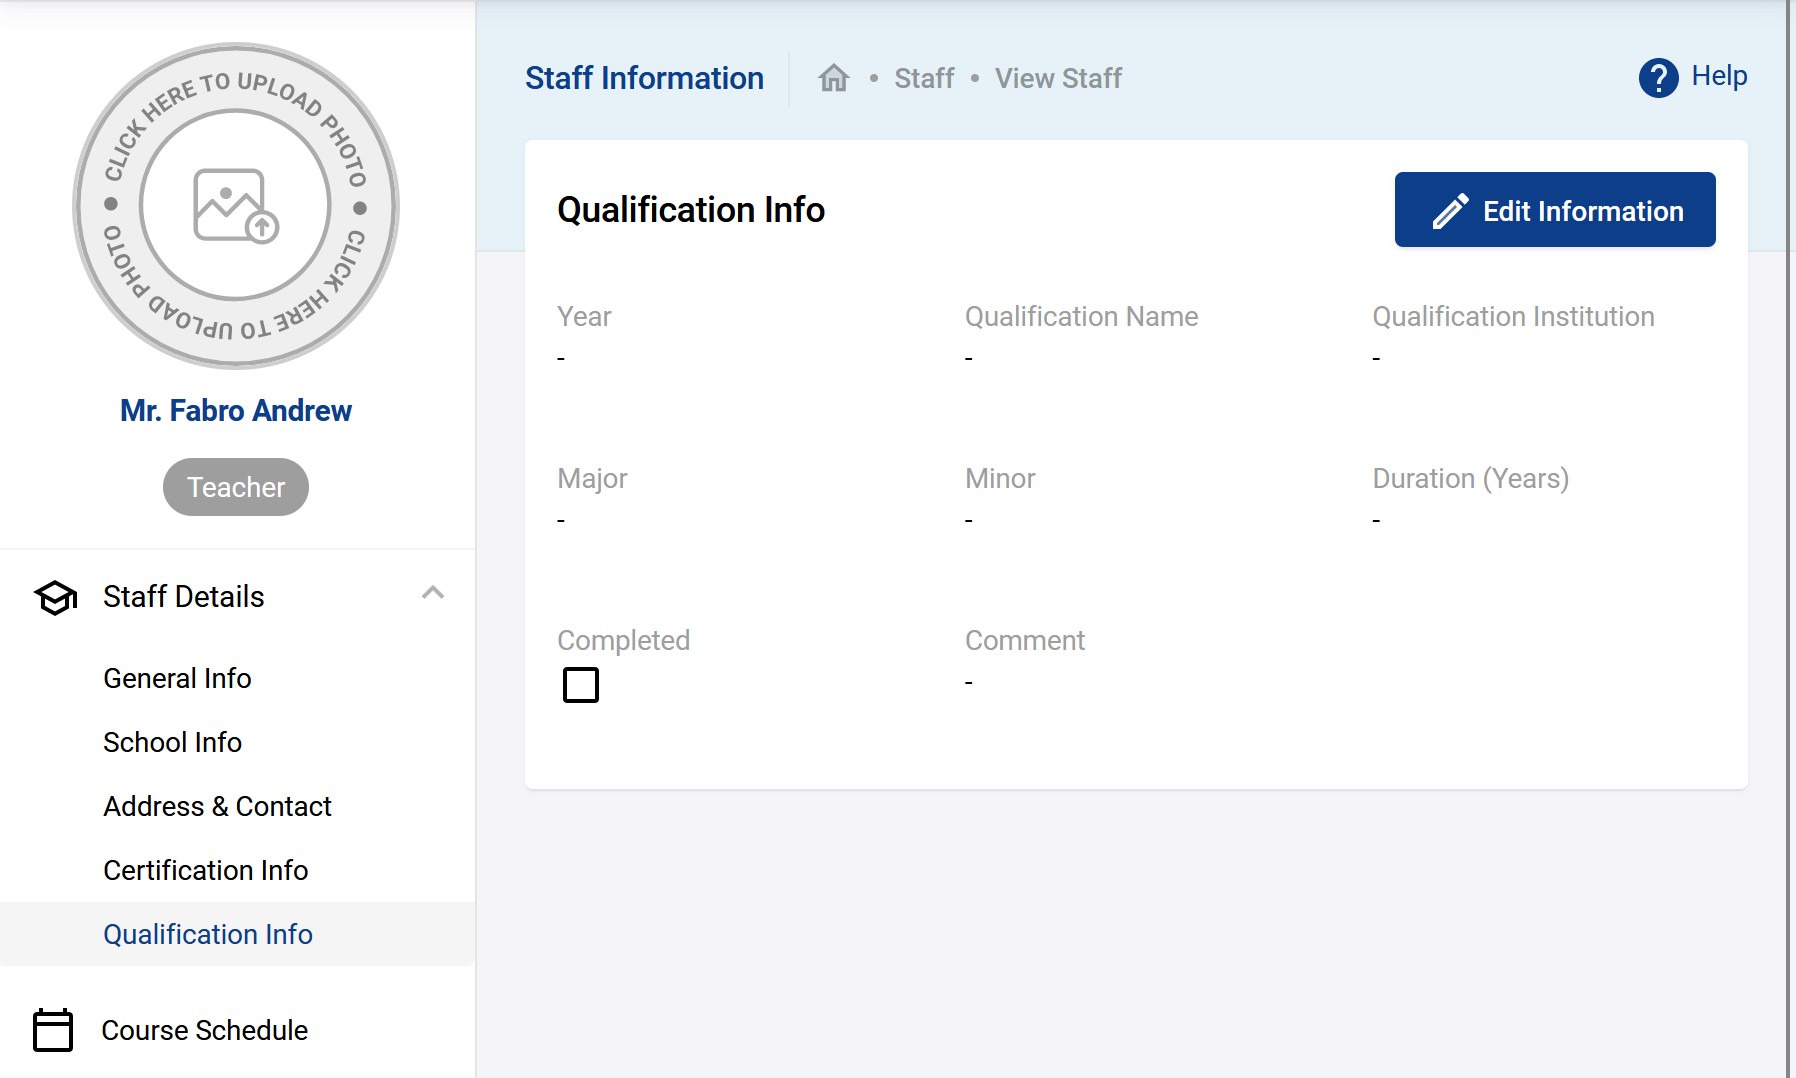
You may have a need to record more information not available by default. You can do this in Settings → Staff Fields.
For example, click on the category Certificate Info and you see a list of all the existing fields under it as shown below.
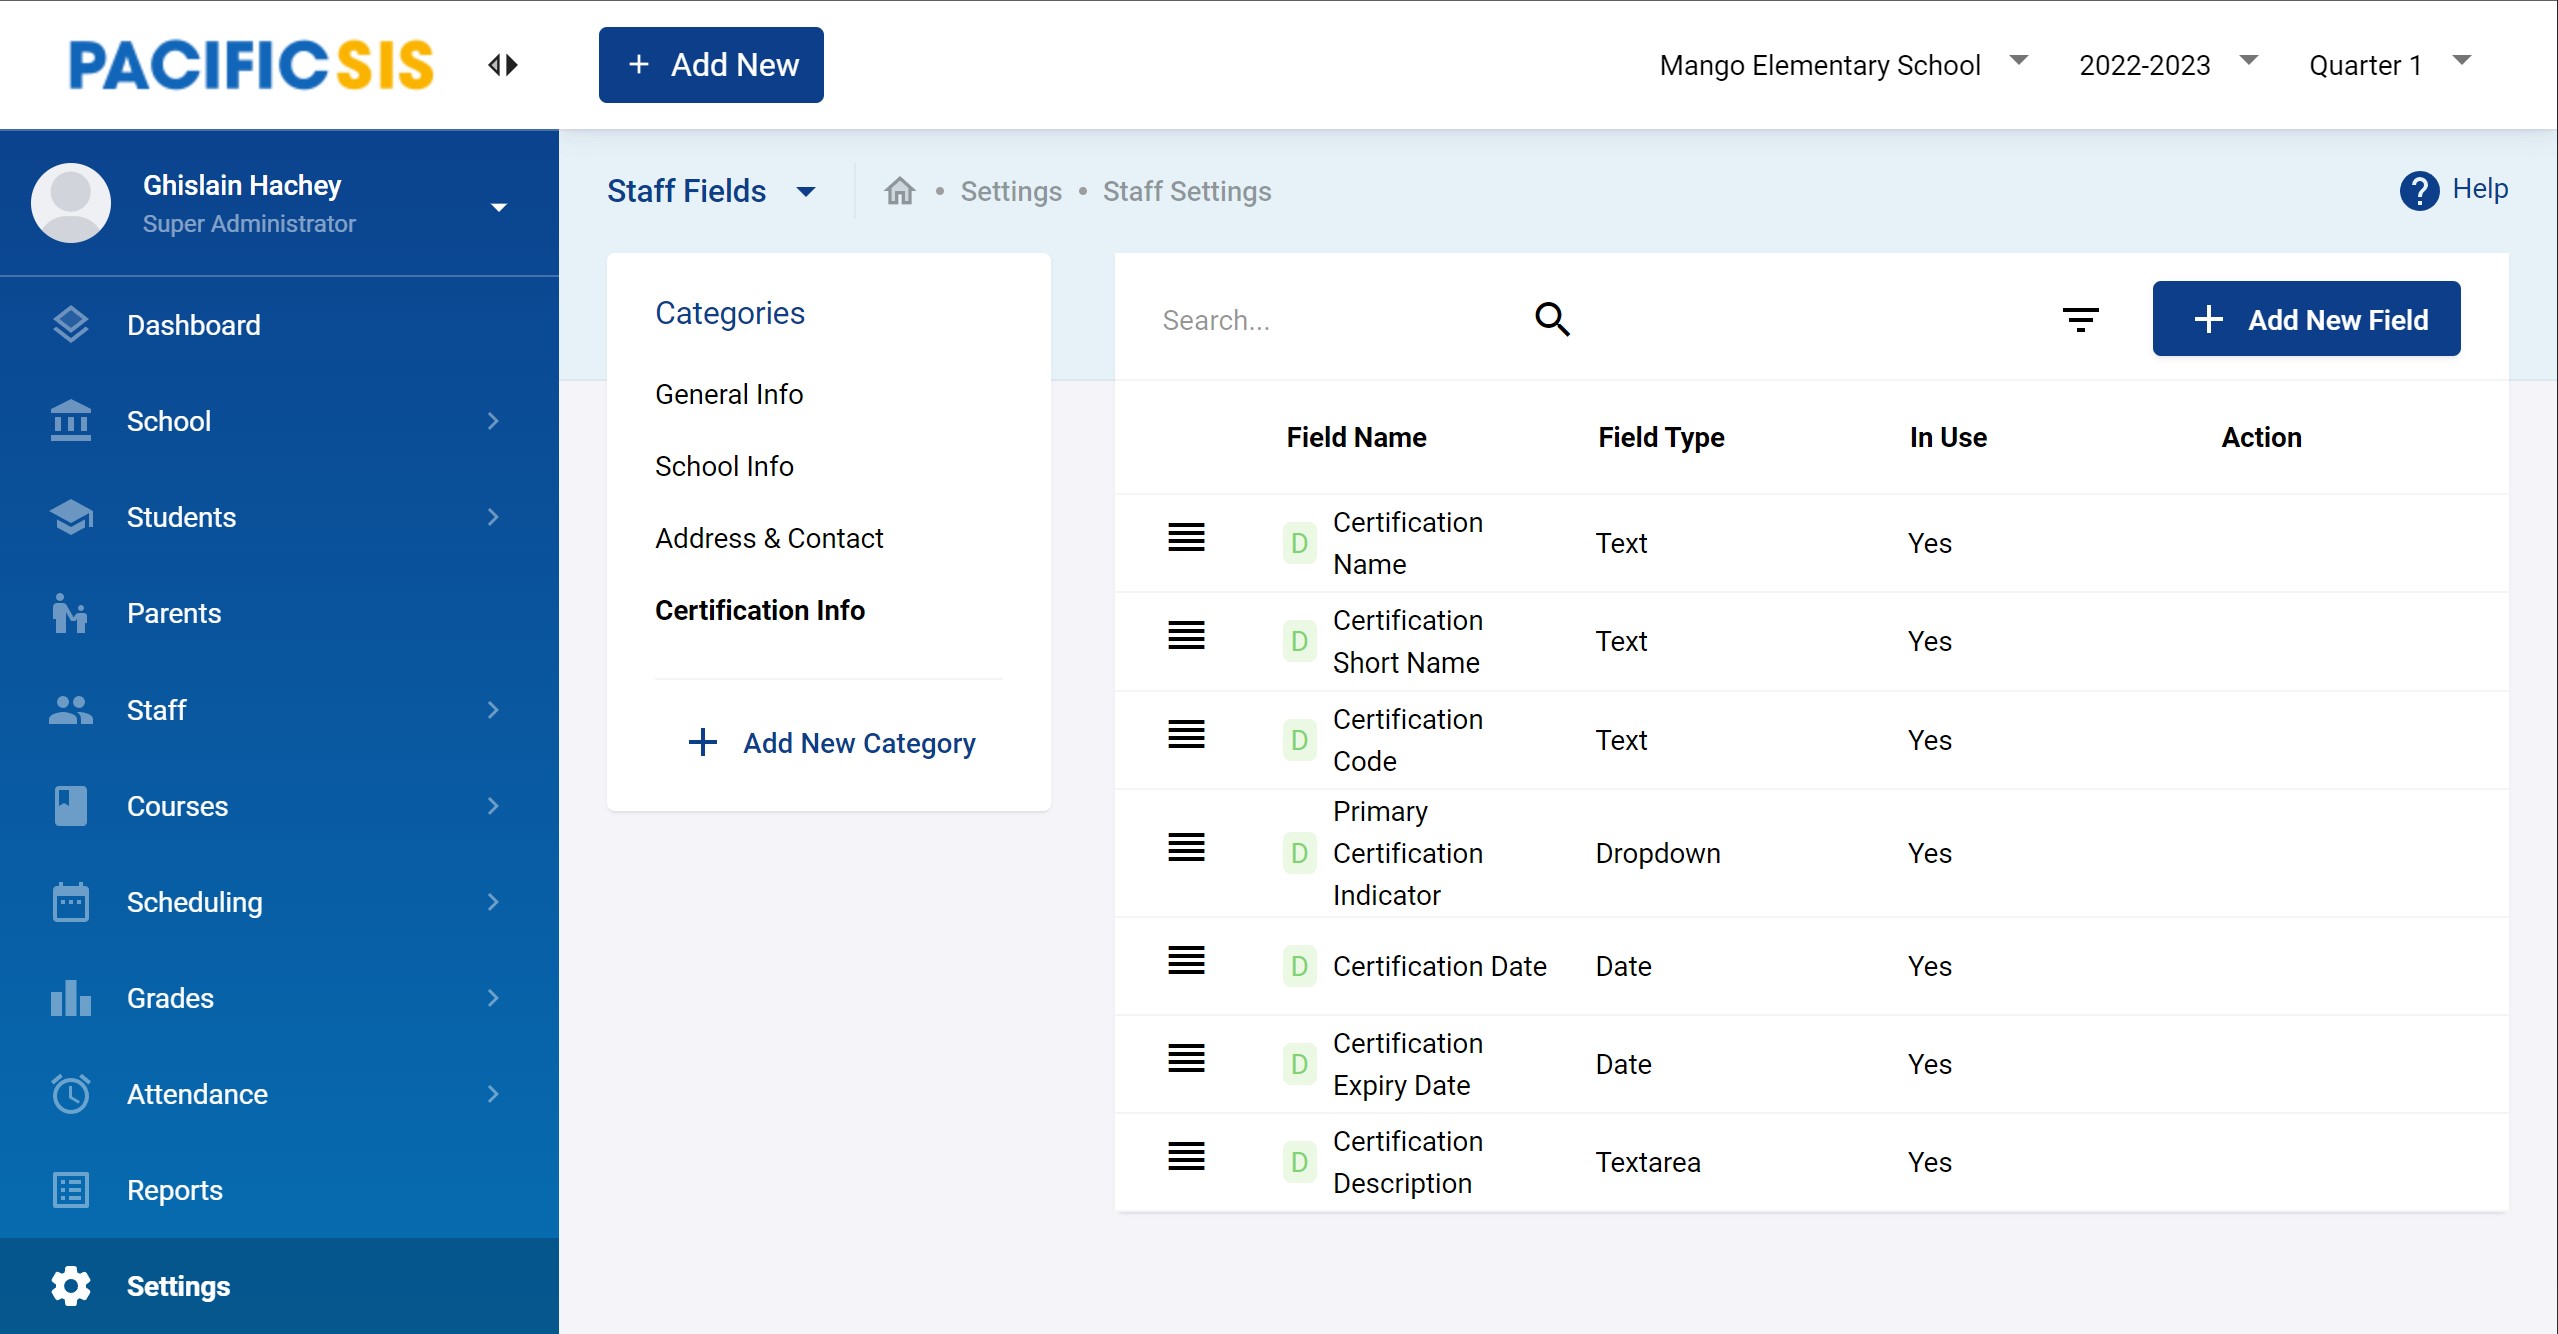
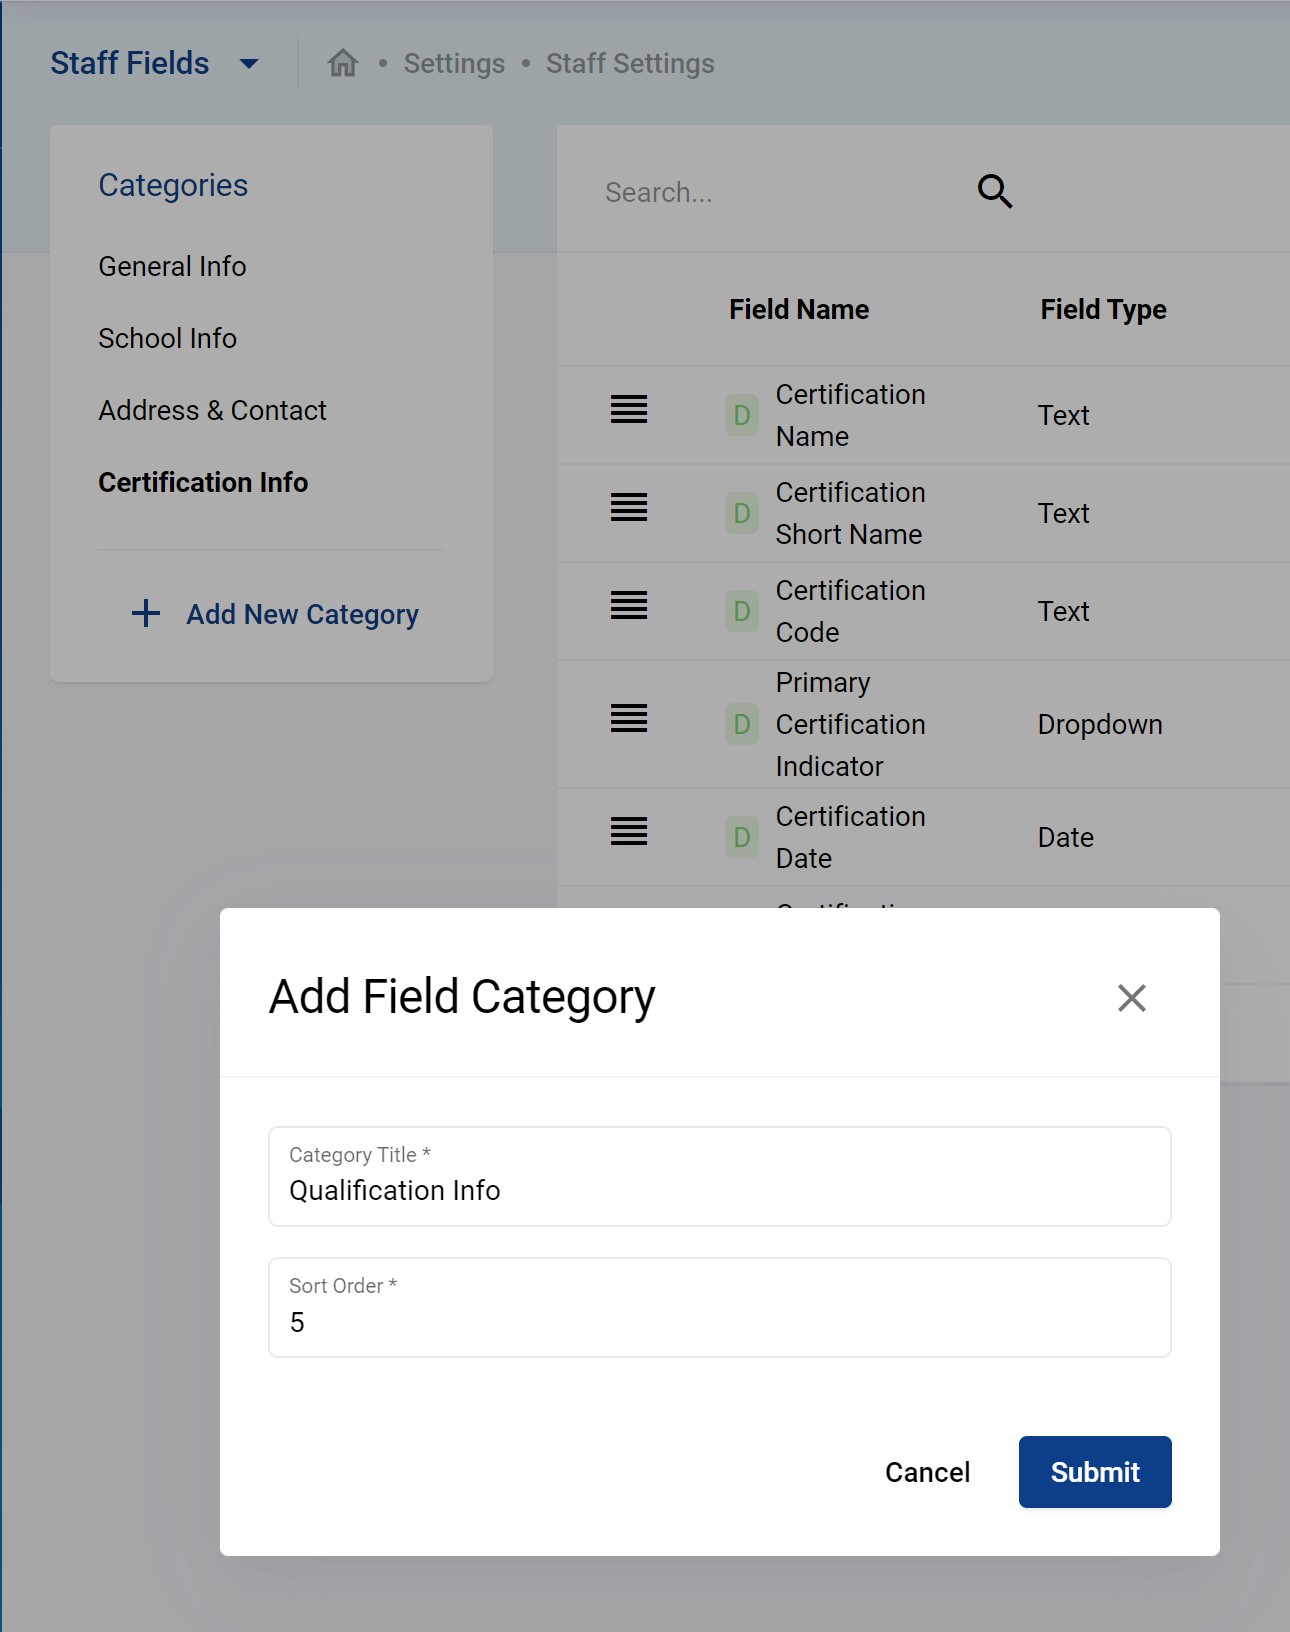
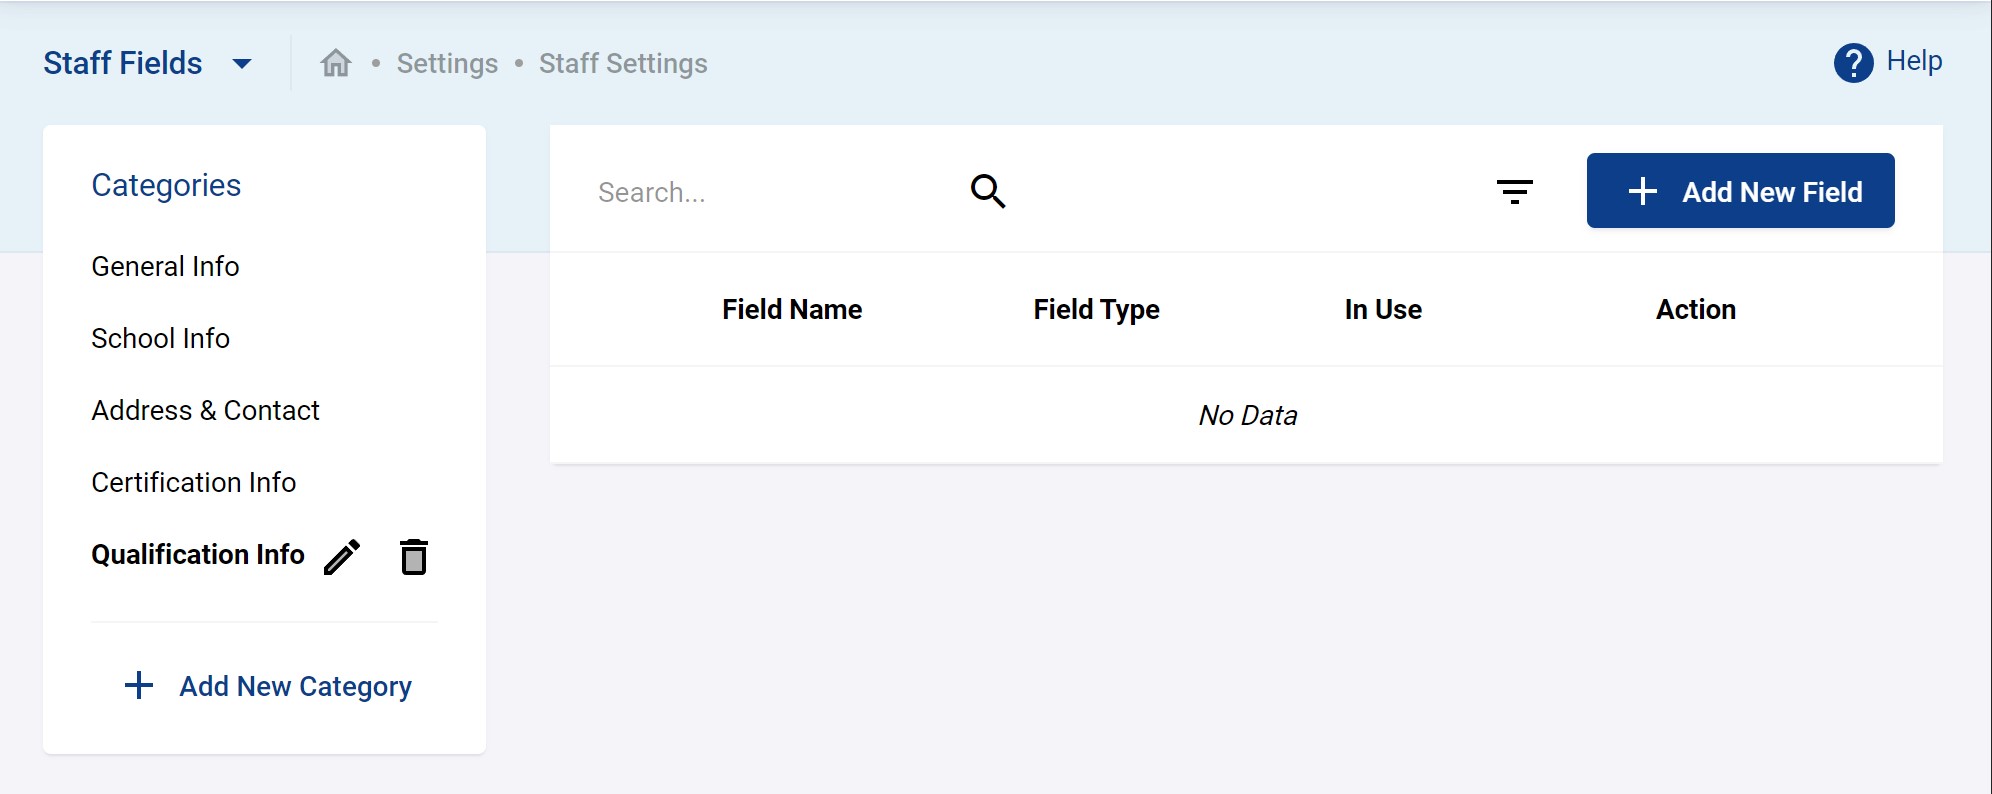
Fields are organized into categories. The ones there already are usually default and can not be removed or changed. But you can add new categories with their own new custom fields. For example, you would like a place to record qualifications of staff. You can simply add a category for this by clicking on + Add New Category (see above figure).
You can then add more fields inside the new Qualifications Info categoruy by clicking on the + Add New Field button.
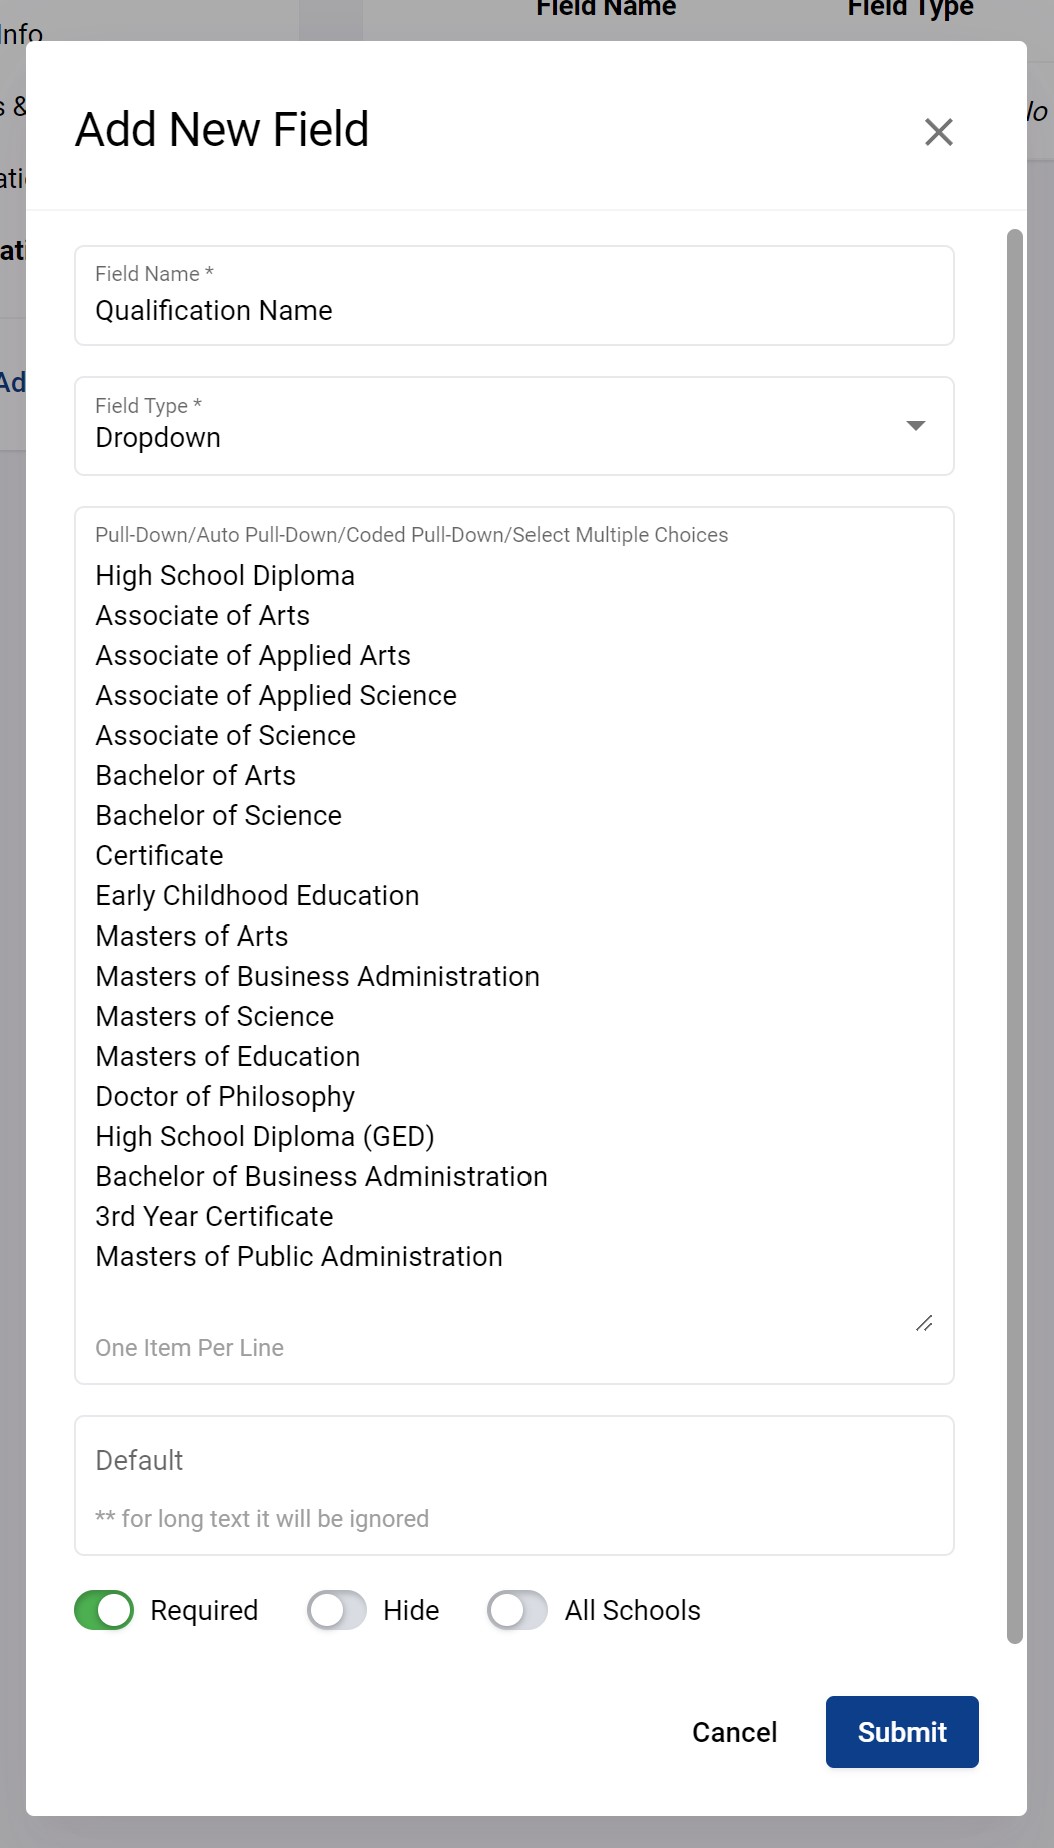
One by one you can add the fields inside Qualification information. You can assign them various type such as text, dates, etc. Below is an an example of adding a dropdown field for the name of the qualification.
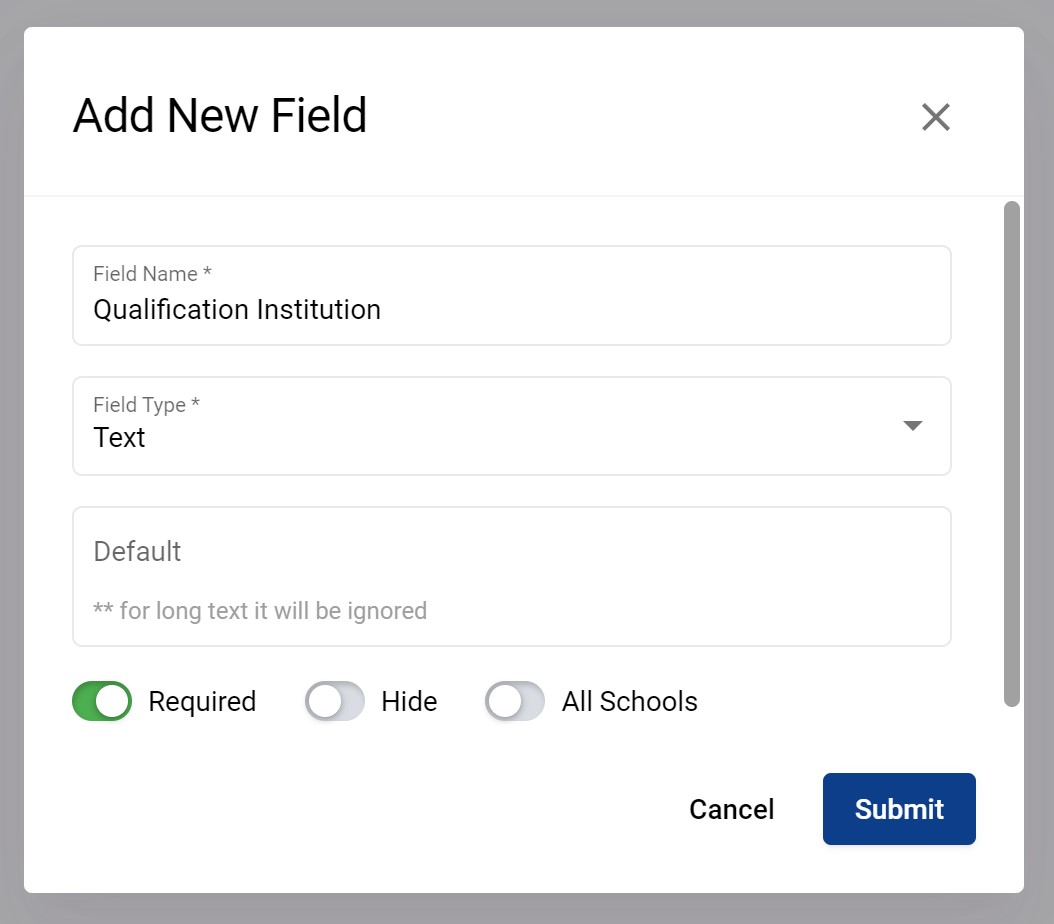
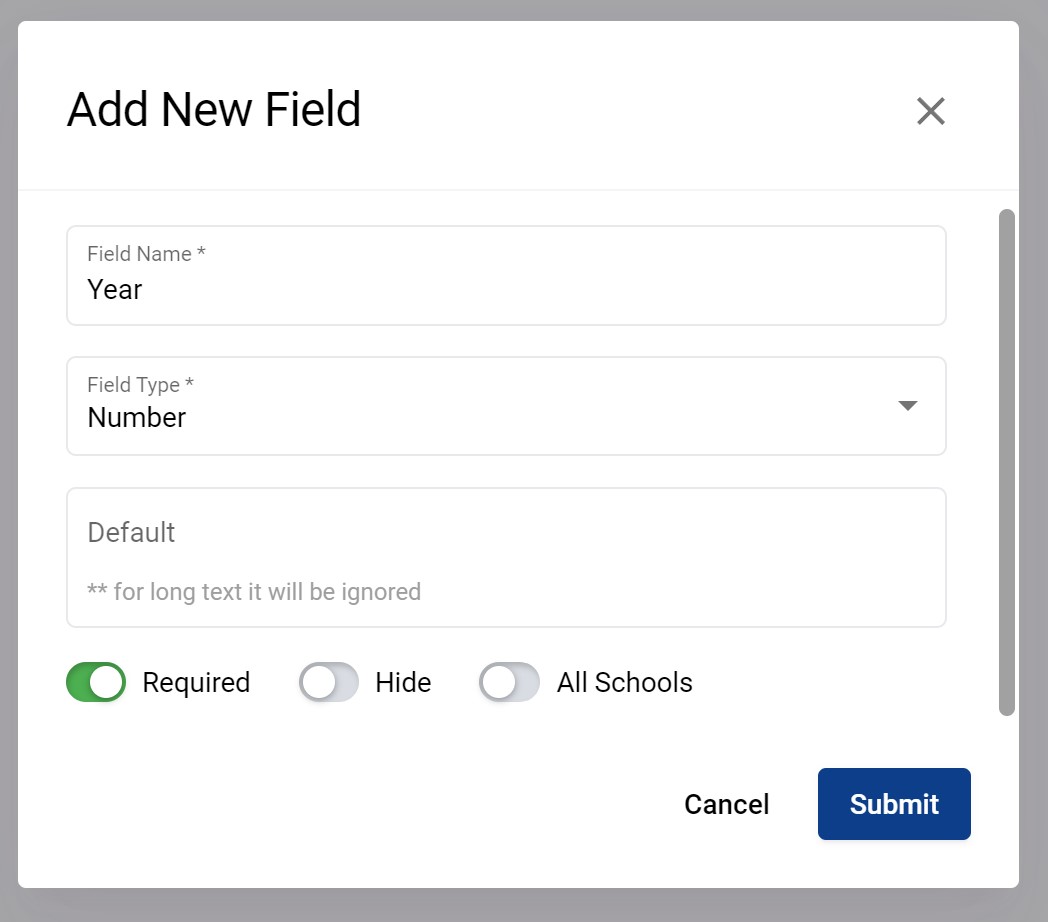
This fields below is are simpler ones meant to record in free text the institution of the qualification of the staff and the year as a number.
A final result may look something like this.

Considering this is a new set of data there are no permissions on it yet. You will likely have to go in the Settings → Profiles and Permissions and enable view and edit permissions for the profiles you want. Below shows adding both read and view to School Administrators.
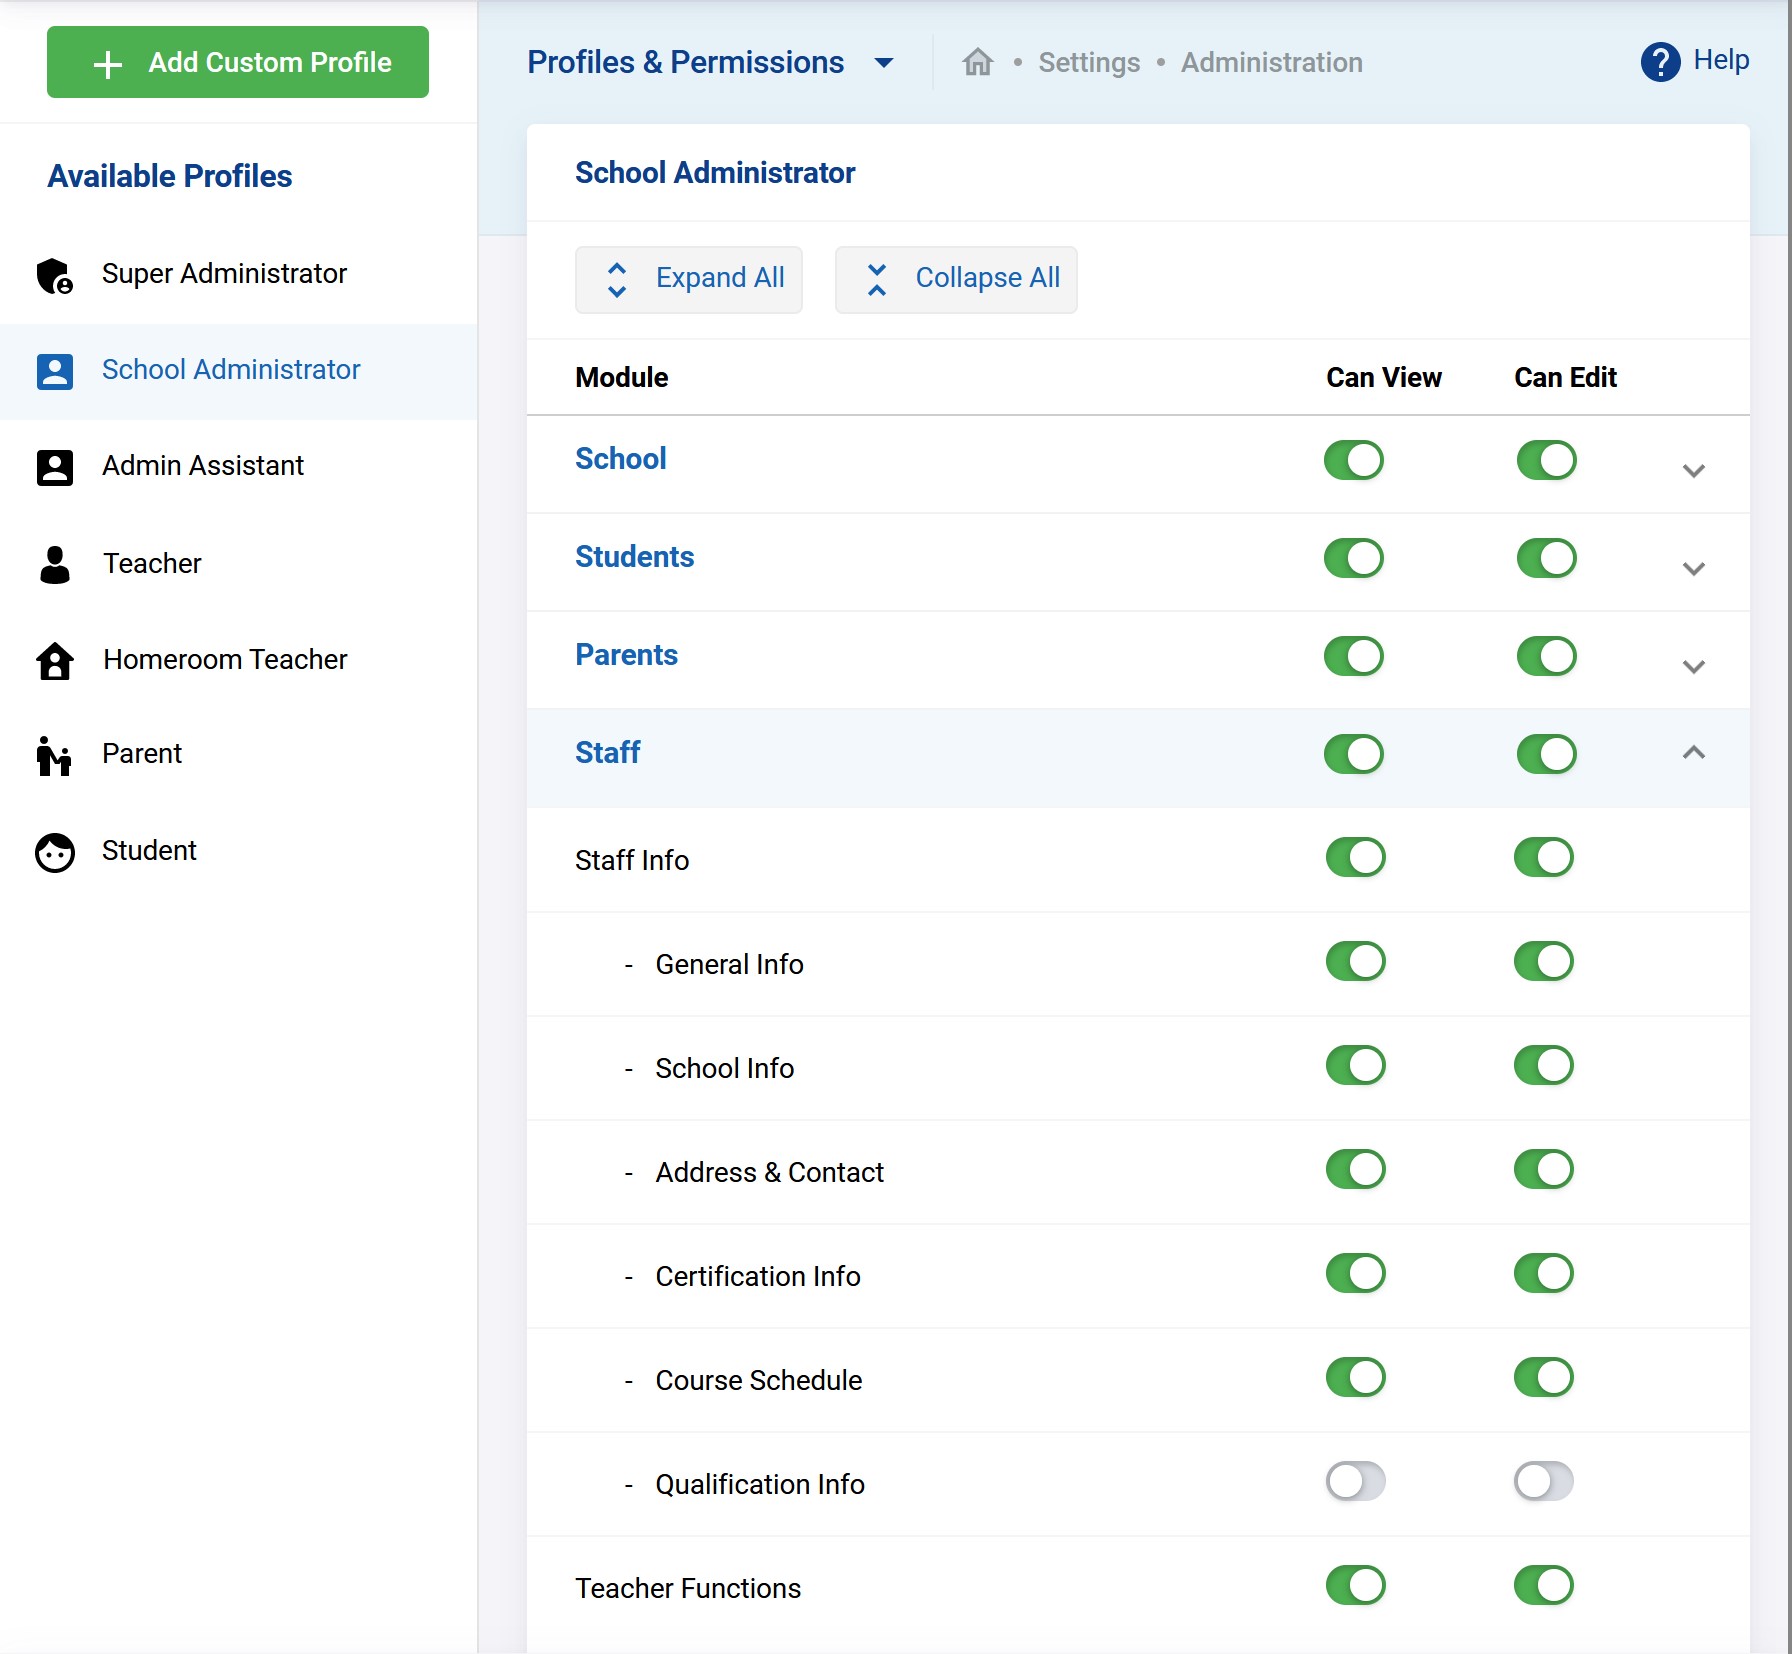
Then, when logged in as a school administrator you should have access to this under all staff record as shown below.
Tools
A number of useful tools are documented here.
Student Bulk Data Import
Detailed in section Students → Bulk Adding Students.
Staff Bulk Data Import
Detailed in section Staff Management → Bulk Adding Students
Rollover
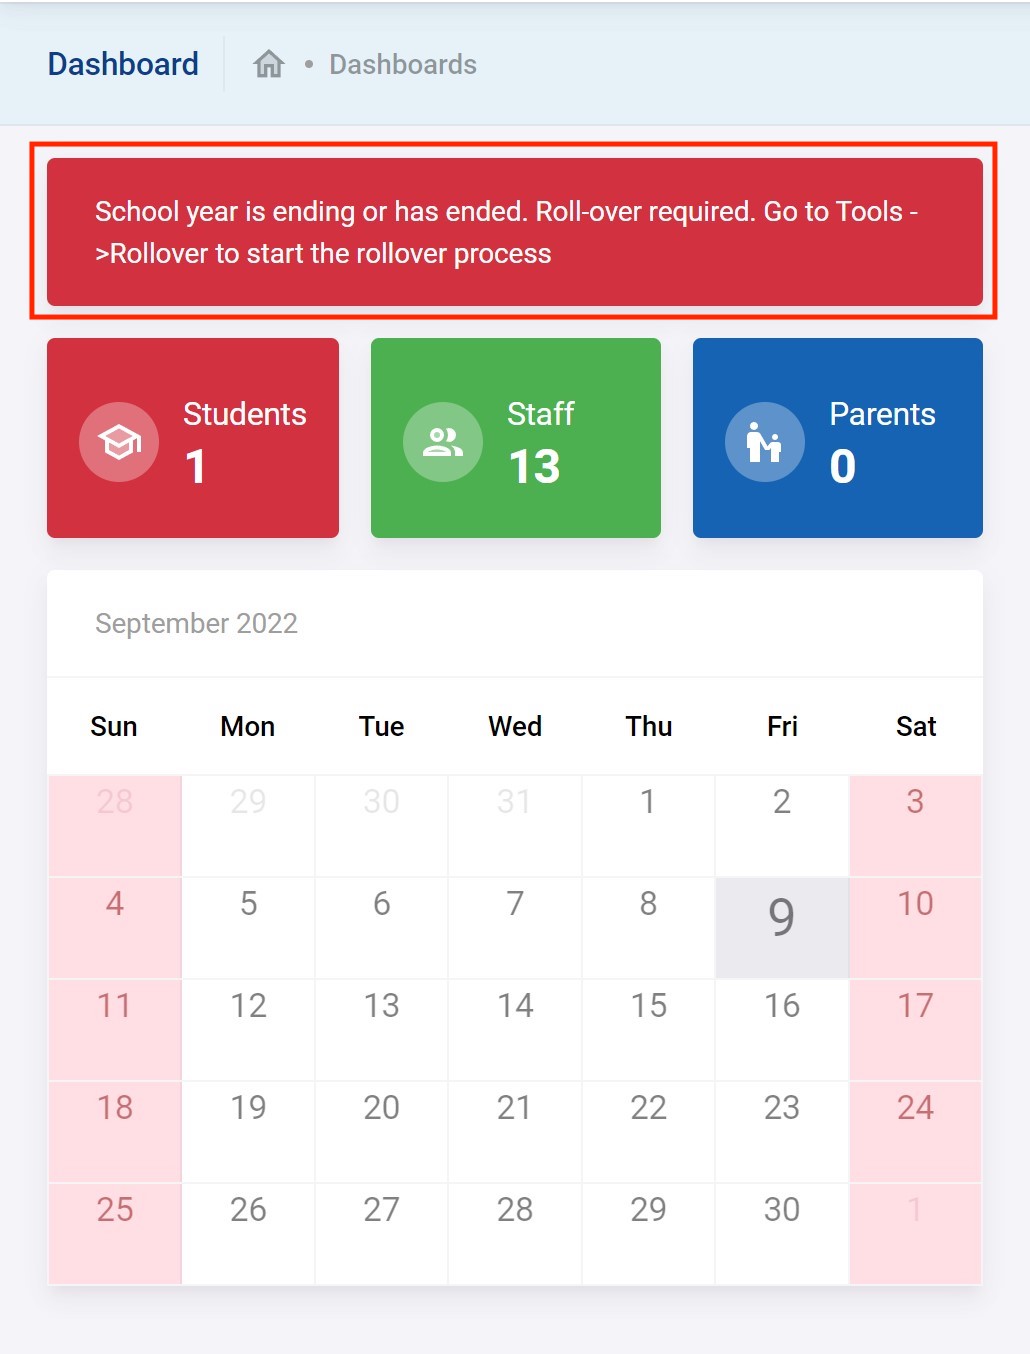
Every year you will do through a rollover. This is very easy and it takes care of promoting your students that promote into the next grade and setting up a new school year. You will be reminded of this at the end of any school year with a message on your dashboard that look like the following.
The typical work process to go through just before the rollover should be something like this:
- Make sure you have transferred out of school any student that has transferred to another school (within your country's own schools or internationally) as detailed in https://docs.pacific-emis.org/doku.php?id=sis_user_manual#student_transfer_out
- Make sure you have dropped out of school any student that has officially dropped as detailed in https://docs.pacific-emis.org/doku.php?id=sis_user_manual#student_dropout
- Make sure that all attendance have been entered for the whole school year as detailed in https://docs.pacific-emis.org/doku.php?id=sis_user_manual#attendance. This should have been done already if the work has been done on time throughout the year.
- Make sure that all grades have been entered for the whole school year as detailed in https://docs.pacific-emis.org/doku.php?id=sis_user_manual#grades. This should have been done already if the work has been done on time throughout the year.
- Set the Rolling/Retention Options for all students as detailed in https://docs.pacific-emis.org/doku.php?id=sis_user_manual#student_setting_rolling_retention_options.
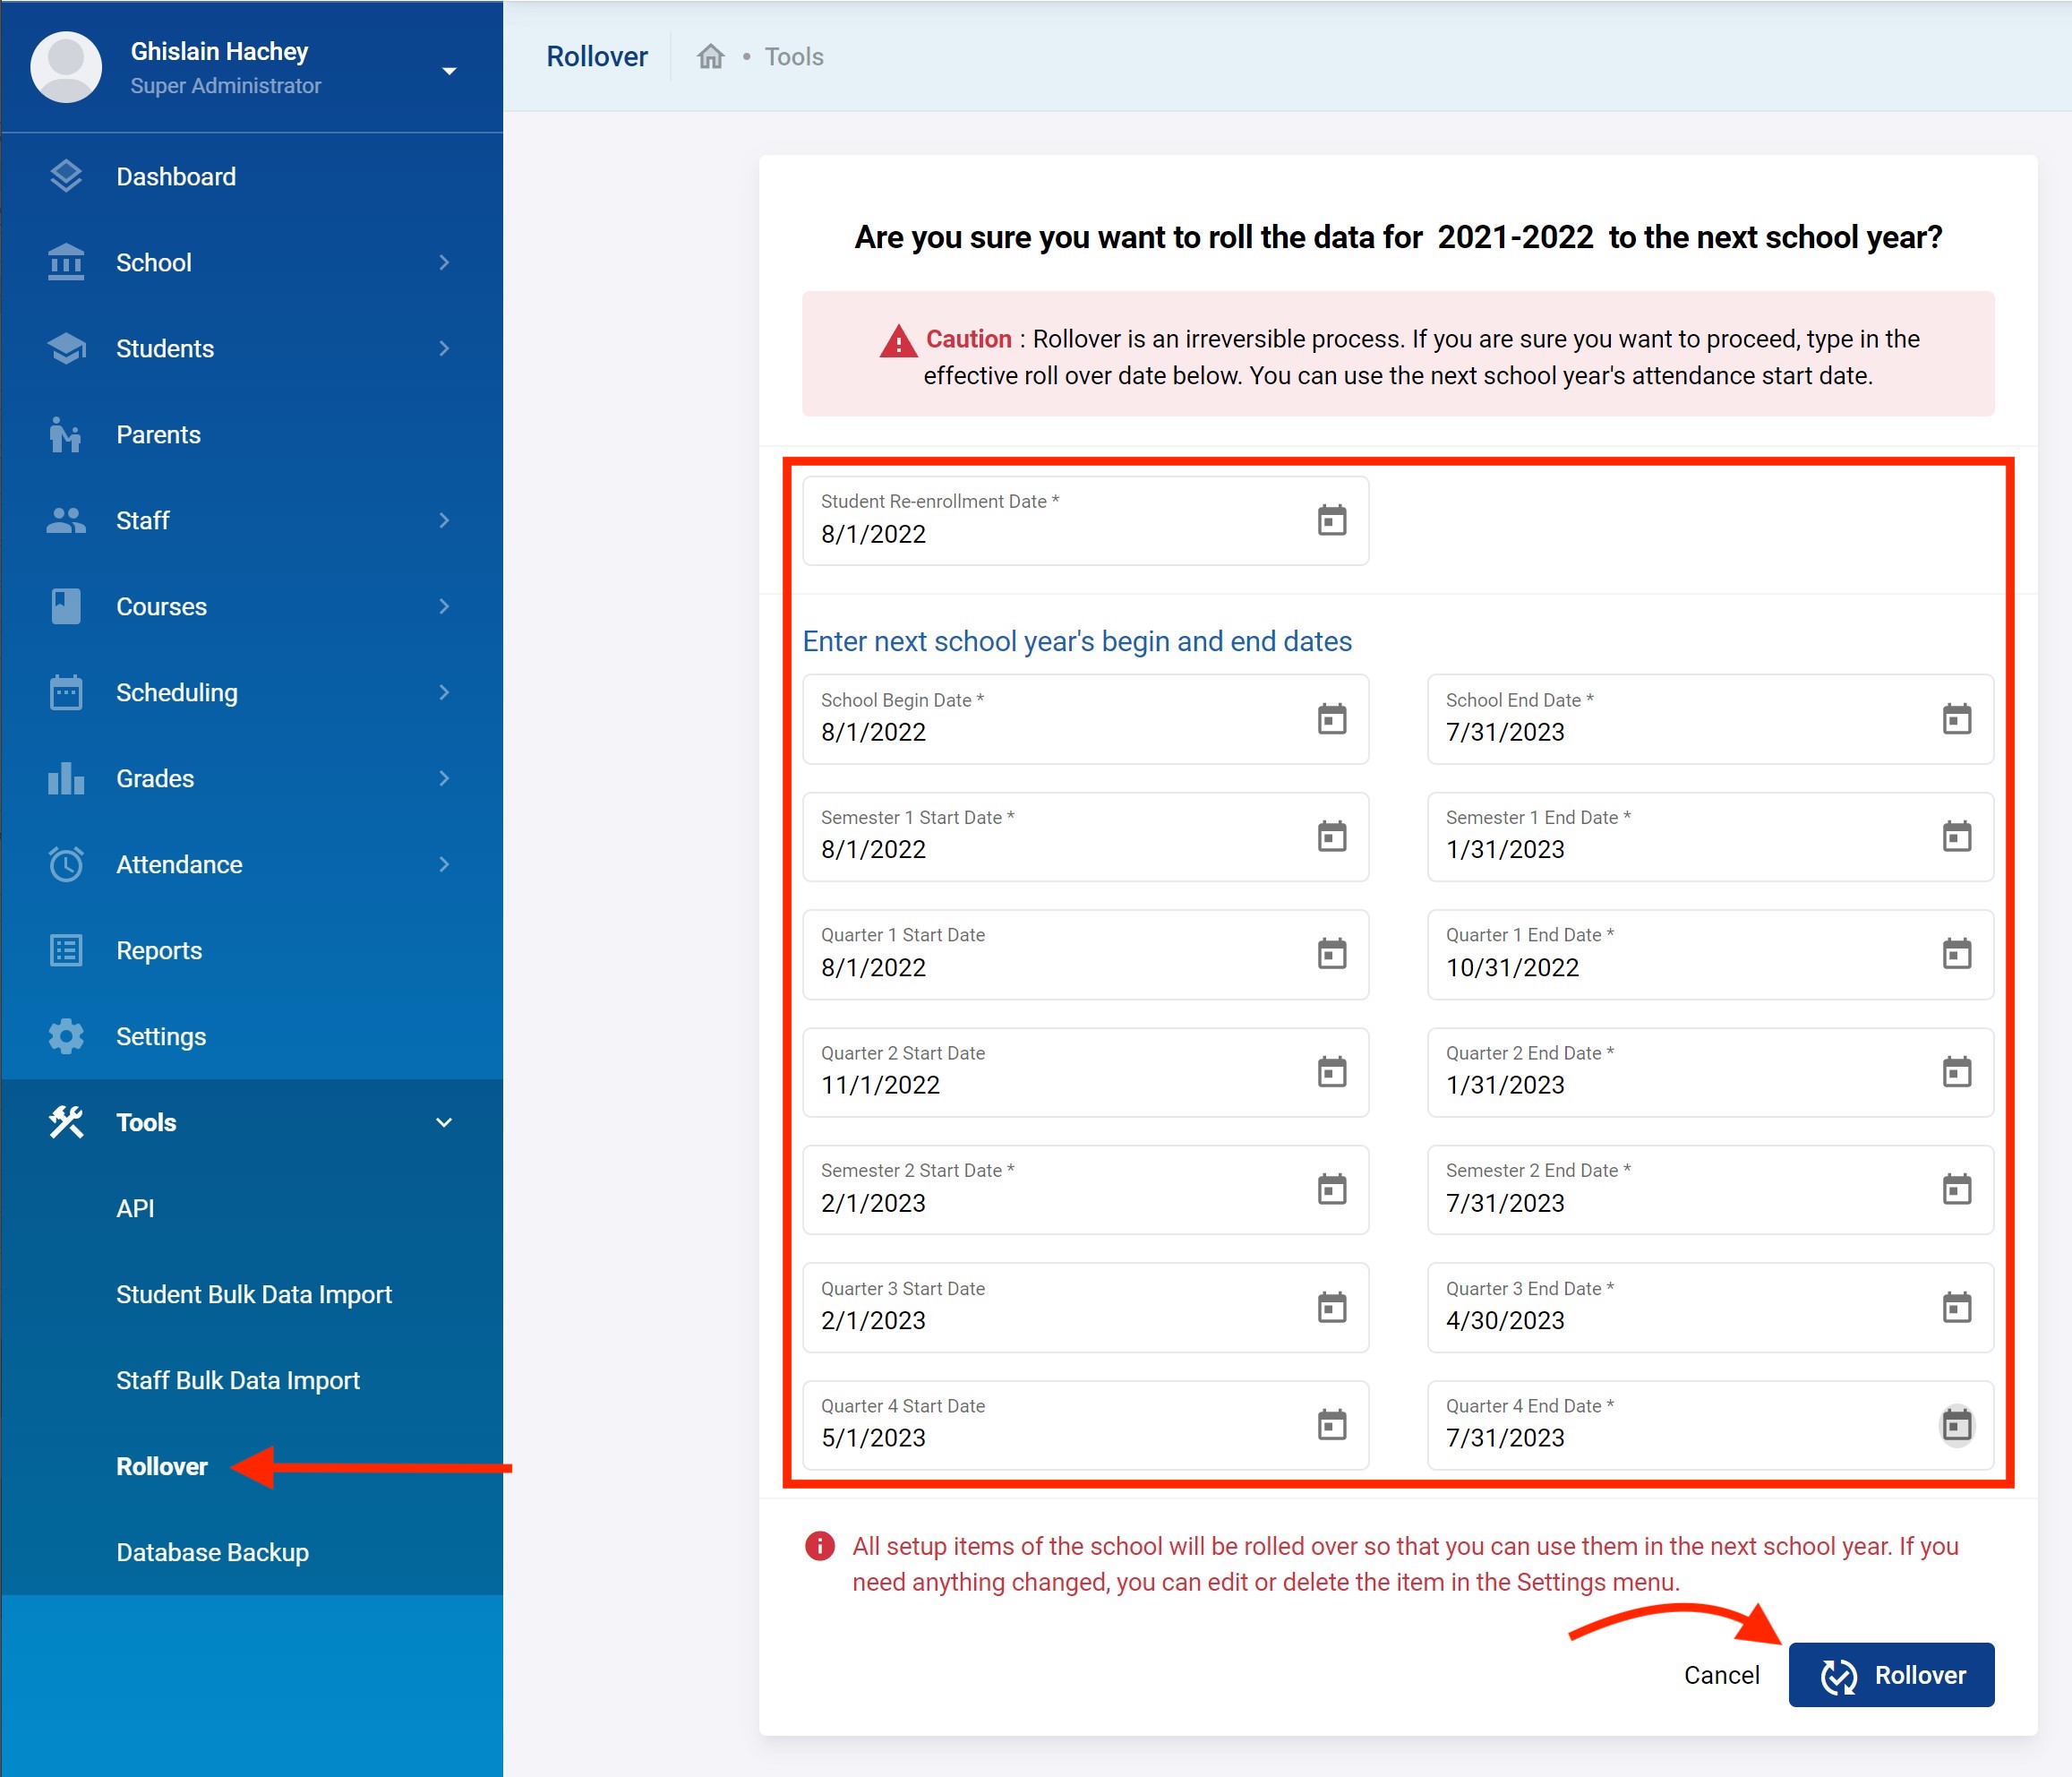
Finally, you can go through the actual rollover. Go to Tools → Rollover. You will need to enter all the marking periods dates as shown below and then click Rollover.
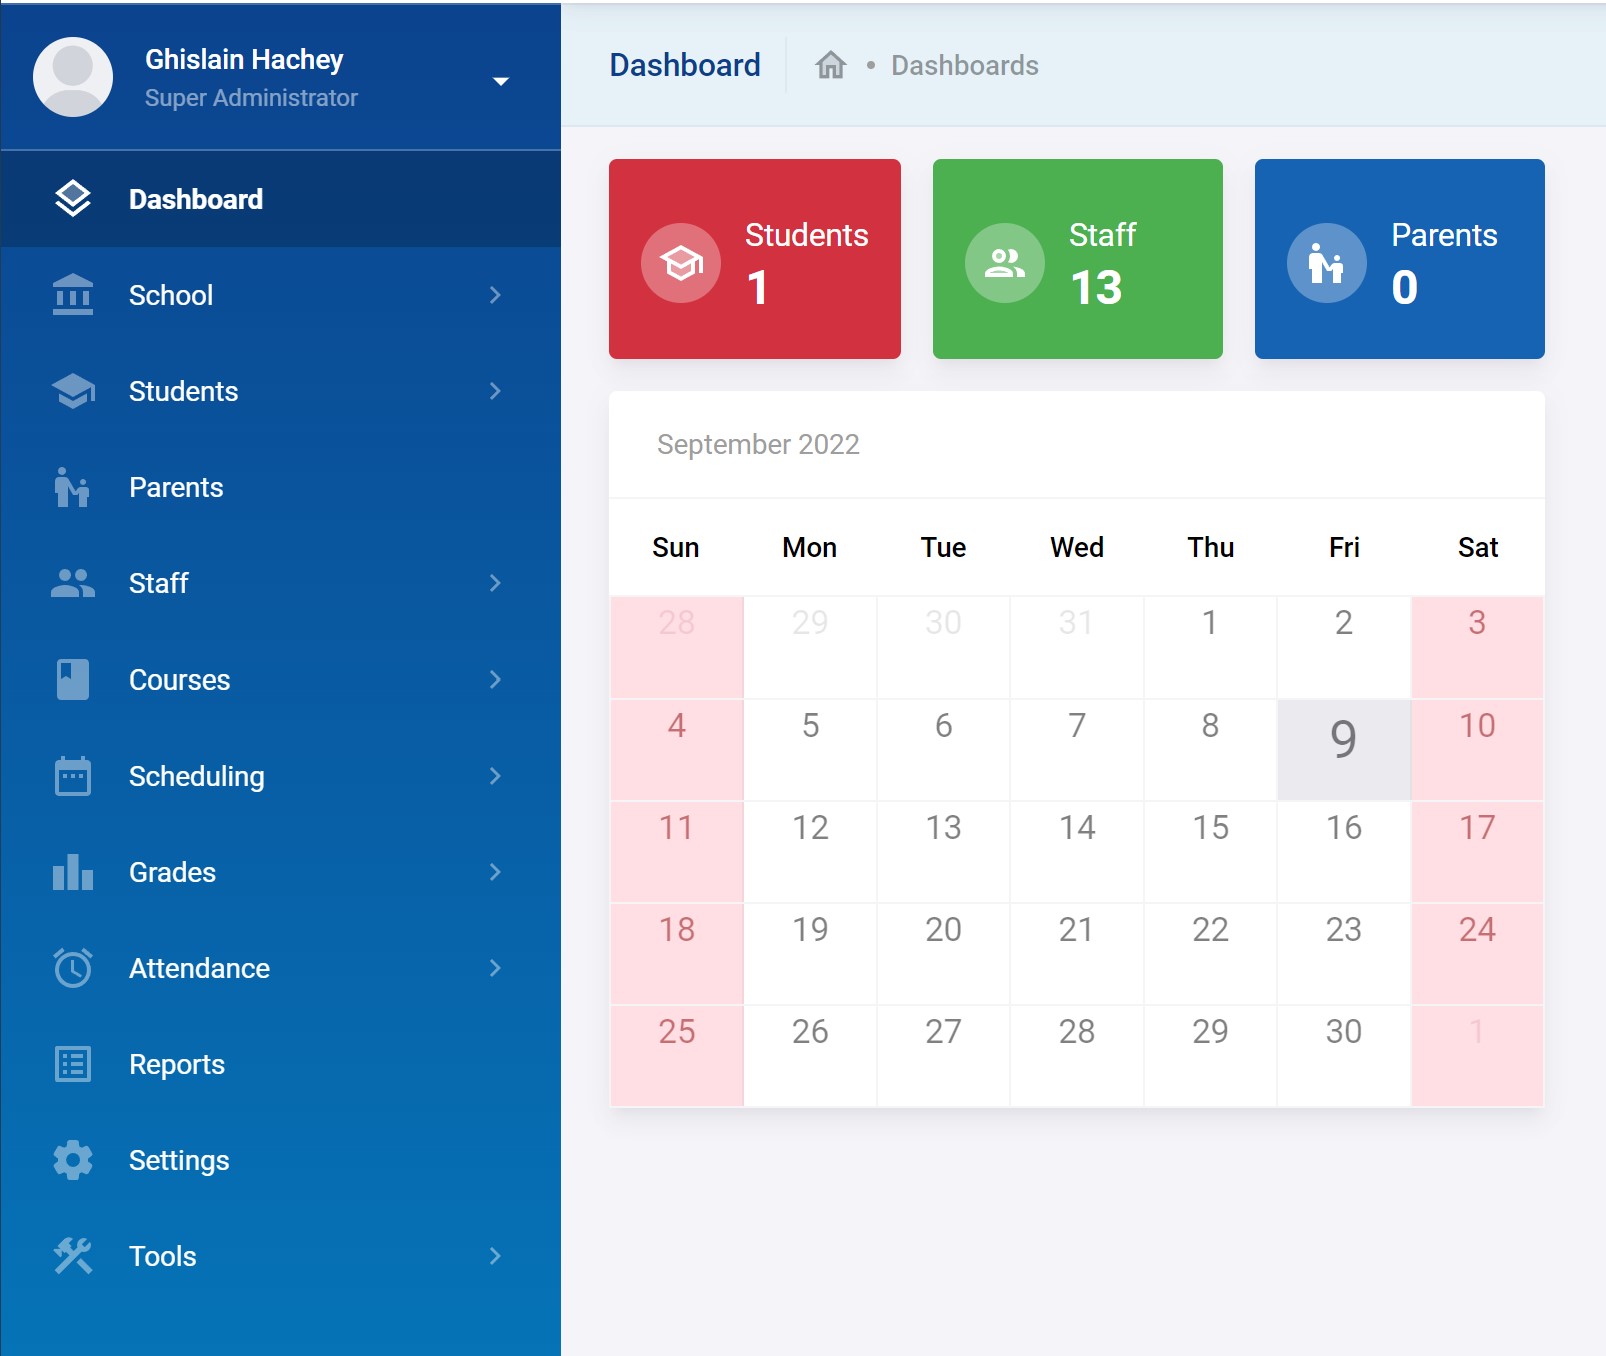
After the rollover you should see a short lived success notice. Then on your main dashboard you will see that the School year is ending or has ended message has disappeared.
Verify all the school settings to make sure everything is still ok and continue using the system normally.
Appendix A
This appendix is a place to include description of all options in the system
Course Section Options
* Course Section Name: a distinct name to identify the course section elsewhere in the system. I like to use the course name following by a “-” and the classroom number and period number. For example, course “Algebra I - Grade 8” that will be offered in “classroom 1” in “period 1” could be titled “Algebra I - Grade 8 - C1P1” but there is no hard rule here and you use whatever is clear to you.
- Calendar: to use mostly to handle attendance data. Most simple setup will have a single Default Calendar.
- Grade Scale: to use to handle the grading data. Most simple setup will have a single Grade Scale.
- Credit Hours: if the course period is credit bearing, you must fill in the Credit Hours for the transcripts to show the completed credit hours for a course;
- Seats: the number of students slot available for this course section.
- Attendance Category: also to use to handle attendance data. Most simple setup will have a single Attendance Category.
- Allow Student Conflict: to allow a student to be scheduled into this course section even if there is a conflict (e.g. student already scheduled in another course section, in other words two different course sections at same time/place)
- Allow Teacher Conflict: to allow a teacher to be scheduled into this course section even if there is a conflict (e.g. teacher already scheduled to teach in another course section, in other words two different course sections at same time/place)
- Course is Weighted: check Course is weighted if this course period needs evaluation based on weighted GP value;
- Affects Class Rank: check Affects Class Rank if you want the course to be counted in the class ranking;
- Affects Honor Roll: check Affects Honor Roll if you want the course to be counted in the honor roll;
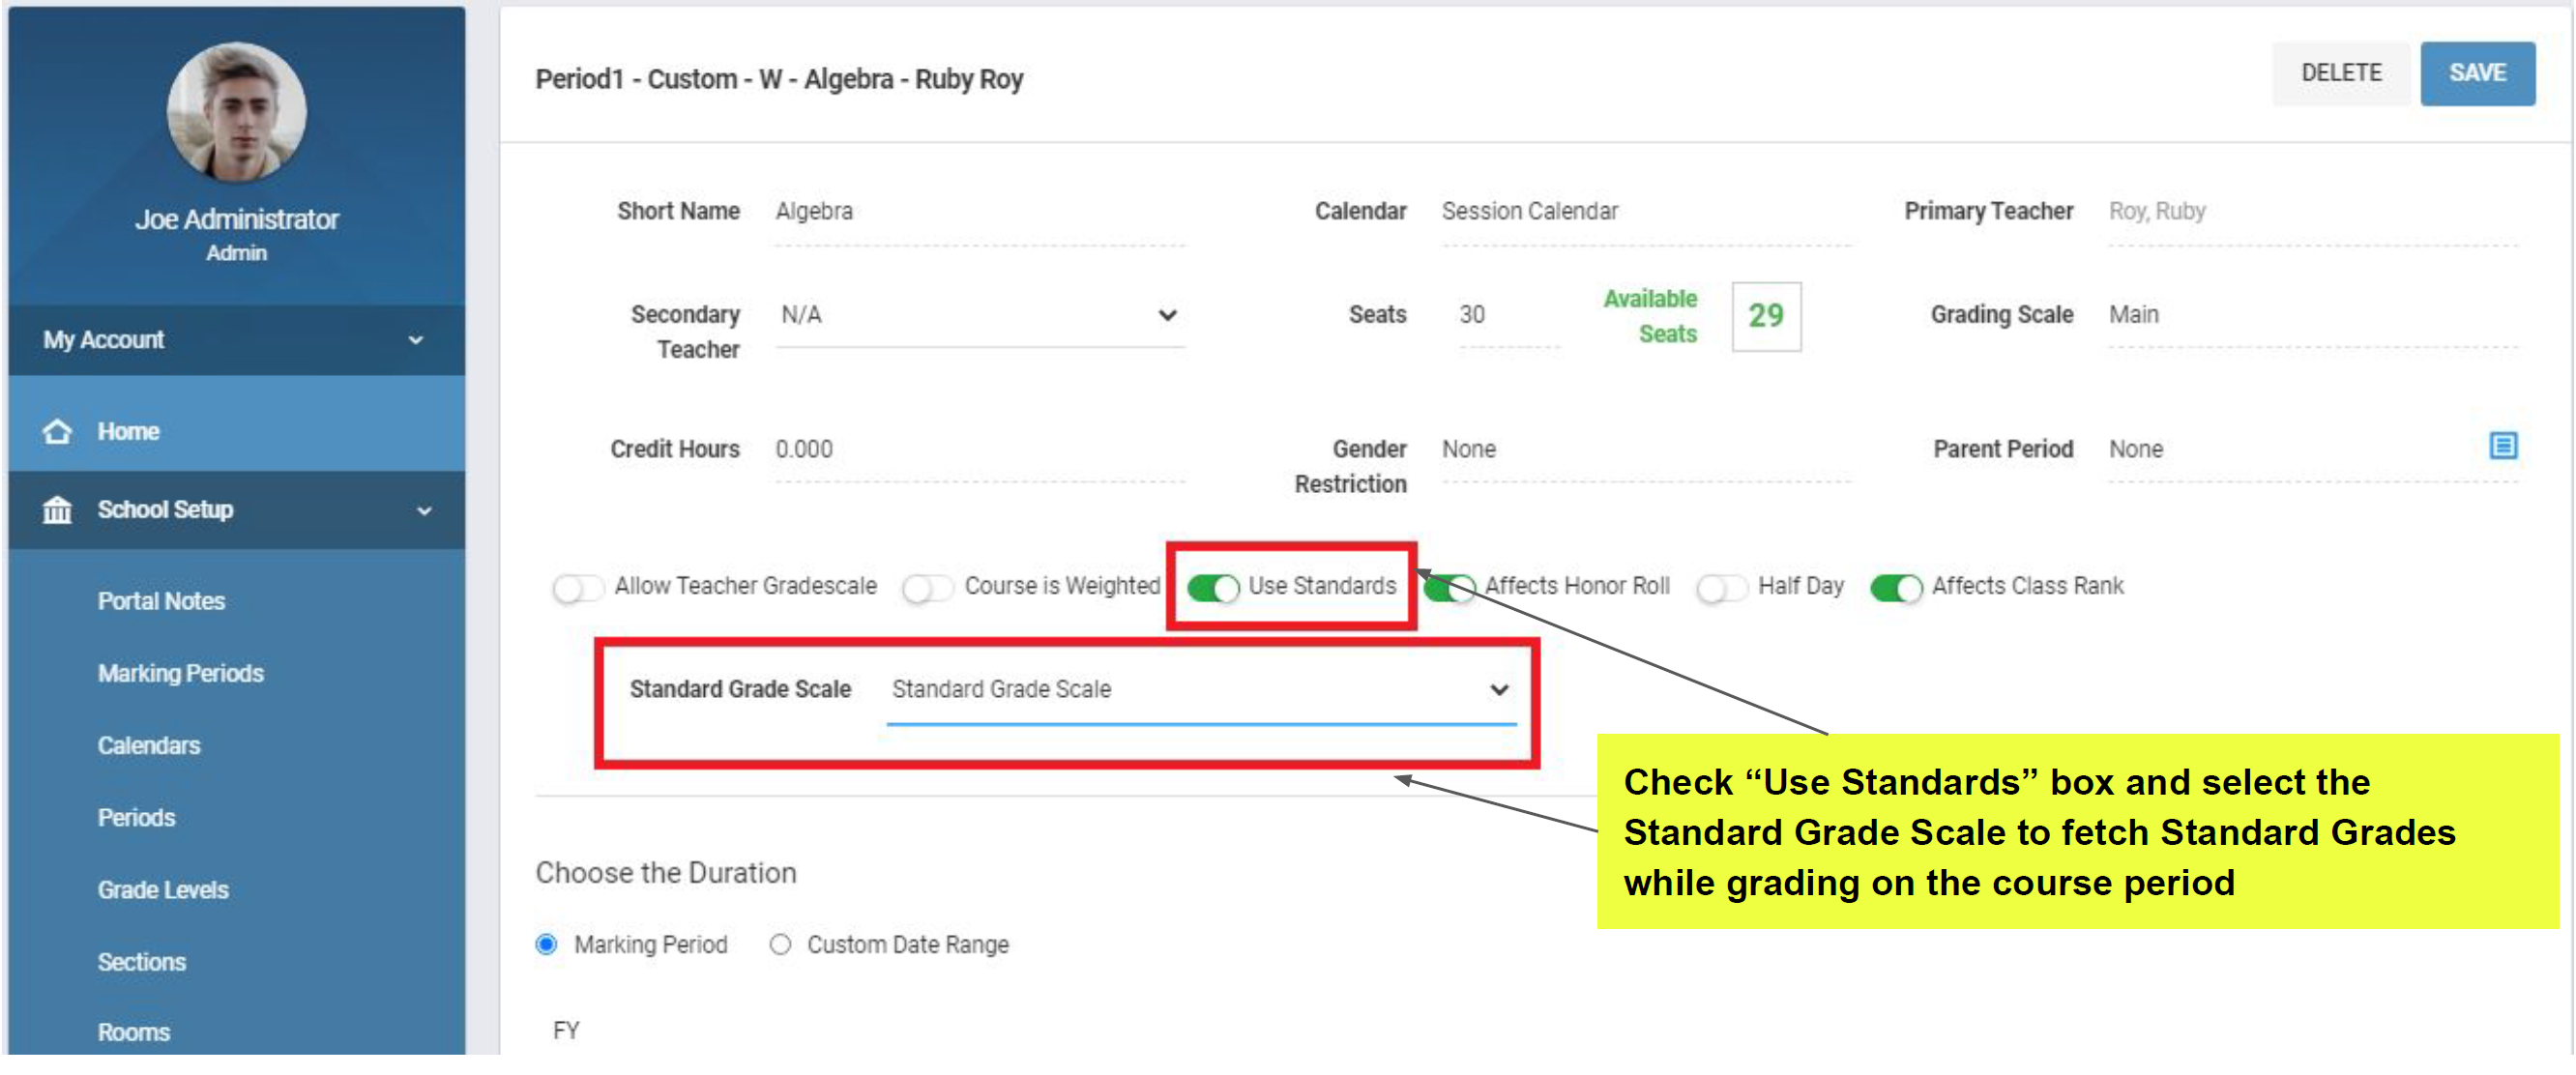
- Use Standards: TODO
- Online Class Room: TODO
- Duration: this defines how long the course section runs for
- Marking Period: using standard marking periods of the school (e.g. Quarter 1, Semester 1, Full Year, etc.).
- Custom Date Range: to use custom date range outside the marking periods defined for the school.
- Schedule Type: When the course section will actually be offered.
- Fixed Schedule: The most common simple scenario is on a Fixed Schedule (i.e. same classroom and same period). It enables you to choose a selected period for selected number of meeting days that continues in the same routine for the whole duration range that has been marked above. Select a Class room and the Period from the drop down list (the list must be created while setting up the system), check the Meeting Days you want the course period and lastly, to enable the course period for attendance, check the Takes Attendance checkbox. After filling all the details, click Save button in this page and the course period will be created.
- Variable Schedule: it enables you to choose periods invariably for all the days in the duration of the course period. Select a Day, Period, Room and check Takes Attendance to validate the course period for marking attendance. Now, click Save and the page refreshes with the entered course period details and alongside will show a (+) sign, beneath the variable schedule, to allow adding of more periods and days similarly.
- Enter by Calendar Days: This schedule type lets you to choose selected dates in the chosen duration. For instance, if you have a course period that you don't need it regularly as other learning lessons like a test period, you can enter particular dates by the calendar for that test period. To do so, after filling out the above details, select Enter by Calendar Days.
- Take Attendance: defines whether the teacher (or assistant) will take attendance for that course.